terraform-quickstart
Terraform is a widely used infrastructure-as-code tool. Harness Infrastructure as Code Management (IaCM) runs MPL-licensed Terraform versions in workspaces and pipelines, with Git-backed configuration, connectors, and optional cost estimation.
This guide walks you from connectors and workspace creation through a standard provision pipeline (init, plan, apply) and an optional approval between plan and apply.
What will you learn?
This guide covers the following:
- Connectors and workspace: Create cloud and Git connectors, then create a Terraform workspace wired to your repository and Terraform version.
- Provision pipeline: Generate or author a pipeline that runs init, plan, and apply for your workspace.
- Approvals: Optionally gate apply behind an approval step.
Before you begin
Before you use this guide, ensure you have the following:
-
Harness account with IaCM enabled: You need Infrastructure as Code Management under Infrastructure in Harness when it is entitled on your account. Go to Getting started with Harness Platform to access or create a Harness account.
Contact Harness supportIf IaCM does not appear, go to Get started with IaCM, or contact your account administrator or Harness Support.
-
Pipeline permissions: View, Create/Edit, and Execute on Pipelines. Go to RBAC in Harness to review the permissions model, and go to Manage roles to assign a role that includes them.
-
Git repository: Access to a Git provider with your Terraform project.
-
Cloud provider: Access to a cloud provider such as AWS or Google Cloud Platform for the infrastructure you manage.
-
Harness organization and project: An organization and project set up on the Harness Platform.
Sample Terraform
The following example Terraform (.tf) file declares:
- Provider Configuration: Specifies the AWS provider and sets the region to "us-east-1". Go to AWS Regions & Availability Zones for a complete region list.
- Resource Definition: Creates an EC2 instance with the identifier
my_first_ec2_instance. - AMI: Utilizes ami-123abc321cba18, go to AWS EC2 User Guide to find your AMI image ID.
- Instance Type: Configures the instance to use a t2.micro. Go to the AWS t2 instances list.
Tags: To facilitate easy identification and management within AWS resources, a tag name with the valuemy_first_ec2_instanceis applied.
provider "aws" {
  region = "us-east-1"
}

resource "aws_instance" "my_first_ec2_instance" {
  ami = "ami-123abc321cba18"
  instance_type = "t2.micro" # Go to https://aws.amazon.com/ec2/instance-types/t2/ for a full T2 instance type list.

  tags = {
    Name = "my_first_ec2_instance"
  }
}
Go to Terraform Documentation to review currently supported workspace types.
Set up your workspace
A workspace is a named environment for storing your Terraform configurations and resources. Connect your Cloud Provider and Code Repository through Connectors to manage infrastructure changes and updates with Harness IaCM pipelines.
Harness recommends configuring your connector before creating your workspace, however, you can also add new connectors during the Create Workspace flow.
Step 1: add connectors
Use Harness AI to create and configure your cloud provider and code repository connectors before you create a workspace:
- Create a Connector
- Step-by-step
When adding any connector, start by:
- Sign in to app.harness.io.
- In the module pane, select Infrastructure.
- Select Project Setup, and then select Connectors.
- Select New Connector (AI).
- Select an option, for example "Create a GitHub connector", or type your request to create a connector for your chosen cloud provider or code repository.
Harness creates a YAML file for your connector. Once you select Create, Harness creates your connector and adds it to your project.
Edit your connector by updating the AI generated YAML file, or by selecting Edit Details in the connectors panel.
Go to Connect your Cloud Provider and Connect your Code Repository to connect your cloud provider and code repository.
For easier access and token management, use the OIDC (OpenID Connect) option in the Credentials panel. This allows your connector to assume roles with permissions set in your Cloud Provider, updated only by authorized users. Go to the Use OIDC tab for setup details.
Step 2: create your workspace
Once you have configured your connectors, you can create a workspace and select them in the New Workspace panel:
For first-time use, use our migration tool to create new workspaces and import your existing Terraform projects into the Harness Platform.
- Interactive Guide
- Step-by-step
- In the module pane, select Infrastructure.
- Select an existing project or create a new project.
- Select Workspaces, and then select New Workspace.
- Select Create new Workspace, then select Start from scratch and complete the following fields in the new workspace wizard:
About workspace
- Name - Enter a unique name to identify the workspace.
- Description (optional): Enter an optional description to help identify the workspace.
- Tags (optional): Add a unique tag to identify the workspace.
Configure repository details
- Select your Git provider, either Harness Code Repository or Third-party Git provider for other providers like GitHub or GitLab.
- Git Connector: Select the Git connector you created in the previous step.
- Git Fetch Type: Select the Git fetch type, either Latest from branch, Git tag or Commit SHA.
- Git Branch: Specify the branch you want to use for the workspace.
You can configure the workspace branch as a JEXL expression that references a pipeline variable, and then set the pipeline variable as a runtime input.

Set your branch variable as a runtime input in the pipeline:
variables:
 - name: iacm_branch
   type: String
   description: ""
   required: true
   value: <+input>.default(main)
- Folder Path: Specify the folder path to the Terraform configuration files in the repository.
Advanced options allow you to include submodules if your code repository includes modules and submodules. Go to Module Registry to review module registry concepts.
Provisioner
- Connector: Select the cloud provider connector you created in the previous step.
- Cloud Cost Estimation: Toggle the Enable Cost Estimation switch to enable cloud cost estimation. This lets you estimate the cost of your infrastructure changes before you apply them.
- Workspace Type: Select Terraform as the workspace type you want to use for the workspace.
- Terraform Version: Select the Terraform version you want to use for the workspace, up to version 1.5.x (MPL licenses).
Add variable set (optional)
If you have configured variable sets for reuse, select the variable set you want to use for the workspace.
- Select Create.
Step 3: add a provision pipeline
A pipeline structures workflows to manage tasks like planning infrastructure changes, enforcing policies, and approvals. Go to Harness Pipelines to review pipeline concepts. You can also add pipelines through the Harness Platform or use a code-first approach with YAML.
Harness AI pipeline generation
- Interactive Guide
- Step-by-step
Start by adding the pipeline:
- Select the Infrastructure module.
- Select Pipelines, then select Create a Pipeline.
- Select an option from Harness AI chat or type a request to generate one, for example:
- "Create a pipeline to Provision a Terraform files with an init, plan and apply step."
- Review the generated YAML and Harness AI chat summary, and make any changes if necessary.
- Select Accept.
The Provision operation adds three Terraform plugin steps: init, plan, and apply. Go to Tofu/Terraform Plugins to review supported OpenTofu/Terraform commands.
Step 4: add an approval step (optional)
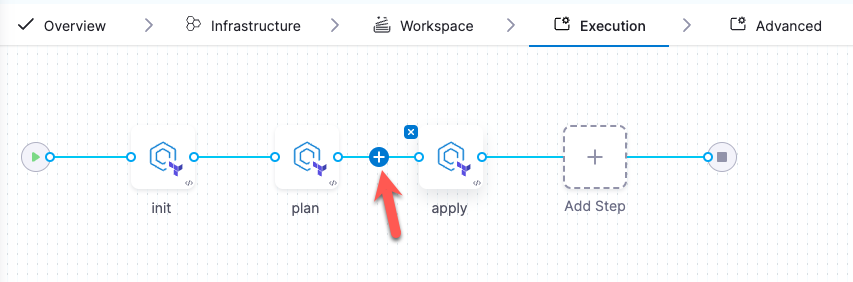
You can add the Approval step to prompt a review of the previous pipeline stage before proceeding. The most common use case is to add the Approval step between the plan and apply steps so you can review infrastructure changes and estimated costs (if cost estimation is enabled on your workspace) before applying them.
When using an Approval step, the underlying machine running the pipeline remains active until the approval is resolved. This means it will continue consuming compute resources.
- Interactive Guide
- Step-by-step
- From the Pipeline > Execution tab, click the Add icon between
planandapply.
- Click Add Step.
- Under IACM, select IACM Approval.
- Name the approval step and click Apply Changes.
- Click Save, then click Run to run your pipeline.