manage-workflow-2o
Workflows enable developer self-service by automating manual tasks and processes. Using Workflows, platform engineering teams can:
- Automate new service onboarding.
- Simplify Day 2 operations for developers.
- Provide developers with golden paths to production that include guardrails and best practices.
This guide will walk you through the process of registering and managing your Workflows directly from Harness IDP. Let us dive in!
Workflows in software catalog
Once a workflow is registered, it is stored in the Software Catalog under the kind "Workflow".
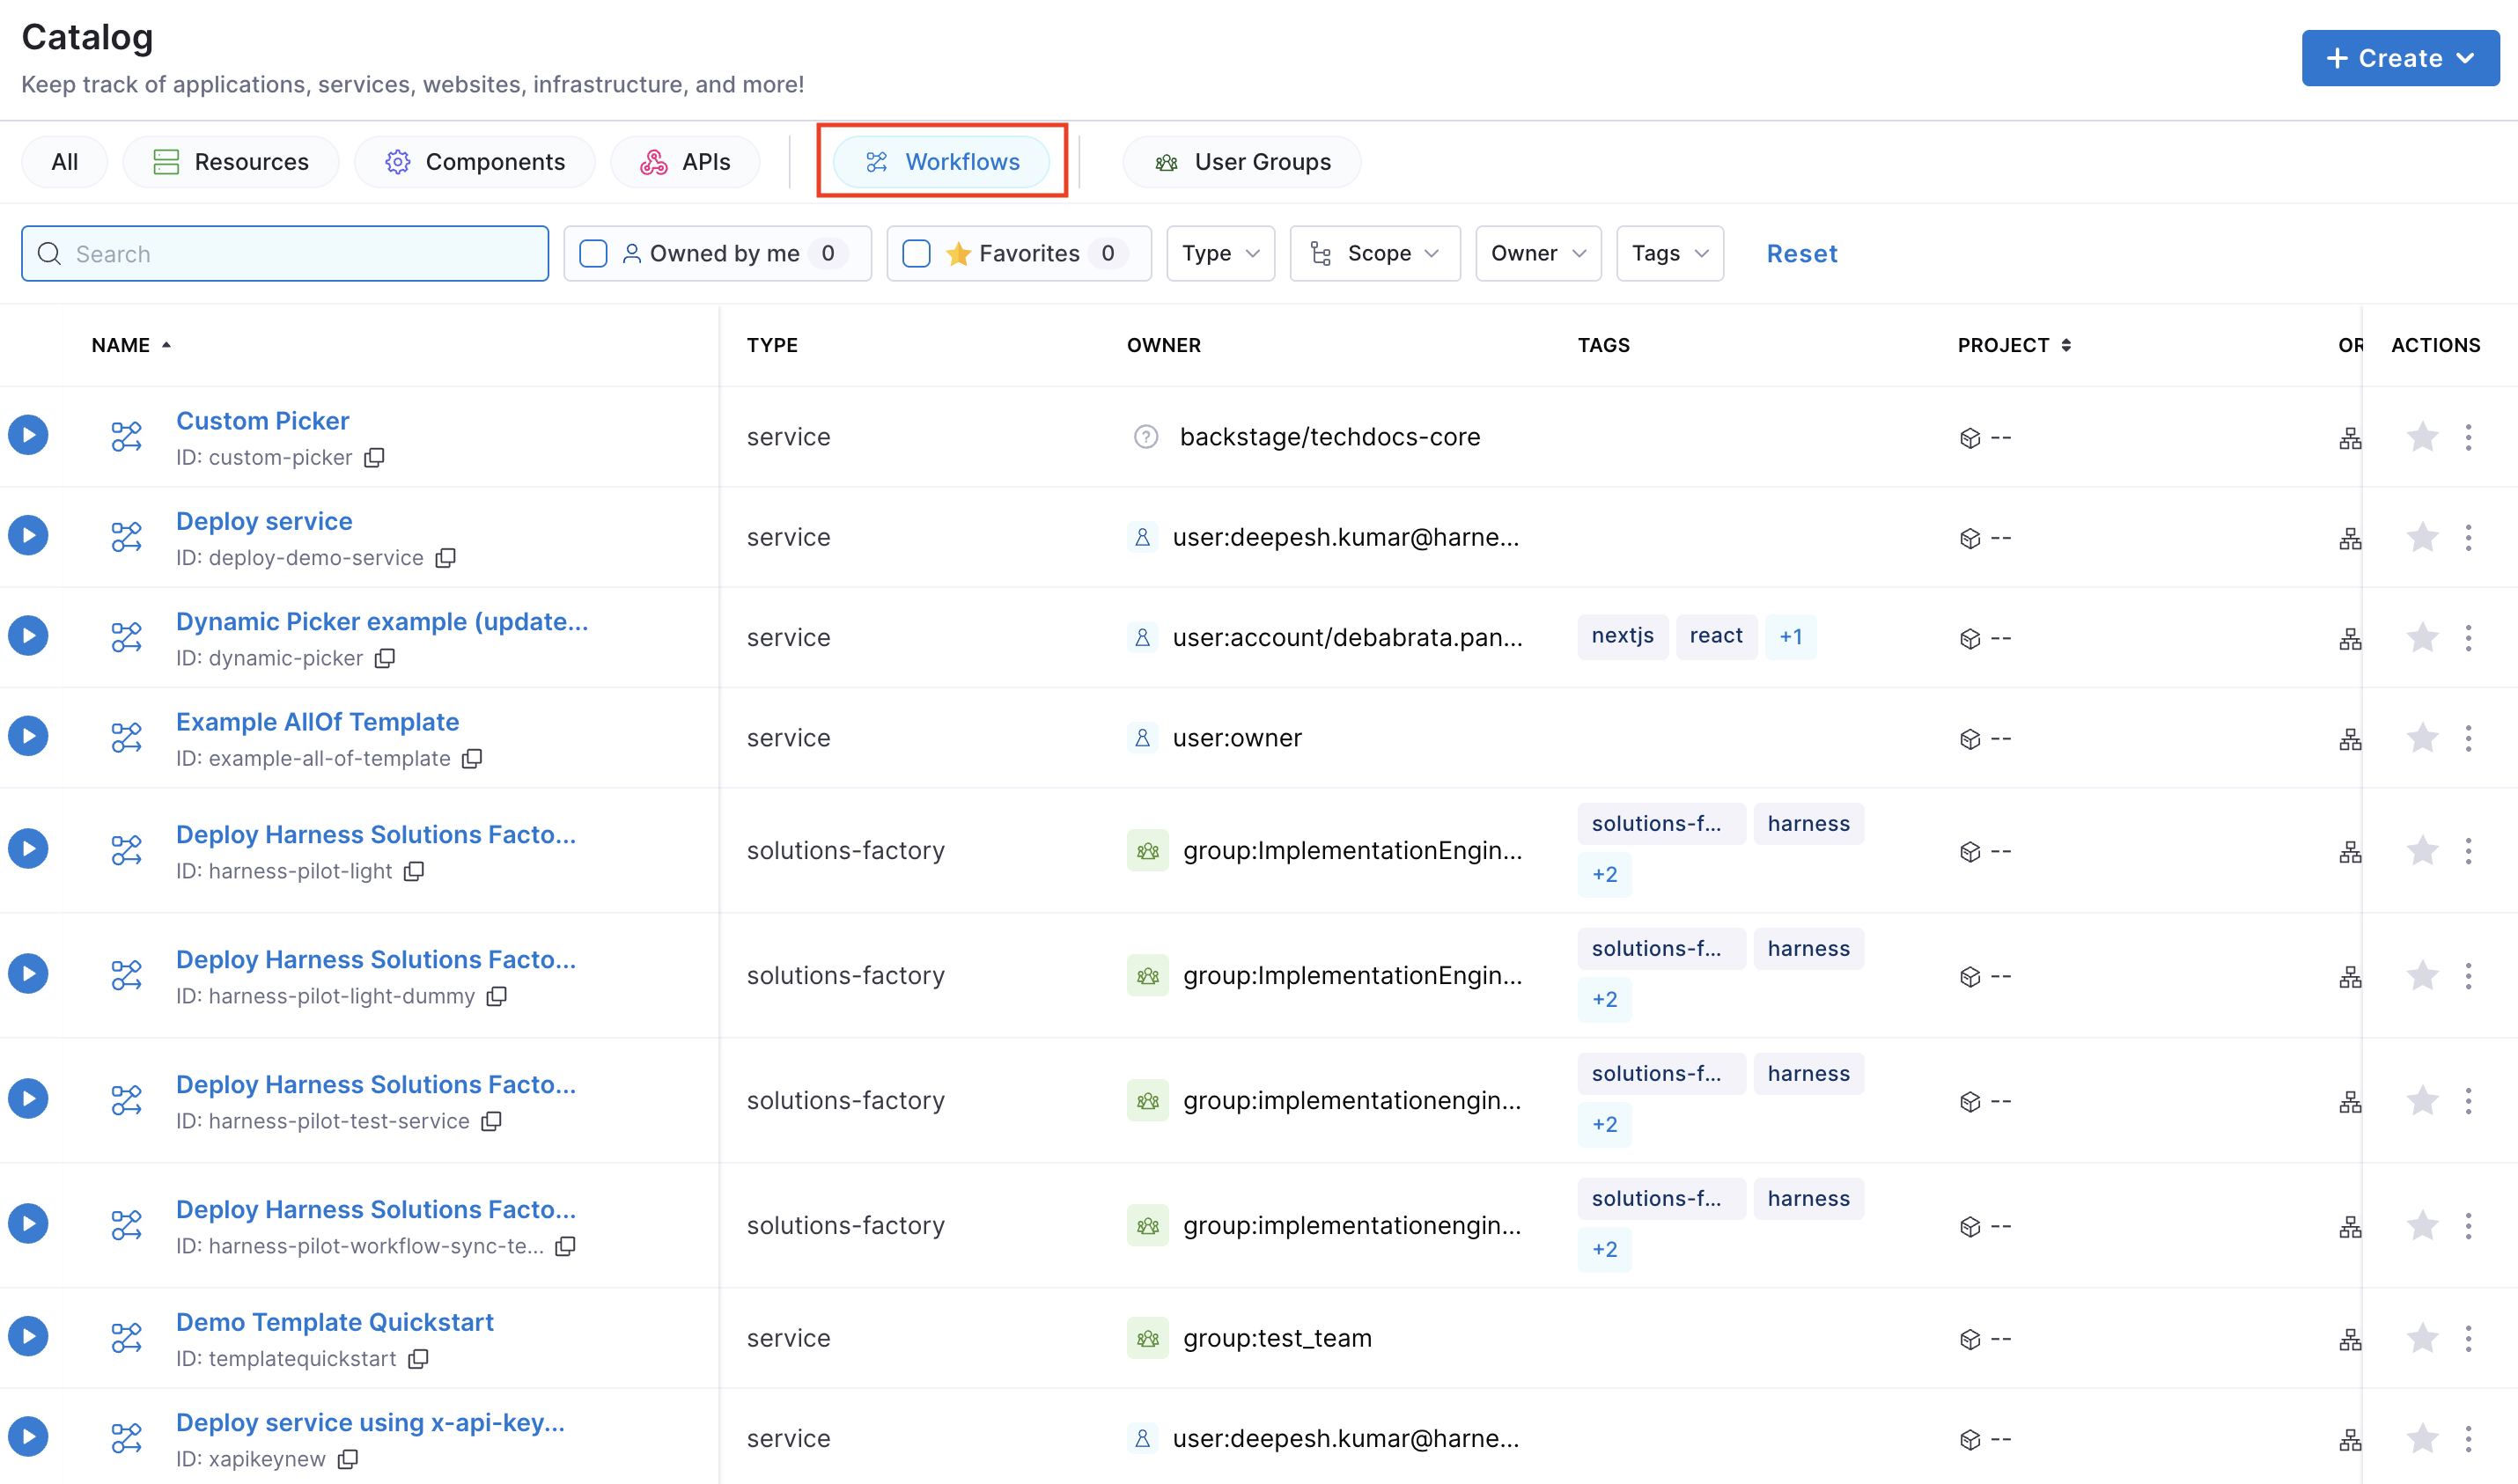
Access workflows
- Navigate to the Catalog page in Harness IDP.
- Select Workflows from the Catalog filter categories to view all registered Workflows.
- Use additional filters (e.g., owner, tags) to narrow down the list.
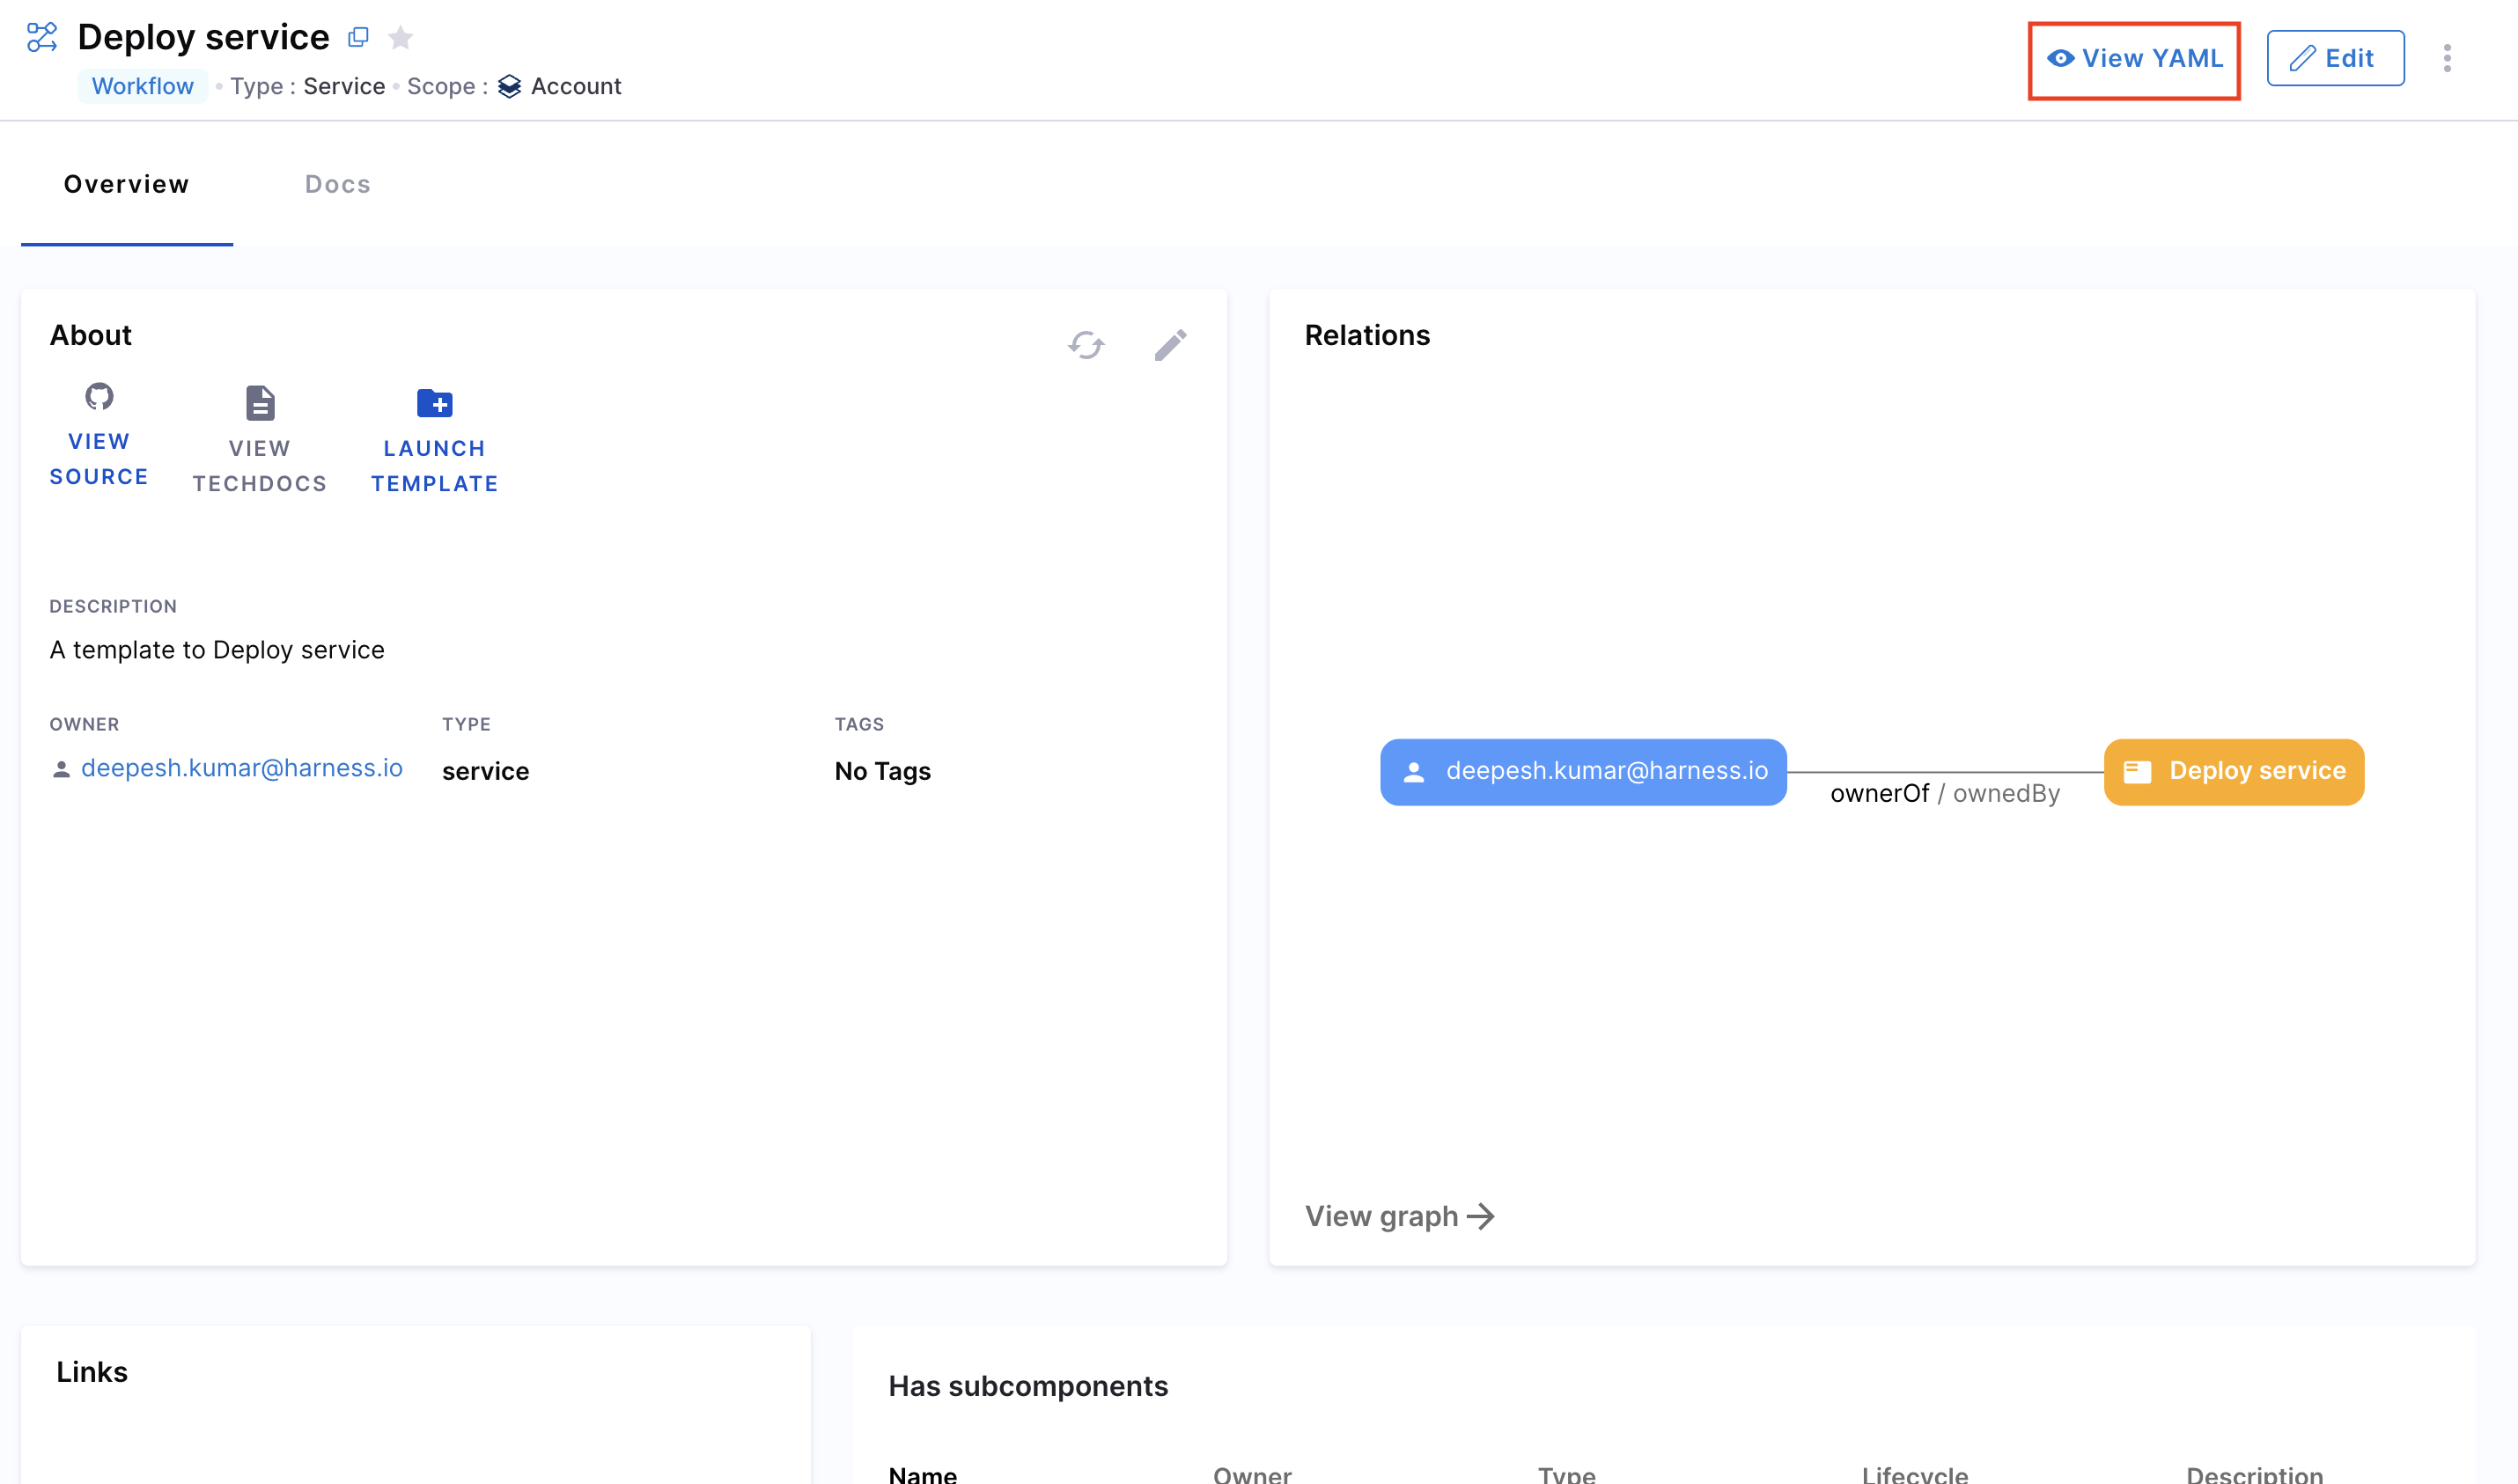
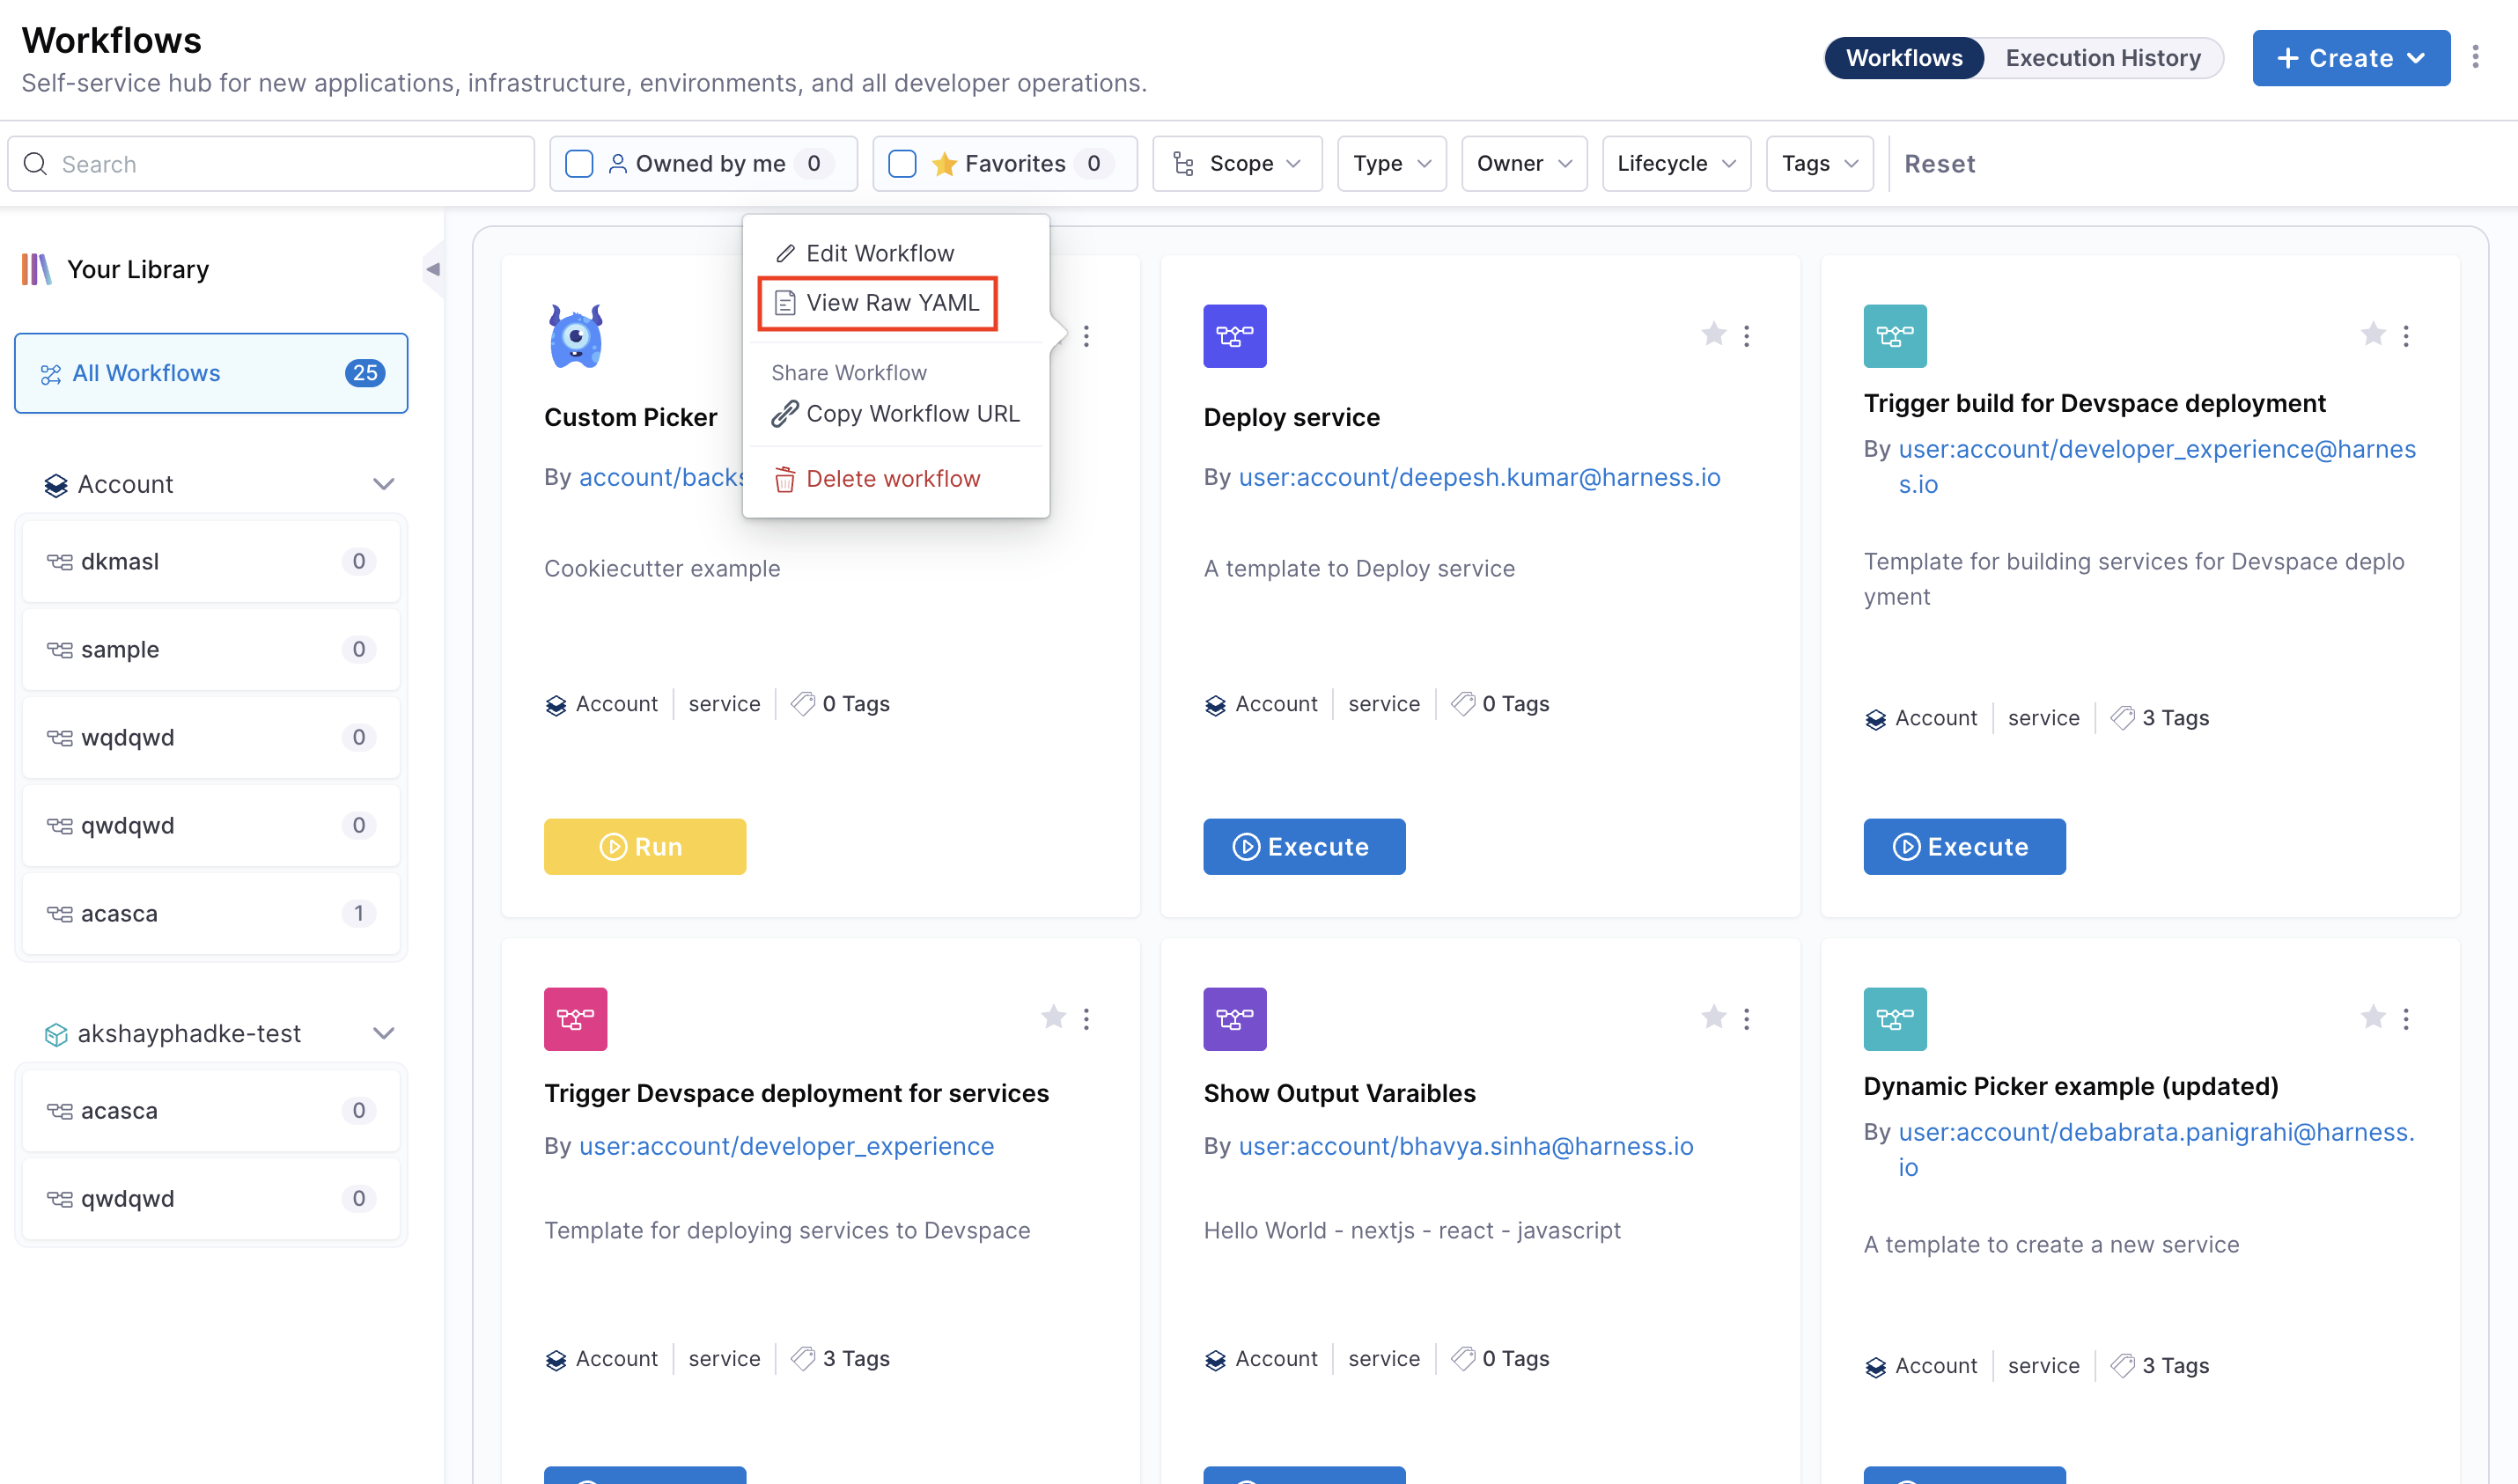
View workflow YAML
You can inspect the Workflow YAML in two ways:
- From the Catalog, select the desired Workflow and click View YAML.
- From the Workflows page, click the three-dot menu on the Workflow and choose View RAW YAML.
Manage workflows
Create workflows
With IDP 2.0, we are moving towards a Harness-native Data Model designed for enterprise scale and access control. To learn more about the different changes in the schema, go to Data Model.
There are two ways for you to add and create a new Workflow in your IDP:
- Create a Workflow via the Harness IDP UI: Use the Harness UI to create Workflows directly, no YAML required. This method offers a streamlined, code-free experience for adding entities.
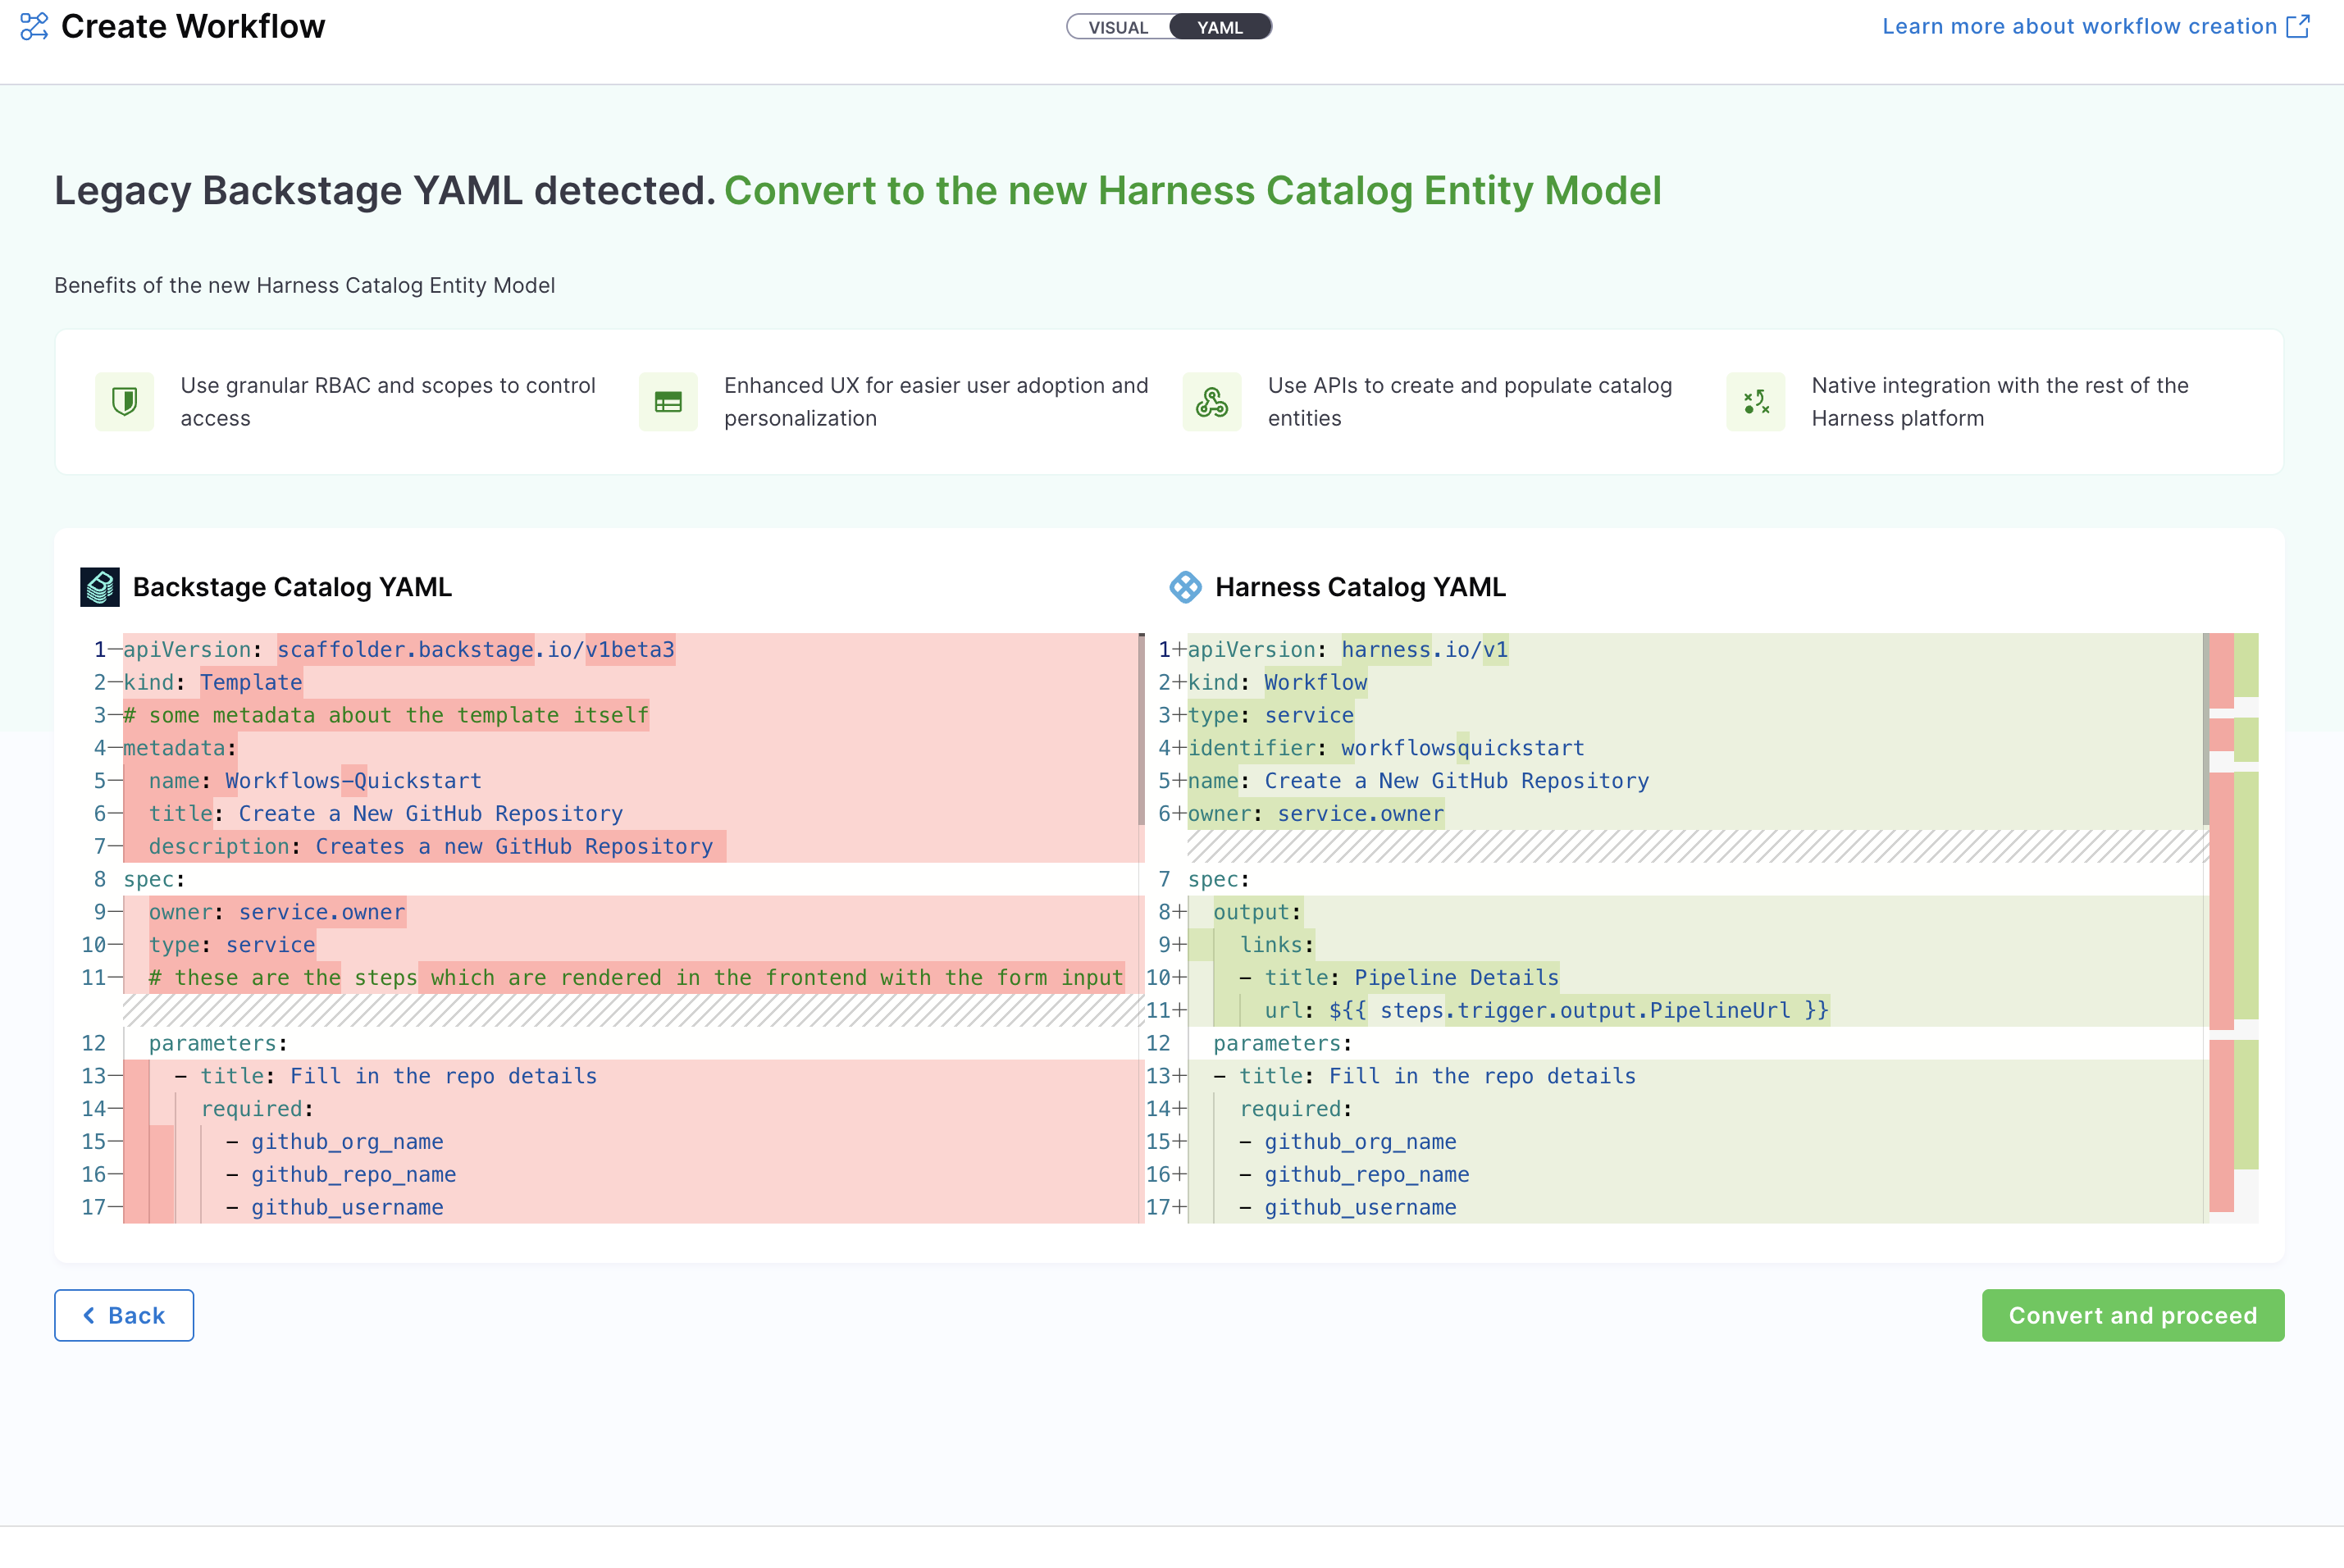
- Create a Workflow using your Workflow YAML: You can still create Workflows using your existing Workflow YAML files. Harness will automatically convert legacy Backstage YAML into the new Harness-native Data Model and register the corresponding Workflow.
Let us try creating a Workflow using both the methods:
- Harness IDP UI
- Workflow YAML
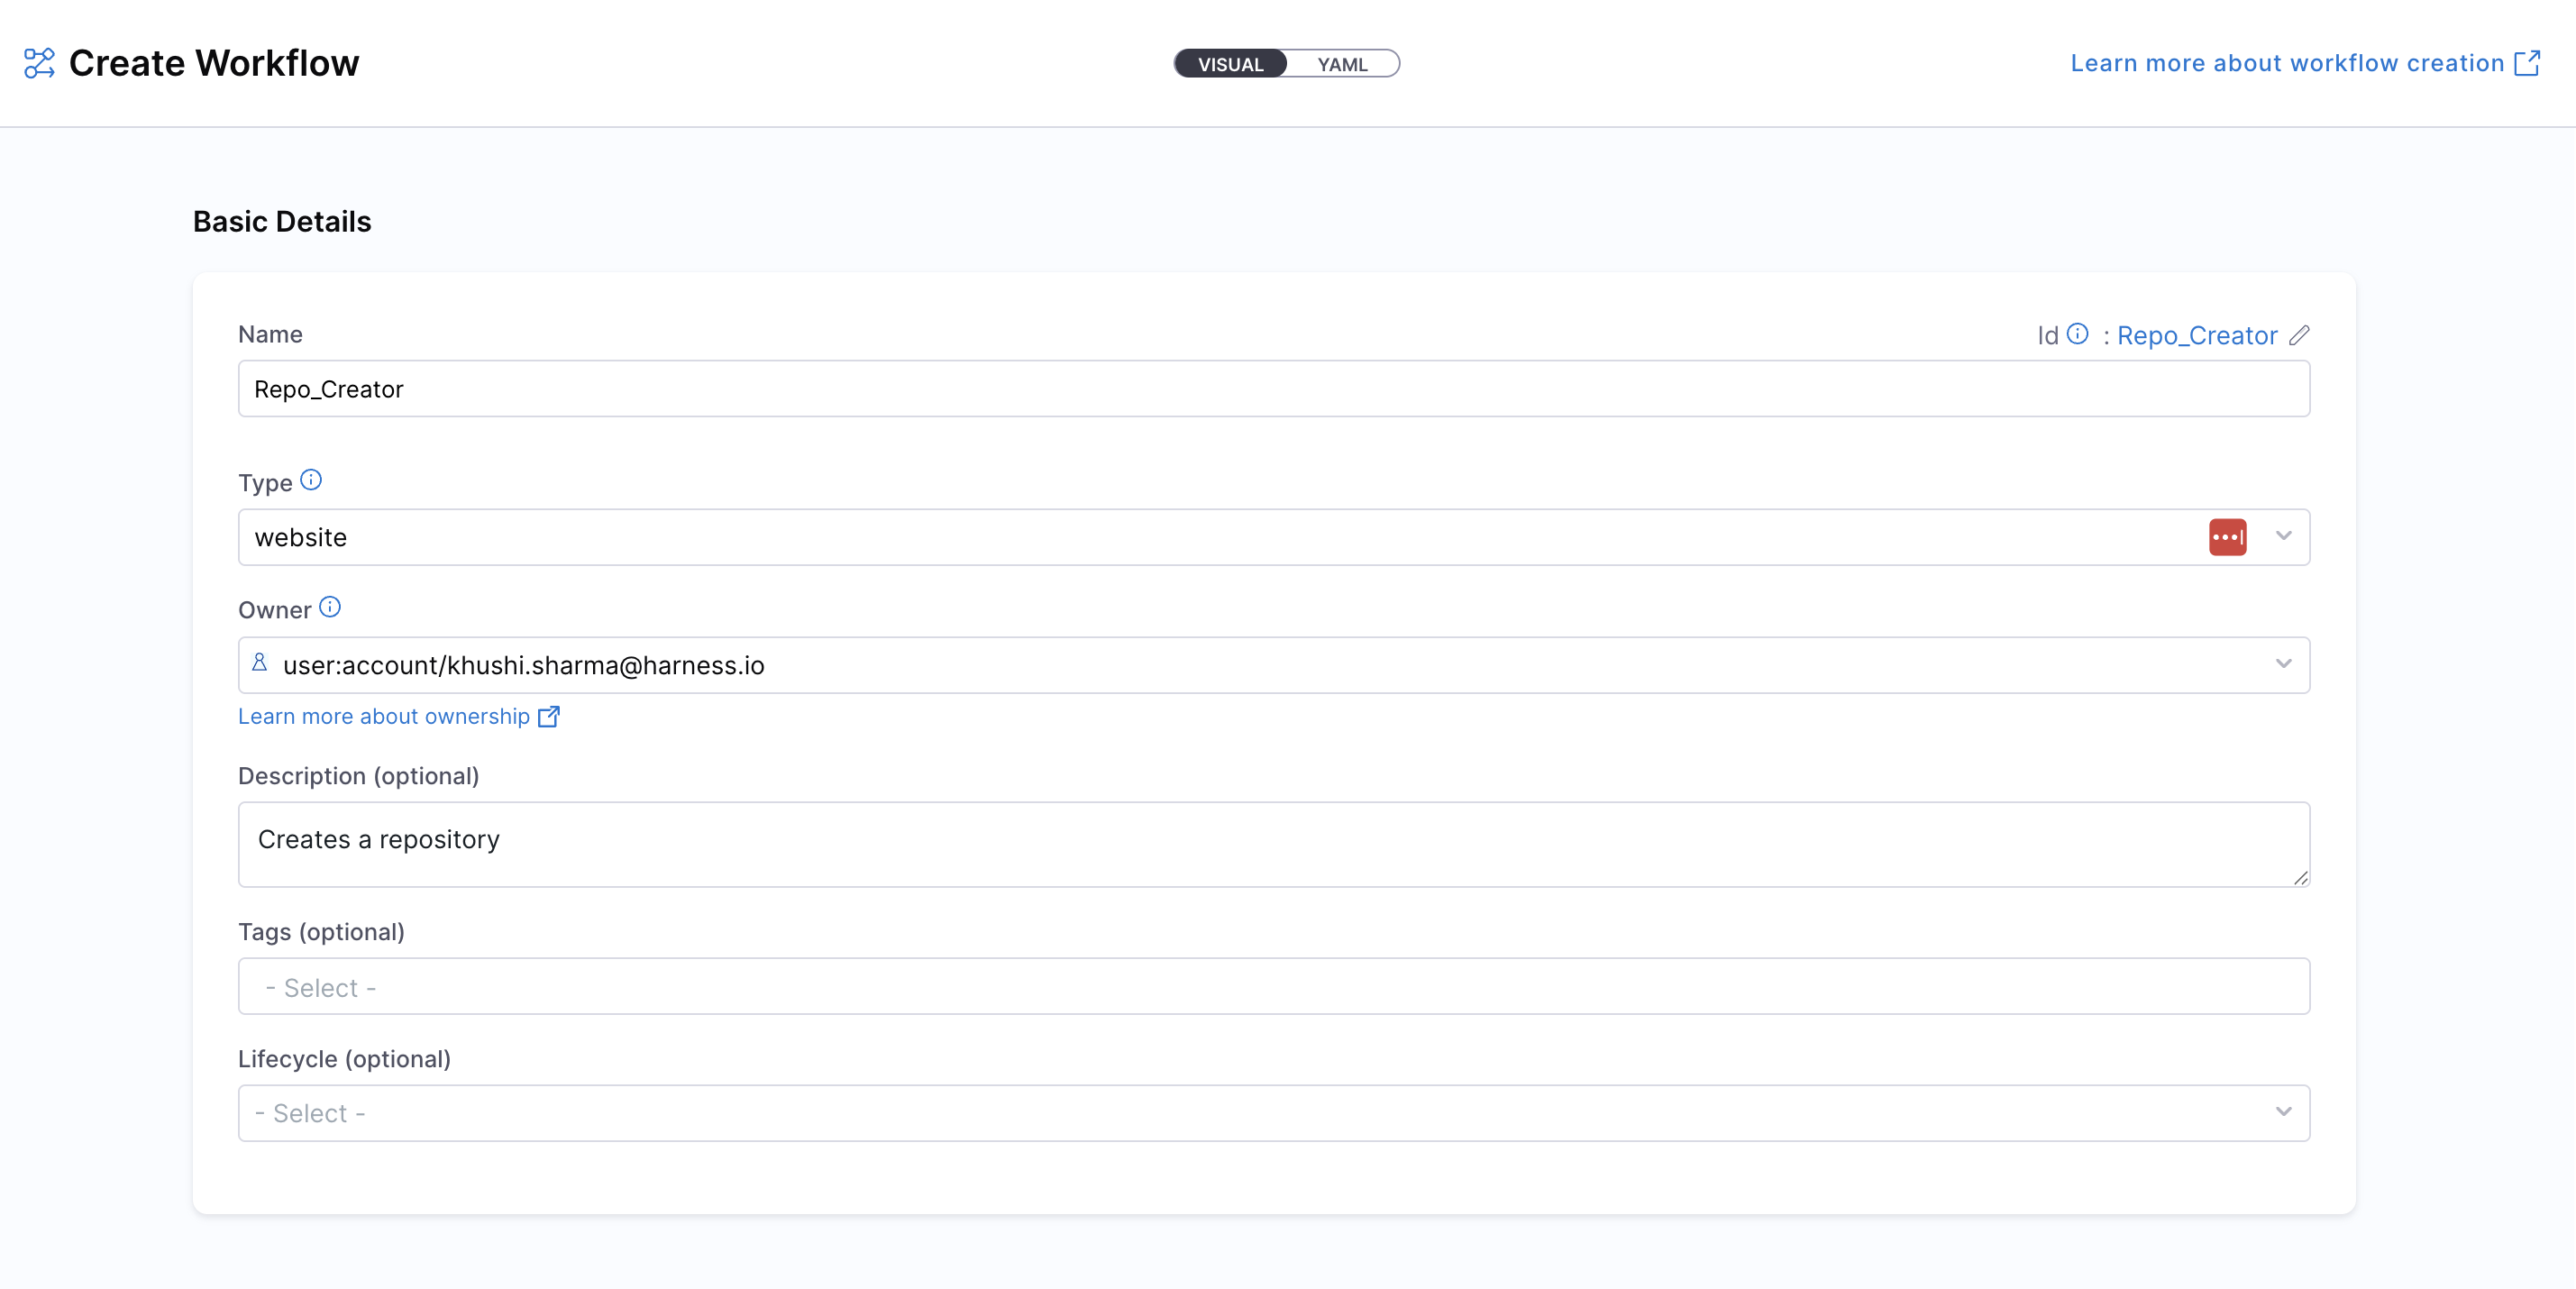
To create a new Workflow, navigate to the Harness IDP portal and click on "Create" from the side-bar menu. Choose Workflow from the panel, and follow these steps:
- You will be redirected to the "Visual View", where you can input basic Workflow details and begin the creation process.
- Enter the required Workflow information. The Visual view is synced in real-time with the YAML view for full transparency.
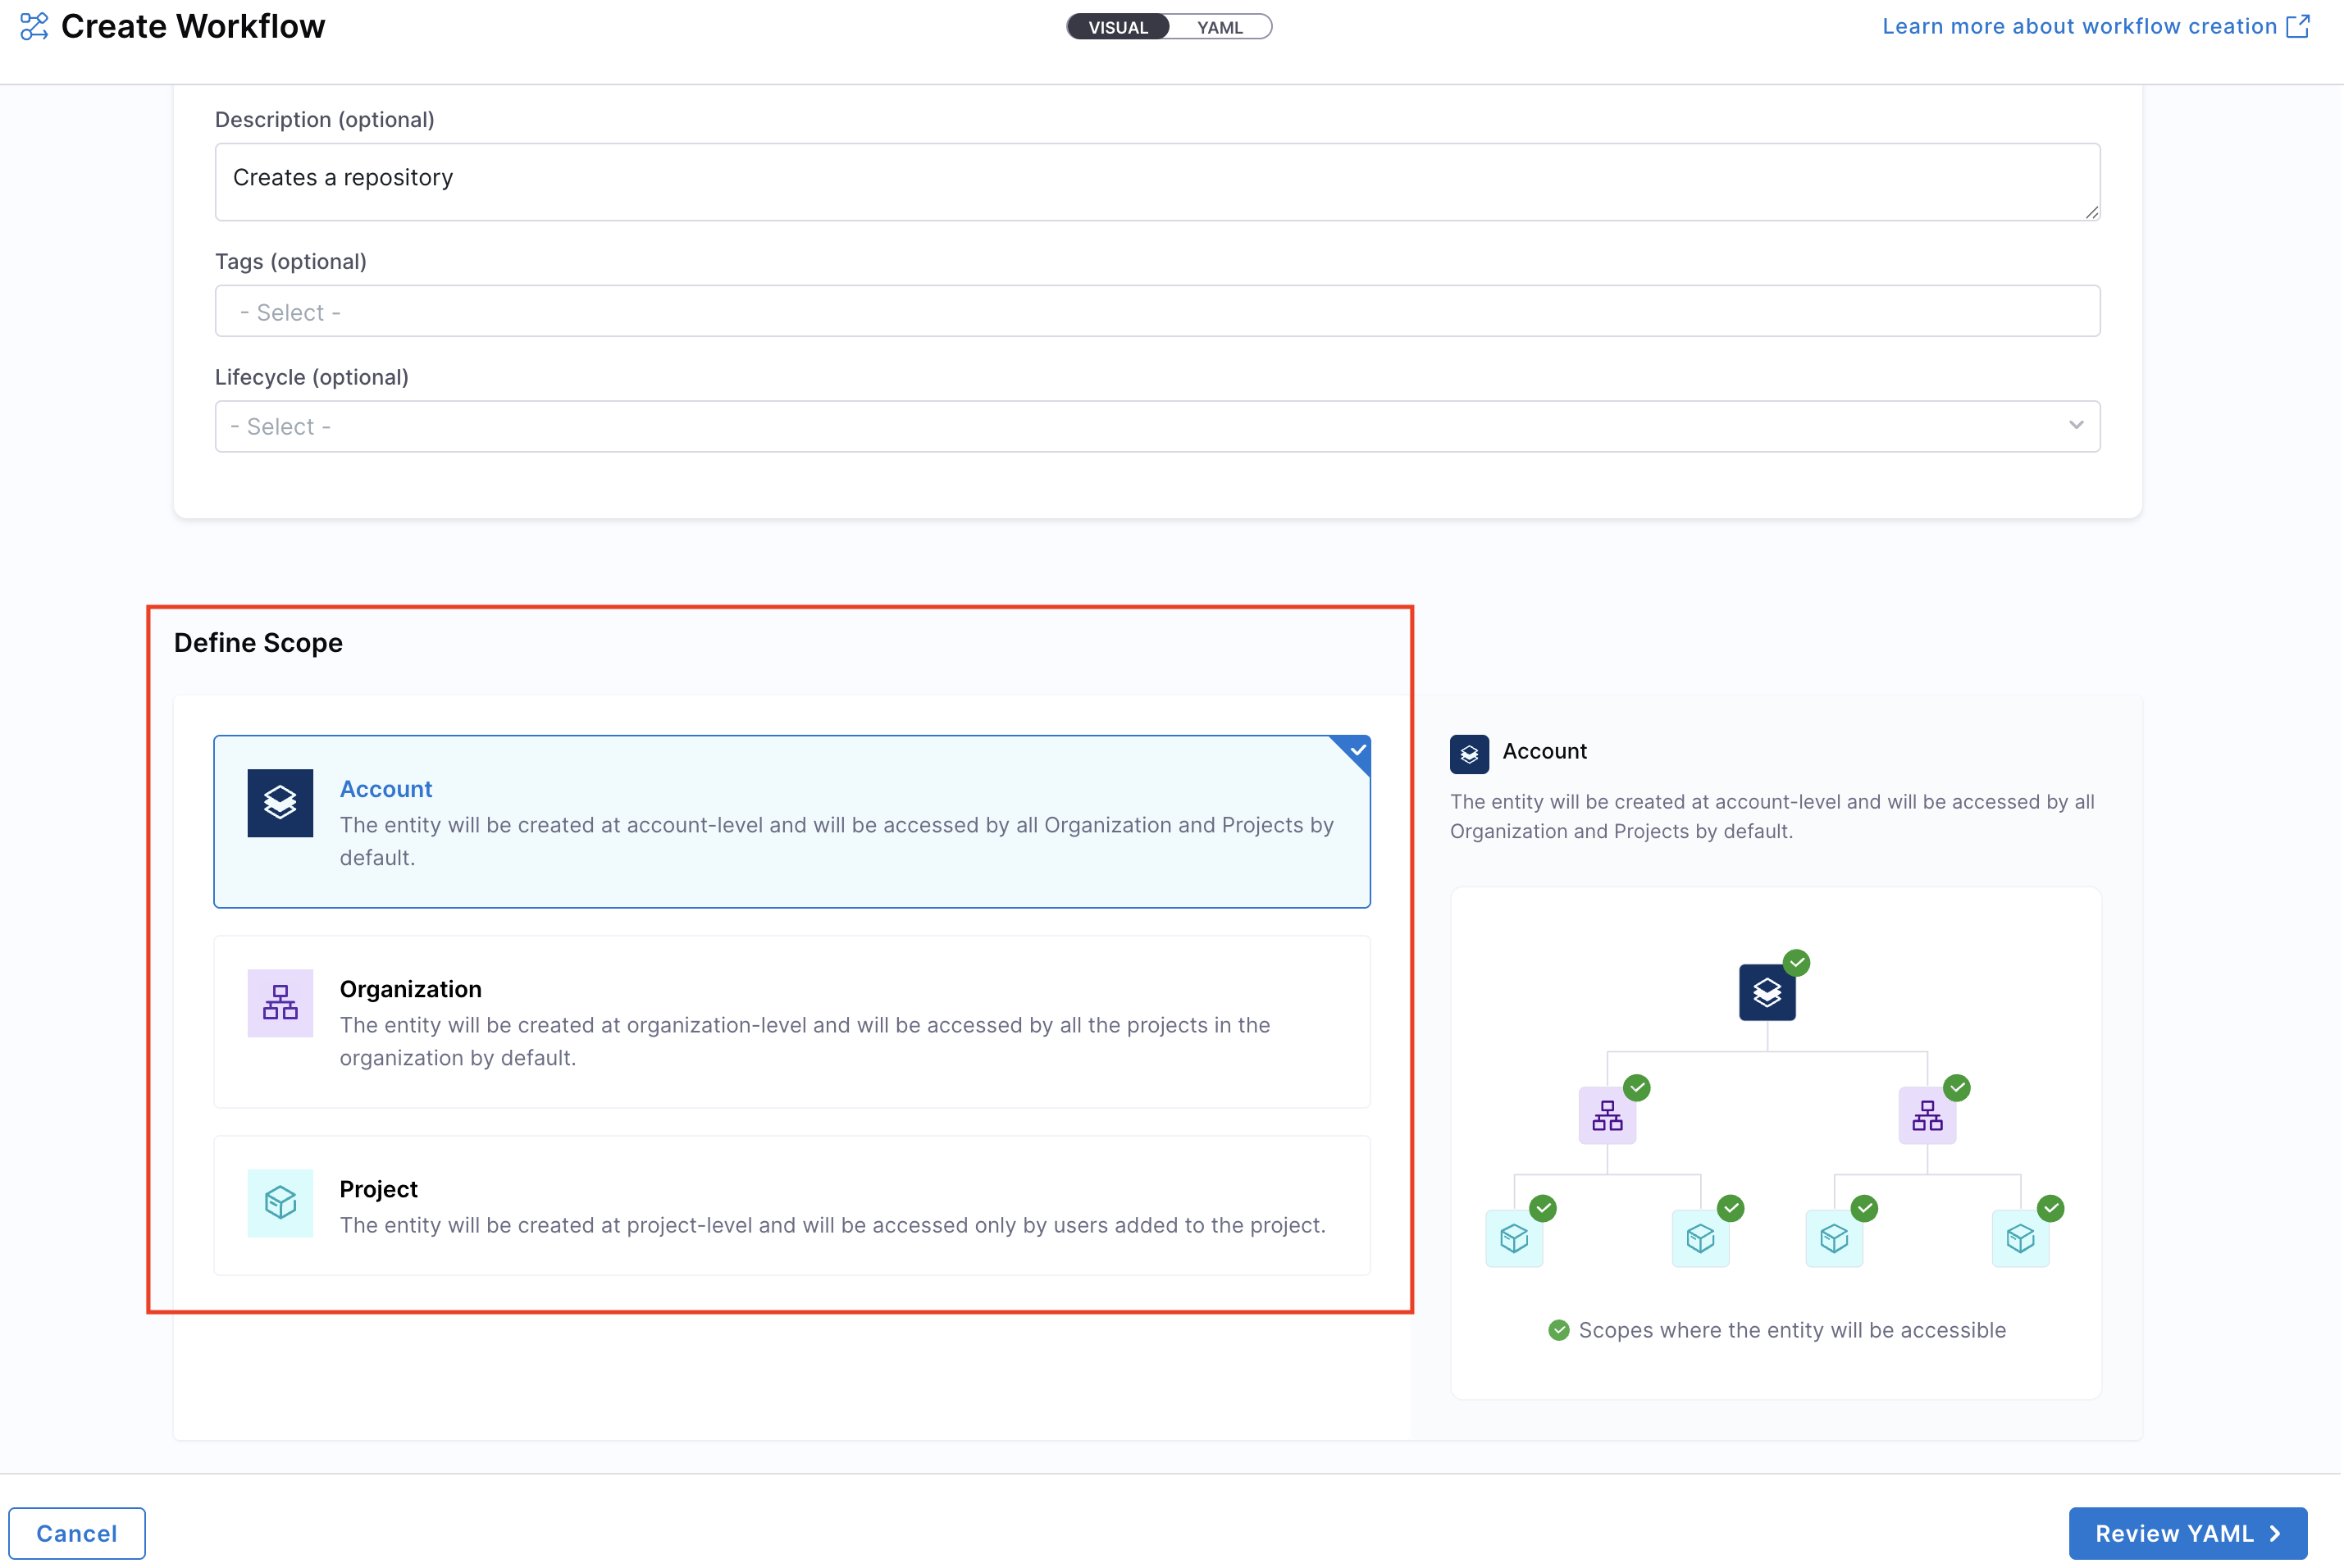
- Define the Workflow scope, choose whether the Workflow should reside at the Account, Project, or Organization level. For this use-case, let us select the Account scope. Read more about Workflow RBAC.
- You now have two options for managing your Workflow configuration:
- Inline (default): Manage the Workflow YAML directly within Harness.
- Remote: Choose to store your Workflow YAML in a Git repository for version control, collaboration, and change tracking.
You can either use a Harness Code Repository or connect to a Third-party Git provider like GitHub or GitLab by selecting a Git connector, repository, branch, and YAML path.
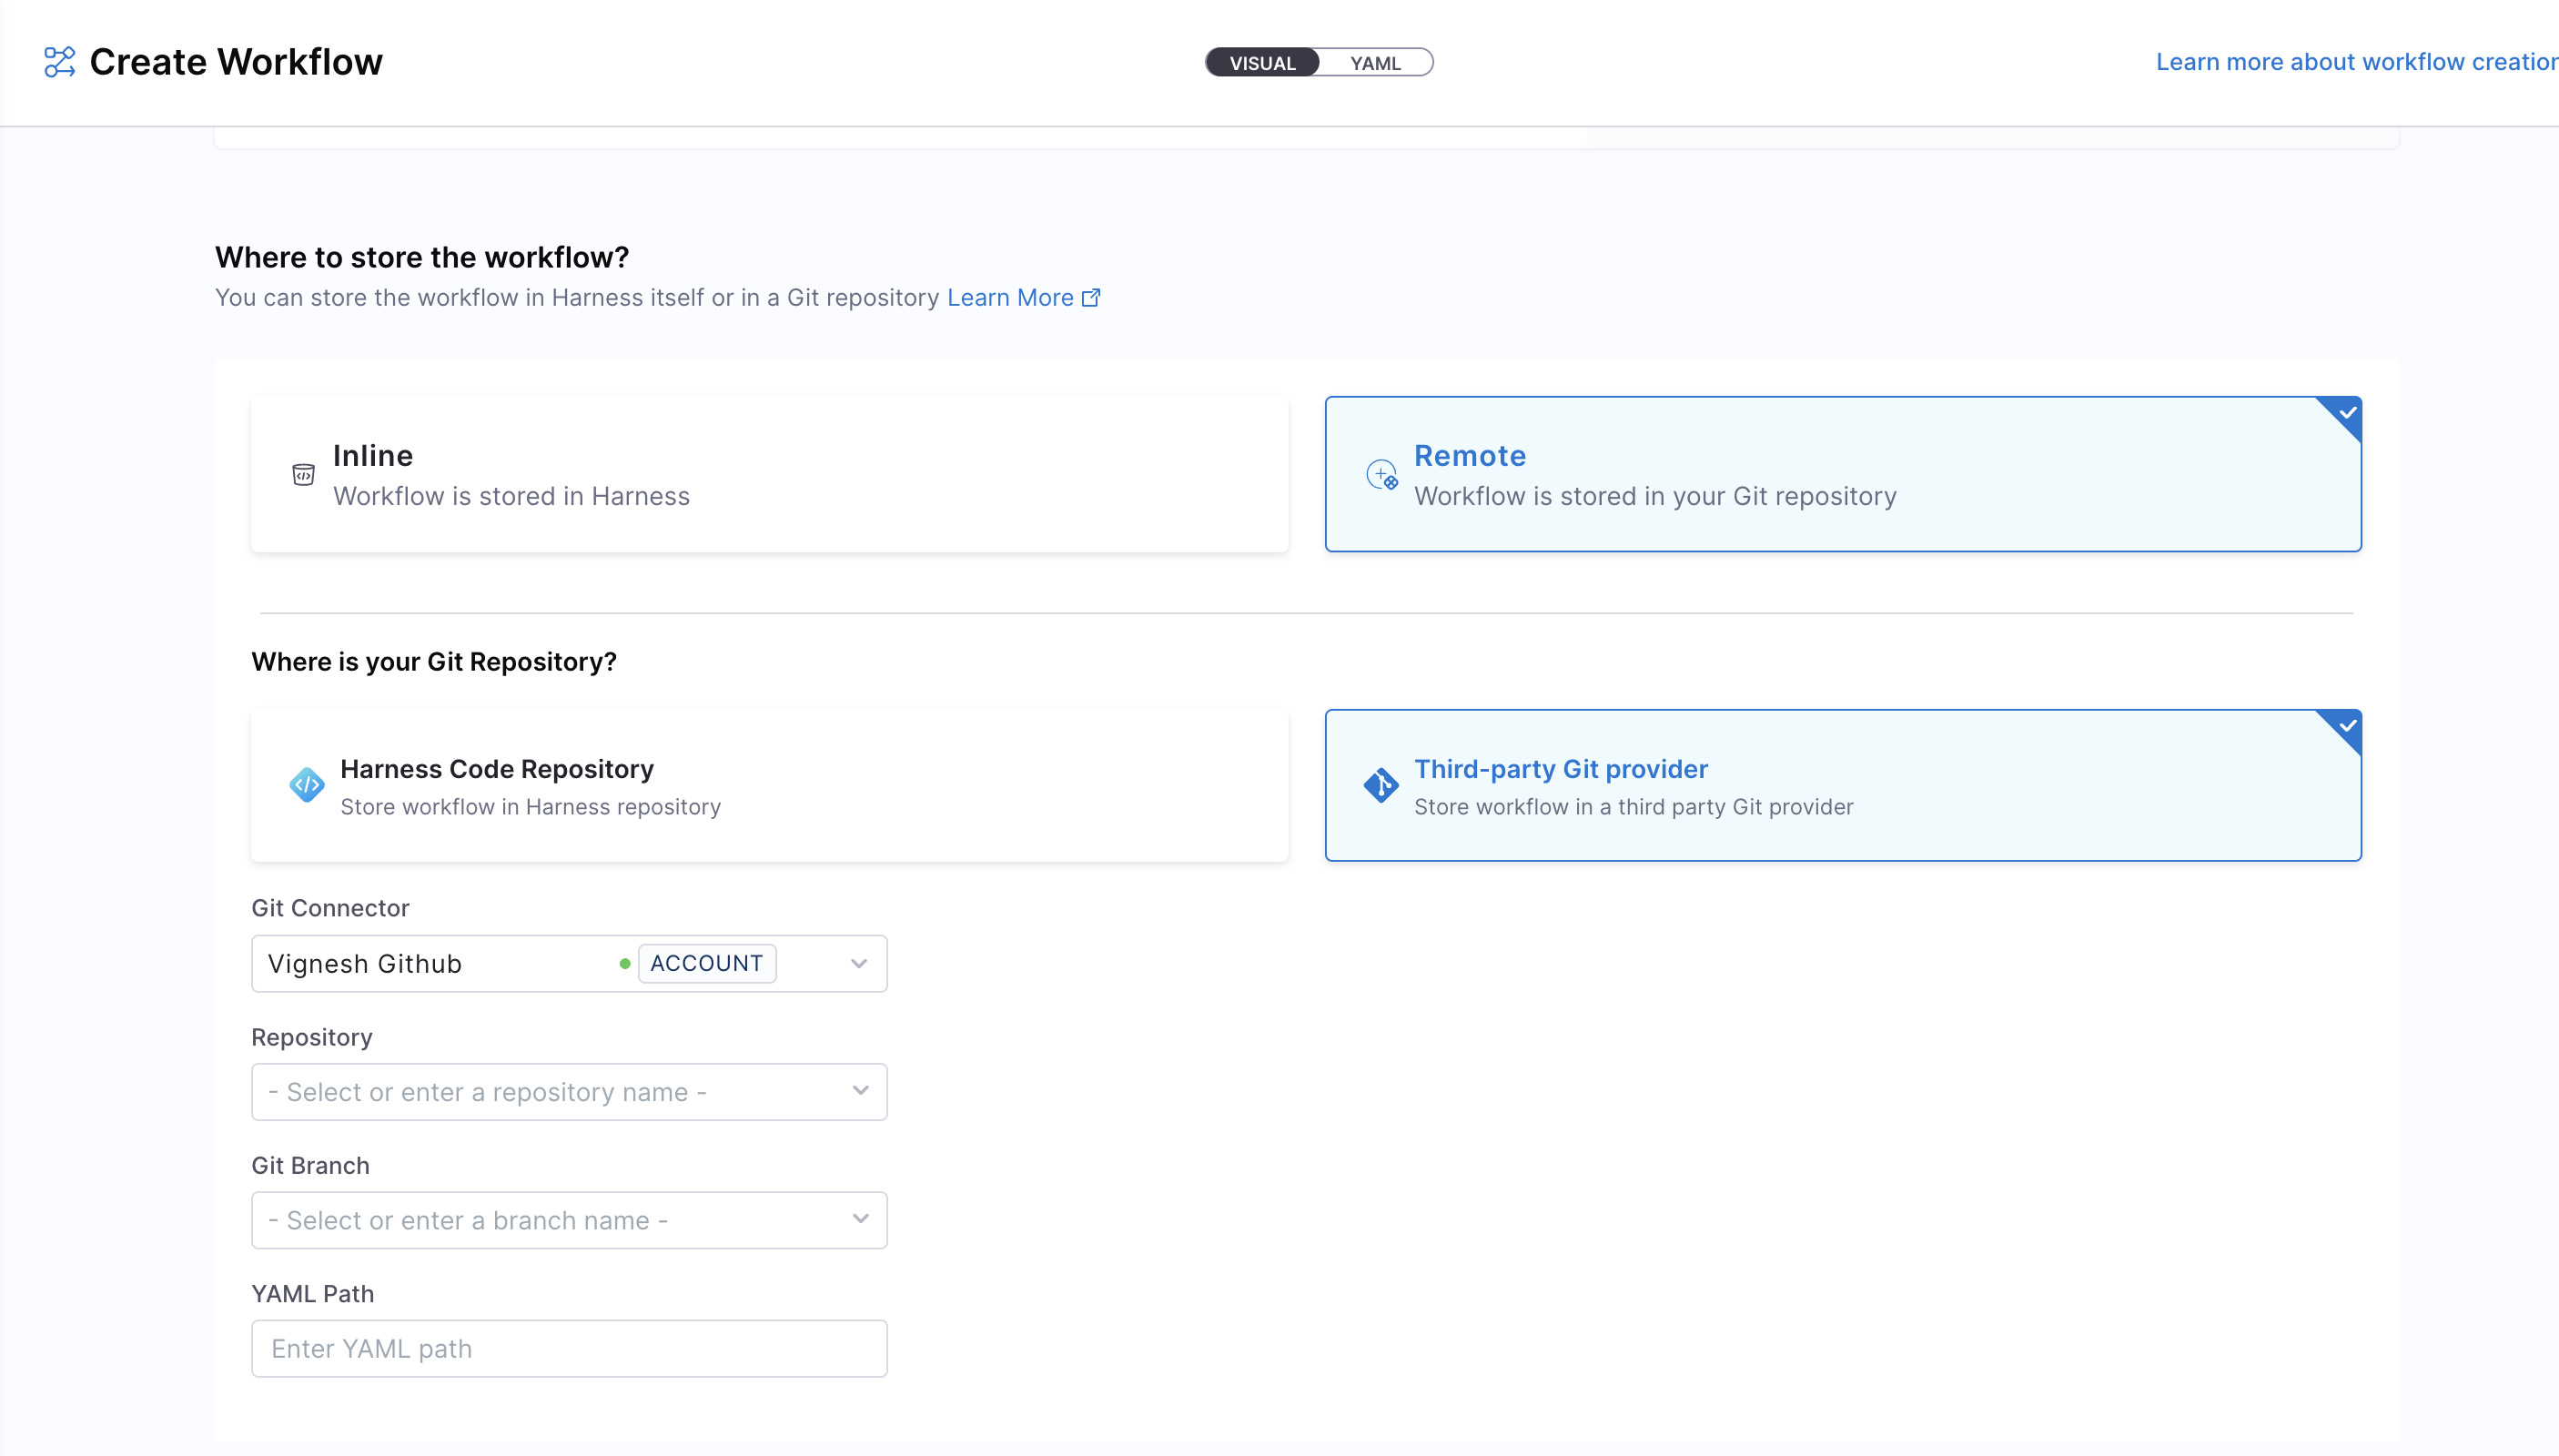
The Git Experience is ideal for teams who prefer to manage Workflows as code, with full version control and Git-native workflows. The changes are reflected in both YAML and execution views, via a webhook which is automatically configured on the Git connector. Learn more in the Git Experience Journey documentation.
- Click on "Review YAML" to view the auto-generated YAML. Since there is a live sync between the Visual and YAML views, changes in one will reflect in the other.
- You can configure your Workflow by editing the YAML directly, add inputs, backend actions, and outputs as needed. This allows you to fully customize the Workflow behavior. Learn more about the components of a Workflow and its YAML structure.
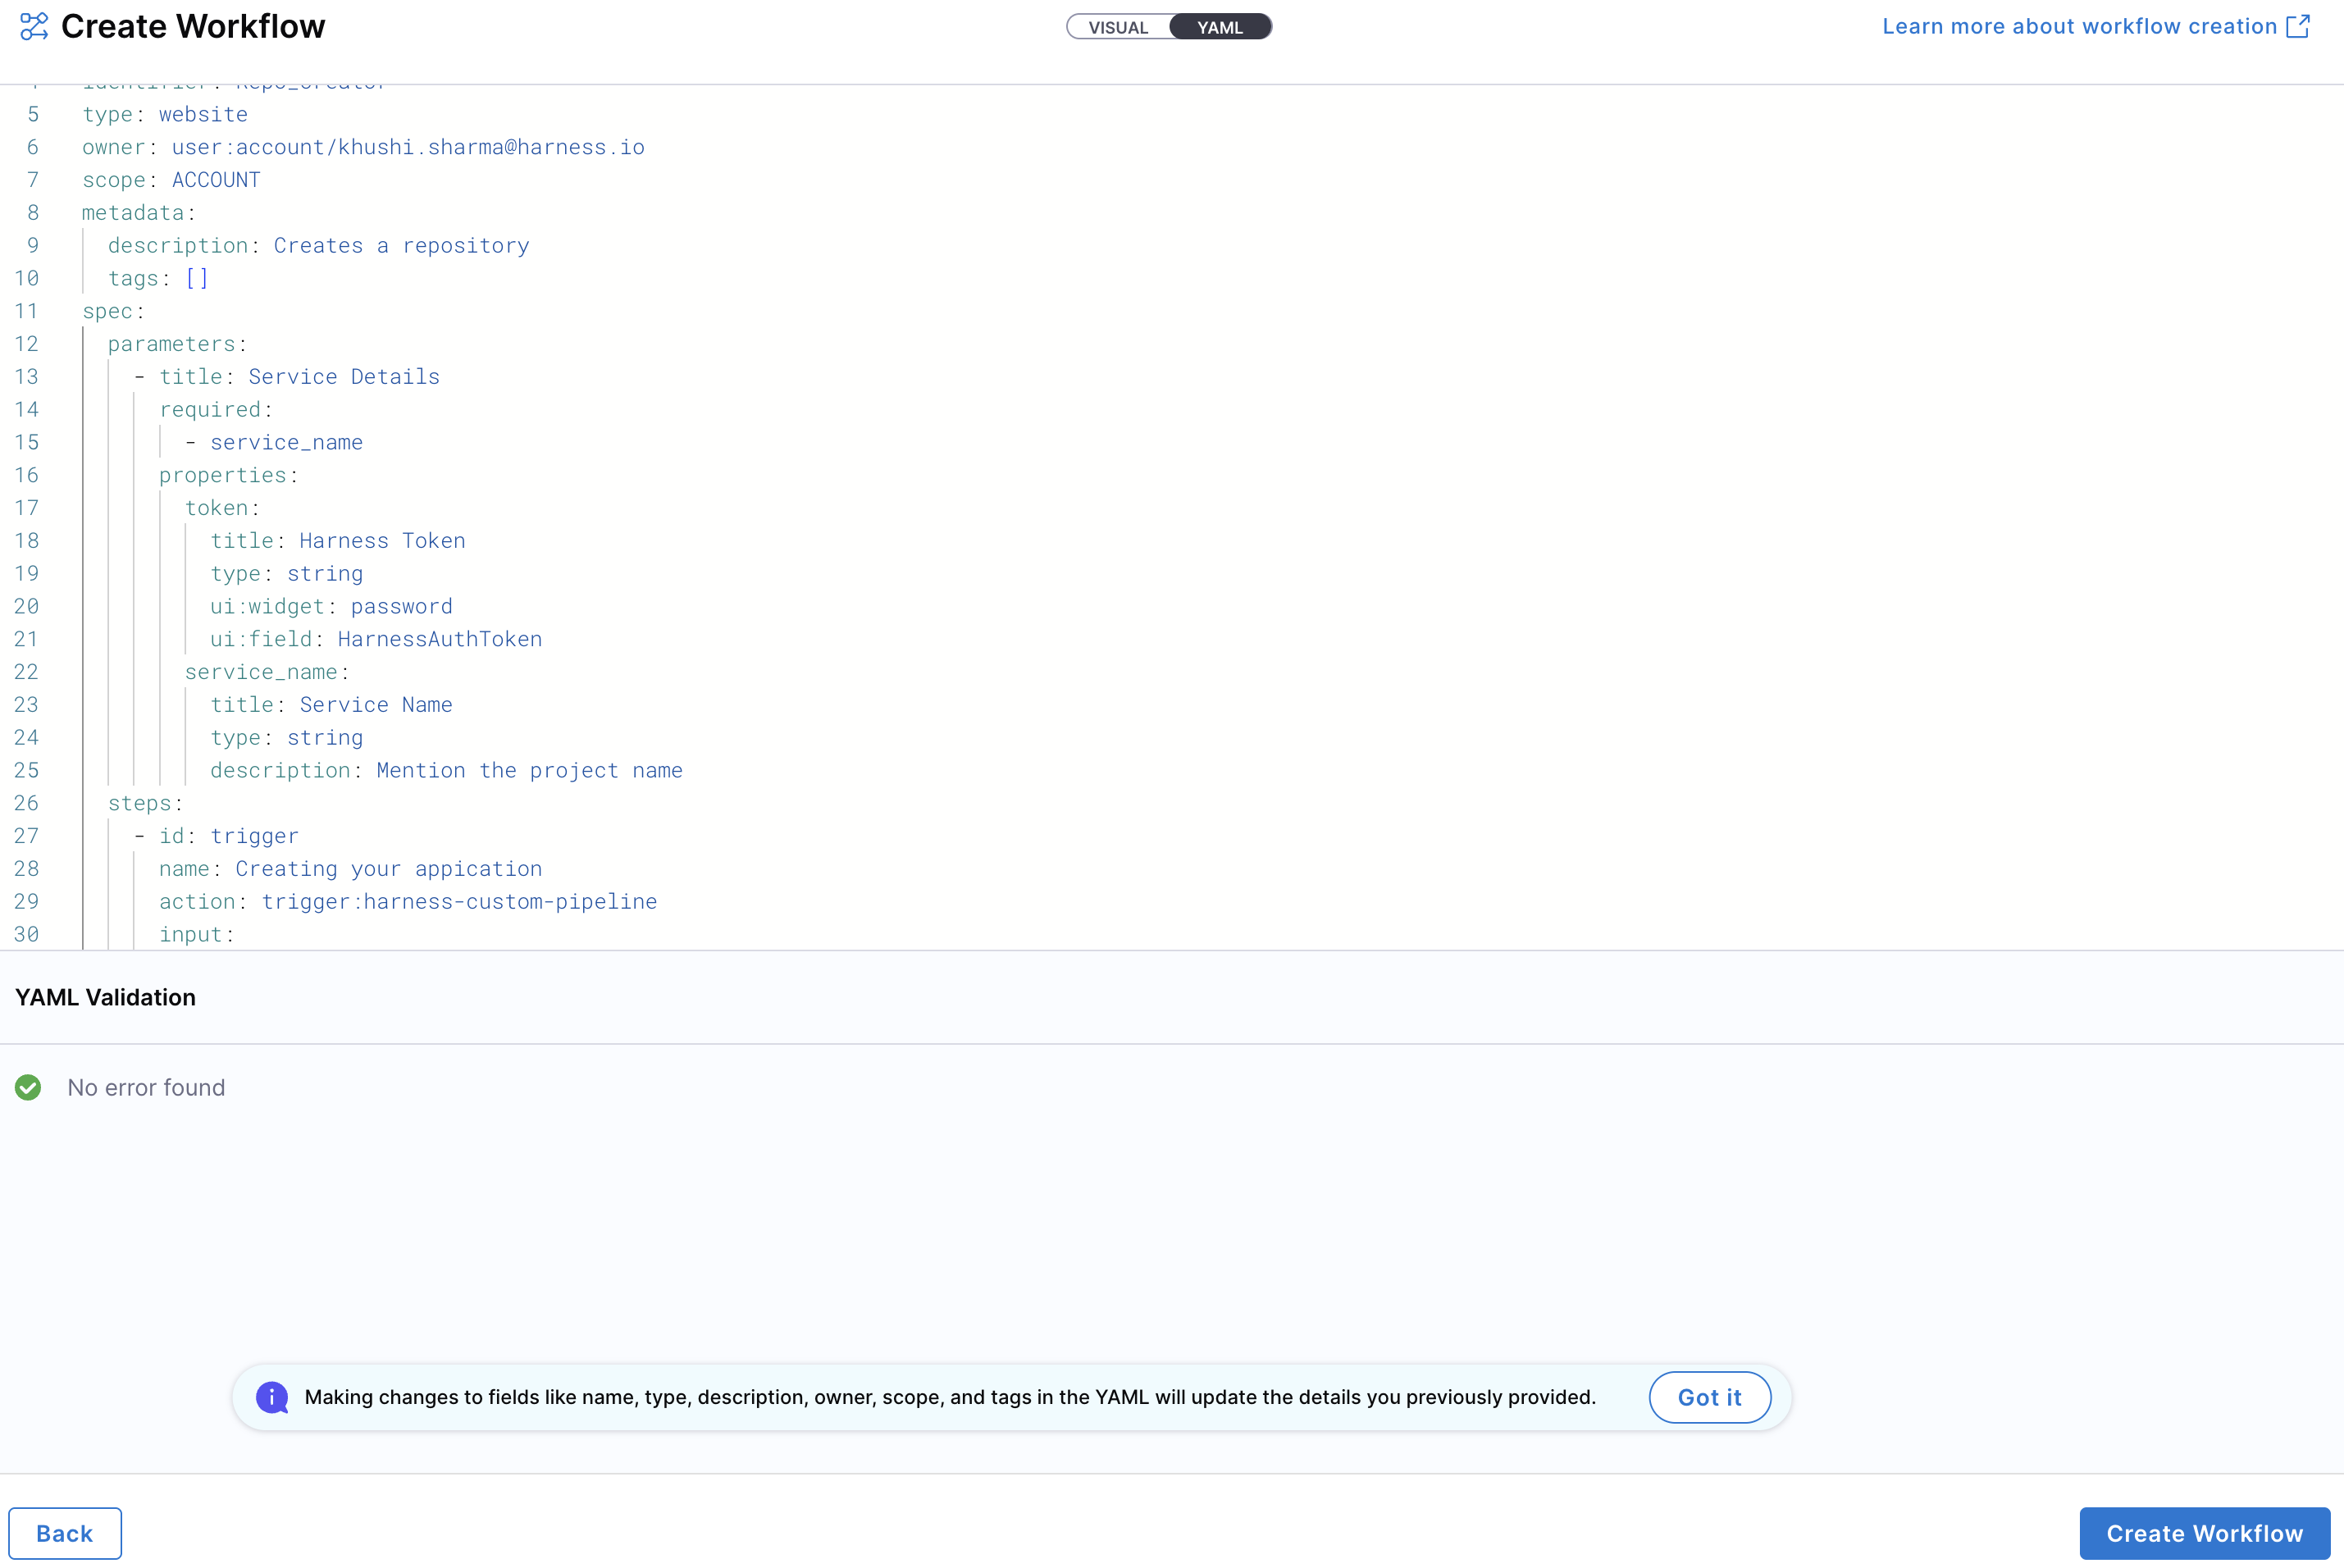
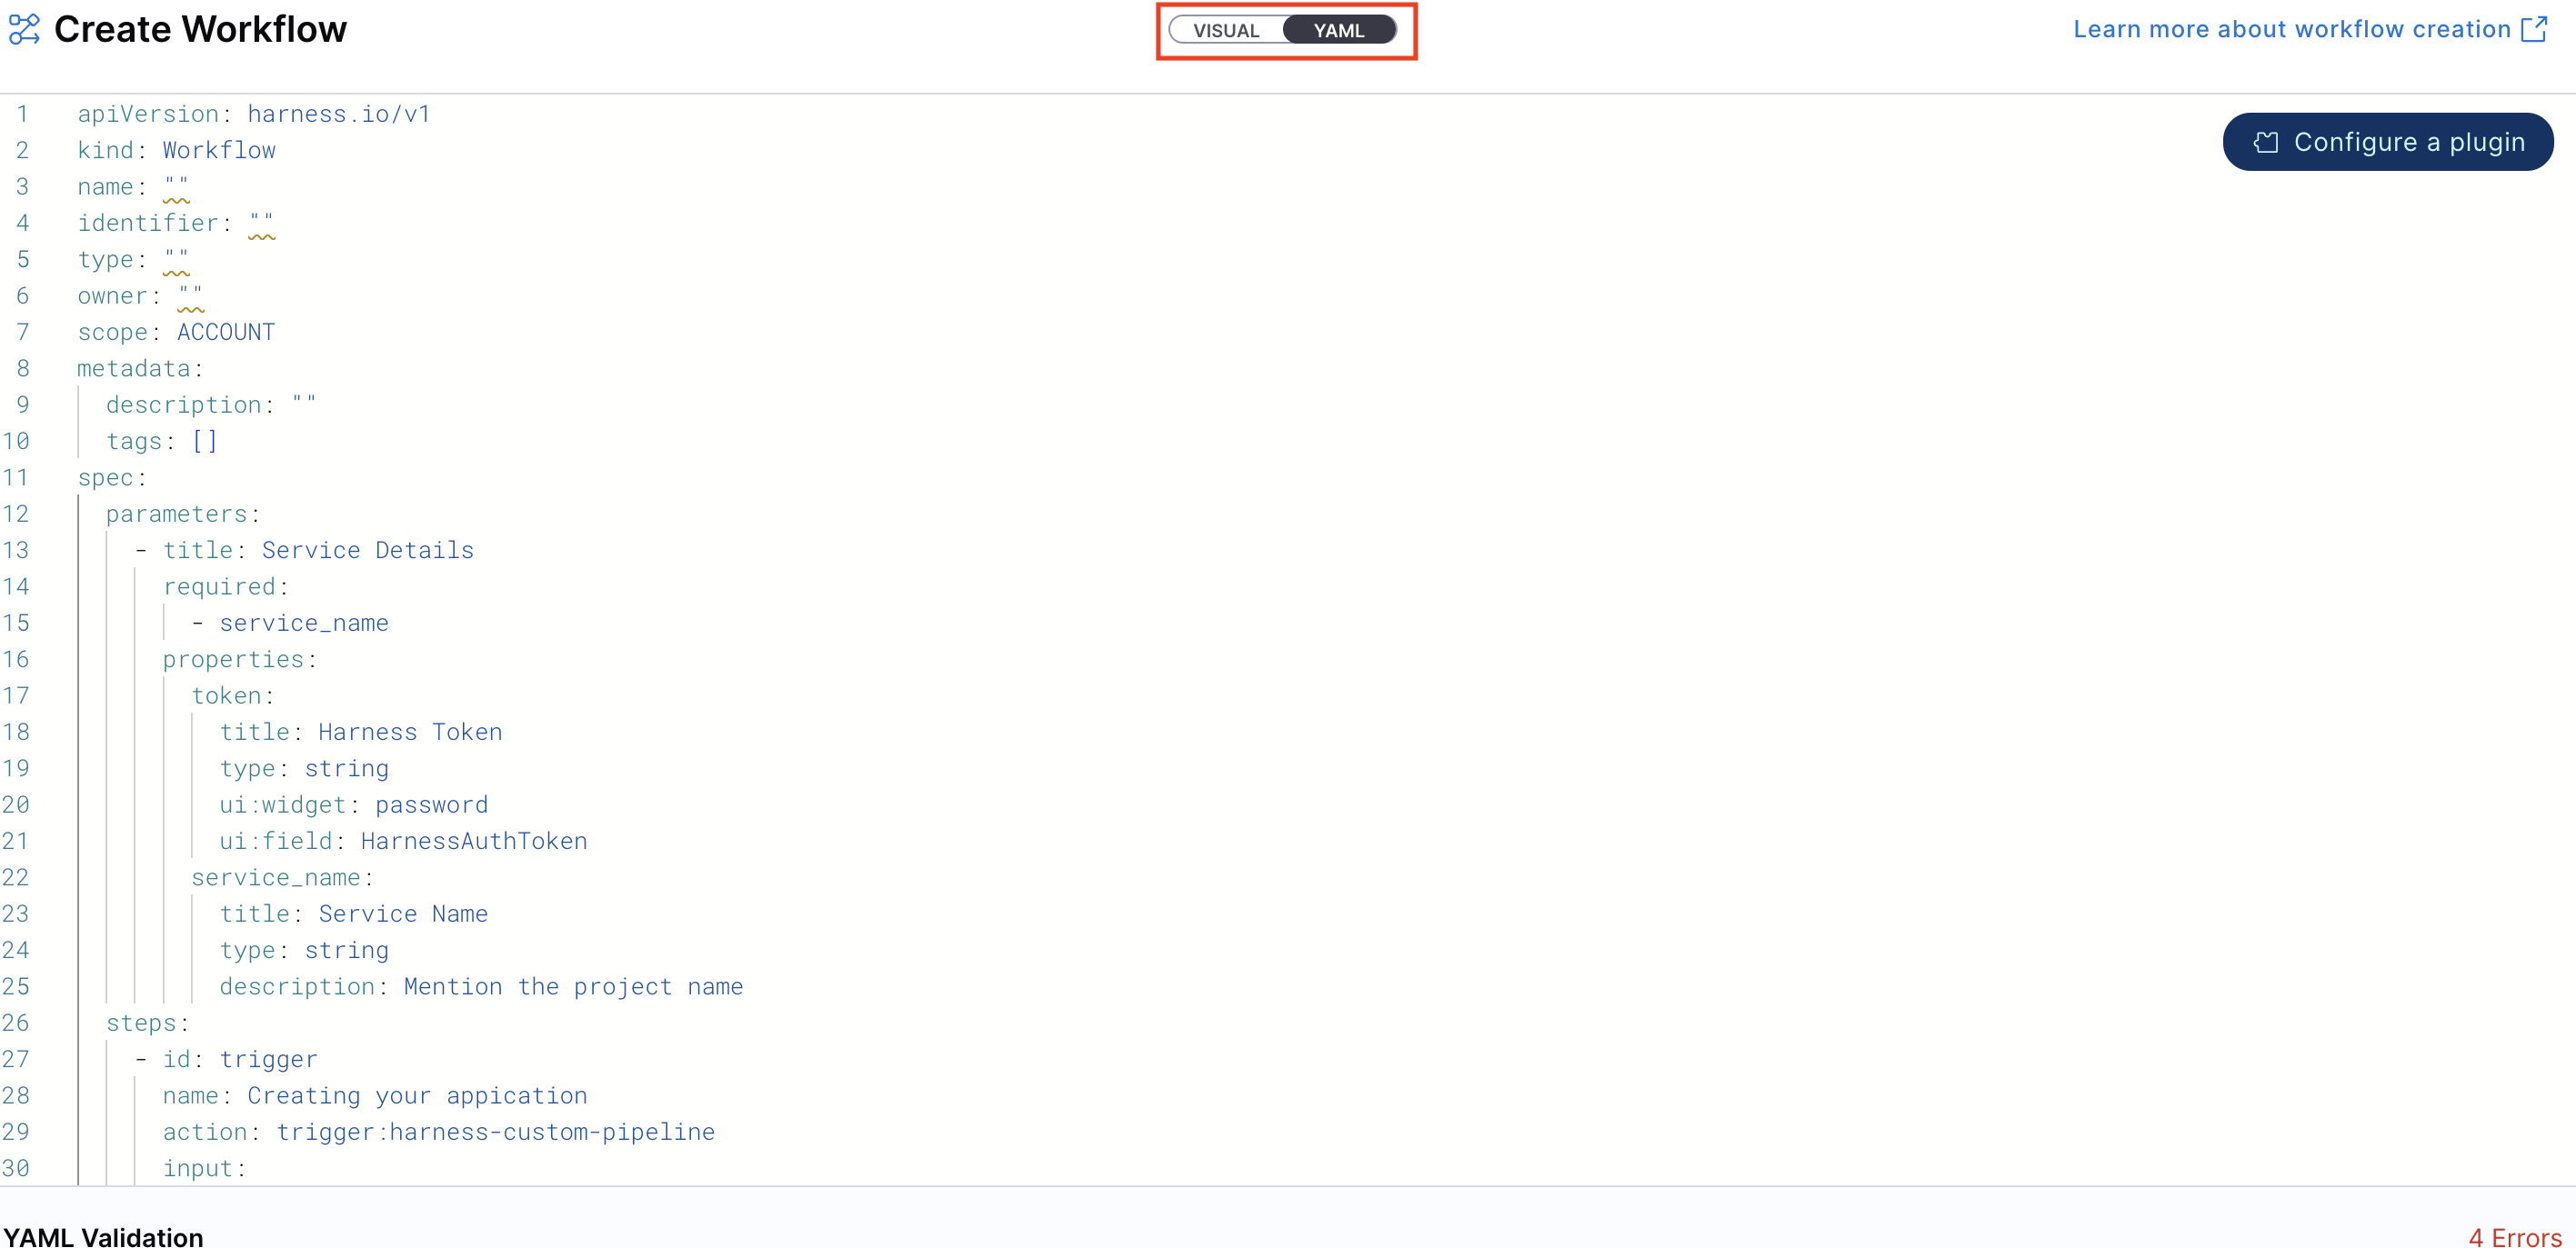
YAML validation is performed to ensure compatibility with the Harness-native Data Model. Any errors will be shown in the Validation logs. Ensure your identifier follows naming rules. Invalid identifiers may lead to entity registration errors.
- Once everything is set, click "Create Workflow" to finalize and create the Workflow.
To create a new entity using the Workflow YAML, navigate to the Harness IDP portal and click "Create" from the side-bar menu. Choose Workflow from the panel.
If you have a legacy Backstage YAML, you can still use it to create a Workflow. Harness will automatically convert it into the Harness-native Data Model format.
-
You will be redirected to the Visual View. You can switch to the YAML View using the toggle at the top of the screen. This allows you to directly edit the Workflow's YAML definition.
-
If you are using a legacy Backstage YAML, paste it into the YAML view. Harness will convert it into the Harness-native format automatically. You can then proceed to finalize and create the Workflow. Since the Visual and YAML views are live-synced, changes made in one view will reflect in the other.
-
You can configure your Workflow by editing the YAML directly, add inputs, backend actions, and outputs as needed. This allows you to fully customize the Workflow behavior. Learn more about the components of a Workflow and its YAML structure.
-
Define the scope of the Workflow in two ways: either switch to the Visual View and select the desired scope, or specify the projectIdentifier or orgIdentifier directly in the YAML to set the project or organization scope.
-
You now have two options for managing your Workflow configuration:
- Inline (default): Manage the Workflow YAML directly within Harness.
- Remote: Choose to store your Workflow YAML in a Git repository for version control, collaboration, and change tracking.
You can either use a Harness Code Repository or connect to a Third-party Git provider like GitHub or GitLab by selecting a Git connector, repository, branch, and YAML path.
The Git Experience is ideal for teams who prefer to manage Workflows as code, with full version control and Git-native workflows. The changes are reflected in both YAML and execution views, via a webhook which is automatically configured on the Git connector. Learn more in the Git Experience Journey documentation.
Note: YAML validation is automatically performed to ensure compatibility with the Harness-native Catalog YAML model. Any validation errors will be displayed in the Validation Logs.
- Once all details are complete, click "Create Workflow" to finalize and register your Workflow in the catalog.
Execute workflows
Once a Workflow is created, it can be executed from:
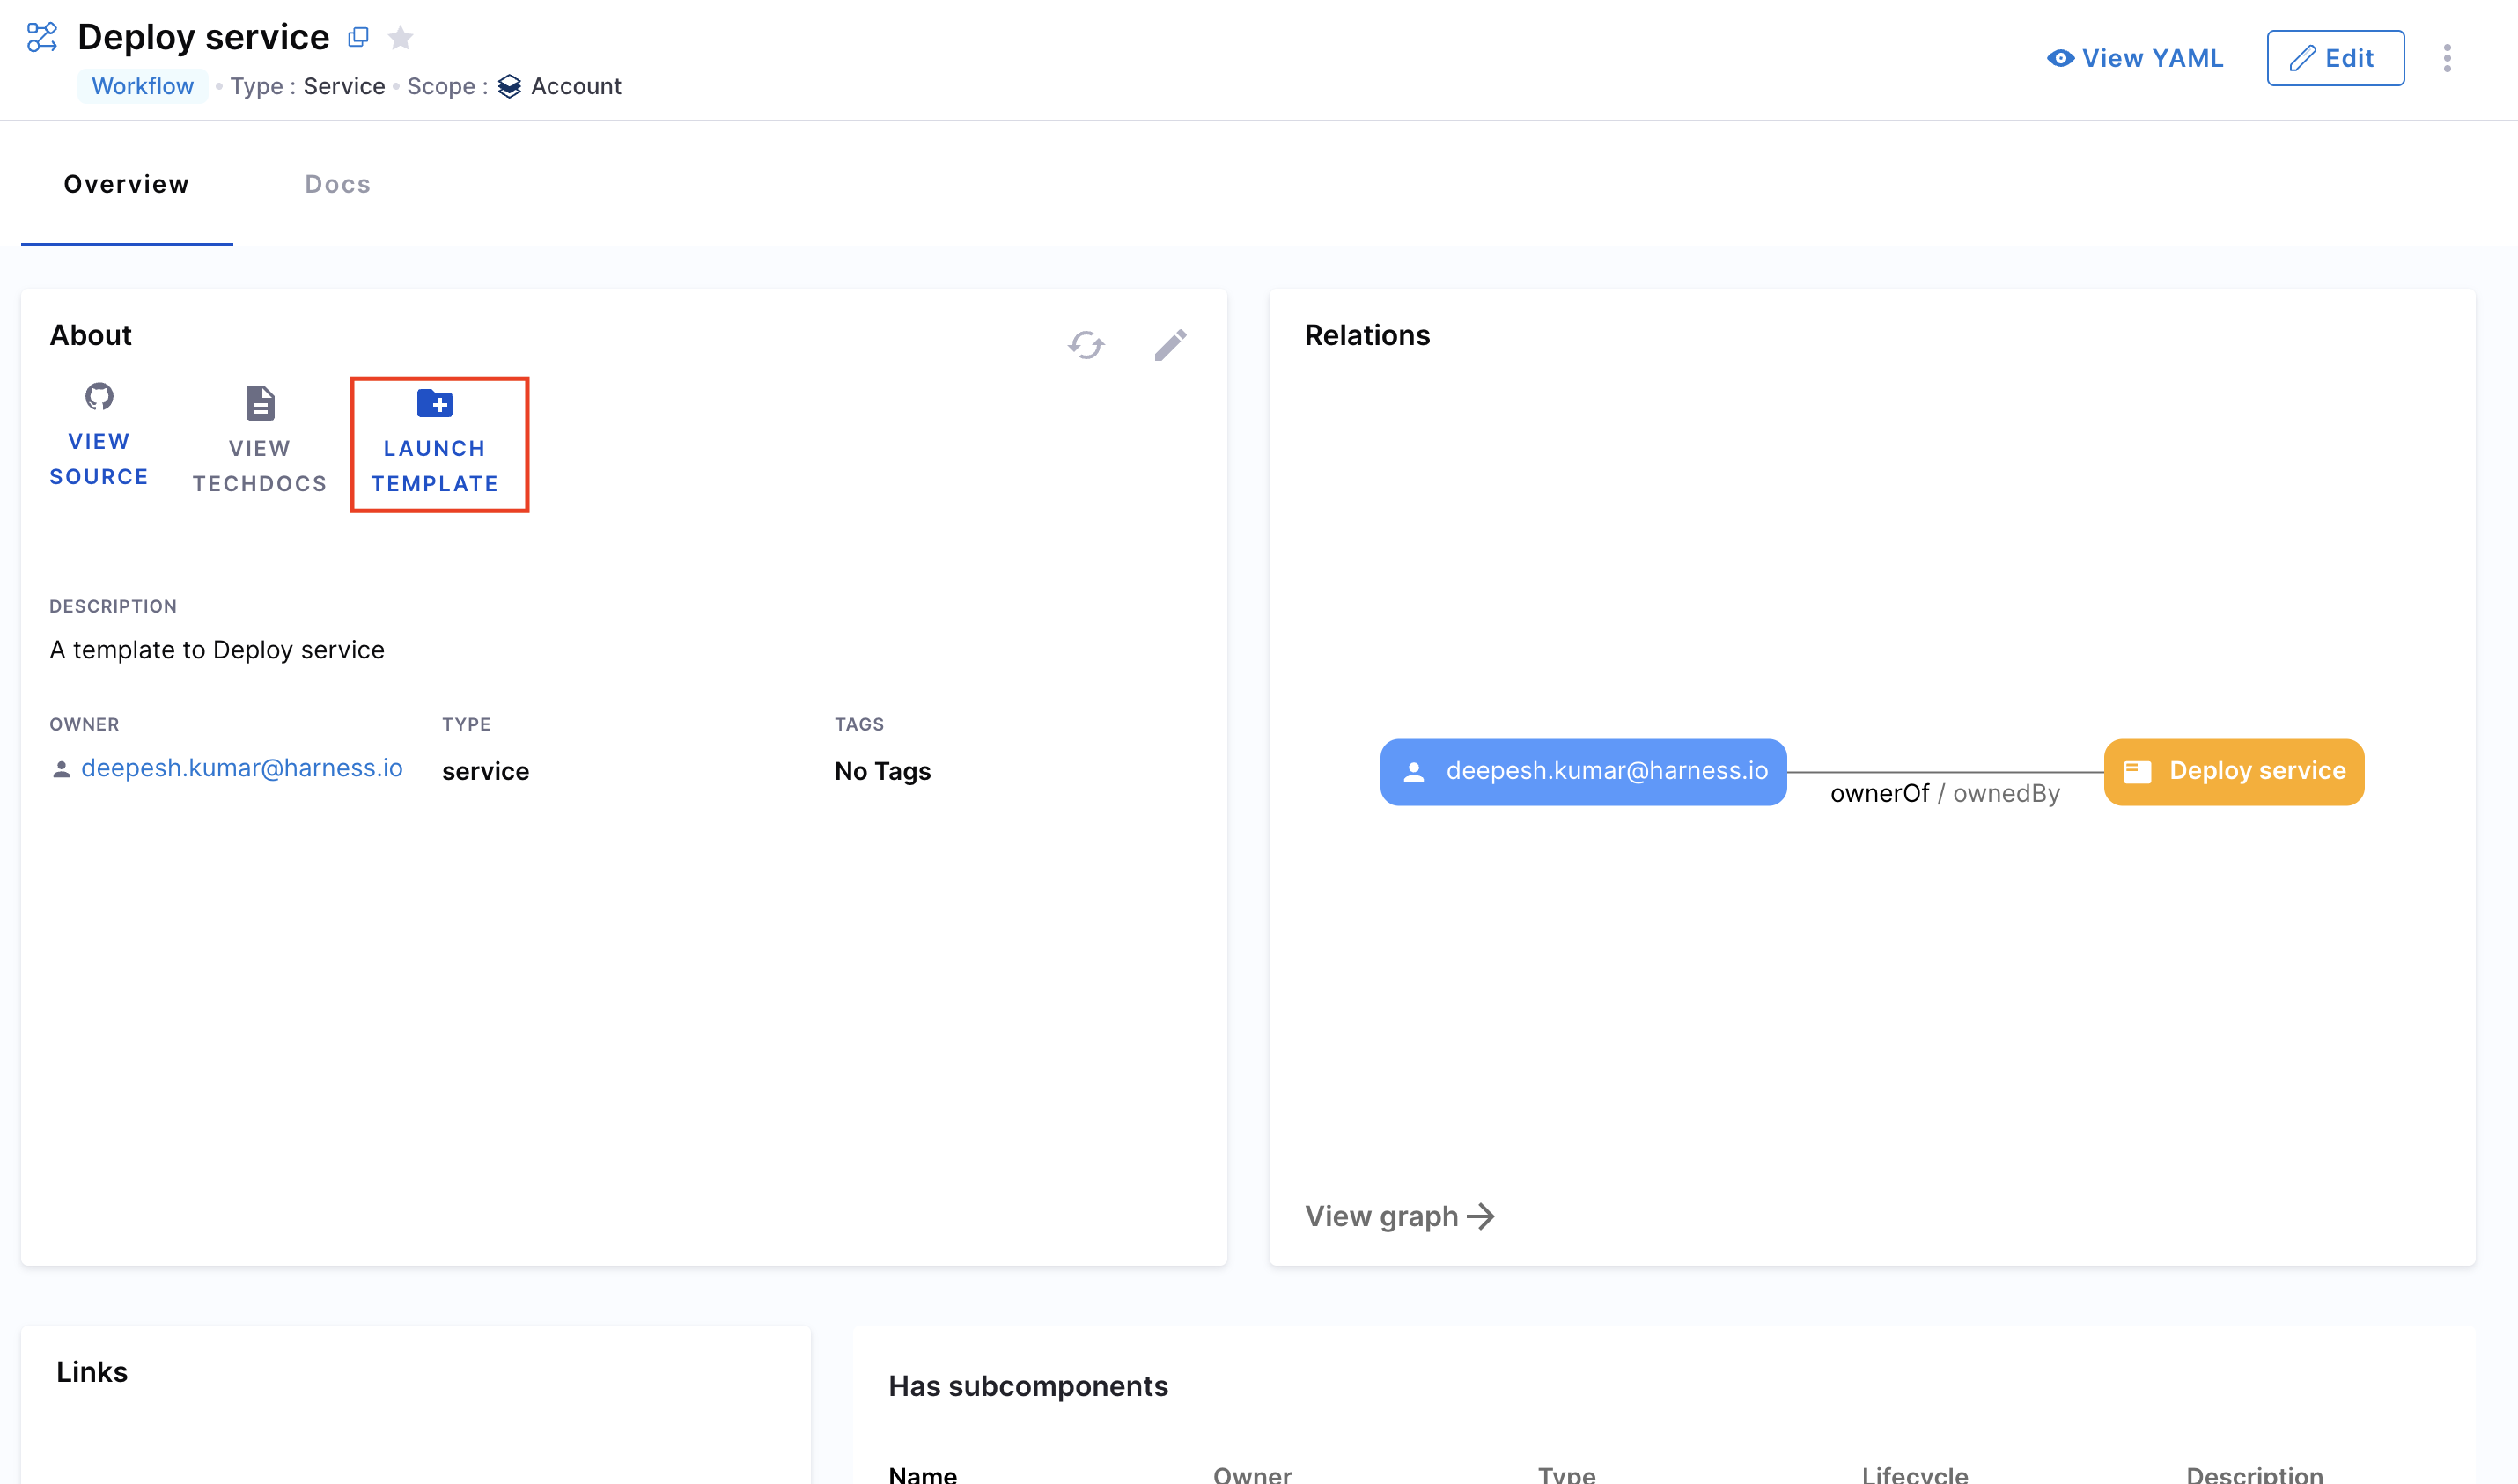
- The Catalog – Click the Workflow entry from the Catalog, then click Launch Template on the details page.
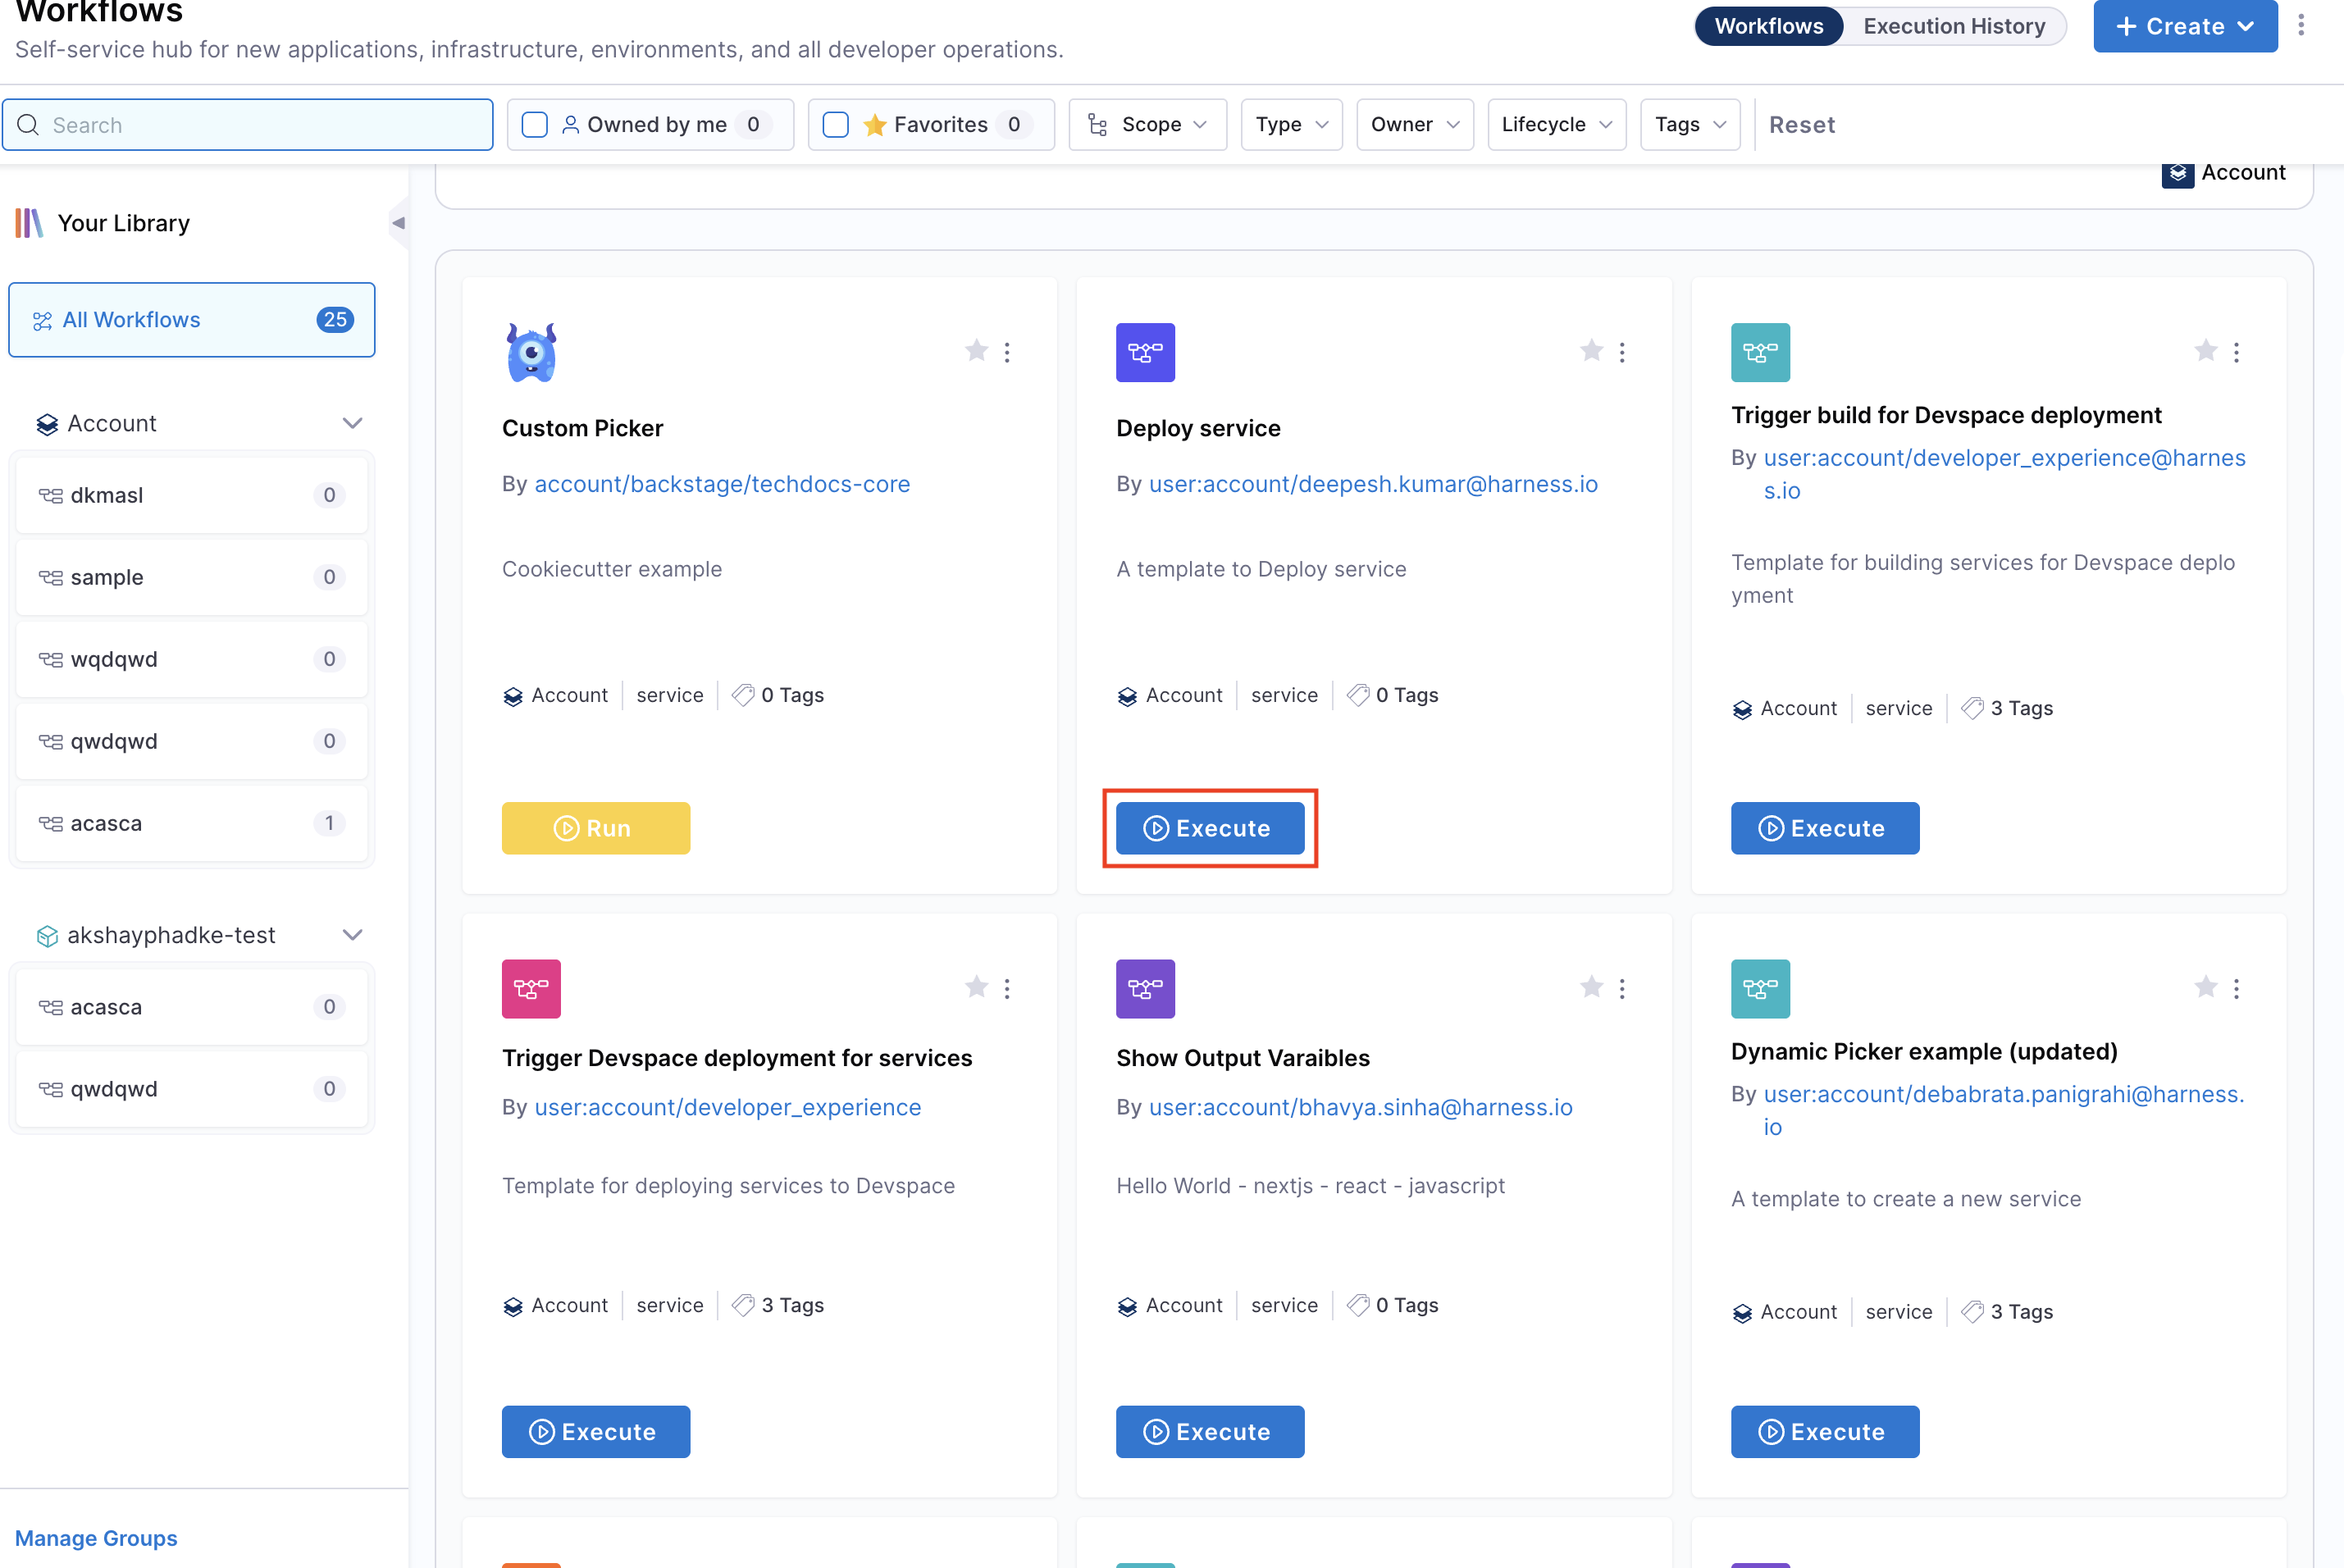
- The Workflows page – Locate the Workflow from the Workflows page and click Execute.
Execute workflows with different branches
When Workflows are stored in a Git repository, you can execute them from different branches. If you have created Workflows from multiple branches of the same repository, the branch selector feature enables you to switch between branches and execute the corresponding Workflow version.
How to execute Workflows from different branches:
- Navigate to the Workflows page.
- Locate and select the Workflow you want to execute.
- Use the branch selector dropdown to switch to your desired branch.
- If a Workflow exists for that specific branch, it will appear.
- Click Execute to run the Workflow from the selected branch.

Execution view
This feature is behind a feature flag IDP_WORKFLOW_EXECUTION_V2. Contact Harness Support to enable this feature flag.
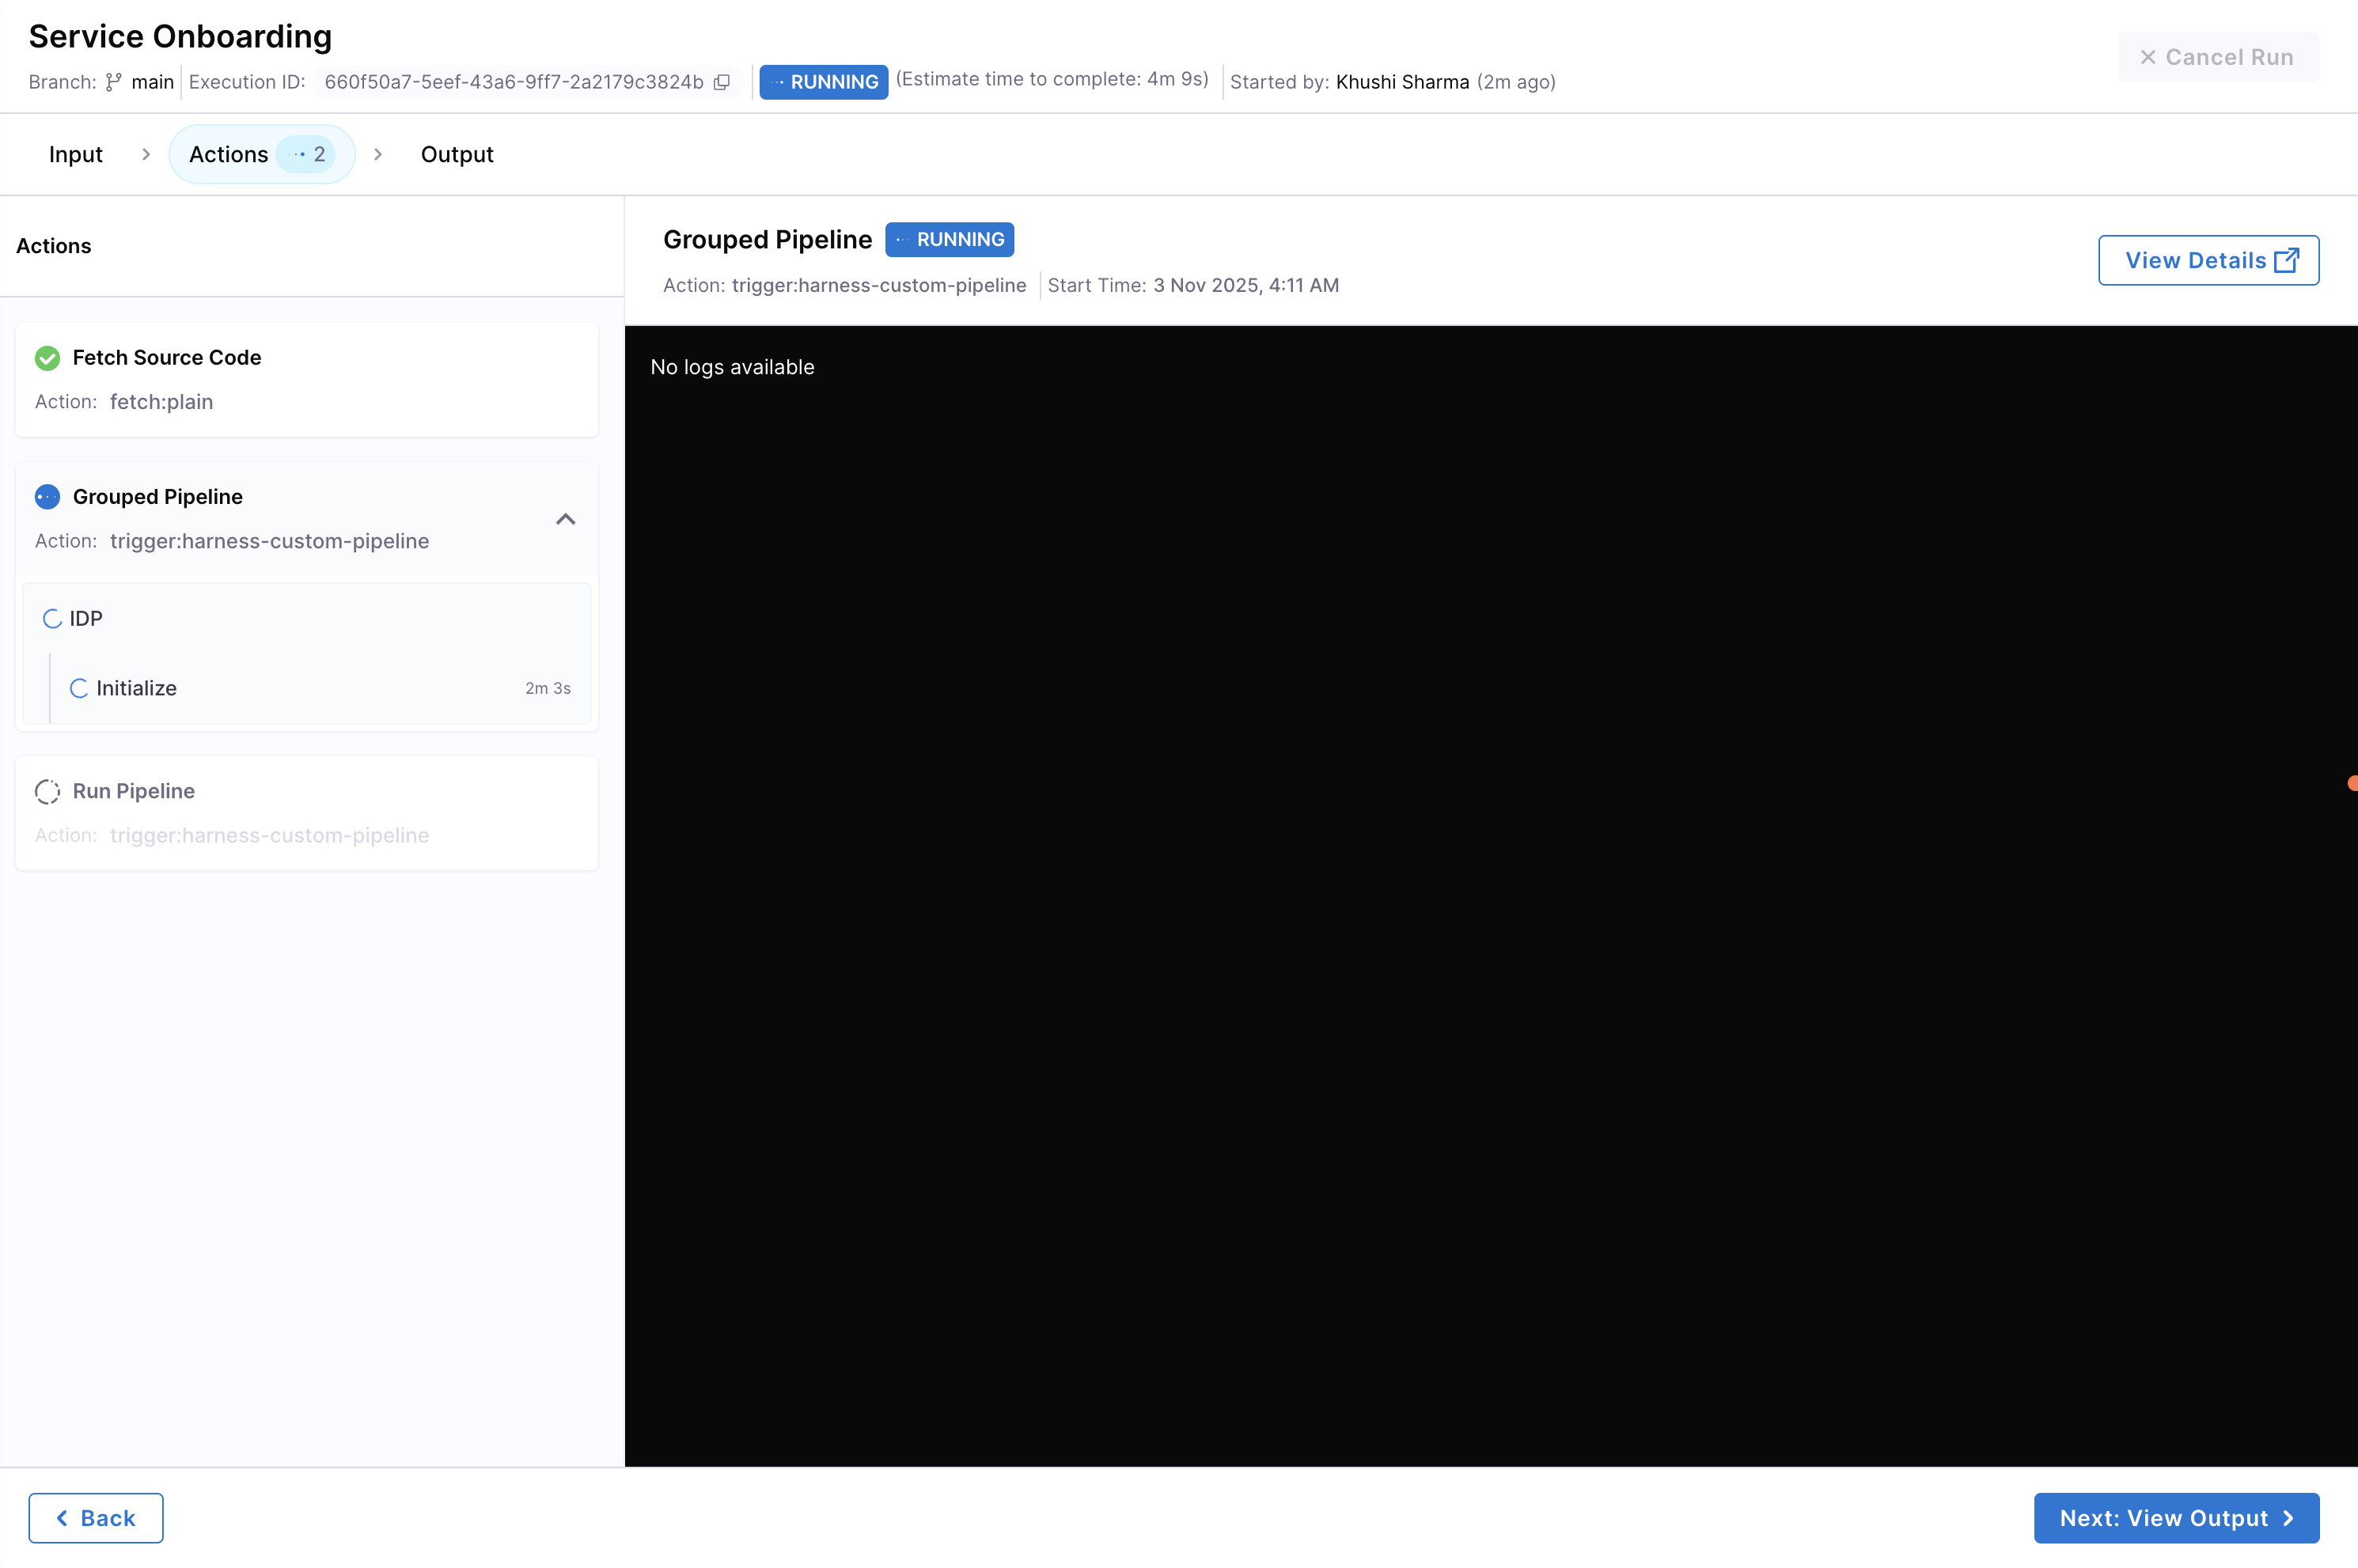
Once you execute a Workflow, you will be taken to the Workflow execution view where you can monitor the progress in real-time.
The top bar of the execution view displays key information about the Workflow run like:
- Branch: The branch from which the Workflow is being executed
- Execution ID: A unique identifier for this specific Workflow run
- Status: Current execution status (Running, Success, Failed)
- Estimated Time: Estimated time to complete the Workflow
- Started By: Details of the user who initiated the Workflow execution
The execution view is mainly organized into three tabs:
1. Inputs:
The Inputs tab displays all the details provided by the user when executing the Workflow. This includes all input parameters entered during Workflow execution.

2. Actions:
The Actions tab shows real-time status of all pipeline executions triggered by the Workflow. Here you can:
- View the status of each pipeline action (Running, Success, Failed).
- Access live logs for each action as they execute.
- Expand individual actions to see detailed execution logs.
- Click "View Details" in the top right corner to navigate directly to the pipeline execution in Harness.
To view pipeline logs and details, you must have the appropriate permissions and RBAC (Role-Based Access Control) configured in Harness. If you do not have the necessary permissions, you will not be able to access the pipeline execution details or logs.
3. Outputs:
The Outputs tab displays the results and outputs configured in the Workflow after execution completes. This includes:
- Success confirmation message
- Pipeline execution summary and reports
- Any output variables generated by the Workflow
- Links to pipeline details for further investigation

You can navigate between these tabs at any time during or after execution to monitor progress and review results.
You can cancel a running Workflow at any time by clicking the "Cancel Run" button in the top-right corner of the execution view. This will stop the Workflow execution and terminate any running pipeline actions.
Rerun failed workflows
When a Workflow execution fails at a specific stage in the pipeline, you can retry the execution from the failed stage instead of starting from scratch. This saves time and resources by resuming the Workflow from where it failed.
How to rerun a failed Workflow:
- Navigate to the Workflow execution view of the failed run.
- In the Actions tab, identify the failed pipeline stage.
- Click the Retry button from the side three dots menu to trigger the pipeline with a retry from the failed stage.
- The Workflow will resume execution from the point of failure, skipping any previously successful stages.
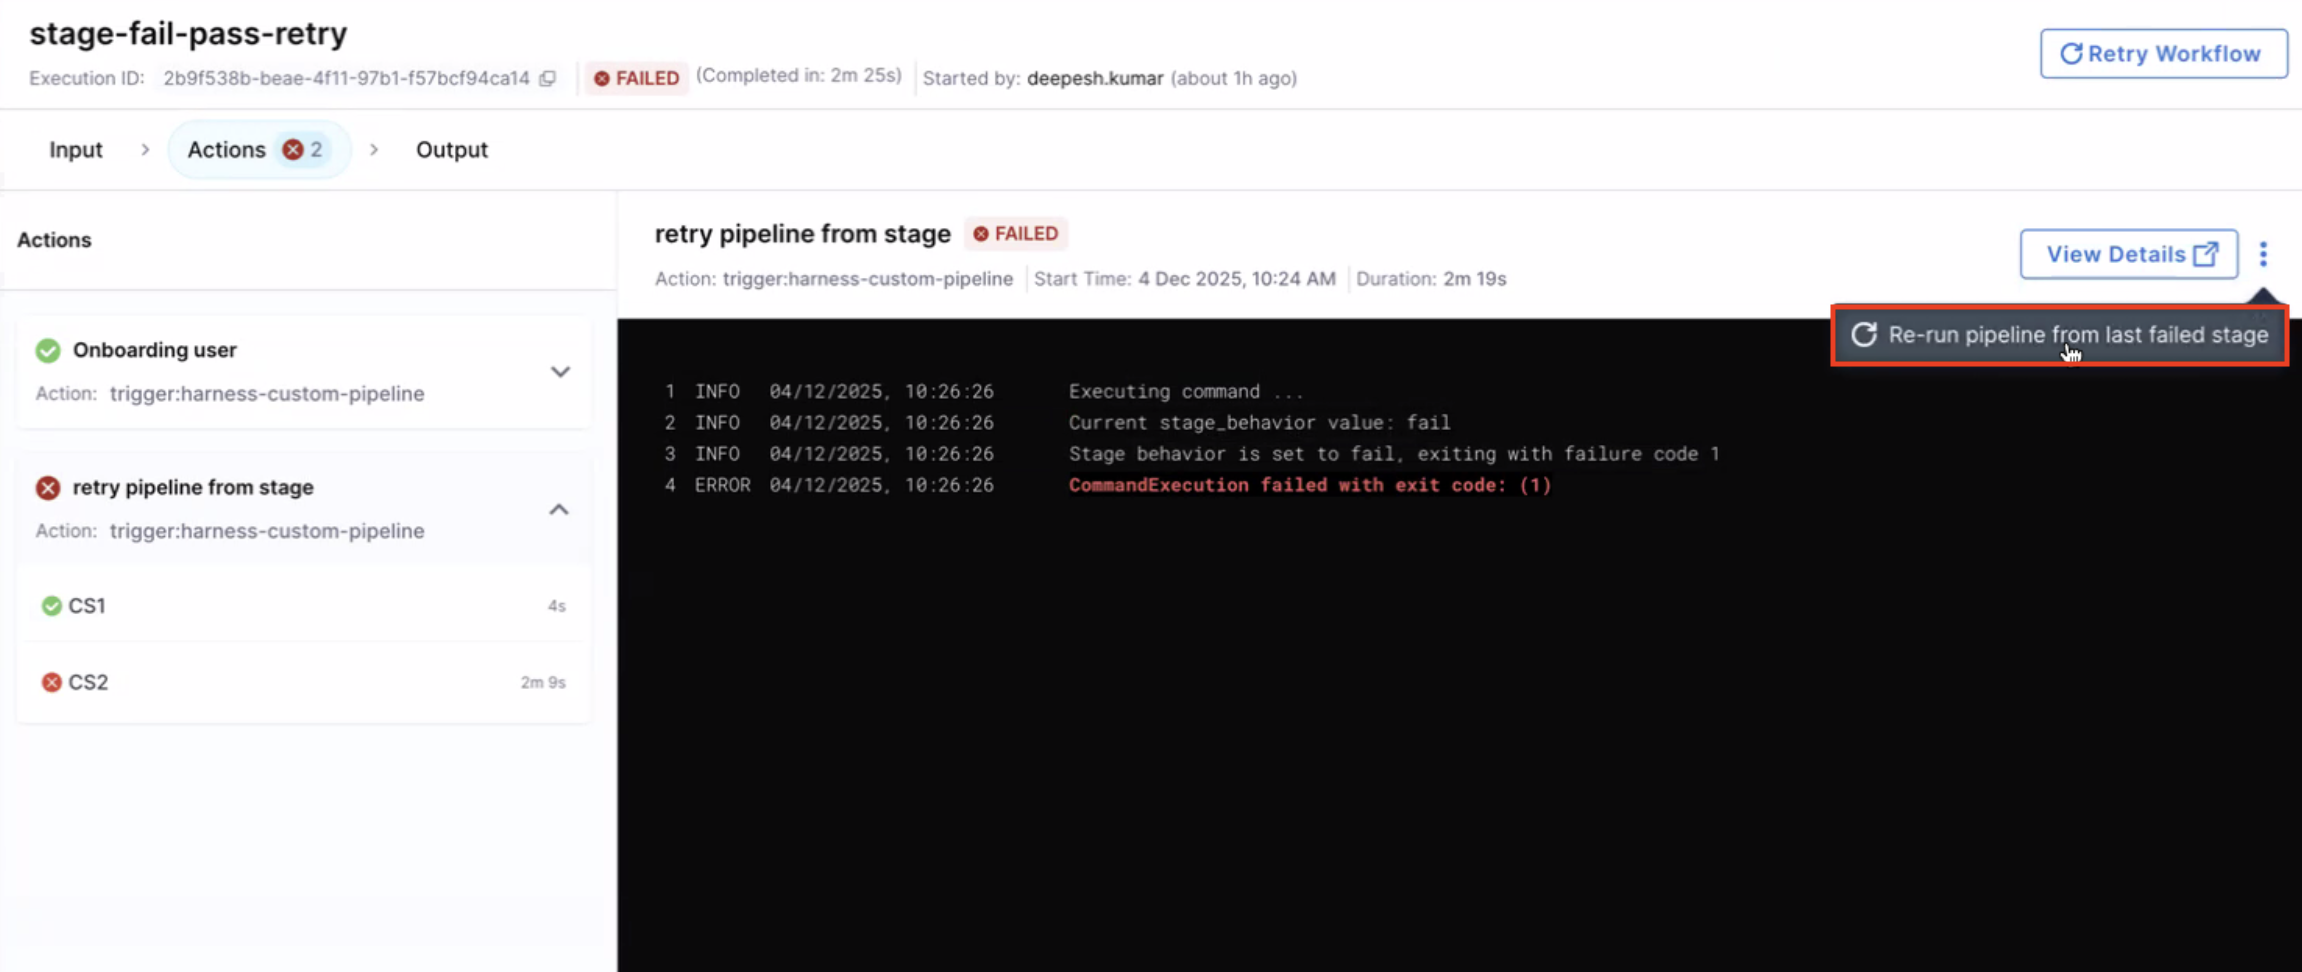
This feature is particularly useful for workflows that encounter temporary issues (e.g., network failures, transient API errors) or when you need to make quick fixes and rerun without repeating the entire workflow process.
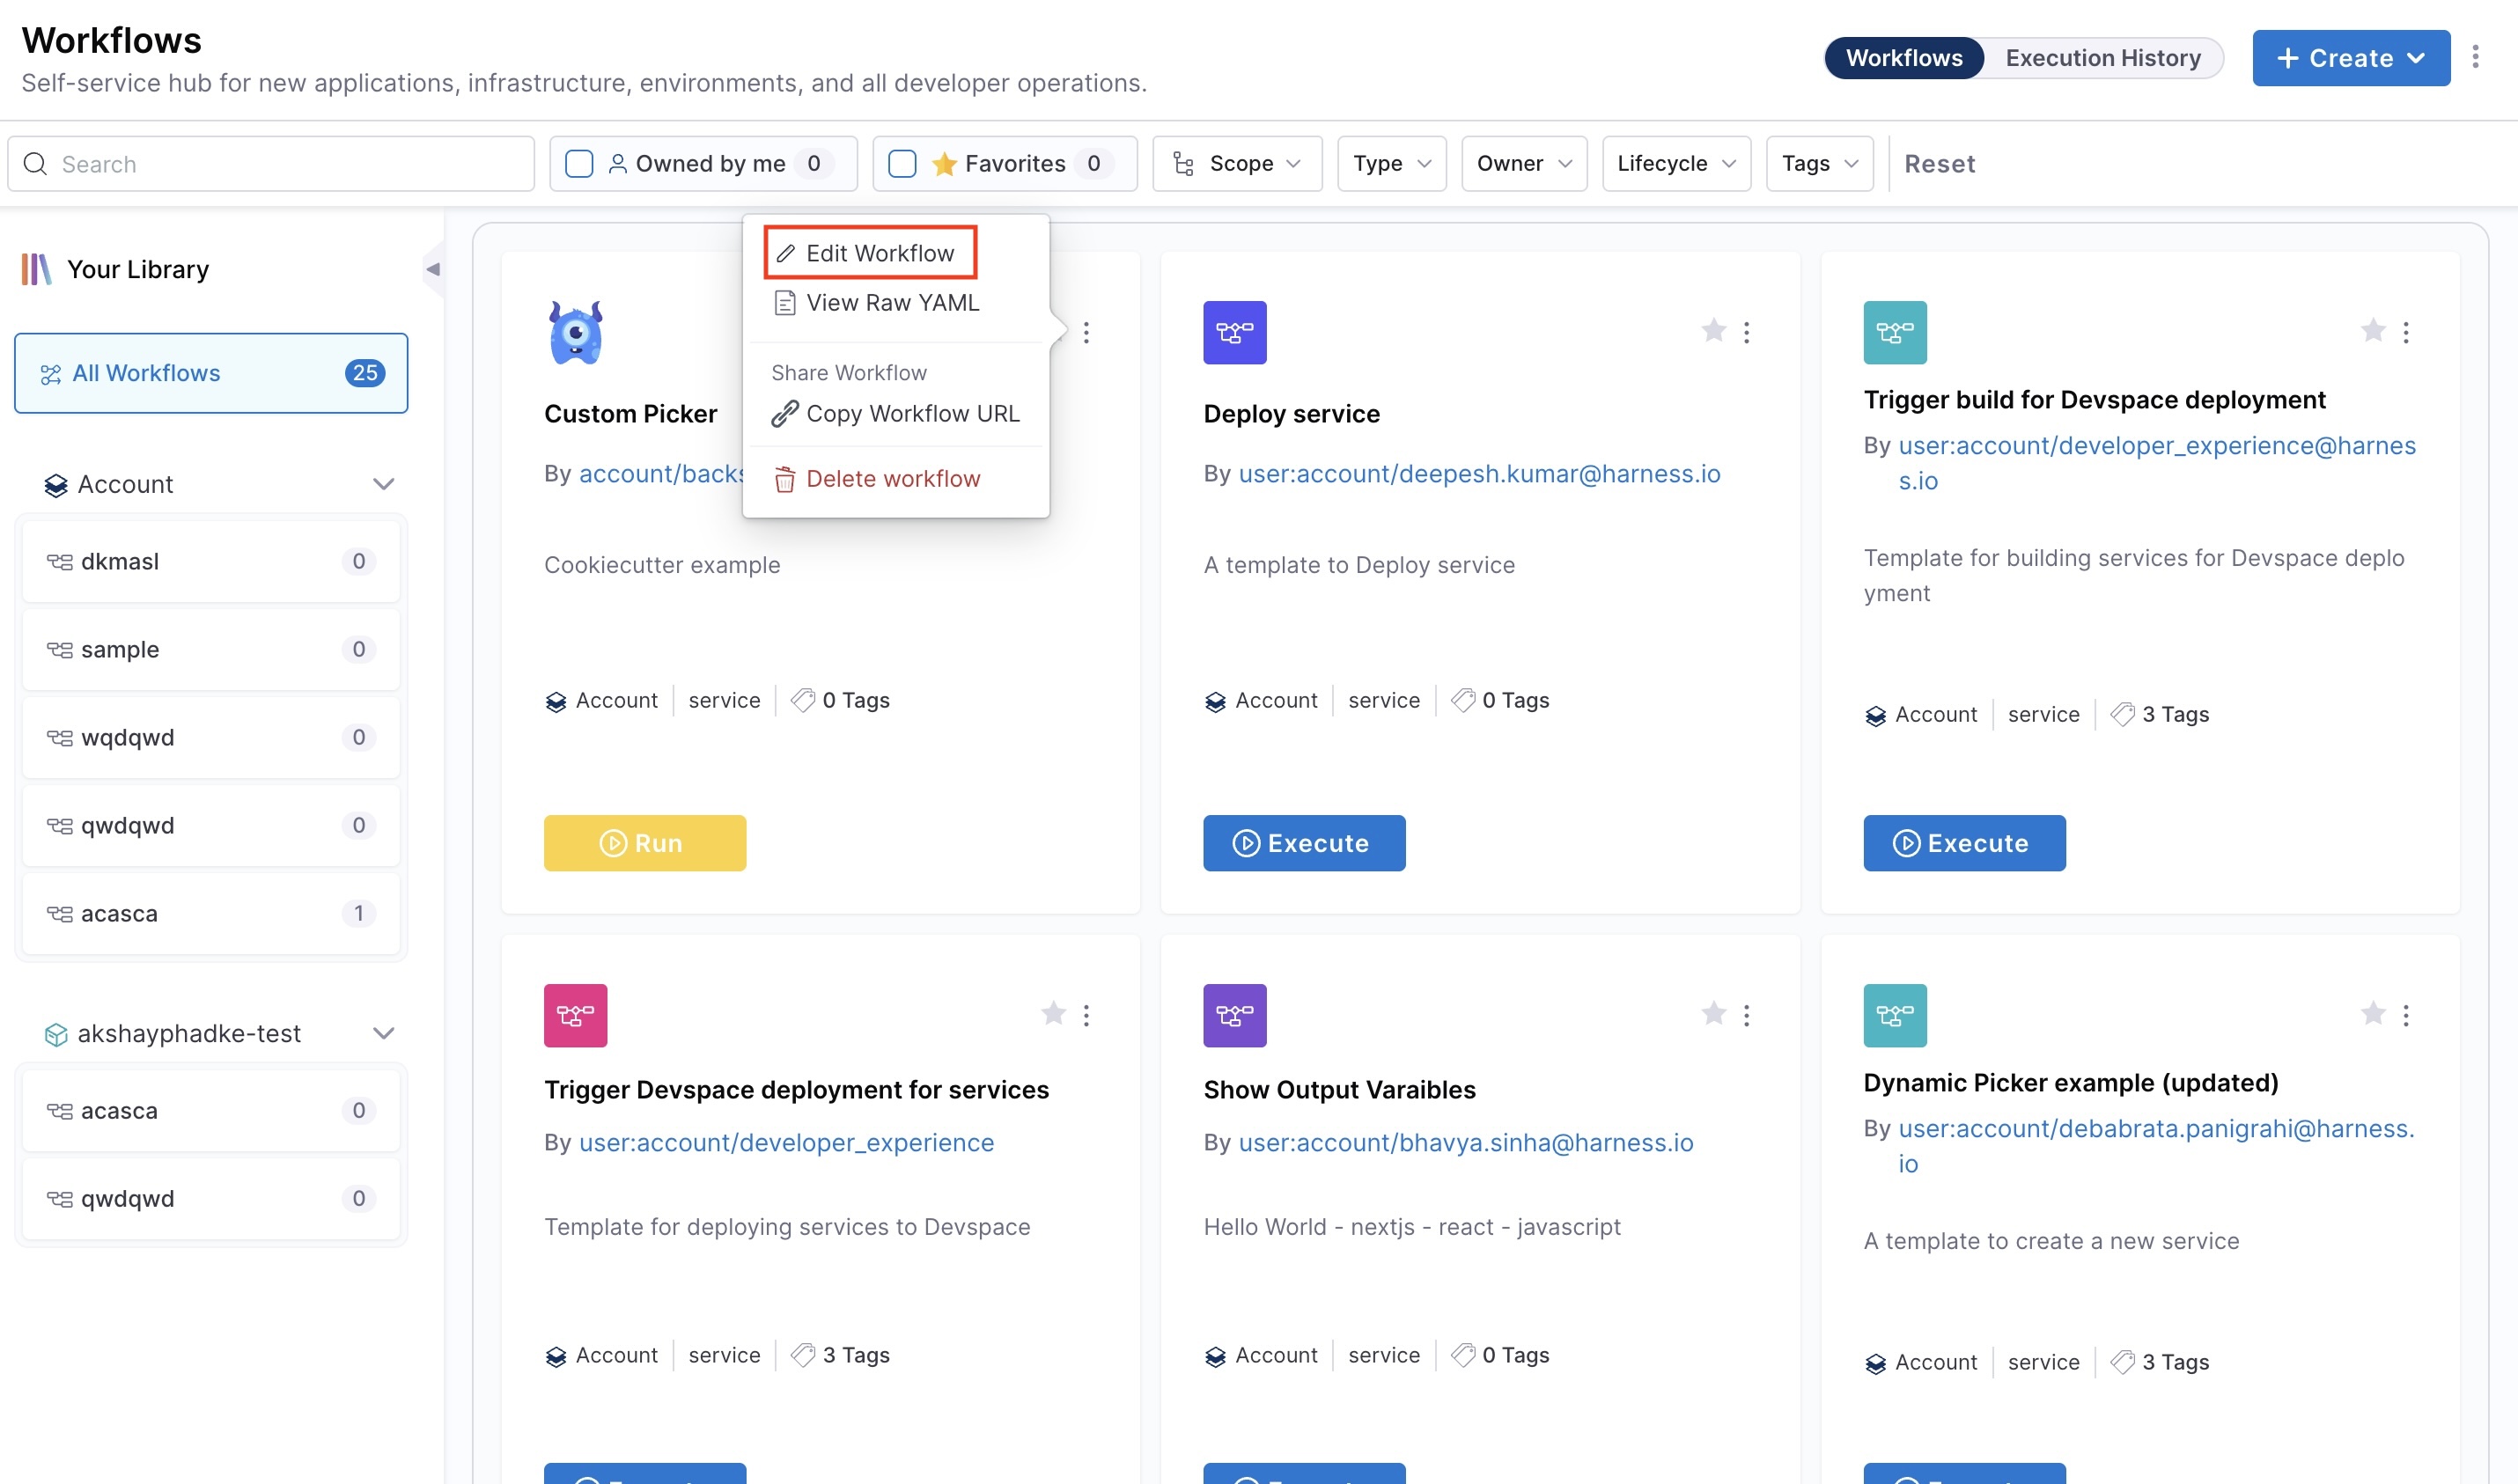
Edit workflows
- Go to the Workflows page.
- Click the three-dot menu on the Workflow you want to edit.
- Select Edit Workflow to open it in edit mode.
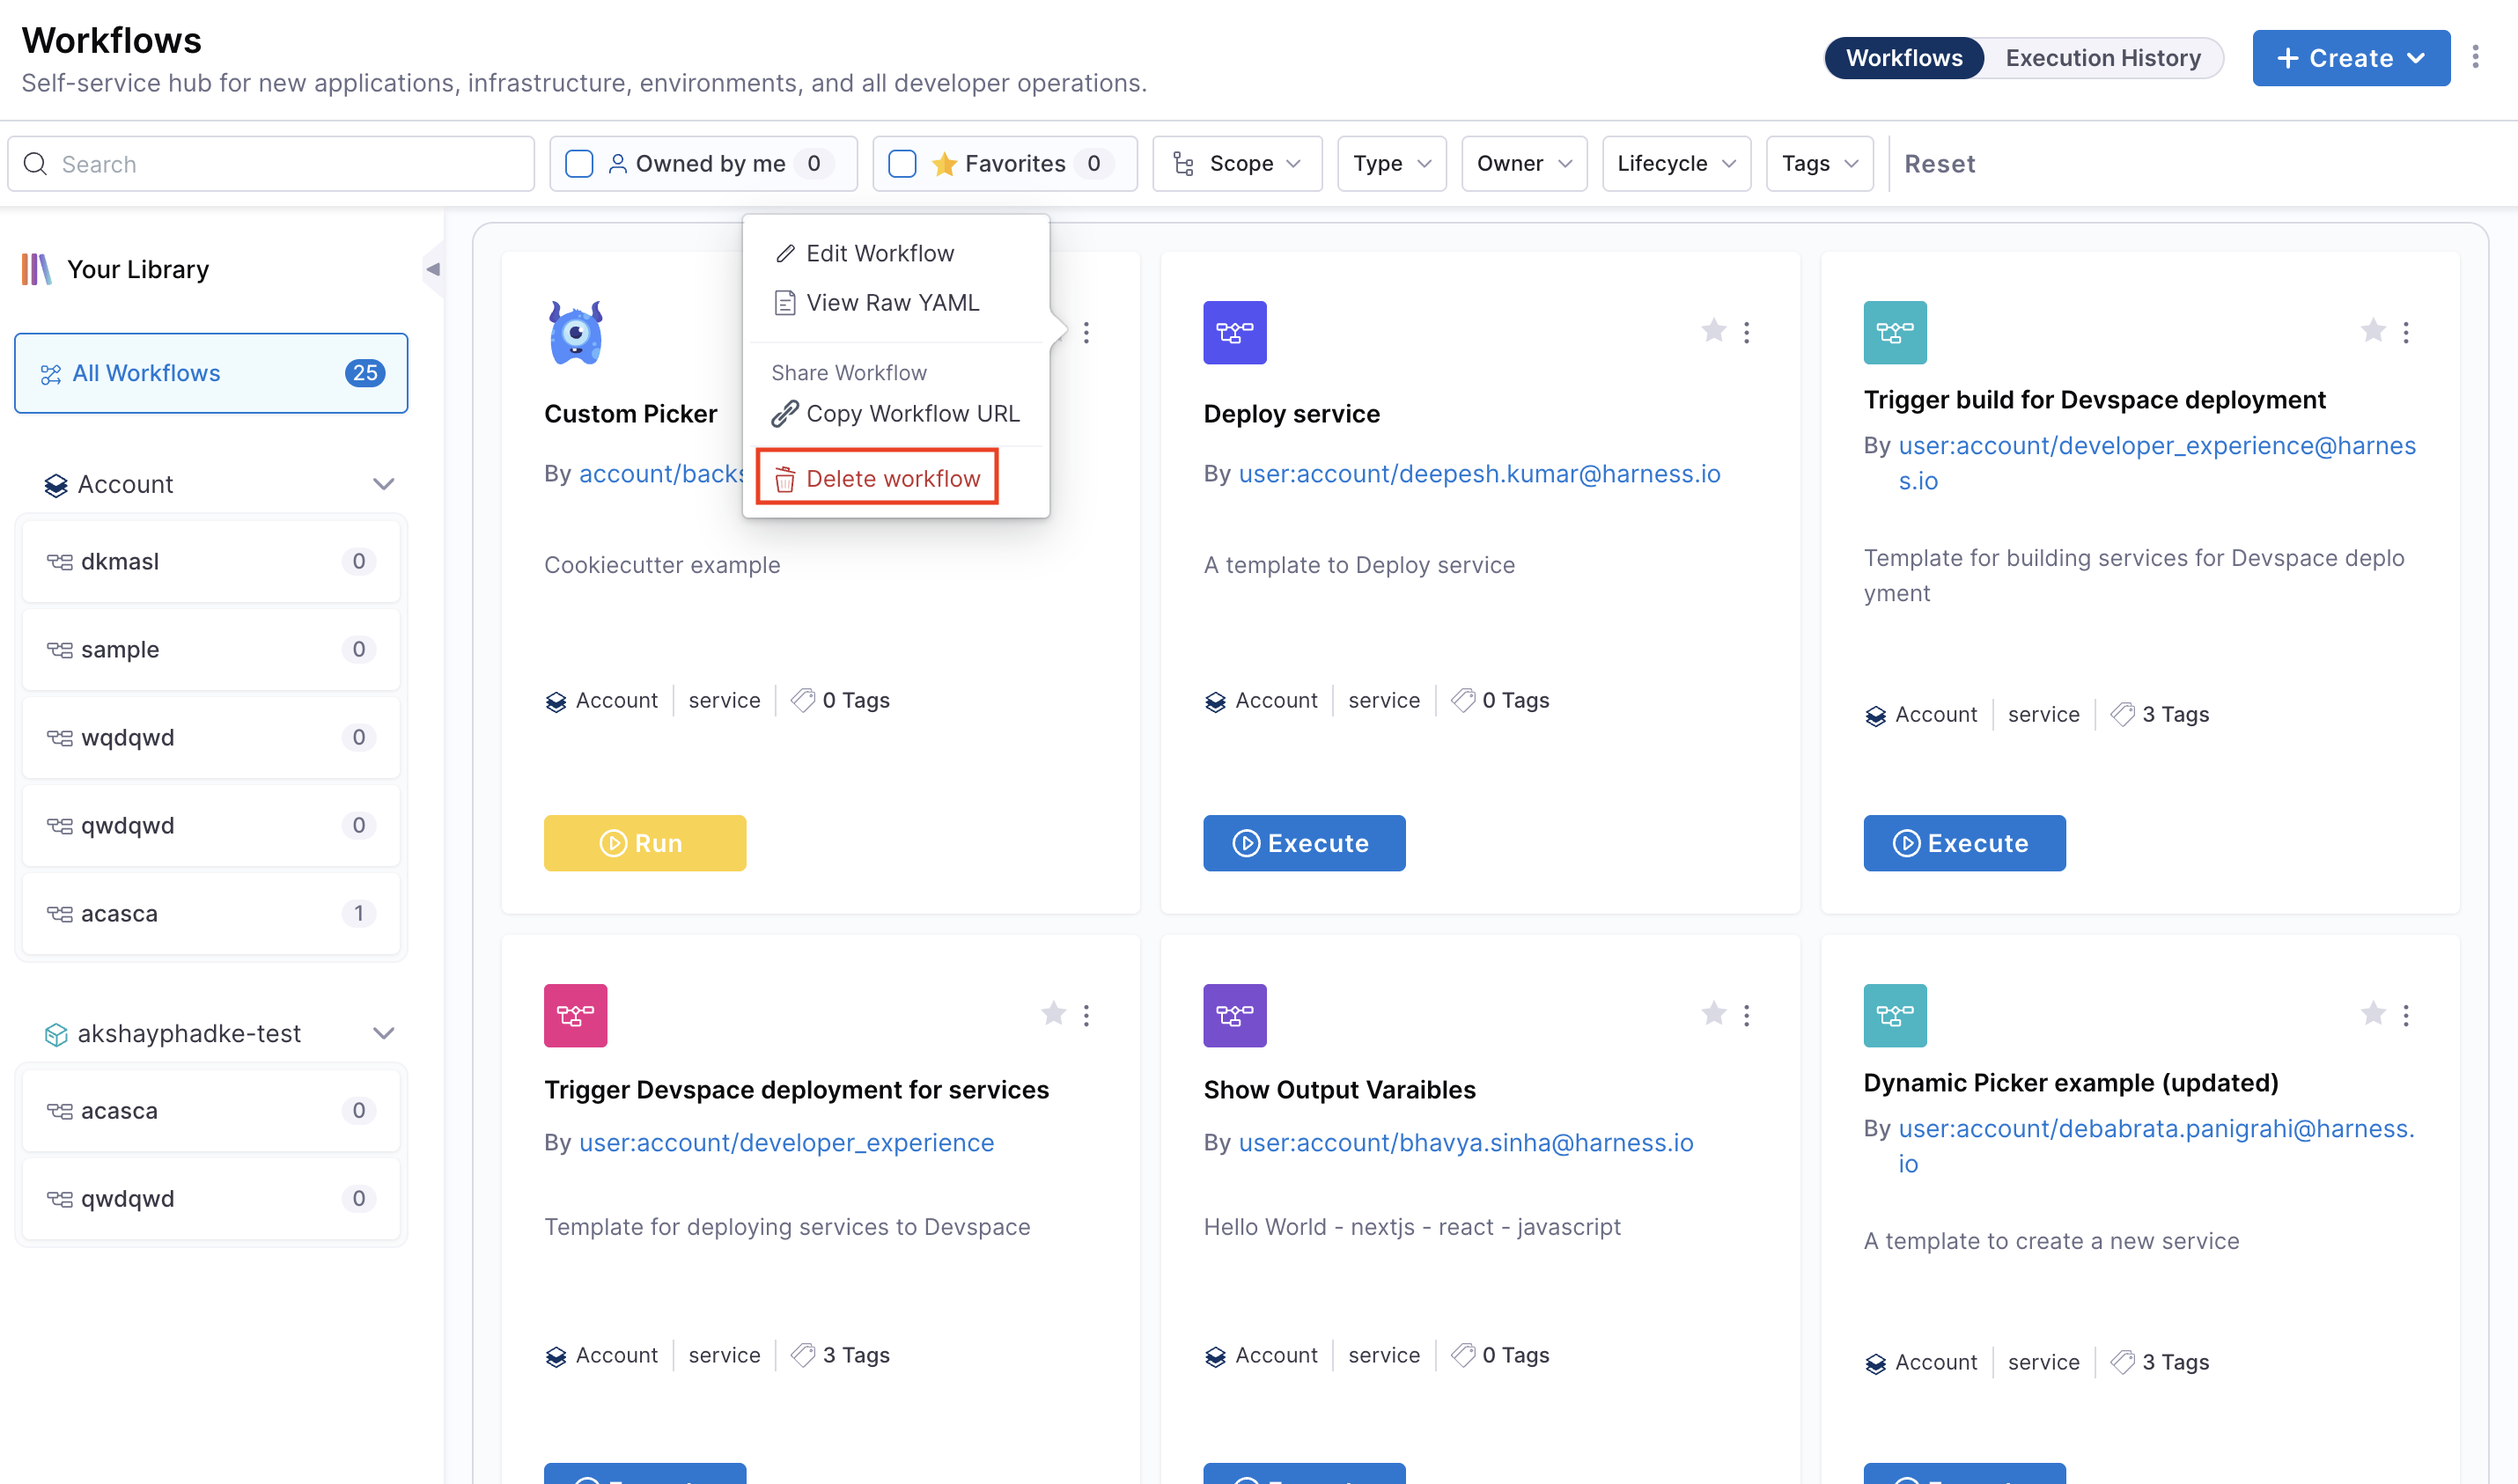
Delete workflows
- Go to the Workflows page.
- Click the three-dot menu on the Workflow you want to delete.
- Select Delete Workflow and confirm the action.
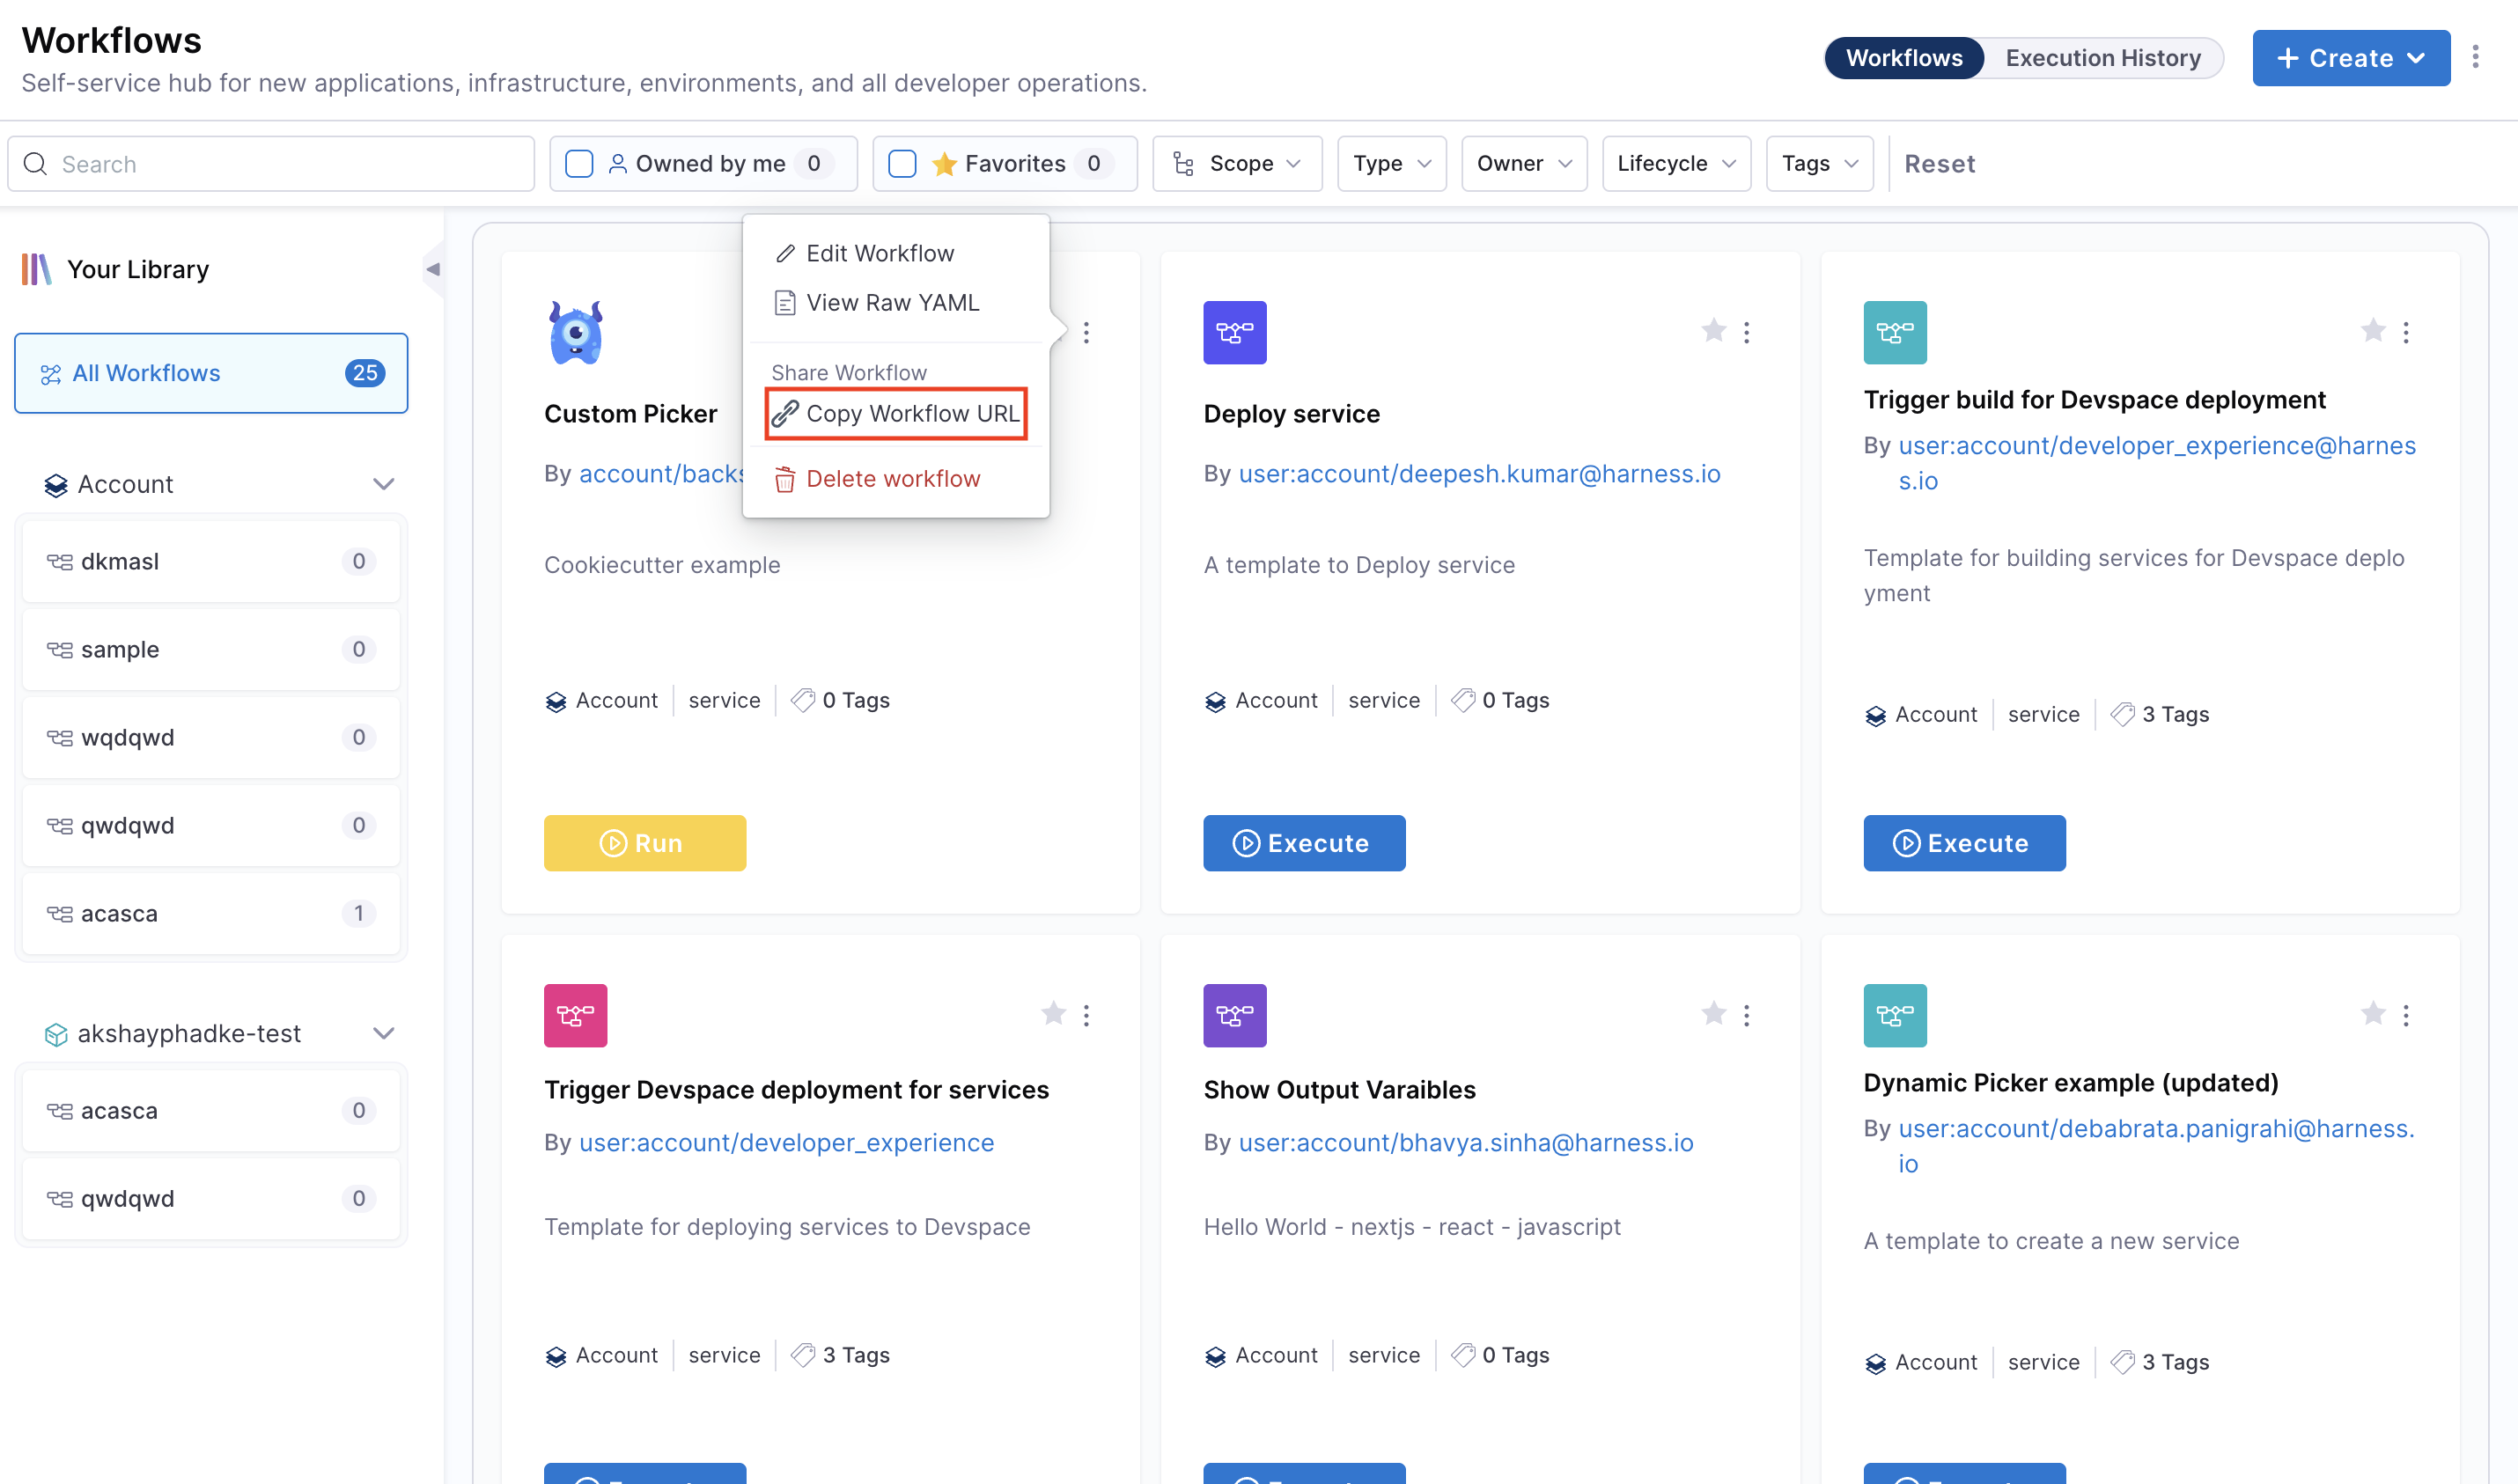
Share workflows
You can share Workflows by copying their direct URL:
- On the Workflows page, click the three-dot menu for the Workflow.
- Select Copy URL.
- Share the link, keeping in mind scope-level access and RBAC permissions.