Automate onboarding with Harness
Harness offers a first-class Terraform Provider to automate adoption and growth.
To use the Harness Terraform Provider, go to Harness' Terraform module in the HashiCorp Terraform Registry. Select Next Gen to see all the resources Harness supports for provisioning.
This topic uses a sample repository to explain the steps to automate onboarding using the Harness Terraform Provider.
Important
- To get started with the Harness provider, Harness recommends installing a delegate with Terraform CLI. You need the delegate to build out the automation pipelines to create the various resources.
- Harness recommends making changes using Git when using the Terraform Provider.
- Defining your resources like service, environment, infrastructure definition, etc. via Terraform is a one-way sync. By using Terraform, you define the object in Git. After you commit the change, a Harness pipeline provisions the resource to your account.
- Any changes you make via Git are propagated to the UI via this pipeline, which fetches the Terraform file definition for the resource.
- To avoid configuration mismatches, any changes you make in the UI must be reconciled and updated in the YAML.
- To prevent the editing and creation of resources in the Harness UI, use RBAC.
Product Demo
Install a delegate
-
Install a Kubernetes delegate. For steps to install a Kubernetes delegate, go to install delegate.
-
Download the YAML.
-
Modify the
INIT_SCRIPTsection in the YAML to include the following value:- name: INIT_SCRIPT
value: | ## Install Terraform Here, You can use the latest version, of Terraform.
curl -O -L https://releases.hashicorp.com/terraform/0.12.25/terraform_0.12.25_linux_amd64.zip
unzip terraform_0.12.25_linux_amd64.zip
mv ./terraform /usr/bin/
terraform --version
YAML sample
apiVersion: v1
kind: Namespace
metadata:
name: harness-delegate-ng
---
apiVersion: rbac.authorization.k8s.io/v1
kind: ClusterRoleBinding
metadata:
name: harness-delegate-ng-cluster-admin
subjects:
- kind: ServiceAccount
name: default
namespace: harness-delegate-ng
roleRef:
kind: ClusterRole
name: cluster-admin
apiGroup: rbac.authorization.k8s.io
---
apiVersion: v1
kind: Secret
metadata:
name: terraform-proxy
namespace: harness-delegate-ng
type: Opaque
data:
# Enter base64 encoded username and password, if needed
PROXY_USER: ""
PROXY_PASSWORD: ""
---
apiVersion: apps/v1
kind: StatefulSet
metadata:
labels:
harness.io/name: terraform
name: terraform
namespace: harness-delegate-ng
spec:
replicas: 1
podManagementPolicy: Parallel
selector:
matchLabels:
harness.io/name: terraform
serviceName: ""
template:
metadata:
labels:
harness.io/name: terraform
spec:
containers:
- image: harness/delegate:latest
imagePullPolicy: Always
name: harness-delegate-instance
ports:
- containerPort: 8080
resources:
limits:
memory: "2048Mi"
requests:
cpu: "0.5"
memory: "2048Mi"
readinessProbe:
exec:
command:
- test
- -s
- delegate.log
initialDelaySeconds: 20
periodSeconds: 10
livenessProbe:
exec:
command:
- bash
- -c
- '[[ -e /opt/harness-delegate/msg/data/watcher-data && $(($(date +%s000) - $(grep heartbeat /opt/harness-delegate/msg/data/watcher-data | cut -d ":" -f 2 | cut -d "," -f 1))) -lt 300000 ]]'
initialDelaySeconds: 240
periodSeconds: 10
failureThreshold: 2
env:
- name: JAVA_OPTS
value: "-Xms64M"
- name: ACCOUNT_ID
value: <YOUR ACCOUNT ID> ## Your Account ID will be generated here
- name: MANAGER_HOST_AND_PORT
value: https://app.harness.io
- name: DELEGATE_NAME
value: terraform
- name: DELEGATE_TYPE
value: "KUBERNETES"
- name: DELEGATE_NAMESPACE
valueFrom:
fieldRef:
fieldPath: metadata.namespace
- name: INIT_SCRIPT
       value: | ## Install Terraform Here, You can use the latest version, of Terraform.
             curl -O -L  https://releases.hashicorp.com/terraform/0.12.25/terraform_0.12.25_linux_amd64.zip
             unzip terraform_0.12.25_linux_amd64.zip
             mv ./terraform /usr/bin/
             terraform --version
- name: DELEGATE_DESCRIPTION
value: ""
- name: DELEGATE_TAGS
value: ""
- name: NEXT_GEN
value: "true"
- name: DELEGATE_TOKEN
value: <YOUR DELEGATE TOKEN> ## Your Generated Delegate token will go here
- name: WATCHER_STORAGE_URL
value: https://app.harness.io/public/prod/premium/watchers
- name: HELM_DESIRED_VERSION
value: ""
- name: PROXY_HOST
value: ""
- name: PROXY_PORT
value: ""
- name: PROXY_SCHEME
value: ""
- name: NO_PROXY
value: ""
- name: PROXY_MANAGER
value: "true"
- name: PROXY_USER
valueFrom:
secretKeyRef:
name: terraform-proxy
key: PROXY_USER
- name: PROXY_PASSWORD
valueFrom:
secretKeyRef:
name: terraform-proxy
key: PROXY_PASSWORD
- name: GRPC_SERVICE_ENABLED
value: "true"
- name: GRPC_SERVICE_CONNECTOR_PORT
value: "8080"
restartPolicy: Always
-
After you modify the delegate YAML, connect to the Kubernetes cluster to install. To do this, run the following command:
kubectl apply -f harness-delegate.yaml -
Run the following command to verify if the Terraform CLI is successfully installed:
kubectl logs <HARNESS_DELEGATE_POD_NAME> -n harness-delegate-ngTo see if the CLI is installed successfully, search
Terraform.
Set up a GitHub repo
-
You can use an existing repo to manage the Harness configuration or create a new one. For more information on creating a GitHub Repo, go to Adding a local repository to GitHub using Git.
Harness recommends creating a GitHub Repo to store and manage the Harness configuration.
-
Harness recommends the following folder structure to manage your configurations:
 service/
 -- backend-service.tf
 -- frontend-service.tf
 -- transformer.tf

 environments/
 -- dev.tf
 -- qa.tf
 -- prod.tf

 infrastructure/
 -- dev_k8s.tf
 -- qa_k8s.tf
 -- prod_k8s.tf
Manage the automation pipeline
Harness recommends storing the automation pipeline to create and manage resources in a common project that many teams can access. You can create a project called Onboarding and users can leverage this to run the pipeline to create a service, environment, infrastructure definition, secret, etc. Harness lets you manage pipelines in Git via the Git experience. This lets you maintain all your pipeline configurations in Git.
Alternatively you can create pipeline templates that teams can use in their projects. This lets a central team manage the onboarding processes and distribute them to the application teams to leverage and onboard.
Set up pipeline
This section explains the steps to set up a sample pipeline.
-
Create a pipeline.
-
Create a trigger for a Git based source.
-
Create the terraform resource file of a Harness object.
-
Commit the Harness terraform resource object (service, environment, infrastructure, etc.) in GitHub.
-
Watch the pipeline execute based on the trigger.
-
In your Harness account, look for the resource that was configured to be created.
Build the pipeline
For detailed steps to build the pipeline, go to Kubernetes deployment tutorial.
Configure pipeline stages
To configure the stages for your pipeline, go to the following:
The Terraform Plan step fetches the terraform resource from Git. Harness then initiates a terraform plan on the files collected.
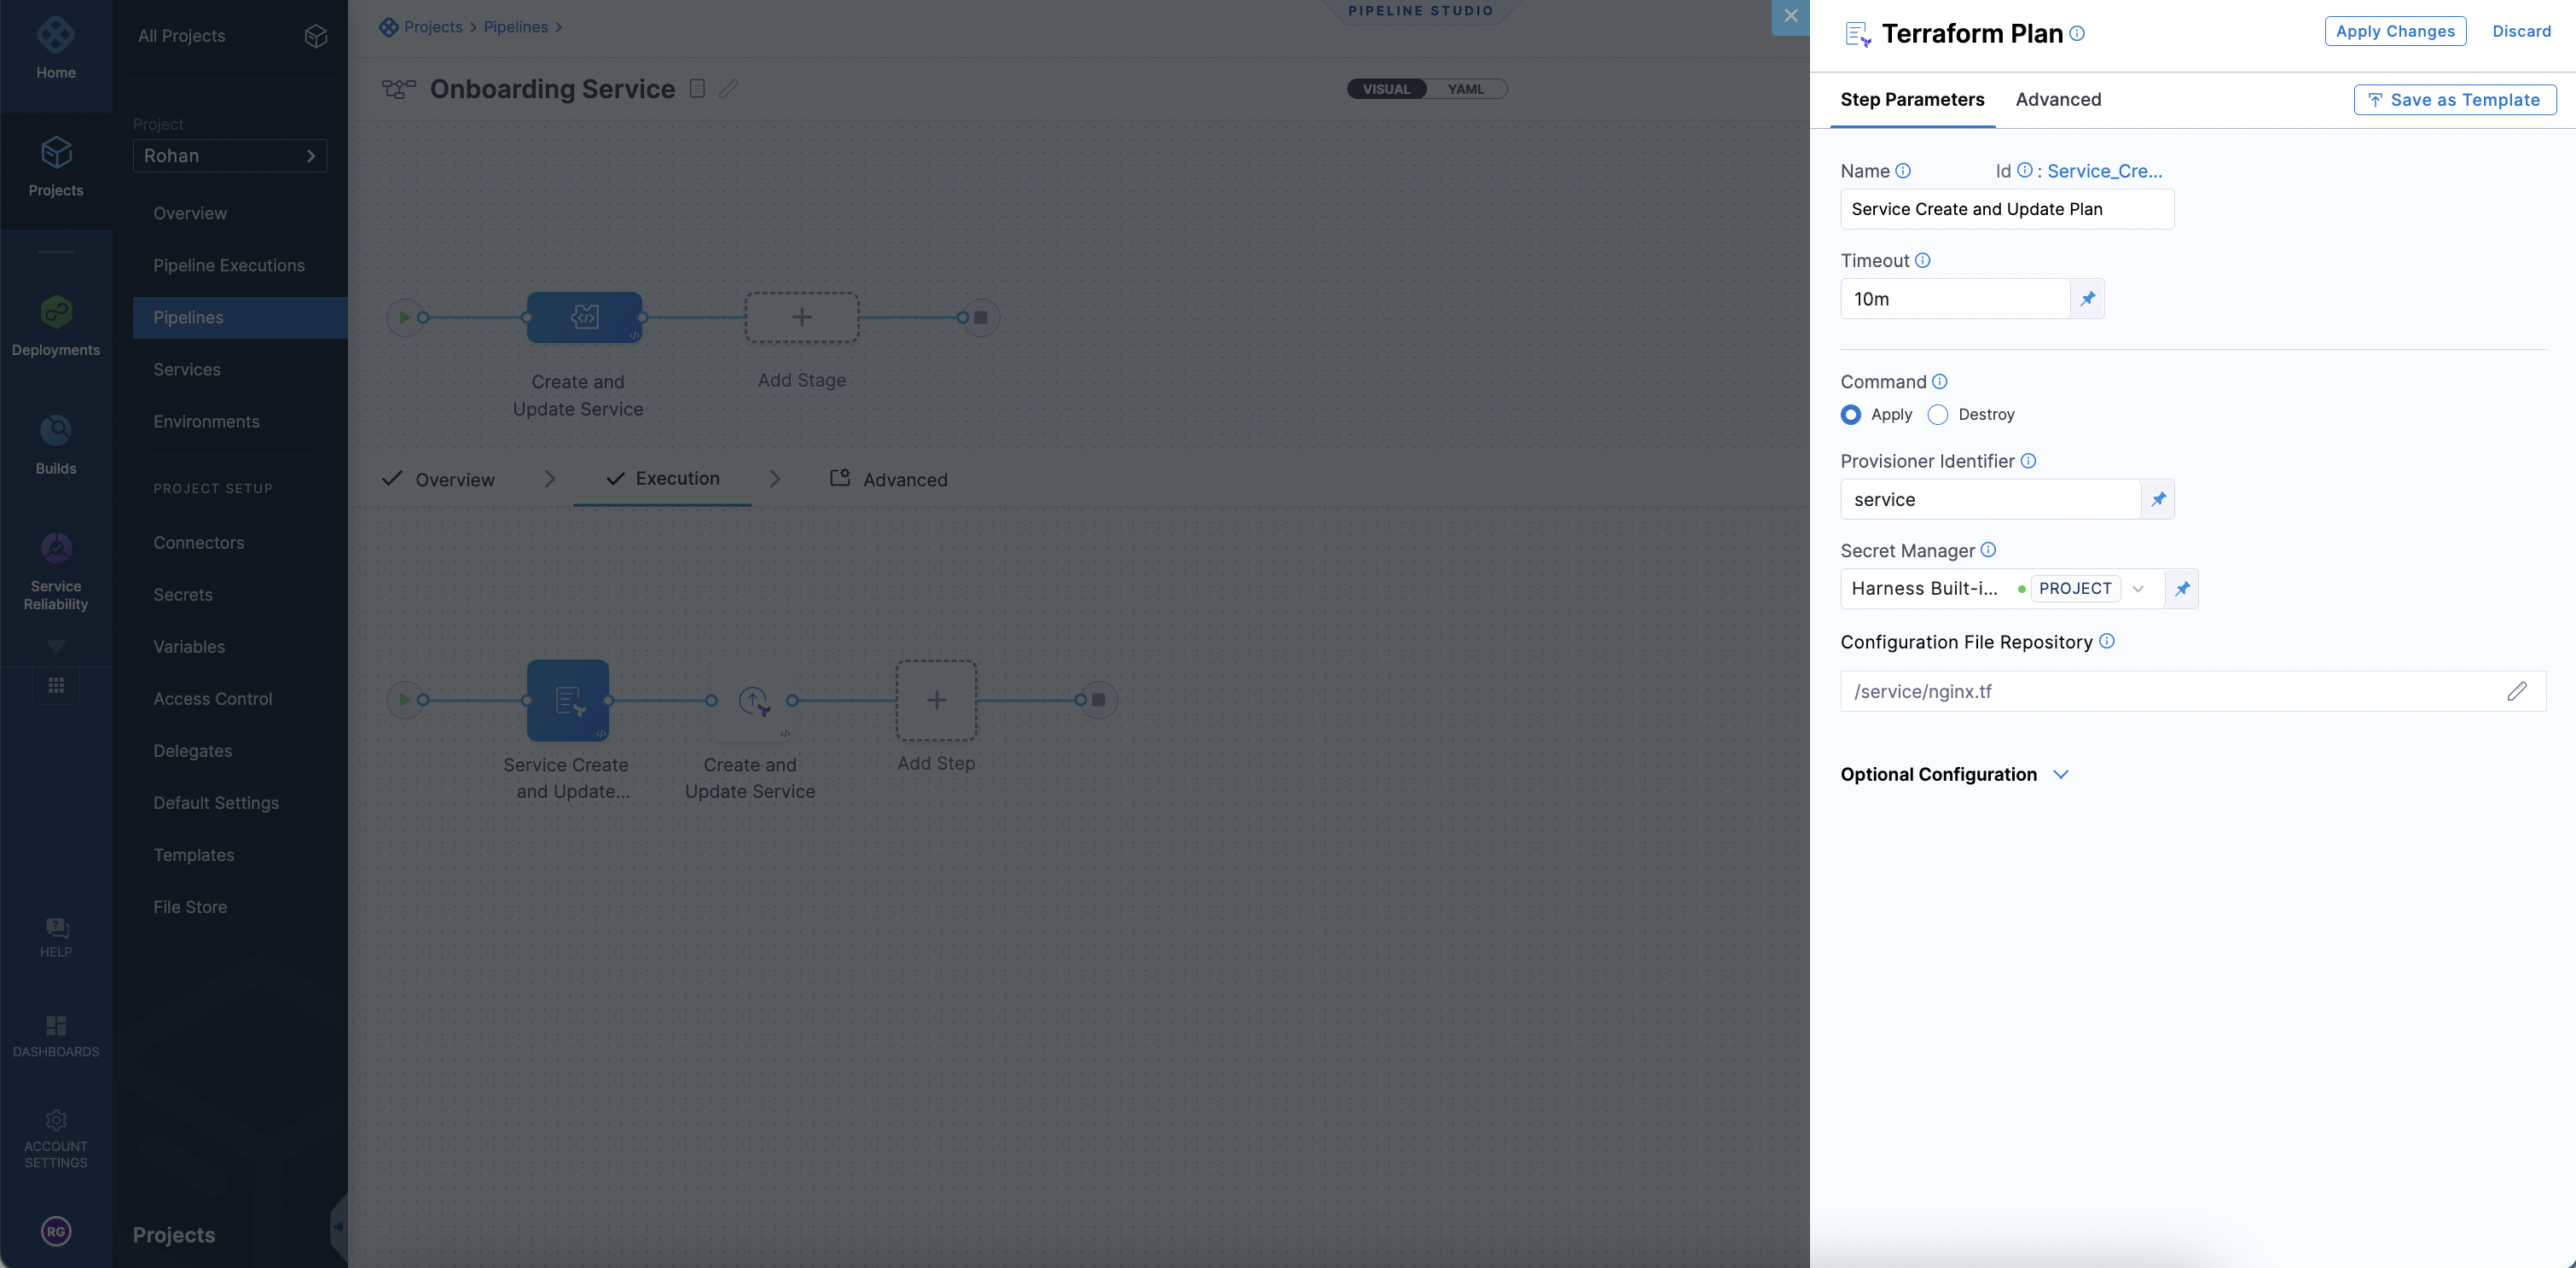
Harness passes the terraform plan that was generated based on the Harness Terraform resource file and then to the Terraform Apply step. The Terraform Apply step can inherit the plan and create or update the service resource by selecting Inherit from Plan.
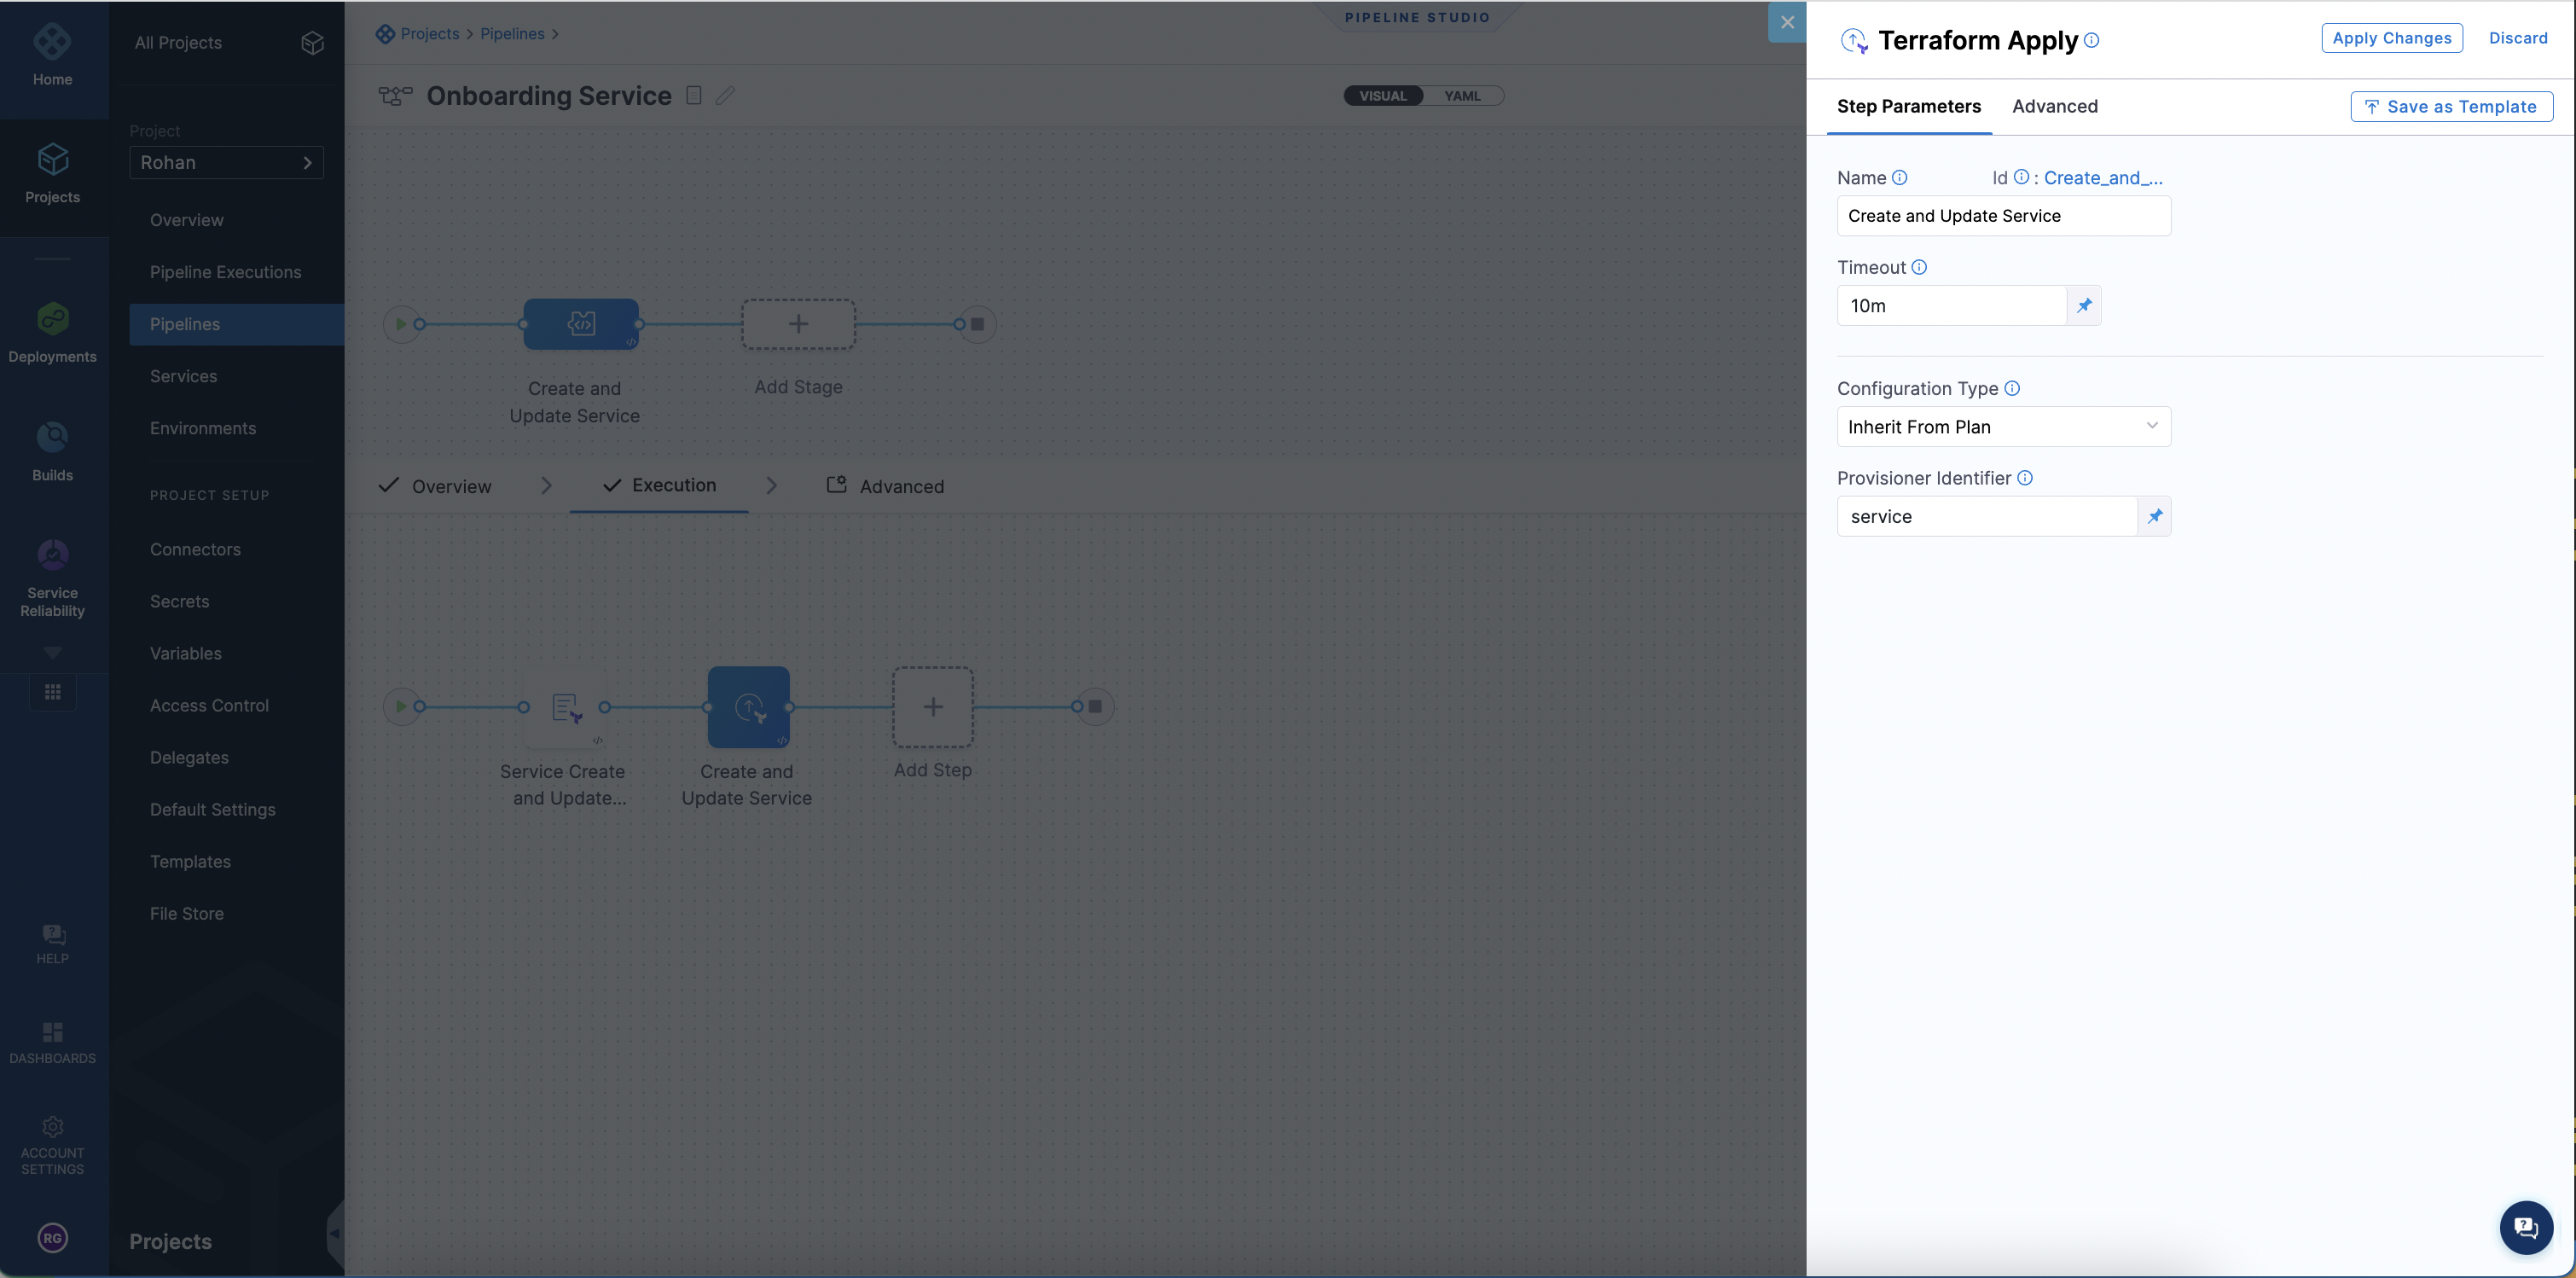
Ensure the Terraform Plan step is configured before the apply step.
Set up trigger
This section explains the steps to set up a sample trigger.
Harness recommends using the GitHub Webhook trigger because you can make changes in GitHub and based of a branch condition, push, pull request, issue comment, etc. you can fire off the pipeline to make changes. The trigger doesn't need to be GitHub.
Harness supports the following:
- GitHub
- GitLab
- Bitbucket
For more information on triggers, go to Trigger pipelines using Git Events.
trigger:
  name: Create and Update Service
  identifier: Create_and_Update_Service
  enabled: true
  encryptedWebhookSecretIdentifier: ""
  description: ""
  tags: {}
  orgIdentifier: default
  projectIdentifier: cdproduct
  pipelineIdentifier: Deploy_Sample_Pipeline
  source:
    type: Webhook
    pollInterval: "0"
    webhookId: ""
    spec:
      type: Github
      spec:
        type: Push
        spec:
          connectorRef: ProductManagementRohan ## Replace this with your Connector
          autoAbortPreviousExecutions: false
          payloadConditions:
            - key: targetBranch
              operator: Equals
              value: main
          headerConditions: []
          repoName: harness
          actions: []
  inputYaml: |
    pipeline: {}
Onboard a service
For onboarding a Service onto Harness you will need to use the Harness Terraform Resource. In Harness, you can create a service at the project, organization or account level.
Your will need to create this YAML and store it in your Github Repository.
resource "harness_platform_service" "service" {
  identifier  = "nginx" ## Service Identifier
  name        = "nginx" ## Service Name to appear in Harness
  description = "sample nginx app created via Harness terraform Provider"
  org_id      = "default" ## Replace with Harness Org Identifier for the resource, optional if creating at account level
  project_id  = "cdproduct" ## Replace with your Harness Project Identifier, optional if creating at org or account level. This project is where the service will be created
  yaml = <<-EOT
                service:
                  name: nginx ## Service Name (same as above)
                  identifier: nginx ## Service Identifier, needs to be same as above
                  serviceDefinition:
                    spec:
                      manifests:
                        - manifest:
                            identifier: nginxManifest
                            type: K8sManifest
                            spec:
                              store:
                                type: Github
                                spec:
                                  connectorRef: <+input> ## This is a connector in your account, project or Org to fetch source code
                                  gitFetchType: Branch
                                  paths:
                                    - /deploy/
                                  repoName: <+input> ## For an account level git connector, you can provide the Repo Name
                                  branch: master
                              skipResourceVersioning: false
                      configFiles: ## This block is optional, this is for config files like a python script or json file you want to attach to the service
                        - configFile:
                            identifier: configFile1
                            spec:
                              store:
                                type: Harness
                                spec:
                                  files:
                                    - <+org.description>
                      variables: ## These are service variables you can define
                        - name: port
                          type: String
                          value: 8080
                        - name: namespace
                          type: String
                          value: <+service.name>-<+env.name>
                    type: Kubernetes
                  gitOpsEnabled: false
              EOT
}
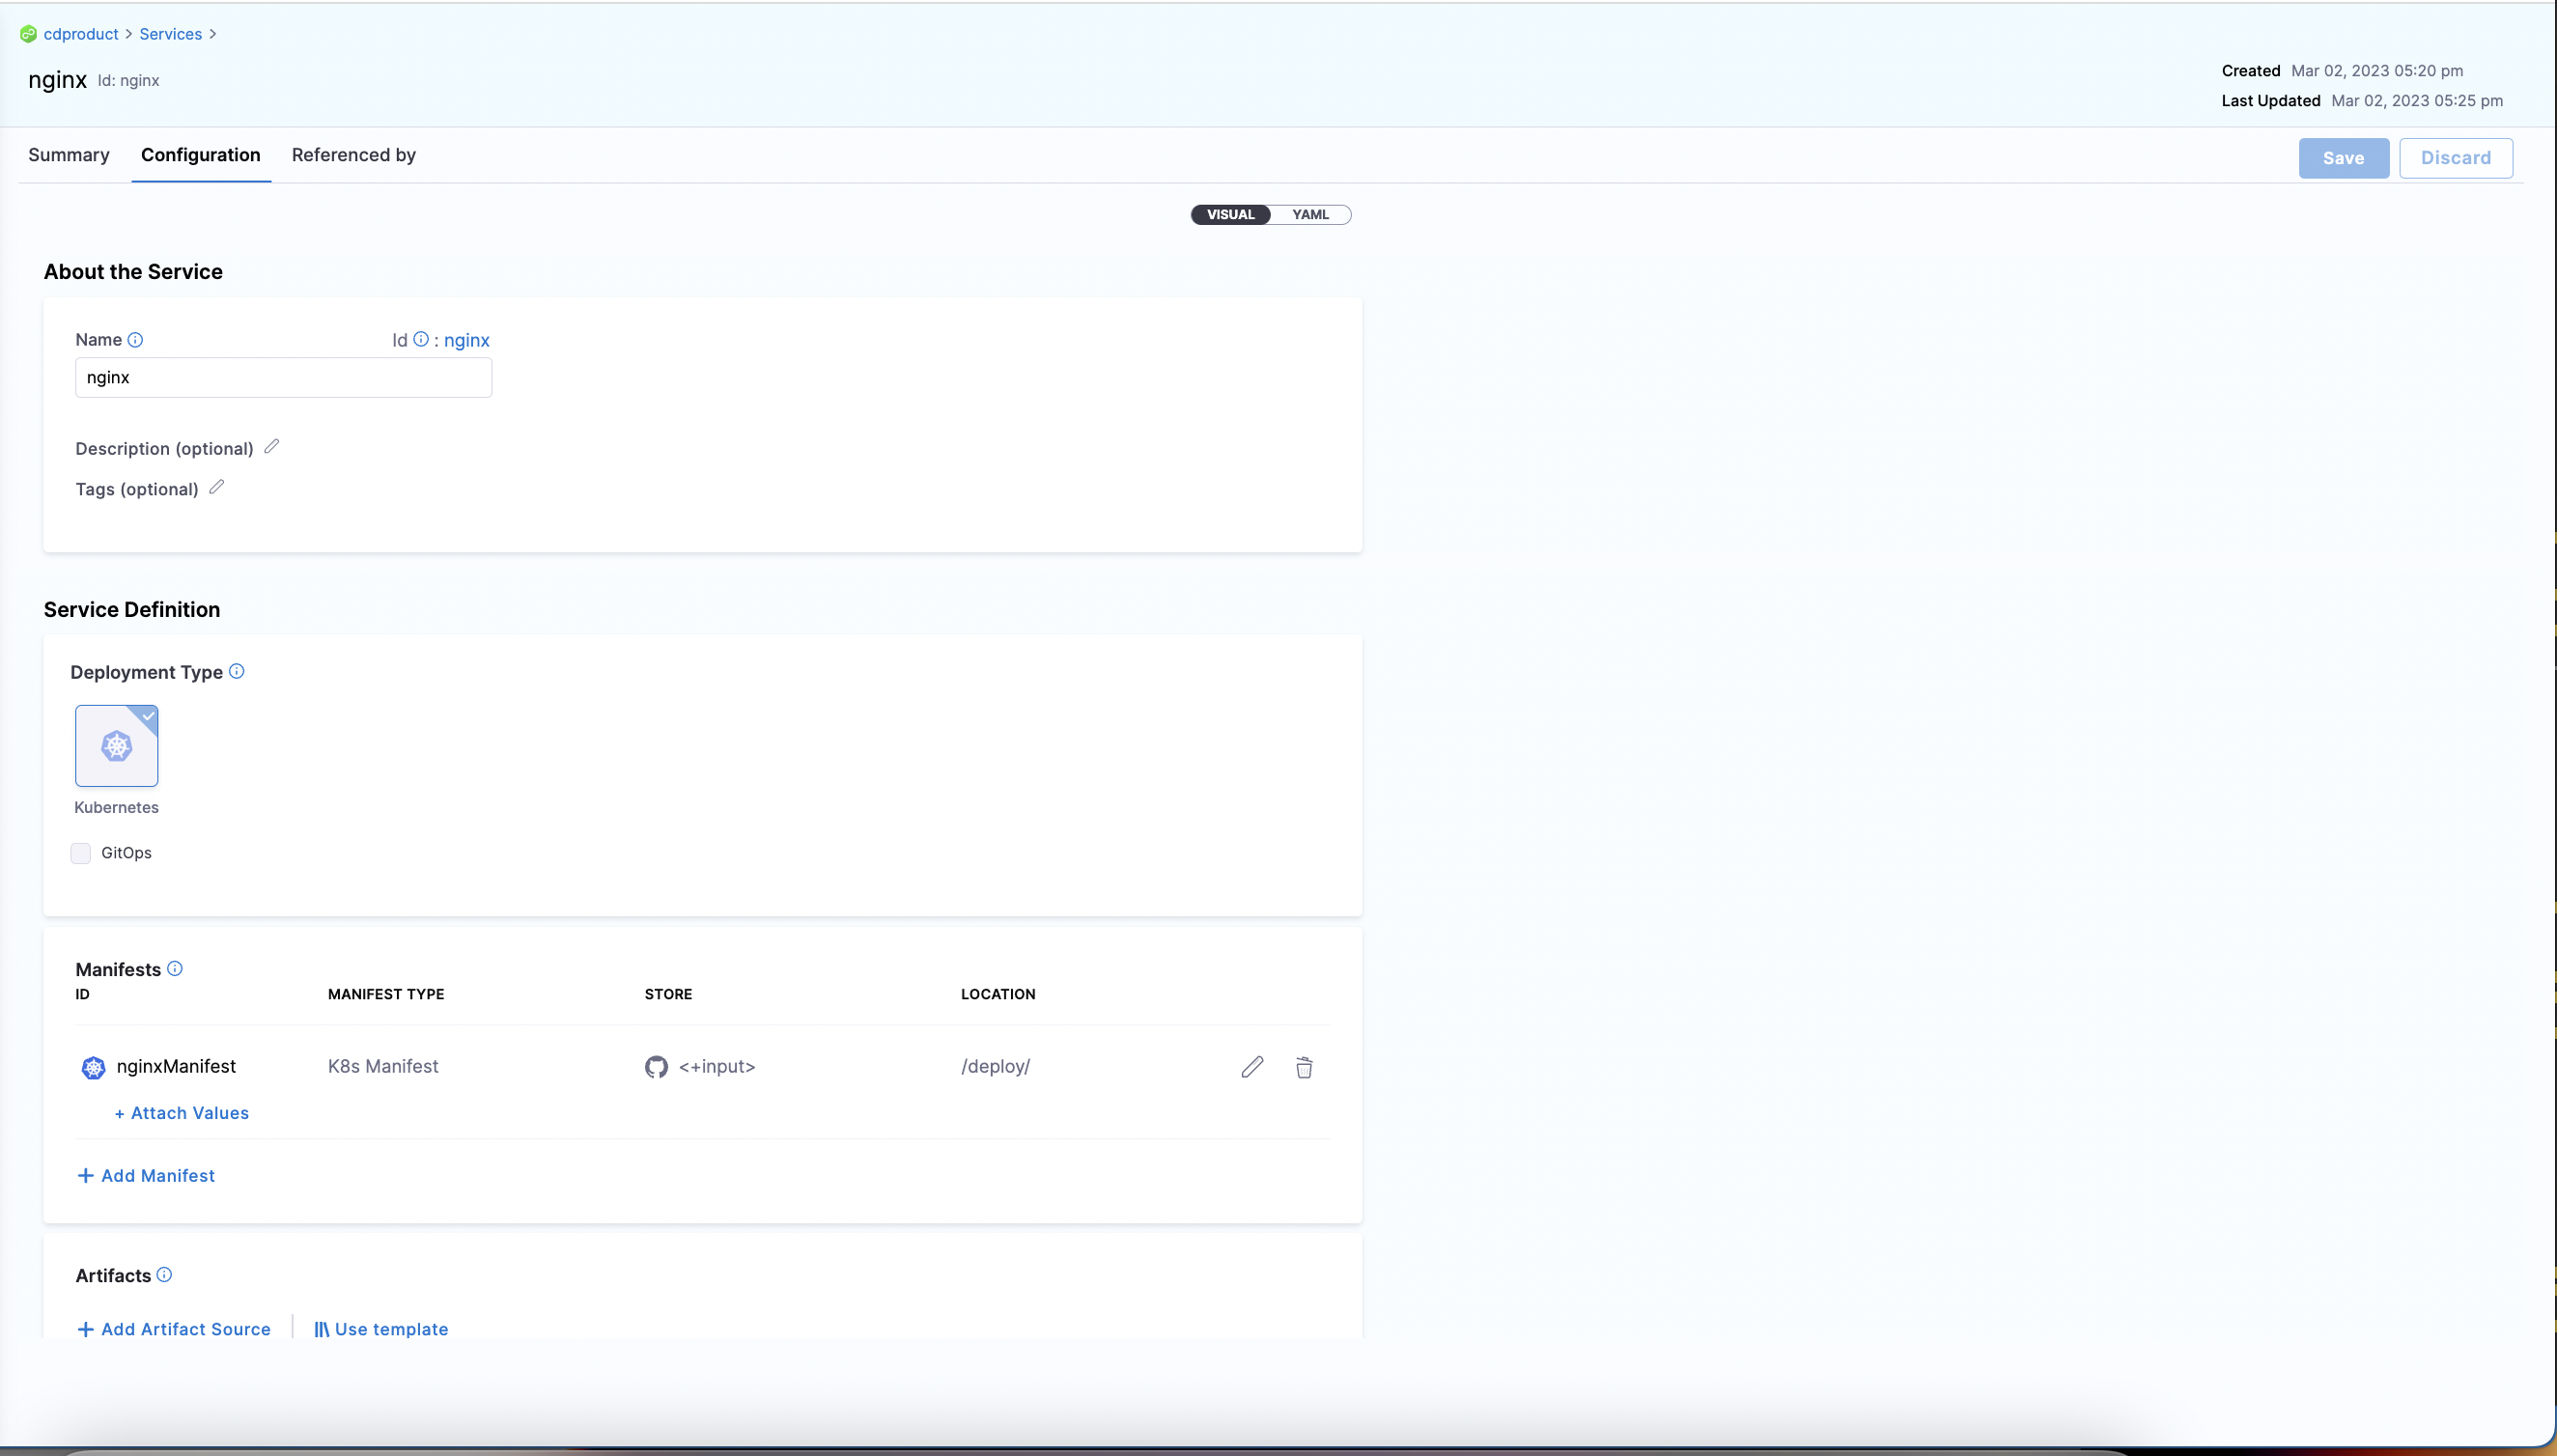
When you run an automation pipeline to create service, you will see the service created in the UI.
Set up pipeline for Service Creation
Here is a sample pipeline to create the nginx service and manage it via Git automation.
You also need to configure a Github Webhook Trigger to initiate updates to the service and automate the pipeline execution to update and create services.
pipeline:
  name: Onboarding Service
  identifier: Deploy_Sample_Pipeline
  projectIdentifier: cdproduct
  orgIdentifier: default
  tags: {}
  stages:
    - stage:
        name: Create and Update Service
        identifier: Create_and_Update_Service
        description: Create and update a service from Github
        type: Custom
        spec:
          execution:
            steps:
              - step:
                  type: TerraformPlan
                  name: Service Create and Update Plan
                  identifier: Service_Create_and_Update_Plan
                  spec:
                    configuration:
                      command: Apply
                      configFiles:
                        store:
                          type: Github
                          spec:
                            gitFetchType: Branch
                            connectorRef: ProductManagementRohan
                            branch: main
                            folderPath: service/nginx.tf
                            repoName: harness
                        moduleSource:
                          useConnectorCredentials: true
                      secretManagerRef: harnessSecretManager
                    provisionerIdentifier: service
                  timeout: 10m
              - step:
                  type: TerraformApply
                  name: Create and Update Service
                  identifier: Create_and_Update_Service
                  spec:
                    configuration:
                      type: InheritFromPlan
                    provisionerIdentifier: service
                  timeout: 10m
        tags: {}
  description: This Pipeline is dedicated to onboarding services in Harness
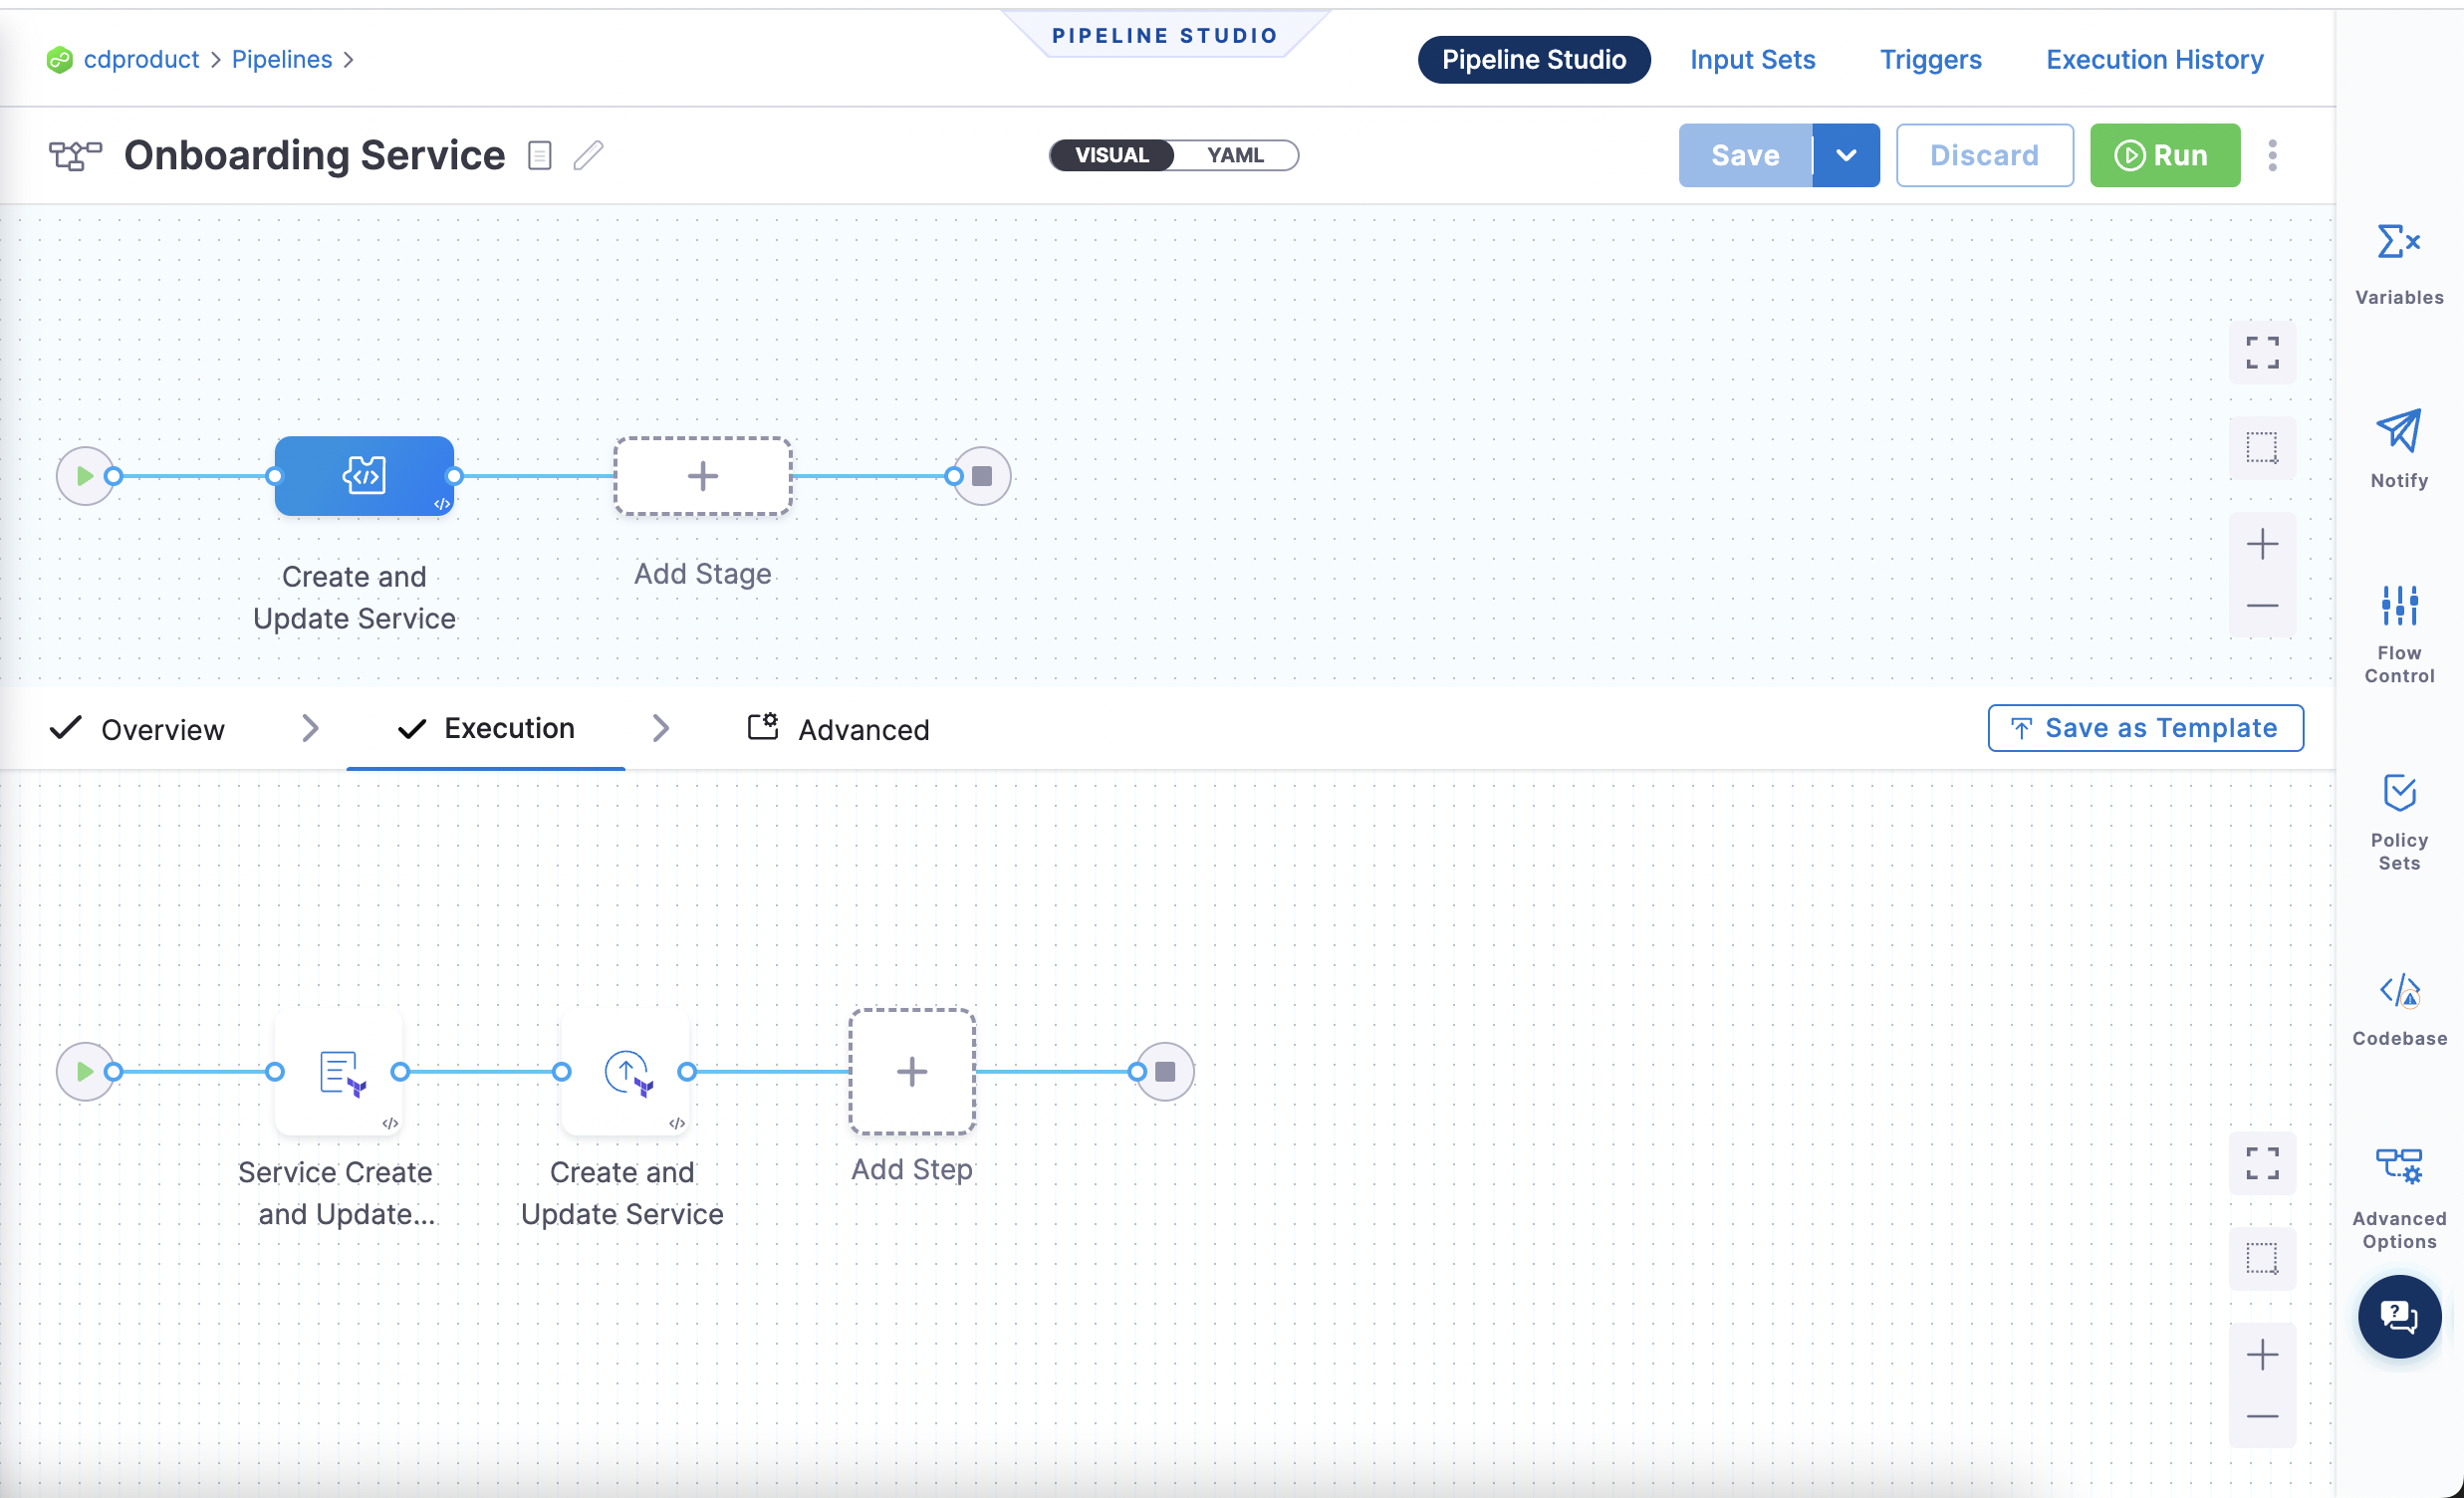
The pipeline looks like this:
Onboard an environment
For onboarding an environment, Harness recommends using the environment resource in the Harness Terraform Provider. In Harness, you can create an environment at the project, organization, and account scope.
Your need to create this YAML and store it in your GitHub Repository.
resource "harness_platform_environment" "environment" {
  identifier = "dev" ## Define Environment Identifier, this is unique to the project, org or account - where the environment will be created
  name       = "dev" ## This will be the name of the environment that you will see in Harness UI
  org_id     = "default" ## Optional if your creating at Account level
  project_id = "cdproduct" ## optional if your creating at Org or Acount
  tags       = ["status:nonregulated", "owner:devops"]
  type       = "PreProduction"
  yaml = <<-EOT
    environment:
         name: dev ## Name of the environment, similar to above
         identifier: dev ## Name of the environment
         orgIdentifier: default
         projectIdentifier: cdproduct ## optional if your creating at Org or Acount, this is where the environment will be created
         type: PreProduction
         tags:
           status: nonregulated
           owner: devops
         variables: ## You can configure global environment variable overides here
           - name: port
             type: String
             value: 8080
             description: "Default Port for Dev Environment"
           - name: db_url
             type: String
             value: "https://postrges:8080"
             description: "postgres url"
         overrides: ## You can configure global environment overrides here
           manifests:
             - manifest:
                 identifier: valuesDev
                 type: Values
                 spec:
                   store:
                     type: Git
                     spec:
                       connectorRef: <+input>
                       gitFetchType: Branch
                       paths:
                         - /dev/dev-values.yaml
                       repoName: <+input>
                       branch: master
           configFiles: ## You can configure configuration file overrides here.
             - configFile:
                 identifier: configFileEnv
                 spec:
                   store:
                     type: Harness
                     spec:
                       files:
                         - account:/Add-ons/svcOverrideTest
                       secretFiles: []
      EOT
}
When you run an automation pipeline to create environments, you will see the environment created in the UI:
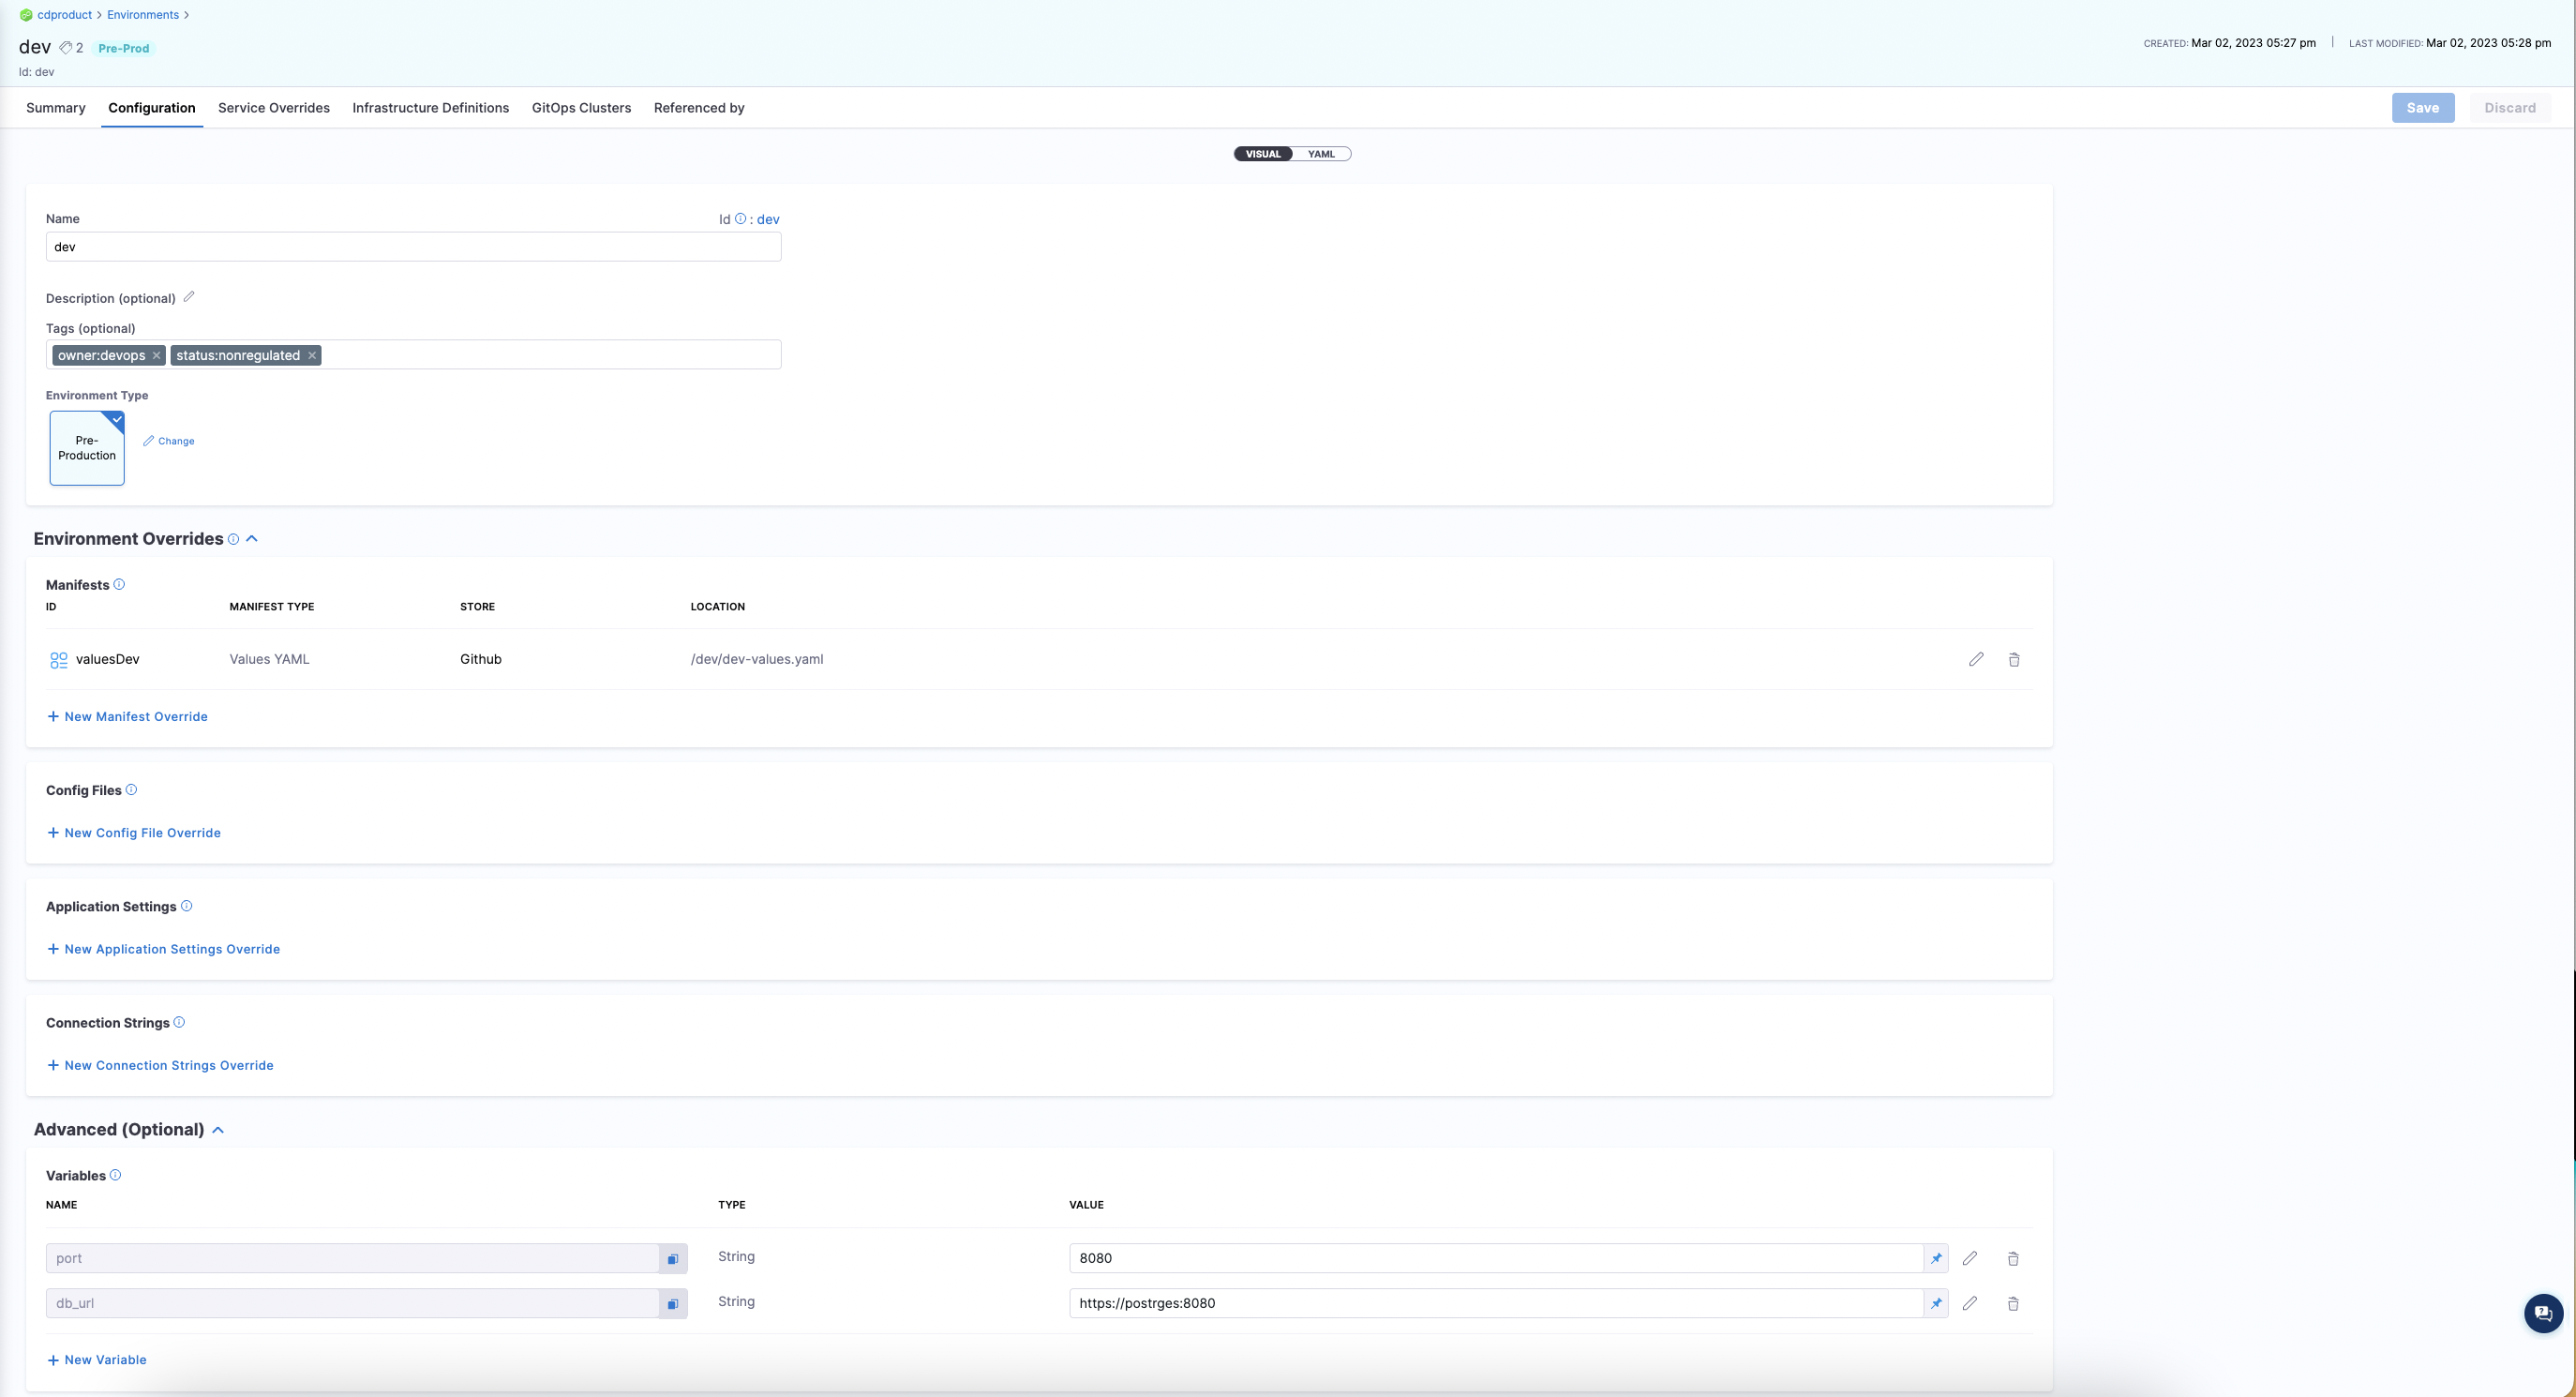
Set up pipeline to onboard environments
pipeline:
  name: Onboarding Environments
  identifier: Create_Environment_Pipeline
  projectIdentifier: cdproduct
  orgIdentifier: default
  tags: {}
  stages:
    - stage:
        name: Create and Update Environment
        identifier: Create_and_Update_Environment
        description: Create and update a environment from Github
        type: Custom
        spec:
          execution:
            steps:
              - step:
                  type: TerraformPlan
                  name: Environment Create and Update Plan
                  identifier: Environment_Create_and_Update_Plan
                  spec:
                    configuration:
                      command: Apply
                      configFiles:
                        store:
                          type: Github
                          spec:
                            gitFetchType: Branch
                            connectorRef: <+input>
                            branch: main
                            folderPath: environments/dev.tf
                        moduleSource:
                          useConnectorCredentials: true
                      secretManagerRef: harnessSecretManager
                    provisionerIdentifier: environment
                  timeout: 10m
              - step:
                  type: TerraformApply
                  name: Create and Update Environment
                  identifier: Create_and_Update_Environment
                  spec:
                    configuration:
                      type: InheritFromPlan
                    provisionerIdentifier: environment
                  timeout: 10m
        tags: {}
  description: This Pipeline is dedicated to onboarding environments in Harness
Onboard an infrastructure definition
For onboarding an Environment, we recommend using the infrastructure definition in our Harness Terraform Provider. In Harness, you can create an Infrastructure Definition at the project, organization and account scope.
resource "harness_platform_infrastructure" "infrastructure" {
  identifier      = "dev"
  name            = "devk8s"
  org_id          = "default"
  project_id      = "cdproduct"
  env_id          = "dev"
  type            = "KubernetesDirect"
  deployment_type = "Kubernetes"
  yaml            = <<-EOT
        infrastructureDefinition:
         name: dev-k8s
         identifier: devk8s
         description: "development kubernetes cluster"
         tags:
           owner: "devops"
         orgIdentifier: default
         projectIdentifier: cdproduct
         environmentRef: dev
         deploymentType: Kubernetes
         type: KubernetesDirect
         spec:
          connectorRef: devkubernetes ### Replace with your connector
          namespace: dev
          releaseName: release-<+INFRA_KEY_SHORT_ID>
          allowSimultaneousDeployments: false
      EOT
}
Infrastructure Definitions are associated with the environment, so you will need to create an environment before creating the infrastructure definition.
When you run your automation pipeline and apply the terraform for the infrastructure definition you will see it appear in the UI:
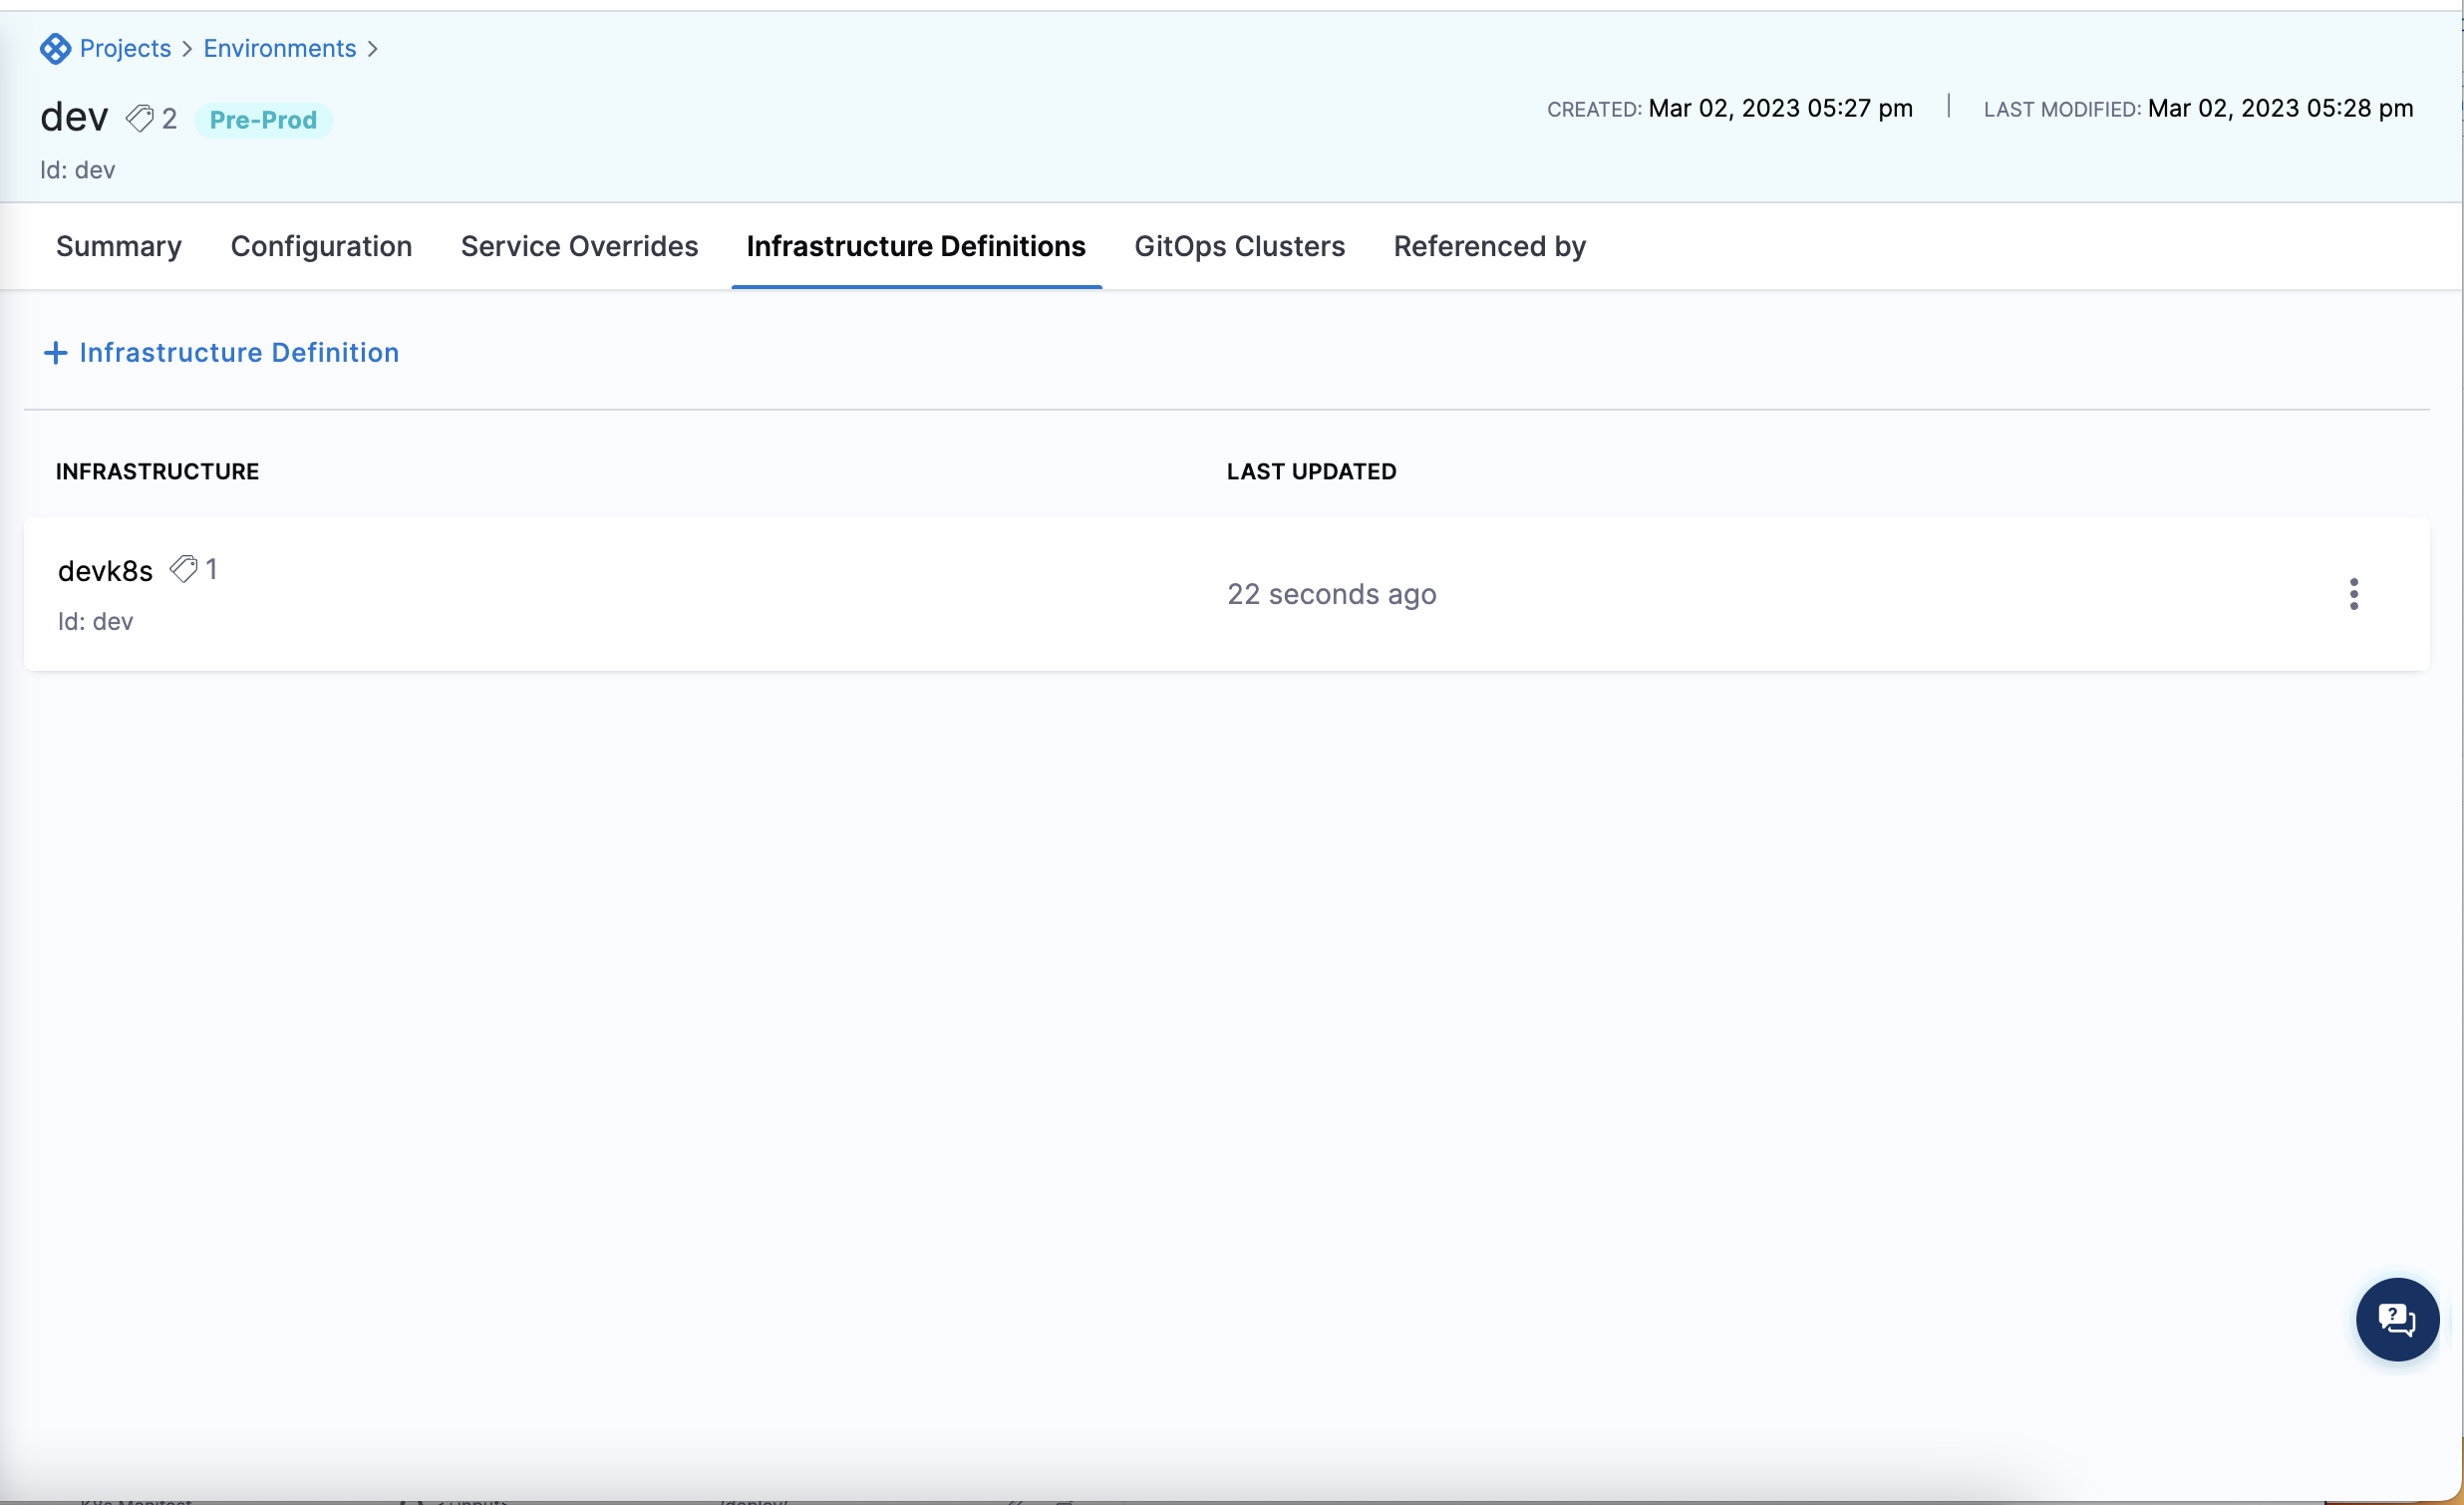
Set up pipeline to onboard infrastructure definitions
pipeline:
  name: Onboarding Infrastructure Definition
  identifier: Create_Infrastructure_Pipeline
  projectIdentifier: cdproduct
  orgIdentifier: default
  tags: {}
  stages:
    - stage:
        name: Create and Update Infrastructure
        identifier: Create_and_Update_Infrastructure
        description: Create and update a Infrastructure from Github
        type: Custom
        spec:
          execution:
            steps:
              - step:
                  type: TerraformPlan
                  name: Infrastructure Create and Update Plan
                  identifier: Infrastructure_Create_and_Update_Plan
                  spec:
                    configuration:
                      command: Apply
                      configFiles:
                        store:
                          type: Github
                          spec:
                            gitFetchType: Branch
                            connectorRef: <+input>
                            branch: main
                            folderPath: infrastructure/devk8s.tf
                        moduleSource:
                          useConnectorCredentials: true
                      secretManagerRef: harnessSecretManager
                    provisionerIdentifier: infra
                  timeout: 10m
              - step:
                  type: TerraformApply
                  name: Create and Update Infrastructure
                  identifier: Create_and_Update_Infrastructure
                  spec:
                    configuration:
                      type: InheritFromPlan
                    provisionerIdentifier: infra
                  timeout: 10m
        tags: {}
  description: This Pipeline is dedicated to onboarding environments in Harness
Best practices
We recommend starting out in the Harness User Interface to get familiar with all the constructions. Once you understand the relationships and the hierarchy you can then begin to automate the creation and management of these resources.
Please review these topics to get familiar with the Harness constructs:
Create a project for resource automation
We recommend two approaches:
-
Creating a centralized project that you can give your end user developers access to onboard their own services and resources
-
Create 1 Project that has a centralized platform team manage and onboard the app team services, environments and other configurations.
You should get started by creating a centralized project like this:
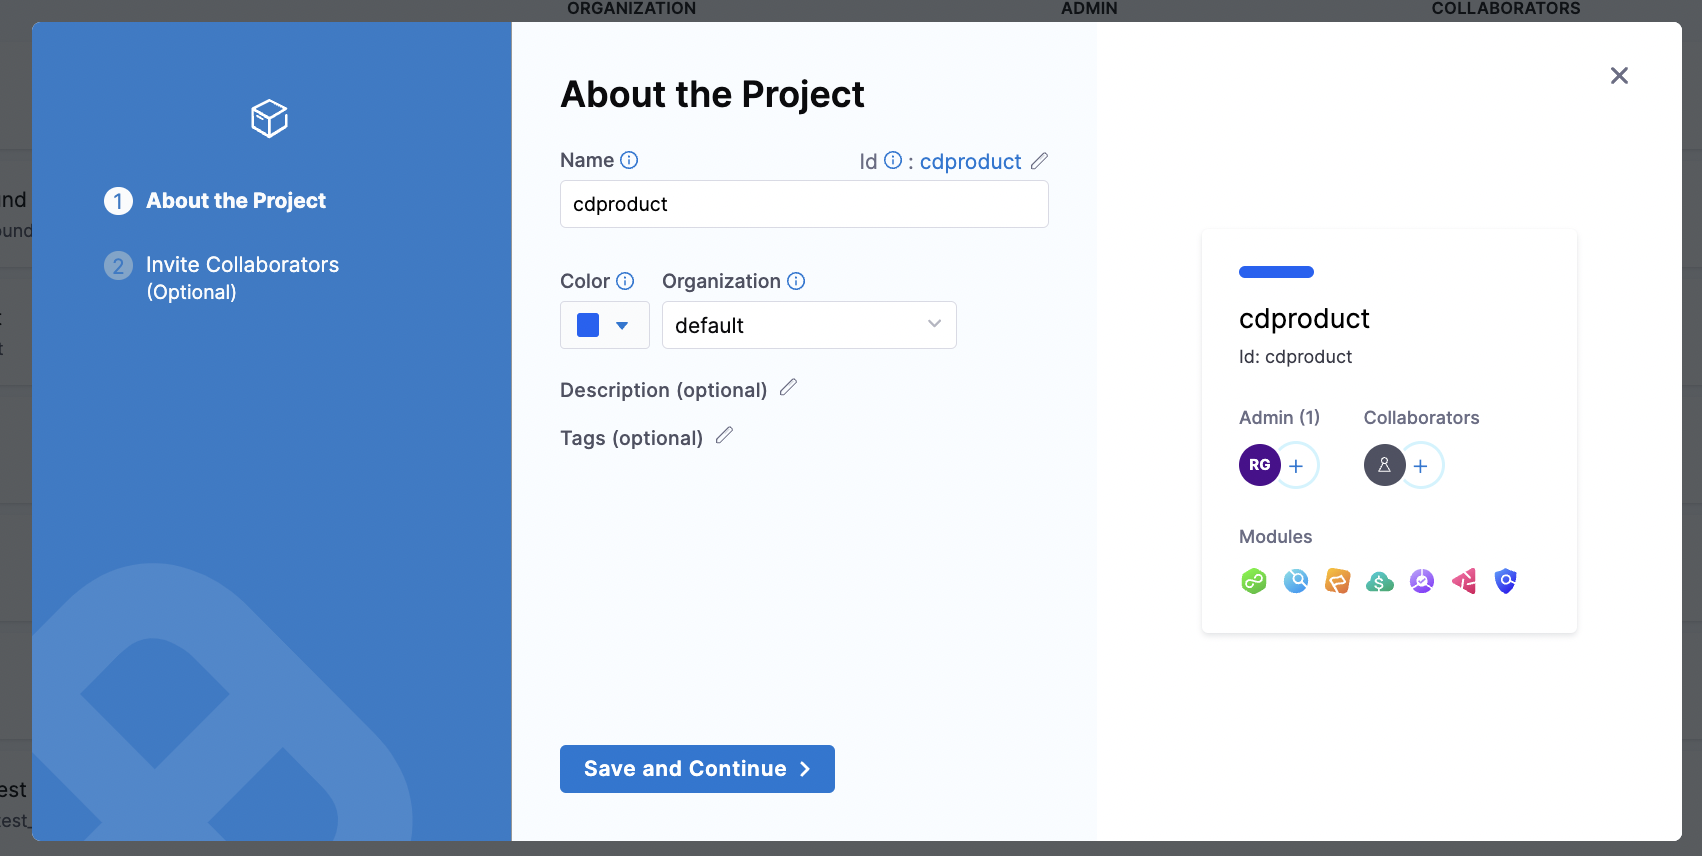
You can also create this via the Terraform Provider and manage it via the Terraform Provider in code
resource "harness_platform_project" "project" {
  identifier = "cdproduct"
  name       = "cdproduct"
  org_id     = "default"
  color      = "#0063F7"
}
To manage the organization and project identifiers in code, we recommend user's creating a tfvars file to manage these resources. The tfvars file will act as a record of all the organizations and projects you created via terraform and can be the parameter file for onboarding automation.
Get the delegate operationalized
- We recommend for production grade delegate installation, to build your own delegate image and deploy it
- When you build your own delegate image, you get to customize all the tooling you want installed on it.
- Harness offers Instructions to build your own delegate image
Tooling you should install:
kubectlhelmterraform
These options are all available in the Harness Docs
Create the connectors and secrets first
Make sure the connectors are created in Harness. You can create them and manage them via the Terraform Provider or in the UI.

Below is a sample snippet for creating a connector via the Terraform Provider:
resource "harness_platform_connector_helm" "helm" {
  identifier  = "bitnami"
  name        = "bitnami"
  description = "bitnami helm connector"
  tags        = ["owner:dev"]
  url                = "hhttps://charts.bitnami.com/bitnami"
  delegate_selectors = ["harness-delegate"]
}
These connectors will require secrets to be configured because connectors are access objects that provide the Harness Delegate access to a particular resource. You can create the connectors via the Terraform Provider or in the Harness UI.

Below is a sample snippet for creating a secret text via the Terraform Provider:
resource "harness_platform_secret_text" "secret" {
  identifier  = "github_pat"
  name        = "github pat"
  description = "github personal access token"
  tags        = ["owner:dev"]
  secret_manager_identifier = "harnessSecretManager"
  value_type                = "Inline"
  value                     = "secret"
}