Trigger pipelines using custom triggers
This topic shows you how to create and run custom triggers for your Harness pipelines using platform-agnostic Webhooks and cURL commands.
Overview of custom triggers
In addition to triggers that use Git providers, artifact providers, manifests, and cron scheduling, Harness includes custom triggers that you can use to run pipelines via cURL or a platform-agnostic Webhook.
Once you create a custom trigger, Harness provides the Webhook URL and cURL command to initiate the trigger.

You can do the following with a custom trigger:
- Start a deployment using a cURL command.
- Use a REST call to get deployment status.
- Start a deployment using a Webhook URL provided by Harness.
Harness variable expressions are not supported in triggers for pipeline or stage variables.
Create the custom trigger
-
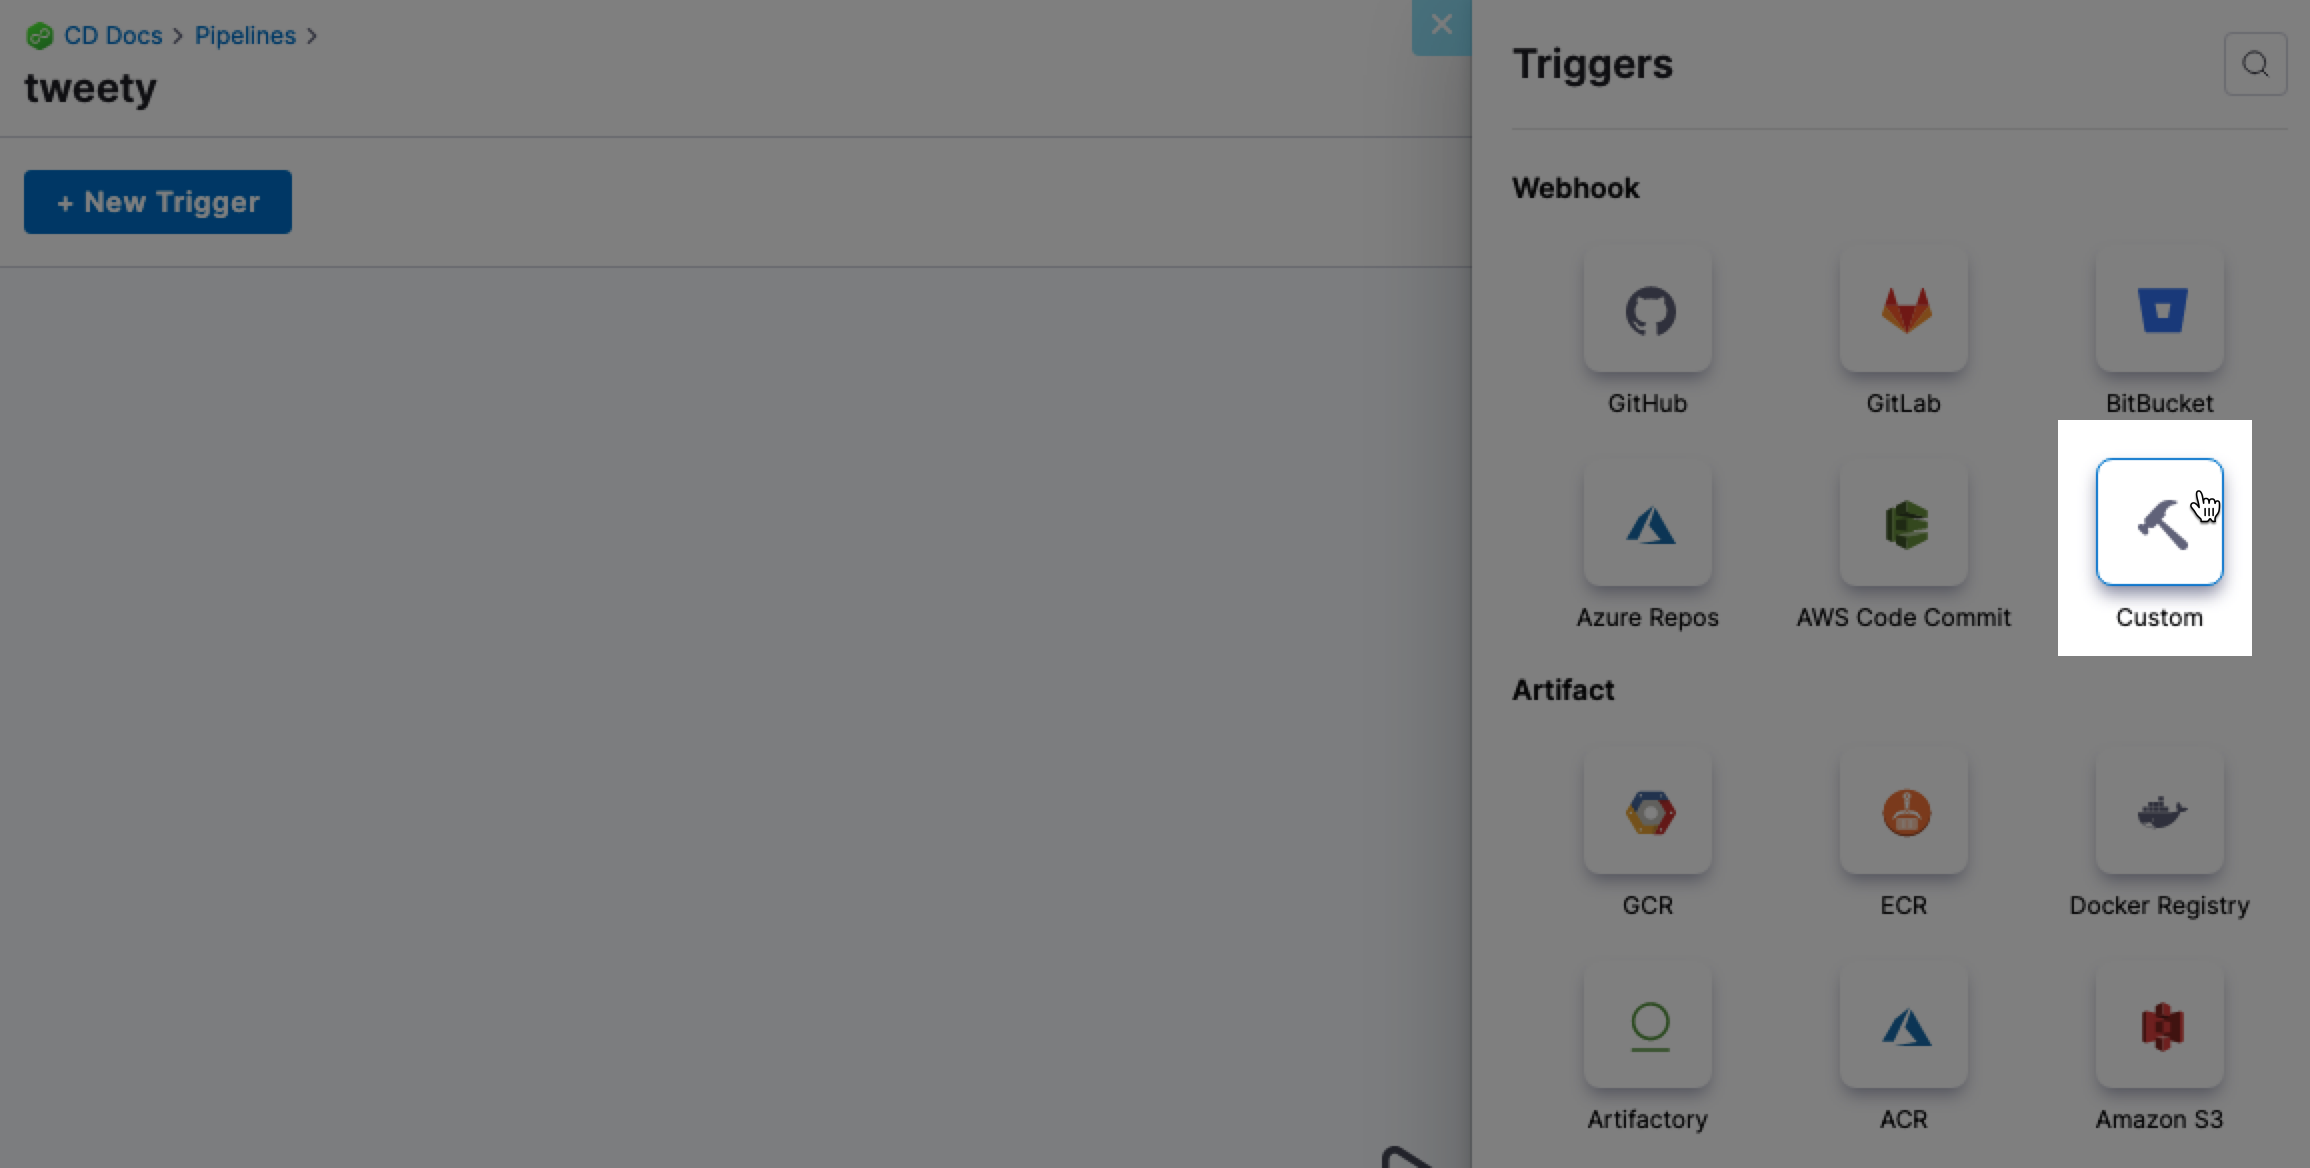
In your Harness pipeline in pipeline studio, click Triggers.
-
Click New Trigger.
-
In Webhook, click Custom.
-
Name the new Trigger and click Continue.
The Payload Type is set as Custom. If this were a Git provider trigger, you would specify the repo URL and events for the trigger.
For more details, go to Trigger Pipelines using Git Events.
Conditions for the custom trigger
Conditions specify criteria in addition to events and actions.
Conditions help to form the overall set of criteria to trigger a Pipeline based on changes in a given source.
For example:
- Execute pipeline if the source or target branch name matches a pattern.
- Execute pipeline if the event is sent for file changes from specific directories in the Git repository. This is very useful when working with a monorepo (mono repository). It ensures that only specific pipelines are triggered in response to a change.
Conditions support Harness built-in expressions for accessing trigger settings, Git payload data, and headers.
JEXL expressions are also supported.
Conditions are ANDed together (boolean AND operation). All Conditions must match an event payload for it to execute the trigger.
Pipeline input for the custom trigger
Pipelines often have Runtime Inputs like codebase branch names or artifact versions and tags.
- Provide values for the inputs. You can use input sets. For more information, go to Passing data in custom triggers.
- Select Create Trigger.
The trigger is now added to the Triggers page.
Trigger a deployment using the cURL command for a custom trigger
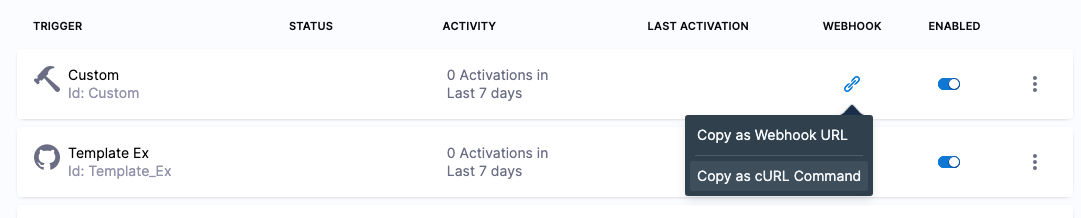
- On the Triggers page, in the Webhook column, select the link icon for your trigger and then select Copy as cURL Command.
Here's an example of the cURL command:
Custom triggers such as Git triggers are part of the pipeline entity and therefore have the account, organization, or project IDs included in the webhook URL.
curl -X POST -H 'content-type: application/json' -H 'X-Api-Key: sample_api_key' --url 'https://app.harness.io/gateway/pipeline/api/webhook/custom/{customWebhookToken}/v3?accountIdentifier=H5W8iol5TNWc4G9h5A2MXg&orgIdentifier=default&projectIdentifier=CD_Docs&pipelineIdentifier=Custom&triggerIdentifier=Custom' -d '{"sample_key": "sample_value"}'
The custom webhook token is a unique token that is generated internally for every custom webhook trigger when it is created. This token cannot be changed.
The -H 'X-Api-Key: sample_api_key' parameter is used to authorize custom triggers. You can use Harness API keys with this parameter. This is described below in Custom trigger authorization using API keys.
To skip authorization, omit the -H 'X-Api-Key: sample_api_key' parameter. When authorization is not enforced for custom webhook triggers, the API key is excluded from the generated cURL command.
Run the example command in a terminal to trigger a pipeline execution. The response will look something like this:
{
   "status":"SUCCESS",
   "data":{
      "eventCorrelationId":"632394c7b018985c661747be",
      "apiUrl":"https://app.harness.io/gateway/pipeline/api/webhook/triggerExecutionDetails/632394c7b018985c661747be?accountIdentifier=H5W8iol5TNWc4G9h5A2MXg",
      "uiUrl":"https://app.harness.io/ng/#/account/H5W8iol5TNWc4G9h5A2MXg/cd/orgs/default/projects/CD_Docs/deployments?pipelineIdentifier=Triggers&page=0",
      "uiSetupUrl":"https://app.harness.io/ng/#/account/H5W8iol5TNWc4G9h5A2MXg/cd/orgs/default/projects/CD_Docs/pipelines/Triggers/pipeline-studio/"
   },
   "metaData":null,
   "correlationId":"5f86c64b-b1a2-4385-88b0-2eaf1085c310"
}
The Execution History page shows that the execution was triggered by a custom trigger:

Links in the response from a custom trigger
The JSON response of the custom trigger cURL command contains several links.
{
   "status":"SUCCESS",
   "data":{
      "eventCorrelationId":"632394c7b018985c661747be",
      "apiUrl":"https://app.harness.io/gateway/pipeline/api/webhook/triggerExecutionDetails/632394c7b018985c661747be?accountIdentifier=H5W8iol5TNWc4G9h5A2MXg",
      "uiUrl":"https://app.harness.io/ng/#/account/H5W8iol5TNWc4G9h5A2MXg/cd/orgs/default/projects/CD_Docs/deployments?pipelineIdentifier=Triggers&page=0",
      "uiSetupUrl":"https://app.harness.io/ng/#/account/H5W8iol5TNWc4G9h5A2MXg/cd/orgs/default/projects/CD_Docs/pipelines/Triggers/pipeline-studio/"
   },
   "metaData":null,
   "correlationId":"5f86c64b-b1a2-4385-88b0-2eaf1085c310"
}
The following section describe each link and what you can do with them.
apiUrl parameter in a custom trigger
apiUrl can be used to track deployment status programmatically, such as using a REST call.
For more information, go to Get Deployment Status using REST below.
uiUrl parameter in a custom trigger
The uiUrl from the cURL command output can be used directly in a browser.
To run a deployment from a browser, paste the URL from uiUrl into the browser location field and hit ENTER.
The browser will open app.harness.io and display the running deployment.
uiSetupUrl parameter in a custom trigger
In the JSON response of a Pipeline executed by a custom trigger, the uiSetupUrl label displays the URL or the pipeline that was run.
Get deployment status using REST for a custom trigger
The apiUrl property in the JSON response can be used to track deployment status programmatically, such as using a REST call.
The eventCorrelationId contains the same Id as the URL in apiUrl.To get deployment status using a REST call (in this example, cURL), use the following cURL command, replacing API_URL with the URL from apiUrl:
curl -X GET --url "API_URL"
This endpoint does not have authorization enforcement by default.
Currently, authorization enforcement for this endpoint is behind the feature flag CDS_AUTH_CHECK_IN_WEBHOOK_DETAILS_ENDPOINTS. Contact Harness Support to enable the feature.
For example:
curl -X GET --url "https://app.harness.io/gateway/pipeline/api/webhook/triggerExecutionDetails/632394c7b018985c661747be?accountIdentifier=H5W8iol5TNWc4G9h5A2MXg"
The response from the cURL command will contain the status of the deployment. For example:
{
   "status":"SUCCESS",
   "data":{
      "webhookProcessingDetails":{
         "eventFound":true,
         "eventId":"632394c7b018985c661747be",
         "accountIdentifier":"xxx",
         "orgIdentifier":"default",
         "projectIdentifier":"CD_Docs",
         "triggerIdentifier":"Custom",
         "pipelineIdentifier":"Triggers",
         "pipelineExecutionId":"_iodHvEhT2y_Mn_DLaR32A",
         "exceptionOccured":false,
         "status":"TARGET_EXECUTION_REQUESTED",
         "message":"Pipeline execution was requested successfully",
         "payload":"{\"sample_key\": \"sample_value\"}",
         "eventCreatedAt":1663276236705,
         "runtimeInput":"pipeline: {}\n"
      },
      "executionDetails":{
         "pipelineExecutionSummary":{
            "pipelineIdentifier":"Triggers",
            "planExecutionId":"_iodHvEhT2y_Mn_DLaR32A",
            "name":"Triggers",
            "status":"Success",
            "tags":[],
            "executionTriggerInfo":{
               "triggerType":"WEBHOOK_CUSTOM",
               "triggeredBy":{
                  "uuid":"systemUser",
                  "identifier":"Custom",
                  "extraInfo":{
                     "execution_trigger_tag_needed_for_abort":"H5W8iol5TNWc4G9h5A2MXg:default:CD_Docs:Triggers",
                     "triggerRef":"H5W8iol5TNWc4G9h5A2MXg/default/CD_Docs/Custom",
                     "eventCorrelationId":"632394c7b018985c661747be"
                  }
               },
               "isRerun":false
            },
            "governanceMetadata":{
               "id":"0",
               "deny":false,
               "details":[],
               "message":"",
               "timestamp":"1663276236674",
               "status":"pass",
               "accountId":"H5W8iol5TNWc4G9h5A2MXg",
               "orgId":"default",
               "projectId":"CD_Docs",
               "entity":"accountIdentifier%3AH5W8iol5TNWc4G9h5A2MXg%2ForgIdentifier%3Adefault%2FprojectIdentifier%3ACD_Docs%2FpipelineIdentifier%3ATriggers",
               "type":"pipeline",
               "action":"onrun",
               "created":"1663276236657"
            },
            "moduleInfo":{
               "cd":{
                  "__recast":"io.harness.cdng.pipeline.executions.beans.CDPipelineModuleInfo",
                  "envGroupIdentifiers":[

                  ],
                  "envIdentifiers":[
                     "dev"
                  ],
                  "environmentTypes":[
                     "PreProduction"
                  ],
                  "infrastructureIdentifiers":[
                     null
                  ],
                  "infrastructureNames":[
                     null
                  ],
                  "infrastructureTypes":[
                     "KubernetesDirect"
                  ],
                  "serviceDefinitionTypes":[
                     "Kubernetes"
                  ],
                  "serviceIdentifiers":[
                     "dev"
                  ]
               }
            },
            "layoutNodeMap":{
               "XZoMGLJIRgm11QqGYbIElA":{
                  "nodeType":"Deployment",
                  "nodeGroup":"STAGE",
                  "nodeIdentifier":"trigger",
                  "name":"trigger",
                  "nodeUuid":"XZoMGLJIRgm11QqGYbIElA",
                  "status":"Success",
                  "module":"cd",
                  "moduleInfo":{
                     "cd":{
                        "__recast":"io.harness.cdng.pipeline.executions.beans.CDStageModuleInfo",
                        "serviceInfo":{
                           "__recast":"io.harness.cdng.pipeline.executions.beans.ServiceExecutionSummary",
                           "identifier":"dev",
                           "displayName":"dev",
                           "deploymentType":"Kubernetes",
                           "gitOpsEnabled":false,
                           "artifacts":{
                              "__recast":"io.harness.cdng.pipeline.executions.beans.ServiceExecutionSummary$ArtifactsSummary",
                              "sidecars":[

                              ]
                           }
                        },
                        "infraExecutionSummary":{
                           "__recast":"io.harness.cdng.pipeline.executions.beans.InfraExecutionSummary",
                           "identifier":"dev",
                           "name":"dev",
                           "type":"PreProduction"
                        }
                     }
                  },
                  "startTs":1663276236851,
                  "endTs":1663276251023,
                  "edgeLayoutList":{
                     "currentNodeChildren":[],
                     "nextIds":[]
                  },
                  "nodeRunInfo":{
                     "whenCondition":"<+OnPipelineSuccess>",
                     "evaluatedCondition":true,
                     "expressions":[
                        {
                           "expression":"OnPipelineSuccess",
                           "expressionValue":"true",
                           "count":1
                        }
                     ]
                  },
                  "failureInfo":{
                     "message":""
                  },
                  "failureInfoDTO":{
                     "message":"",
                     "failureTypeList":[],
                     "responseMessages":[]
                  },
                  "nodeExecutionId":"YC_1XgBQSUu79da21J7aVA",
                  "executionInputConfigured":false
               }
            },
            "modules":[
               "cd"
            ],
            "startingNodeId":"XZoMGLJIRgm11QqGYbIElA",
            "startTs":1663276236674,
            "endTs":1663276251126,
            "createdAt":1663276236698,
            "canRetry":true,
            "showRetryHistory":false,
            "runSequence":11,
            "successfulStagesCount":1,
            "runningStagesCount":0,
            "failedStagesCount":0,
            "totalStagesCount":1,
            "executionInputConfigured":false,
            "allowStageExecutions":false,
            "stagesExecution":false
         }
      },
      "executionUrl": "https://app.harness.io/ng/#/account/xxx/cd/orgs/default/projects/CD_Docs/pipeline/Custom/executionS/_iodHvEhT2y_Mn_DLaR32A/pipeline"
   },
   "metaData":null,
   "correlationId":"4b76cec6-c4b3-408c-b66b-7e14540c6e14"
}
Passing data in custom triggers
For information on how to pass data in the cURL command for a custom trigger, go to Passing data in Custom triggers.
Custom trigger authorization using API keys
You can use Harness API keys in your cURL command to authorize the execution of a trigger.
You can see the -H 'X-Api-Key: sample_api_key' parameter in the cURL command you copy from Harness.
curl -X POST -H 'content-type: application/json' -H 'X-Api-Key: sample_api_key' --url 'https://app.harness.io/gateway/pipeline/api/webhook/custom/v2?accountIdentifier=px7xd_BFRCi-pfWPYXVjvw&orgIdentifier=default&projectIdentifier=Docs&pipelineIdentifier=Custom&triggerIdentifier=Custom' -d '{"sample_key": "sample_value"}'
You can use this parameter with a Harness API key in your cURL command to authorize the execution of a trigger. You can also enforce the use of API keys for all custom triggers.
To skip authorization omit the -H 'X-Api-Key: sample_api_key' parameter.
Adding authorization to custom triggers
-
Create the Harness API key you want to use for authorization.
-
Save the token from the key. Please make sure to copy and store your token value somewhere safe. You won't be able to see it again after you create it.
-
Copy the cURL command for your custom trigger. For example:
curl -X POST -H 'content-type: application/json' -H 'X-Api-Key: sample_api_key' --url 'https://app.harness.io/gateway/pipeline/api/webhook/custom/{customWebhookToken}/v3?accountIdentifier=px7xd_BFRCi-pfWPYXVjvw&orgIdentifier=default&projectIdentifier=Docs&pipelineIdentifier=Custom&triggerIdentifier=Custom' -d '{"sample_key": "sample_value"}' -
Replace
sample_api_keywith the API key you created. For example:curl -X POST -H 'content-type: application/json' -H 'X-Api-Key: pat.<YOUR_PAT>' --url 'https://app.harness.io/gateway/pipeline/api/webhook/custom/{customWebhookToken}/v3?accountIdentifier=px7xd_BFRCi-pfWPYXVjvw&orgIdentifier=default&projectIdentifier=Docs&pipelineIdentifier=Custom&triggerIdentifier=Custom' -d '{"sample_key": "sample_value"}' -
Use the cURL command. A
SUCCESSstatus will look something like this:{"status":"SUCCESS","data":{"eventCorrelationId":"63bc6fe5ffaf786364414258","apiUrl":"https://app.harness.io/gateway/pipeline/api/webhook/triggerExecutionDetails/63bc6fe5ffaf786364414258?accountIdentifier=px7xd_BFRCi-pfWPYXVjvw","uiUrl":"https://app.harness.io/ng/#/account/px7xd_BFRCi-pfWPYXVjvw/cd/orgs/default/projects/Docs/deployments?pipelineIdentifier=Custom&page=0","uiSetupUrl":"https://app.harness.io/ng/#/account/px7xd_BFRCi-pfWPYXVjvw/cd/orgs/default/projects/Docs/pipelines/Custom/pipeline-studio/"},"metaData":null,"correlationId":"ef3da895-bd19-4187-be25-e813af14408b"}
Adding authorization is only supported for /v3 webhook endpoints. For that reason, all the curl commands in this section use /v3 endpoints.
Enforce authorization for custom triggers
You may Mandate Authorization for Custom Webhook Triggers. Doing this will mandate the use of an API key token in the header of all the custom webhooks in your account. If the setting is turned on, and an API token isn't provided, then the following error will occur:
{"status":"ERROR","code":"INVALID_REQUEST","message":"Invalid request: Authorization is mandatory for custom triggers in px7xd_BFRCi-pfWPYXVjvw:default:Docs. Please add X-Api-Key header in the request","correlationId":"465d6463-152b-4211-8cb5-6bcc2538afa8","detailedMessage":null,"responseMessages":[{"code":"INVALID_REQUEST","level":"ERROR","message":"Invalid request: Authorization is mandatory for custom triggers in px7xd_BFRCi-pfWPYXVjvw:default:Docs. Please add X-Api-Key header in the request","exception":null,"failureTypes":[]}],"metadata":null}
If RBAC is required on the triggers in your environment, please review the Harness Documentation on enforcing Authorization via RBAC
Executions
Currently this feature is behing the Feature Flag PIPE_FILTER_EXECUTIONS_BY_GIT_EVENTS. Please contact Harness Support to enable this feature.
My Executions filter on the listing page displays both manual executions and those triggered automatically by custom trigger i.e execution executed by custom trigger/curl command and manually execution pipeline execution will appear in the My Execution list.
But to display execution triggered by custom webhook trigger it must have a authorization i.e X-API-key should be present