Bitbucket connector settings reference
This topic describes the settings and permissions for the Bitbucket connector. Harness supports both Cloud and Data Center (On-Prem) versions of Bitbucket. The following settings are applicable to both versions.
Starting with Delegate version 26.02.88600 and SCM Service version 1.45.1, Harness has migrated to the new Bitbucket Cloud APIs following Atlassian's deprecation of cross-workspace APIs. With repository-level access tokens, Test Connection and repository listing (used during remote entity creation) will fail. Other Git Experience operations such as branch listing continue to work.
Harness recommends switching to workspace-level access tokens for full connector functionality. See Troubleshooting for details.
Bitbucket App Passwords are deprecated and will stop working after June 9, 2026. Migrate to API tokens or access tokens for authentication. For more information, see the Bitbucket App Password deprecation announcement.
If you're using App Passwords, see Migrate from App Passwords to API tokens for migration instructions.
Overview settings
- Name: The unique name for this connector. Harness generates an Id (Entity Identifier) based on the Name. You can edit the Id during initial connector creation. Once you save the connector, the Id is locked.
- Description: Optional text string.
- Tags: Optional labels you can use for filtering. For details, go to the Tags reference.
Details settings
The Details settings specify which BitBucket account or repository you want this connector to connect to, whether to connect over HTTP or SSH, and the URL to use.
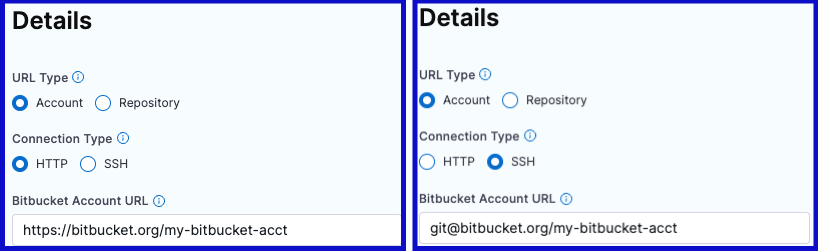
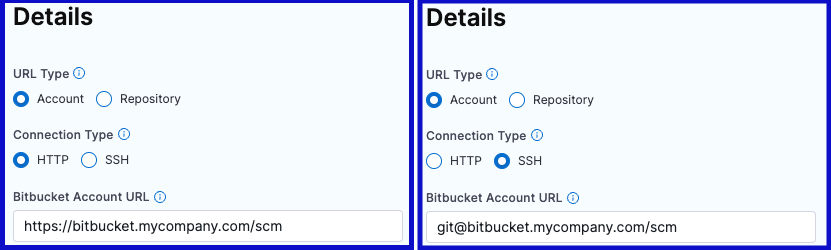
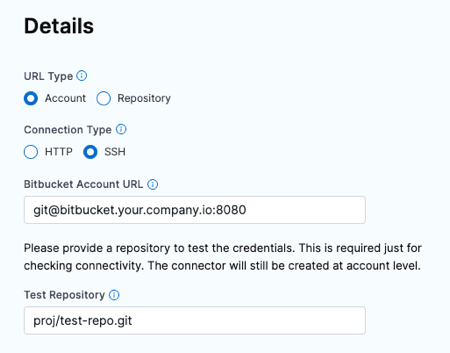
URL Type
Select Account to connect an entire Bitbucket account. This option lets you use one connector to connect to all repositories in the specified Bitbucket account. Make sure you have at least one repo in the account; you need a repo to test the connection and save the connector.
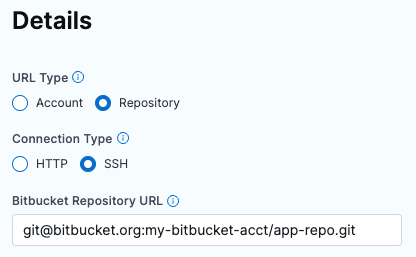
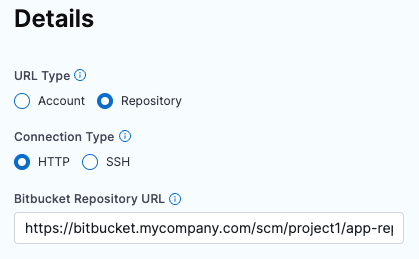
Select Repository to connect to a single, specific repo in a Bitbucket account.
Connection Type
Select the protocol, HTTP or SSH, to use for cloning and authentication. The Connection Type determines the URL format required for the Bitbucket Account/Repository URL field. It also determines the Authentication method you must use in the Credentials settings.
Bitbucket Account/Repository URL
Enter the URL for the Bitbucket account or repository that you want to connect to. The required value is determined by the URL Type, Connection Type, and your Bitbucket account type (Cloud or Data Center).
- URL Type: Account
- URL Type: Repository
In the Bitbucket Account URL field, provide only the account-identifying portion of the Bitbucket URL, such as https://bitbucket.org/my-bitbucket/. Do not include any repo name or project name.
The URL format depends on the Connection Type and your Bitbucket account type (Cloud or Data Center). The following table provides format examples for each combination.
| Connection Type | Bitbucket Cloud | Bitbucket Data Center (On-Prem) |
|---|---|---|
| HTTP | https://bitbucket.org/USERNAME/ or https://bitbucket.org | https://bitbucket.YOUR-ORG-HOSTNAME/scm/ |
| SSH | git@bitbucket.org:USERNAME/ | git@bitbucket.YOUR-ORG-HOSTNAME/ |
In the Bitbucket Repository URL field, provide the complete URL to the Bitbucket repository that you want this connector to point to.
The URL format depends on the Connection Type and your Bitbucket account type (Cloud or Data Center). The following table provides format examples for each combination.
| Connection Type | Bitbucket Cloud | Bitbucket Data Center (On-Prem) |
|---|---|---|
| HTTP | https://bitbucket.org/USERNAME/REPO-NAME.git | https://bitbucket.YOUR-ORG-HOSTNAME.com/scm/PROJECT-ID/REPO-NAME.git |
| SSH | git@bitbucket.org:USERNAME/REPO-NAME.git | git@bitbucket.YOUR-ORG-HOSTNAME/PROJECT-ID/REPO-NAME.git |
There are several possible URL formats for Bitbucket Data Center (On-Prem) accounts, such as bitbucket.myorg.com or bitbucket.my.org.com, as well as variations of repo URLs. Your URL might not match the examples above, and you might need to modify the URL.
For SSH URLs, you may need to use a DOMAIN-NAME:PORT format for the authority portion, such as bitbucket.myorg.com:8080. This depends on your server and firewall configuration. If the connection test fails, make sure you've used the appropriate URL format.
If your On-Prem repo URL has an extra segment before the project ID or a multi-segment project ID, such as bitbucket.myorg.com/scm/DESCRIPTOR/PROJECT-ID/REPO-NAME.git, some API functionality can fail if you use the full URL. To fix this, exclude the extra segment when you enter the URL in the Bitbucket Repository URL field.
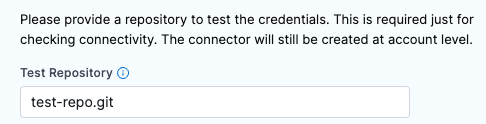
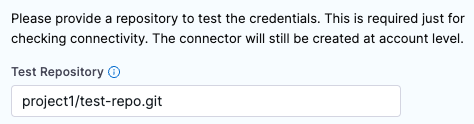
Test Repository
This field is only required if the URL Type is Account. Provide a path to a repo in your Bitbucket account that Harness can use to test the connector. Harness uses this repo path to validate the connection only. When you use this connector in a pipeline, you'll specify a true code repo in your pipeline configuration or at runtime.
For Bitbucket Cloud accounts, the Test Repository path format is: REPO-NAME.git.
For BitBucket Data Center (On-Prem) accounts, you must include the project ID, such as PROJECT-ID/REPO-NAME.git.
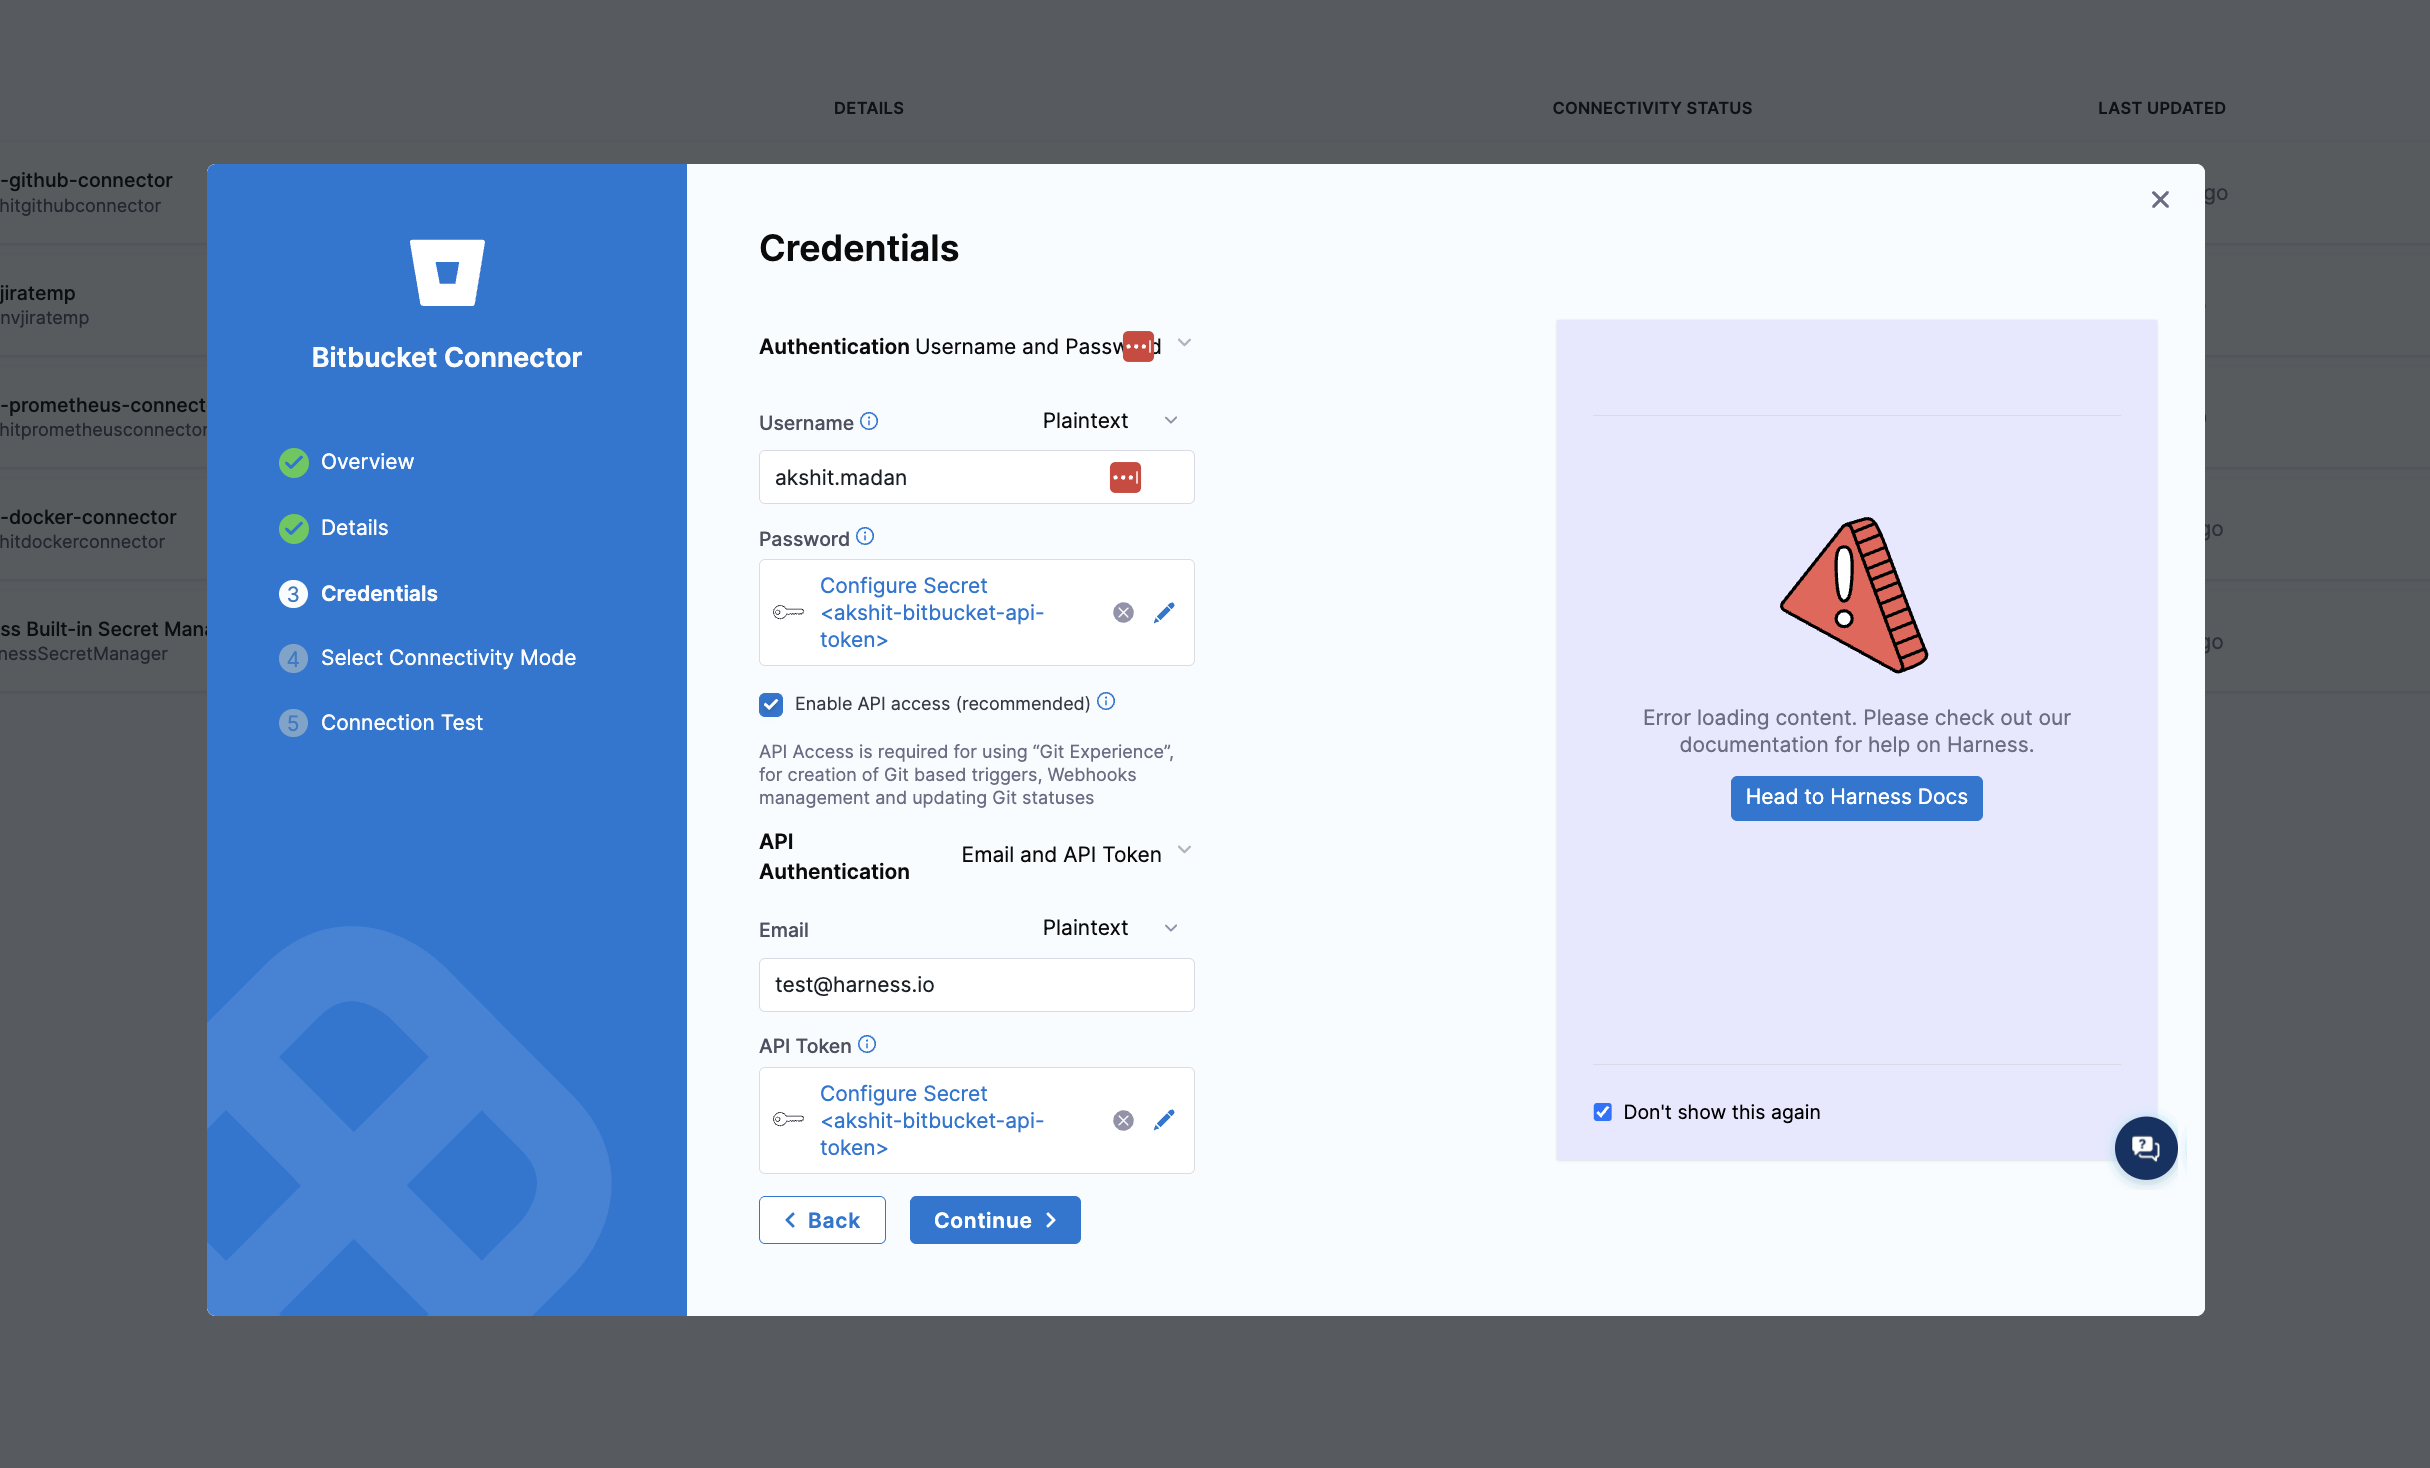
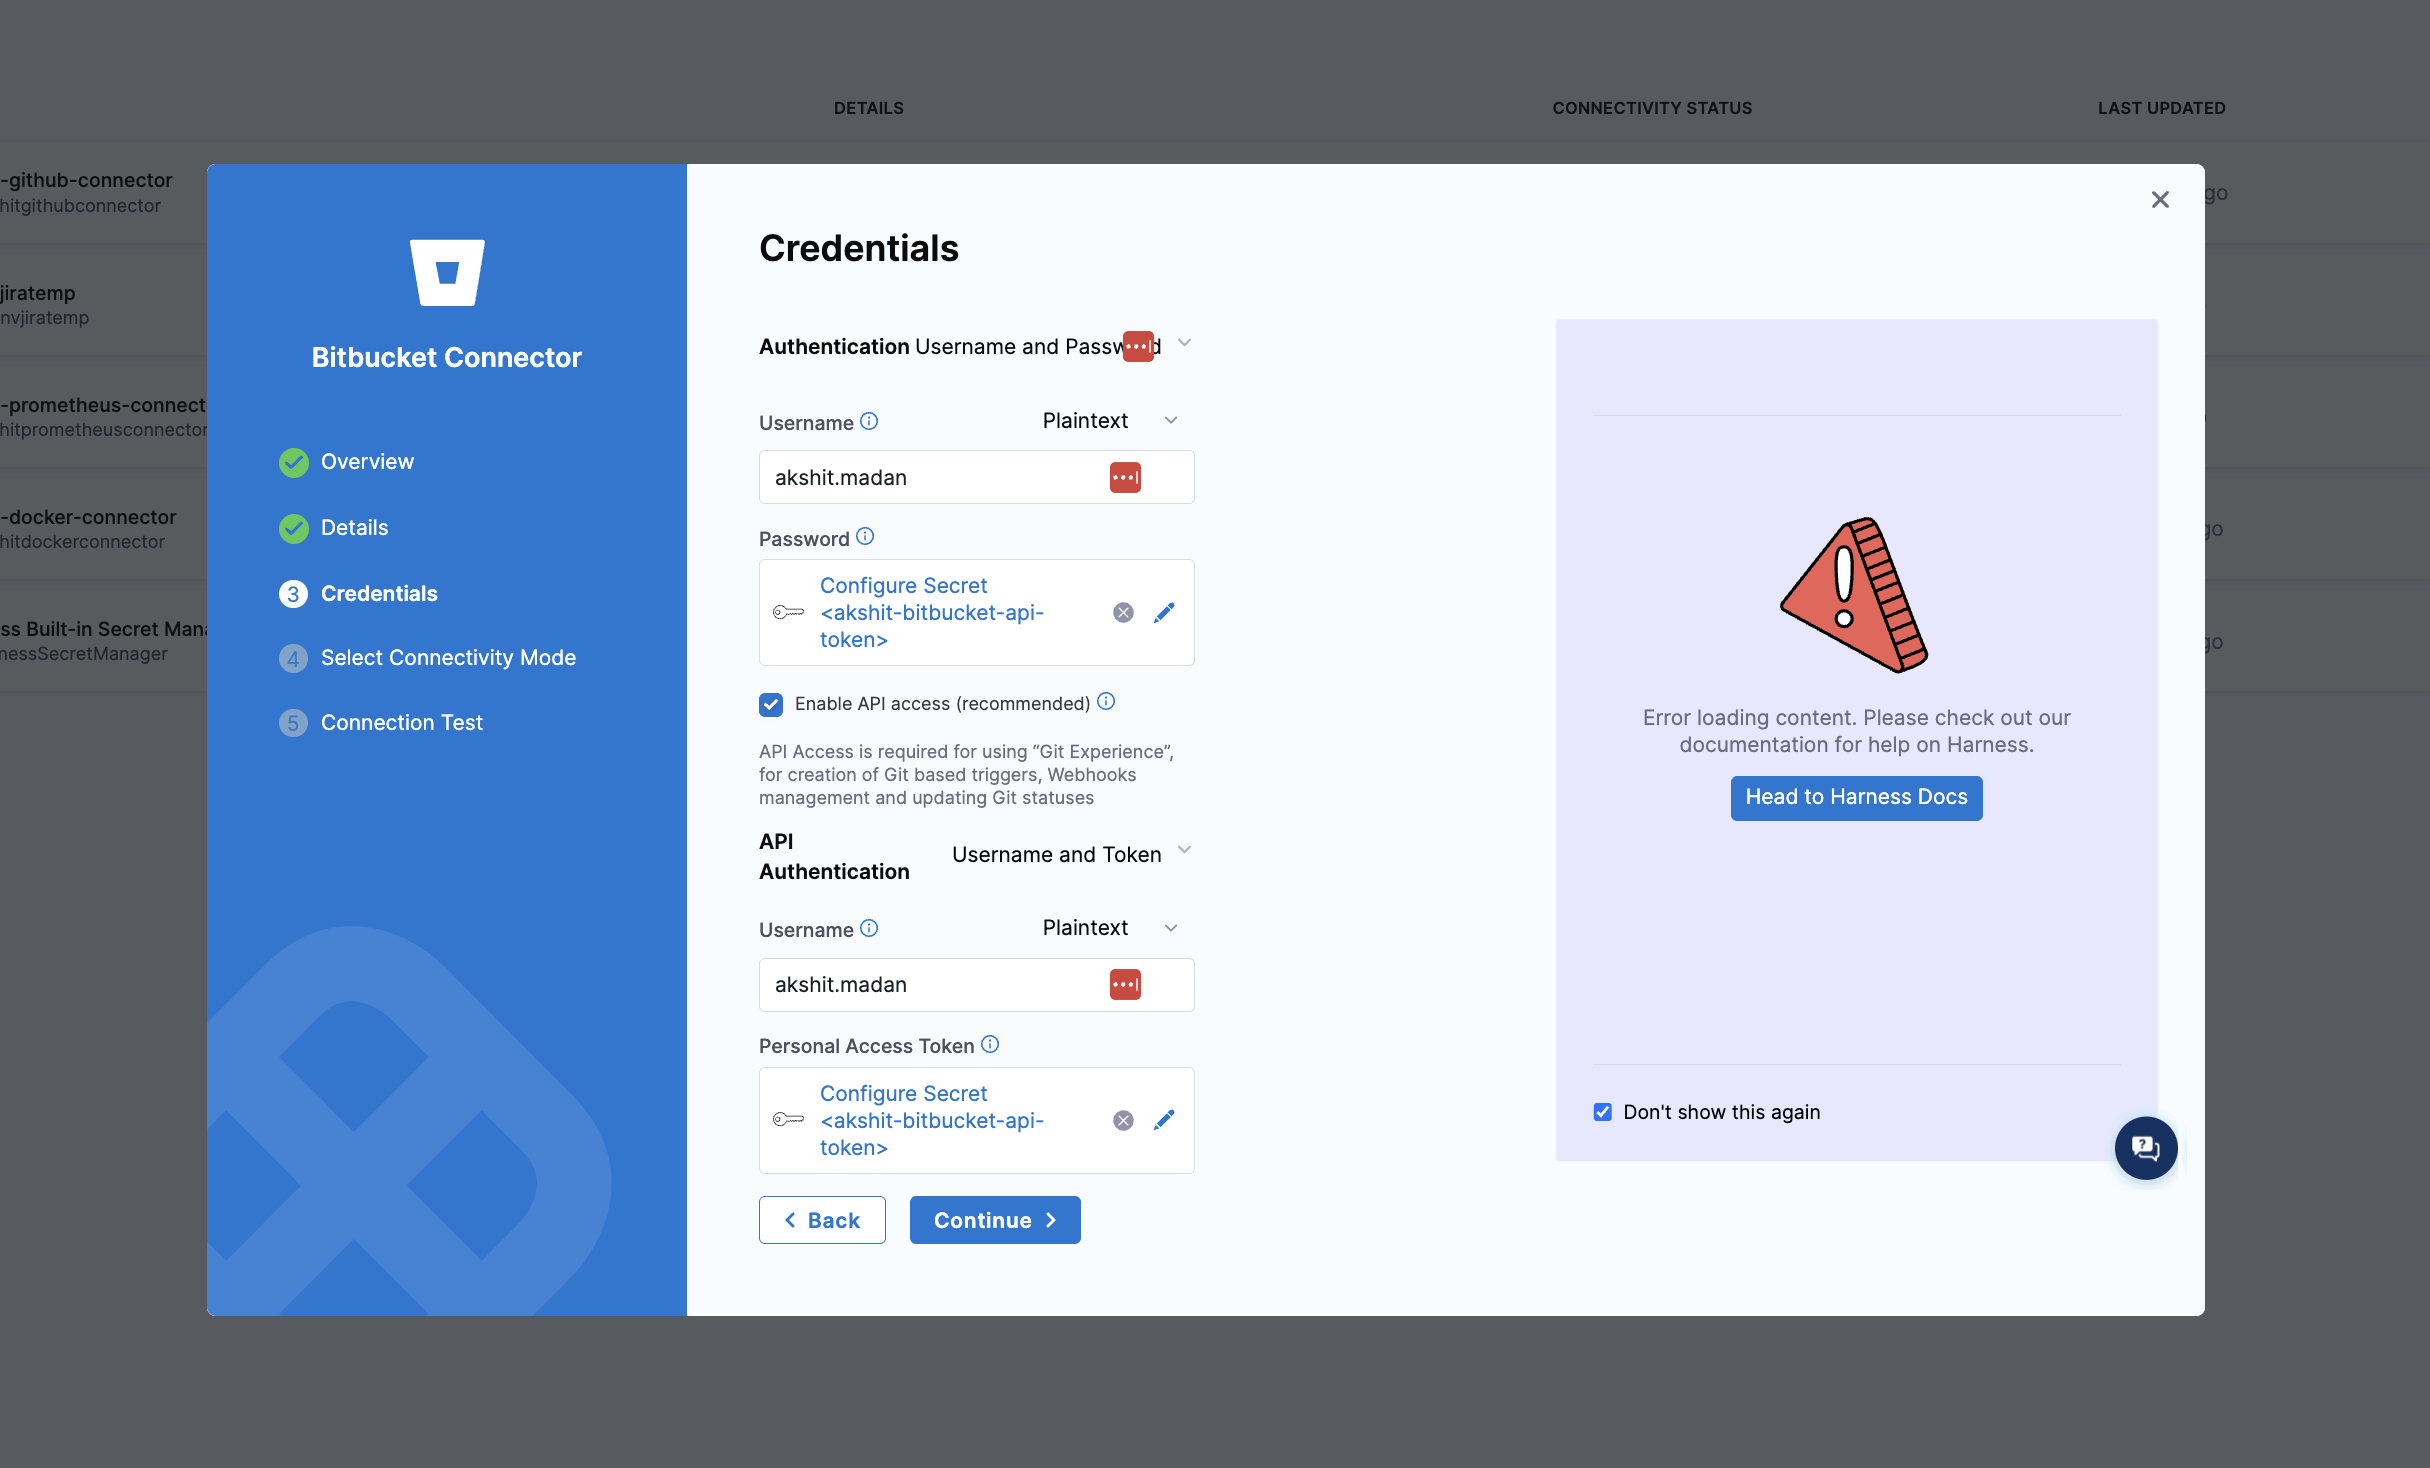
Credentials settings
Provide authentication credentials for the connector.
Authentication
The Connection Type you chose in the Details settings determines the Authentication method.
- HTTP: Username and Password
- SSH: SSH Key
The HTTP Connection Type requires Username and Password authentication for all accounts and repos, including read-only repos.
Username
In the Username field, enter your Bitbucket account username. You can find your username in your Bitbucket Account settings. You can use either plaintext or a Harness encrypted text secret.
If you're unsure of your Bitbucket username, go to https://bitbucket.org/account/settings/ to view your account username. This is different from your email address.
Password
In the Password field, provide one of the following authentication credentials. All passwords are stored as Harness encrypted text secrets.
For Bitbucket Cloud:
- API Token (recommended): Use an API token with your username. API tokens are the recommended authentication method for Bitbucket Cloud. See Create an API token for instructions.
- Access Token: Use an access token with your username. If you use an access token, the Username must be
x-bitbucket-api-token-auth. - App Password (deprecated): App Passwords are deprecated and will stop working after June 9, 2026. Migrate to API tokens. See Migrate from App Passwords to API tokens.
For Bitbucket Data Center (On-Prem):
- HTTP Access Token: Use an HTTP access token with your username.
The authentication options available depend on your Bitbucket account type:
- Bitbucket Cloud: Use API tokens (recommended), access tokens, or App Passwords (deprecated).
- Bitbucket Data Center (On-Prem): Use HTTP access tokens only. API tokens and App Passwords are not supported.
You must provide an account-level or workspace-level token. Repo-level tokens are not supported.
The SSH Connection Type requires an SSH Key in PEM format. OpenSSH keys are not supported. In Harness, SSH Keys are stored as Harness SSH credential secrets. When creating an SSH credential secret for a code repo connector, the SSH credential's Username must be git. Always save the ssh key as a file secret.
For details on creating SSH keys and adding them to your Bitbucket account, go to the Bitbucket documentation about Configuring SSH and two-step verification.
If you use the keygen command to generate an SSH key, include arguments such as rsa and -m PEM to ensure your key is properly formatted and uses the RSA algorithm. For example, this command creates an SSHv2 key:
ssh-keygen -t rsa -m PEM
Make sure to follow the prompts to finish creating the key. For more information, go to the Linux ssh-keygen man page.
Enable API access
You must enable API access to use Git-based triggers, manage webhooks, or update Git statuses with this connector. If you are using the Harness Git Experience, this setting is required. API access allows authentication via multiple methods.
HTTP API Base URL for SSH connectors with context paths
When you use an SSH connector to connect to a Bitbucket Data Center server that has a context path, you may need to provide the HTTP API Base URL explicitly. A context path is a URL segment that appears between the hostname and the repository path, such as /bitbucket in https://example.com/bitbucket/scm/project/repo.git.
SSH URLs (such as ssh://git@example.com:7999/project/repo.git) do not contain context path information. Without this information, Harness cannot construct the correct HTTP URL for API calls.
The HTTP API Base URL field appears when you enable API access. You can leave this field empty for most connector configurations. You must provide a value only when all of the following are true:
- You are connecting to Bitbucket Data Center (On-Prem) (not Bitbucket Cloud)
- You select SSH as the Connection Type
- Your Bitbucket server uses a context path in its HTTP URLs
Bitbucket Cloud does not use context paths. Bitbucket Data Center (On-Prem) HTTP connectors already contain the context path in their connection URL.
In the HTTP API Base URL field, enter the complete HTTP base URL including the context path. Do not include /scm/ or repository-specific paths. Provide only the base URL up to and including the context path.
URL format: https://HOST/CONTEXT-PATH
Example: If your Bitbucket server is accessible at https://example.com/bitbucket, enter https://example.com/bitbucket in the HTTP API Base URL field.
Example configuration for an SSH connector with a context path
Suppose your Bitbucket Data Center installation has the following configuration:
- SSH clone URL:
ssh://git@example.com:7999/myproject/myrepo.git - HTTP clone URL:
https://example.com/bitbucket/scm/myproject/myrepo.git - Context path:
/bitbucket
To enable API access for this connector:
- In the Bitbucket Repository URL field, enter:
ssh://git@example.com:7999/myproject/myrepo.git - Select SSH as the Connection Type
- Configure SSH key authentication
- Enable API access
- In the HTTP API Base URL field, enter:
https://example.com/bitbucket - Configure your API access credentials (Access Token or Username and Token)
Harness uses the HTTP API Base URL as the foundation for all API requests, appending the appropriate Bitbucket REST API endpoints automatically (for example, /rest/api/1.0/projects).
If you do not provide the HTTP API Base URL for an SSH connector on a Bitbucket server with a context path, the connection test may pass for SSH operations (clone, fetch, push) but fail for API operations (webhooks, triggers, status updates).
- Email and API Token (Bitbucket Cloud only)
- Username and App Password (Deprecated)
- Access Token
This authentication method is available only for Bitbucket Cloud. It requires Harness Delegate version 26.02.88600 or later.
In the Email field, enter the email address associated with your Bitbucket account.
In the API Token field, provide a Bitbucket account-level API token stored as a Harness Encrypted Text secret. See Create an API token for instructions on creating an API token with the required scopes.
The Email and API Token authentication method requires Harness Delegate version 26.02.88600 or later. If you're using an older delegate version, use one of the other authentication methods.
Email and API Token authentication is only available for Bitbucket Cloud. For Bitbucket Data Center (On-Prem), use the Access Token method.
App Passwords are deprecated and will stop working after June 9, 2026. Migrate to Email and API Token or Access Token authentication methods. Learn More
In the Username field, enter the Bitbucket account username as specified in your Bitbucket Account settings. Note that this might be different from what you entered in the first Username field. You can use either plaintext or a Harness encrypted text secret.
In the Personal Access Token field, provide a Bitbucket account-level App password. Passwords are stored as Harness Encrypted Text secrets.
You must provide an account-level app password or token. Repo-level tokens are not supported.
For HTTP Connection Types, use the same password you used earlier, and make sure the Username fields are both plain-text or both encrypted. Don't use a plain-text username for one field and a secret for the other.
For On-Prem repos, if the repo URL has an extra segment before the project ID, such as bitbucket.myorg.com/scm/DESCRIPTOR/PROJECT-ID/REPO-NAME.git, some API functionality can fail if you use the full URL. To fix this, remove the extra segment from the Bitbucket Repository URL.
Access tokens can be scoped to a Bitbucket repository, project, or workspace. For Bitbucket Cloud connectors, Harness recommends using a workspace-level access token. With Delegate version 26.02.88600 and later, repository-level tokens cannot list workspaces, which causes Test Connection and repository listing to fail.
When you select the access token method, provide the reference to a secret containing your Bitbucket access token (stored as a Harness Encrypted Text secret) in the Access Token field.
For information about the features and limitations of Bitbucket access tokens, see the Bitbucket documentation.
With Delegate version 26.02.88600 and later, repository-level access tokens can no longer list workspaces due to Atlassian's deprecation of cross-workspace APIs. If you are using a repository-level access token, Harness recommends switching to a workspace-level access token for full connector functionality.
Create an API token
To use API token authentication, you must create an API token in Bitbucket with the required scopes.
Steps to create an API token
- Go to Bitbucket API Tokens Page
- Click Create API token with scopes.
- Enter a label for your token (for example, "Harness Connector").
- Set an expiry date (maximum is one year).
- Select Bitbucket as the workspace.
- Select the following required scopes:
read:issue:bitbucketread:meread:project:bitbucketread:pullrequest:bitbucketread:repository:bitbucketread:user:bitbucketread:webhook:bitbucketread:workspace:bitbucketwrite:webhook:bitbucketwrite:issue:bitbucketwrite:repository:bitbucketwrite:pullrequest:bitbucketdelete:issue:bitbucketdelete:webhook:bitbucket
- Click Create.
- Copy the API token immediately. You won't be able to view it again.
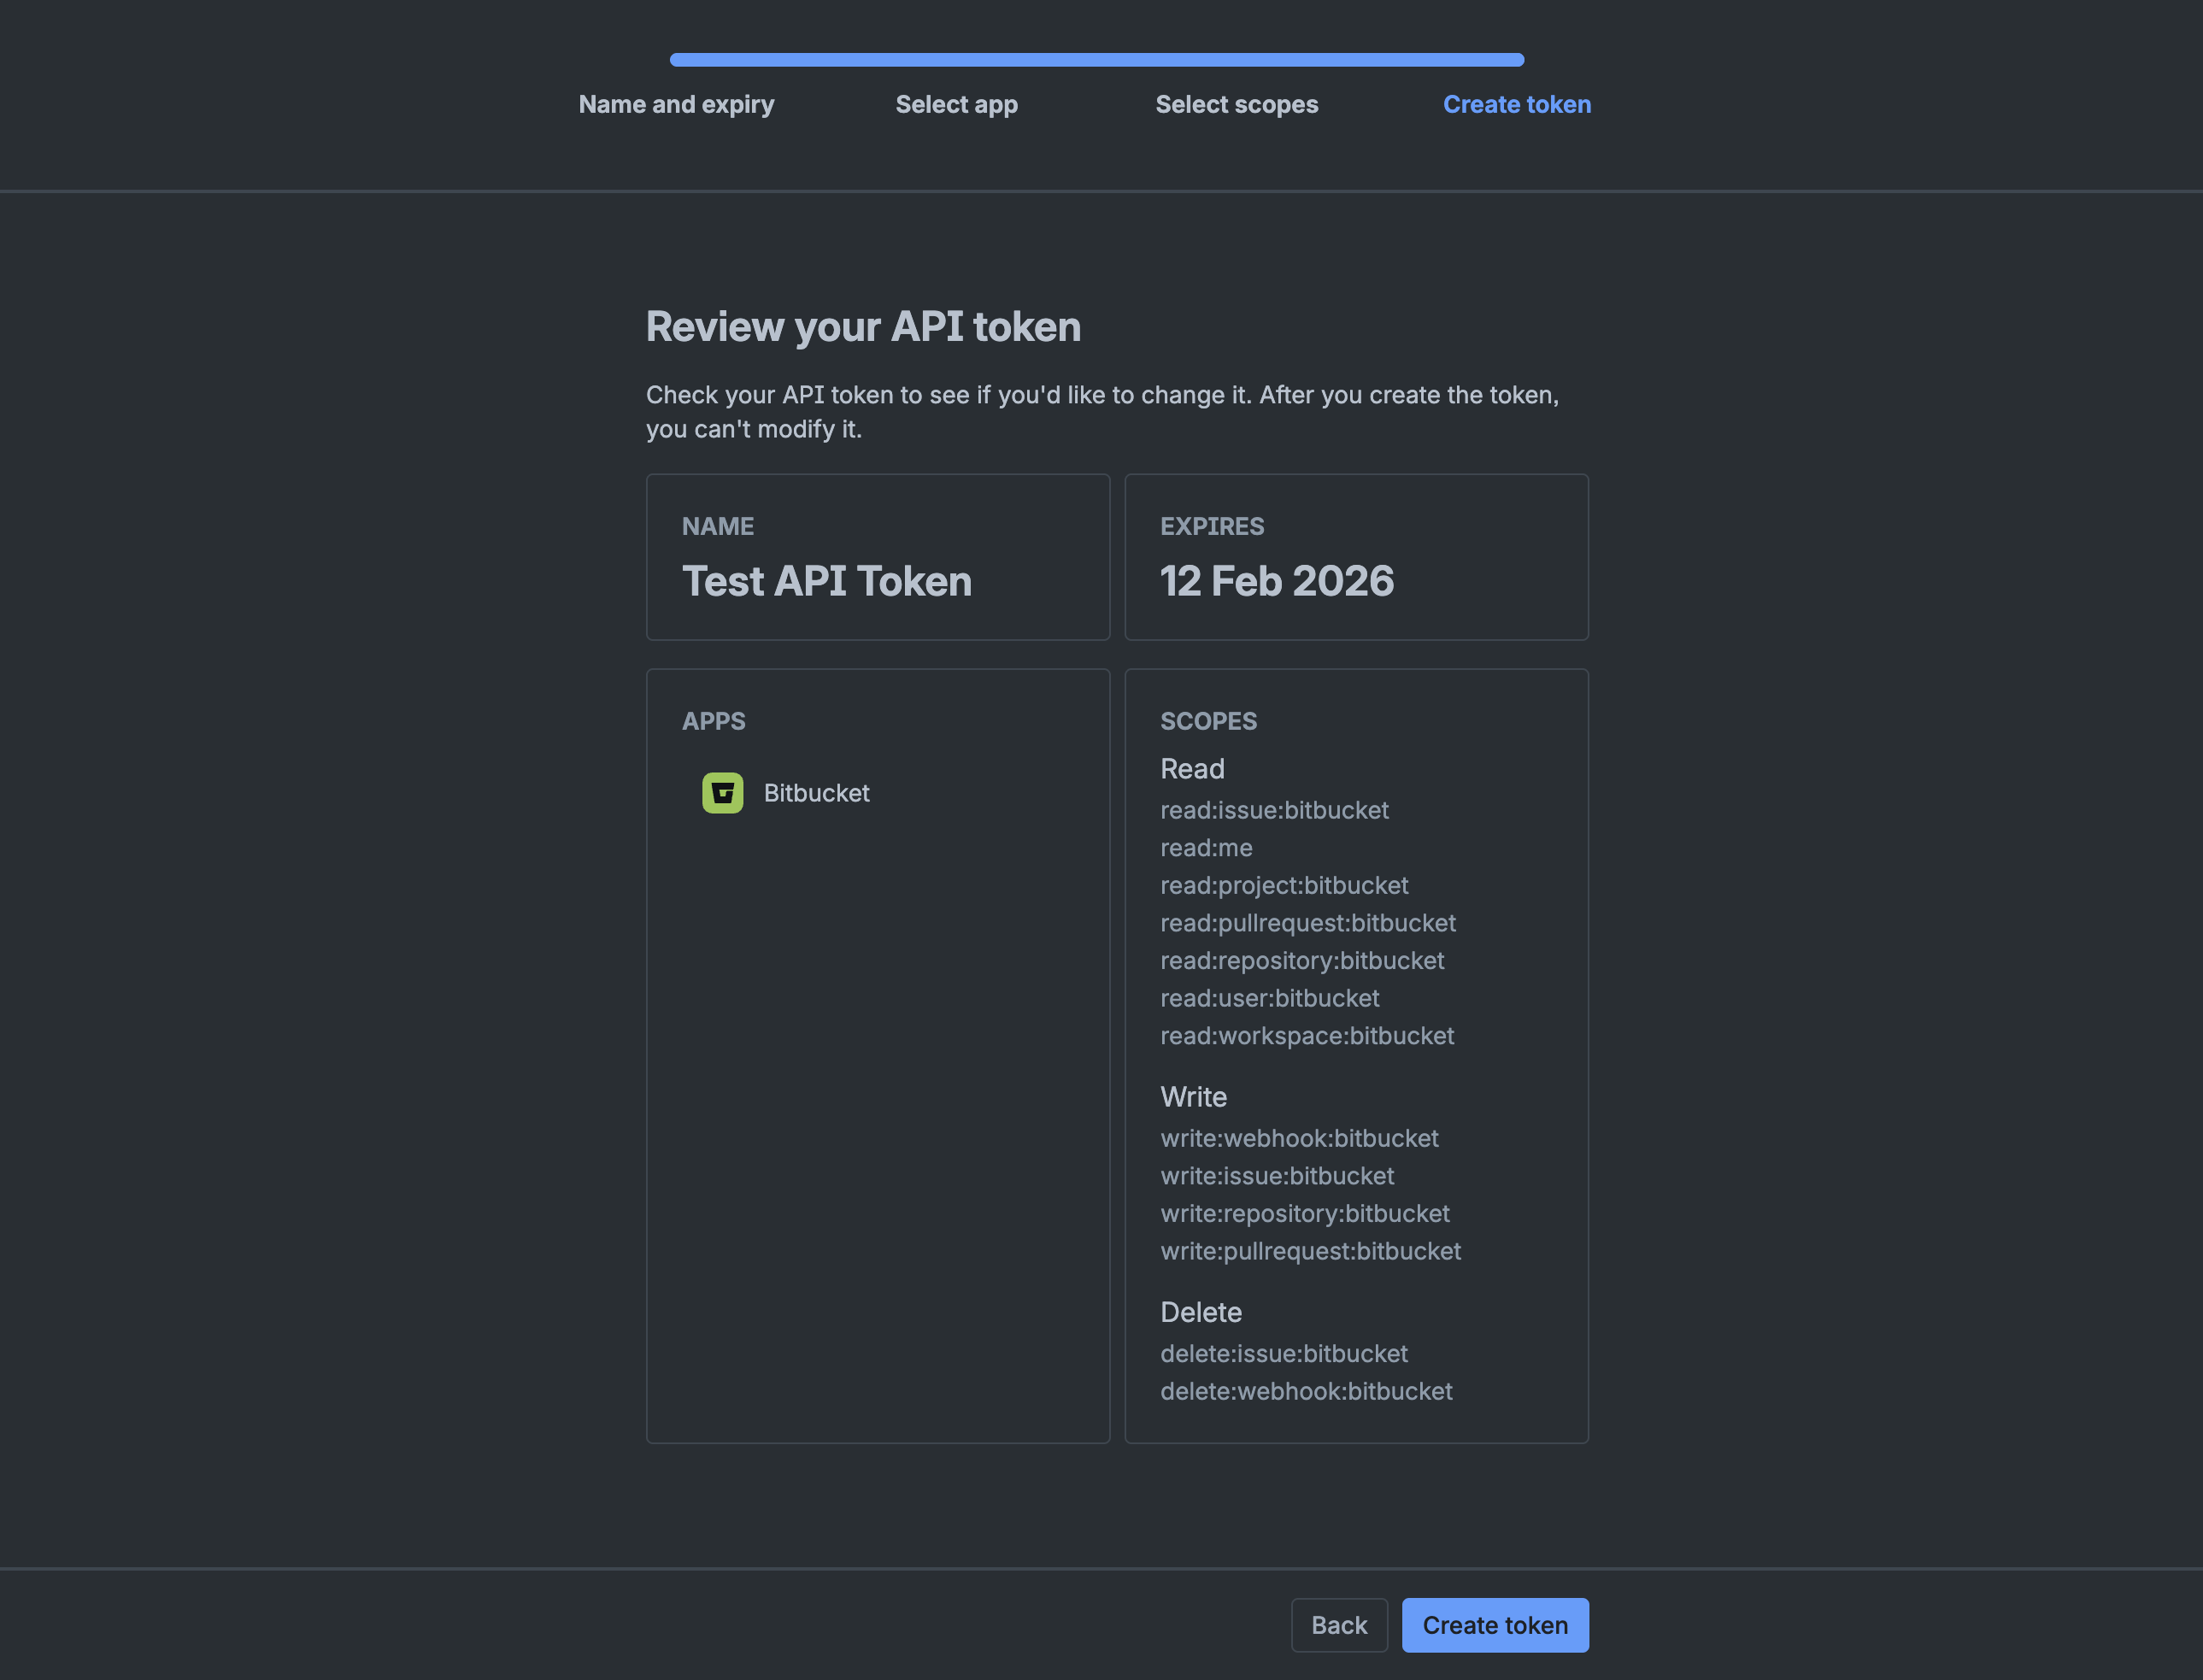
Store the API token as a Harness Encrypted Text secret and reference it in your connector configuration.
Bitbucket requires two-factor authentication (2FA) to be enabled on your account before you can create API tokens.
Migrate from App Passwords to API tokens
If you're currently using App Passwords, migrate to API tokens before June 9, 2026, when App Passwords will stop working.
Migration steps
-
Create an API token in Bitbucket with the required scopes. See Create an API token for instructions.
-
Update your connector:
- Open your Bitbucket connector in Harness.
- In the Password field (under Credentials settings), edit the secret.
- Replace the App Password with your new API token.
- Save the connector.
-
If you enabled API access:
- If you're using Username and App Password for API access, switch to Email and API Token (Bitbucket Cloud only) or Access Token.
- Update the credentials accordingly.
-
Test the connection to verify the migration was successful.
You can use the same API token for both basic authentication (Username/Password) and API access (Email and API Token), but make sure the token has all the required scopes listed in Create an API token.
Connectivity Mode settings
Select whether you want Harness to connect directly to your Bitbucket account or repo, or if you want Harness to communicate with your Bitbucket account or repo through a delegate. If you plan to use this connector with Harness Cloud build infrastructure, you must select Connect through Harness Platform.
For private network connectivity options with Harness Cloud, see Private network connectivity options.
Delegates Setup
If you select Connect through a Harness Delegate, you can select Use any available Delegate or Only use Delegates with all of the following tags.
If you want to use specific delegates, you must identify those delegates. For more information, go to Use delegate selectors.
Kubernetes delegate with self-signed certificates
If your codebase connector allows API access and connects through a Harness Delegate that uses self-signed certificates, you must specify ADDITIONAL_CERTS_PATH in the delegate pod, as described in Configure a Kubernetes build farm to use self-signed certificates.
Troubleshooting
Here are some troubleshooting suggestions for BitBucket Connectors.
Connection test failing
If the connection test returns a not authorized error, check the following:
-
Username: Make sure you used the Username specified in the Bitbucket Account settings, not your email address. You can find your username at https://bitbucket.org/account/settings/.
-
Token permissions: The connection test may fail if the token doesn't have sufficient privileges. Make sure your API token or access token has all the required scopes. See Create an API token for the list of required scopes.
-
App Password deprecation: If you're using an App Password and the connection test fails, the App Password may have expired or been revoked. Migrate to an API token. See Migrate from App Passwords to API tokens.
Test Connection or repository listing fails after delegate upgrade to 26.02.88600
After upgrading to Delegate version 26.02.88600 or later, the following operations may fail if you are using a repository-level access token for Bitbucket Cloud:
- Test Connection fails because the test attempts to fetch repositories across the workspace.
- Repository listing (for example, when creating remote entities in Git Experience) returns errors because workspace-level access is required to discover repositories.
Both failures share the same root cause: Atlassian has deprecated cross-workspace APIs in Bitbucket Cloud, and repository-level tokens no longer have permission to list workspaces or repositories across the workspace.
Other Git Experience operations — such as branch listing, file sync, and webhook operations — continue to work with repository-level tokens.
To resolve this:
- Switch to a workspace-level access token. See the Bitbucket access tokens documentation for instructions on creating one, or switch to an API token for workspace-level access.
- If you are already using an API token (under Email and API Token authentication), ensure the token has the
read:workspace:bitbucketscope. - Update the connector credentials in Harness and run Test Connection to verify.
Status doesn't update in BitBucket Cloud PRs
There are two potential causes for this:
- Harness uses the pipeline's codebase connector to send status updates to BitBucket. Check the pipeline's codebase configuration to confirm that it is using your BitBucket code repo connector.
- BitBucket Cloud limits the key size for sending status updates to PRs, and this can cause incorrect status updates in PRs due to some statuses failing to send. An enhancement was released in April 2024 for this behavior. However, if you modified your BitBucket Cloud settings based on the original handling, you might need to edit the settings again to account for the enhancement.
Some API functions fail for On-Prem repos
If your On-Prem repo URL has an extra segment before the project ID or a multi-segment project ID, such as bitbucket.myorg.com/scm/DESCRIPTOR/PROJECT-ID/REPO-NAME.git, some API functionality can fail if you use the full URL. To fix this, remove the extra segment from the Bitbucket Repository URL.
Connection test fails for SSH connectors with API access enabled on servers with context paths
If you are using an SSH connector with API access enabled and your Bitbucket Data Center server uses a context path (for example, /bitbucket), the connection test may fail even though SSH Git operations work correctly.
SSH URLs (such as ssh://git@example.com:7999/project/repo.git) do not include the context path that appears in HTTP URLs (such as https://example.com/bitbucket). Without the context path, Harness cannot construct the correct API URL.
To resolve this, provide the HTTP API Base URL in the API access configuration. Go to HTTP API Base URL to review detailed instructions.