Harness Git Experience Quickstart
This quickstart shows you how to enable and use Git Experience for your Harness resources, such as pipelines.
Harness Git Experience lets you store your resources and configurations in Git and pick Git repos as the source of truth.
Objectives
You'll learn how to:
- Enable Git Experience for a pipeline.
- Create and sync a pipeline with your Git repo.
- Execute a pipeline
Before you begin
Make sure you have the following set up before you begin this quickstart:
-
Make sure you have a Git repo with at least one branch.
-
Make sure you have a Git connector with a Personal Access Token (PAT) for your Git account.
-
A Personal Access Token (PAT) for your Git account.
- Harness needs the PAT to use the Git platform APIs.
- You add the PAT to Harness as a Text Secret, and it is encrypted using a Harness Secret Manager.
- Your Git Personal Access Token is stored in your Harness secret and is a private key to which only you have access. This secret cannot be accessed or referenced by any other user.
Make sure you configure SSO for your GitHub token when enabling Git provider access via SSO.
- The PAT must have the following scope:
- GitHub:

- Bitbucket:
- GitHub:
- To enable Git Experience for your resources, make sure that you have Create/Edit permissions for them.
If you are using Harness Code Repository as your Git Repository, you won't need a Git Connector or a PAT.
Make sure your repo has at least one branch, such as main or master. For most Git providers, you add a README file to the repo, and the branch is created.
Supported Git providers
The following section lists the support for Git providers for Harness Git Sync:
- Harness Code Repository
- GitHub
- Bitbucket Cloud
- Bitbucket Server
- Azure Repos
- GitLab
Make sure feature.file.editor is not set to false in the bitbucket.properties file if you are using Bitbucket on-prem.
Git experience requirements
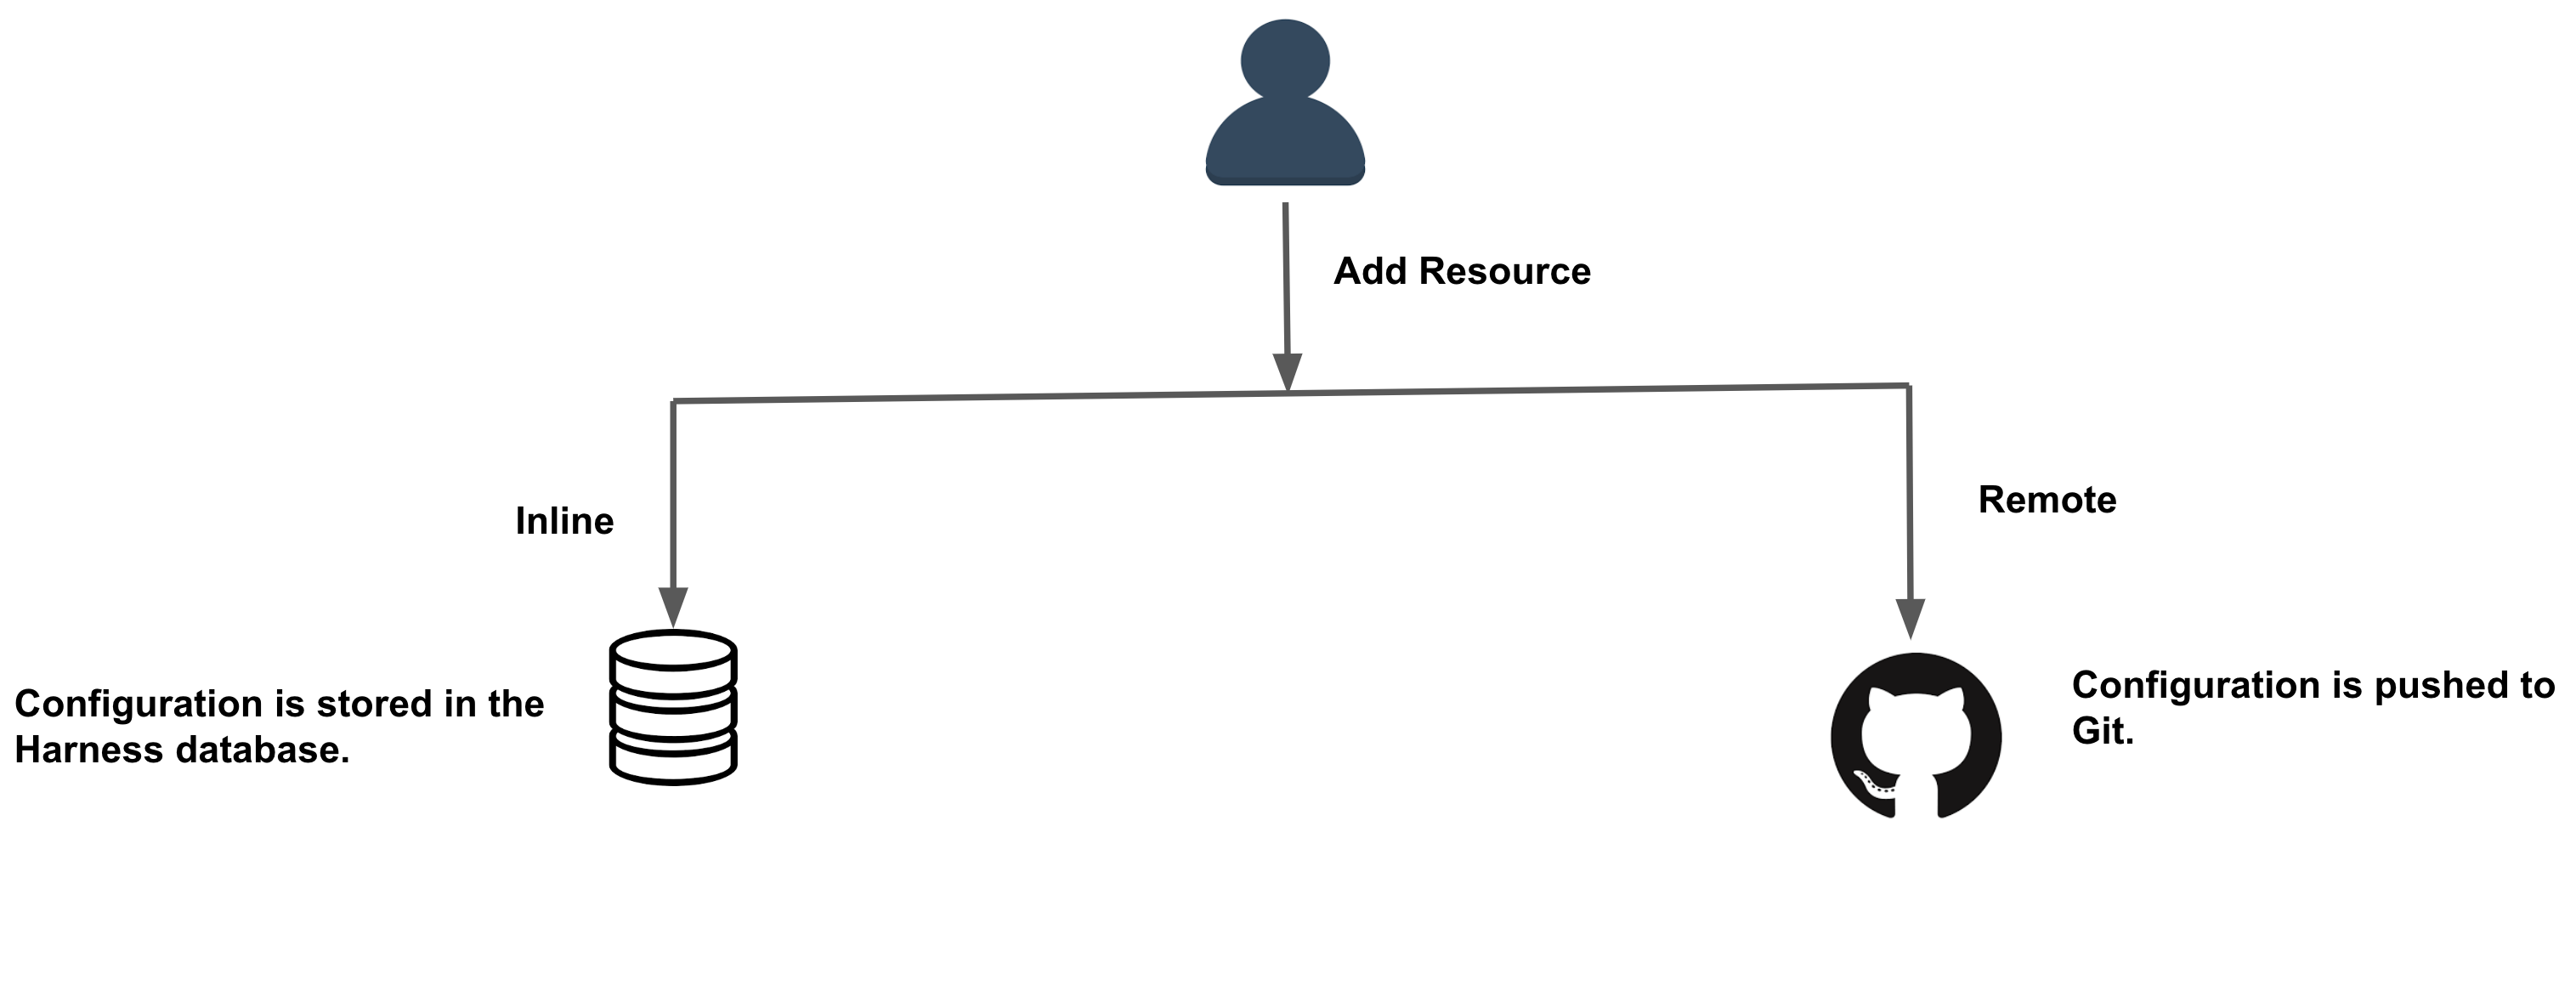
You can store your resources and configurations in Git by selecting the Remote option while creating the resources.
To do this, you must specify a Harness Git Connector along with the repository and branch details.
The file path will follow the convention described in Autocreation of Entities in Harness.
If you are using Harness Code Repository as your Git Repository, you won't need a Git Connector.
This topic explains how to create a remote pipeline and execute it using Harness Git Experience.
You can also store your configurations in Harness by selecting the Inline option while creating resources. For more information on creating an inline pipeline, see Pipelines and Stages.
The following entities are supported in Git Experience:
- Pipelines
- Input sets
- Templates
- Services
- Environment
- Infrastructure Definition
- Policy
Enforce Git experience
To ensure that your resource configurations are saved only in Git repositories, you can enforce Git experience in your Harness account.
You can do this by enabling Enforce git experience for pipelines and templates.
This setting applies to the following resources:
- Pipelines
- Input sets
- Templates
- Services
- Environment
- Infrastructure Definition
- Policy
Harness disables inline pipelines and templates, and users can only create remote pipelines and templates after enabling this setting. You can still create inline input sets corresponding to existing inline pipelines.
To enforce Git experience in Harness:
-
Go to Account Settings, and then select Account Resources.
-
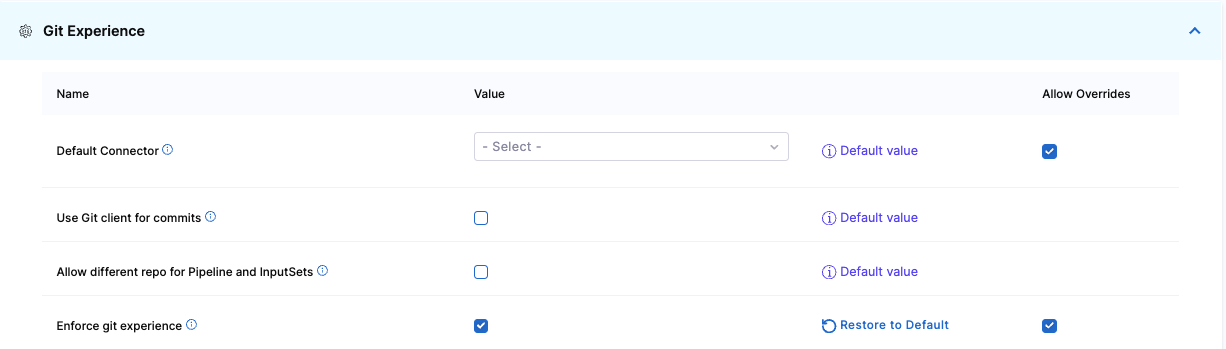
Select Account Default Settings, and then select Git Experience.
-
Enable Enforce git experience. After you enable this setting, it applies to all the scopes (account, organization, and project) in Harness.
-
To override this setting in the child scopes, select Allow Overrides beside the settings. This forces configurations at the account scope to be saved only in Git repositories. Users can, however, still create inline pipelines and templates at the organizational and project levels.
Add a remote pipeline
This quickstart explains how to add a pipeline and sync it with your Git repo. This is called the Remote option. To add a remote pipeline, see the Remote option. To add an inline pipeline, see Create a Pipeline.
In your Project, click Pipelines and then click Create a Pipeline. The Create New Pipeline settings appear.
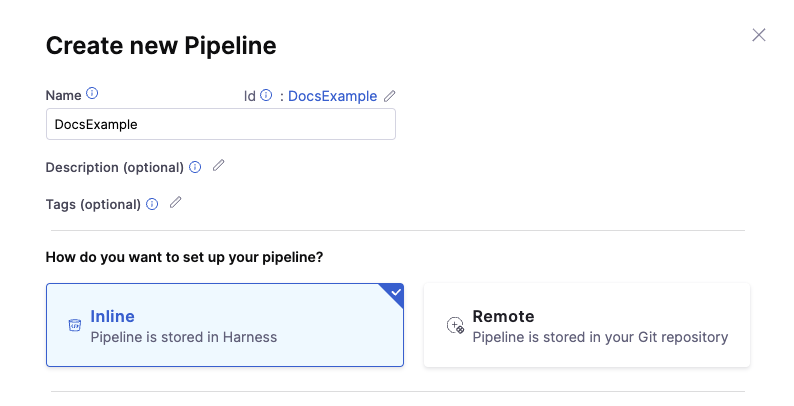
Enter a Name for your pipeline.
Click Remote. The additional settings appear to configure Git Experience.
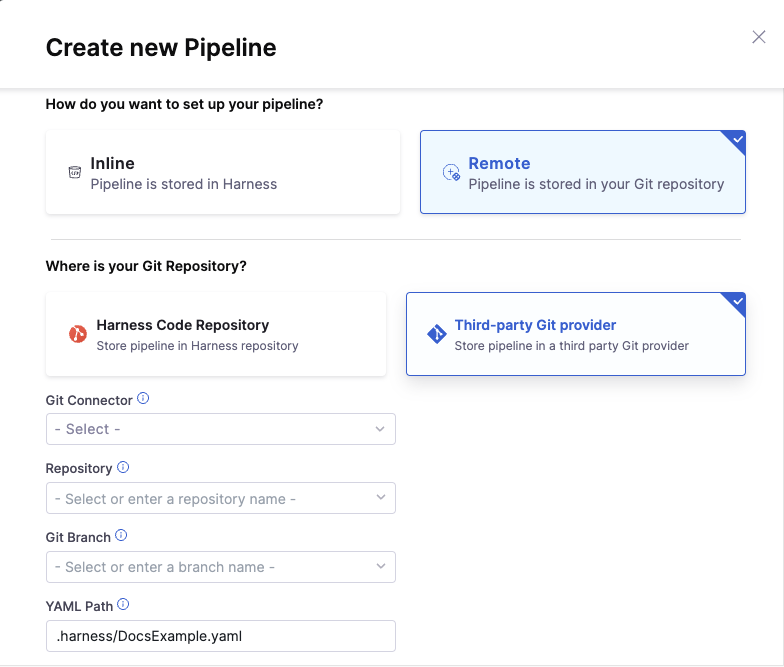
Here you can choose to use Harness Code Repository or a third-party provider. If you decide on Harness Code Repository, you won't need to configure a Git Connector and can skip to selecting your Repository below.
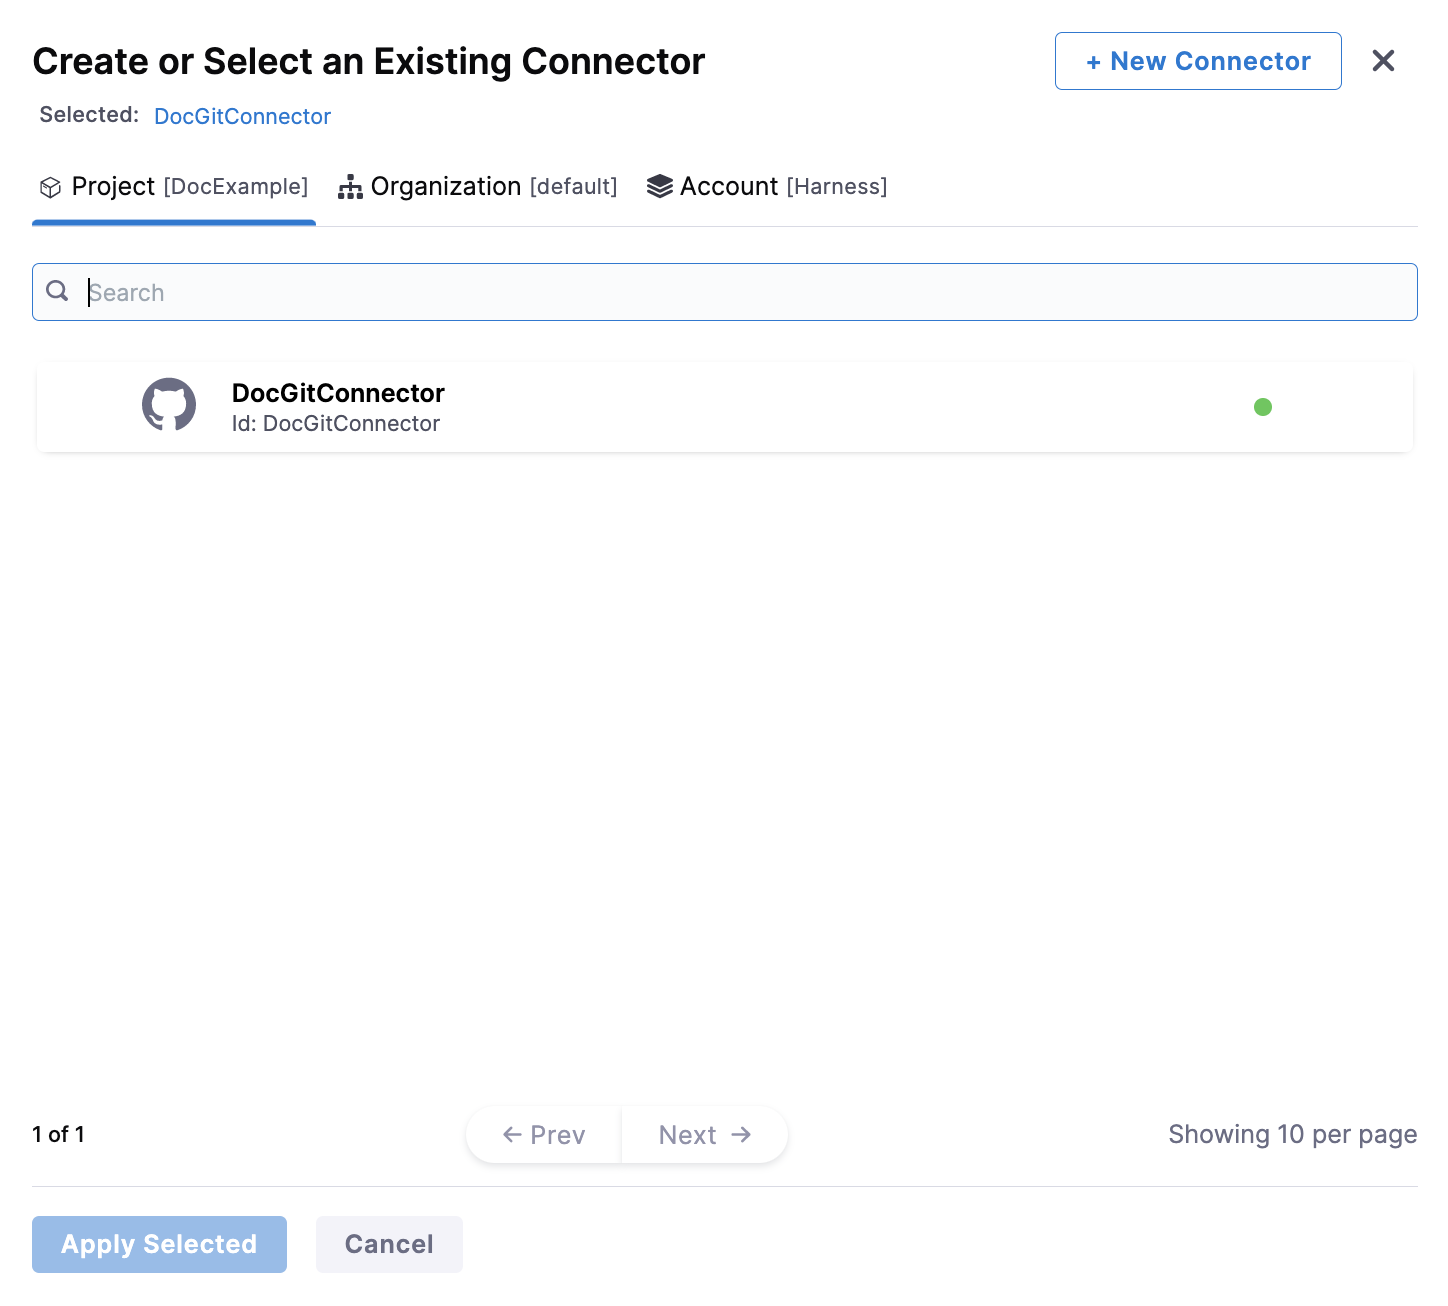
Otherwise, in Git Connector, select or create a Git Connector for your project's repo. For steps, go to Code Repo Connectors.
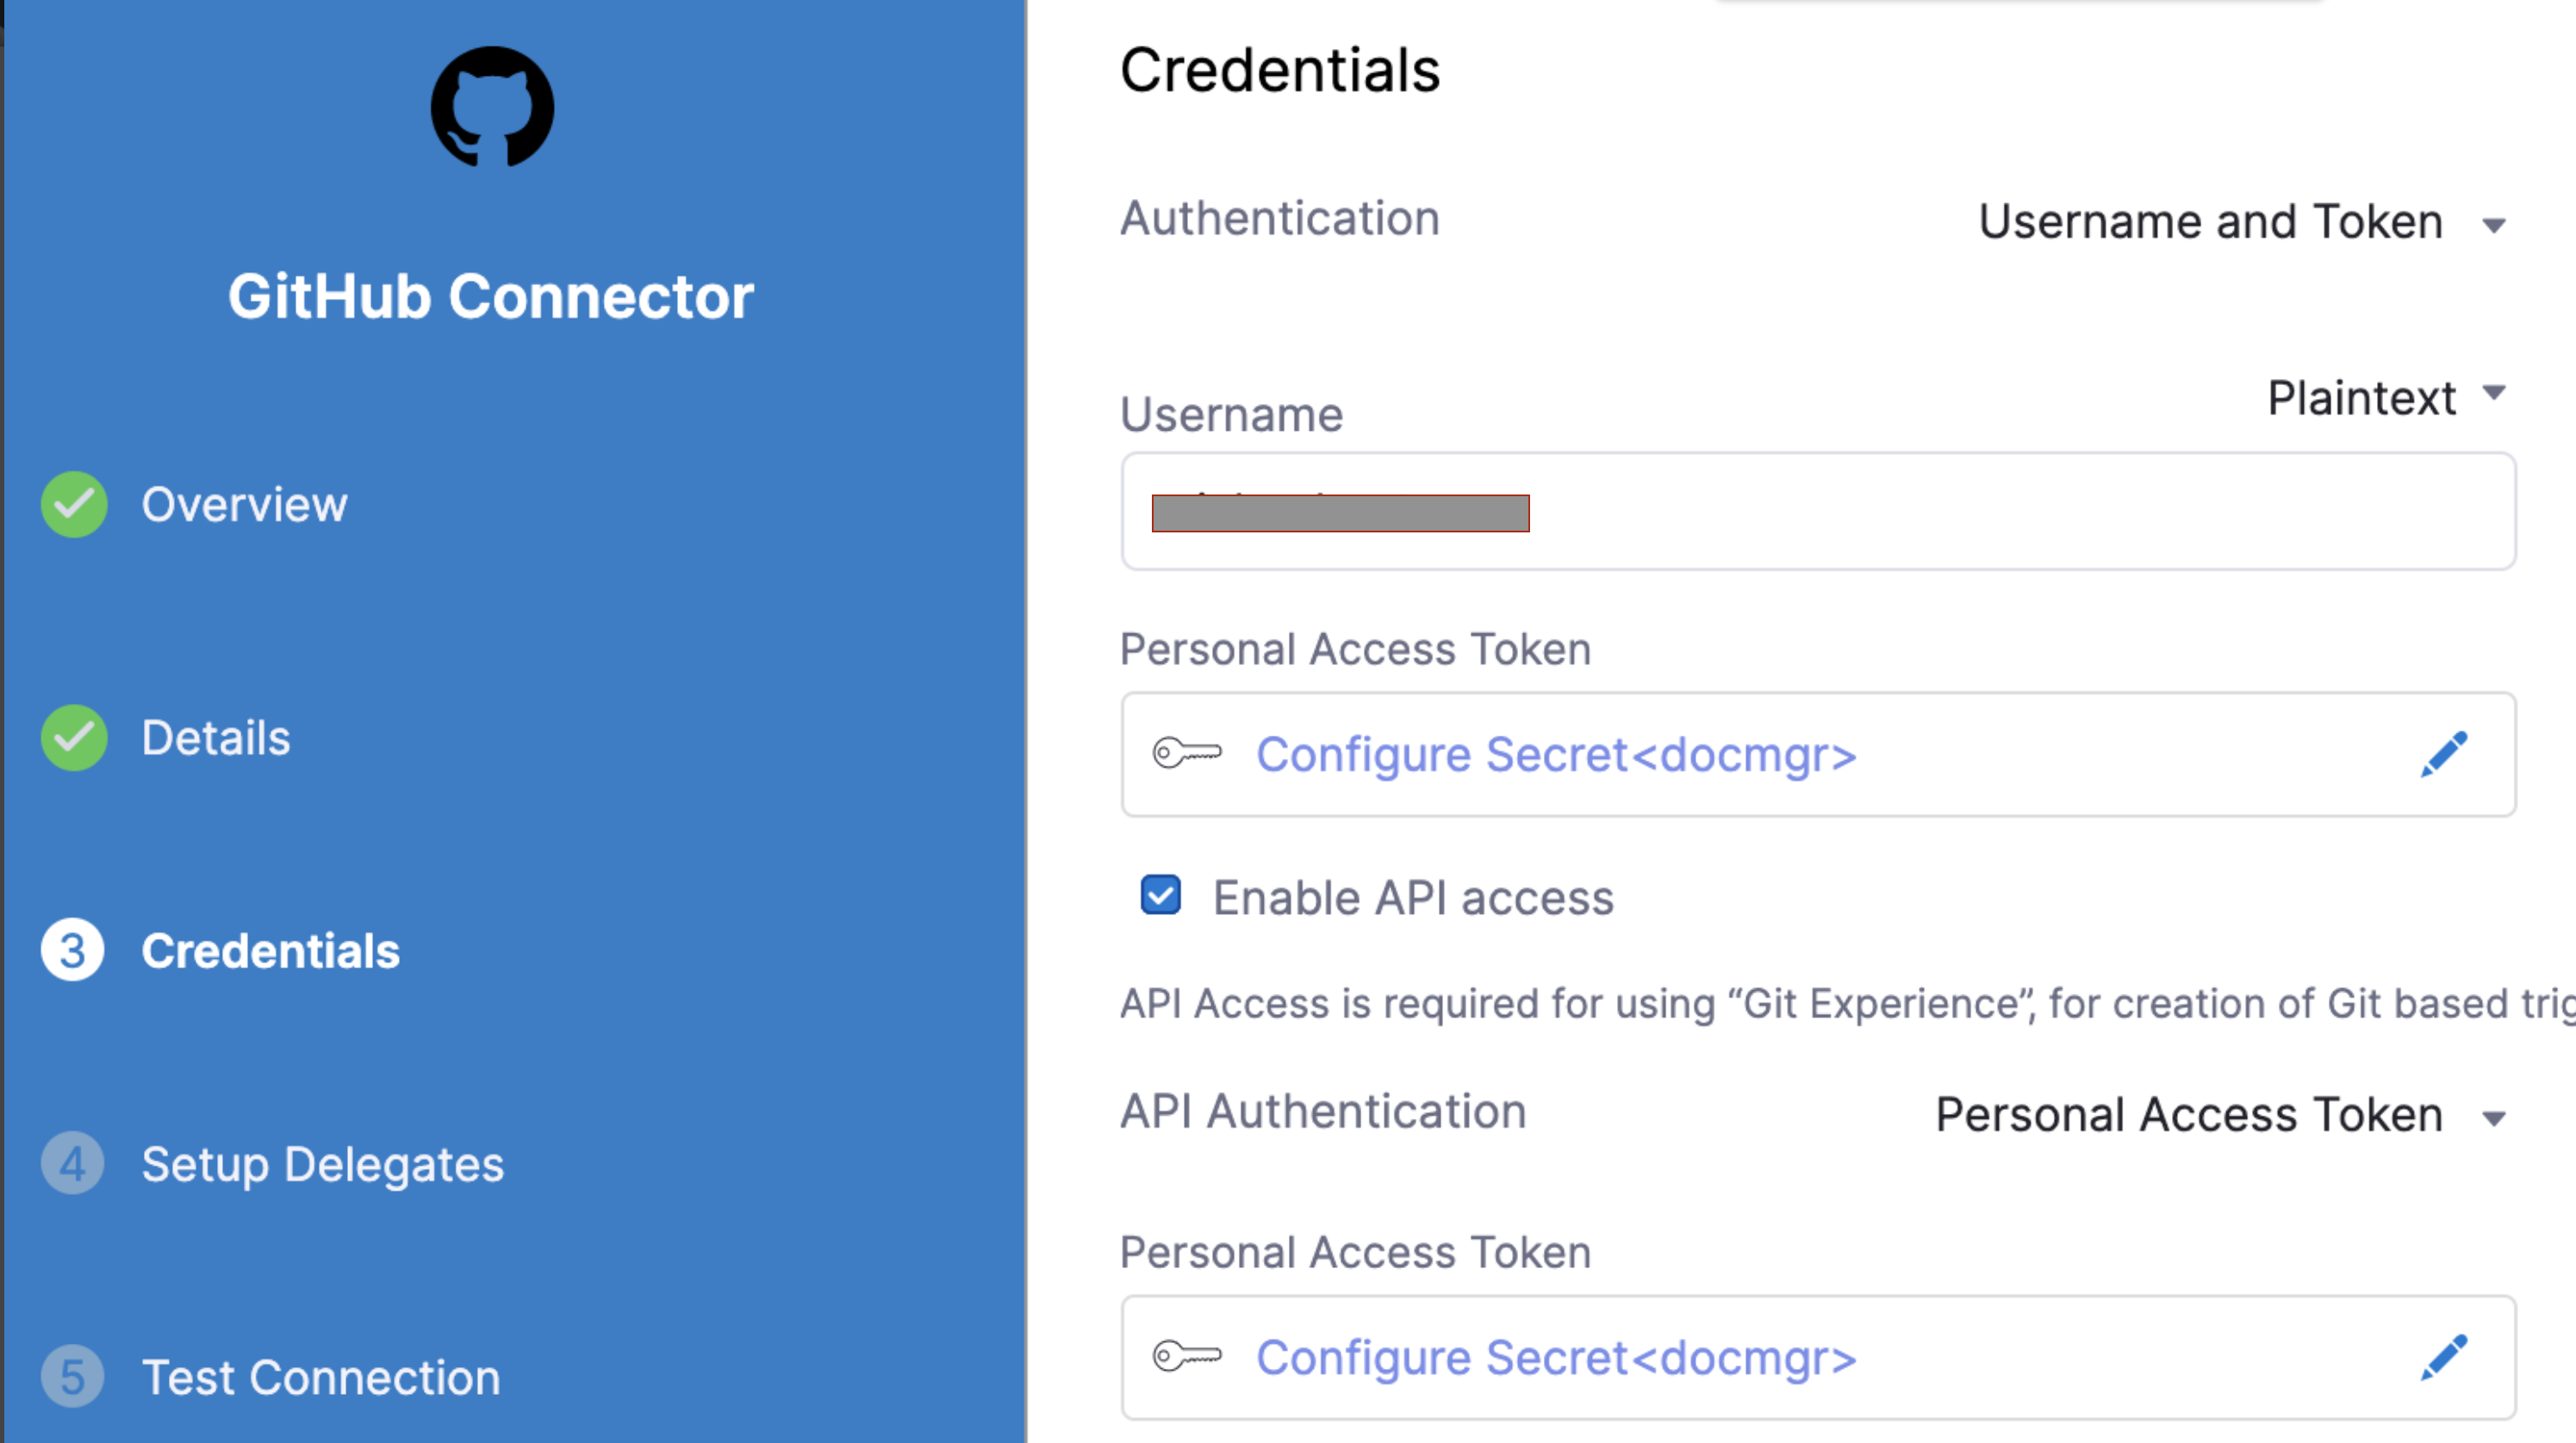
IMPORTANT
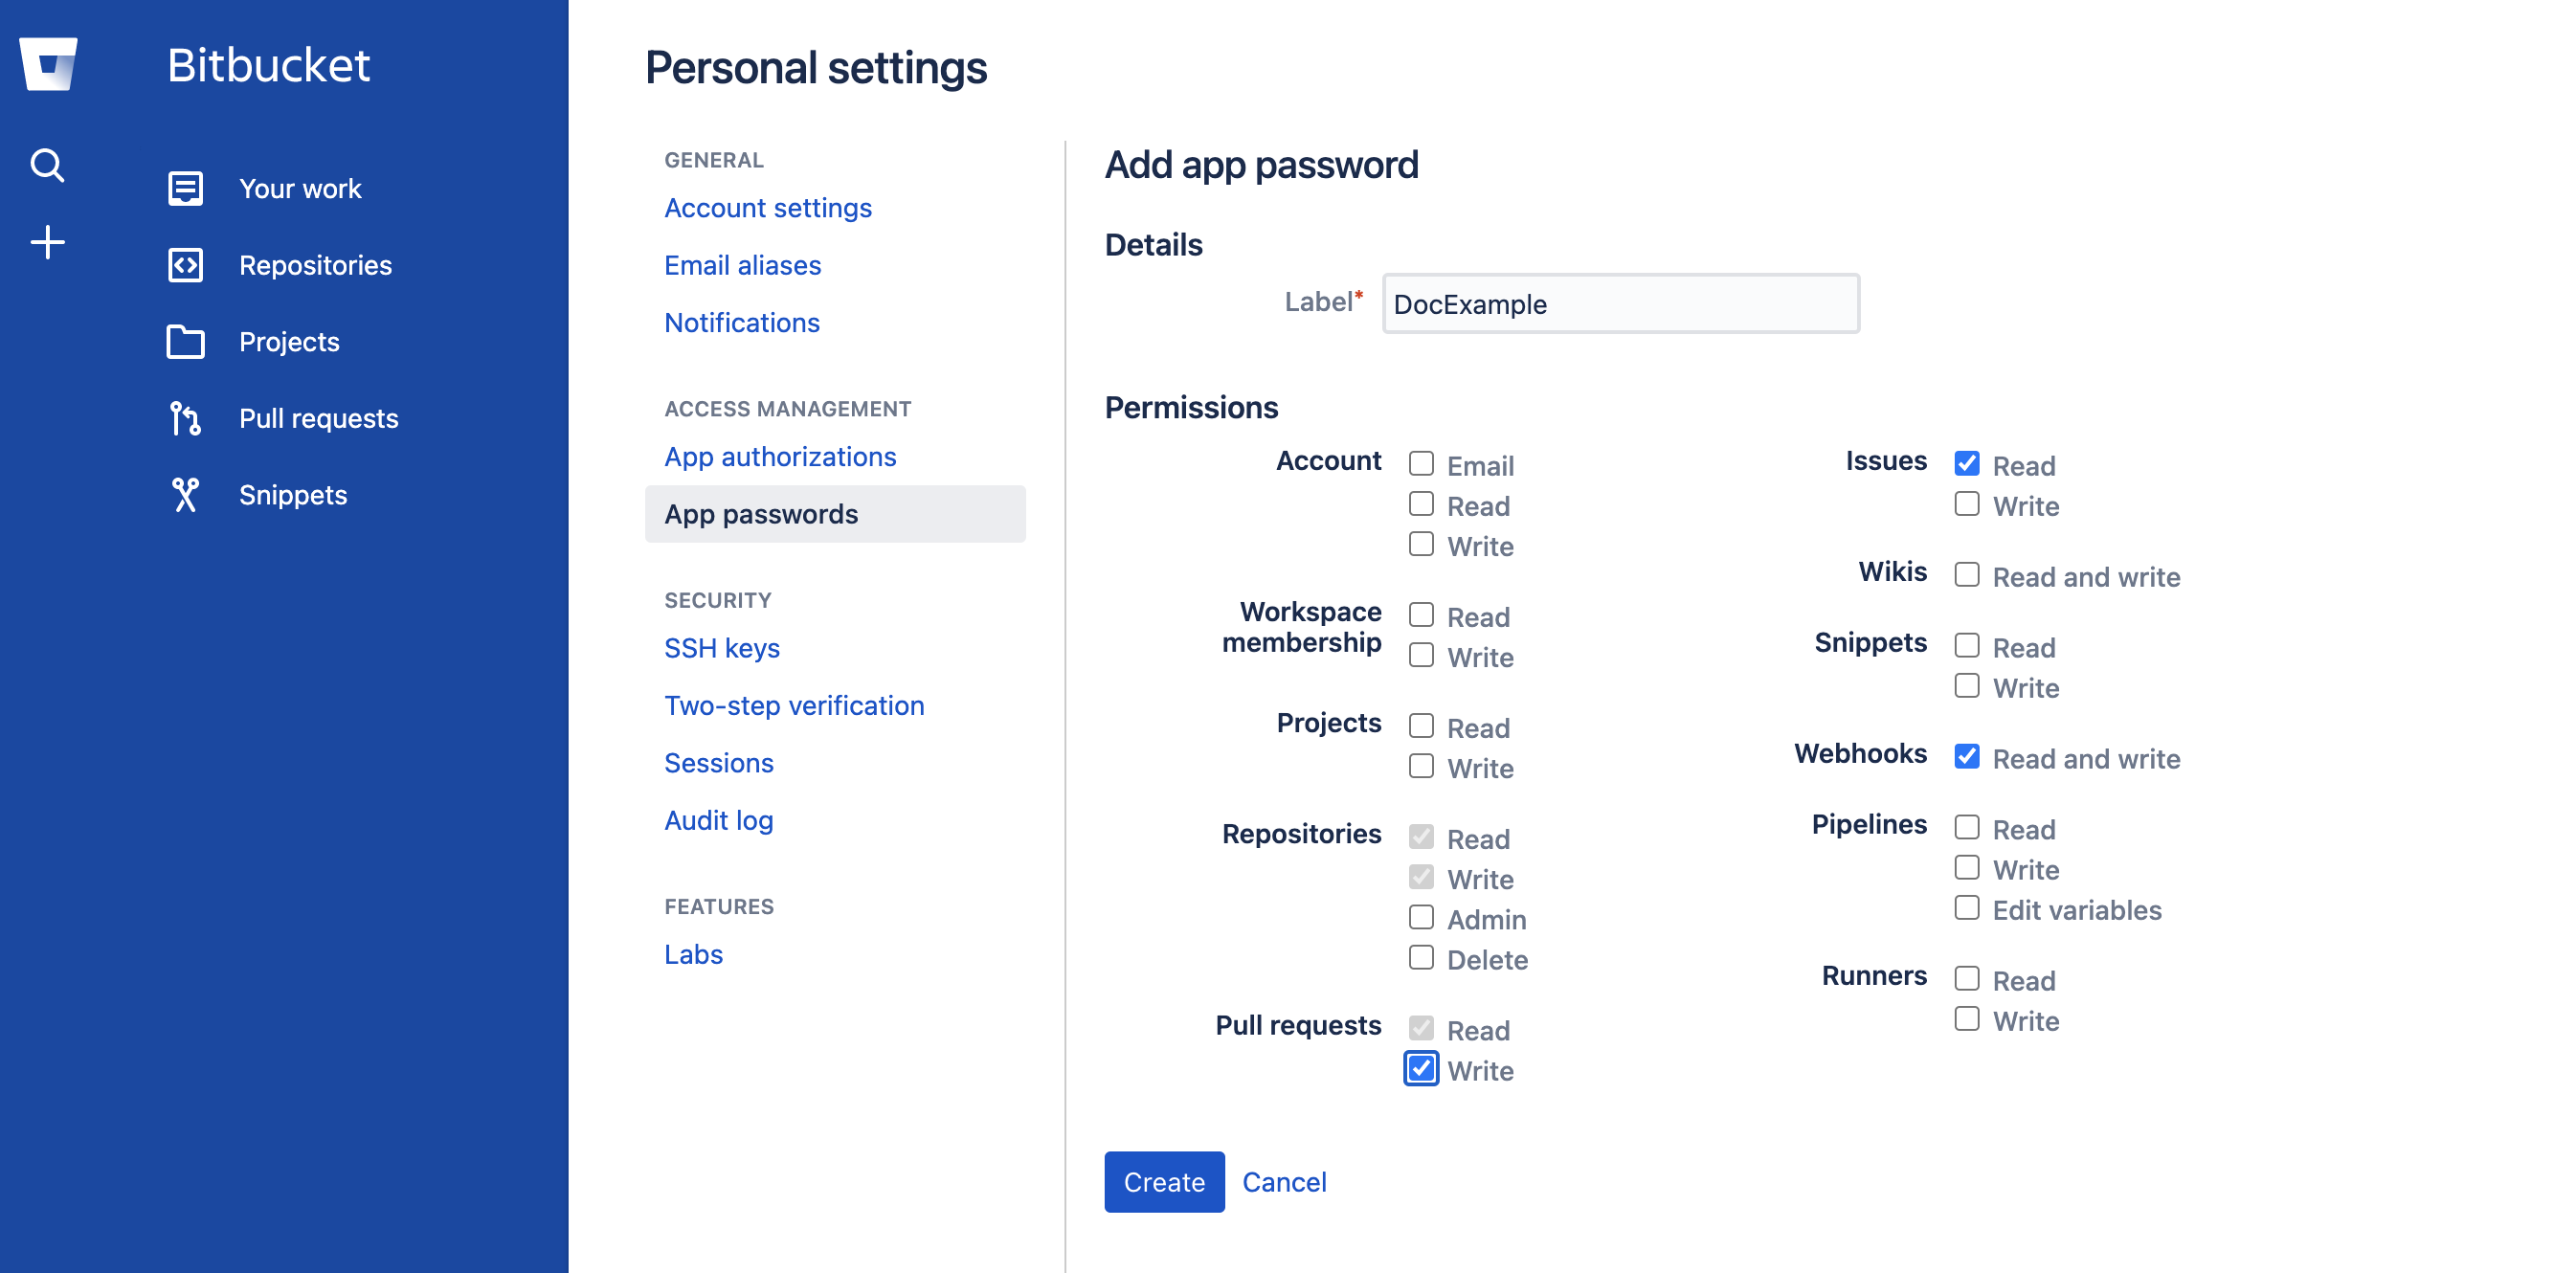
Connector must use the Enable API access option and Token The Connector must use the Enable API access option and Username and Token authentication. Harness requires the token for API access. Generate the token in your Git provider account and add it to Harness as a Secret. Next, use the token in the Git Connector credentials.

For GitHub, the token must have the following scopes:
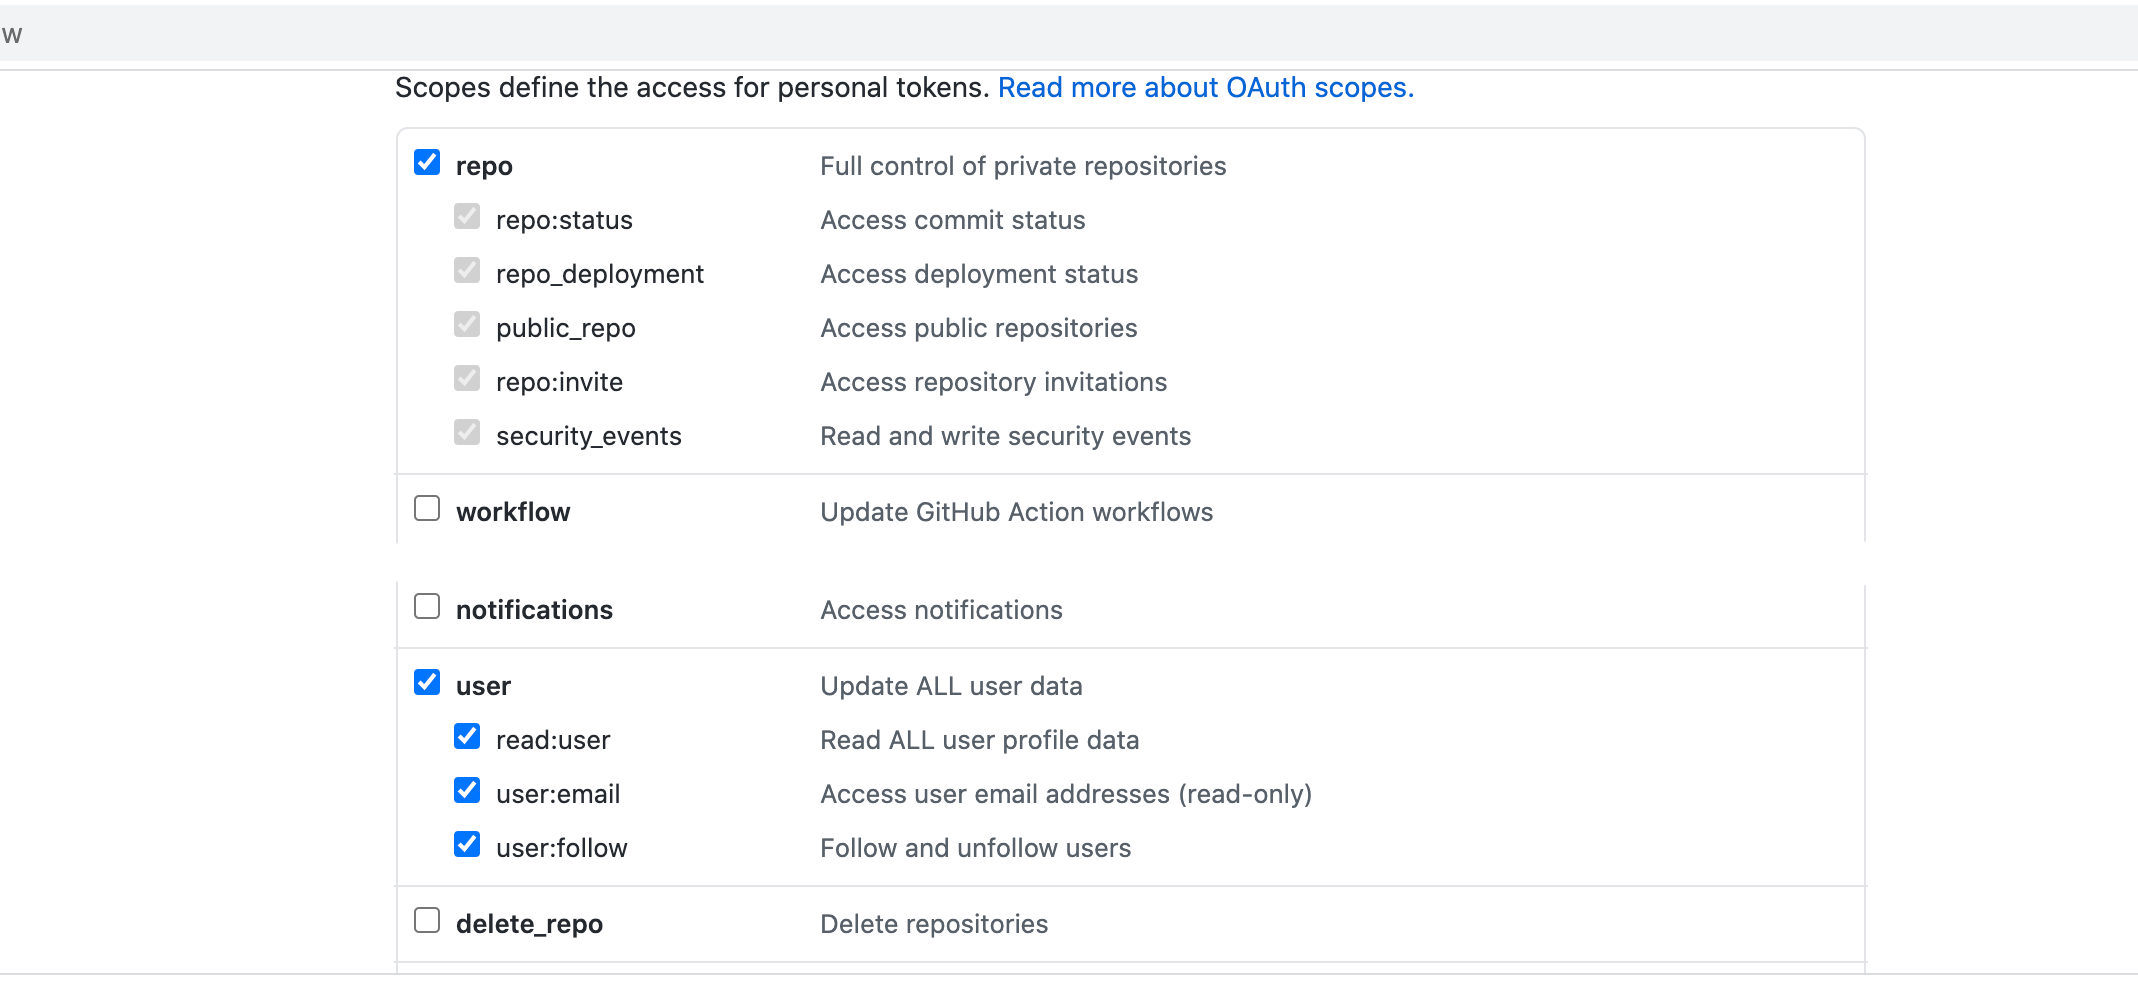
Here's an example of a GitHub Connector with the correct settings:
In Repository, select your repository. If your repository isn't listed, enter its name, as only a select few repositories are listed here.
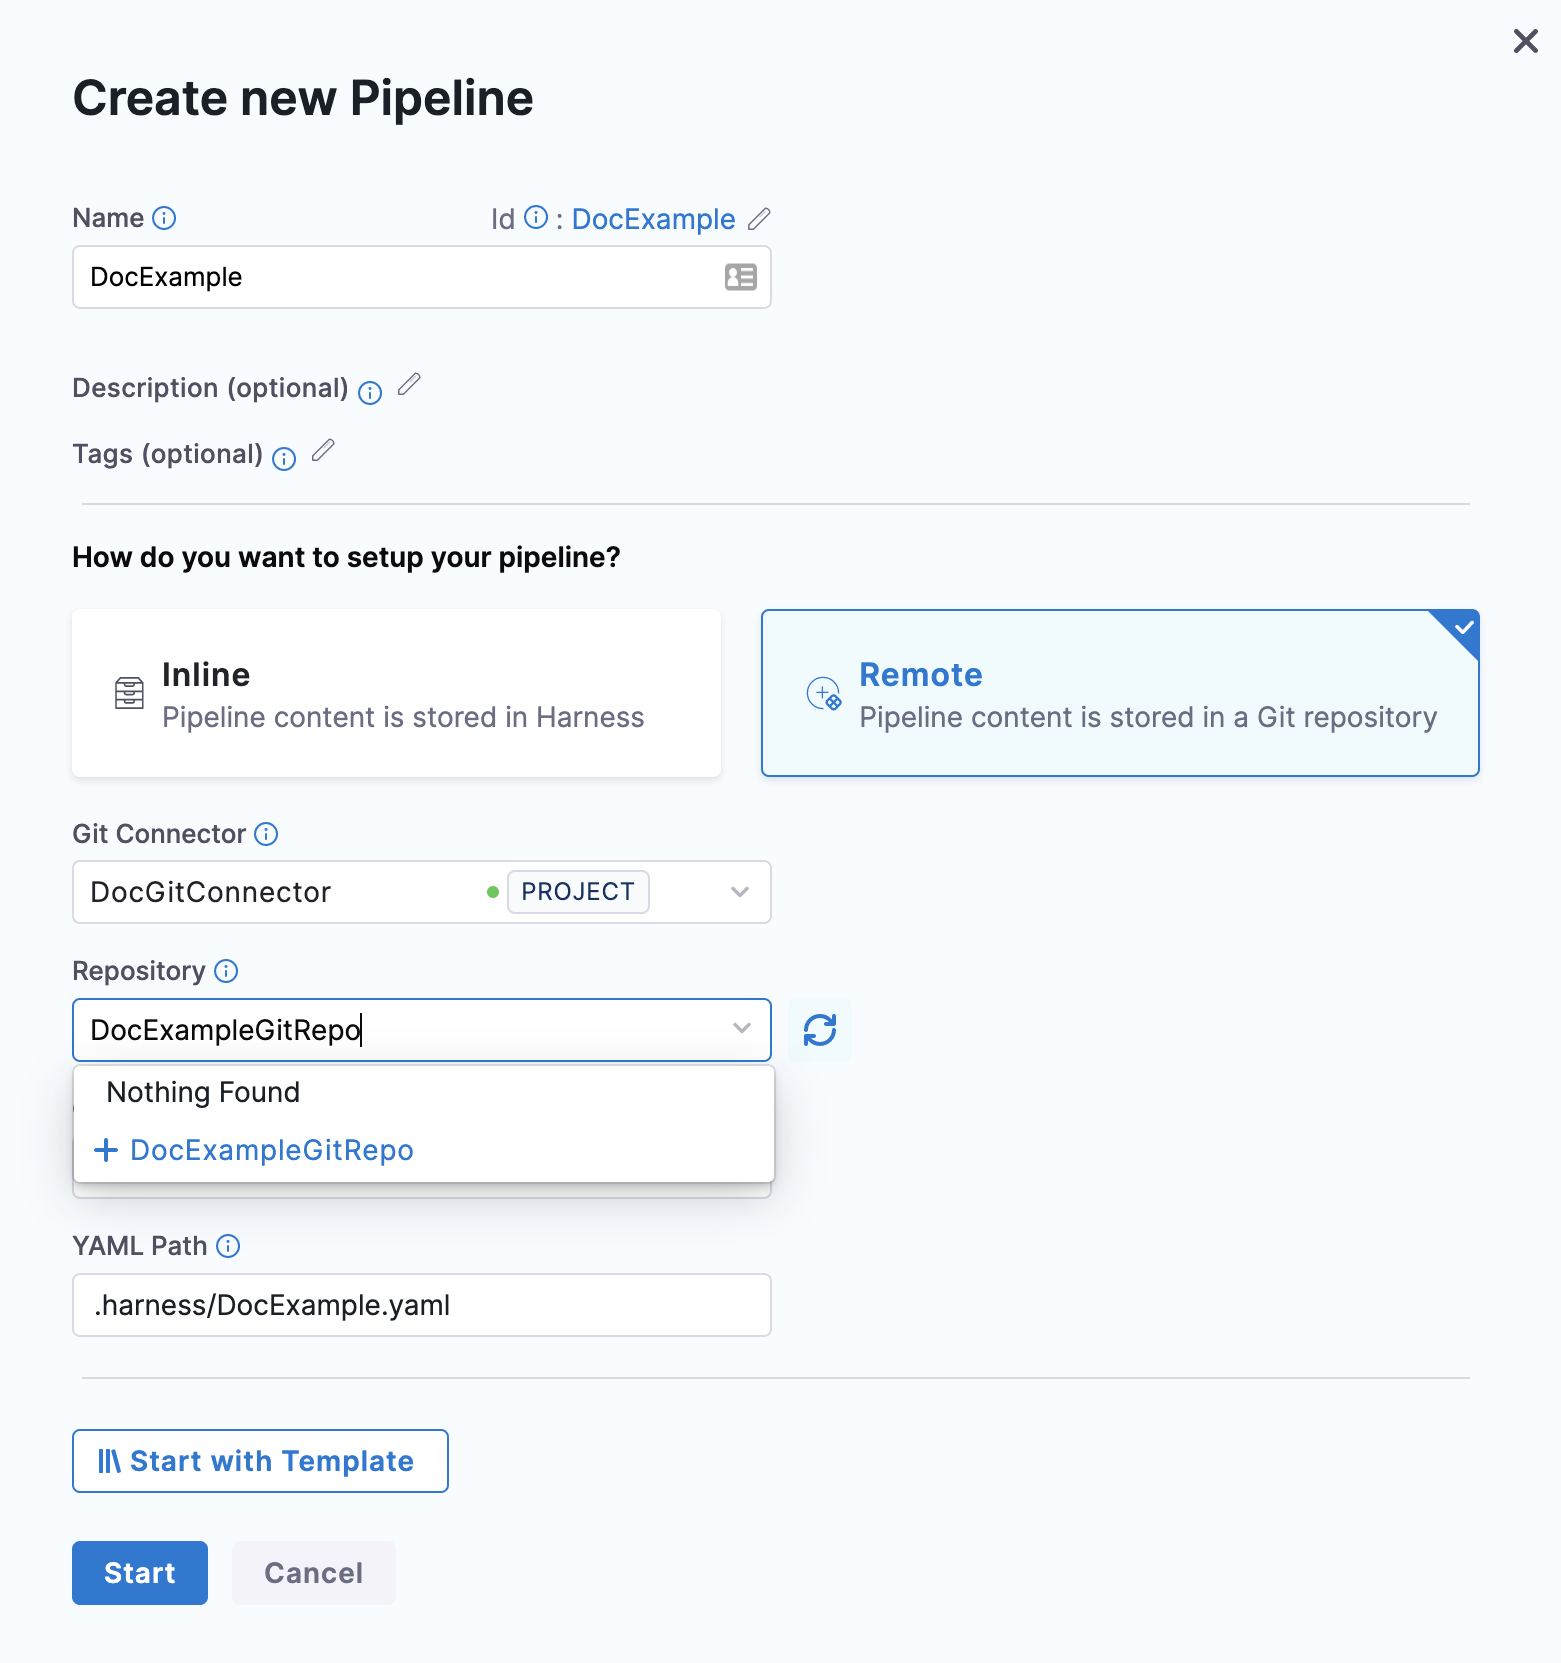
Create the repository in Git before entering it in Select Repository. Harness does not create the repository for you.
In Git Branch, select your branch. If your branch isn't listed, enter its name, as only a select few branches are listed here.
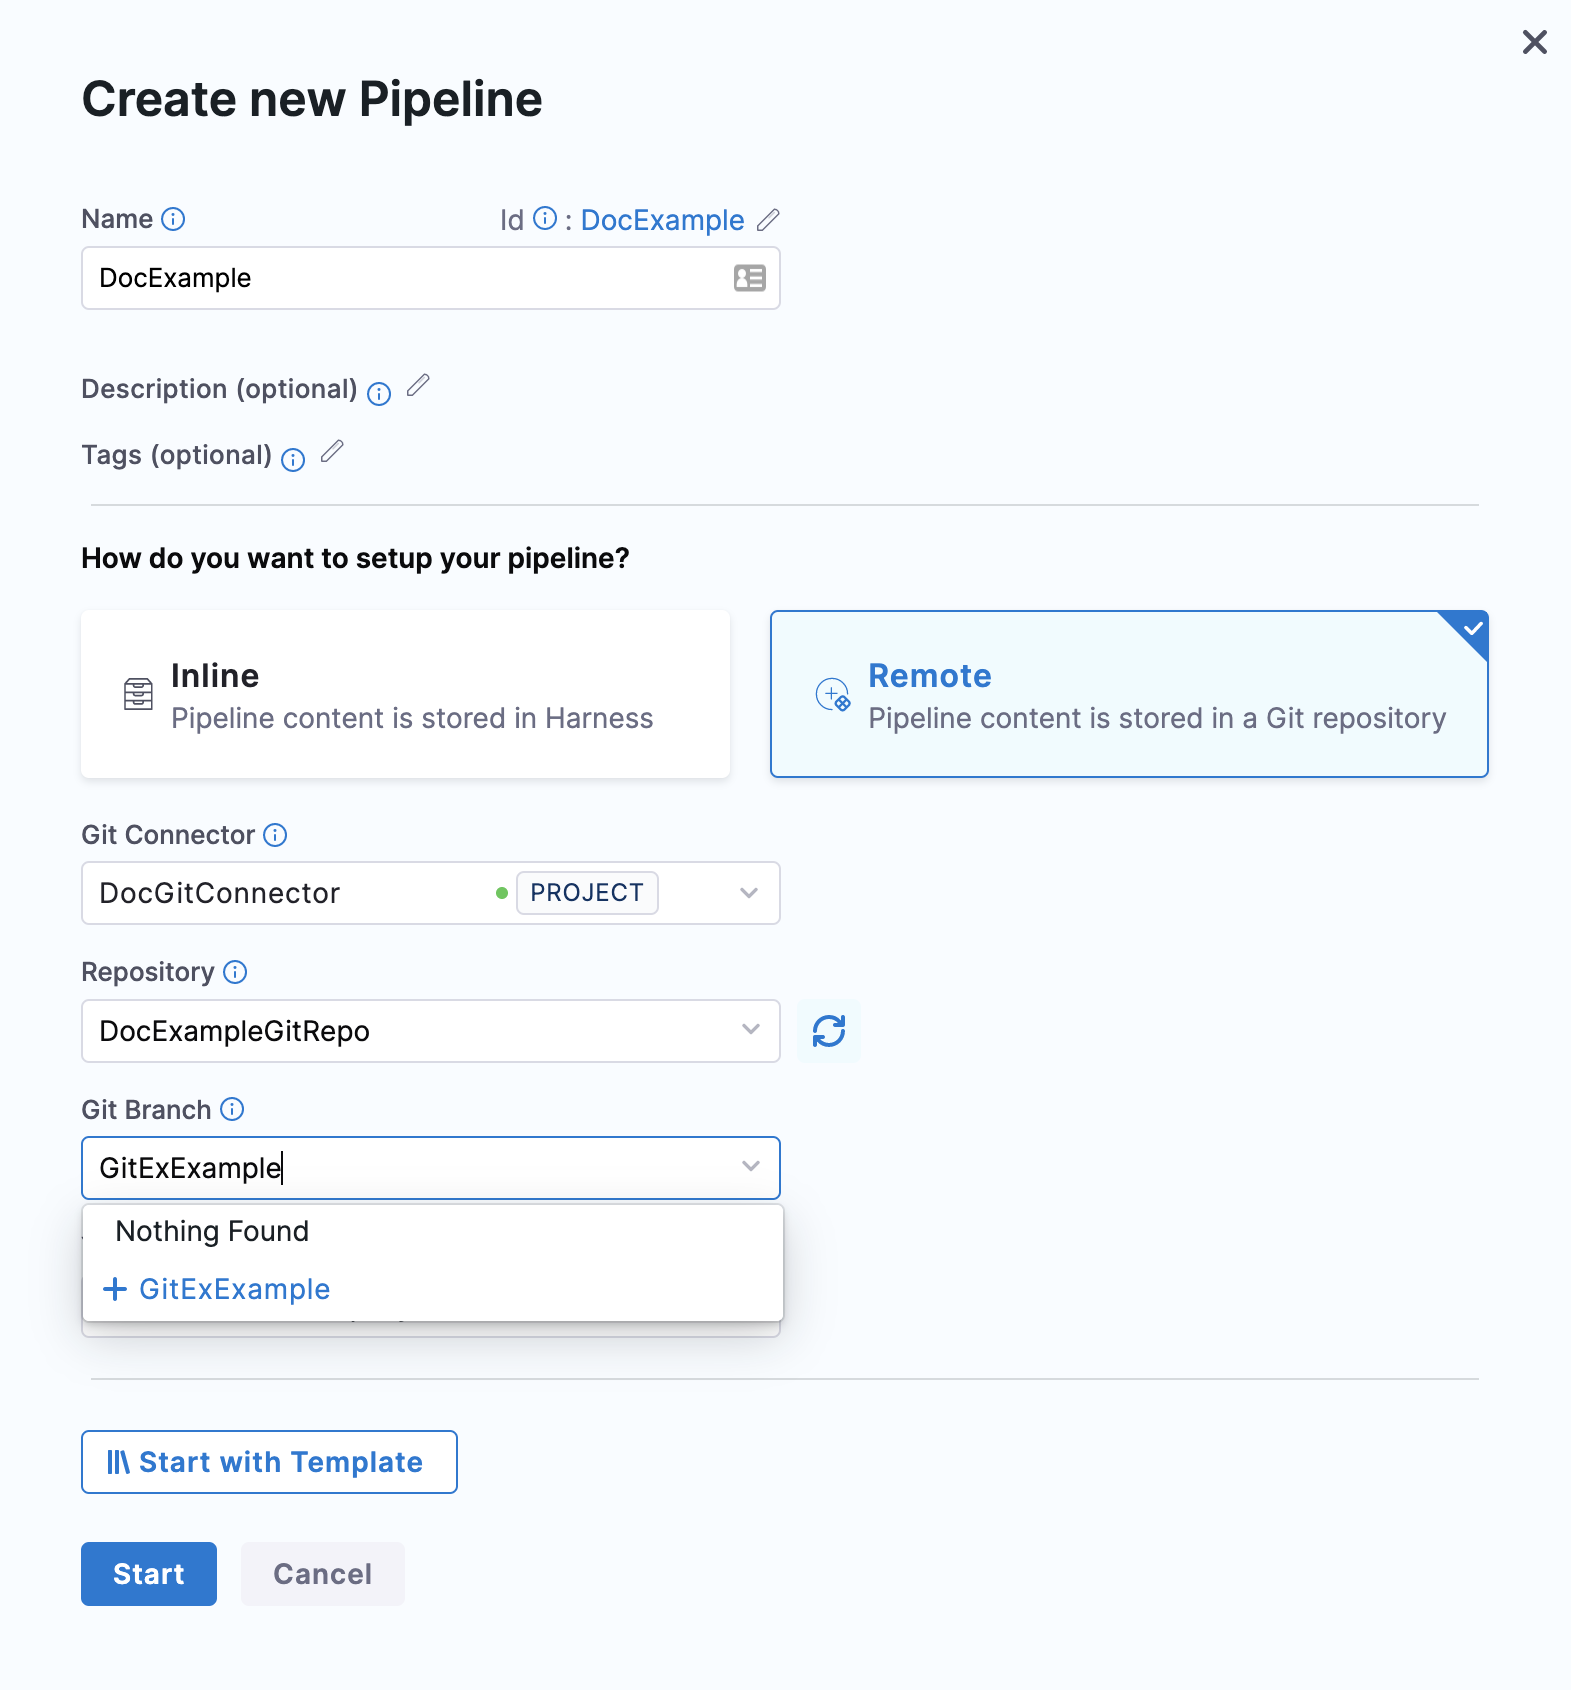
Create the branch in your repository before entering it in Git Branch. Harness does not create the branch for you.
Harness pre-populates the YAML Path. You can change this path and the file name. All your configurations are stored in Git in the Harness Folder.
Make sure that your YAML path starts with .harness/ and is unique.
Click Start.
The pipeline Studio is displayed with your repo and branch name.

Add a stage
Click Add Stage. The stage options appear.
Select a stage type and follow its steps.
The steps you see depend on the stage type you selected.
For more information, see Add Stage.
Add a step and click Save.
The Save Pipelines to Git settings appear.
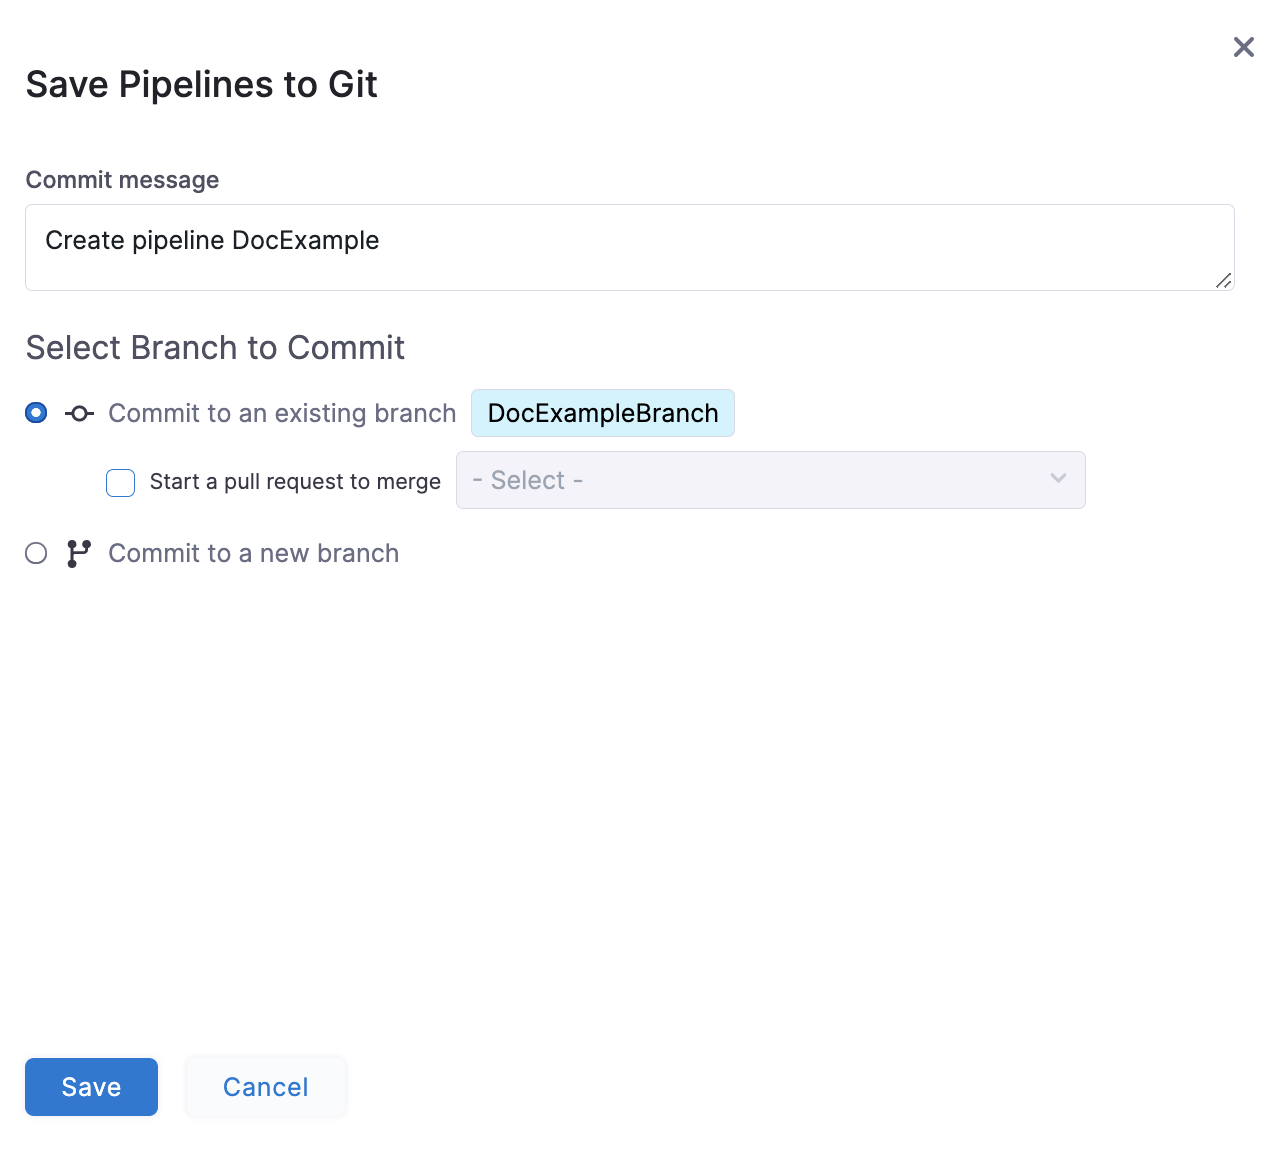
In Select Branch to Commit, commit to an existing or new branch.
- Commit to an existing branch: You can start a pull request if you like.
- Commit to a new branch: enter the new branch name. You can start a pull request if you like.
Click Save.
If you are using Bitbucket on-prem and feature.file.editor is set to false in the bitbucket.properties, make sure you enable Use Git client for commits in the default settings at the account scope. Harness will check out the code from the delegate and use the Git client to commit to your Git repository.
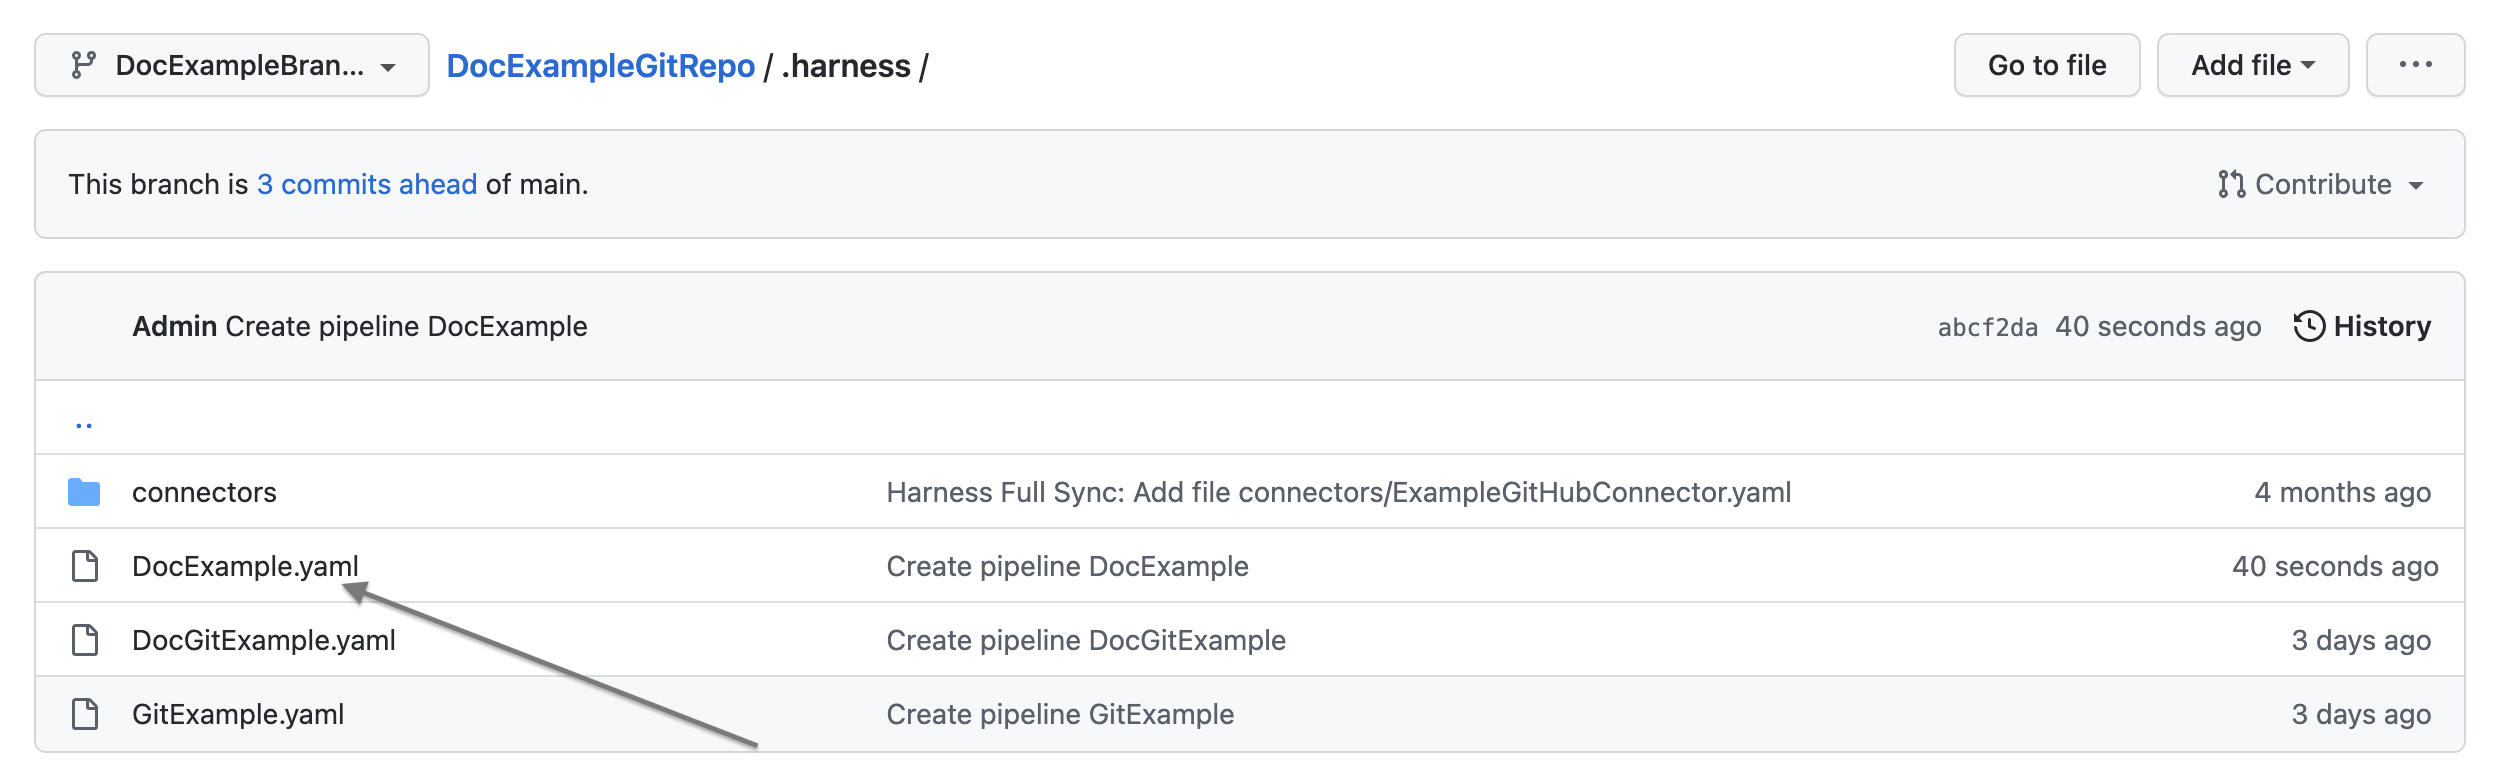
Your pipeline is saved to the repo branch.
Click the YAML file to view the pipeline's YAML.
Edit the pipeline YAML. For example, rename a step.
Commit your changes to Git.
Return to Harness and refresh the page.
A Pipeline Updated message appears.
Click Update.
The changes you made in Git are now applied to Harness.
Edit Git details for a pipeline
The Harness manager allows you to edit the Git details after the pipeline is configured and saved. You can modify the following Git settings:
- Git connector
- Repository
- YAML path
To modify these Git settings, do the following:
-
In your Project, select Pipelines.
-
Go to the pipeline where you want to edit the Git details, and select more options.

-
Make changes to the settings, and then select Save.

Execute pipeline
In your Project, click Pipelines.
Click on your pipeline.
Harness loads your pipeline depending on where you saved your remote pipeline.
- If you saved your pipeline on the default branch, Harness loads it from the default branch.
- If you saved your pipeline on a non-default branch, Harness uses the metadata of this pipeline to load it from the non-default branch.
- If you saved your pipeline in a branch that is no longer available, Harness throws an error. You must select a branch to load your pipeline in this case.
Harness fetches your pipeline details from the default branch if you created your remote pipeline before version 77808. Select the corresponding branch and proceed to load a pipeline residing in a branch other than the default branch.
Click Run.

Click Run Pipeline.
When you open a remote pipeline, Harness loads it from the repository's default branch (typically main). The input YAML and input sets are also fetched from this branch. If the pipeline and its input sets live on a different branch, you must switch to that branch using the branch picker in the Pipeline Studio toolbar before selecting Run. The Run Pipeline dialog itself does not offer a branch selector.
There is no built-in option to configure a per-pipeline default branch for input YAML directly within the pipeline configuration. For trigger-based executions, you can use the <+trigger.branch> expression in the Pipeline Reference Branch field to dynamically resolve the branch from the webhook payload. For more details, go to Manage input sets and triggers in Git Experience.
Branch selection logic for fetching referenced entities in remote pipelines
The configurations of the required resources and any referenced entities like input sets and templates are fetched from Git during pipeline fetch, creation, or execution.
Following are the possible scenarios when your remote pipelines reference entities:
- The referenced entities are stored in the same repository as the pipeline.
- The referenced entities are stored in a different repository than the pipeline.
The referenced entities are stored in the same repository as the pipeline
Following are the key points to keep in mind when the referenced entities reside in the same repository:
- During pipeline execution, Harness fetches the entities like templates from the same branch as the pipeline. This lets you test the templates before merging them back into the "default" branch.
- Harness recommends creating a separate project for testing templates.
- Templates and the corresponding pipelines to test them must be in the same repository.
- When you modify a template in a feature branch, the test pipeline is also present in the feature branch.
- As you can execute the pipeline from any branch, you can select the branch in which the changes to test templates were pushed. Merge the changes after testing. Upon merging, others can access them.
- This approach works best when the teams responsible for creating and managing templates are different from those responsible for executing the pipeline (Platform Engineering or DevOps teams versus Developers), so the test projects should be separate from the production projects.
Let us look at an example:
There is a pipeline DocRemotePipeline that references a remote pipeline template named remotedocpipelinetemplate. This remote pipeline template references a remote stage template named RemoteStageTemplate. These 3 entities are in the same Git repo.
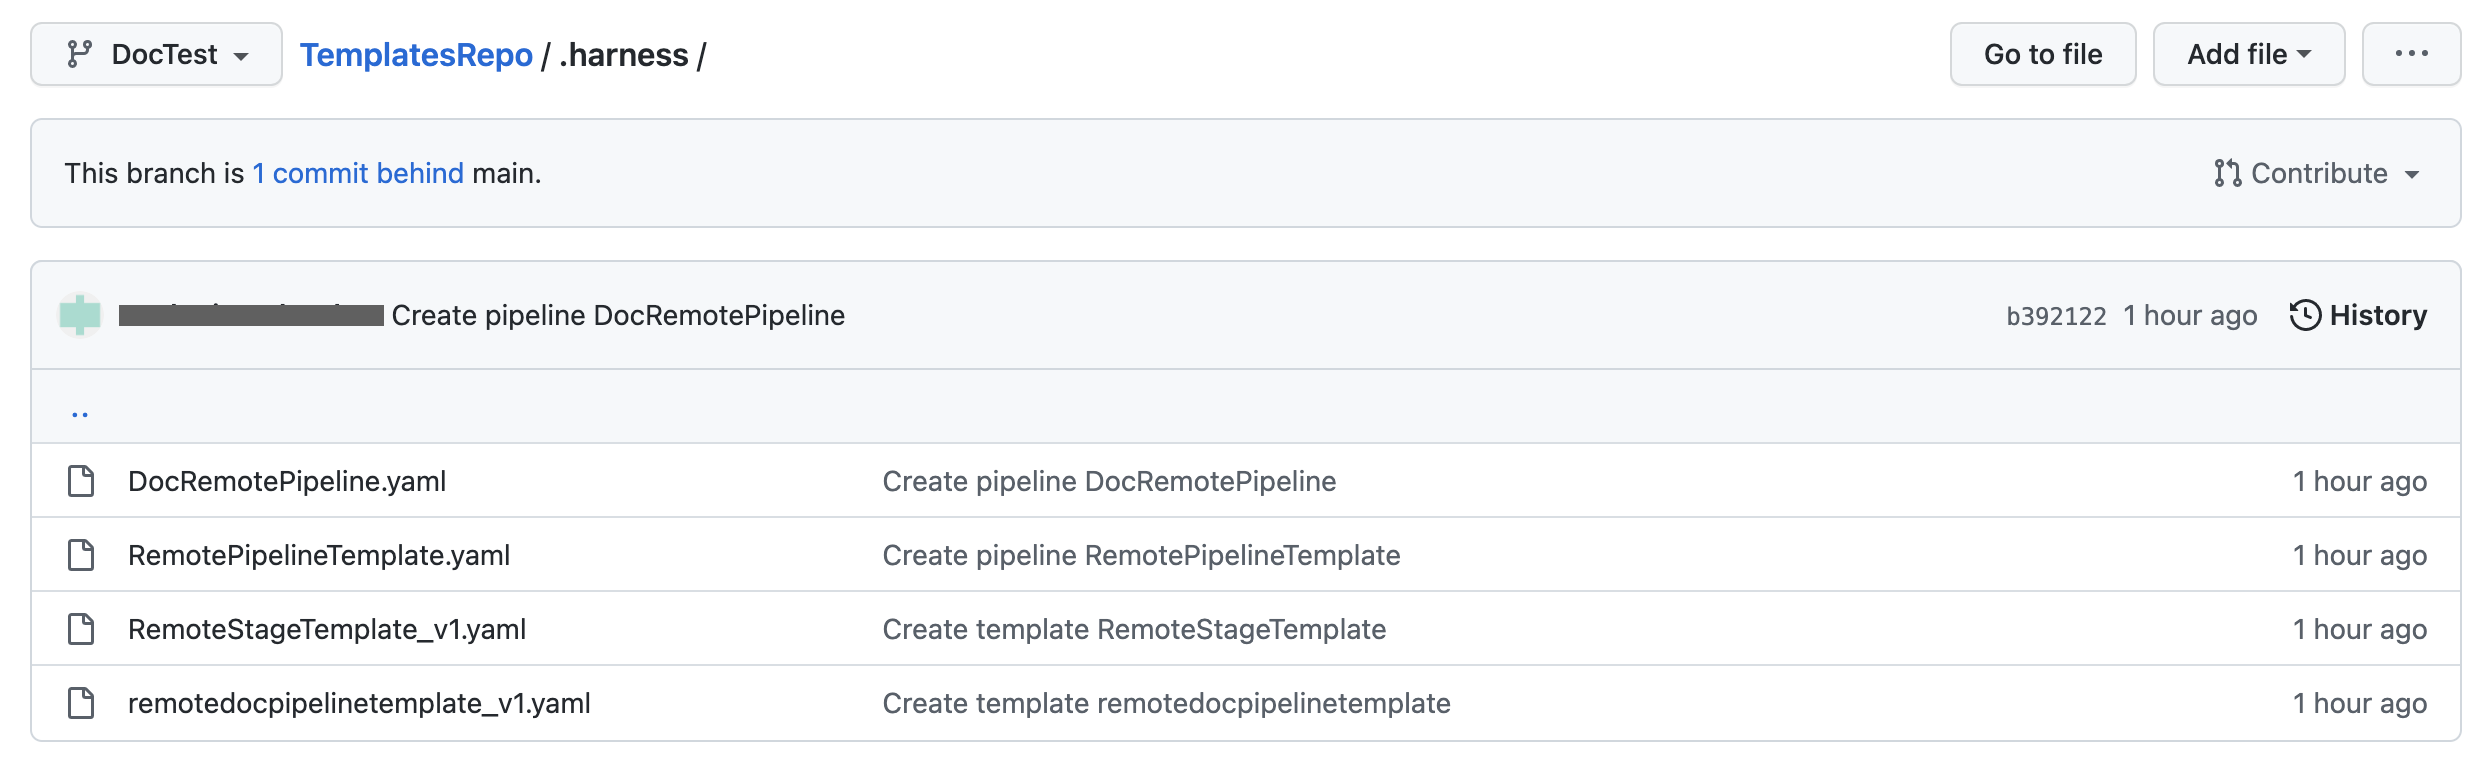
When you execute this pipeline, Harness fetches these entities from the branch that you have selected.

The referenced entities are stored in a different repository than the pipeline
Harness fetches entities like templates from the default branch of the repository if they are stored in another repository.
This ensures:
- Teams always use tested and approved templates.
- Prevents teams to execute pipelines using templates from different branches that have not yet been tested.
If your inline entities refer remote entities, Harness fetches the remote entities from the default branch.
Let us look at an example:
There is a pipeline remoteDocrepoPipeline that references a remote pipeline template named remotepipelinetemplate_docrepo. This remote pipeline template references a remote stage template named RemoteStageTemplate. These 3 entities are in different Git repos.
When you execute this pipeline, Harness fetches these nested entities from the default branch of the respective repositories.
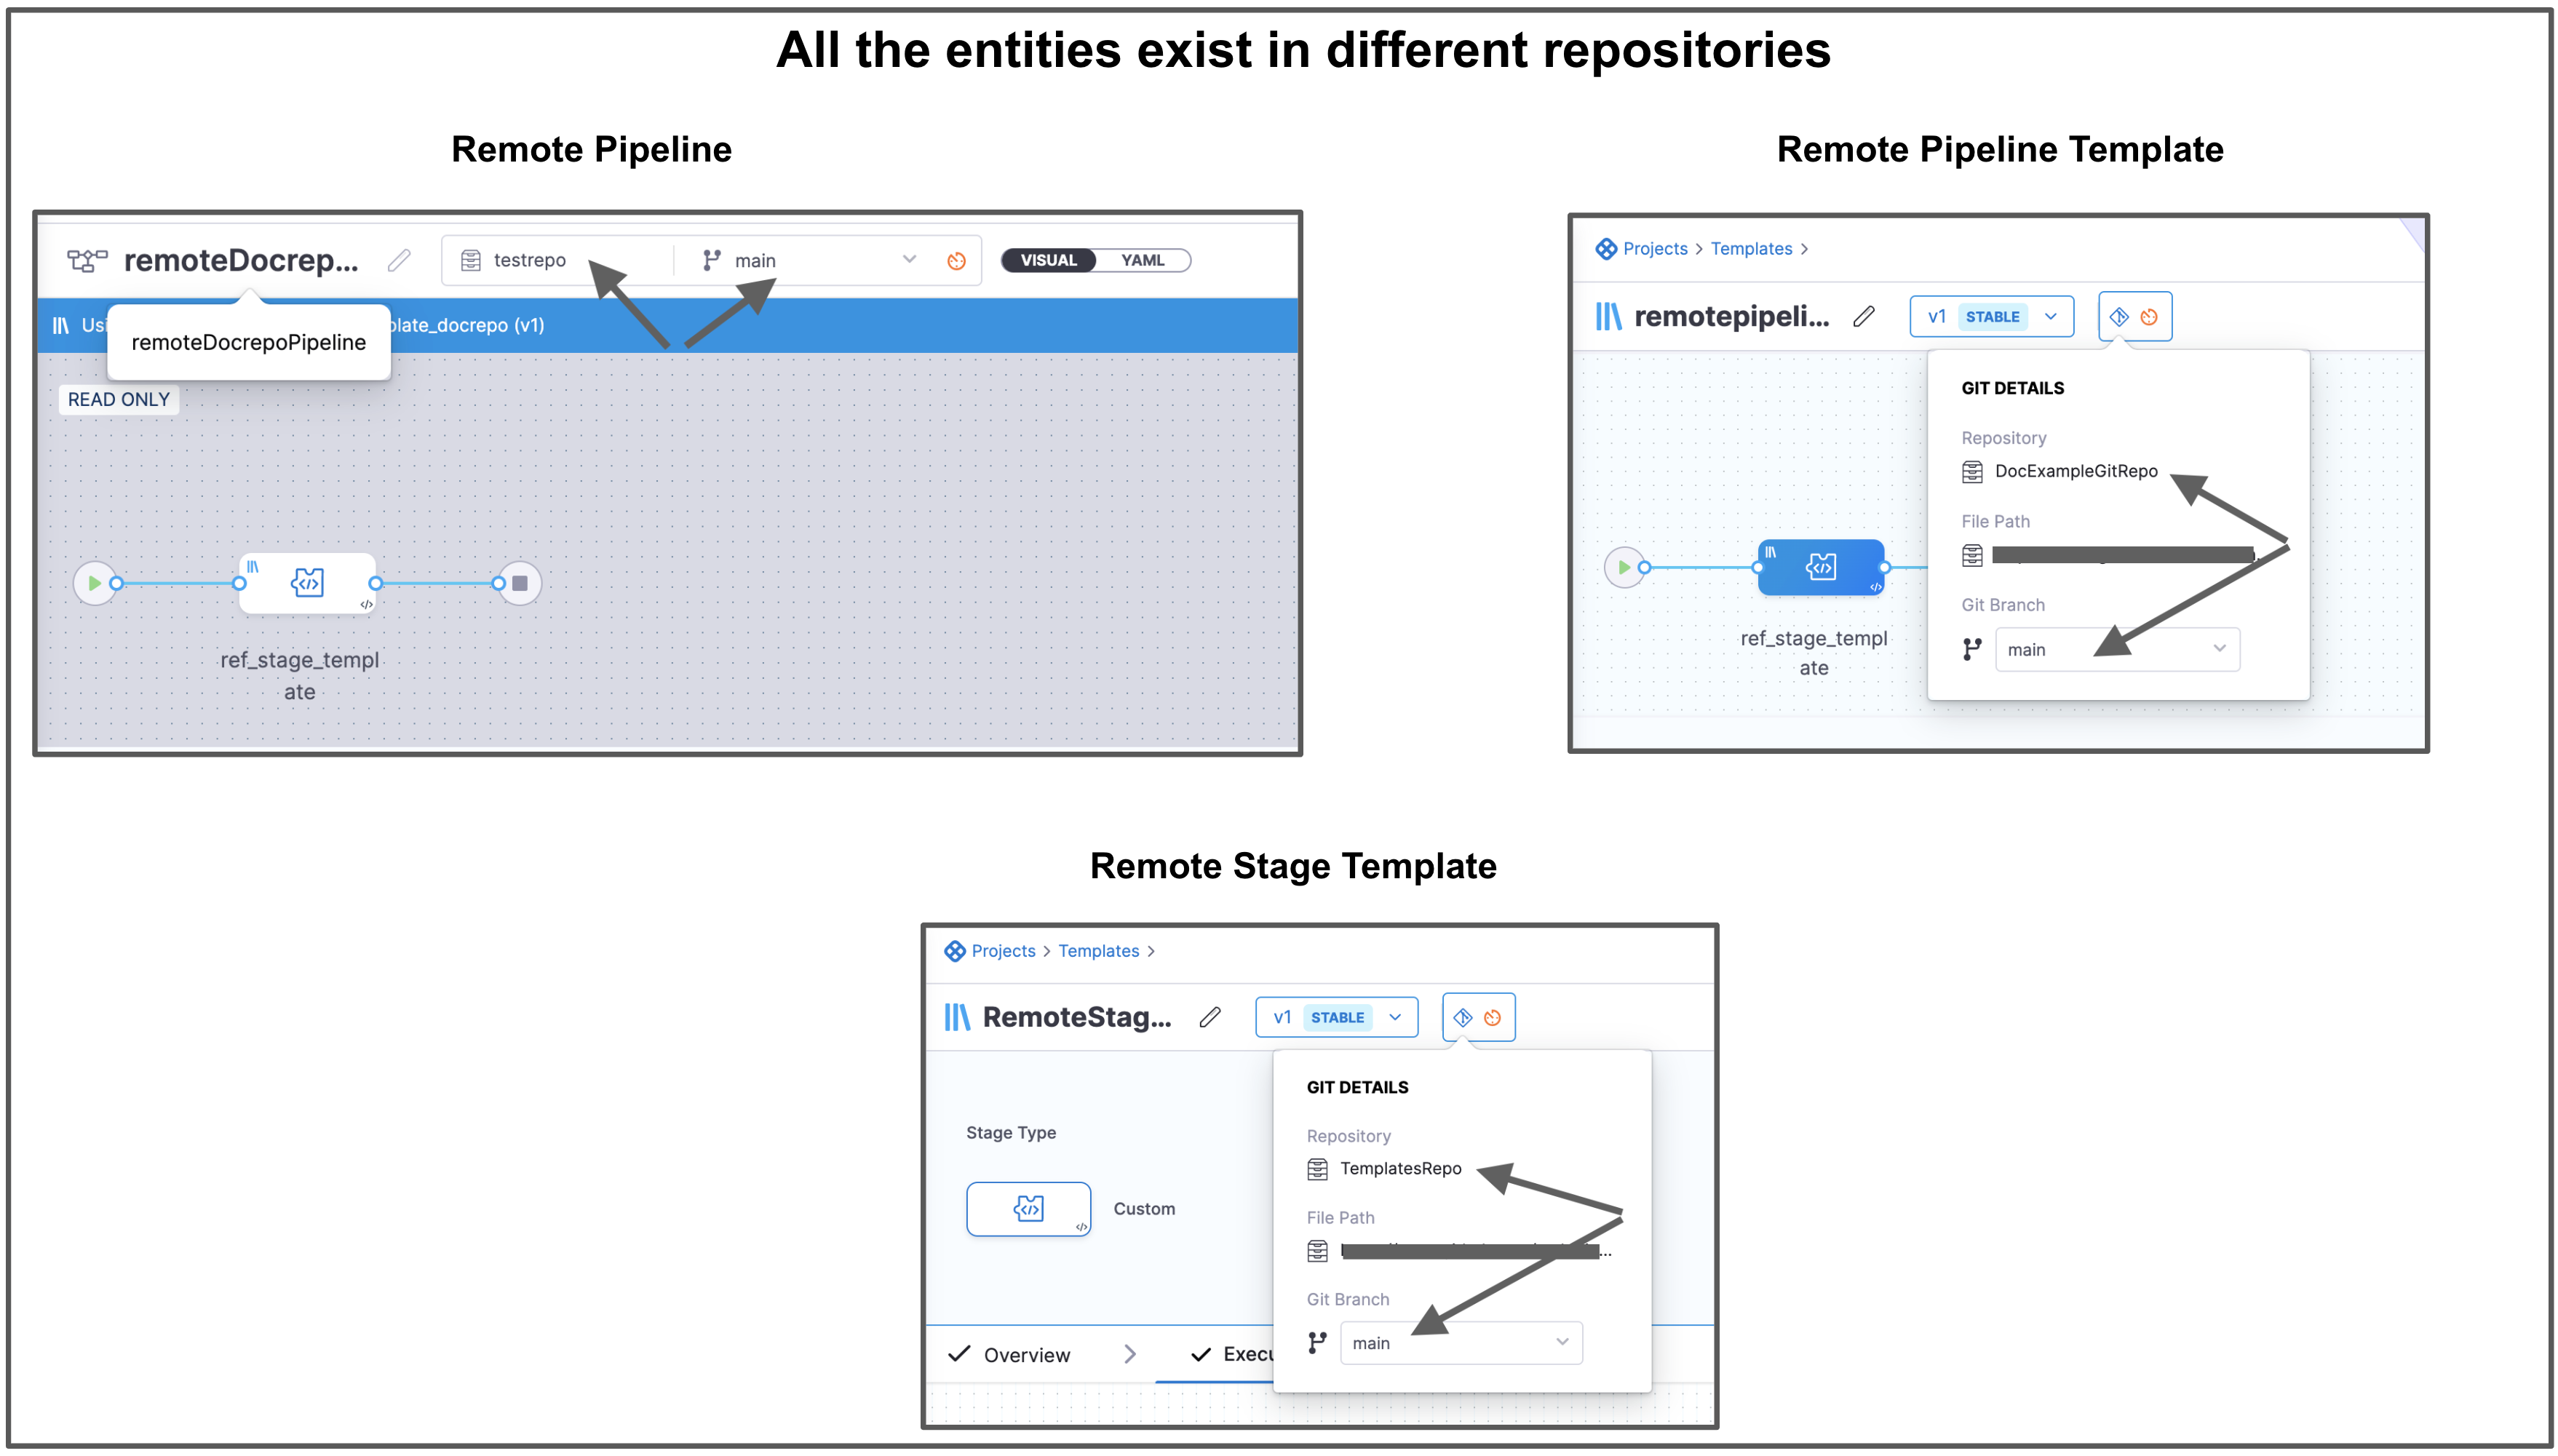
Harness resolves all the dependencies and then proceeds with Pipeline execution.
Manual branch selection
It is also possible to select the branch for the referenced entities if you have explicitly selected a feature branch.
For example, you can select a branch in your pipeline to reference templates from another branch.
Here is a demo explaining steps to select a branch for a referenced template:
To specify the remote branch for the referenced template:
-
Select your remote pipeline, and then select Add Stage.
-
Select Use Template.
-
Select the branch, and then select Use Template.
The template has now been referenced from a different branch in the remote pipeline.
Harness displays the pipeline branch and the referenced template branch.
-
Select Save.
The parent YAML will include an example of a YAML screenshot if you explicitly select any branch for the child template.
The parent YAML will not contain a branch for the child if you do not specify a branch explicitly.
To switch the referring child entity from a feature branch to a default branch, manually remove the field gitBranch from the parent YAML.
Handling references for remote entities
All entities have a Referenced By tab where you can view all other entities that use it. For all git-backed entities, Harness creates and maintains setup references only for the default branch.
How setup references work
Harness computes and maintains setup references for all git-backed entities that belong to the default branch. References are updated when you create, update, or fetch entities—whether through the Harness UI, API, or directly on the Git side. Any changes you make to entity YAML, including adding, updating, or deleting git-backed entities, are captured and reflected in the setup references.
Why only the default branch?
Managing references exclusively for the default branch ensures that only stable versions of entities are tracked. If Harness maintained references across all branches, it would create redundant and potentially conflicting entries that could block deletion operations or produce misleading usage data. The default branch (for example, main or master) serves as the single source of truth for entity relationships.
Example: Setup references
Any git-backed entity—such as connectors, pipelines, services, environments, input sets, or templates—has a Referenced By tab that shows all other entities using it.
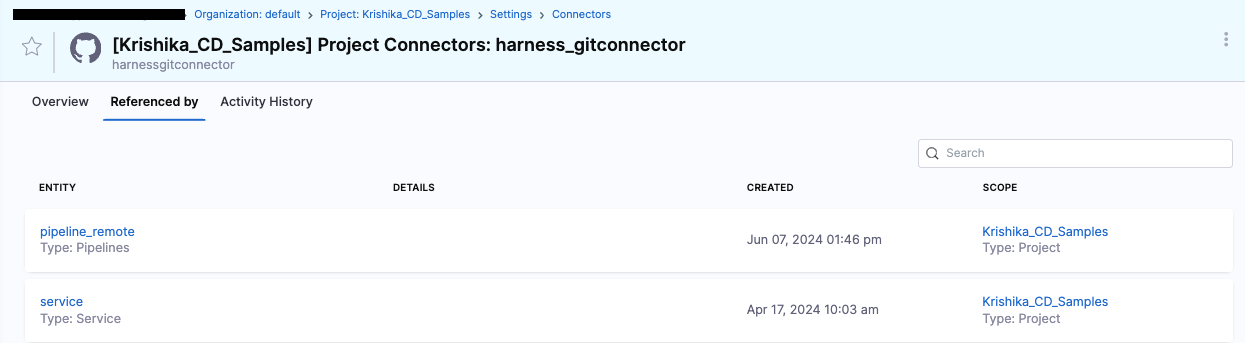
If you store these entities in the default branch, they appear in the Referenced By section. For example, if a pipeline references a connector and that pipeline is stored remotely in the default branch (or inline), the connector's Referenced By tab lists the pipeline. Similarly, a template used by multiple pipelines on the default branch shows all of them as references. Entities saved in non-default branches do not create entries in the Referenced By section.