Provision users and groups with Okta (SCIM)
System for Cross-Domain Identity Management (SCIM) is an open standard protocol for automated user provisioning. In Harness, automated provisioning involves creating users and user groups, assigning users to groups, and managing some user attributes (such as names and email addresses). In addition to creating users and groups, automated provisioning also edits and removes users and user groups as and when required.
If Okta is your identity provider, you can efficiently provision and manage users in your Harness account. Using Okta's SCIM integration with Harness enables Okta to serve as a single identity manager, to add and remove users, and to provision user groups. This is especially efficient for managing users at scale.
This topic describes how to use an Okta SCIM integration for automated provisioning in Harness. To configure this integration, you must take steps in both Okta and Harness.
Requirements
You need an understanding of:
- System for Cross-domain Identity Management (SCIM).
- Harness' key concepts.
- RBAC in Harness.
You must be an Administrator in your Okta account, and you must be an Account Admin in Harness.
You need a Harness API key and unexpired token that has all Users and User Groups permissions. API keys inherit permissions from the user they are associated with. If you use an API key for a service account, make sure the service account has all Users and User Groups permissions.
Create an Okta app integration
To enable automated provisioning, you must add a Harness app to your Okta administrator account.
-
Log in to your Okta administrator account, select Applications, and select Create App Integration.

-
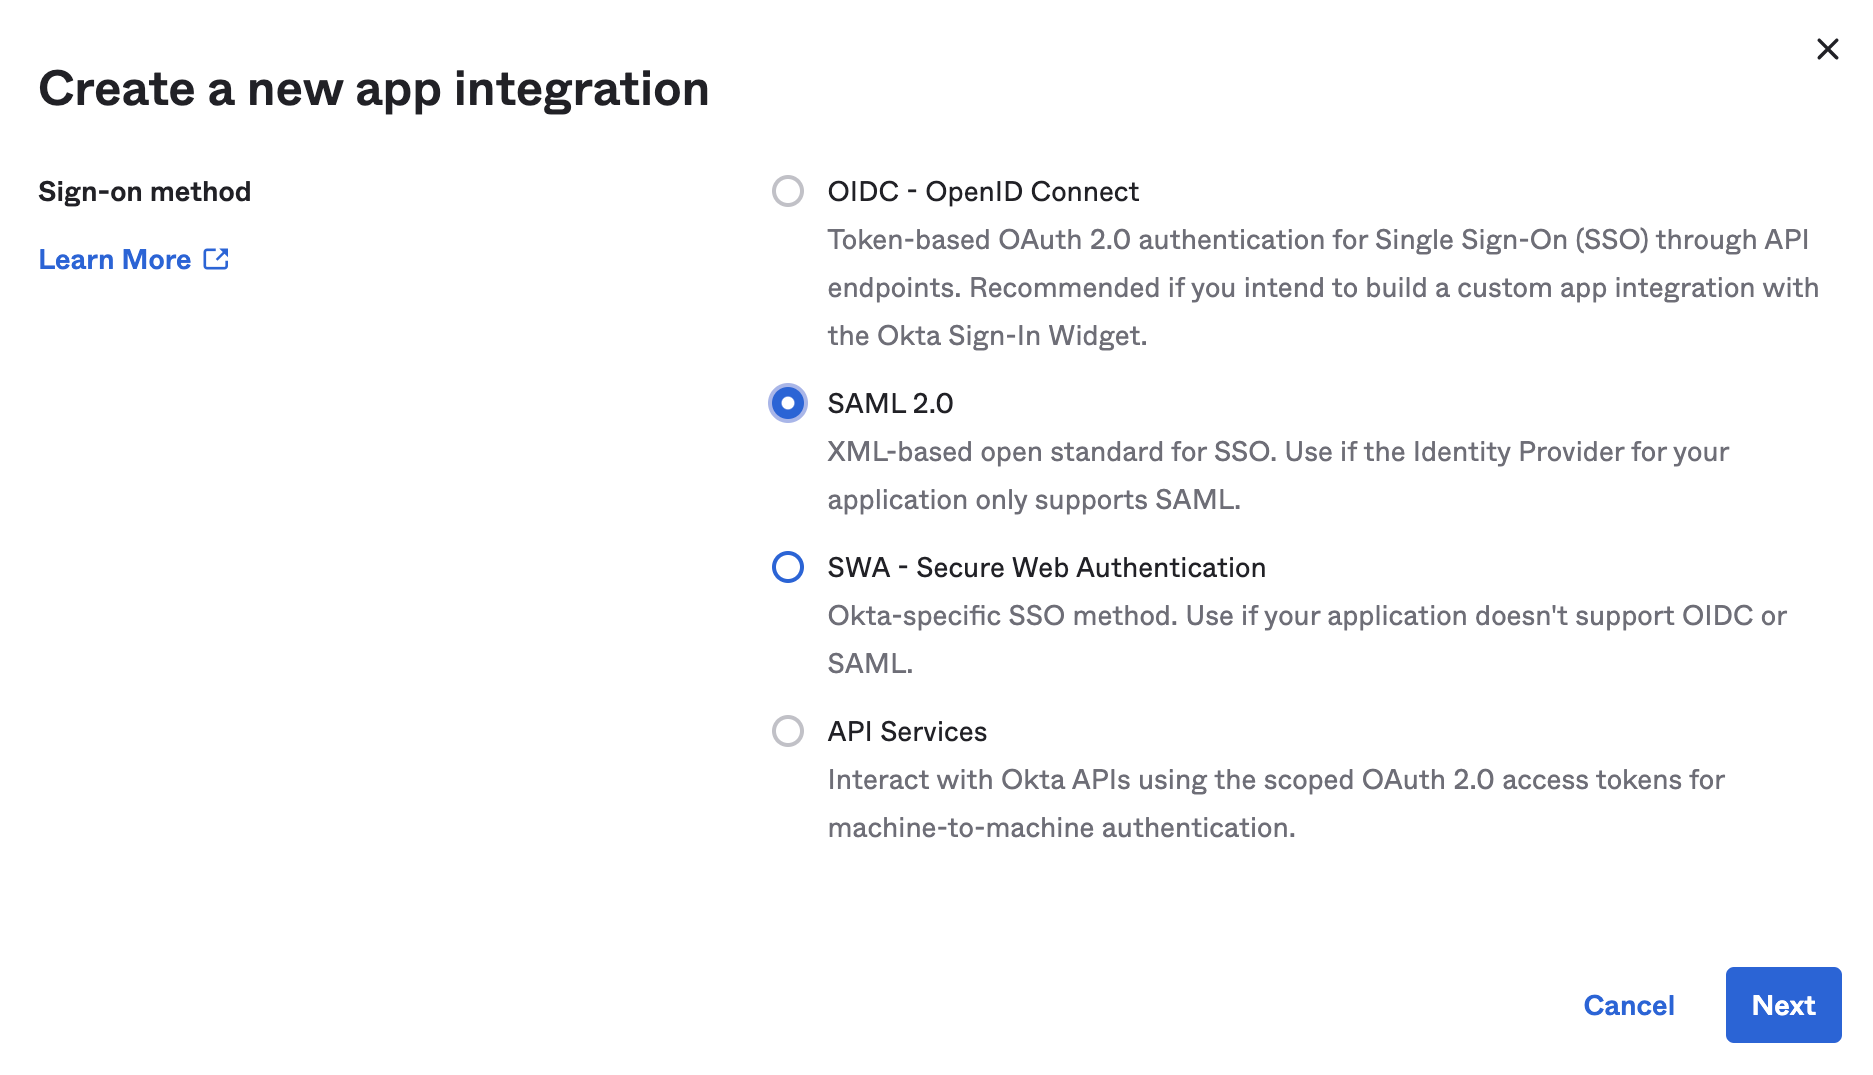
On the Create a new app integration page, select SAML 2.0 for the Sign-on Method, and then select Next.
-
In the General Settings, enter a name in the Application label field, and then select Next.
-
In the SAML settings, enter your Harness Single sign on URL.
The base URL format will follow the following base format:
https://app.harness.io/gateway/ng/api/scim/account/[YOUR_ACCOUNT_ID], (e.g https://app.harness.io/gateway/ng/api/scim/account/9999aaaa9999AA)
However, this will need to be modified depending on which cluster your account exists within. You can verify this by going to your Account Settings -> Account Details, in the Harness Cluster Field.
| Cluster | URL Format |
|---|---|
| Prod1 | https://app.harness.io/gateway/ng/api/scim/account/[YOUR_ACCOUNT_ID] |
| Prod2 | https://app.harness.io/gateway/gratis/ng/api/scim/account/[YOUR_ACCOUNT_ID] |
| Prod3 | https://app3.harness.io/gateway/ng/api/scim/account/[YOUR_ACCOUNT_ID] |
| Prod0/Prod4 | https://accounts.harness.io/gateway/ng/api/scim/account/[YOUR_ACCOUNT_ID] |
| EU clusters | https://accounts.eu.harness.io/ng/api/scim/account/[YOUR_ACCOUNT_ID] |
Please note that if customers select the incorrect cluster, the changes will not show up within their environment, even if there is a successful response from Harness.
If you environment is On-Prem (SMP) the URL will use your custom domain name and omits gateway.
For example, if your On-Prem domain name is harness.mycompany.com, then your SCIM base URL would become https://harness.mycompany.com/ng/api/scim/account/[YOUR_ACCOUNT_ID].
- For Audience URI (SP Entity ID), enter
app.harness.io. - For Attribute Statements (optional), enter a name in the Name field, select Basic for the Name Format, and set the Value to user.email.
- For Group Attribute Statements (optional), enter a name in the Name field, select Basic for the Name format (optional), select an appropriate Filter, and enter the appropriate corresponding filter value.
- Select Next.
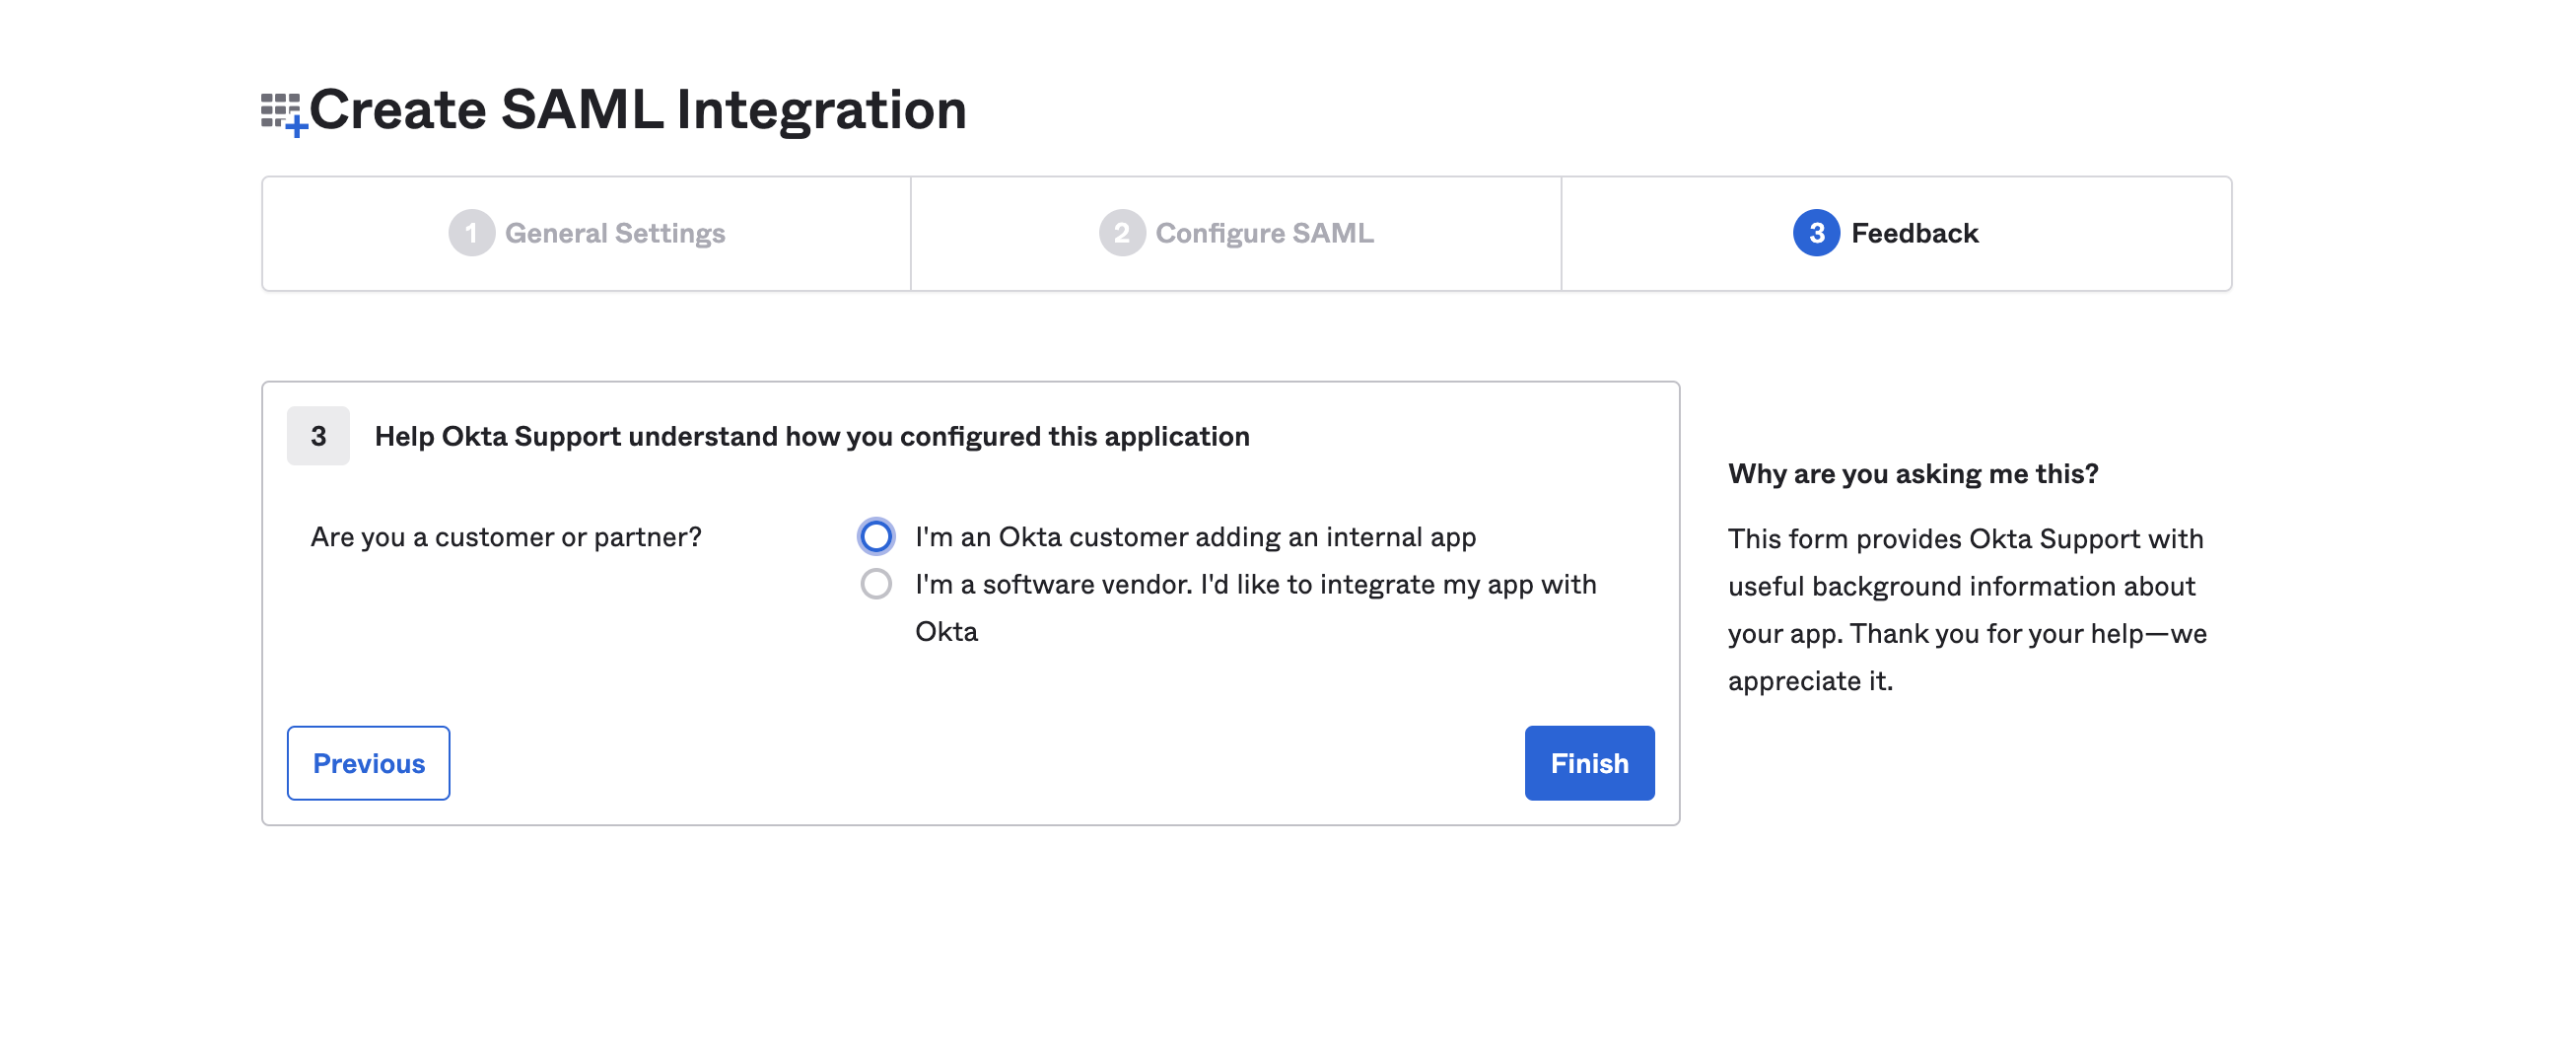
- In the Feedback options, select the relevant option, and then select Finish.
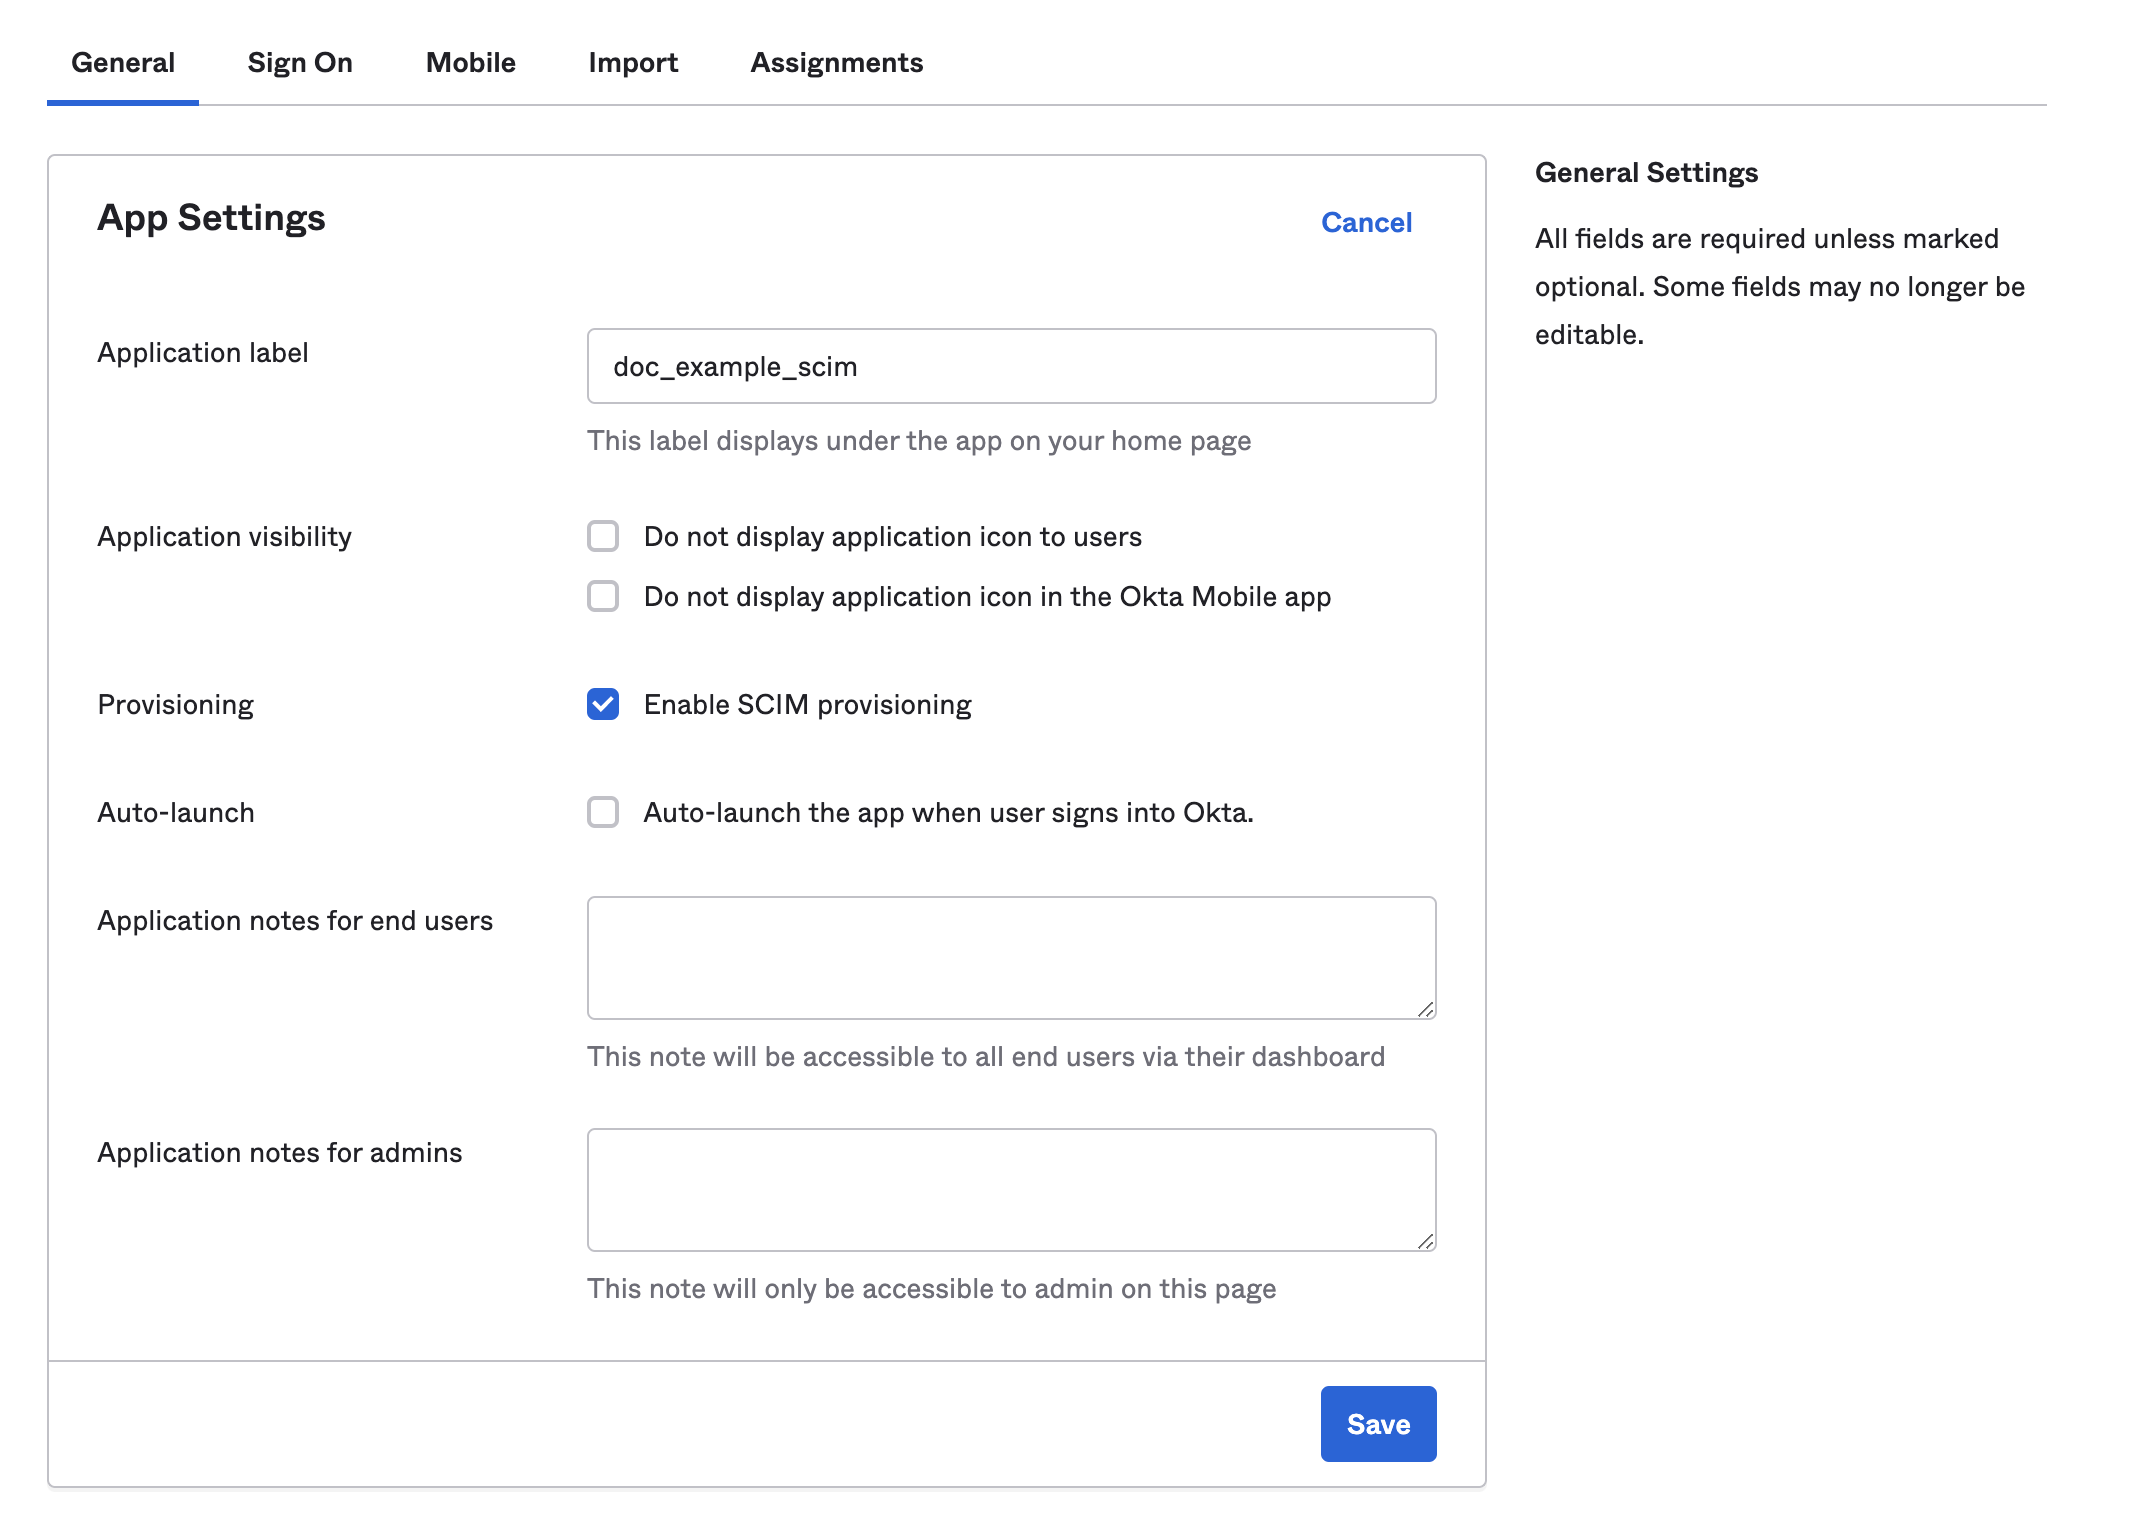
- In your newly created app, select the General tab, and then under App Settings, select Edit.
- Select Enable SCIM provisioning, and then select Save.
Authorize the Okta integration
Authorize your Okta app with Harness.
-
In your Okta administrator account, go to Applications, and then select Applications.
-
Find your Harness app, select Provisioning, and then select Integration.
-
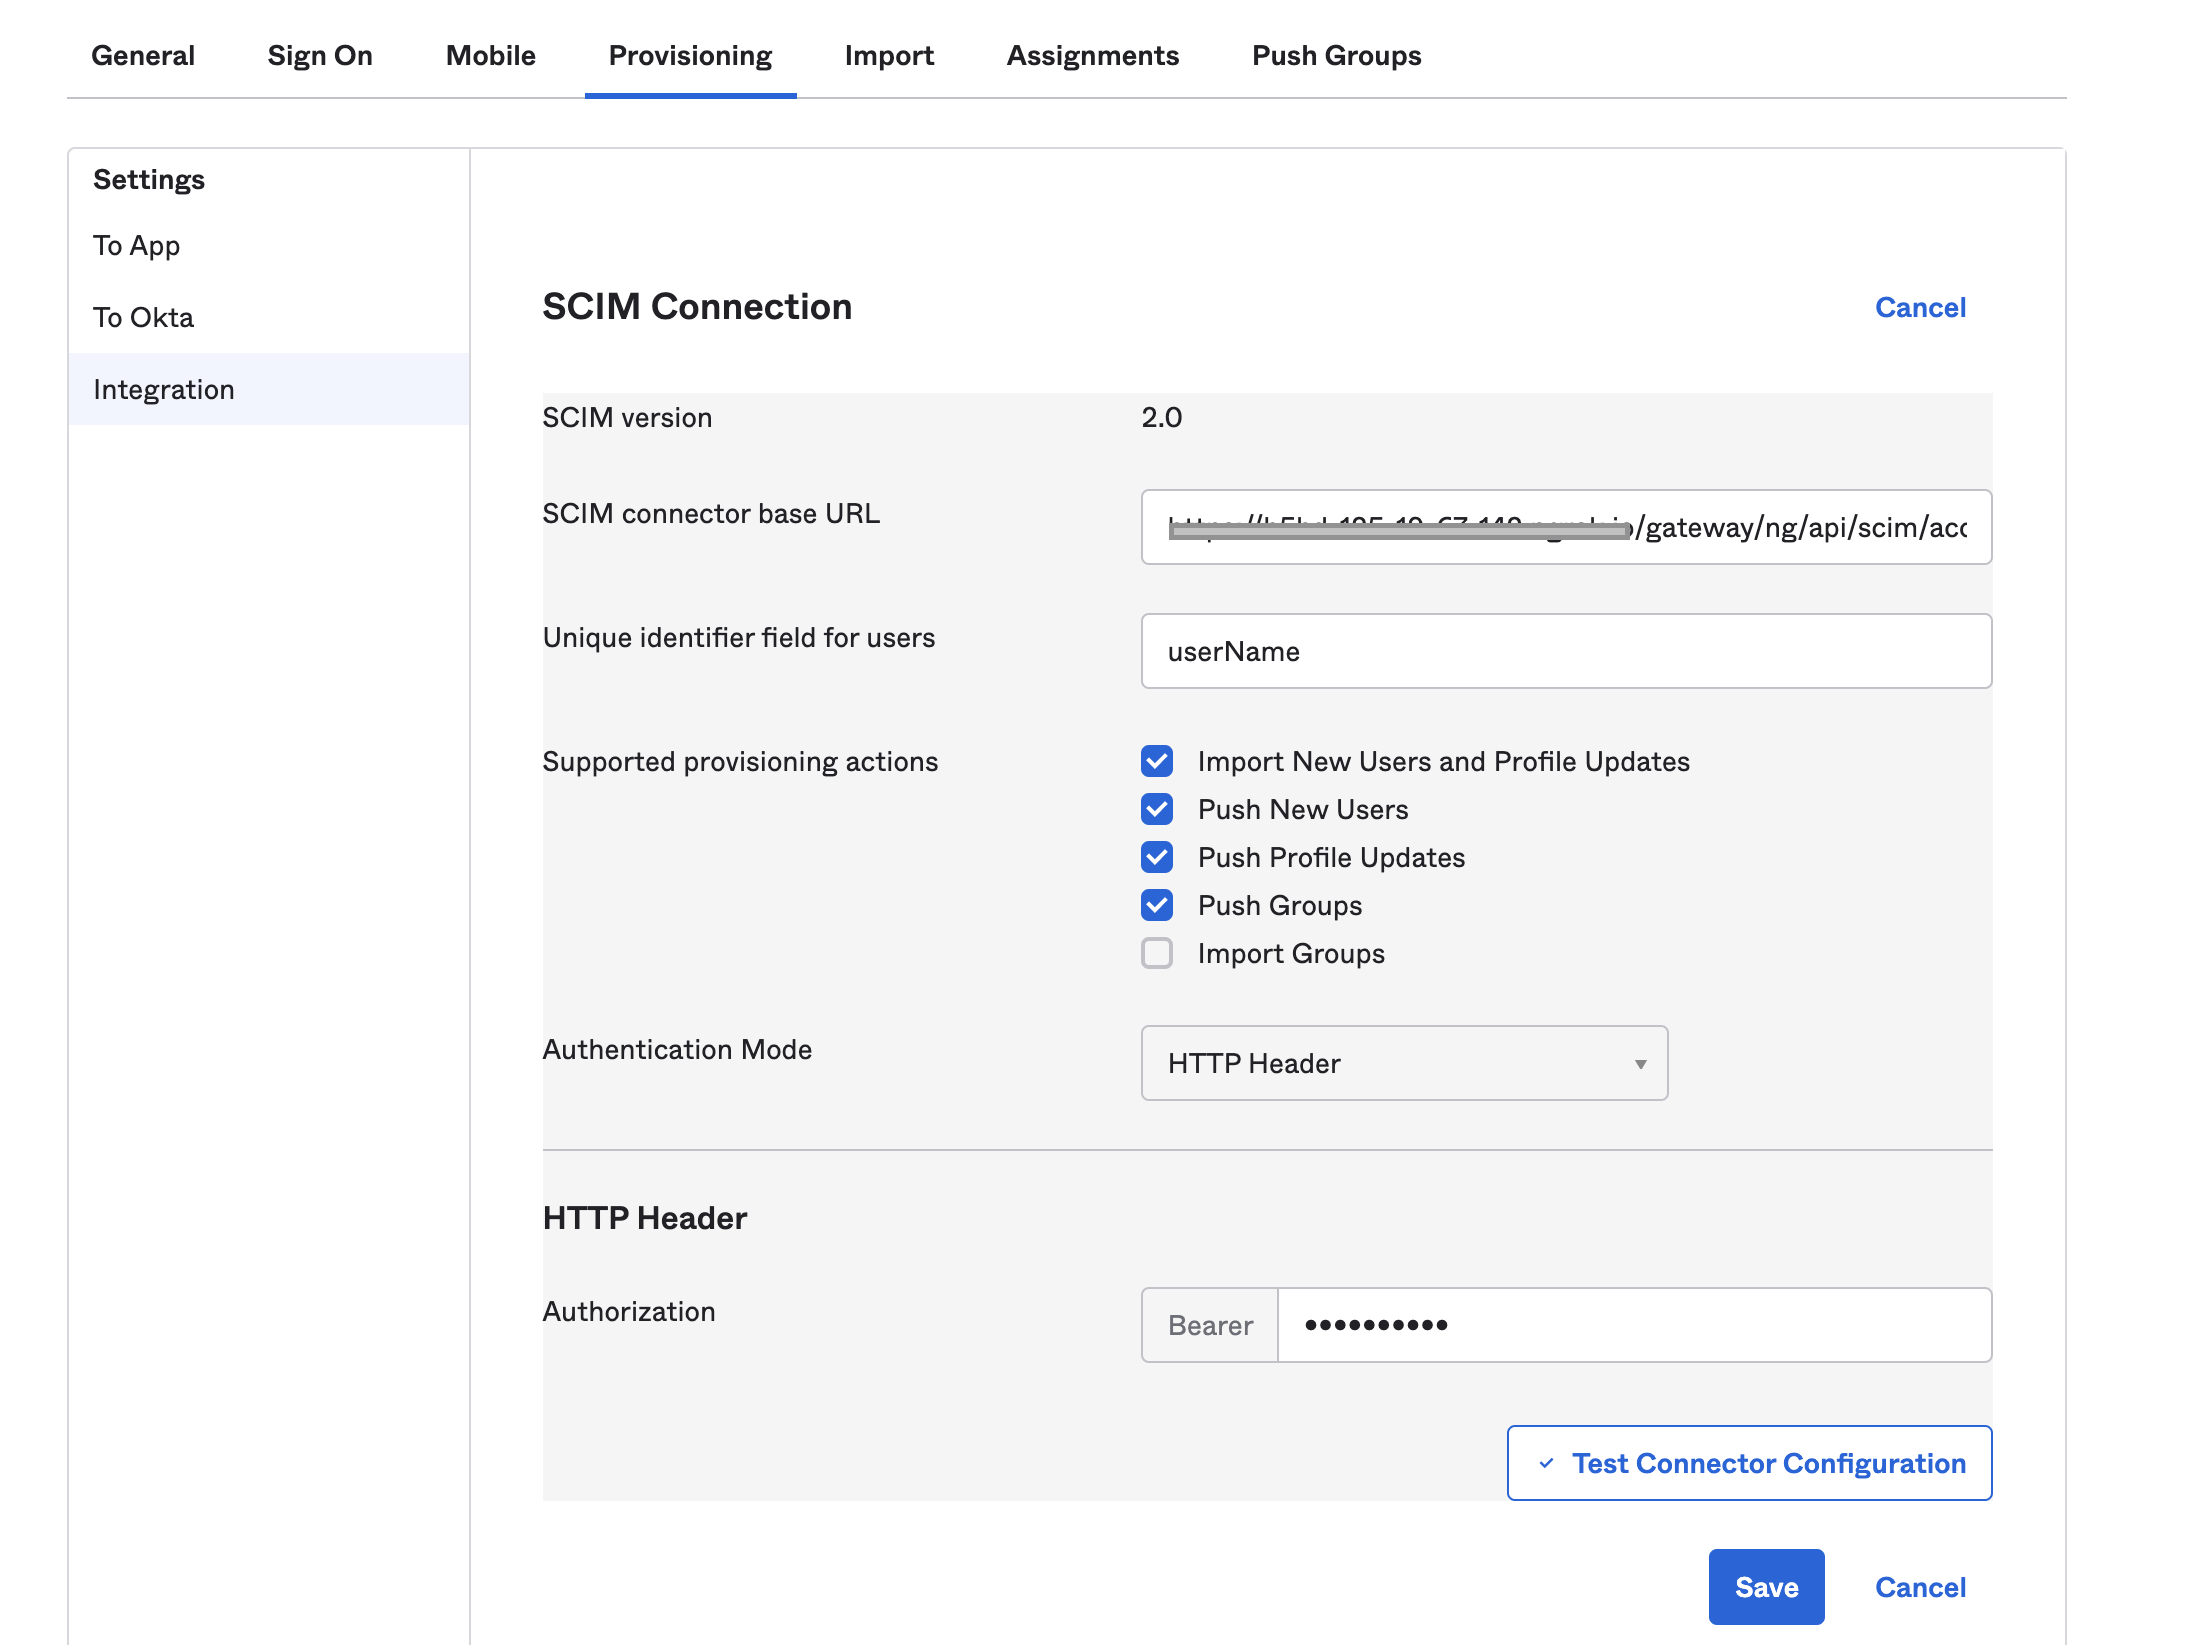
Select Edit.
-
For SCIM connector base URL, enter the base URL for your API endpoint.
The base URL format is:
https://app.harness.io/gateway/ng/api/scim/account/YOUR_ACCOUNT_IDReplace
YOUR_ACCOUNT_IDwith your Harness account ID. -
In Unique identifier field for users, enter
userName. -
Select the Supported provisioning actions:
- Import new users and profile updates
- Push new users
- Push profile updates
- Push groups
-
For Authentication Mode, select HTTP Header, and enter your Harness API token in Bearer.
For instructions on creating Harness API keys and tokens, go to Manage API keys.
-
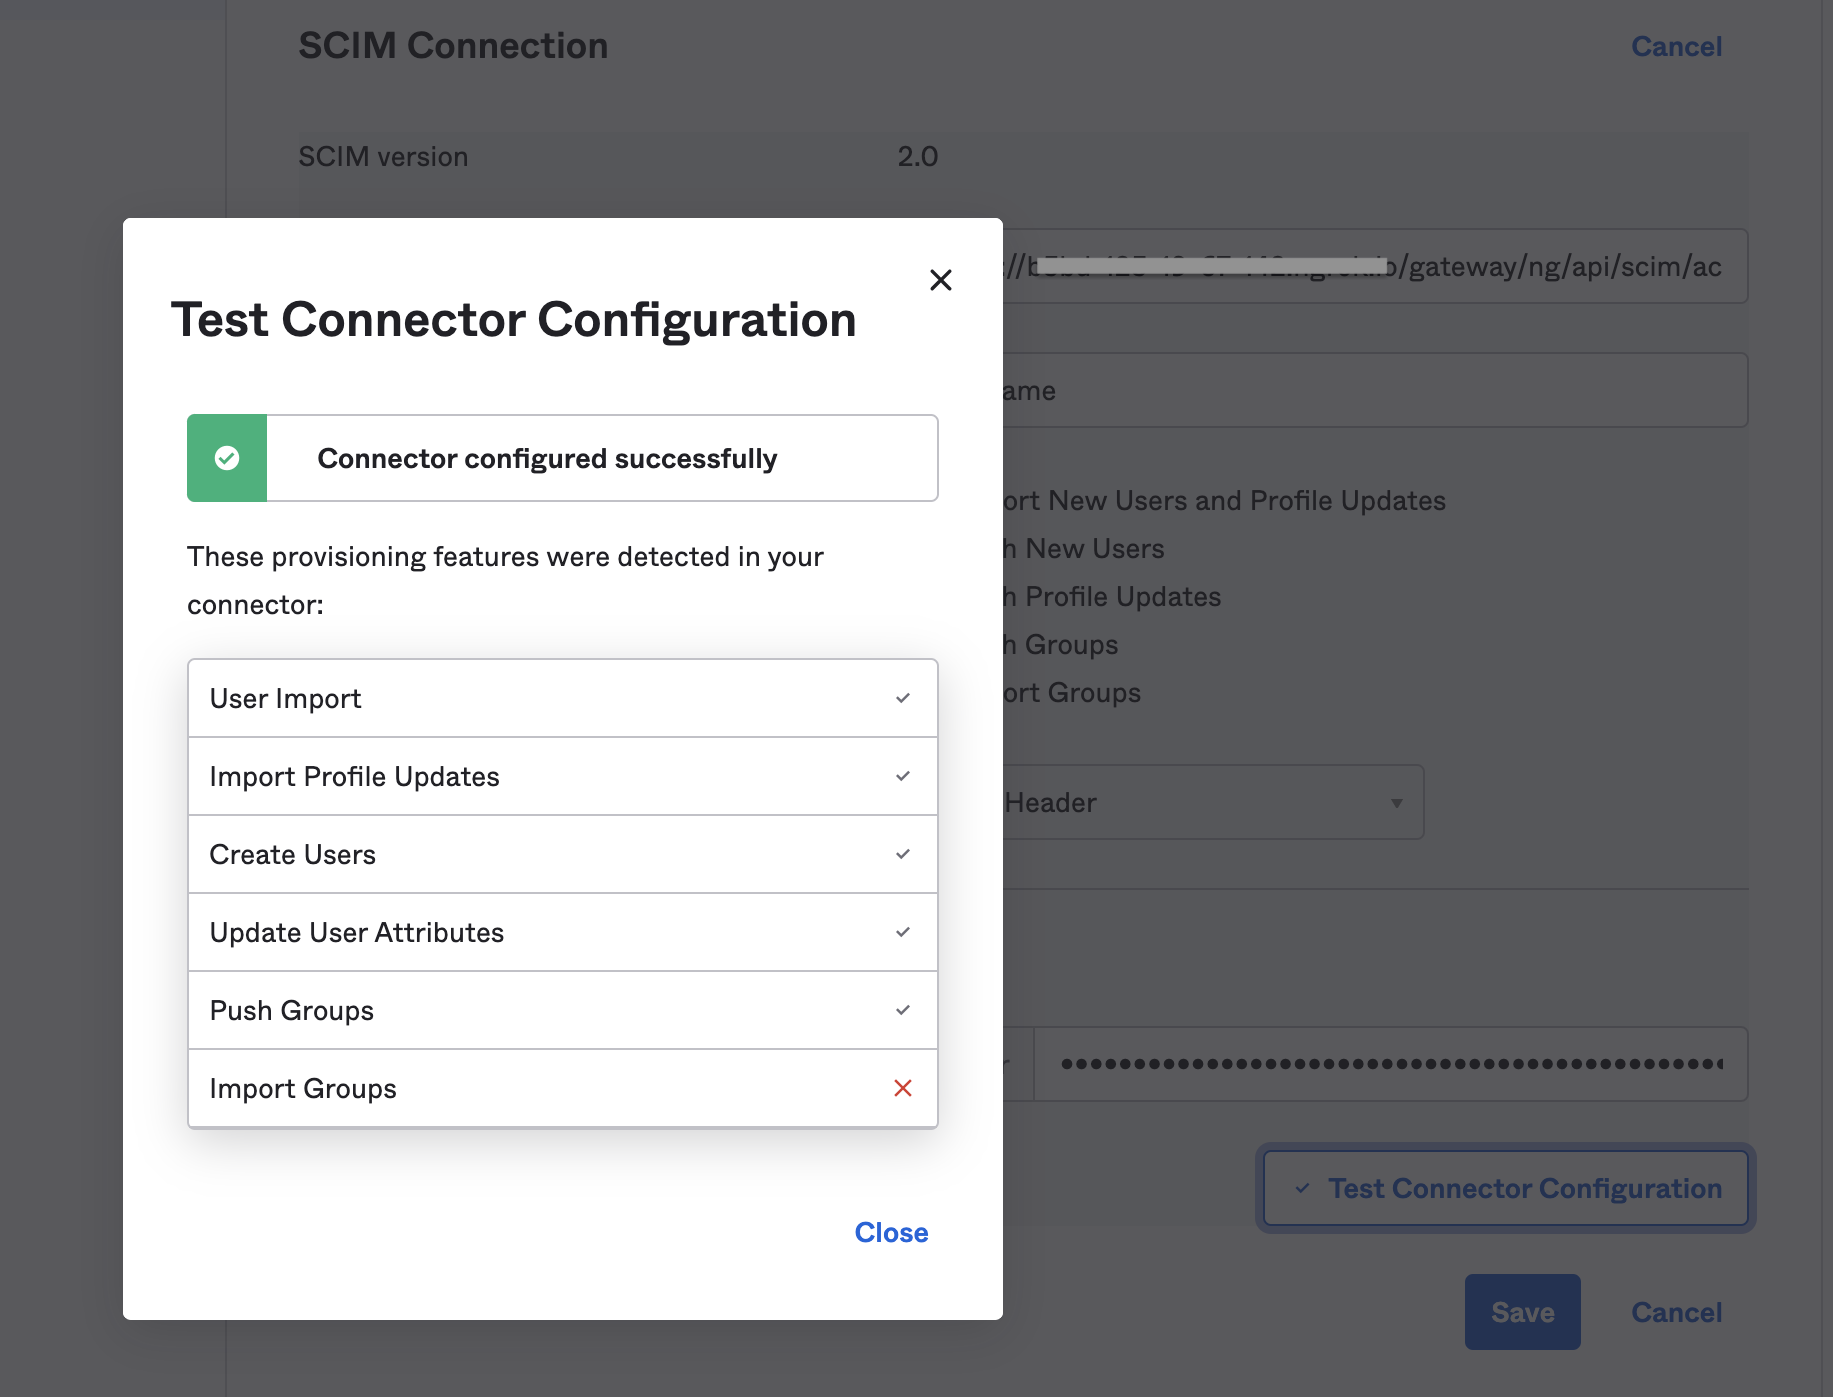
Select Test Connection.
-
If the test succeeds, select Save.
-
Go to the Provisioning tab, and select the To App settings.
-
Enable Create Users, Update User Attributes, and Deactivate Users.
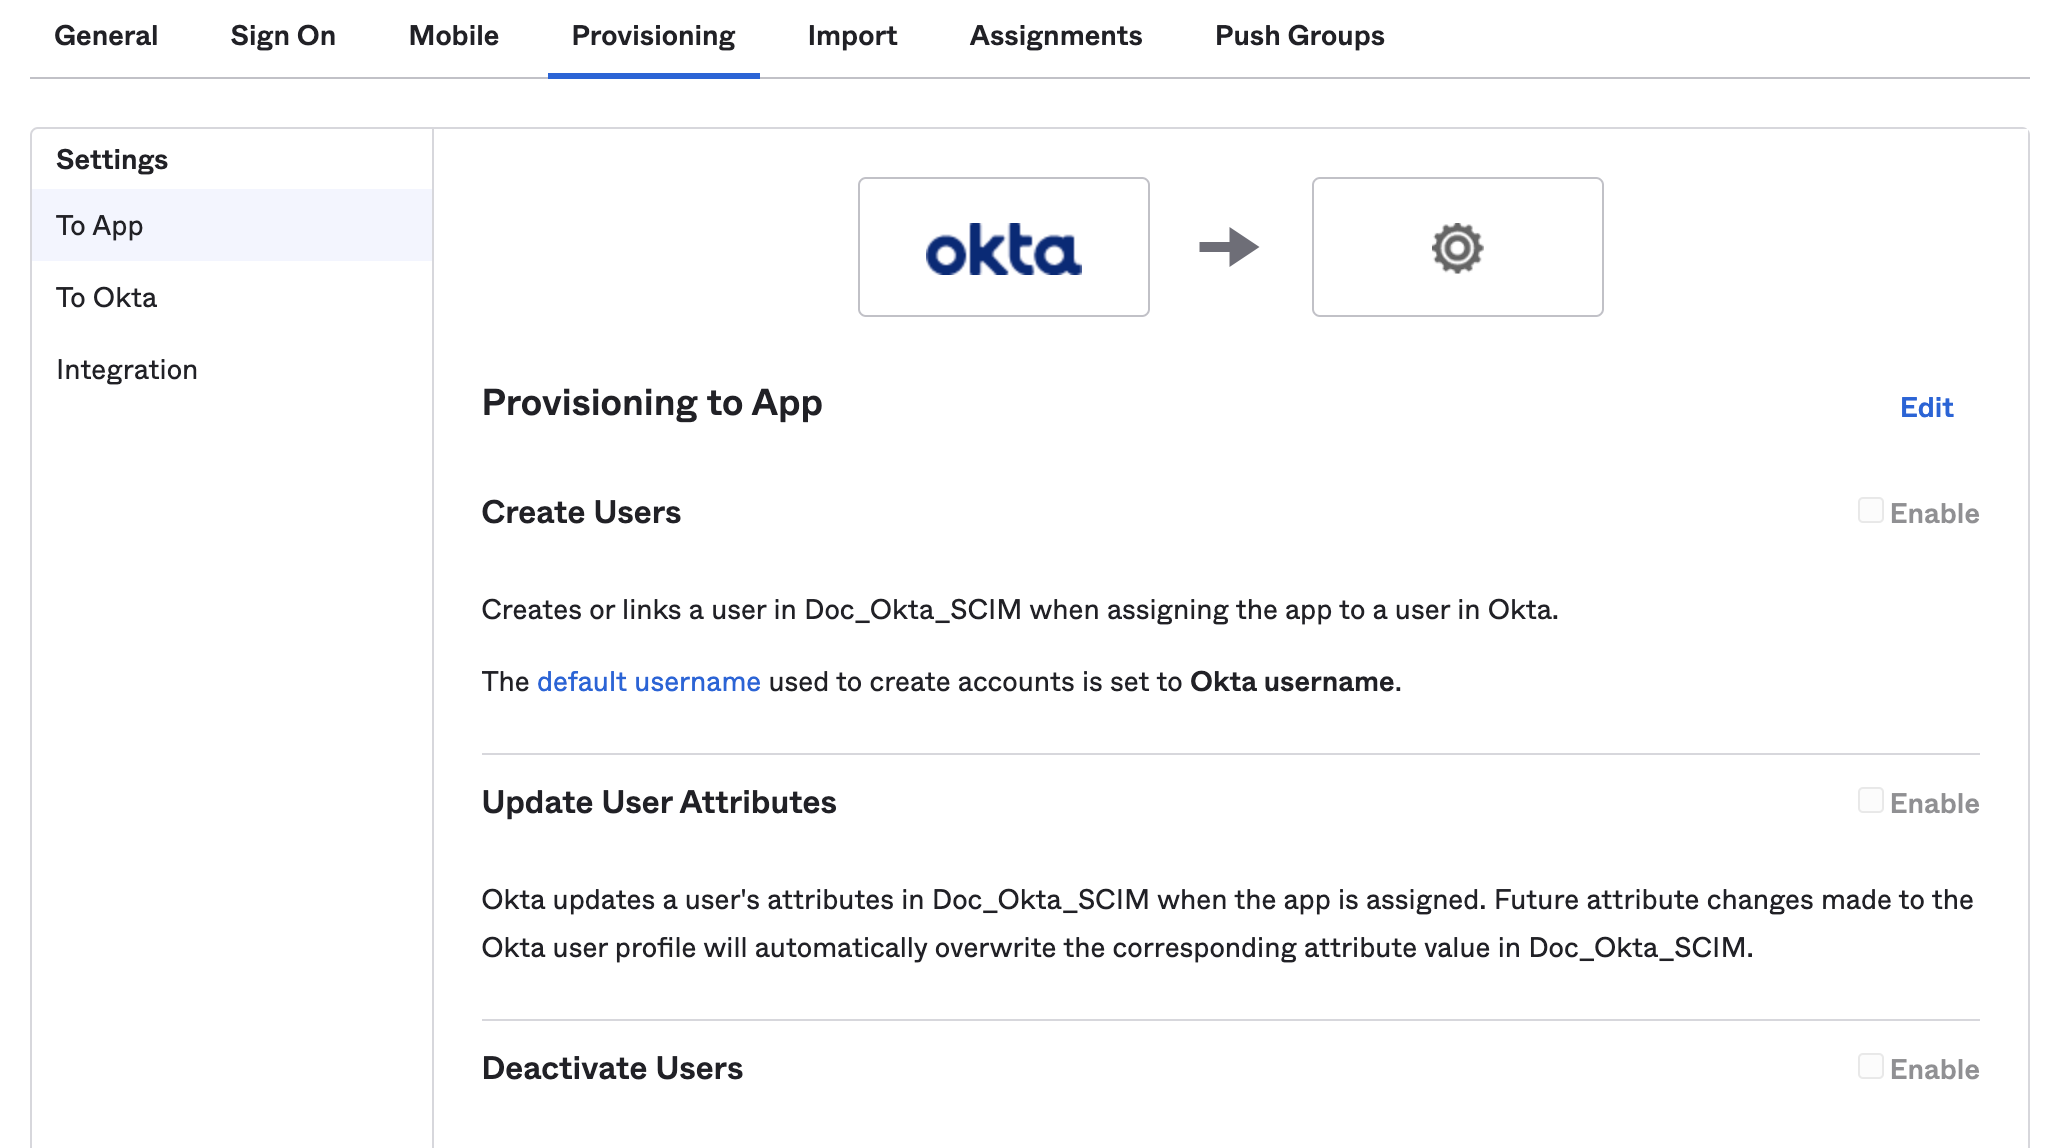
- Select Save.
Harness user management with Okta SCIM
Using the Okta SCIM integration requires you to manage certain user and user group attributes in Okta, rather than in Harness. This includes:
- Adding, removing, and editing group members. Group membership must be managed in Okta.
- Renaming user groups. Groups can only be renamed in Okta.
- Deleting user groups. Groups can only be deleted in Okta.
- Editing user email addresses, full names, and group assignments.
- You can't edit these user details in Harness if the user was provisioned as part of an Okta-provisioned user group.
- If you need to change a user's group (for example, to change their permissions), you must change the user's group membership in Okta.
- You must use Okta to delete Okta-provisioned users from Harness. To delete an Okta-provisioned user, remove them from the corresponding Okta app.
If an Okta-provisioned user group has the same name as an existing user group in Harness, Harness retains both groups. To prevent confusion, you can rename the existing Harness group.
You can use Okta to provision individual users or groups containing sets of users. If you use Okta to provision individual users directly to Harness, these users initially have no user group assignment in Harness. You must assign them to a group, either in Okta or in Harness. Directly provisioning individual users is the only way that you can change an Okta user's group membership in Harness. When provisioned as part of an Okta group, the user's group membership must always be managed through Okta.
Once you have set up the SCIM integration between Okta and Harness, administrators can perform the following Harness user management actions in Okta:
- Provision individual users.
- Provision Okta groups in Harness.
- Update user attributes.
- Deactivate or remove users.
Role and resource group assignments are not controlled in Okta. You must assign permissions to user groups in Harness.
Provision individual users
You can provision individual users, without a group affiliation, in Harness from Okta. Users assigned to groups are provisioned with their group.
- In your Harness Okta app, select Assignments.
- Select People.
- Select Assign, and then select Assign to People.
- Select the users you want to provision, and then select Assign.
- Select Save and Go Back.
- Select Done after you've finished assigning users.
Users with the Harness app assignment are shown under People. You can edit or delete users from here as well.
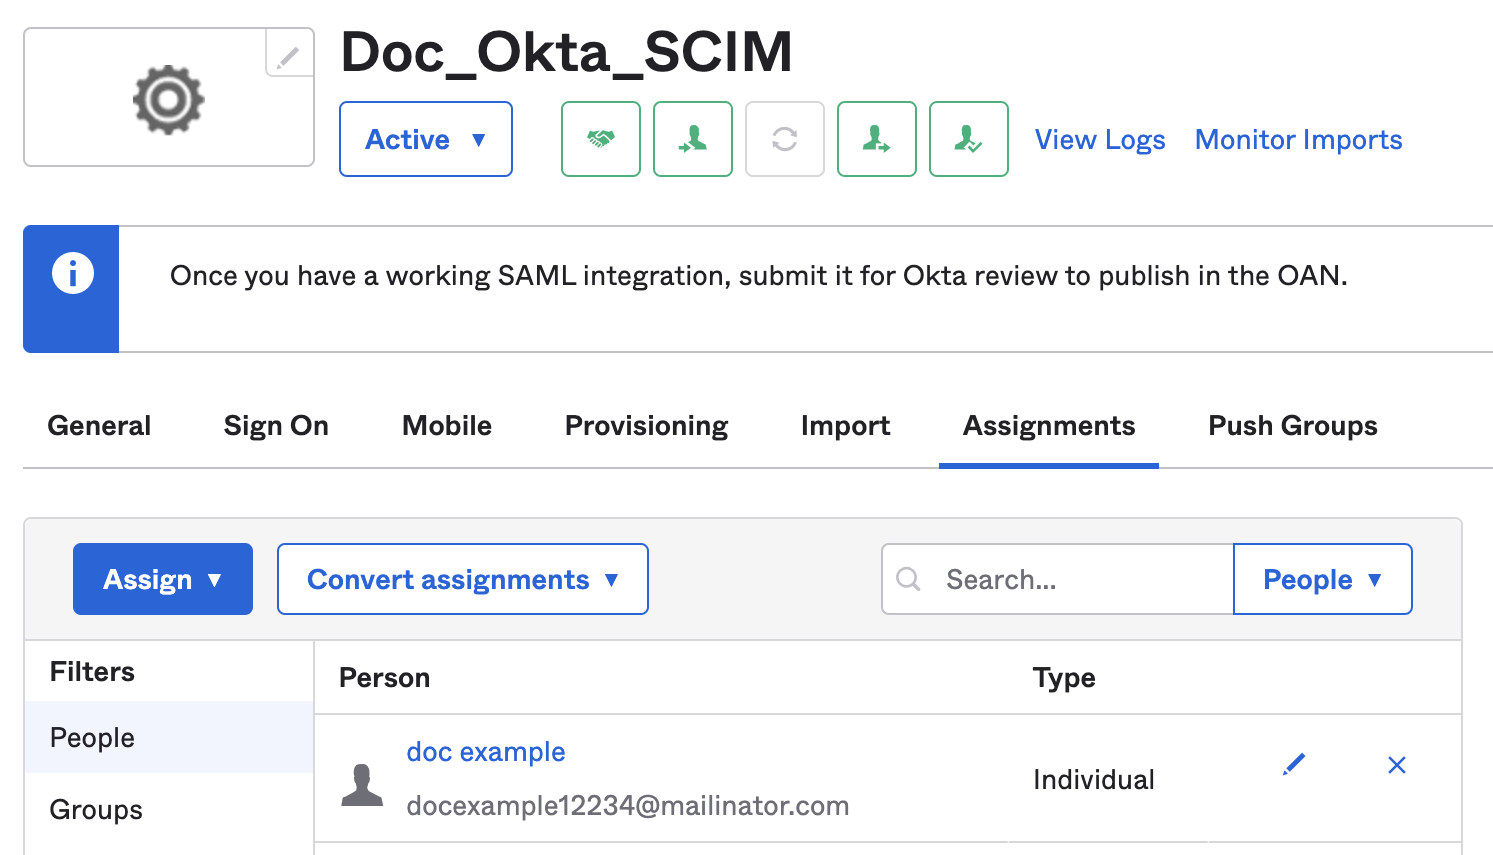
These users are also listed in your Harness account.

You can use Okta to provision individual users or groups containing sets of users. If you use Okta to provision individual users directly to Harness, these users initially have no user group assignment in Harness. You must assign them to a group, either in Okta or in Harness. Directly provisioning individual users is the only way that you can change an Okta user's group membership in Harness. When provisioned as part of an Okta group, the user's group membership must always be managed through Okta.
Provision groups
You can provision Okta user groups in Harness. To do this, you must assign groups to your Harness Okta app and then push the groups (and the group members) to Harness.
When provisioning user groups through SCIM, Harness creates IDs for user groups based on the group name in Okta. If the name contains periods, dashes, or spaces, those characters are replaced by underscores in the Harness user group ID. For example, if a group's name is example-group in Okta, the group's Harness ID is example_group.
If an Okta-provisioned user group has the same name as an existing user group in Harness, Harness retains both groups. To prevent confusion, you can rename the existing Harness group.
-
In your Harness Okta app, select Assignments.
-
Select Groups.
-
Select Assign, and then select Assign to Groups.
-
Select the groups you want to provision, and then select Assign.
-
Select Save and Go Back.
-
Select Done after you've finished assigning groups.
Groups with the Harness app assignment are shown under Groups. You can edit or delete groups from here as well.
-
Next, push your assigned groups to Harness.
-
In your Harness Okta app, select Push Groups.
-
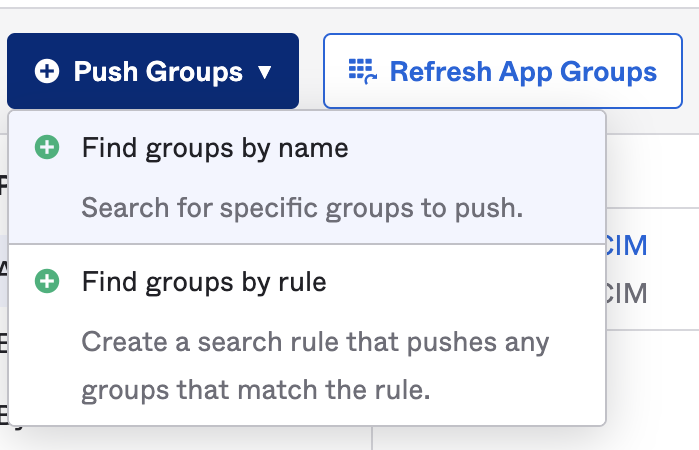
Select Push Groups, and then select Find groups by name or Find groups by rule.
-
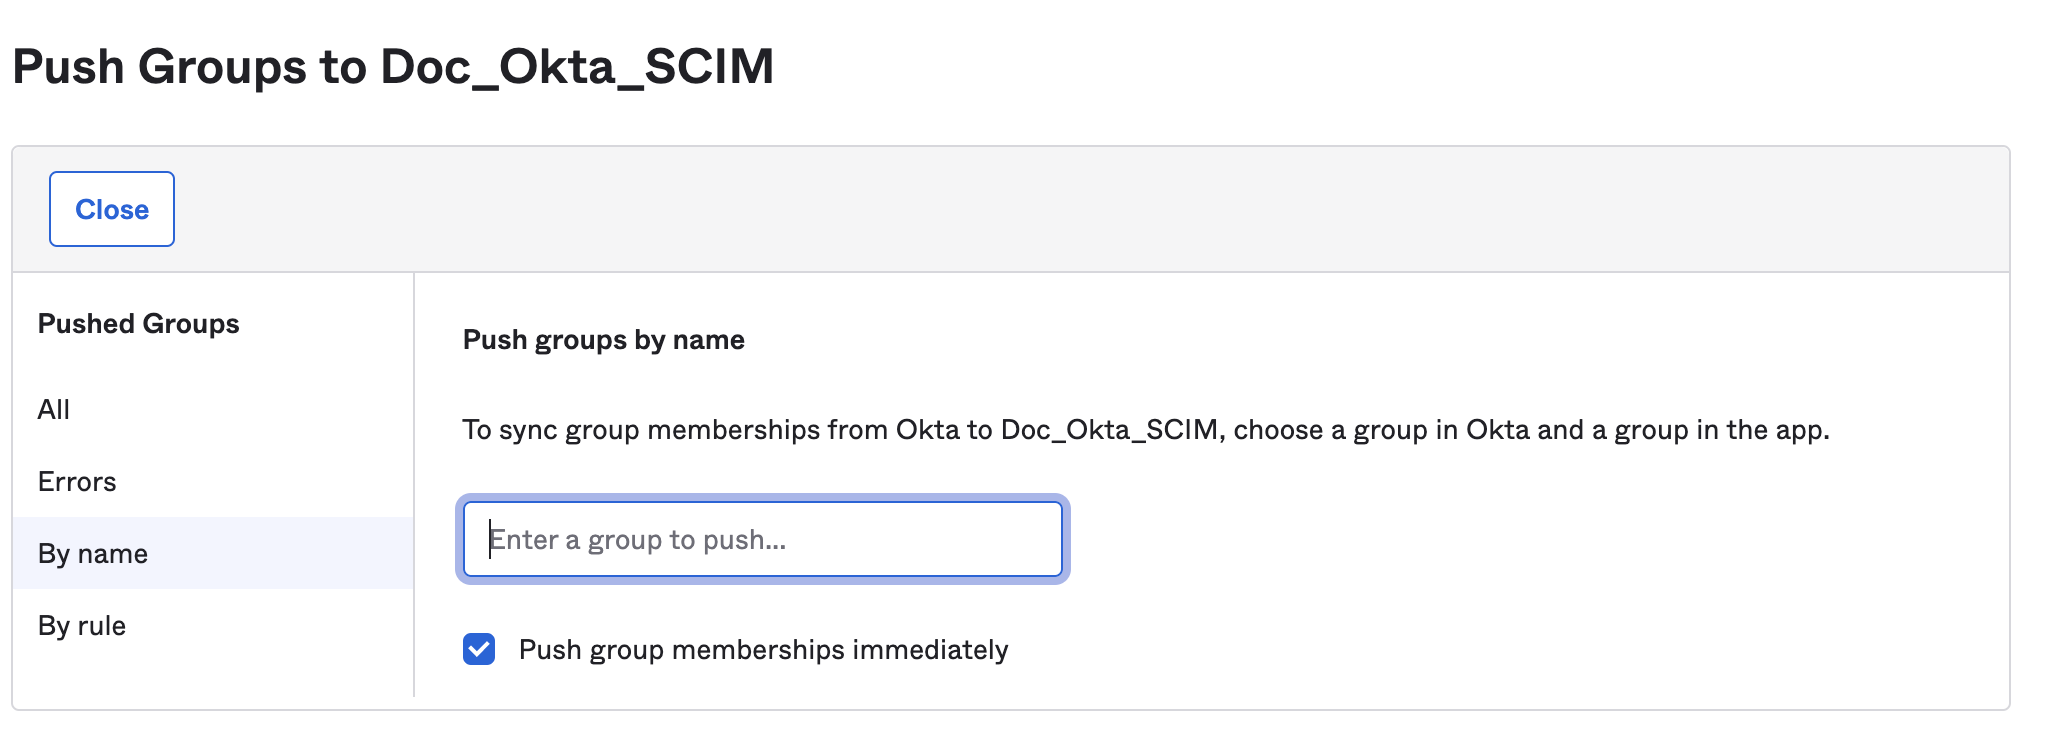
Find the groups that you want to push.
-
After you've found all the groups you want to push, select Save.
-
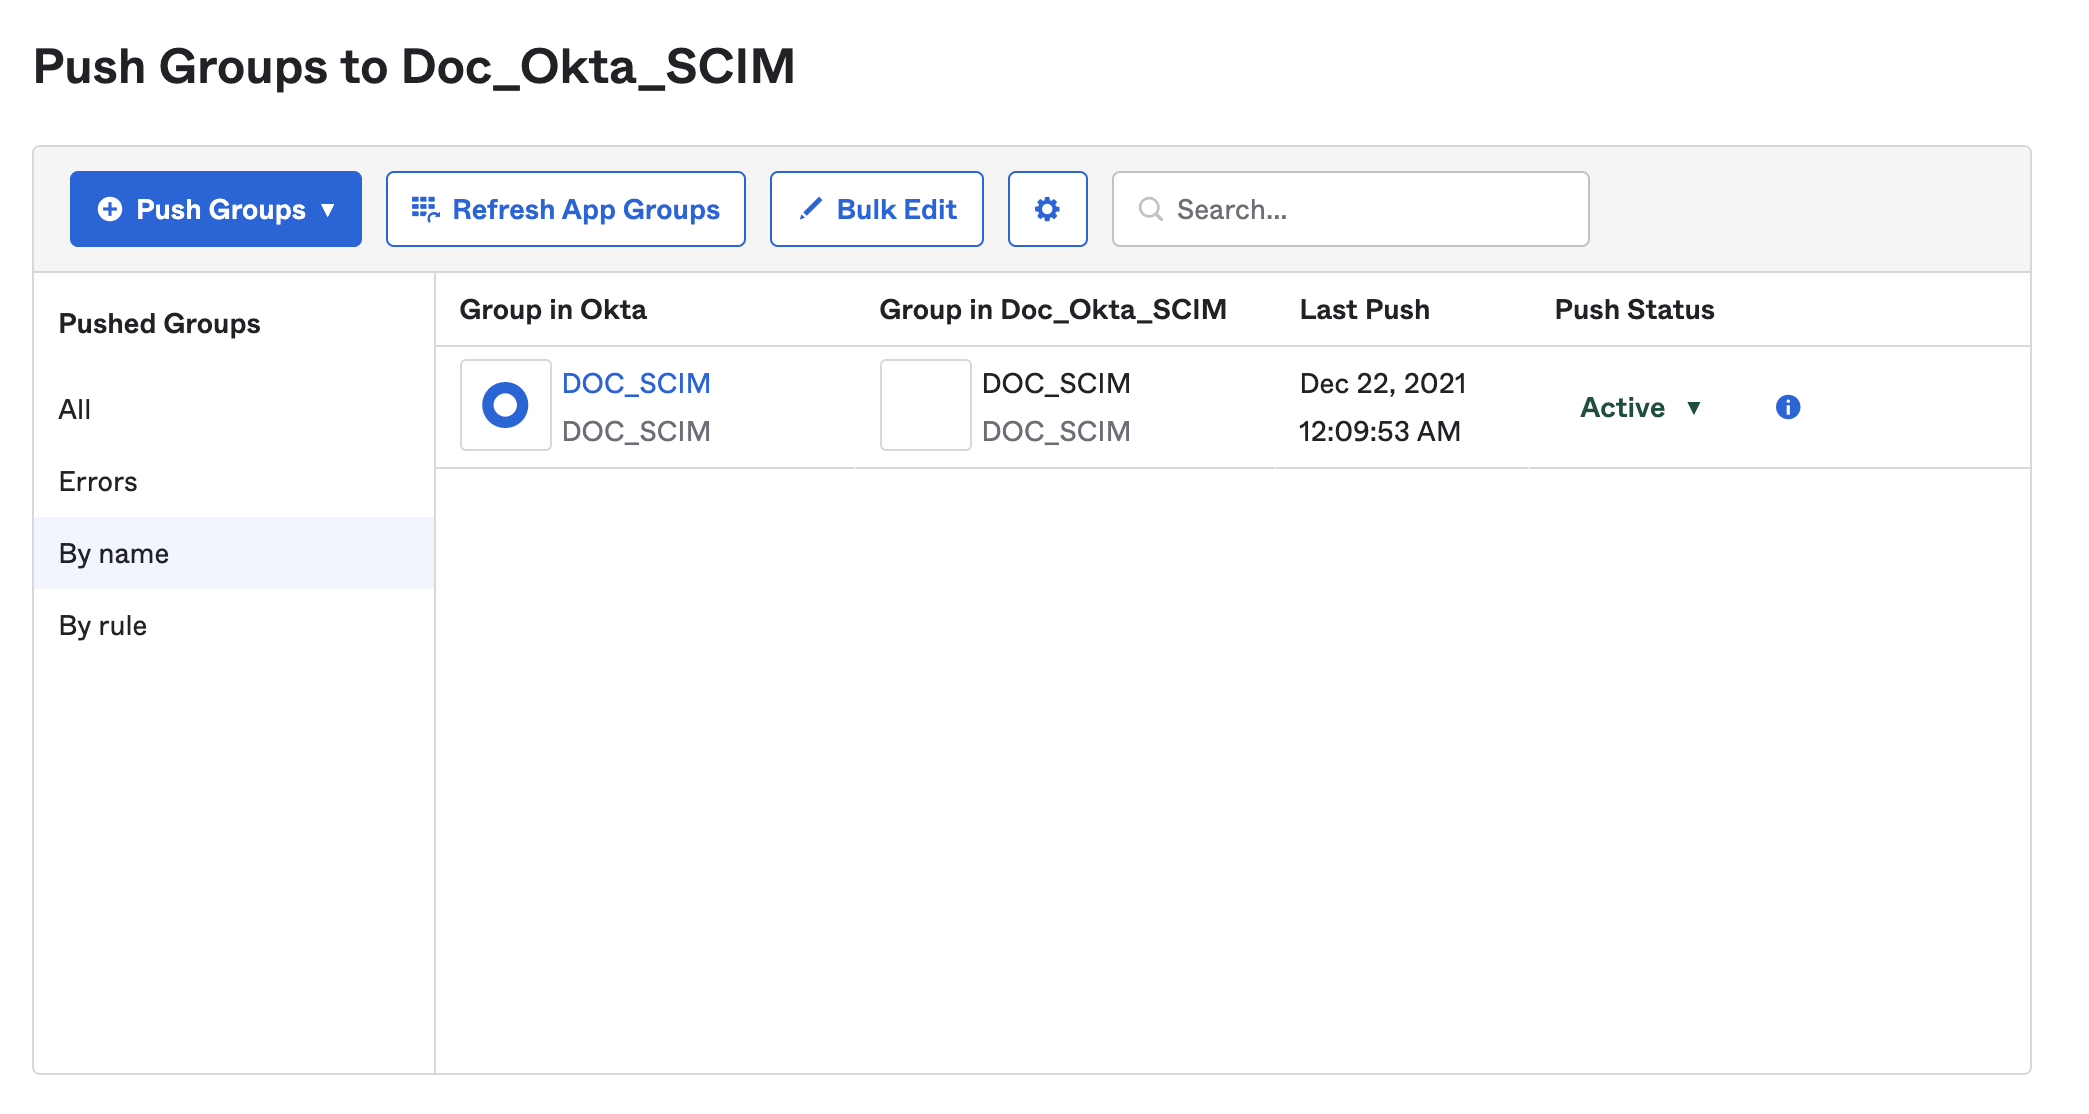
You can check the status of pushed groups in your Harness Okta app.
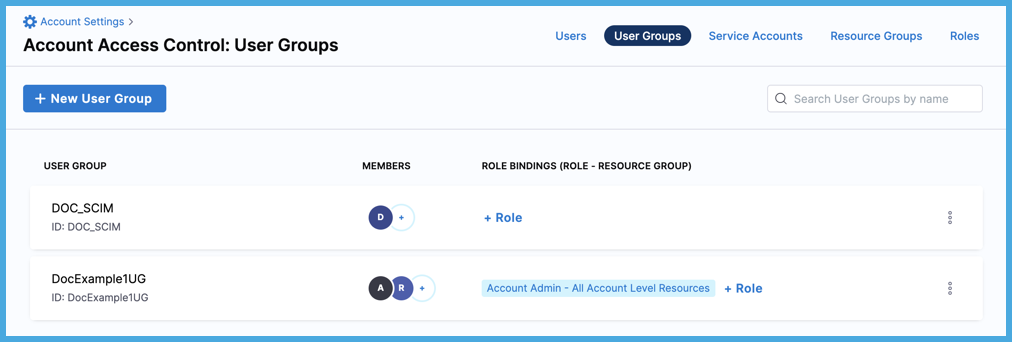
Active and successfully pushed groups are listed in your Harness account. The group members are also provisioned as Harness users when you push the group.
If an error prevents adding, deleting, or updating a group member in Harness, you must retry provisioning the user later, after resolving the issues. For more information, go to the Okta documentation on Troubleshooting Group Push.
Assign permissions
After user groups are provisioned through SCIM, you can manage permissions granted to the users in those groups by assigning roles and resource groups to user groups in Harness.
Harness roles and resource groups aren't managed in Okta.
If you need to change a user's group (for example, to change their permissions), you must change the user's group membership in Okta.
Update user attributes
You can edit the following attributes in a user's Okta profile to update the corresponding values in Harness:
- Given name
- Family name
- Primary email
- Primary email type
- Display name (This is the user's Harness user name)
These are the only field synced to Harness. Editing other fields in a user's Okta profile won't change those fields in Harness, even if an equivalent field exists.
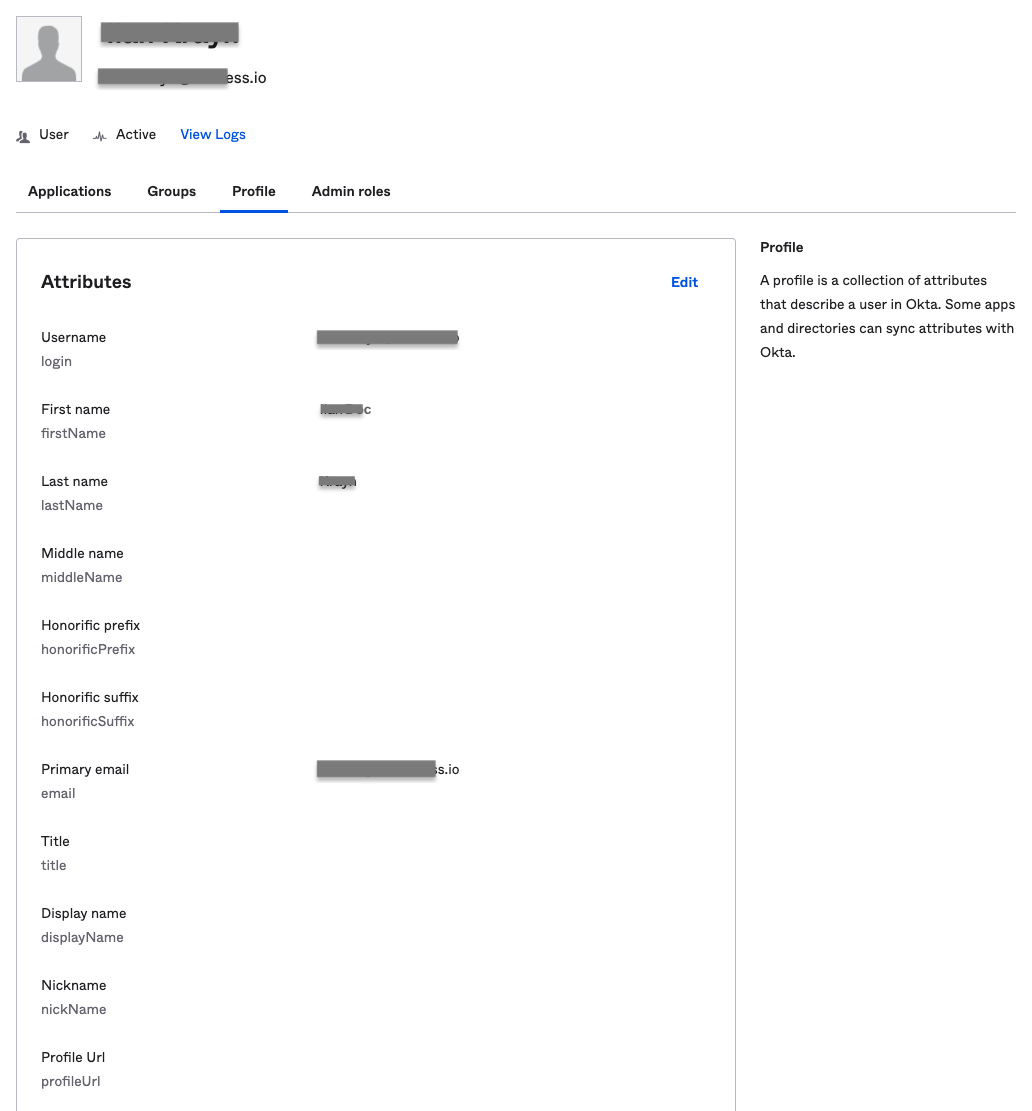
To update user attributes:
- From your Okta administrator account, select Directory, and then select People.
- Locate the user you want to edit, and select their name.
- Select the Profile tab, and then select Edit.
- Update the user's profile, and then select Save.
Deactivate or remove users
You must use Okta to delete Okta-provisioned users from Harness.
To delete an individual Okta-provisioned user (without a group affiliation), remove them from your Harness Okta app.
To delete a user provisioned through a group, remove them from the group in Okta.
To delete a user from Harness and all other provisioned apps, deactivate the user's Okta profile.
Deactivating a user removes them from all provisioned apps, including Harness. While a user account is deactivated, you can't change it.
- From your Okta administrator account, select Directory, and then select People.
- Locate the user you want to deactivate, and then select their name.
- On the user's profile, select More Actions, and then select Deactivate.
- Select Deactivate on the confirmation dialog.
To reactivate a deactivated user, go to the user's profile, select More Actions, and then select Activate.
Set the default experience
Environment administrators can set the default Harness generation landing page, FirstGen or NextGen, for their users to ensure the correct Harness Experience is provided to each user. For more information, go to Account details.
I already have a Harness FirstGen Okta integration
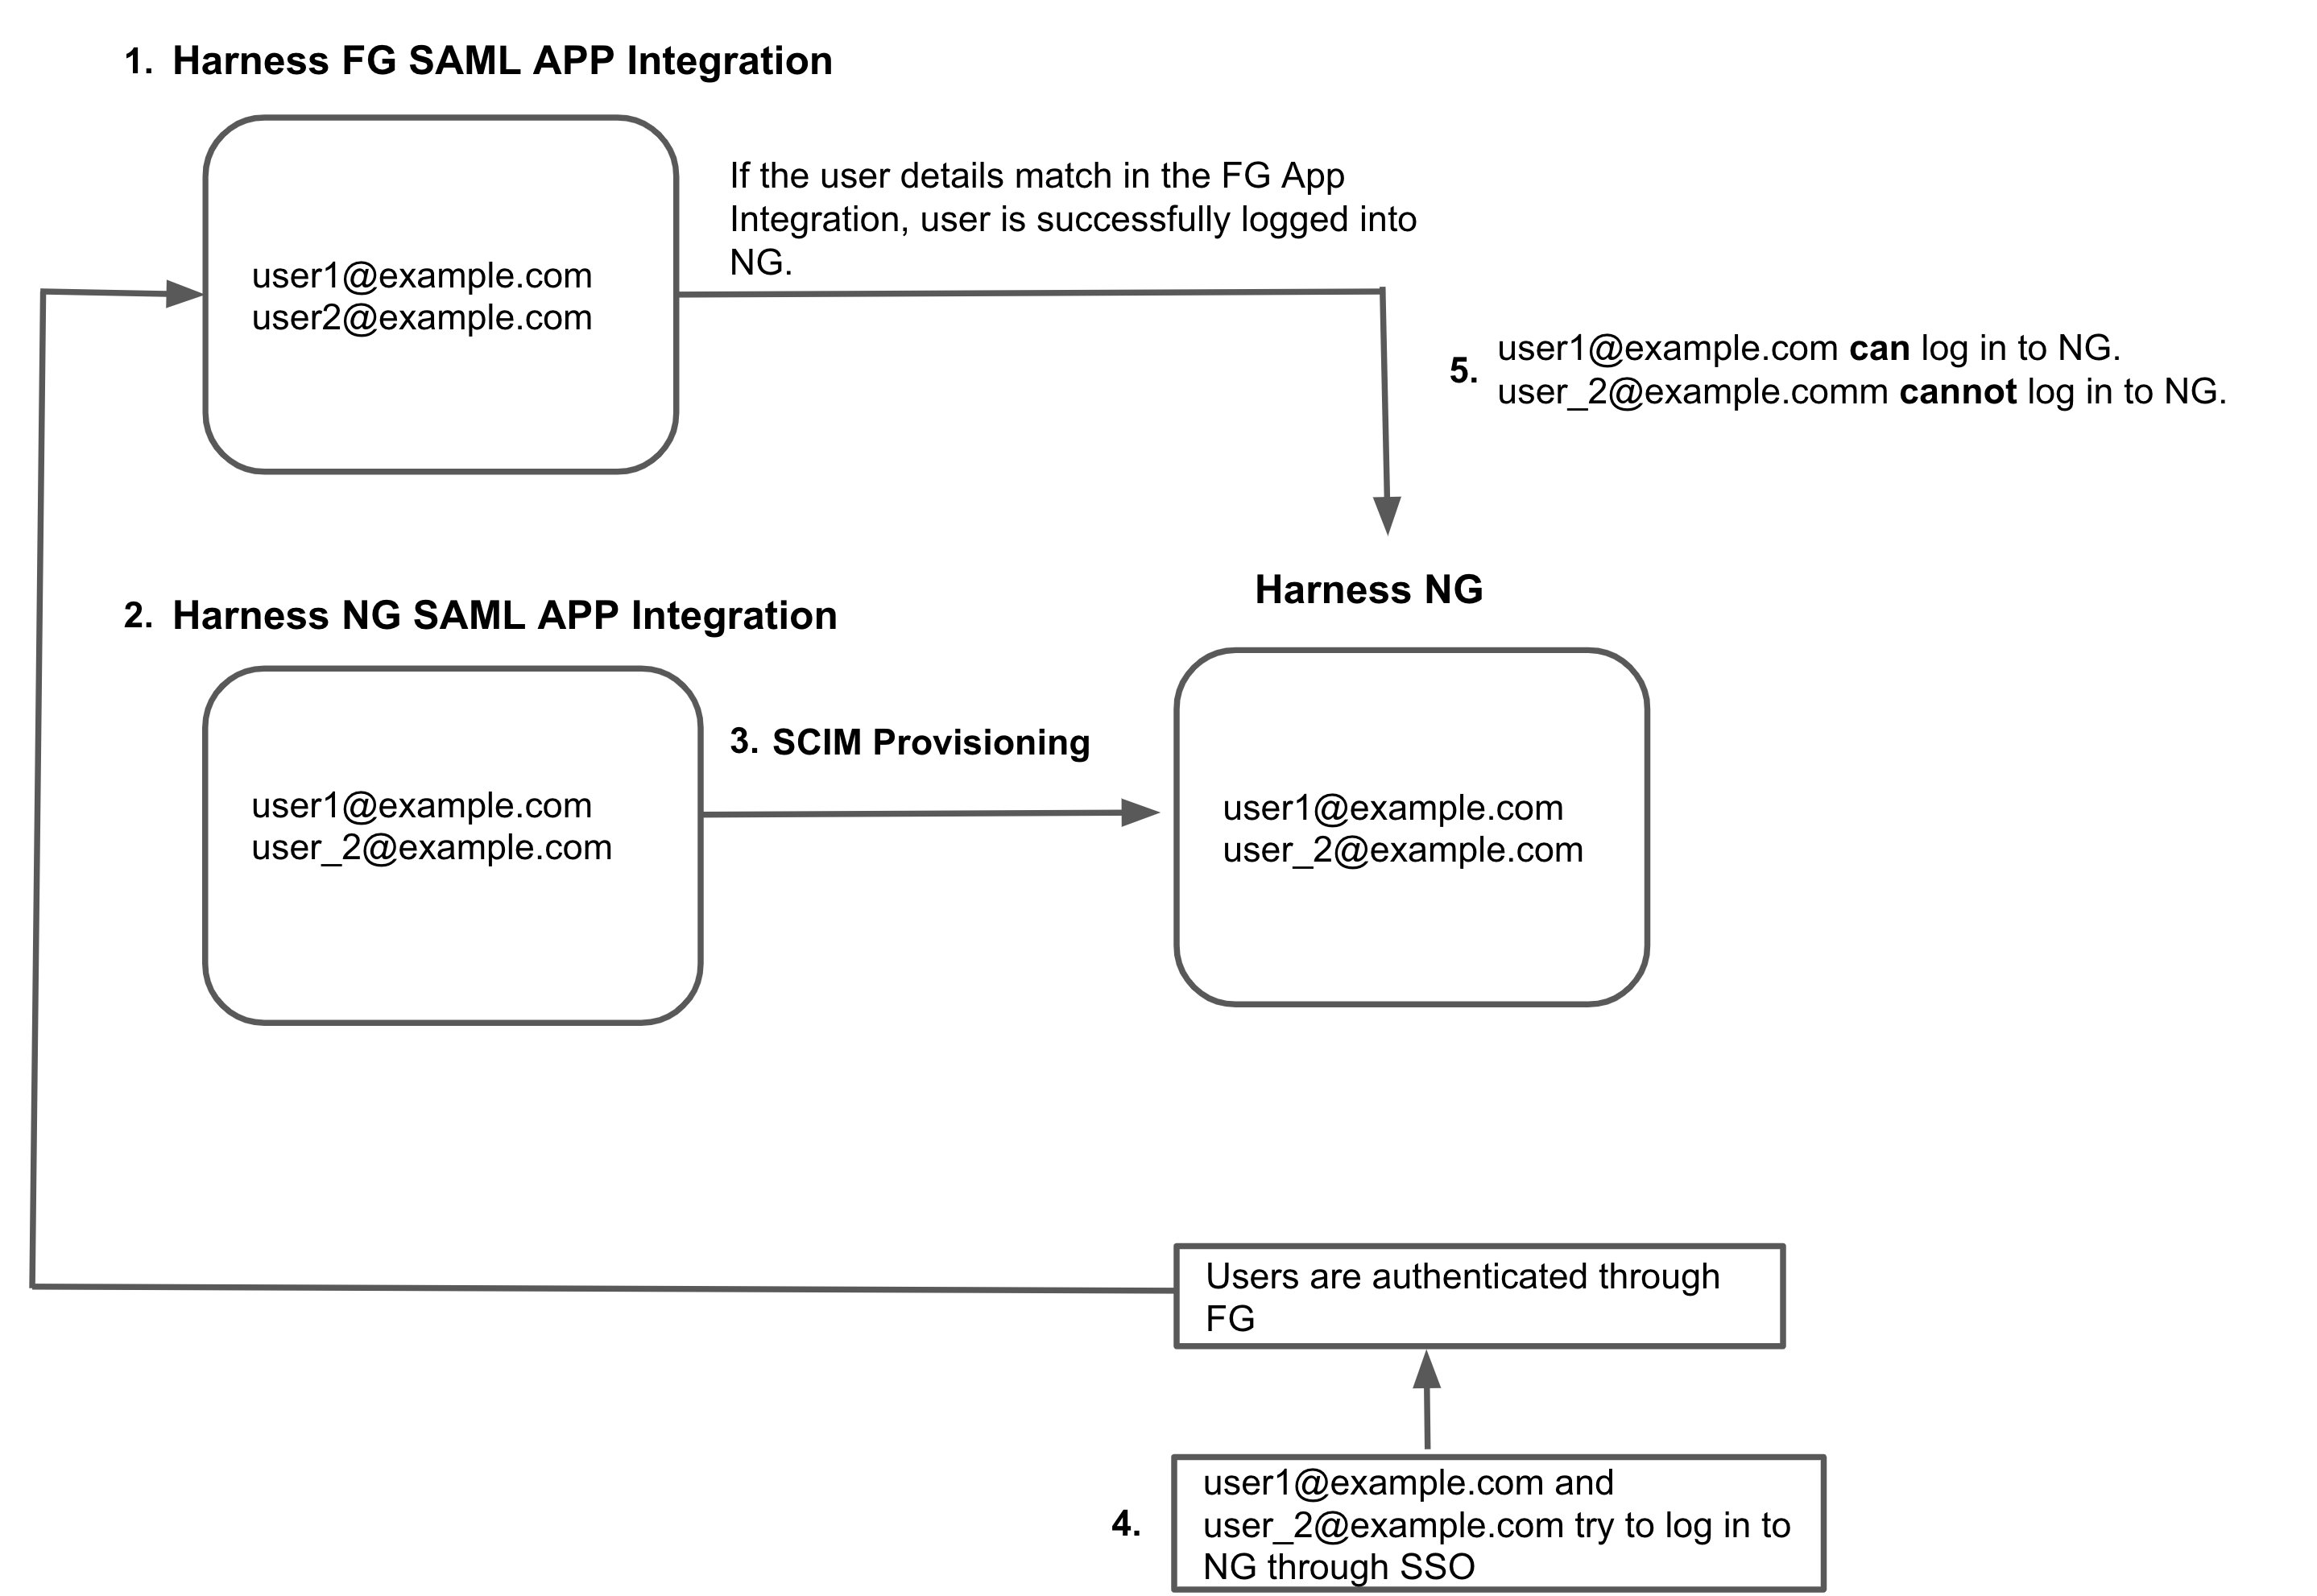
If you currently have a Harness FirstGen App Integration in your IdP, and you want to create one for Harness NextGen, make sure the user information is included in the FirstGen App Integration before attempting to log into Harness NextGen through SSO.
Harness authenticates users using either the FirstGen App Integration or the NextGen App Integration. If you have set up both, Harness continues to use your existing App Integration in FirstGen to authenticate users that attempt to log in using SSO.
For example:
-
An App Integration is already set up for FirstGen with two users as members:
user1@example.comanduser2@example.com. -
You create the App Integration for Harness NextGen, and you add
user1@example.comanduser_2@example.comas members. -
You provision these users to Harness NextGen through SCIM.
-
user1@example.comanduser_2@example.comtry to log in to Harness NextGen through SSO. -
The FirstGen App Integration is used for user authentication through SSO.
user1@example.comis a member of the FirstGen App Integration. They are successfully authenticated and logged in to Harness NextGen.user_2@example.comis not a member of the FirstGen App Integration. Authentication fails and the user can't log in to Harness NextGen.
