Onboarding guide
This topic describes the steps you need to do to set up STO in your pipeline.
The entire setup should take about 30 minutes.
STO requirements
Make sure you meet the following requirements before you do the STO Setup Procedures steps described below.
External requirements
Before you create your first Harness pipeline, you must have the following:
- Git account and Personal Access Token — If you are scanning a repo, you need an account and access token with the Git provider.
- Docker Hub account — STO uses Docker-in-Docker to run scans. The Pipeline needs to pull the docker:dind image from Docker Hub.
- A build infrastructure for executing pipelines and scanning targets.
Harness user permissions
- Developers need a Security Testing Developer role to run tests and view results.
- Security Operations staff need a Security Testing SecOps role to run tests, view results, and approve security exemptions.
- To assign these roles, you need an Account Admin role. Project Admin permissions aren't enough.
Harness account requirements
Harness recommends you create the following resources at the Account level. This enables you to use them across all projects and pipelines in the account.
- Harness Delegate — Required to run builds in your Kubernetes infrastructure.
- Secret for Git access credentials — Required to set up a codebase connector.
- Git codebase connector — Required if you want to scan a codebase in your pipeline.
- Docker Hub connector — Required to download images needed to run the pipeline.
STO setup procedures
The following sections describe the workflow for setting up STO. Once you complete this workflow, you'll have the build infrastructure and connectors required to build a pipeline and run security scans. You'll also have an STO-enabled pipeline that you can clone and configure based on your security requirements.
Add Security Testing roles
Harness includes two RBAC roles specifically for STO users:
-
Security Testing Developer role — Permissions for developer workflows:
-
Configure and run scans
-
Set baselines (such as the
mainbranch oflatesttag) for scan targets -
View scan results and troubleshoot detected issues
-
Configure scan steps to fail the pipeline if any "show-stopper" vulnerabilities are found
-
Request exemptions ("ignore rules") to allow a pipeline to proceed even if a scan detects vulnerabilities with a specific severity or higher (Critical, High, Medium, etc.)
-
-
Security Testing SecOps role — Permissions for Security Operations staff. SecOps users have all Developer permissions, but only SecOps users can approve exemption requests.
These workflows are covered in Your first STO pipeline.
You need Administrative privileges at the Account level (Account Admin role) to assign these roles.
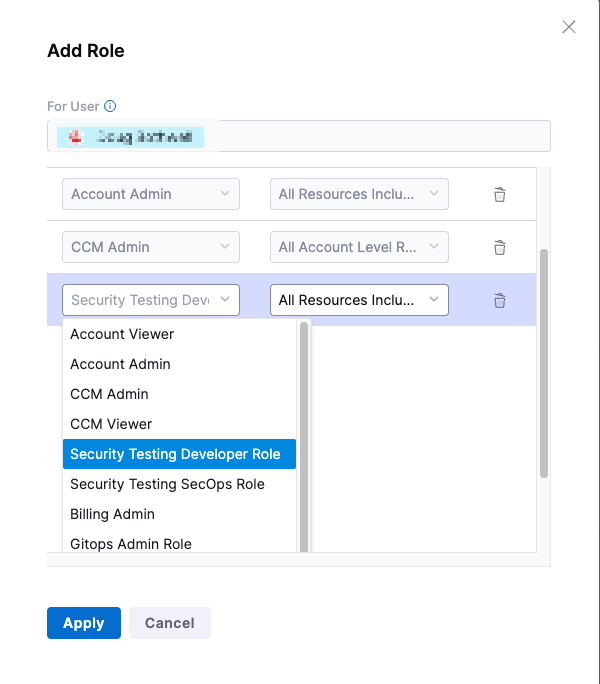
Assign Security Testing roles: default workflow
- Select Account Settings (left menu) > Access Control.
- In the Users table, select the user profile.
- Under Role Bindings, select +Role.
- Assign the Security Testing Developer role or the Security Testing SecOps role to the user profile.
Set up a build infrastructure for STO
You need a Harness build infrastructure to run scans in STO. First, review Operating systems and architectures supported by STO. Then select the infrastructure you want to use:
-
This is the simplest option. Not initial setup is required. Run your pipelines on Harness-managed VMs preconfigured with tools, packages, and settings commonly used in CI pipelines.
-
Self-managed Kubernetes cluster build infrastructure
Recommended when you want to run ephemeral builds-at-scale in your own infrastructure.
-
Local Docker runner build infrastructure
Recommended for small, limited builds, such as a one-off build on your local machine.
Kubernetes cluster and local runner infrastructures might also require a Docker-in-Docker background step in your pipeline. For more information, go to Docker-in-Docker requirements for STO.
Create secrets for your Git and DockerHub access credentials
Harness includes a built-in Secrets Manager that enables you to store encrypted secrets, such as access keys, and use them in your Harness account. Secrets are always stored in encrypted form and are not accessible by Harness. Only the delegate, which runs in your infrastructure, can access them.
In this step, you'll create a secret for your GitHub and DockerHub access tokens. Then you'll use the secret when you set up the connector to your GitHub repo.
Create a Secret for your GitHub access token: default workflow
- In your Github account, a GitHub Personal Access Token that has the following scopes:
- repo
- admin:repo_hook
- user
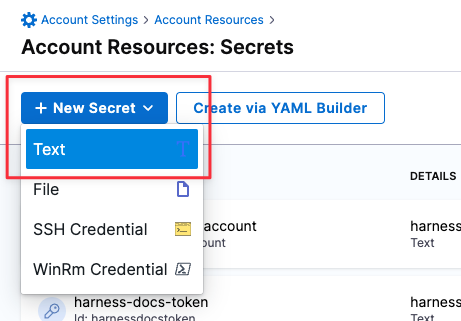
- Go to Account Settings > Account Resources and select Secrets.
- Select New Secret > Text.
-
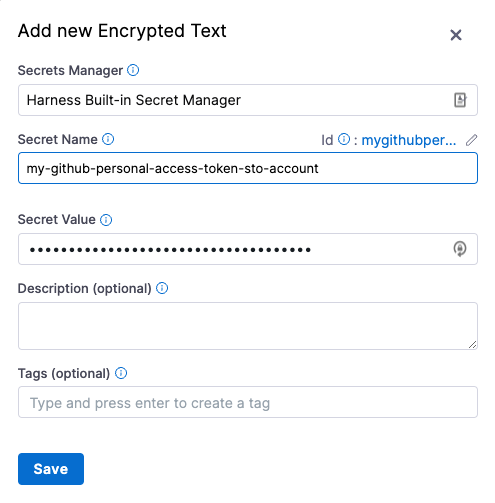
Specify the Secret Name and Secret Value (your GitHub access token). It's good practice to indicate the scope of the secret in the name, as shown in this example.
-
Repeat this procedure to create a secret for your DockerHub access token.
Create a Docker Hub connector
A Docker Hub connector is required to run a Docker-in-Docker service as described in Set up the Security stage below. It is also required for any pipeline that scans or uploads a built image.
Create a Docker Hub Connector: Default Workflow
- If you want to upload images to your Docker Hub repo, you'll need an access token. To do this:
- Create a token: log in to your Docker Hub account and go to https://hub.docker.com/settings/security.
- Create a secret for your token.
- Go to the Account Settings > Account Resources page and select Connectors.
- Select New Connector. Under Artifact Repositories, select Docker Registry.
- In the connector setup wizard, specify the following:
- Docker Registry URL = https://index.docker.io/v2/
- Provider Type = DockerHub
- Username = Your Docker Hub username
- Password = The secret you created for your Docker Hub access token.
- In Delegates Setup, select Use any available Delegate and then select Save and Continue.
- Wait for "Verification successful" and then select Finish.
Create a Codebase connector
You'll need a GitHub account to do the STO Tutorials.
You also need a Git repo connector for any STO pipeline that scans a codebase. You can create codebase connectors for the following SCMs:
To do the STO tutorials, point the connector at the following repo: https://github.com/williamwissemann/dvpwa
Create a Codebase connector: default workflow
- Go to the Account Settings > Account Resources page and select Connectors.
- Under Code Repositories, choose GitHub.
- Specify the following in the setup wizard:
- Overview:
Name = GitHub STO tutorial. - Details:
URL Type: Repository
Connection Type: HTTP
GitHub Repository URL: https://github.com/williamwissemann/dvpwa - Credentials:
Username: Your GitHub username.
Personal Access Token: Your GitHub Personal Access Token secret.
Enable API Access: Select this checkbox and select the same secret. - Connect to the provider:
Select Connect through Harness Platform.
- Overview:
- When you're done, select Save and Continue. Harness will test the connection and credentials. Select Finish.
Next steps
Now that you've set up Harness, you're ready to start using STO.
A good next step is to go through Your first STO pipeline. This tutorial covers the basic concepts of STO. You'll set up a standalone pipeline with one scanner, run scans, analyze the results, and learn how to investigate and fix detected vulnerabilities.
The STO tutorials also include a set of quickstarts and end-to-end workflows that show you how to create pipelines that you can apply to a wide variety of security-related use cases.
Happy scanning!