Set up Grype in air-gapped environments
This topic describes how to set up Grype in an air-gapped environment. It is provided as a supplement to Offline and air-gapped environments in the Grype documentation.
Before you begin
To run Grype scans in an air-gapped environment, you need do the following:
- Set up a private registry or local file server in your air-gapped environment. You need for your Harness pipelines to access your local container images, Grype databases, support files, and other artifacts. You need a local web server so that the Grype step can request local artifacts via HTTP and HTTPS.
Documentation about setting up a private registry is outside the scope of this topic. For more information, go to the documentation for the artifact tool you want to use. One popular tool for air-gapped environments is JFrog Artifactory; this blog post provides a comprehensive overview.
-
Load local copies of your Harness container images to your private registry. For more information, go to Configure your pipeline to use STO images from private registry.
-
Install Grype and set it up to run in your air-gapped environment. For more information, go to the following sections in the Grype documentation:
Initial setup
Anchore maintains a Grype database of known vulnerabilities and updates it regularly. The Grype scanner uses this database to detect issues when it scans a target. By default, the scanner downloads the latest database from a public URL when it runs a scan. If the local database is stale, the scan fails.
The Grype container image provided by Harness includes the latest database at the time the image was built. As part of the initial setup, you will configure Grype to use the local database and override (temporarily) the default stale-database check.
To to verify that Grype runs as intended in your air-gapped environment, do the following:
-
Add a CI Build or Security stage to your Harness pipeline.
-
Set up a Grype step in the stage.
-
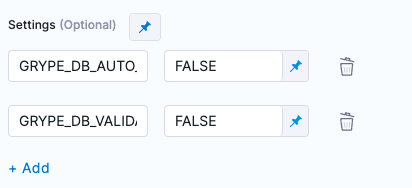
Add the following settings to the Grype step:
GRYPE_DB_AUTO_UPDATE=FALSEDisables downloading a new database.GRYPE_DB_VALIDATE_AGE=FALSEDisables the staleness check for the database.
-
Run the pipeline and verify that the local Grype scanner runs correctly.
Production setup
To run Grype in a production environment, you need to set up a mechanism to transfer the latest Grype database to your local registry.
The following steps outline the basic workflow:
-
Add a copy of the latest Grype database to your local registry:
-
Download a JSON of the latest databases from this URL:
https://toolbox-data.anchore.io/grype/databases/listing.jsonEach database entry in the JSON includes the build date/time, version number, URL, and checksum.
-
Download the latest database and upload it to your local registry.
-
Set up a copy of
listing.jsonin your local registry. This file specifies the local Grype databases available for running scans.-
Download a copy of the
listing.jsonfile from the Grype repository. -
Edit the local file so that it has one entry with the
"built","version","url", and"checksum"values for the database you just uploaded.Here's an example of a local
listing.json. Note that theurlnow points to a local registry (Artifactory in this example), not the remote URL that you'd use in an online environment.{"available": {"1": [{"built": "2023-09-24T01:25:55Z","checksum": "sha256:a676908681232596b549934651e65109b11dce1c6a86c034a32110653fd95e71","url": "https://artifactory.myorg.internal:443/artifactory/example-repo-local/grype/vulnerability-db_v1_2023-09-24T01:25:55Z_c1e349e7e8023eb909f4.tar.gz","version": 1}]}} -
Upload the updated
listing.jsonto your local registry.
For more information about Grype databases, go to Grype's databases in the Grype documentation.
-
-
Add this setting to the Grype step in your Harness pipeline:
GRYPE_DB_UPDATE_URLThe URL to thelisting.jsonin your local registry. For example,https://artifactory.myorg.internal:443/artifactory/example-repo-local/grype/listing.json
-
Run the pipeline again and verify that the Grype step runs as intended.
-
-
Before your Grype step is production-ready, you need to configure the Grype scanner to check the database build time and fail the scan if the database is stale. To enable the staleness check, set the following settings in the Grype step as follows:
GRYPE_DB_VALIDATE_AGEChange this fromFALSEtoTRUEto enable the staleness check for the database. (You added this setting as part of the initial setup.)GRYPE_DB_MAX_ALLOWED_BUILT_AGEThe maximum allowable age of a database before it is considered stale and the Grype scan fails. Specify the age using golang's time duration syntax. Valid examples include24h(one day) and120h(five days).
Update the database (ongoing)
When you run Grype in an air-gapped environment, you must update the database regularly to ensure that your scans check for the latest vulnerabilities.
To update your system to use the latest database:
- Add a copy of the latest Grype database to your local registry:
-
Download a JSON of the latest databases from this URL:
https://toolbox-data.anchore.io/grype/databases/listing.json -
Download the latest archive and transfer it to your local registry.
-
- Update the
listing.jsonfile in your local registry: add a new entry with the"built","version","url", and"checksum"values for the database you just added. Make sure you update the"url"to point to your local registry.