Snyk step configuration
The Snyk step in Harness STO enables you to perform Snyk Code, Open Source, Container, and IaC scanning in both Orchestration and Ingestion modes of STO. This document will guide you through understanding the fields, configuring them, and providing any necessary information for setting up the step.
- You can utilize custom STO scan images and pipelines to run scans as a non-root user. For more details, refer Configure your pipeline to use STO images from private registry.
- STO supports three different approaches for loading self-signed certificates. For more information, refer Run STO scans with custom SSL certificates.
The following topics contain useful information for setting up scanner integrations in STO:
Snyk step settings
It is recommended to add a Snyk step to the Security or Build stage and configure it as described below.
Scan
Scan Mode
- Orchestration Configure the step to run a scan and then ingest, normalize, and deduplicate the results.
- Ingestion Configure the step to read scan results from a data file and then ingest, normalize, and deduplicate the data.
Scan Configuration
The predefined configuration to use for the scan. All scan steps have at least one configuration.
Target
Type
The target type to scan for vulnerabilities.
-
Repository Scan a codebase repo.
In most cases, you specify the codebase using a code repo connector that connects to the Git account or repository where your code is stored. For information, go to Configure codebase.
- Container Image Scan the layers, libraries, and packages in a container image.
Target and variant detection
When Auto is enabled for code repositories, the step detects these values using git:
- To detect the target, the step runs
git config --get remote.origin.url. - To detect the variant, the step runs
git rev-parse --abbrev-ref HEAD. The default assumption is that theHEADbranch is the one you want to scan.
When Auto is enabled for container images, the step detects the target and variant using the Container Image Name and Tag/Digest defined in the step or runtime input.
Note the following:
- Auto is not available when the Scan Mode is Ingestion.
- By default, Auto is selected when you add the step. You can change this setting if needed.
Name
The identifier for the target, such as codebaseAlpha or jsmith/myalphaservice. Descriptive target names make it much easier to navigate your scan data in the STO UI.
It is good practice to specify a baseline for every target.
Variant
The identifier for the specific variant to scan. This is usually the branch name, image tag, or product version. Harness maintains a historical trend for each variant.
Workspace (repository)
The workspace path on the pod running the scan step. The workspace path is /harness by default.
You can override this if you want to scan only a subset of the workspace. For example, suppose the pipeline publishes artifacts to a subfolder /tmp/artifacts and you want to scan these artifacts only. In this case, you can specify the workspace path as /harness/tmp/artifacts.
Additionally, you can specify individual files to scan as well. For instance, if you only want to scan a specific file like /tmp/iac/infra.tf, you can specify the workspace path as /harness/tmp/iac/infra.tf
Container image
Type
The registry type where the image is stored:
-
Docker v2 A registry that uses the Docker Registry v2 API such as Docker Hub, Google Container Registry, or Google Artifact Registry. STO will automatically pull and scan the container image or OCI/Docker archive.
-
AWS ECR Set your AWS ECR connector with image details. STO will automatically pull and scan the container image or OCI/Docker archive.
-
Jfrog Artifactory Set your Jfrog Artifactory connector with image details. STO will automatically pull and scan the container image or OCI/Docker archive.
-
Local Image in this Stage Scan a local image built and stored within the context of the current stage (via
/var/run/docker.sockregistered as a stage level volume mount). For this, you will need to configure Docker-in-Docker as a background step. STO will identify and scan the container image matching the step configuration inside the Docker-in-Docker background within that stage. -
Local OCI/Docker archive in this Stage Scan an OCI or Docker archive created and stored within the current stage. STO will scan the archive based on the path configured in the workspace field during the step. Ensure that the path to which the archive is saved is a shared volume mount.
Domain
The URL of the registry that contains the image to scan. Examples include:
docker.ioapp.harness.io/registryus-east1-docker.pkg.dev
Name
The image name. For non-local images, you also need to specify the image repository. Example: jsmith/myalphaservice
Tag/Digest
The image tag or digest. Examples: latest, 1.2.3, @sha256:abc123...
Authentication
Access Token (Orchestration scans)
The access token to log in to the scanner. This is usually a password or an API key.
You should create a Harness text secret with your encrypted token and reference the secret using the format <+secrets.getValue("my-access-token")>. For more information, go to Add and Reference Text Secrets.
Scan Tool
Use Raw Scanner Severity
This option allows you to configure the step to use the severity reported directly by the scanner. By default, STO assigns severity based on numeric scores (such as CVSS). When this option is enabled, STO bypasses its internal severity mapping and uses the severity levels reported by the scanner (e.g., Critical, High, Medium, Low).
To enable this behavior, check the Use Raw Scanner Severity field (recommended), or add ingest_tool_severity: true setting in the Settings section.
Ingestion File
The path to your scan results when running an Ingestion scan, for example /shared/scan_results/myscan.latest.sarif.
-
The data file must be in a supported format for the scanner.
-
The data file must be accessible to the scan step. It's good practice to save your results files to a shared path in your stage. In the visual editor, go to the stage where you're running the scan. Then go to Overview > Shared Paths. You can also add the path to the YAML stage definition like this:
- stage:spec:sharedPaths:- /shared/scan_results
Log Level
The minimum severity of the messages you want to include in your scan logs. You can specify one of the following:
- DEBUG
- INFO
- WARNING
- ERROR
Additional CLI flags
Use this field to run the Snyk scanner with additional flags such as:
--all-projects --detection-depth=3
With these flags, the Snyk step scans recursively down the repository tree to a depth of 3 folders.
-
Passing CLI flags is an advanced feature. Some flags might not work in the context of STO. You should test your flags and arguments thoroughly before you use them in your production environment.
-
STO does not support context-specific arguments or arguments that appear at the end of the command line, such as Maven or Gradle arguments.
Fail on Severity
Every STO scan step has a Fail on Severity setting. If the scan finds any vulnerability with the specified severity level or higher, the pipeline fails automatically. You can specify one of the following:
CRITICALHIGHMEDIUMLOWINFONONE— Do not fail on severity
The YAML definition looks like this: fail_on_severity : critical # | high | medium | low | info | none
Settings
You can use this field to specify environment variables for your scanner.
Additional Configuration
The fields under Additional Configuration vary based on the type of infrastructure. Depending on the infrastructure type selected, some fields may or may not appear in your settings. Below are the details for each field
- Override Security Test Image
- Privileged
- Image Pull Policy
- Run as User
- Set Container Resources
- Timeout
Advanced settings
In the Advanced settings, you can use the following options:
Show original issue severities overridden by Snyk security policies
Harness originally will categorize a scan utilizing the CVSS scores that are provided, and using it to categorize vulnerabilities into Critical, High, Medium, and Low categories
With the Snyk Step, or a Custom Scan Step utilizing a self installed Snyk runner, you can configure Harness to utilize the severity scores in a Snyk Enterprise security policy, and provide an override severity for an issue. This can be adjusted from your Snyk results, or it can also come from the snyk CLI. You can see this information in Issue Details.
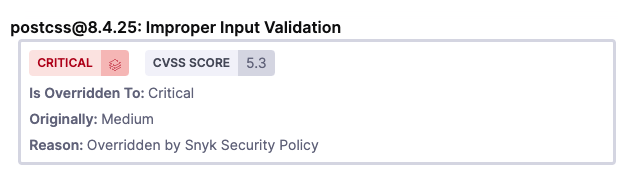
Harness will also display the information that the severity was overriden, and the original score, so long as the report follows the Snyk required format
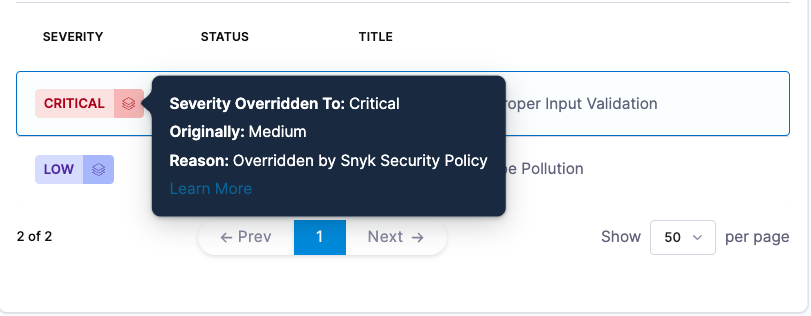
This feature is supported for snyk container and snyk test JSON output that properly reflects an override.
Requirement
JSON Output Format
Please note that the override format must follow the Snyk documented process, such as in the following Snyk example.
The formatting should contain the following:
- A value,
originalSeverity, needs to be defined, and should contain the original severity value - The
severityvalue can now be defined with the new severity value. Below is a portion of an adjusted vulnerability sample:
{
     "vulnerabilities": [
        {
            "id": "SNYK-JS-POSTCSS-5926692",
            "title": "Improper Input Validation",
            "CVSSv3": "CVSS:3.1/AV:N/AC:L/PR:N/UI:N/S:U/C:N/I:L/A:N",
            "credit": [
                "Unknown"
            ],
            "semver": {
                "vulnerable": [
                    "<8.4.31"
                ]
            },
            "exploit": "Not Defined",
            "fixedIn": [
                "8.4.31"
            ],
            "patches": [],
            "insights": {
                "triageAdvice": null
            },
            "language": "js",
            "severity": "critical",
            "originalSeverity": "medium",
            "cvssScore": 5.3,
            "functions": [],
            "malicious": false,
            "isDisputed": false,
            "moduleName": "postcss",
            [...]
        }
    ]
 }
Proxy settings
This step supports private network connectivity if you're using Harness Cloud infrastructure. For information on connectivity options, see Private network connectivity options. When using proxy configurations, the HTTPS_PROXY and HTTP_PROXY variables are automatically set to route traffic through the secure tunnel. If there are specific addresses that you want to bypass the proxy, you can define those in the NO_PROXY variable. This can be configured in the Settings of your step.
If you need to configure a different proxy, you can manually set the HTTPS_PROXY, HTTP_PROXY, and NO_PROXY variables in the Settings of your step.
Definitions of Proxy variables:
HTTPS_PROXY: Specify the proxy server for HTTPS requests, examplehttps://sc.internal.harness.io:30000HTTP_PROXY: Specify the proxy server for HTTP requests, examplehttp://sc.internal.harness.io:30000NO_PROXY: Specify the domains as comma-separated values that should bypass the proxy. This allows you to exclude certain traffic from being routed through the proxy.