Veracode step configuration
The Veracode step in Harness STO identifies security issues in your application code. It supports Veracode Static Analysis, which includes Static Application Security Testing (SAST) and Software Composition Analysis (SCA). While this step does not execute Dynamic Application Security Testing (DAST), it can automatically retrieve existing DAST scan results from the Veracode platform to STO during any scan mode execution, provided the DAST scan results are already available in Veracode platform.
Based on your requirements, you can choose from the following three STO scan modes. Each mode is explained in a dedicated section with detailed instructions.
-
Orchestration Mode: In this mode, you can initiate a scan directly in Veracode from STO. The scan results are automatically saved in STO.
-
Ingestion Mode: Use this mode to import scan results from a data file into STO. This section guides you on ingesting scan results from an XML file generated by Veracode.
-
Extraction Mode: Extraction Mode allows you to retrieve the latest scan data of a specific Veracode Application's scan and import it into STO.
To understand the details of each field in the Veracode step, you can refer to Veracode step settings.
- You can utilize custom STO scan images and pipelines to run scans as a non-root user. For more details, refer Configure your pipeline to use STO images from private registry.
- STO supports three different approaches for loading self-signed certificates. For more information, refer Run STO scans with custom SSL certificates.
The following topics contain useful information for setting up scanner integrations in STO:
Orchestration mode configuration
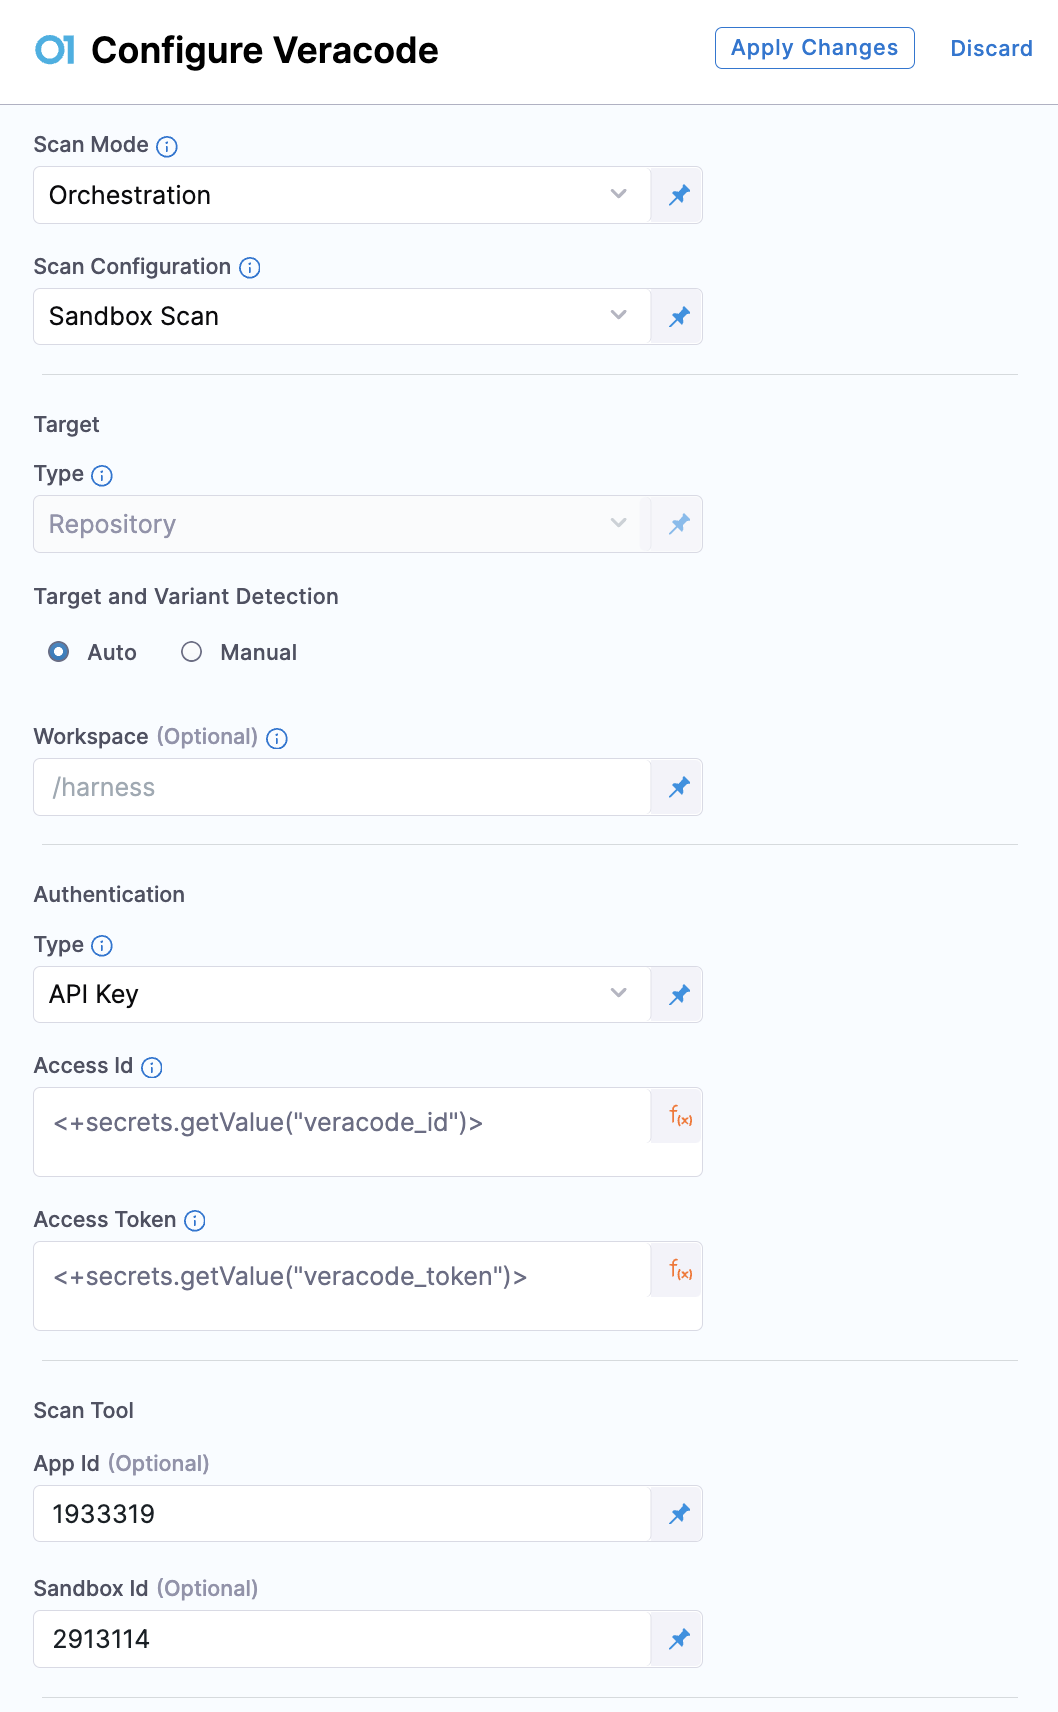
The Orchestration mode in Veracode step allows you to initiate a scan on your configured codebase in your Harness pipeline stage. This mode will perform SAST, SCA, and Policy evaluations, the results are then saved in STO. Here's how you can configure an Orchestration in Veracode step
Search for and add the Veracode step to your pipeline. This step can be used in either the Build stage or the Security stage. In the step configuration, set the following fields:
- Scan Mode: Set the Scan Mode to Orchestration.
- Scan Configuration: Based on your requirements, choose between Default or Sandbox Scan as the scan configuration.
- Target: The Type is to Repository by default. For Target and Variant Detection, you can use the Auto option to let STO set the Name and Varient fields for you. Or, you can manually define them using the Manual option.
- Workspace(optional): Specify the path to the file or directory you want to scan in the Workspace field. If this field is left blank, the entire repository will be scanned.
- Authentication: Select the Authentication Type as either API Key or Username and Password. Based on the type, configure the Access Id and Access Token.
- App Id(optional): In the Scan Tool section, you can enter the Veracode App Id of the application you want to use for the scan. If this field is left blank, the step will attempt to locate an application using the Target Name you provided. If no matching application is found, a new Veracode Application will be created automatically with the name format
harness-HARNESS_PROJECT_ID-TARGET_NAME. Additionally, refer to this section to learn more on how to use an existing Veracode Application created by STO. - Sandbox Id(optional): This field appears if you select Sandbox Scan as your Scan Configuration. You can enter your Sandbox Id to use an existing Veracode Sandbox. If left blank, STO will create a new Sandbox automatically, naming it in the format
s-harness-HARNESS_PROJECT_ID-TARGET_NAME.

These are the essential settings required to perform an Orchestration scan using the Veracode step. The scan results, including any Veracode policy failures, can be viewed in the Vulnerabilities tab on the pipeline execution page. For additional features and configuration options, see the Veracode step Settings section.
Ingestion mode configuration
With the Ingestion mode in the Veracode step, you can read scan results from a data file and import them into STO. To do this, you need the scan results saved in the XML format. Importantly, before you can ingest scan results, you must perform all the Veracode prerequisites for the repo that you're scanning. If you're scanning a Java repo, for example, the Veracode documentation outlines the specific packaging and compilation requirements for scanning your Java applications. For specific requirements, go to the Veracode docs and search for Veracode Packaging Requirements.
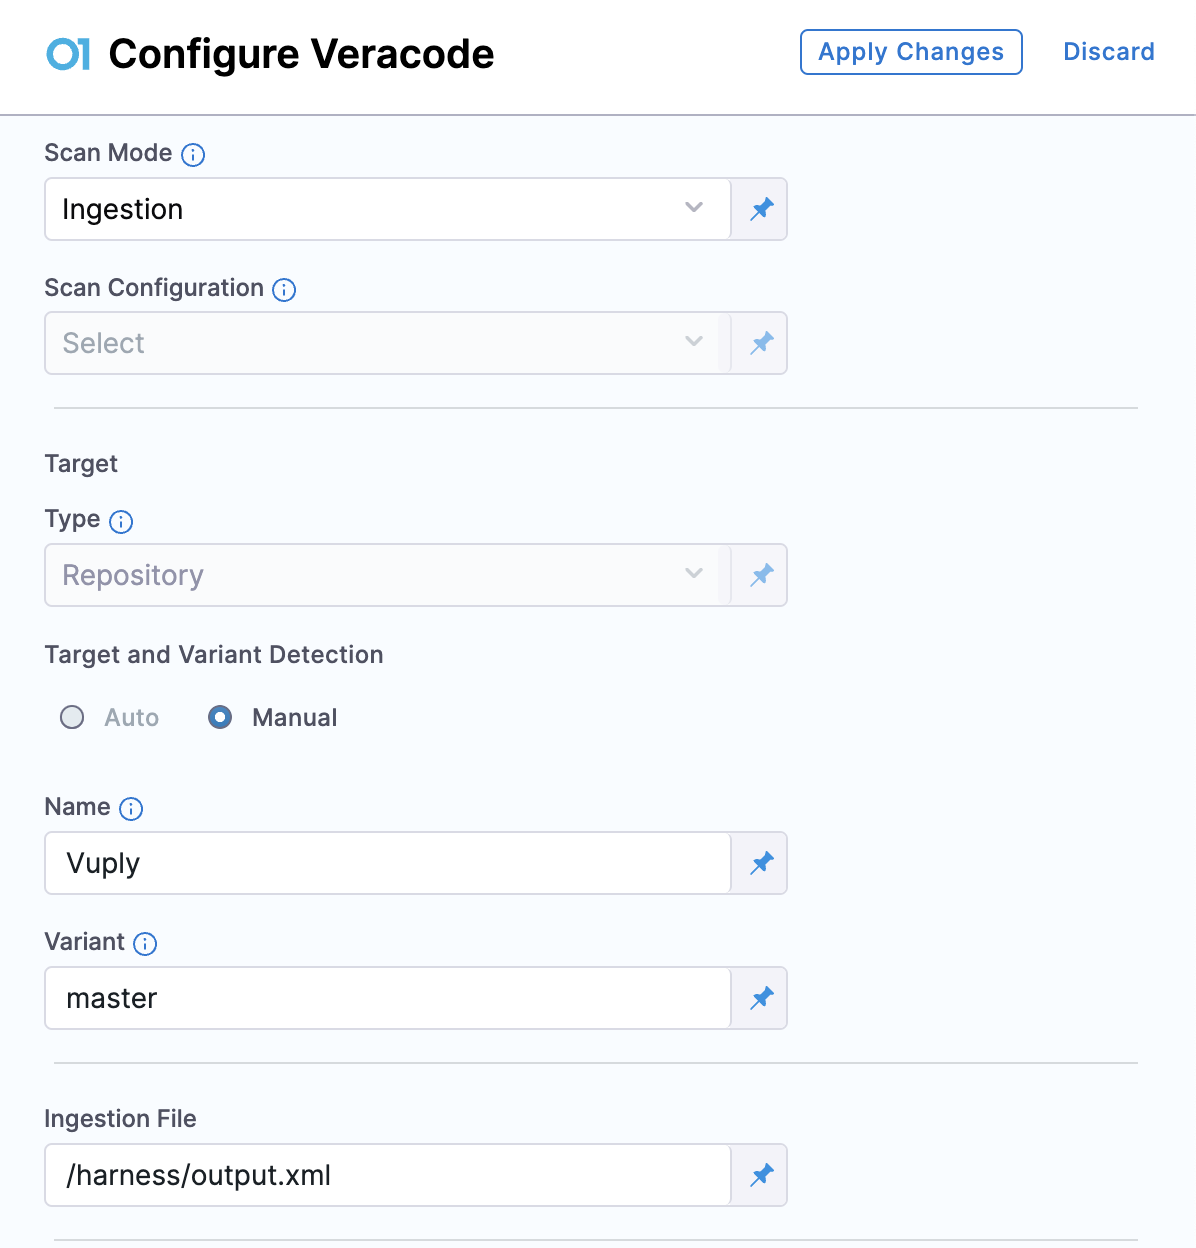
Here's how you can configure your Veracode step to Ingest the scan results from the XML data file downloaded from Veracode portal.
- Search for and add the Veracode step to your pipeline.
- Scan Mode: Set the Scan Mode to Ingestion.
- Target: The Type is to Repository by default. For Target and Variant Detection, define the Name and Varient manually.
- Ingestion File: For the field Ingestion File, enter the path where the XML scan results file is saved. for example
/harness/output.xml

These are the essential settings required to perform an Ingestion scan using the Veracode step. The scan results, including any Veracode policy failures, can be viewed in the Vulnerabilities tab on the pipeline execution page. For additional features and configuration options, see the Veracode Step Settings section.
Extraction mode configuration
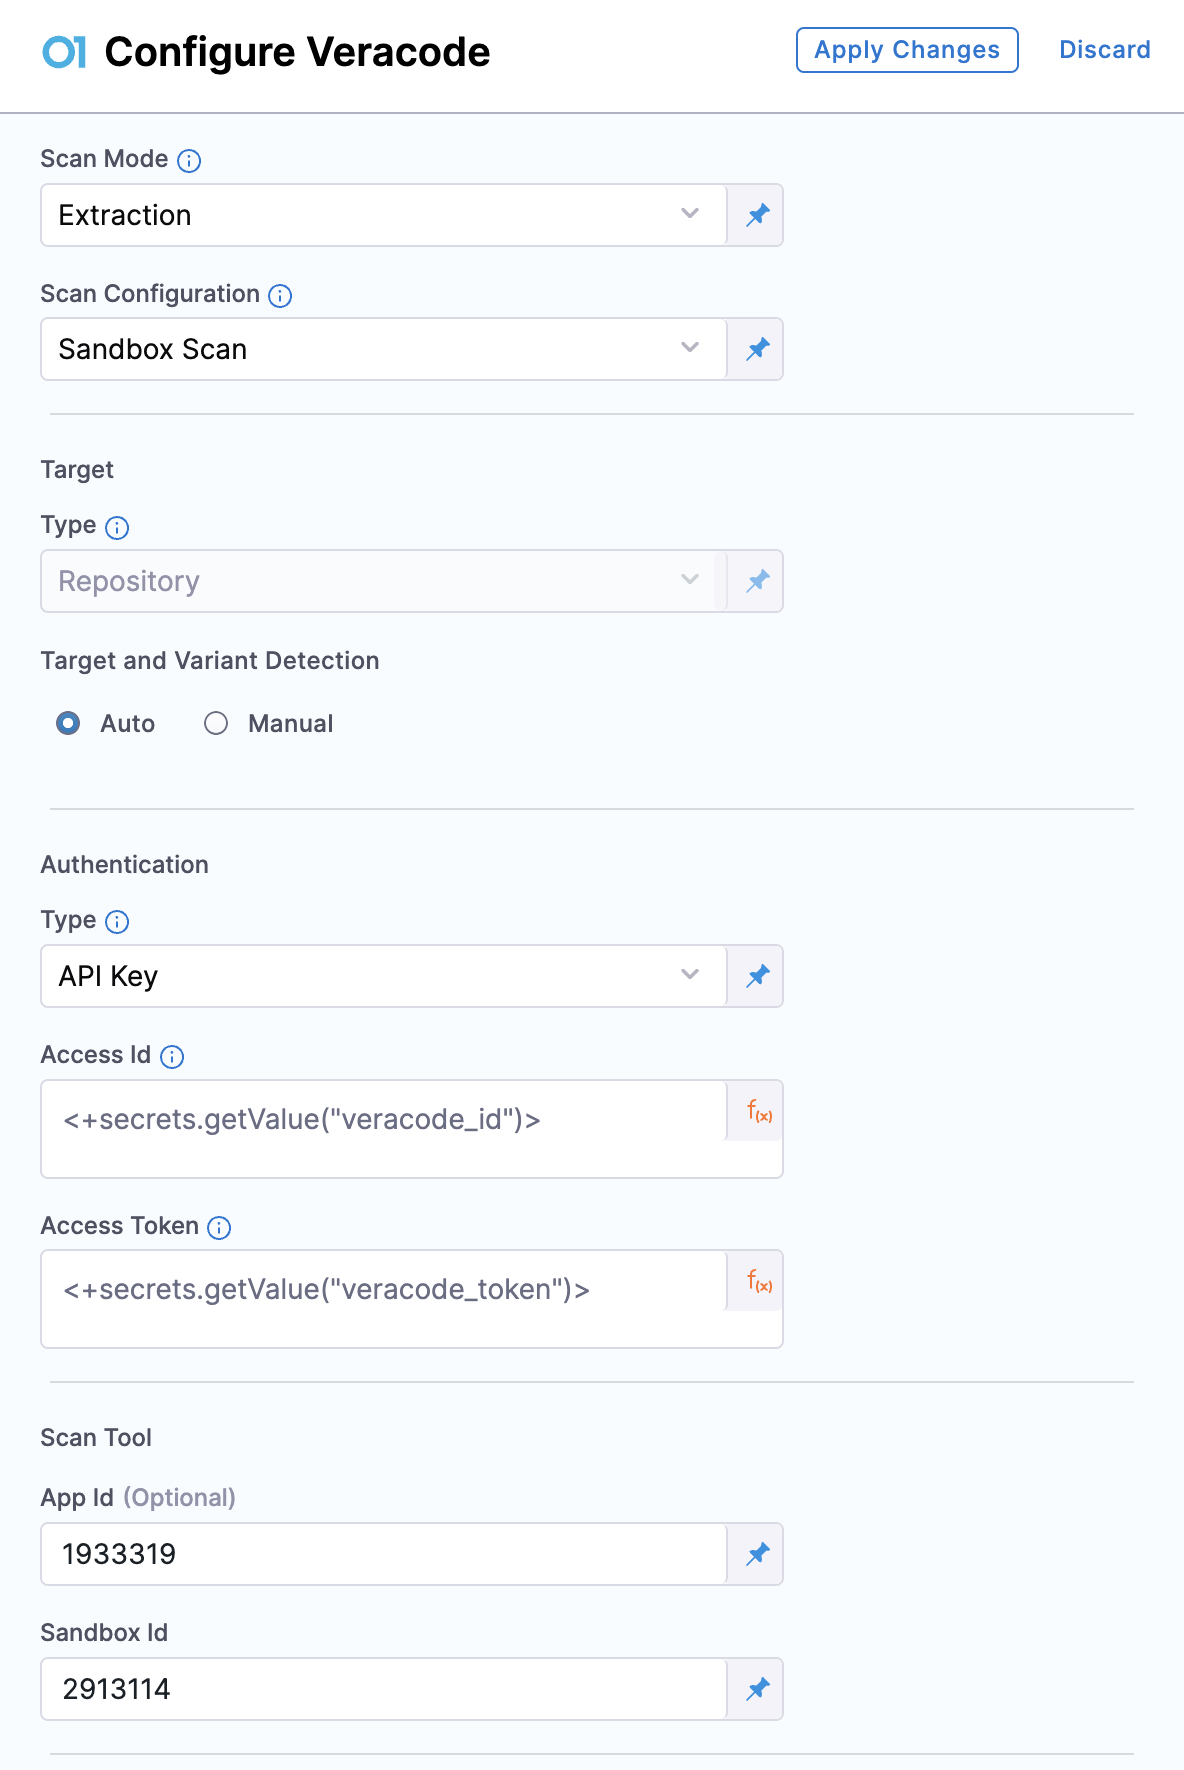
The Extraction mode in Veracode step allows you to retrieve the latest scan data of a specific Veracode Application and feed the results into STO. Here's how you can do it.
Search for and add the Veracode step to your pipeline. This step can be used in either the Build stage or the Security stage. In the step configuration, set the following fields:
- Scan Mode: Set the Scan Mode to Extraction.
- Scan Configuration: If your scan results needs to be retrieved from a Veracode Sandbox you can choose Sandbox Scan. Else, you can use Default.
- Target: The Type is to Repository by default. For Target and Variant Detection, you can use the Auto option to let STO set the Name and Variant fields for you. Or, you can manually define them using the Manual option.
- Authentication: Select the Authentication Type as either API Key or Username and Password. Based on the type, configure the Access Id and Access Token.
- App Id(optional): In the Scan Tool section, you can provide the Veracode App Id of the application from which you want to fetch scan results. If left blank, the step will try to locate an application using the Target Name you specified. Note that the step can only find applications previously created by STO during orchestration, as it relies on the specific naming convention used by STO. Additionally, refer to this section to learn more on how to use an existing Veracode Application created by STO.
- Sandbox Id: This field appears if you select Sandbox Scan as your Scan Configuration. You can enter your Sandbox Id to use an existing Veracode Sandbox.

These are the essential settings required to perform an Extraction scan using the Veracode step. The scan results, including any Veracode policy failures, can be viewed in the Vulnerabilities tab on the pipeline execution page. For additional features and configuration options, see the Veracode Step Settings section.
Veracode step settings
The following are the details of each field in the Veracode step.
Scan Mode
The Veracode step in STO supports three scan modes, Orchestration, Ingestion, and Extraction. Refer to the documentation specific to each mode for details and configuration instructions.
Scan Configuration
The predefined configuration used for the scan. The Veracode step supports Default and Sandbox Scan
Default
For Orchestration, the scan will take place in Veracode platform but not in any Sandbox.
Sandbox Scan
For Orchestration, the scan will take place in a Veracode Sandbox. If you and do not provide the sandbox id to the Sandbox Id field, the step can automatically create a new sandbox to perform the scan.
Target
Type
The type is set to Repository by default, which is used to scan a code repository.
Target and Variant Detection
You can configure the details of your scan by specifying its Name and Variant, which are labels assigned to the target you are scanning. These can be set manually by selecting the Manual option or configured automatically by selecting Auto. In Auto mode, the Name is derived from the repository name, and the Variant is set to the branch name.
Additionally, in Orchestration mode, the Name is used as part of the Veracode Application creation process and included in the Veracode Application name.
Workspace
The workspace path on the pod running the scan step. The workspace path is /harness by default.
You can override this if you want to scan only a subset of the workspace. For example, suppose the pipeline publishes artifacts to a subfolder /tmp/artifacts and you want to scan these artifacts only. In this case, you can specify the workspace path as /harness/tmp/artifacts.
Additionally, you can specify individual files to scan as well. For instance, if you only want to scan a specific file like /tmp/iac/infra.tf, you can specify the workspace path as /harness/tmp/iac/infra.tf
Authentication
Type
Authentication can be configured using one of two methods, API Key or Username and Password. Each method requires specific credential configurations. It is recommended to use the API Key method over the Username and Password method for better security. To securely store and reference your credentials, create a Harness text secret and use the format <+secrets.getValue("veracode_id")>. For detailed steps, refer to Add and Reference Text Secrets.
API Key
Enter your Veracode ID in the Access Id field and your Veracode Secret Key in the Access Token field.
Ensure that the API credentials you provide have the necessary permissions with the Security Lead role in Veracode.
Username and Password
Enter your account username in the Access Id field and your password in the Access Token field.
Scan Tool
App Id
Enter your Veracode Application ID. To find the App ID, navigate to the homepage of the Veracode Application whose results you want to scan. The App ID is the number that appears at the end of the URL.
For example, in the following URL:
https://analysiscenter.veracode.com/auth/index.jsp#HomeAppProfile:88881:1973759
The App ID is 1973759.
Sandbox Id
Enter your Sandbox id. To find the Sandbox Id, navigate to your Sandbox page. The Sandbox Id is the number that appears at the end of the URL.
For example, in the following URL:
https://analysiscenter.veracode.com/auth/index.jsp#SandboxView:104077:2367896:6899436
The Sandbox Id is 6899436
Ingestion File
The path to your scan results when running an Ingestion scan, for example /shared/scan_results/myscan.latest.sarif.
-
The data file must be in a supported format for the scanner.
-
The data file must be accessible to the scan step. It's good practice to save your results files to a shared path in your stage. In the visual editor, go to the stage where you're running the scan. Then go to Overview > Shared Paths. You can also add the path to the YAML stage definition like this:
    - stage:
      spec:
        sharedPaths:
          - /shared/scan_results
Log Level
The minimum severity of the messages you want to include in your scan logs. You can specify one of the following:
- DEBUG
- INFO
- WARNING
- ERROR
Fail on Severity
Every STO scan step has a Fail on Severity setting. If the scan finds any vulnerability with the specified severity level or higher, the pipeline fails automatically. You can specify one of the following:
CRITICALHIGHMEDIUMLOWINFONONE— Do not fail on severity
The YAML definition looks like this: fail_on_severity : critical # | high | medium | low | info | none
Settings
You can use this field to specify environment variables for your scanner.
Additional Configuration
The fields under Additional Configuration vary based on the type of infrastructure. Depending on the infrastructure type selected, some fields may or may not appear in your settings. Below are the details for each field
- Override Security Test Image
- Privileged
- Image Pull Policy
- Run as User
- Set Container Resources
- Timeout
Advanced settings
In the Advanced settings, you can use the following options:
View Veracode policy failures
By default, Veracode policy failures will appear in scan results as Info severity issues, with the issue type set to EXTERNAL_POLICY. Additionally, you can apply OPA policies in Harness STO to enforce or manage these failures. Additionally, you can apply an OPA policy to fail the pipeline based on the policy failures. This can be achieved using the Security Tests - External Policy Failures policy from the security tests policy samples.
Configure External Policy Failures
You can configure Harness STO to treat external policy failures as vulnerabilities. To do this, navigate to Account Settings, go to the Default Settings page, select Security Test Orchestration, and click the External Policy Failures setting.
Enable the external policy failures setting to map them to a selected severity level — Critical, High, Medium, or Low to treat them as vulnerabilities instead of Info level issues. This setting takes effect from the next pipeline execution.
This feature is behind the Feature flag STO_EXTERNAL_POLICY_FAILURES_AS_VULNS. Contact Harness Support to enable this flag.
Using an existing Veracode Application created by STO
If you want to reuse an existing Veracode Application created by STO during a previous Orchestration, you have two approaches.
- You can provide the Veracode Application ID in the App Id field to directly reference the existing application. The step will use the appropriate Veracode Application.
- You can set the Target Name to match the one used in your previous Orchestration. If the Veracode Application name follows the standard format (e.g.,
harness-D2dLdFdfF-dvpwa), you can simply enter the last part of the name, such asdvpwa, as the Target Name, and the step will automatically use that Application. In this case, you can leave the App Id field blank. However, this approach only works if the application name is in the exact format expected by the step, as it uses this structure to locate the application.
Proxy settings
This step supports private network connectivity if you're using Harness Cloud infrastructure. For information on connectivity options, see Private network connectivity options. When using proxy configurations, the HTTPS_PROXY and HTTP_PROXY variables are automatically set to route traffic through the secure tunnel. If there are specific addresses that you want to bypass the proxy, you can define those in the NO_PROXY variable. This can be configured in the Settings of your step.
If you need to configure a different proxy, you can manually set the HTTPS_PROXY, HTTP_PROXY, and NO_PROXY variables in the Settings of your step.
Definitions of Proxy variables:
HTTPS_PROXY: Specify the proxy server for HTTPS requests, examplehttps://sc.internal.harness.io:30000HTTP_PROXY: Specify the proxy server for HTTP requests, examplehttp://sc.internal.harness.io:30000NO_PROXY: Specify the domains as comma-separated values that should bypass the proxy. This allows you to exclude certain traffic from being routed through the proxy.