Use an external self-managed TimescaleDB with your installation
Harness Self-Managed Enterprise Edition requires you to install a database by default. You can optionally use an external self-managed database with your installation. This enables you to separate your data from node execution. To use an external self-managed TimescaleDB with your Harness Self-Managed Enterprise Edition installation, you must ensure that your hardware, software, and network meet the minimum requirements for installation and configuration. This tutorial describes how to deploy TimescaleDB with VMs and replication.
The controller-worker replication setup described in this tutorial ensures data redundancy and fault tolerance, providing a robust and reliable environment to manage your TimescaleDB.
Limitations
TimescaleDB VMs offer many advantages, but there are a few limitations to consider:
-
Resource overhead: Running a VM incurs resource overhead, such as CPU and memory usage, which may impact the performance of the PostgreSQL database.
-
Hardware dependency: VM performance is influenced by the underlying hardware. Ensure that the host system provides sufficient resources for the VM to function optimally.
-
Complexity: Setting up and managing a VM requires knowledge and expertise in virtualization technologies.
-
Maintenance overhead: VMs require regular maintenance, including updates, backups, and monitoring, which adds overhead compared to a native TimescaleDB installation.
Hardware requirements
Harness recommends a PostgreSQL three-member replica set configuration with the following minimum hardware:
- Three nodes
- Four CPU (3*4 = 12 CPU)
- 24GB RAM (324 = 72GB RAM)
- 300GB SSD data storage, depending on your requirements
Software requirements
External database setup requires the following software:
- Supported OS: TimescaleDB supports Debian 11, Ubuntu, and CentOS
Network requirements
Ensure the following:
-
Set allowlisting of VMs so each VM can send traffic. Add the source using TimescaleDB, for example, the Kubernetes cluster service range to your allowlist.
-
Reserve internal and external static addresses for each VM.
-
Add port 5432 to the NAT firewall settings allowlist on the application cluster so it can connect to the TimescaleDB instance. TimescaleDB uses 5432 as the default communication port. This enables communication between Harness services running in a Self-Managed Enterprise Edition cluster and a self-managed TimescaleDB cluster.
Architecture
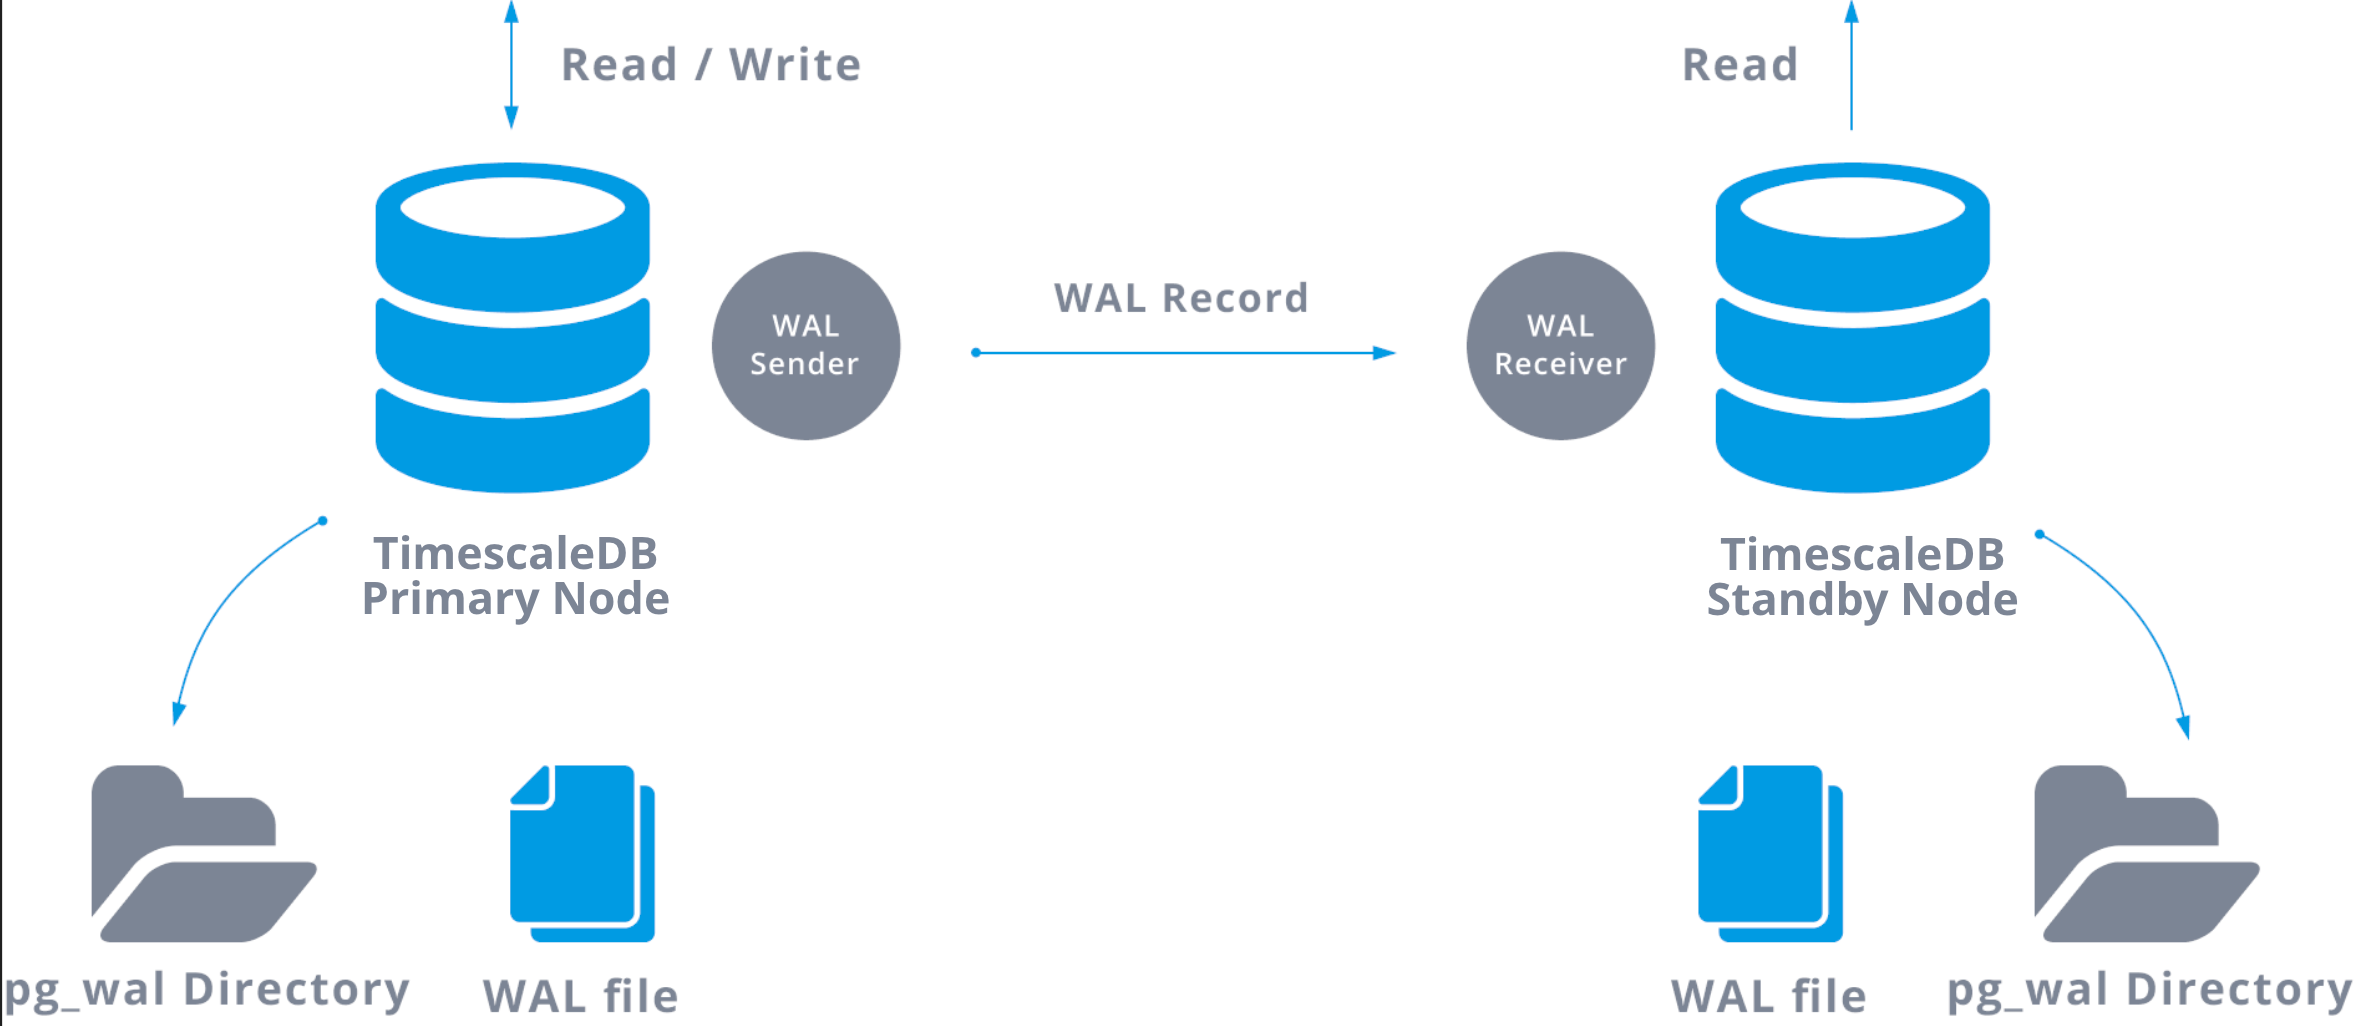
TimescaleDB replication architecture uses the native replication capabilities of PostgreSQL to ensure high availability and fault tolerance. It employs a controller-worker configuration, where the controller node handles read and write operations, while the worker nodes act as standby databases for data replication.
Write-ahead logs (WAL) are generated on the controller node and streamed to the standby nodes, allowing them to apply the changes and maintain data consistency. TimescaleDB extends the replication protocol with optimizations specific to time-series data, ensuring accurate replication of time-series operations and metadata.
In the event of controller node failure, a standby node can be promoted as the new controller, ensuring uninterrupted data access and minimal downtime. PostgreSQL does not provide support for automatic failover.
For more information, go to Streaming replication and Write-ahead logging in the PostgreSQL documentation.
High availability
To create a highly-available setup, there will be a DNS record that always points to the primary node of your TimescaleDB replication setup. You can use service discovery with a third-party tool (etcd/Consul/Zookeeper) to track your current primary node's IP address and health status.
You can update the DNS record dynamically using a script or use the service discovery tool's built-in functionality.
Set up TimescaleDB VMs on Debian-based systems
If you installed PostgreSQL through a method other than the apt package manager maintained by Debian or Ubuntu archive, you may receive errors when following these instructions. Harness recommends that you uninstall existing PostgreSQL installations before you continue.
Example passwords used in this tutorial are for instructional purposes only. Replace the examples with your own secure passwords. Harness recommends following your organization's standards for password security, including the use of strong passwords. Strong passwords are:
- At least 12 characters long. Longer passwords are more secure.
- Any combination of uppercase letters, lowercase letters, numbers, and symbols.
- Not a word in the dictionary of any language or the name of a person, place, character, or organization.
- Unique for each account.
To set up a TimescaleDB VM, do the following:
-
Connect to the VM and make sure you are running as root to prevent permission issues.
sudo su - -
Add the PostgreSQL third-party repository to get the latest PostgreSQL packages.
apt install gnupg postgresql-common apt-transport-https lsb-release wget -
Run the PostgreSQL repository setup script.
/usr/share/postgresql-common/pgdg/apt.postgresql.org.sh -
Add the TimescaleDB third party repository.
Debian:
echo "deb https://packagecloud.io/timescale/timescaledb/debian/ $(lsb_release -c -s) main" | sudo tee /etc/apt/sources.list.d/timescaledb.listUbuntu 21.10 and later:
wget --quiet -O - https://packagecloud.io/timescale/timescaledb/gpgkey | sudo gpg --dearmor -o /etc/apt/trusted.gpg.d/timescaledb.gpg -
Install the TimescaleDB GPG key.
wget --quiet -O - https://packagecloud.io/timescale/timescaledb/gpgkey | sudo apt-key add - -
Update your local repository list.
apt update -
Install TimescaleDB.
apt install timescaledb-2-postgresql-13The output should look similar to the following:
Ver Cluster Port Status Owner    Data directory              Log file
13 main 5432 down postgres /var/lib/postgresql/13/main /var/log/postgresql/postgresql-13-main.log -
Run TimescaleDB tune.
timescaledb-tune --quiet --yes
Set up the TimescaleDB extension on Debian-based systems
To set up TimescaleDB extension on Debian-based systems, do the following:
-
Restart the service after you enable TimescaleDB using
timescaledb-tune.systemctl restart postgresql -
Open the
psqlcommand-line utility as the postgres superuser on your local system at the command prompt. -
Run the following as postgres user (default user for postgres).
sudo su - postgres -
Run the following.
psqlUpon successful connection, you'll see a message similar to the one below, followed by the psql prompt:
psql (13.11 (Debian 13.11-1.pgdg110+1))
Type "help" for help -
Set the password for the postgres user.
\password Te$tp@ssw0rD#@ -
Exit PostgreSQL.
\q -
Use the
psqlclient to connect to PostgreSQL.psql -U postgres -h localhost -
Create an empty database at the
psqlprompt. In this example, our database istsdb.CREATE database tsdb; -
Connect to the database you created.
\c tsdb -
Add the TimescaleDB extension.
CREATE EXTENSION IF NOT EXISTS timescaledb;
-
Verify that the TimescaleDB extension is installed using the
\dxcommand at thepsqlprompt. The output should be similar to the following.tsdb-# \dx
List of installed extensions
Name | Version | Schema | Description
-------------+---------+------------+-------------------------------------------------------------------
plpgsql | 1.0 | pg_catalog | PL/pgSQL procedural language
timescaledb | 2.11.2 | public | Enables scalable inserts and complex queries for time-series data
(2 rows) -
Run the following to connect directly to your database.
psql -U postgres -d tsdb -h localhost
- Repeat the steps for all VMs.
Configure replication
When you configure your replication, you will make some updates to controllers and replicas and other updates to only controllers or only replicas.
When you create new directories or files, always use the postgres user. Run the following command before you create a new directory or file.
sudo su - postgres
To configure replication, do the following:
-
Make sure you are logged in to the VM with superUser access on postgres user.
-
Run the following on one of your replicas.
sudo su - postgres
ssh-keygen -t rsa
// enter three times and generate a key
// copy the public key in /var/lib/postgresql/.ssh/id_rsa.pub -
Copy the certificates to the other replicas in the same directory
/var/lib/postgresql/.ssh/. -
Run the following on your controller.
cd
mkdir .ssh
cd ..ssh
vi authorization_key
// paste the public key, enter and paste it again and save, the second key should end with postgres@externalIP -
Make the following change to the
pg_hba.conffile in/etc/postgresql/13/main/pg_hba.conffor your controller and replicas. This allows PostgreSQL to accept traffic from other networks and adds them to the allowlist.#host all all 127.0.0.1/32 md5
host all all 0.0.0.0/0 md5This example allows everything to the TimescaleDB instance. Harness recommends that you configure your firewall rules to allow only certain IPs to use port 5432.
-
(Optional) Make the following changes to set your allowlist at the database-level.
#host    all             all             127.0.0.1/32            md5 <— changes
 host    all             all             <ip range1>             md5 <— changes
 host    all             all             <ip range2>             md5 <— changes
 host    all             all             <replica ip range>      md5 <— changes
host all all <controller ip range> md5 <— changes -
Change your directory to edit the
postgresql.confconfiguration file.cd /etc/postgresql/13/main/ -
Set
max_wal_sendersto the number of replicas. Setmax_replication_slotsto the number of replicas plus two. Edit or add the following settings.listen_addresses = '*'
wal_level = replica
archive_command = 'test ! -f /var/lib/postgresql/13/main/archive/%f && cp %p /var/lib/postgresql/13/main/archive/%f'
archive_mode = on
max_wal_senders = 2
max_replication_slots = 4 -
In your controller only, make sure you are running as Postgres.
sudo su - postgres -
Create an archive directory in
/var/lib/postgresql/13/main.
cd /var/lib/postgresql/13/main
mkdir archive
-
Add the following line to the bottom of your
pg_hba.conffile.host replication reptest <External IP of Replica>/32 md5 -
Create a new user,
reptest, and log in as Postgres.CREATE ROLE reptest WITH REPLICATION PASSWORD 'testp@ssw0rd123' LOGIN;sudo su - postgres
run psql -
Create the first replication slot at the psql slot. You can use any name. This example uses
replica_1_slot.SELECT * FROM pg_create_physical_replication_slot('replica_1_slot');
Repeat this step for each replica.
-
Restart PostgreSQL on your controller and your replicas (run as root).
service postgresql restart
Initiate replication
After you've completed the above steps, you can initiate your replication. Follow the steps below for your replicas only.
To initiate replication, do the following:
-
Stop the PostgreSQL service.
service postgresql stop -
Copy the existing data and create a backup.
sudo su - postgrescd /var/lib/postgresql/13
mv main main.org
mkdir main -
Restore from the base backup, using the IP address of the primary database and the replication username.
pg_basebackup -h <PRIMARY_IP> -p 5432 -U reptest -D /var/lib/postgresql/13/main/ -Fp -Xs -RThe backup utility prompts you for the
reptestpassword. -
Create a
standby.signalfile in your data directory.touch /var/lib/postgresql/13/main/standby.signal
chmod -R 0700 /var/lib/postgresql/13/mainWhen PostgreSQL finds a
standby.signalfile in its data directory, it starts in recovery mode and streams the WAL through the replication protocol. -
Restart PostgreSQL in your replicas.
service postgresql restart -
Run the following to check the logs and verify that the replica works.
tail -f /var/log/postgresql/postgresql-13-main.logThe output should be similar to the following.
LOG: entering standby mode
LOG: redo starts at 0/3000138
LOG: database system is ready to accept read only connections
LOG: started streaming WAL from primary at 0/4000000 on timeline 1 -
Add entries to your primary instance to verify your replica is synchronized with the primary database and prepared to stream.
Configure your Harness environment and Helm charts
Follow the steps below to set up a Harness Self-Managed Enterprise Edition cluster with an external self-managed TimescaleDB.
-
Run the following command to ensure your new database has the TimescaleDB extension.
\c template1
CREATE EXTENSION IF NOT EXISTS timescaledb CASCADE; -
Create two databases,
harnessandharnesstiin the TimescaleDB instance. -
Create a new secret for your username and password in the same namespace where Harness is installed.
kubectl create secret generic tsdb-secret -n <namespace> \
--from-literal=username=<username-of-postgres-database> \
--from-literal=password='<password-of-postgres-database>' -
Update your
override-prod.yamlfile with the following fields.global:
database:
timescaledb:
installed: false
# -- provide default values if mongo.installed is set to false
hosts:
- hostname.timescale.com:5432
secretName: "tsdb-secret"
userKey: "username"
passwordKey: "Te$tp@ssw0rD#@"
sslEnabled: false
certName: "tsdb-cert"
certKey: "cert"
Enable SSL
You have the option to configure SSL on TimescaleDB.
To enable SSL on TimescaleDB, do the following:
-
Run the following.
kubectl create secret generic tsdb-secret -n <namespace> --from-file cert=<localCertFile> -
Set the following fields in your
override.yamlfile.sslEnabled: true
certName: "tsdb-cert"
certKey: "cert"
Failover functionality
PostgreSQL provides some failover functionality, where the replica is promoted to primary in the event of a failure. This is available using the pg_ctl command or the trigger_file; however, PostgreSQL does not provide support for automatic failover.
Promote standby/secondary to primary
When a primary instance shuts down or is unavailable, the TimescaleDB remains available, but only in read-only mode. You must promote the standby/secondary to primary.
Before you promote a replica, make sure the primary is completely down.
To promote the standby/secondary to primary, do the following:
-
Run the
pg_ctlpromotecommand./usr/lib/postgresql/13/bin/pg_ctl promote -D /var/lib/postgresql/13/main/
service postgresql restart -
Change the host in your Harness instance, and upgrade your Helm charts.
Recover the former primary
You can recover the former primary VM after you promote the standby/secondary.
Replica promotion affects primary and secondary use in the following way:
-
Former primary ↔︎ new secondary
-
New primary ↔︎ former secondary ↔︎ former standby
When you convert the standby instance to primary, operations could occur in the new primary, and the former primary may go out of sync. To have the former primary become the new secondary and the former secondary remain as the new primary, you must add host replication.
To recover the former primary and add host replication, do the following.
-
Add the host replication in the
pg_hba.conffile in the new primary.host replication reptest <EXTERNAL IP of OLD PRIMARY/32 md5 -
Run the following as root.
service postgresql restart -
Copy data to recover the former primary.
cd /var/lib/postgresql/13
mv main main.org
mkdir main
chmod -R 0700 mainpg_basebackup -h <NEW_PRIMARY_IP> -p 5432 -U reptest -D /var/lib/postgresql/13/main/ -Fp -Xs -RThe former primary instance is now a new secondary instance.
Enable the pg_cron extension
To utilize scheduled tasks within your PostgreSQL database, you must enable the pg_cron extension on your database instance.
pg_cron functions as a cron-based job scheduler that operates internally within the database as an extension. It adheres to the familiar syntax of regular cron while empowering you to schedule PostgreSQL commands directly from within your database environment.
This approach offers more efficiency compared to relying solely on TimescaleDB. With the capabilities of pg_cron, the system efficiently schedules and executes aggregation tasks essential for generating metric data.
Install pg_cron on your Postgres database
For installations on Red Hat, CentOS, Fedora, or Amazon Linux running PostgreSQL 16 using the PostgreSQL Global Development Group (PGDG):
# Install the pg_cron extension
sudo yum install -y pg_cron_16
For installations on Debian or Ubuntu with PostgreSQL 16 using apt.postgresql.org:
# Install the pg_cron extension
sudo apt-get -y install postgresql-16-cron
Alternatively, you can opt to build pg_cron from its source:
git clone https://github.com/citusdata/pg_cron.git
cd pg_cron
Ensure that pg_config is within your path, for instance:
export PATH=/usr/pgsql-16/bin:$PATH
make && sudo PATH=$PATH make install
To ensure that the pg_cron background worker starts with PostgreSQL, add pg_cron to shared_preload_libraries within the postgresql.conf file:
# add to postgresql.conf
# required to load pg_cron background worker on start-up
shared_preload_libraries = 'pg_cron'
By default, the pg_cron background worker assumes that its metadata tables exist within the Postgres database. However, you can customize this behavior by setting the cron.database_name configuration parameter in the postgresql.conf file:
# add to postgresql.conf
# optionally, specify the database in which the pg_cron background worker should run (defaults to postgres)
cron.database_name = 'postgres'
Previously restricted to GMT, pg_cron now enables you to adapt timezones by setting cron.timezone in the postgresql.conf file. For example:
# add to postgresql.conf
# optionally, specify the timezone in which the pg_cron background worker should run (defaults to GMT). For example:
cron.timezone = 'PRC'
After restarting PostgreSQL, execute CREATE EXTENSION pg_cron; as a superuser to create the necessary pg_cron functions and metadata tables:
-- run as superuser:
CREATE EXTENSION pg_cron;
GRANT USAGE ON SCHEMA cron TO <DATABASE_USER>;
Upgrade TimescaleDB
You can upgrade your self-managed TimescaleDB installation in-place. A major upgrade is when you upgrade from one major version of TimescaleDB to the next major version. For example, when you upgrade from TimescaleDB 13 to TimescaleDB 14.
A minor upgrade is when you upgrade within your current major version of TimescaleDB. For example, when you upgrade from TimescaleDB 13.5, to TimescaleDB 13.6.
For more information, go to About upgrades in the TimescaleDB documentation.
Uninstall TimescaleDB
To uninstall TimescaleDB, do the following:
service stop postgresql
sudo apt-get --purge remove {POSTGRES-PACKAGE NAME}
sudo rm -rf /var/lib/postgresql/
sudo rm -rf /var/log/postgresql/
sudo rm -rf /etc/postgresql/