Connect with Jira Cloud
The Jira integration enables AI DLC Insights to ingest issue management data from Atlassian Jira. This data can be used to track operational performance and correlate incidents and changes with DORA metrics in AI DLC Insights dashboards.
Prerequisites
Before you can configure the Jira integration, ensure you have the following requirements:
-
Create a classic API token without scopes for a Jira Cloud user account.
Use a Jira user accountThe user creating the token must have the Browse Projects, View Aggregated Data, Browse Users, and User Picker permissions for all projects that you want AI DLC Insights to track and search issues within relevant projects.
Use a Jira user account with a classic API token without scopes. Scoped API tokens are not supported.
Service accounts cannot be used to authenticate the SEI Jira integration. The API token must be generated from a standard Jira user account with the required permissions.
-
Make sure to copy the token somewhere that you can retrieve it when you configure the integration.
Allowlist ConfigurationIf you have enabled an allow list in your Atlassian account, certain Harness IP addresses must be added to it in order to allow communication between the Harness Platform and Atlassian. If the necessary IPs are not whitelisted, the integration may fail to authenticate or sync data properly.
To ensure your integration can work correctly, refer to the list of Harness Platform IPs that may need to be whitelisted in your firewall.
Setup
To configure the Jira integration:
-
From the SEI navigation menu, click Account Management.
-
From the Integrations page, navigate to the Available Integrations tab.
-
Locate the Jira integration tile under
Issue Managementand click Add Integration. -
Select an installation option: Jira Software Cloud or Jira Software Data Center.
-
If you select Jira Software Cloud, you can click Using Jira API Token (recommended) or Using Jira Connect App (deprecated).
Using Jira API TokenHarness recommends using token-based authentication to integrate Jira Cloud with AI DLC Insights. The Jira Connect App–based integration has been deprecated and should only be used for existing setups.
- Jira API Token
- Jira Connect App
The Using Jira Connect App method is no longer supported. You can re-authenticate the Jira Cloud integration by using a classic unscoped API token. Scoped API tokens are not supported.
The token must be created for a Jira user account. The user account must have the Browse Projects, View Aggregated Data, Browse Users, and User Picker permissions to be able to read/search issues and access all Jira projects you want AI DLC Insights to track. Service accounts are not supported.
To set up the integration using a Jira API token:
-
Add a name for the integration.
-
Optionally, add a description and tags for the integration.
-
Click Next.
-
Provide your Jira Cloud credentials in the Configure Jira Authentication section:
- Add the URL of your Jira instance, for example:
"https://organization.atlassian.net". - Enter the email address associated with your Atlassian user account.
- Provide the API token generated for that account.
- Add the URL of your Jira instance, for example:
-
Click Validate Credentials. Then, click Next.
-
Optionally, select Jira projects by clicking Use the project selector or entering a JQL query to filter issues for ingestion. For example, to ingest only bugs and stories from a project:
project = ENG AND issuetype in (Bug, Story)Then, click Validate JQL.
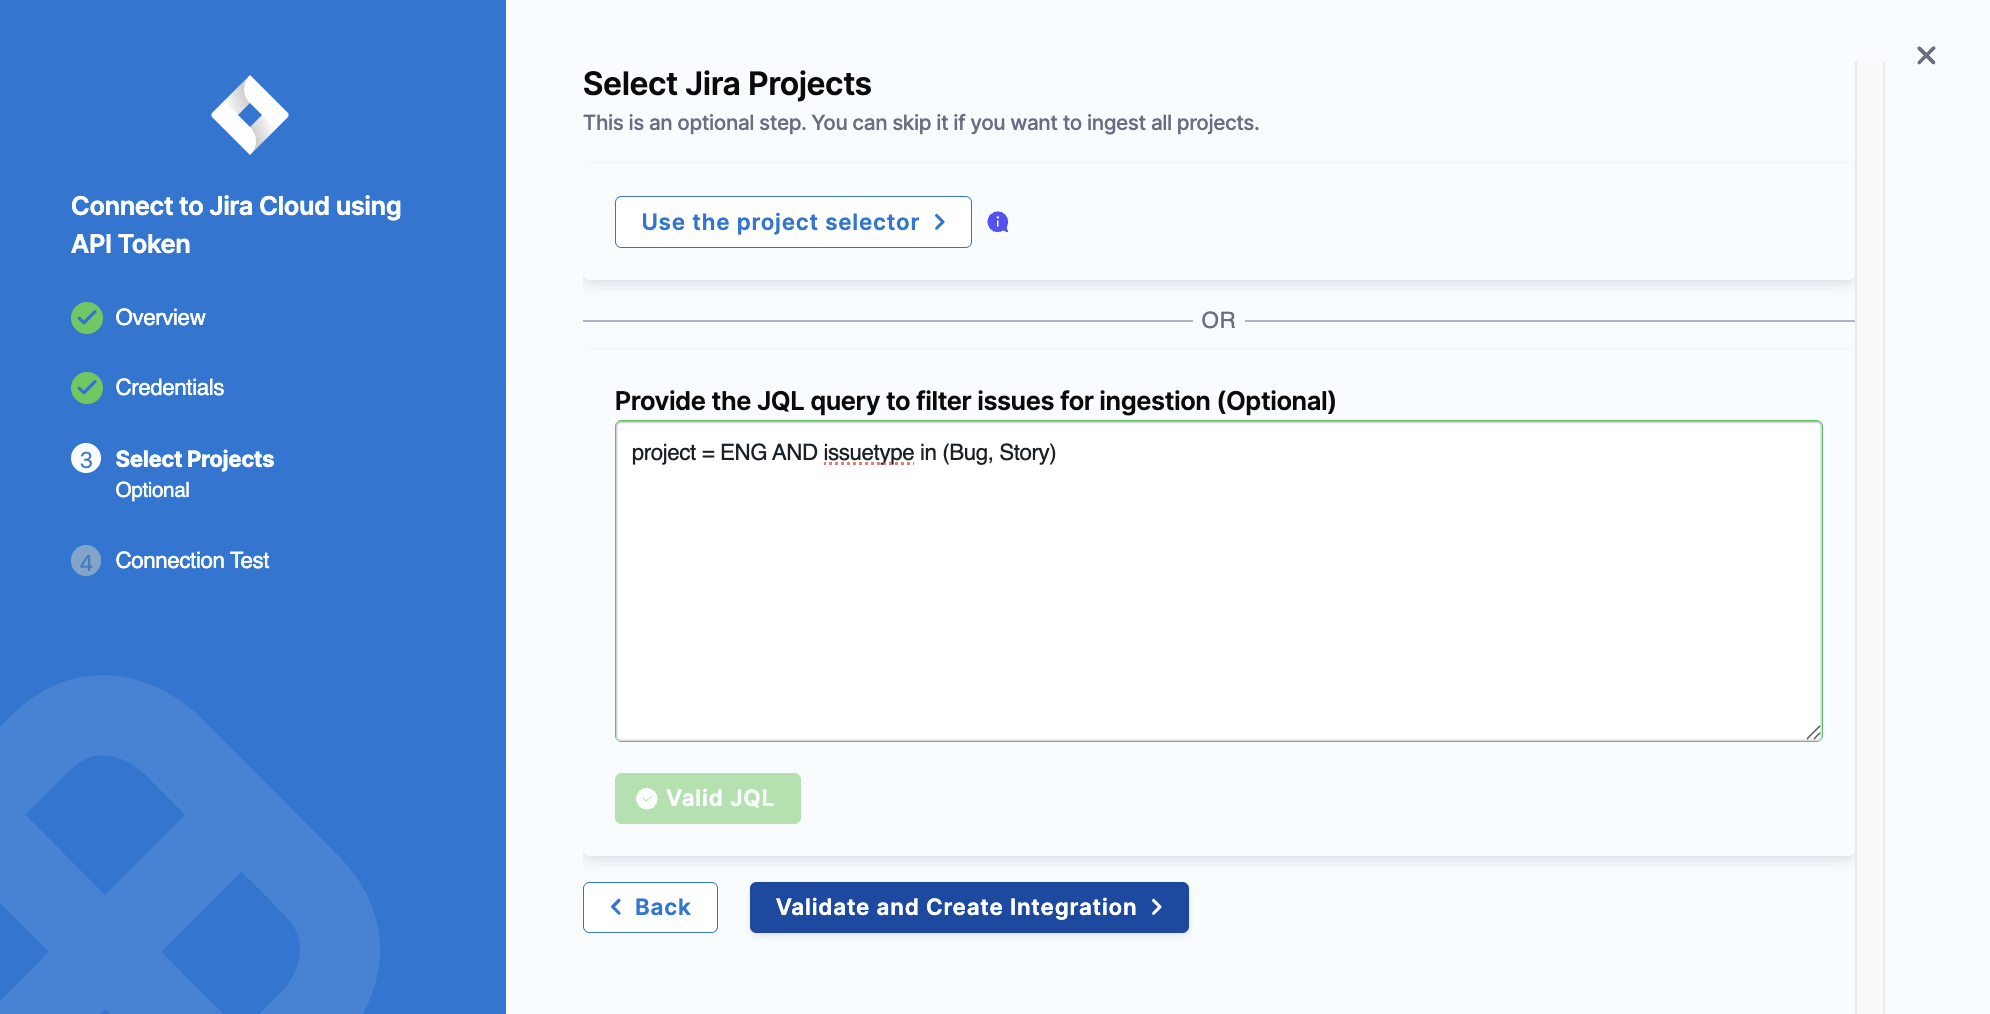
You can also click Validate and Create Integration to skip filtering and ingest all accessible projects.
-
Click Done.
Jira Connect App is no longer supported. For existing organizations using the Jira Connect App method, see the Using Jira API Token tab to re-authenticate Jira Cloud with a token-based integration.
The Jira Connect App facilitates a seamless connection to Jira projects with minimal user intervention, requiring Jira admin configuration for the app.
Using the Jira Connect App allows you to retrieve all user emails from Jira, making it faster and easier to connect and manage the integration.
The following permissions are required to configure the Jira Connect App integration:
- View email addresses of users: This permission allows the integration to access and view the email addresses of users within the Atlassian account.
- Read data from the application: This permission allows the integration to read data from the Atlassian account, such as data from Jira tickets, Jira projects etc.
To set up the integration using the Jira Connect App:
-
Select the Jira Connect App tile to set up the connection with Jira.
-
In the Jira Connect App settings page, add the basic overview information:
- Integration Name: Name for your integration.
- Description (optional): Add a description for the integration.
- Tags (optional): Add tags for the integration if required.
-
Install the Jira Connect App. To do this, follow these steps:
-
Verify that you are an owner of the Jira account where you track issues. An easy way to check is to visit your organization page and verify that the organization is listed.
-
Go to the Atlassian Marketplace to install the app and configure the SEI app to access the Jira projects.
-
Install the App.
-
Generate and copy the Jira Connect App key in the SEI integration configuration settings.
-
Go back to the Jira Connect App you just installed.
-
Select Apps on the header (beside Create button)
-
Select Harness AIDI Atlassian Connect configuration from the dropdown menu.
-
Paste the Harness AIDI OTP key.
tipThe key expires after 10 minutes, so generate a new key if the current one expires.
-
-
Click Validate Connection to validate the connection, and once successful, you'll have the integration set up under the Your Integrations tab.
Once enabled, Jira data is ingested into AI DLC Insights.
Edit configuration
Navigate to the Configuration tab to click Edit Configuration.
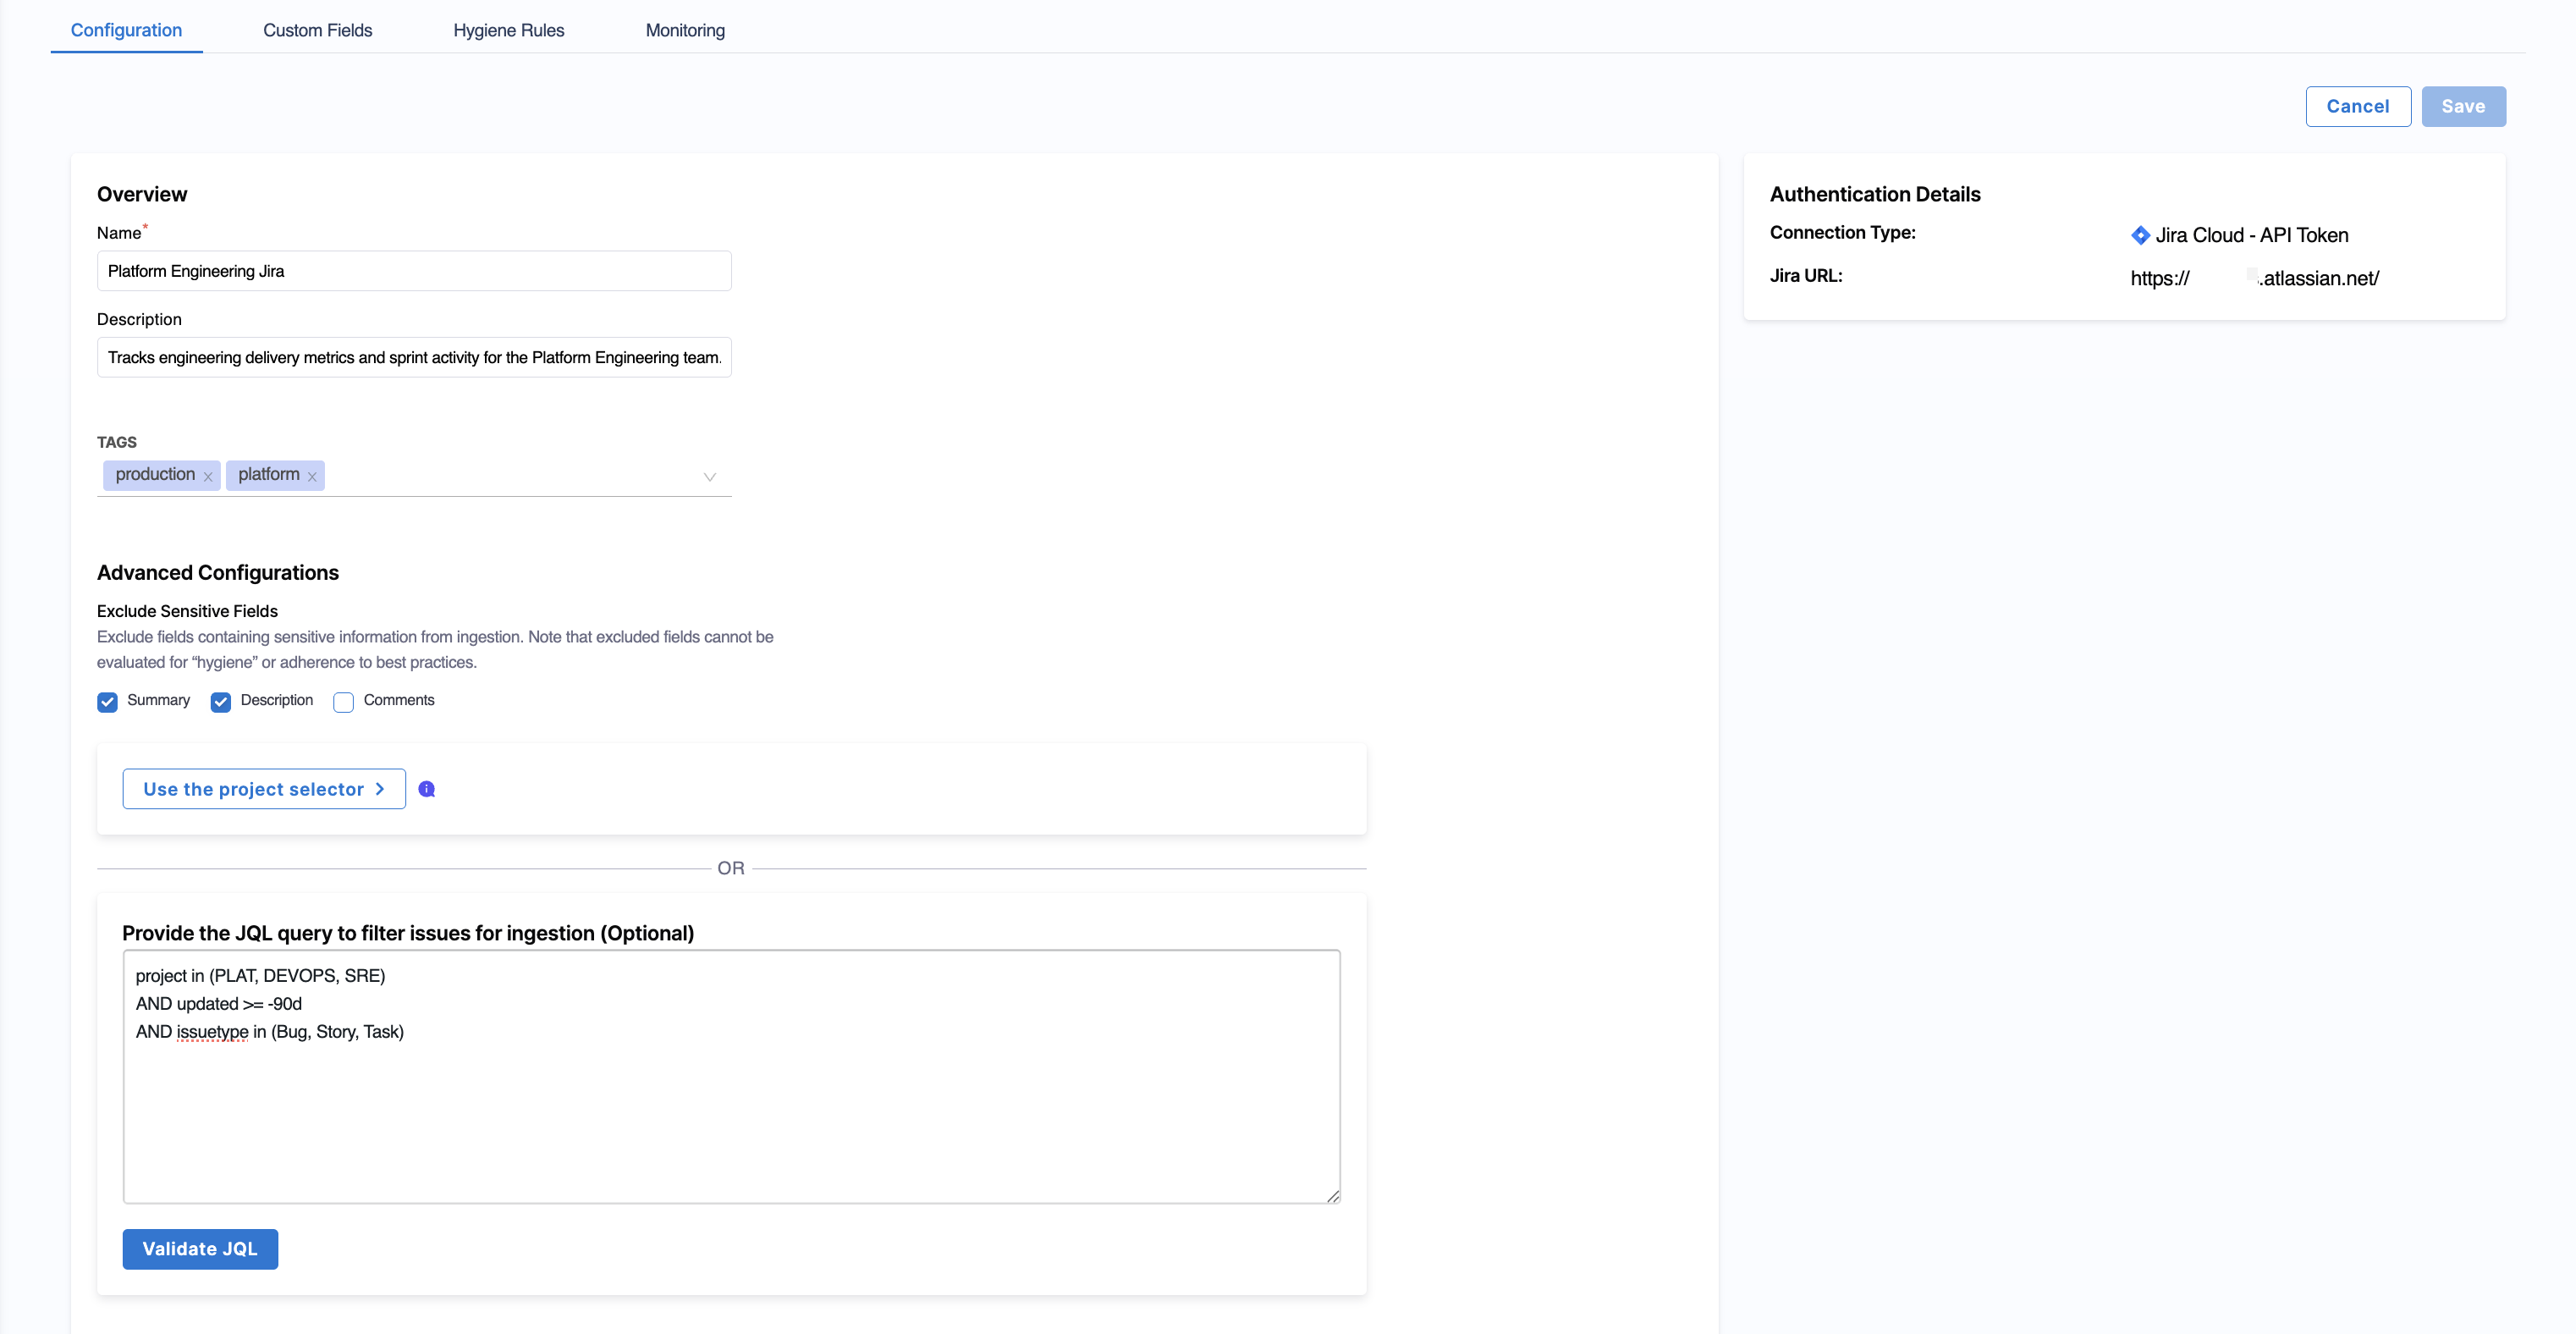
In the Advanced Configurations section, you can control what Jira data is ingested into Harness AI DLC Insights by either excluding sensitive fields or defining a JQL filter.
Exclude sensitive fields
You can exclude specific Jira issue fields from ingestion:
- Summary
- Description
- Comments
Use this option to prevent sensitive or unnecessary text fields from being ingested while still capturing issue metadata and activity signals.
Filter issues using JQL
Alternatively, you can define a JQL query to control which Jira issues are ingested. Only issues matching the query will be included in AI DLC Insights.
Use JQL filtering to limit ingestion to active projects, specific teams, or relevant issue types to reduce noise in downstream analytics. For example:
project in (PLAT, DEVOPS, SRE)
AND updated >= -90d
AND issuetype in (Bug, Story, Task)
Custom fields
The Custom Fields tab allows you to map additional Jira fields to SEI. You can use custom fields to include organization-specific metadata (such as priority, assignment group, or custom attributes) in your SEI dashboards and reports.
You can map custom fields by defining filter sets for incident and change request identification on the Incident Management tab in Team Settings.
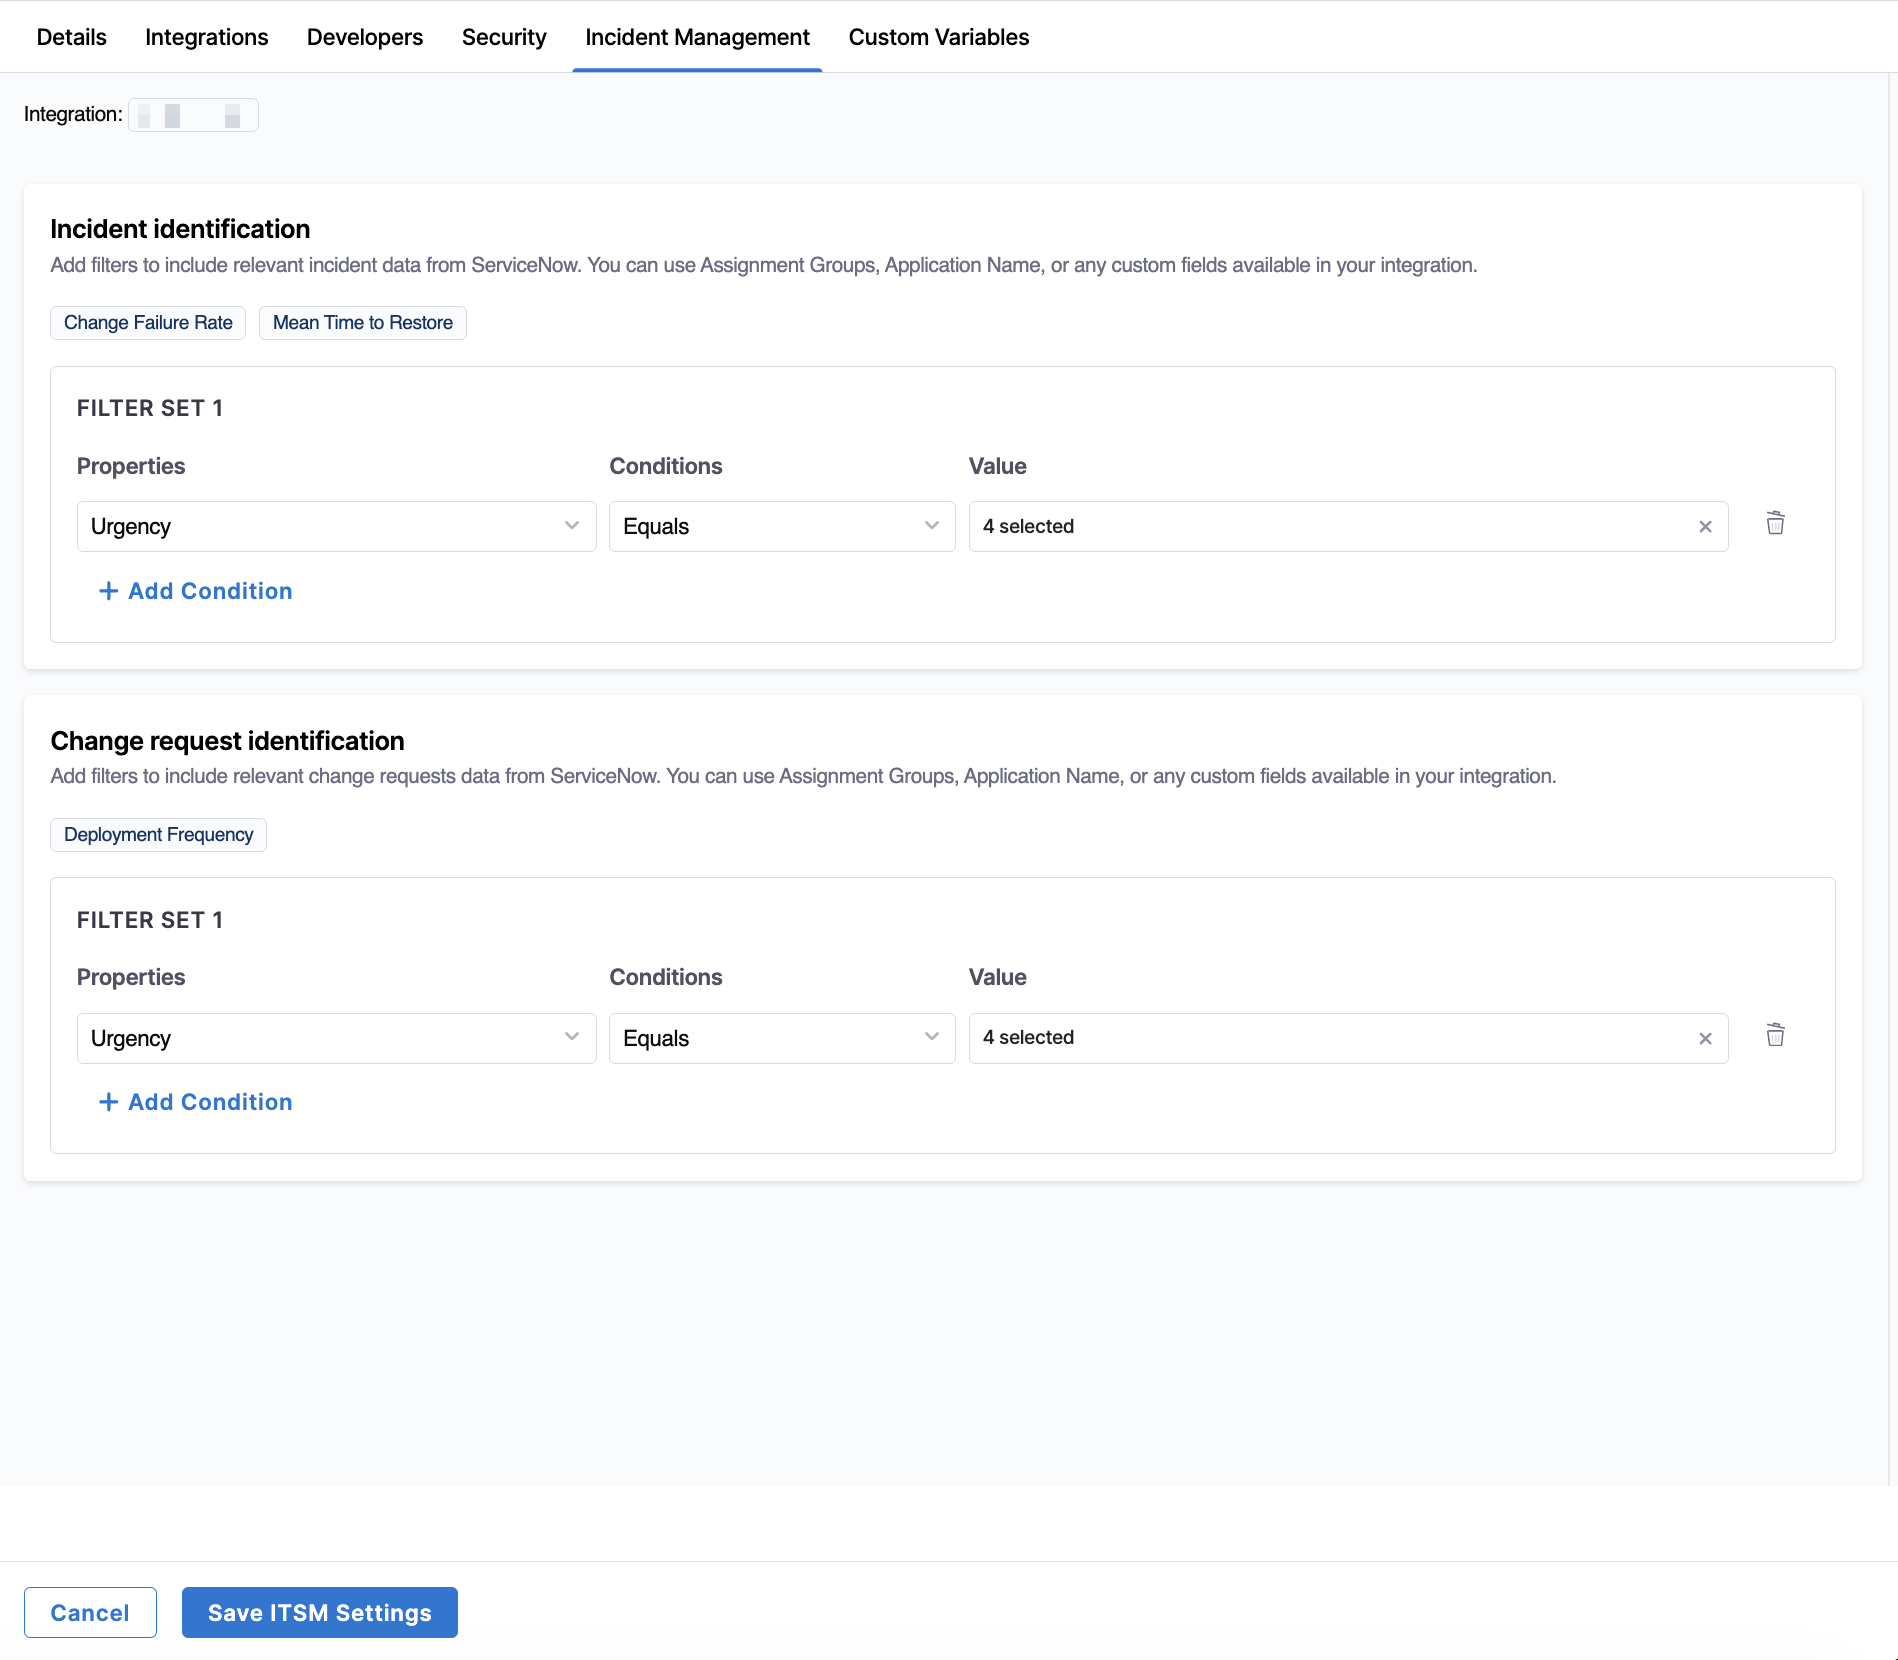
Once configured, these fields are included in data ingestion and become available for filtering and analysis in AI DLC Insights.
Hygiene rules
The Issue Hygiene Report widget uses data from Jira to calculate hygiene scores.
These scores represent hygiene misses in a designated time frame. A hygiene miss means that a ticket in your issue management system was missing an important field, failed to change status while sprint was active, or was assigned to an inactive user.
What constitutes a miss depends on your hygiene categories. There are several built-in hygiene categories, and you can add custom hygiene categories by configuring Custom Hygiene Misses in your issue management integration.
To add custom hygiene categories:
-
In your Harness Project, select the SEI Module, and go to your Account.
-
Select Integrations under Data Settings.
-
Find your Jira integration and edit it.
-
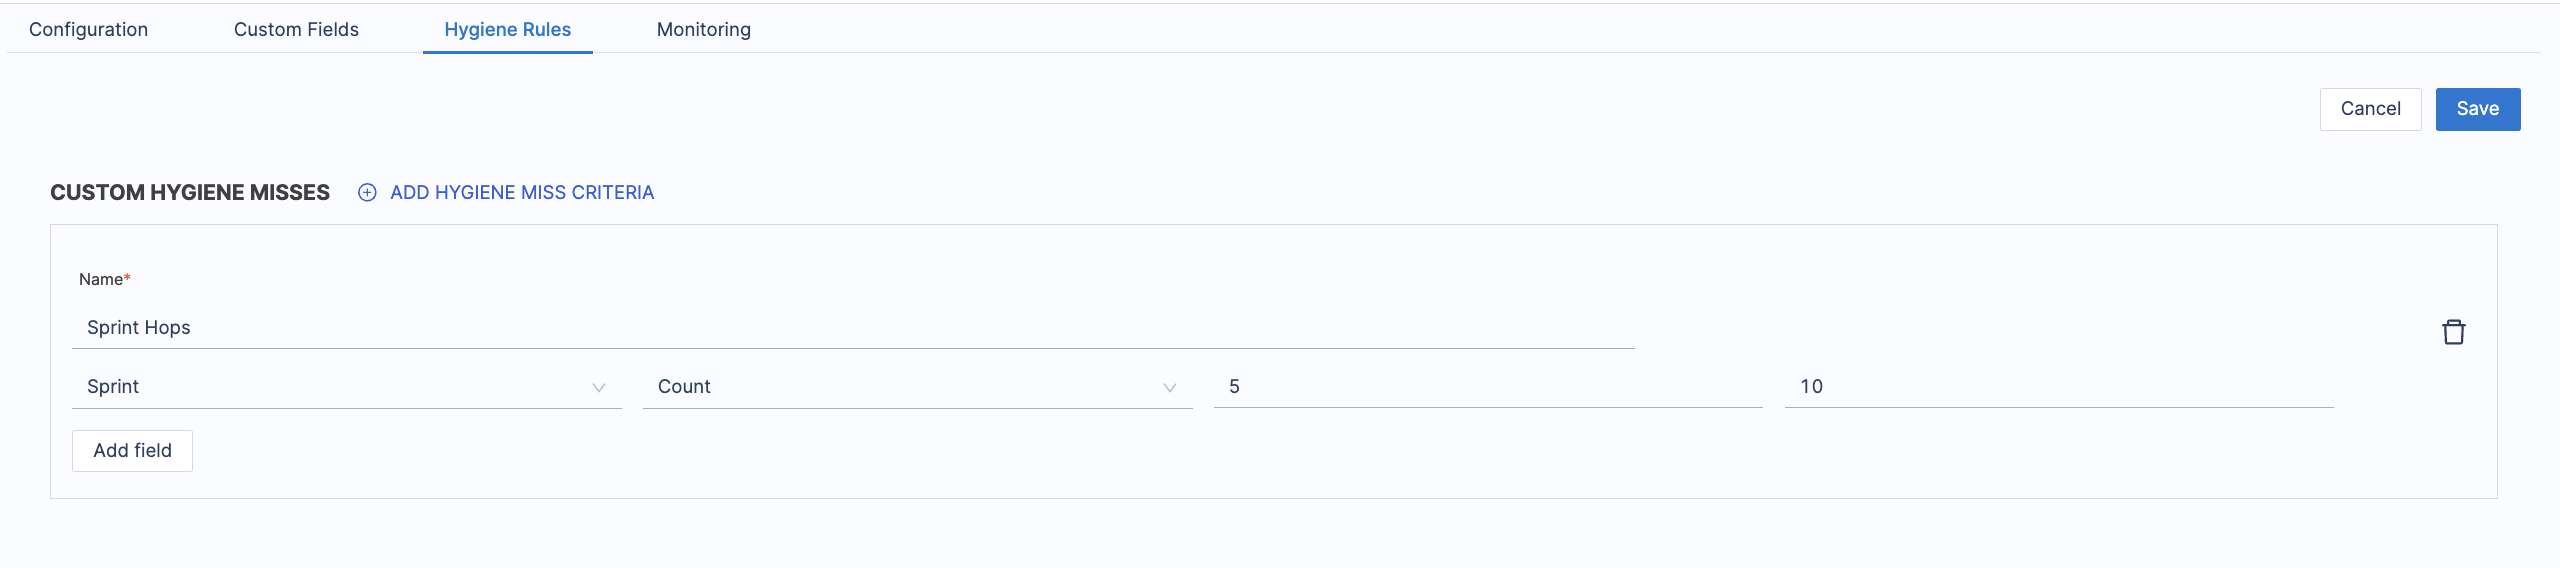
Select Add Hygiene Miss Criteria and configure the new hygiene category:

- Name: Enter a name for the category. This name appears on the Issue Hygiene Report widget along with the category's score.
- Field: Select the Jira field that provides data for this category.
- Operator: Specify the operator, such as Missing or Greater Than, that determines if there was a hygiene miss for this category.
The Operator represents an undesired state for the specified Field. For example, if your desired state is for the specified Field to be populated, then your undesired state is that the field is empty. Therefore, you would set the Operator to Missing.
-
To get scores for custom hygiene categories, you must modify the category Weights in your Issue Hygiene Report widgets. Custom categories don't have an initial weight, so you must modify all instances of the widget to include your custom categories in the hygiene score calculations. For detail instructions, go to Configure the Issue Hygiene Report.
Integration monitoring
To monitor the status of the Jira integration, navigate to the Monitoring tab. This page provides visibility into data ingestion, availability, and overall integration health.
The following health indicators are displayed: Healthy, Unhealthy, Pending, or No Data. These indicators help ensure data freshness and identify issues impacting Jira-based reporting in AI DLC Insights.
You can use the time range selector to switch between Last 7 Days and Last 30 Days. Changing the time range updates both the New Projects Onboarded and Tickets sections, along with their associated charts.
New Projects Onboarded
The New Projects Onboarded section shows the number of Jira projects discovered and ingested during the selected time range.
- Onboarded in Last 30 Days: The number of Jira projects onboarded during the selected time range.
- Total Onboarded: The cumulative number of Jira projects onboarded since the integration was configured.
Use this view to confirm that Jira projects are being successfully discovered and synced in Harness AIDI.
Tickets
The Tickets section shows Jira issue ingestion activity during the selected time range.
- Ingested in Last 30 Days: The number of Jira issues ingested during the selected time range.
- Total Ingested: The cumulative number of Jira issues ingested since the integration was configured.
Use this view to confirm that Jira issue data is being continuously ingested into Harness AIDI.
Data Availability
The Data Availability timeline visualizes the health of data ingestion during the selected time range. Each segment reflects the integration status at a given point in time:
- Healthy: Data was successfully ingested
- Unhealthy: Ingestion failed or encountered errors
- Pending: Ingestion is in progress
- No Data: No data was received for the time window
Use this view to identify ingestion gaps, delays, or outages that may impact DORA Insights reporting.
Troubleshooting
What happens to Jira tickets that are deleted after being synced to Harness AIDI?
If you delete a Jira ticket, it will still appear in Harness AIDI and continue to count toward metrics until you request that it be manually hidden or removed. To remove or hide deleted tickets, contact Harness Support.