ServiceNow Integration
This guide shows you how to configure AI DLC Insights to ingest incident and change management data from a ServiceNow instance. Once configured, you can correlate ServiceNow incidents and changes with engineering metrics in AI DLC dashboards.
AI DLC Insights can be configured to ingest IT Service Management (ITSM) data from a customer-managed ServiceNow instance. This data can be used to track operational performance and correlate incidents and changes with engineering metrics in AI DLC dashboards.
ServiceNow is a trademark of ServiceNow, Inc. Harness is not affiliated with, endorsed by, or sponsored by ServiceNow, Inc. This documentation describes configuration of Harness with a customer-managed ServiceNow instance.
AI DLC Insights supports the following authentication methods:
- API key authentication using a ServiceNow API key with permissions to read ServiceNow data
- Username/password authentication using ServiceNow account credentials
- OAuth authentication using a ServiceNow client ID and client secret
Before you begin
Before configuring AI DLC Insights for a ServiceNow instance, ensure you have the following:
-
Harness account with AI DLC Insights enabled: You need access to AI DLC Insights in Harness when it is entitled on your account. For how to access or create a Harness account, go to Getting started with Harness Platform.
Contact Harness supportIf AI DLC Insights does not appear, contact your account administrator or Harness Support.
-
Integration permissions in AI DLC Insights: You need permissions to create and manage integrations in AI DLC Insights. An administrator must assign you a role that includes integration management permissions. Go to RBAC in Harness and Manage roles to configure roles.
-
ServiceNow instance URL: The base URL of your ServiceNow instance (for example,
https://your-instance.service-now.com). -
Admin access to your ServiceNow account: Needed to create a service account and assign roles.
-
ServiceNow service account with required roles: Create a dedicated service account in ServiceNow with the following roles:
Role Description itilProvides access to IT Service Management (ITSM) data such as incidents, change requests, users, and Configuration Management Database (CMDB) records. personalize_choicesAllows AI DLC to retrieve choice field labels (dropdown/picklist values such as incident state and severity). personalize_dictionaryAllows AI DLC to retrieve field metadata and custom field definitions. oauth_adminRequired only when configuring OAuth applications in ServiceNow. userRequired to ingest user-related metadata for all users in the ServiceNow instance. Assign together with user_admin.user_adminOptional. Required only if you want to ingest extended user attributes. To ingest user-related metadata for all users in the ServiceNow instance, ensure that
useranduser_adminroles are also assigned. -
Harness IP addresses allowlisted (if applicable): If your ServiceNow instance uses IP allowlisting, add the required Harness IP addresses to the allowlist. Go to Harness Platform IPs to view the IP addresses.
Configure OAuth in ServiceNow
To use OAuth authentication, create an OAuth application in ServiceNow before starting the integration setup in AI DLC. You will need the Client ID and Client Secret during the AI DLC integration setup.
-
Log in to ServiceNow with an administrator account.
-
Navigate to System OAuth > Application Registry.
-
Click New.
-
Select Create an OAuth API endpoint for external clients.
-
Enter a name for the application.
-
Leave the Redirect URL field empty for now. You will add the redirect URL generated by AI DLC during the integration setup in the next section.
-
In the Auth Scopes section, add the
table_readscope. -
Click Submit to save the application.
-
Copy the generated Client ID and Client Secret for use during integration setup.
dangerThe Client ID and Client Secret are sensitive credentials. Store them securely.
-
After you complete the integration setup in AI DLC (which generates the redirect URL), return to this OAuth application and add the redirect URL to the Redirect URL field.
Configure the ServiceNow integration
To configure AI DLC to connect to a ServiceNow instance:
-
In the Harness navigation, go to AI DLC Insights.
-
From the AI DLC navigation menu, click Account Management.
-
From the Integrations page, navigate to the Available Integrations tab.
-
Locate the ServiceNow tile under Incident Management and click Add Integration.
-
Select an installation option: ServiceNow Cloud or ServiceNow On-Prem.
- ServiceNow Cloud
- ServiceNow On-Prem
Once you have selected ServiceNow Cloud, click Using Cloud Credentials (requires ServiceNow account with Admin access, username, and password) or Using OAuth (requires ServiceNow account with Admin access, ServiceNow client ID, and ServiceNow client secret).
Configure with cloud credentials
If you are using Cloud Credentials:
-
In the Overview section, enter a name for the integration. Optionally, add a description or tags.
-
In the Credentials section, enter your ServiceNow URL and select an authentication method: API Key or Username.
- For API Key, enter your API token in the API Token field.
- For Username, enter a username and password in the Username and Password fields.
-
Enter a timezone in the Timezone field.
-
Optionally, to limit the incidents and change requests ingested into AI DLC, create a filter query in ServiceNow.
-
In ServiceNow, create and copy the query string for the incidents or change requests you want to ingest, then paste the query into the appropriate filter fields in the Advanced Configuration section.
-
Click Validate Connection.
-
Once validation succeeds, click Validate and Create Integration.
Configure with OAuth
If you are using OAuth:
-
In the Overview section, enter a name for the integration. Optionally, add a description or tags.
-
In the Credentials section, enter your ServiceNow URL and copy the generated redirect URL.
-
In ServiceNow, add the redirect URL to your OAuth application configuration. Go to Configure OAuth in ServiceNow if you have not already created the OAuth application.
-
Back in the AI DLC integration setup, enter your ServiceNow OAuth client ID and client secret.
-
Enter a timezone in the Timezone field.
-
Optionally, to limit the incidents and change requests ingested into AI DLC, create a filter query in ServiceNow.
-
In ServiceNow, create and copy the query string for the incidents or change requests you want to ingest, then paste the query into the appropriate filter fields in the Advanced Configuration section.
-
Click Connect ServiceNow. You will be redirected to ServiceNow to authorize the connection. After granting access, you will be returned to the AI DLC integration setup page.
-
Once validation succeeds, click Validate and Create Integration.
Once you have selected ServiceNow On-Prem:
Configure on-premises integration
-
In the Overview section, enter a name for the integration. Optionally, add a description or tags.
-
In the Provide ServiceNow Details section, enter your ServiceNow URL and provide a username and password.
-
Enter a timezone in the Timezone field.
-
Optionally, to limit the incidents and change requests ingested into AI DLC, create a filter query in ServiceNow.
-
In ServiceNow, create and copy the query string for the incidents or change requests you want to ingest, and add it to the appropriate fields in the Advanced Configuration section.
-
Click Download YAML File. This
satellite.ymlconfiguration file contains the metadata for establishing the connection and data ingestion from ServiceNow to your on-premises infrastructure. -
Deploy the
satellite.ymlfile to your on-premises infrastructure. Go to Deploy the ingestion satellite to deploy the satellite. -
Click Done.
Once configured, AI DLC begins ingesting ITSM data from the customer-managed ServiceNow instance. Ingestion begins immediately and runs on a scheduled interval. You can view ingestion status on the Monitoring tab (described below) and access ServiceNow data in AI DLC dashboards after the first sync completes.
Custom fields
The Custom Fields tab allows you to map additional ServiceNow fields to AI DLC. You can use custom fields to include organization-specific metadata (such as priority, assignment group, or custom attributes) in your AI DLC dashboards and reports.
To map custom fields:
-
From the integration settings page, click the Custom Fields tab.
-
Define filter sets for incident and change request identification on the Incident Management tab in Team Settings.
For example, you can map a custom Priority field from ServiceNow to filter incidents by priority level in AI DLC reports.
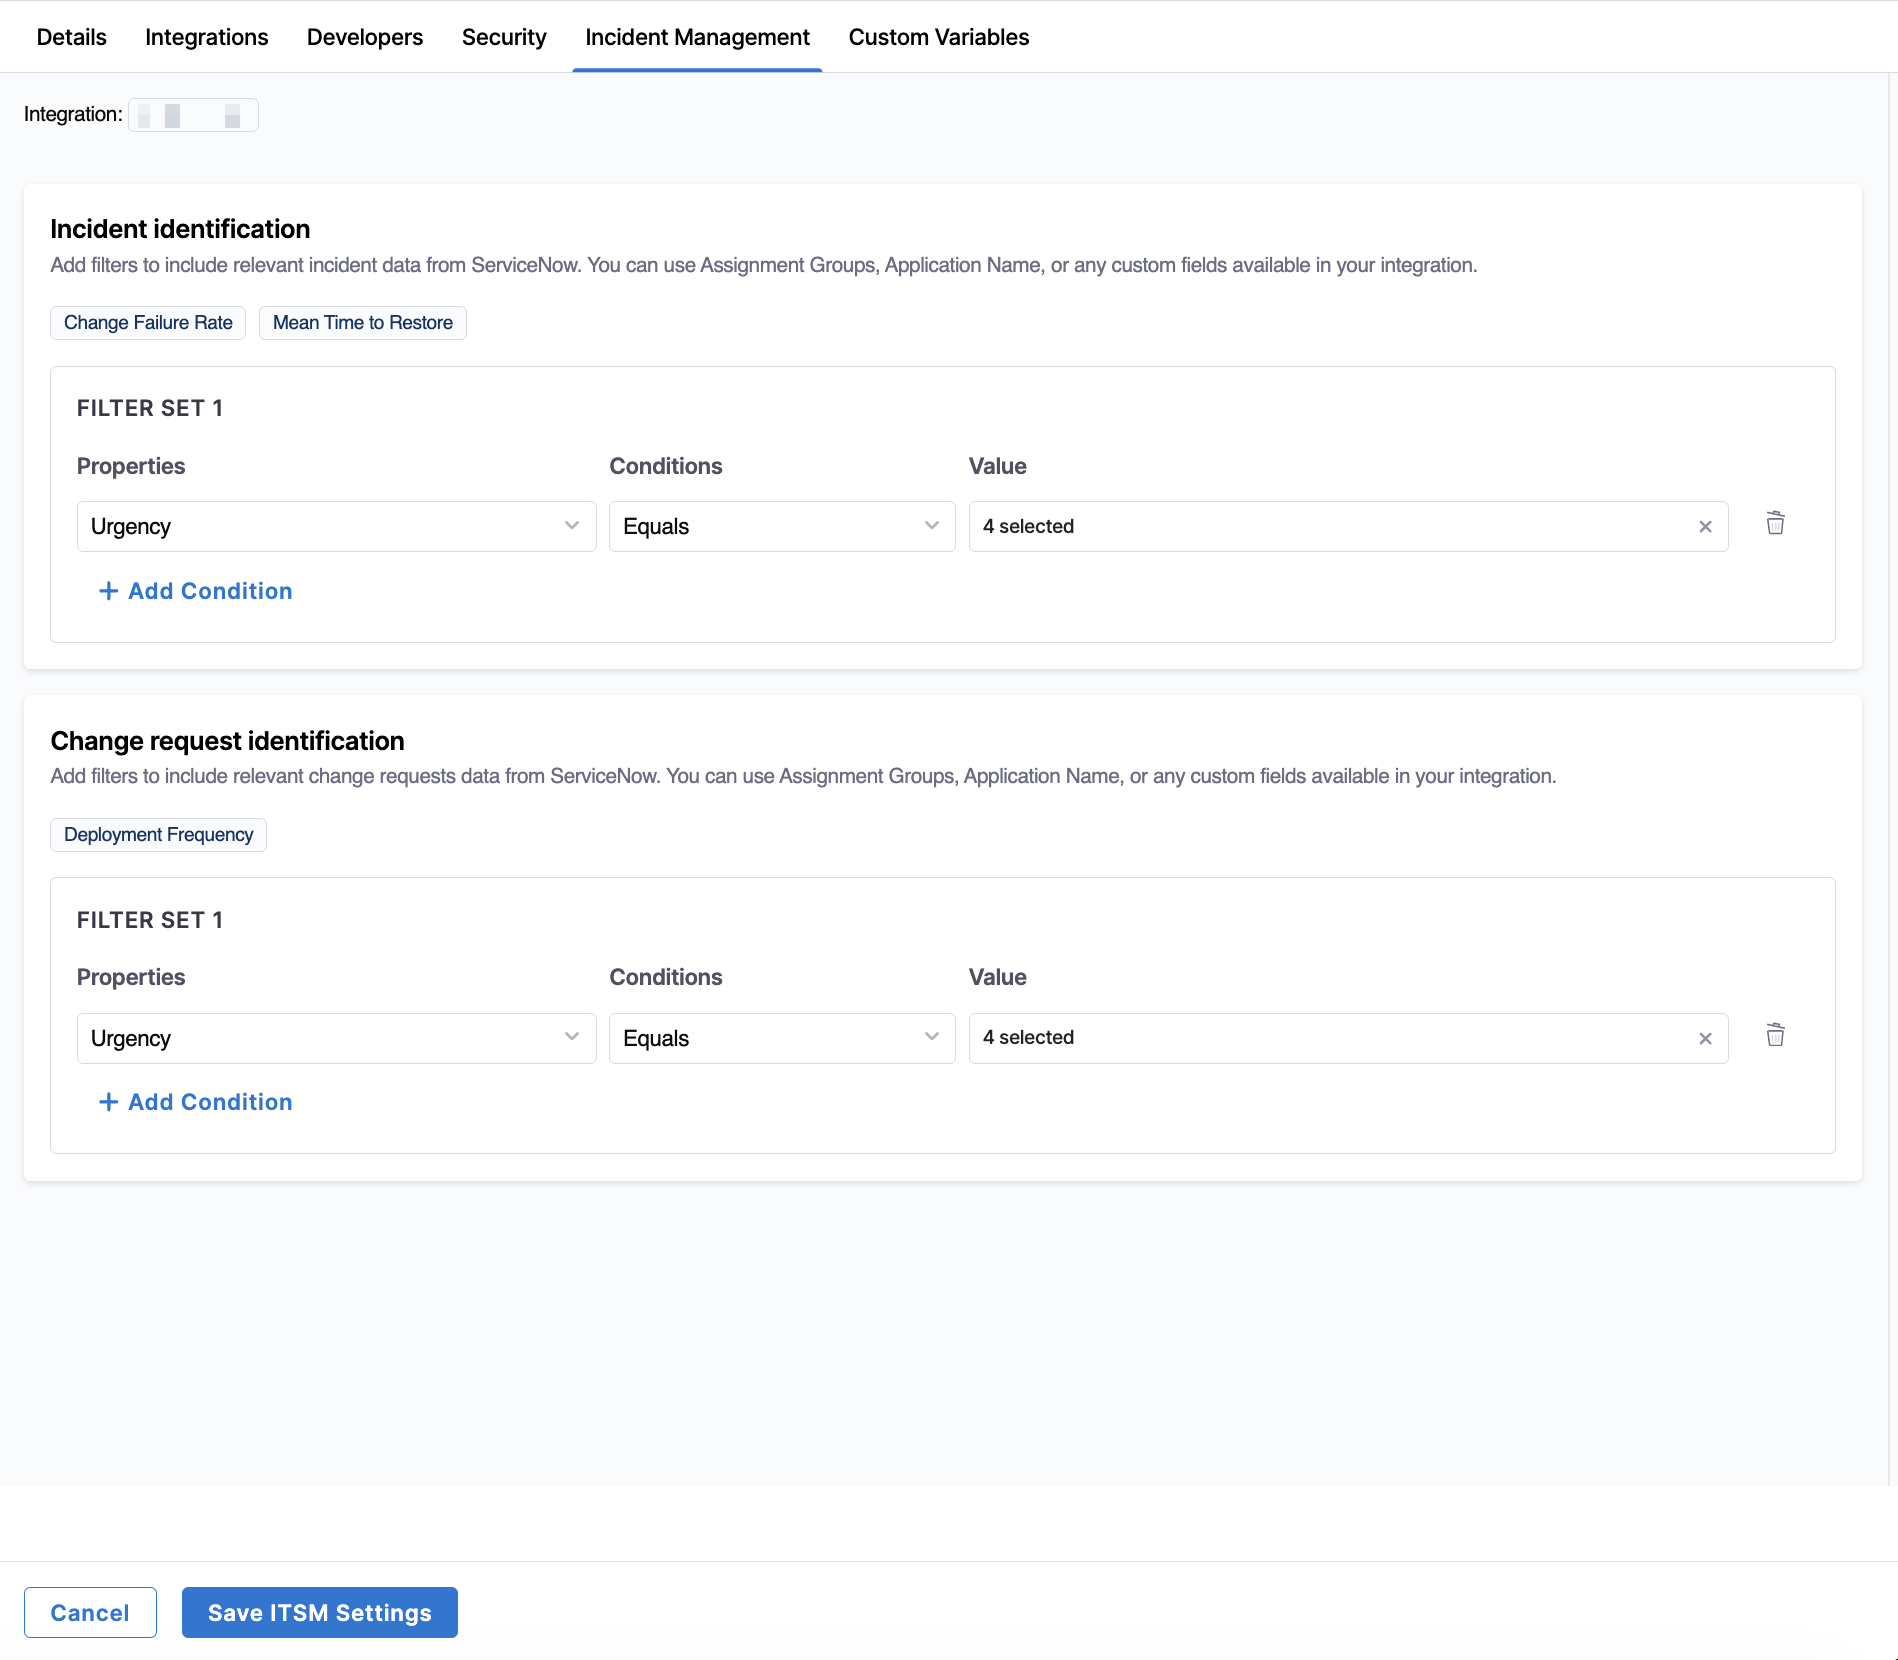
The Team Settings page with Incident Management custom field mapping configuration
Once configured, these fields are included in data ingestion and become available for filtering and analysis in AI DLC.
Integration monitoring
To monitor the status of the ServiceNow integration:
- From the AI DLC navigation menu, click Account Management.
- From the Integrations page, click the ServiceNow integration.
- Click the Monitoring tab.
This page displays ingestion logs that provide visibility into data synchronization.
You can click the Filters icon to filter logs by Status (Success, Failed, Pending, or Scheduled).
Each ingestion log includes the following fields:
| Field | Description |
|---|---|
| Scan Range Time | The time window of data retrieved from ServiceNow during the ingestion task. |
| Data Retrieval Process | The ingestion job responsible for fetching data from ServiceNow. |
| Task Start Time | The timestamp when the ingestion task began running. |
| Status | The current state of the ingestion task (for example, Success, Failed, Pending, or Scheduled). |
| Time to Complete | The total duration required for the ingestion task to complete. |
| Retries | The number of times the ingestion task was retried after a failure. |
Troubleshooting
Validation fails with 'Invalid credentials' error in AI DLC ServiceNow integration setup
Verify that the ServiceNow username, password, or API token is correct. Ensure the service account has the required roles (itil, personalize_choices, personalize_dictionary) assigned in ServiceNow.
ServiceNow filter query returns no results in AI DLC Insights
Check the filter query syntax for errors. Test the query directly in ServiceNow by navigating to the Incidents or Change Requests table and applying the query string in the filter bar. Ensure the query returns results in ServiceNow before adding it to the AI DLC integration.
OAuth authorization fails when connecting AI DLC to ServiceNow
Verify that the Client ID and Client Secret are correct. Ensure the redirect URL generated by AI DLC is added to the OAuth application configuration in ServiceNow. Check that the service account has the oauth_admin role assigned if OAuth configuration is required.
Next steps
You have successfully configured the ServiceNow integration. AI DLC now ingests incident and change management data from ServiceNow. You can view ServiceNow data in AI DLC dashboards and correlate incidents with engineering metrics.
- Go to Configure custom fields to map additional ServiceNow fields for filtering and analysis.
- Go to AI DLC integrations overview to configure additional integrations.