Zero Day Agent
SCS helps you identify vulnerable open source software (OSS) dependencies across your software supply chain through continuous SBOM analysis. However, remediating these dependencies is often a manual and time-consuming process. Security and development teams must identify affected repositories, determine a safe dependency version, create pull requests, and verify that the fix has been applied. During critical events such as zero-day vulnerabilities, this process can delay remediation across multiple repositories.
To address this challenge, Harness continuously monitors and validates zero-day vulnerabilities, backed by our Security Research Team. Once a zero-day vulnerability is confirmed, the Zero Day Agent automatically identifies affected assets and triggers the remediation workflow. This accelerates the remediation process across your software supply chain and reduces the time and manual effort required to respond to critical security events.
The Zero Day Agent is not a worker agent. It is a pre-built SCS agent designed specifically to respond to zero-day vulnerabilities.
What will you learn in this topic?
By the end of this topic, you will be able to:
- Understand how the Zero Day Agent works in SCS.
- Configure the agent’s notifications, connectors, and severity filter.
- Choose the infrastructure on which the agent runs.
- View agent executions and findings details.
- Create remediation pull requests for affected repositories.
Before you begin
Make a note of the following before you proceed with Zero Day agent configuration:
- Ensure your SCM provider is integrated with the platform to generate SBOMs for your code repositories. You can do this in one of the following ways:
- Repository onboarding through RSPM currently supports GitHub and Bitbucket:
- To integrate your GitHub account and onboard the repositories, go to Onboard GitHub Repositories.
- To integrate your Bitbucket account and onboard the repositories, go to Onboard Bitbucket Repositories.
- SBOMs can be generated through pipeline execution. To generate SBOM via pipeline execution, refer to the Generate SBOM for Repositories documentation.
- Repository onboarding through RSPM currently supports GitHub and Bitbucket:
- Ensure that SBOMs are generated for your artifacts. For more information, see Generate SBOM for artifacts.
Understand the Zero Day agent
The Zero Day Agent is a pre-built SCS agent that automatically responds to zero-day vulnerabilities identified by the Harness Security Research Team. Once enabled at the Account scope, the agent analyzes the affected component against the SBOMs generated for your repositories and artifacts to determine its impact across your software supply chain. It identifies affected repositories and artifacts. The agent can also discover newly detected vulnerabilities that may not yet be identified by traditional SCA scanners, helping you respond to vulnerabilities that could otherwise be detected later. For eligible repositories, the agent provides the recommended dependency update and lets you create a remediation pull request.
The agent also provides visibility throughout the remediation workflow. Each run records the packages analyzed, affected repositories and artifacts, and remediation status. The agent performs component analysis to provide details about the affected packages and their security relevance. It also sends notifications with information about the detected vulnerability, affected packages, impacted targets, and available remediation actions. This gives security and development teams visibility into the impact of a zero-day vulnerability and the progress of its remediation.
The following table provides a structured overview of the Zero Day Agent, when to use it, and how it helps automate the response to zero-day vulnerabilities across your software supply chain.
| Why use it? | When to use? | How can you leverage it? |
|---|---|---|
| 1. Automate dependency remediation across repositories. 2. Reduce the time required to respond to security events. 3. Standardize remediation across your software supply chain. 4. Improve remediation visibility and governance. | 1. When you need to remediate vulnerable or risky OSS dependencies. 2. During zero-day vulnerabilities or newly disclosed security issues. 3. When managing applications distributed across multiple repositories and artifacts. 4. When security and development teams need to monitor remediation progress. | 1. Detects affected repositories, creates remediation pull requests, and validates the applied fixes. 2. Automatically identifies impacted dependencies and provides recommended dependency updates for remediation when the agent is enabled after configuration. 3. Provides a consistent remediation workflow and provides centralized execution tracking. 4. Records execution details, generated pull requests, and remediation status for every run. |
Configure the Zero Day agent
Configuring the Zero Day agent lets you control how it notifies you, which severities it acts on, and where its executions run. It is available only at the Account scope. To configure the Zero Day Agent in SCS, complete the following steps:
Step 1 - Configure the notifications
Configuring notifications within the agent can display an in-app banner and send notifications to your messaging tools when it detects risky dependencies. To configure notifications, complete the following steps:
-
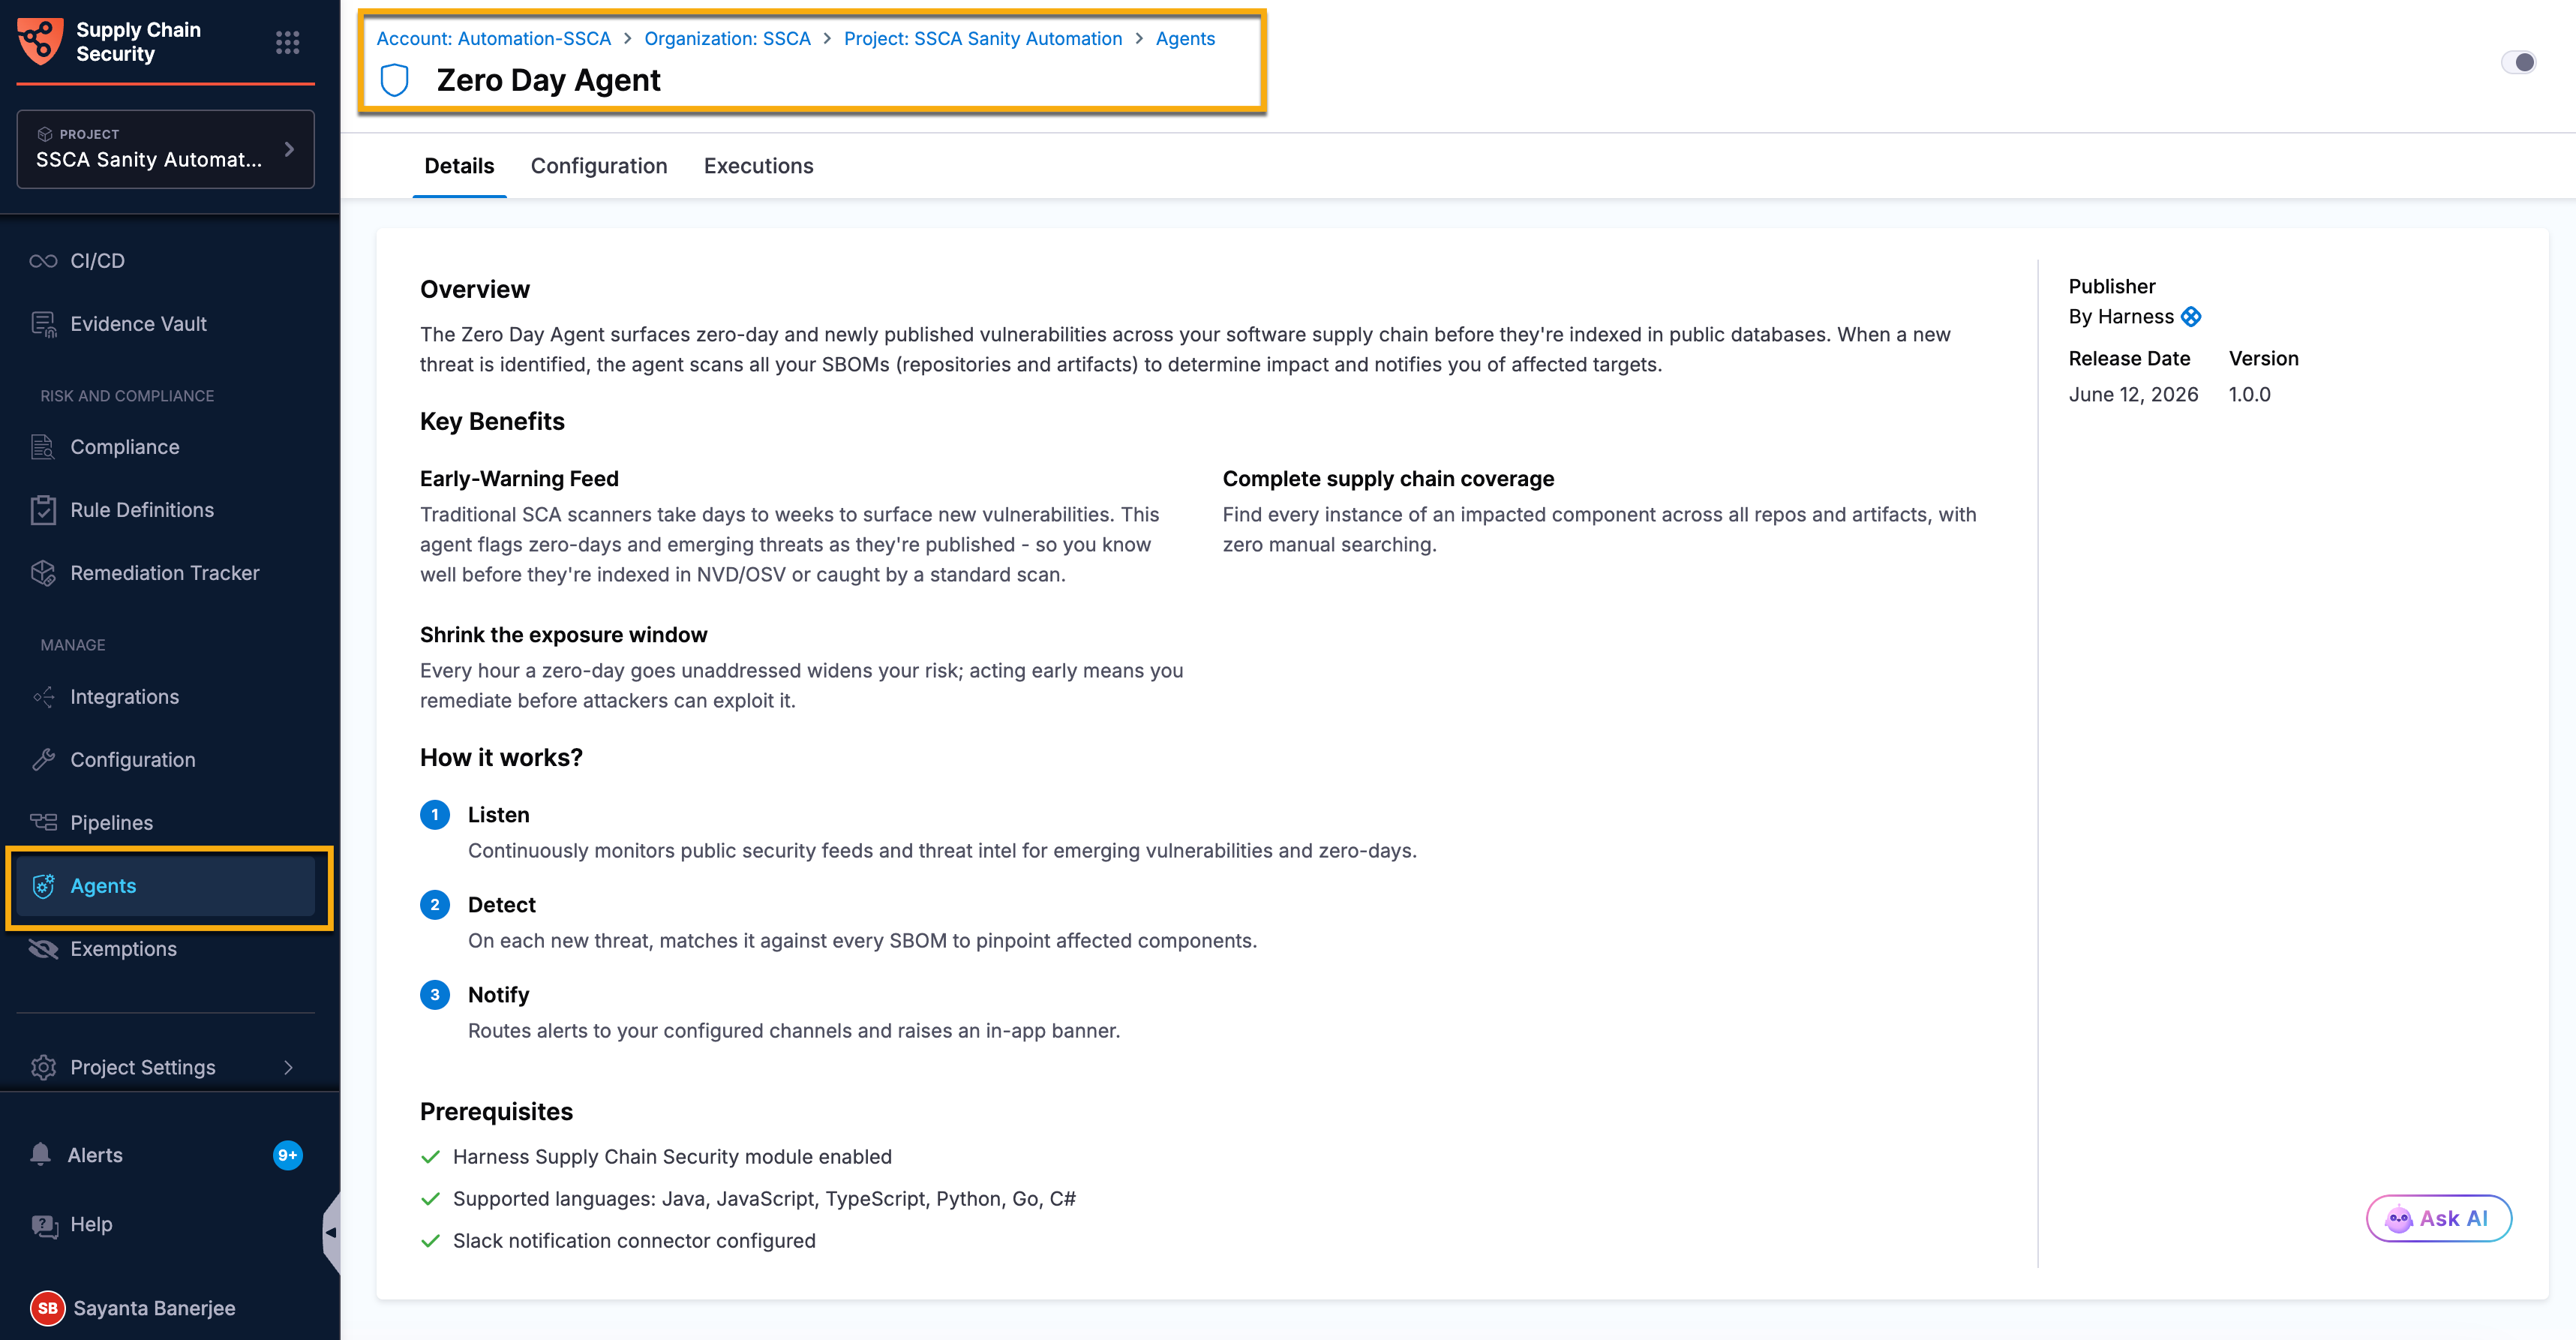
Navigate to the Agents page from the sidebar navigation of your SCS account. The page lists the prebuilt agents available in your account. Each agent is displayed as a card.
-
Click the Zero Day Agent card to open the agent. The Details tab opens by default.
-
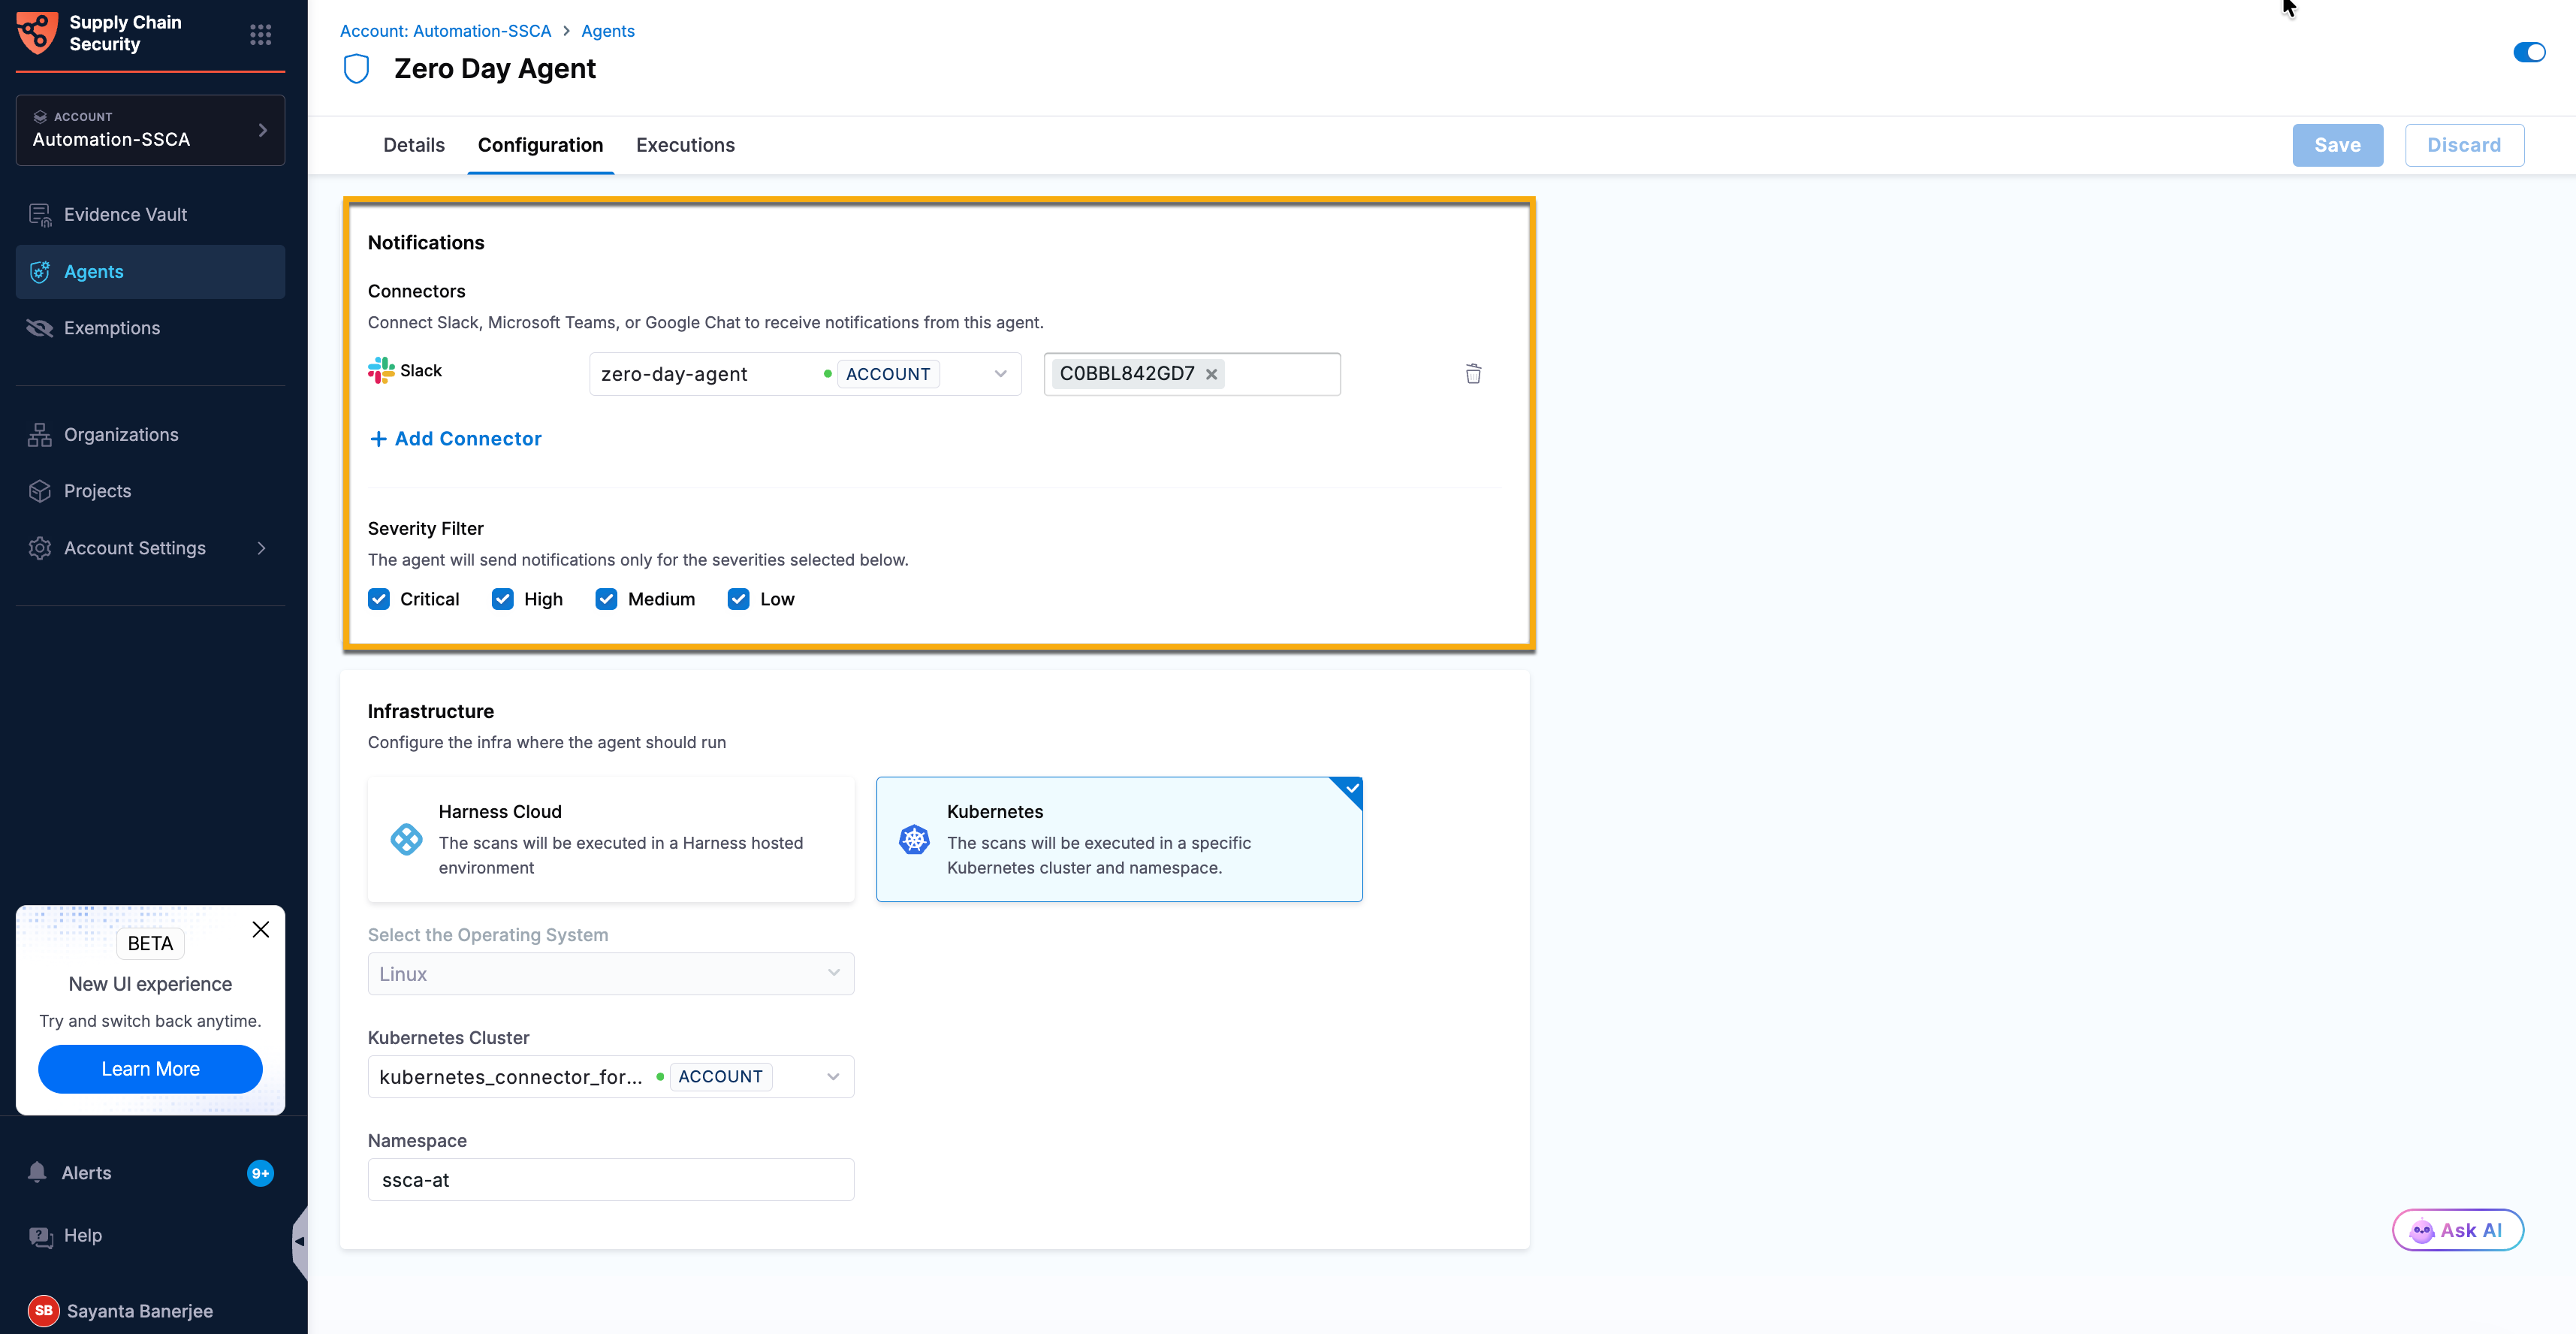
Select the Configurations tab to open the Notifications and Infrastructure configuration panels.
-
Within the Notifications configuration panel, under Connectors, click + Add Connector to open the
Select Notification Channeldialog box. -
Select your preferred notification channel for connector configuration. The available notification channel is Slack. Support for Microsoft Teams and Google Chat will be available in a future release.
-
Click Add to add the notification channel and configure its connector.
noteYou can add more than one connector for multiple notification channels.
-
Click Select beside your selected notification channel to open the
Create or Select an Existing Connectordialog. -
Select your required connector from the list of existing connectors. You can search for your created connector or filter connectors by Project, Organization, and Account.
-
Alternatively, click + New Connector to create a new connector for your selected notification channel.
-
Enter the Slack channel ID where you want the Zero Day Agent to send notifications.
You can enter multiple channel IDs. -
Under Severity Filter, select one or multiple checkboxes beside the severities for which you want the agent to deliver notifications. The available options are Critical, High, Medium, and Low.
Step 2 - Set up the infrastructure
The infrastructure setting determines where the agent's executions run. To configure the infrastructure, complete the following steps:
-
Within the Infrastructure configuration panel, select the execution environment where the agent runs. The available options are:
- Harness Cloud - Select this option to run the agent in a Harness-hosted environment.
- Linux is selected as the default operating system for running executions in Harness Cloud.
- Select your preferred architecture from the dropdown to run the executions. The available options are ARM64 and AMD64.
- Kubernetes - Select this option to run the agent in a specific Kubernetes cluster and namespace.
- Linux is selected as the default operating system for running the agent in Kubernetes.
- Click Select Kubernetes Cluster under Kubernetes Cluster to open the
Create or Select an Existing Connectordialog. - Select your required connector from the list of existing connectors. You can search for your created connector or filter connectors by Project, Organization, and Account.
- Alternatively, click + New Connector to create a new Kubernetes cluster connector for connecting your existing Kubernetes clusters with Harness. For more information, see Add a Kubernetes cluster connector.
- Enter the namespace in your Kubernetes cluster where you want the agent to run.
- Harness Cloud - Select this option to run the agent in a Harness-hosted environment.
-
After verifying the details, click Save on the top right corner.
Once saved, you can view the Configuration saved successfully toaster message at the top, indicating that the agent notification and infrastructure settings have been configured successfully.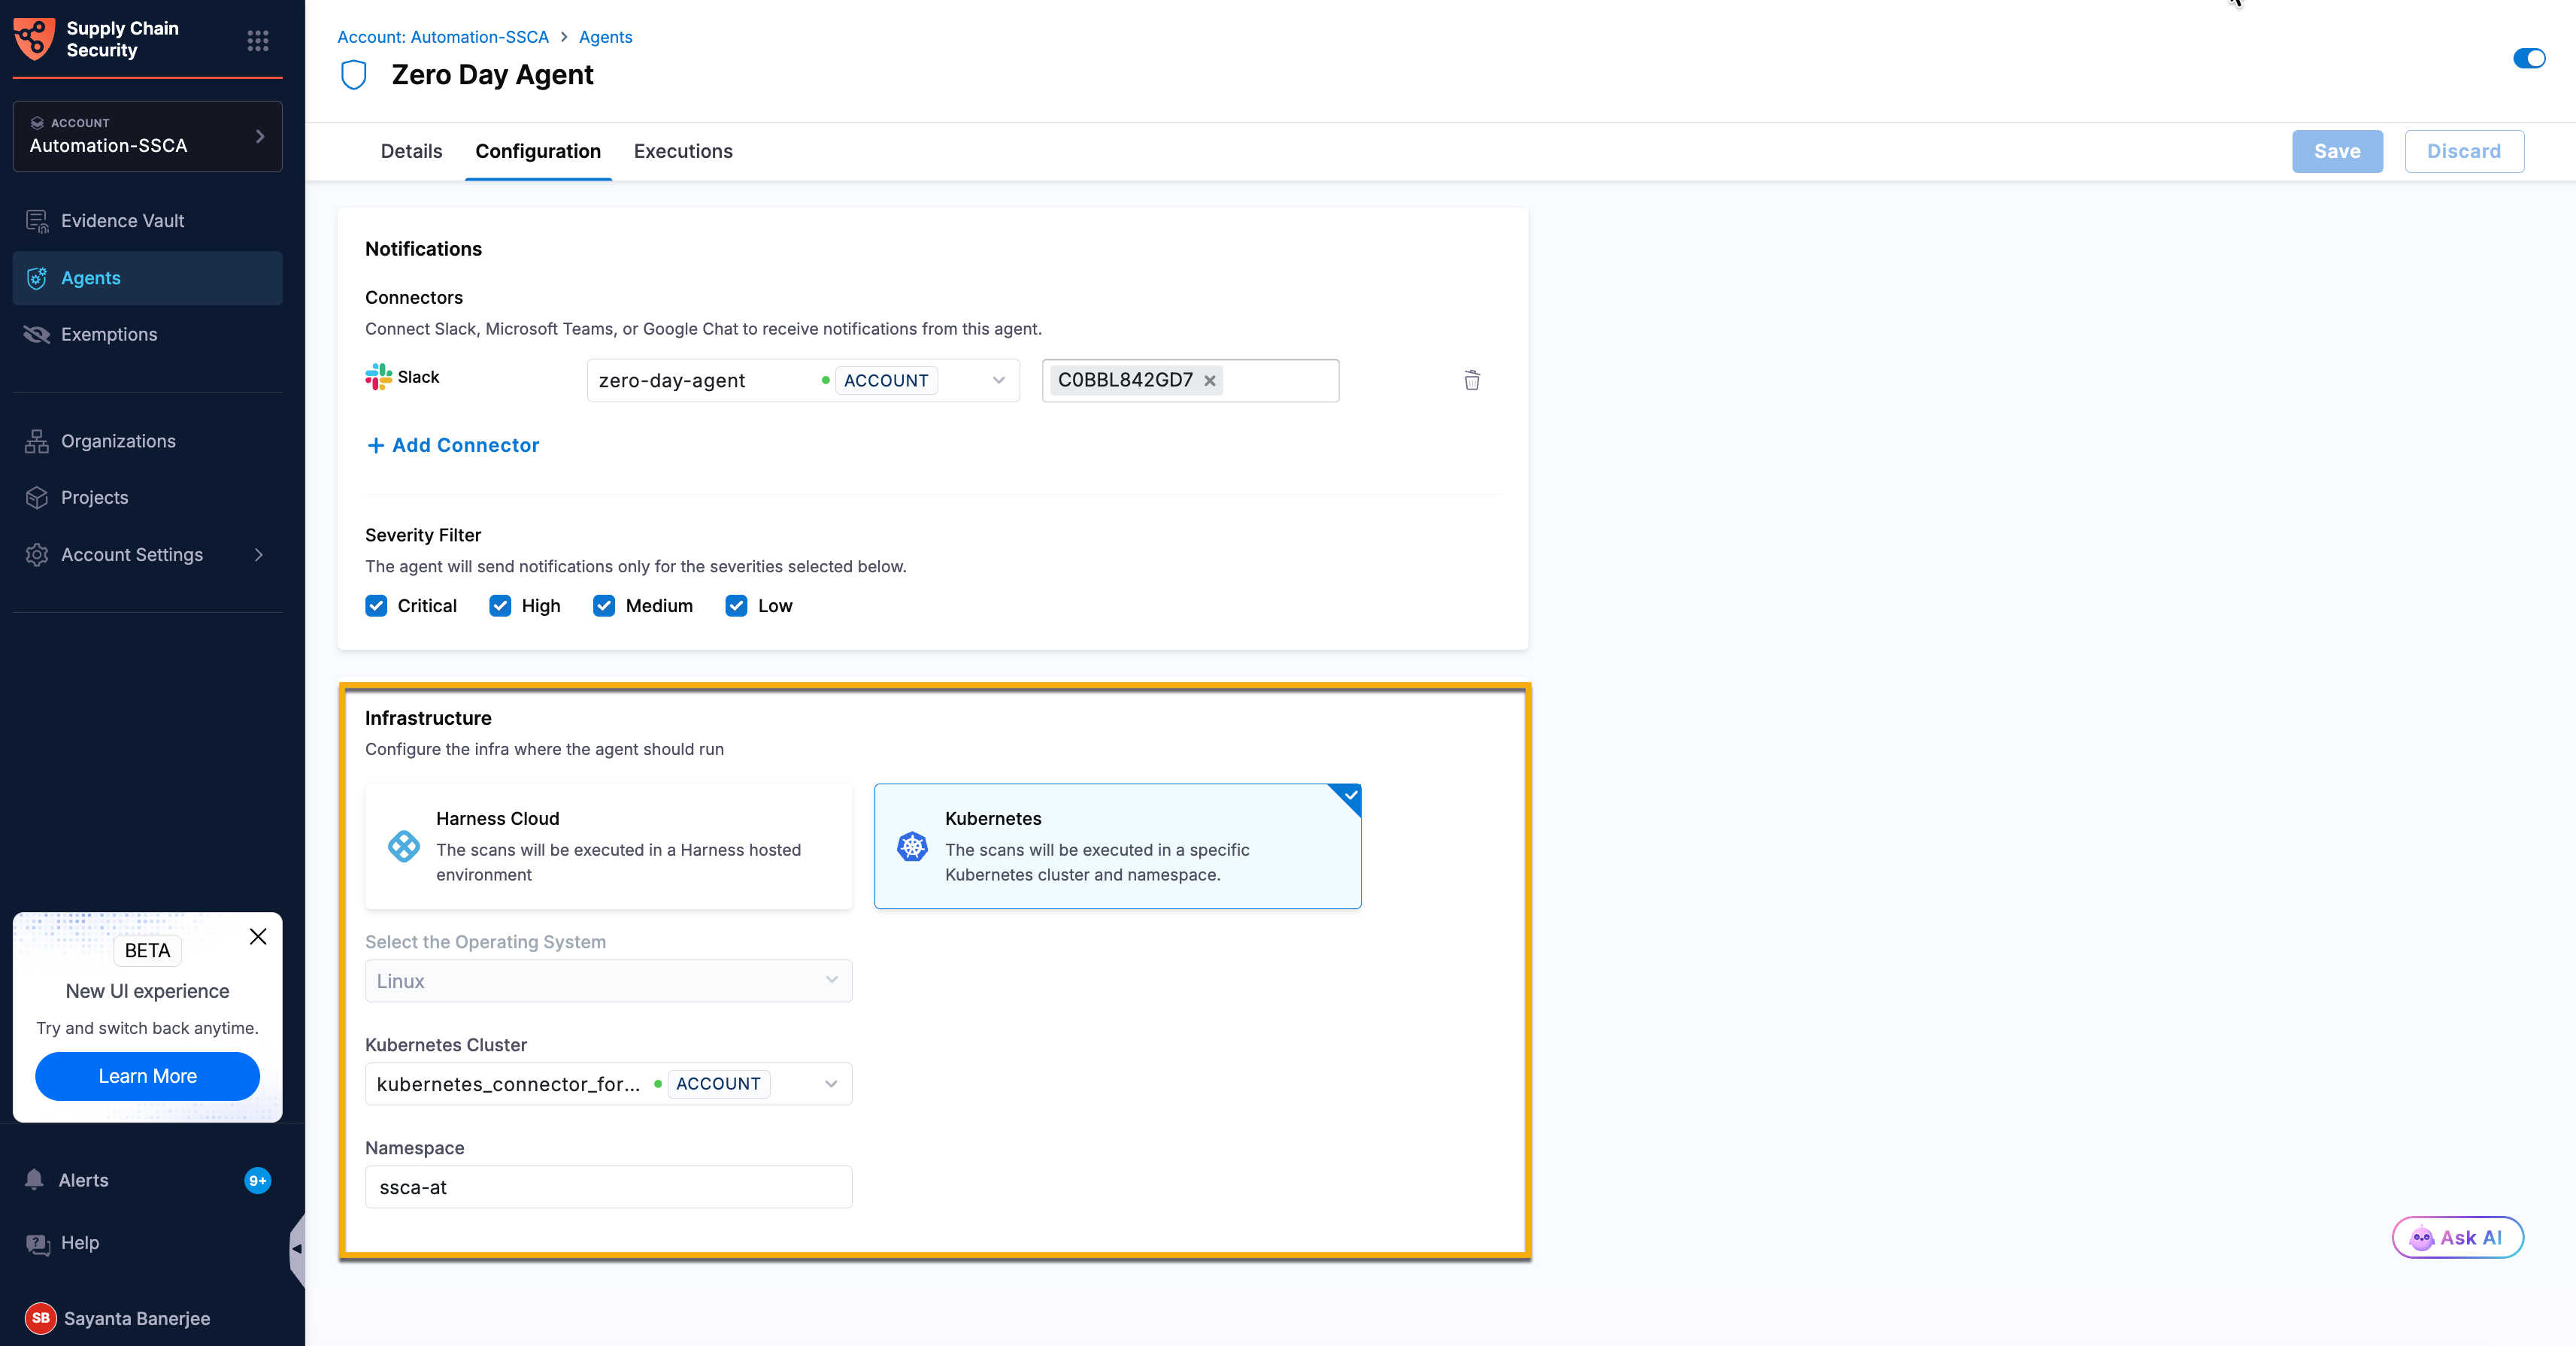
Enable the Zero Day agent
The Zero Day Agent is enabled at the Account scope and automatically responds to zero-day vulnerabilities. When a new zero-day vulnerability is identified, the agent analyzes the affected component, identifies all affected repositories and artifacts, and sends notifications through the configured notification channel before initiating the remediation workflow.
When you enable the Zero Day Agent, SCS automatically creates a template pipeline named ZERO_DAY in the default_project under the default organization. The agent uses this pipeline to run its executions.
To enable the agent, complete the following steps:
-
Navigate to the Agents page from the sidebar navigation of your SCS account.
-
Enable the agent using the toggle on the agent card or the toggle in the upper-right corner of the agent page.
Once enabled, the agent automatically responds to zero-day vulnerabilities identified by the Harness Security Research Team and runs across your software supply chain without requiring any user intervention. -
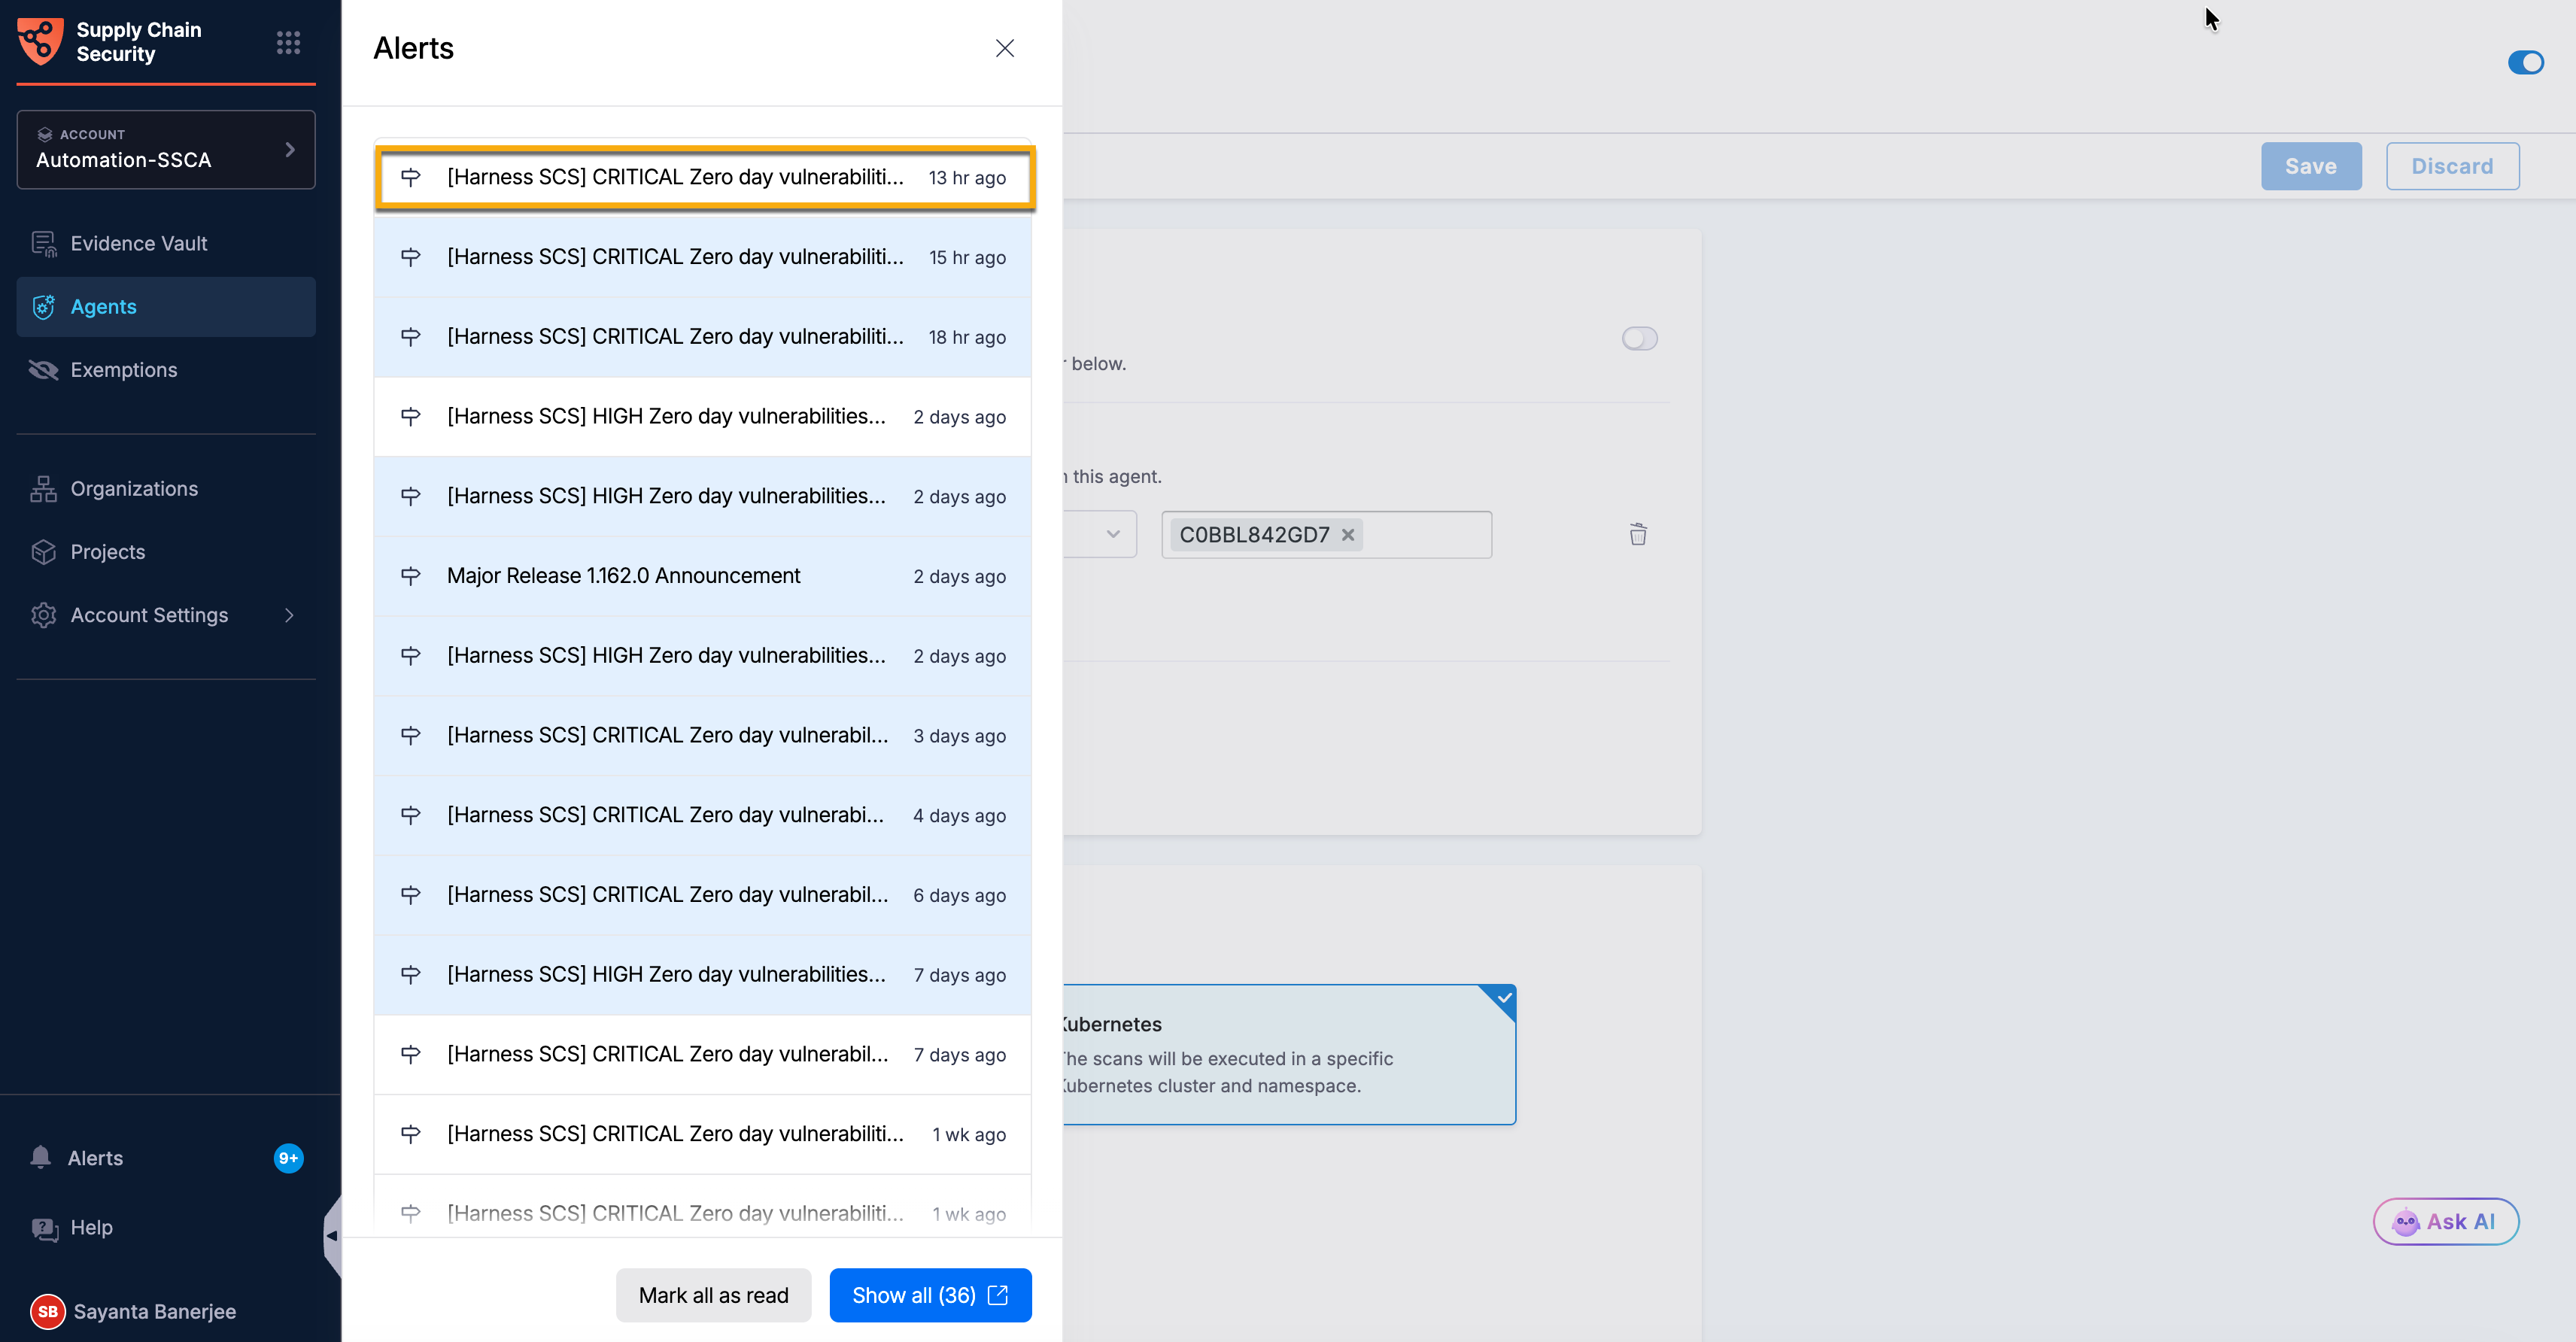
Once a run is detected, the agent sends an alert notification to the Alerts panel.
The agent also sends a notification through the configured notification channel. -
Select Alerts from the sidebar navigation to open the Alerts panel and view the alert notifications. For more information on alerts, go to Platform Alerts.
-
Click any notification to view the notification details.
The notification includes the severity of the detected zero-day vulnerability, the number and details of affected packages, total affected targets, organization, project, and a link to view the corresponding execution.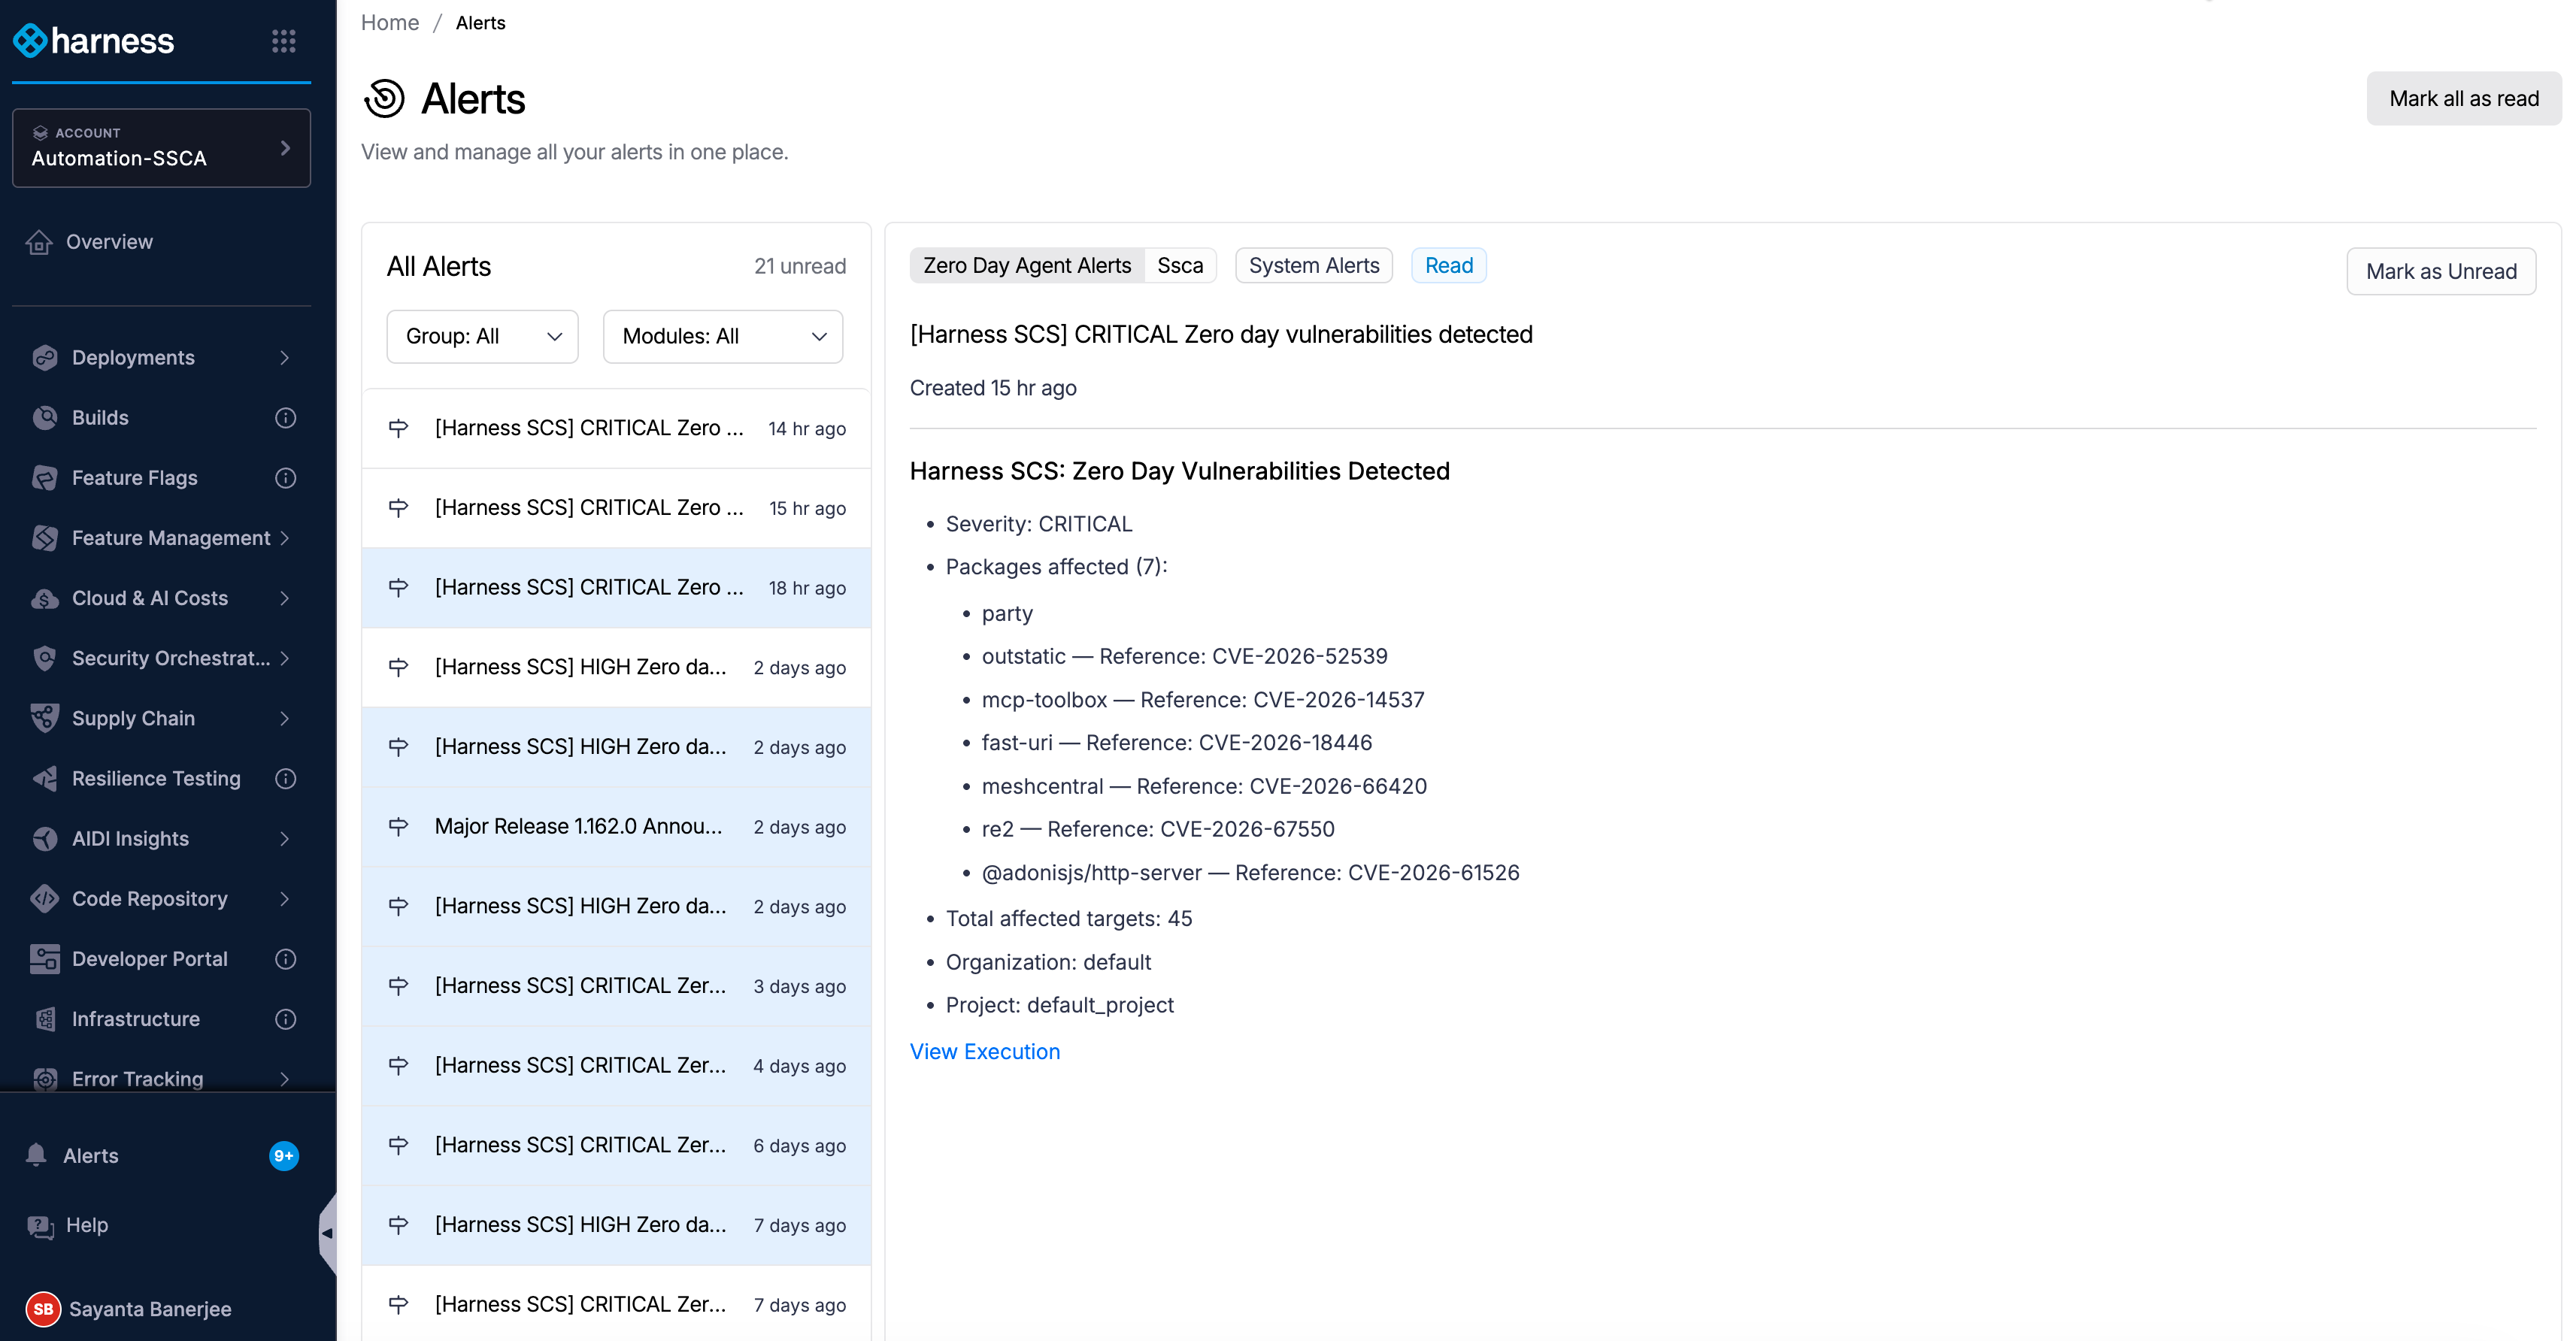
-
Click View Execution to review the execution details for the detected zero-day vulnerability.
View the agent executions
After the agent runs, each execution is recorded in the Executions tab. You can view the executions at both the Account and Project scopes, review the affected packages and repositories, and monitor the status of each execution. To view agent executions, complete the following steps:
-
Navigate to the Agents page under the Manage section from the sidebar navigation of your SCS account.
-
Click the Zero Day Agent card to open the agent. The Details tab opens by default.
-
Select the Executions tab to open the table of affected packages.
The table lists each detected package with its Ecosystem, Severity, Affected Version, Fixed Version, Targets Impacted, Discovered At, and Agent Status. Use the search bar to find a specific package.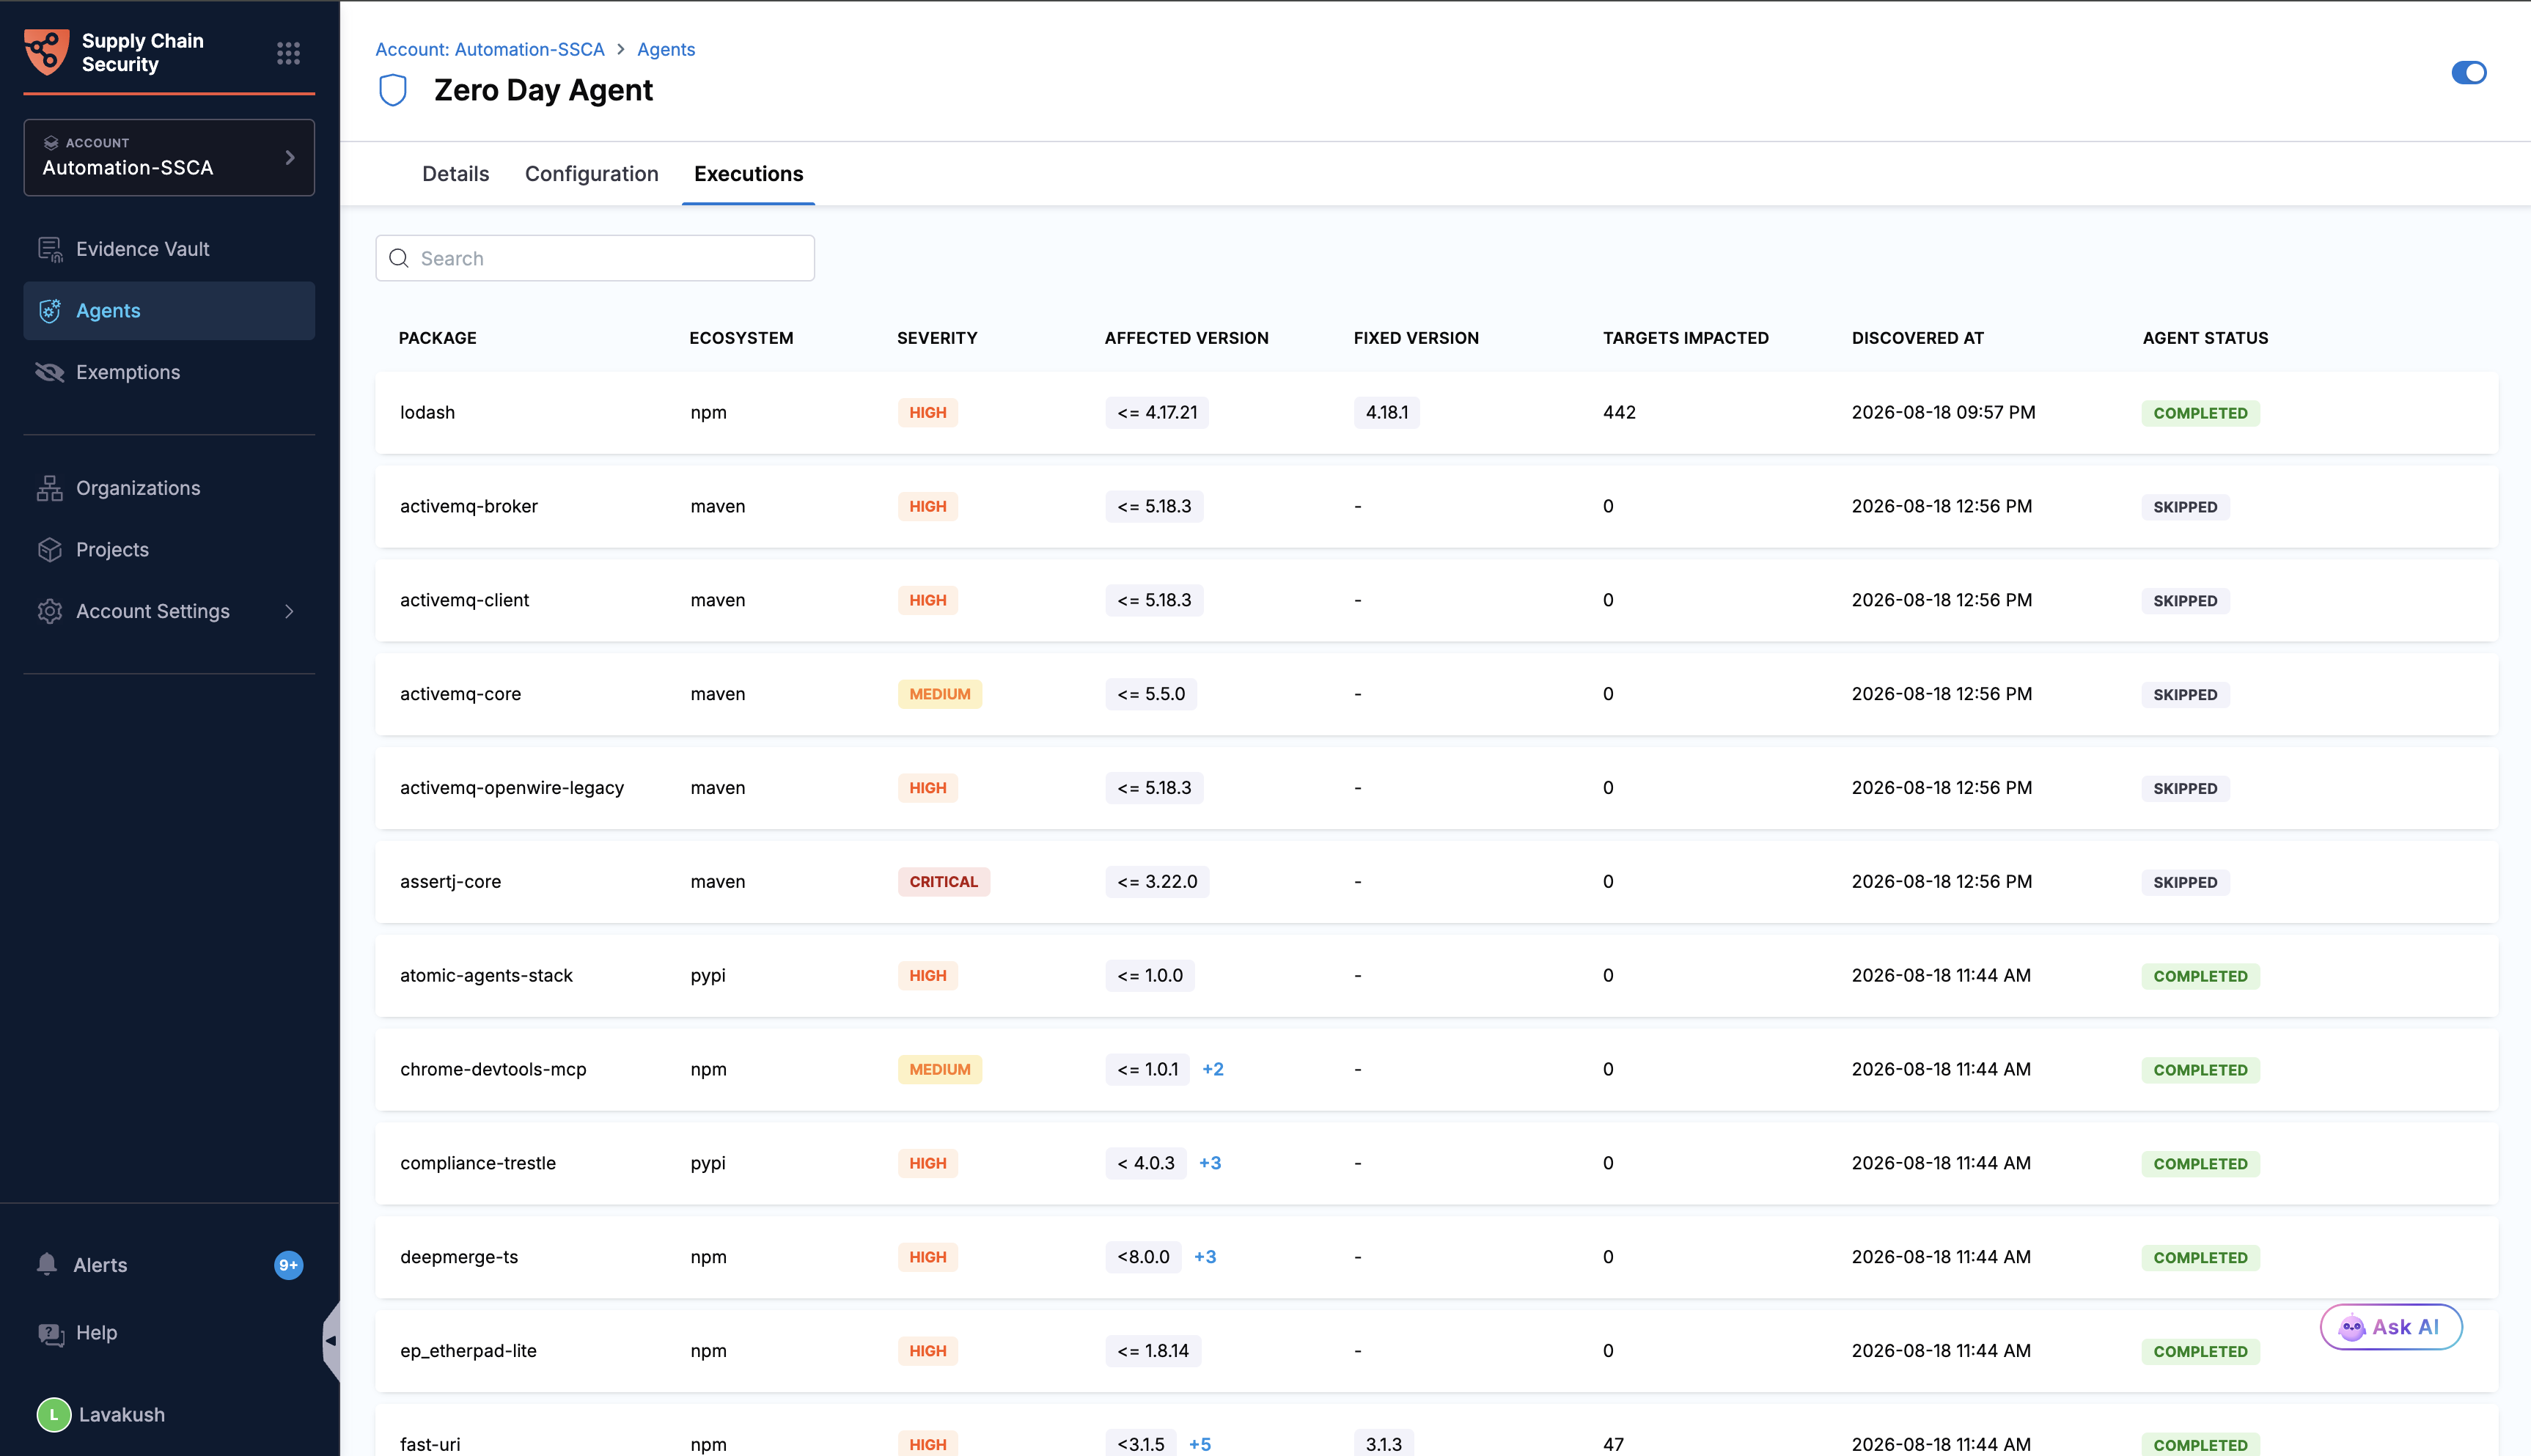
-
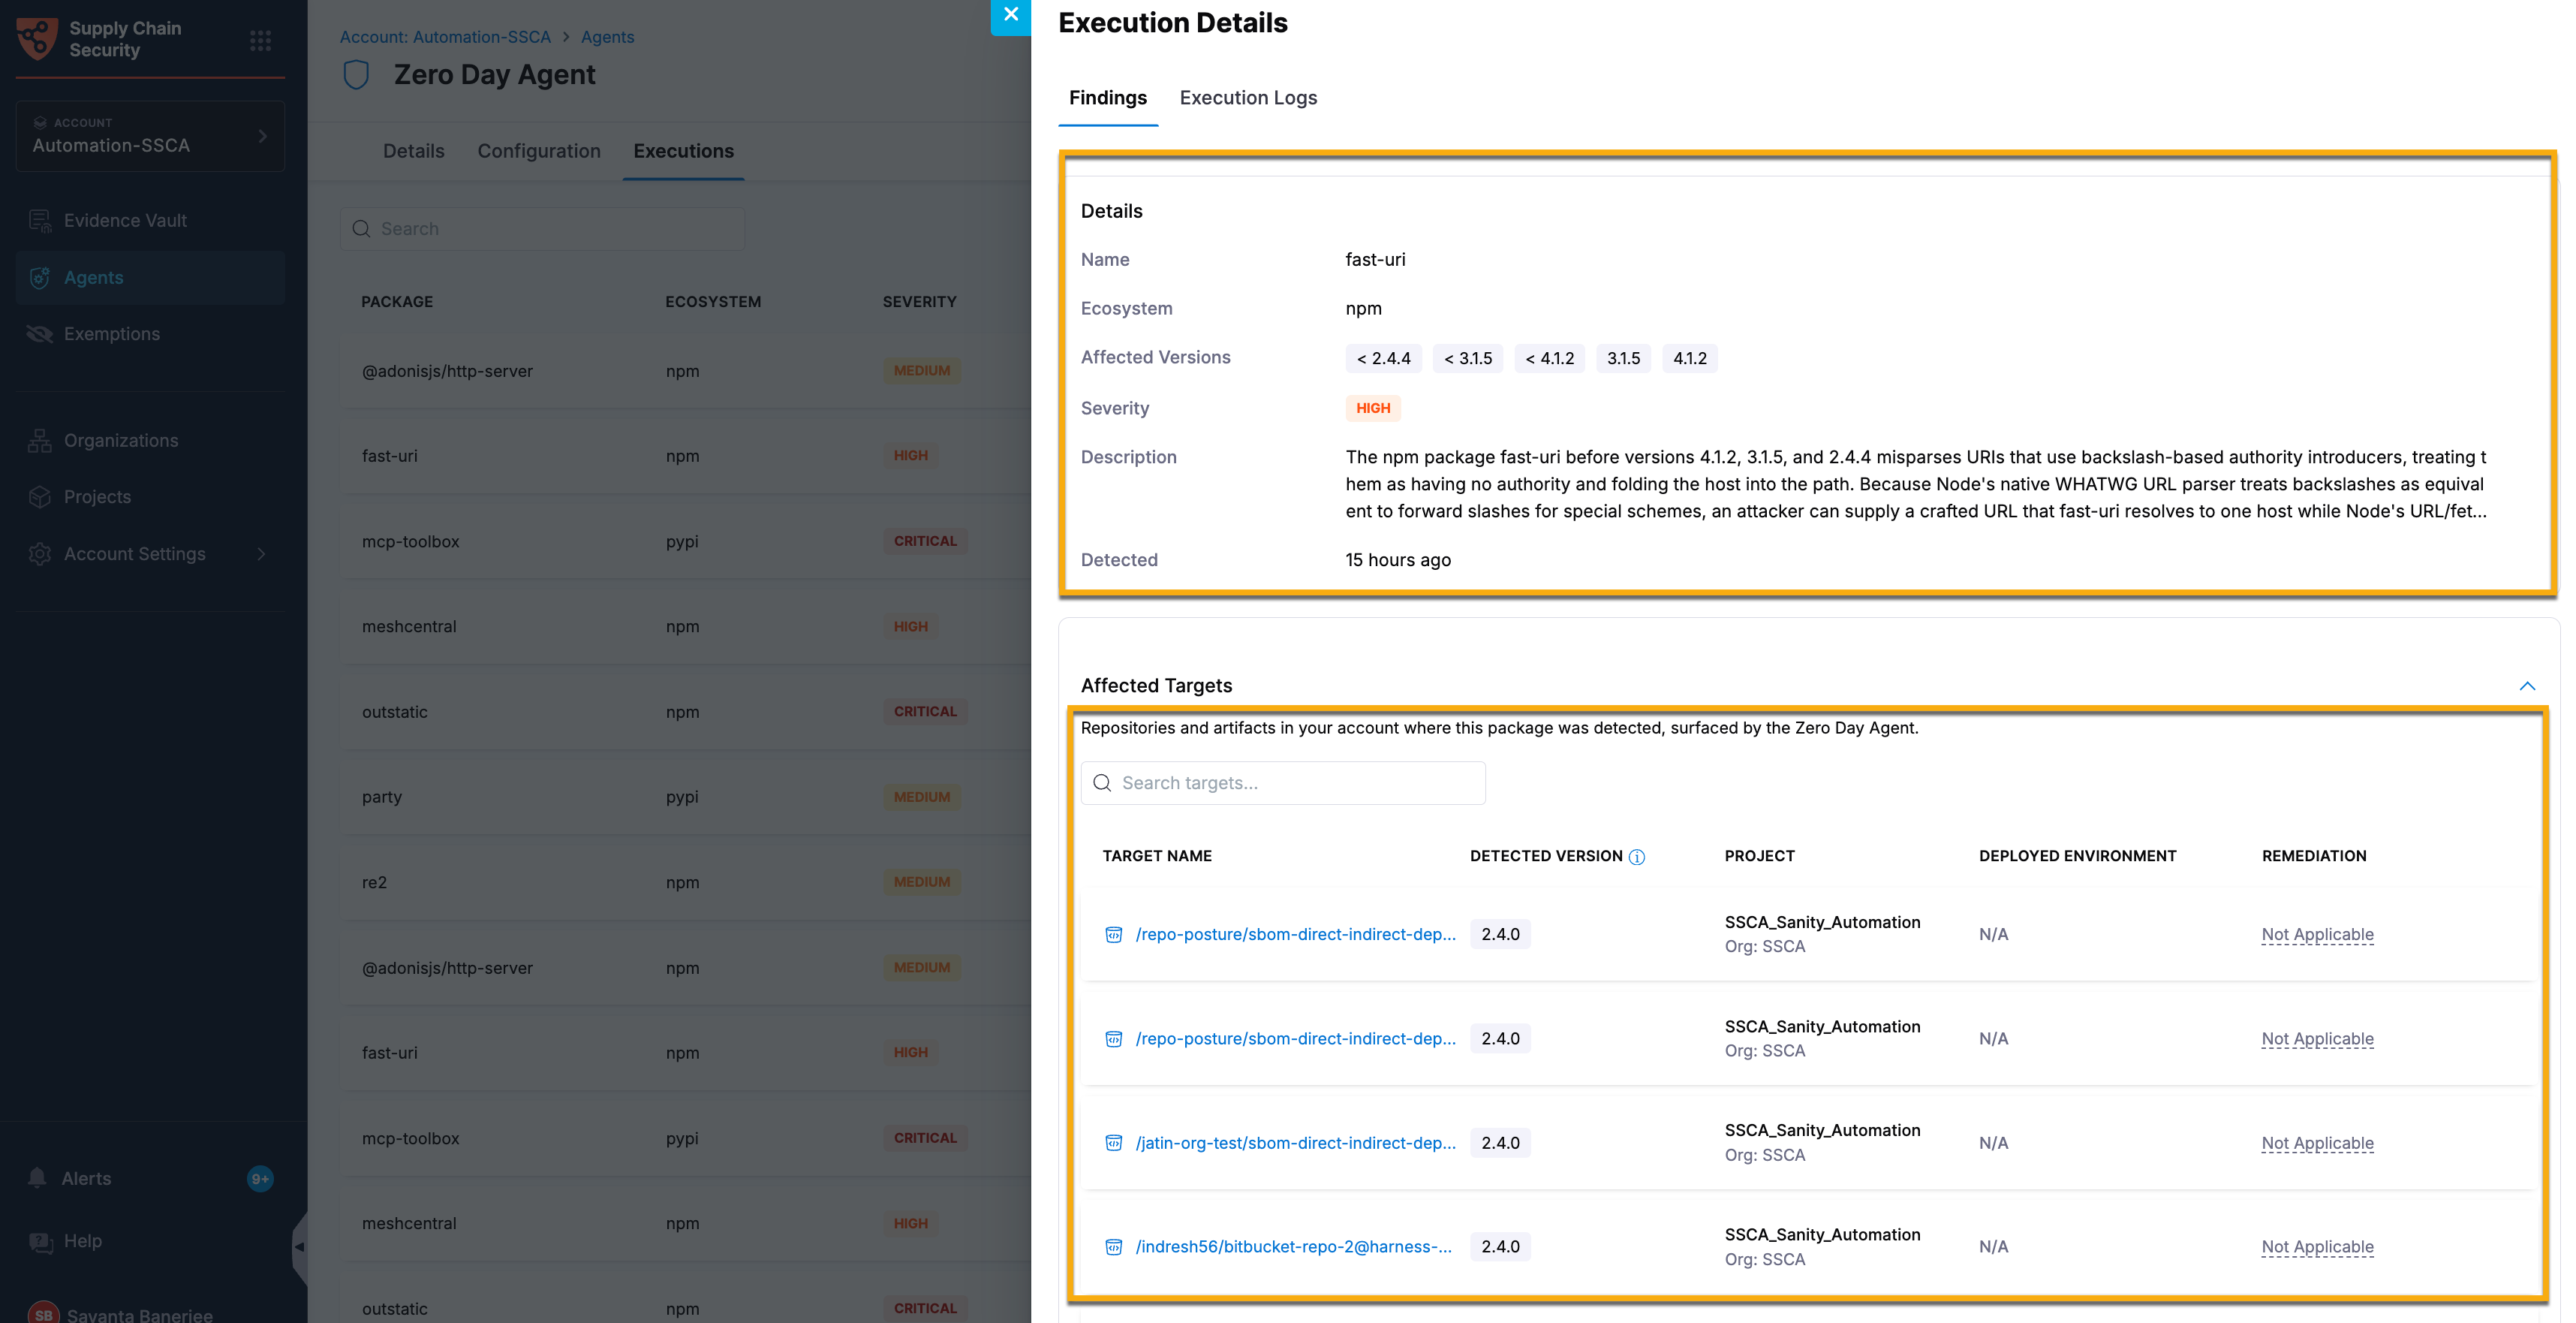
Click a package row to open the Execution Details side panel. The Findings tab opens by default.
-
In the Details section, review the package details including the name, ecosystem, affected versions, severity, description with the associated CVE, and detection time.
-
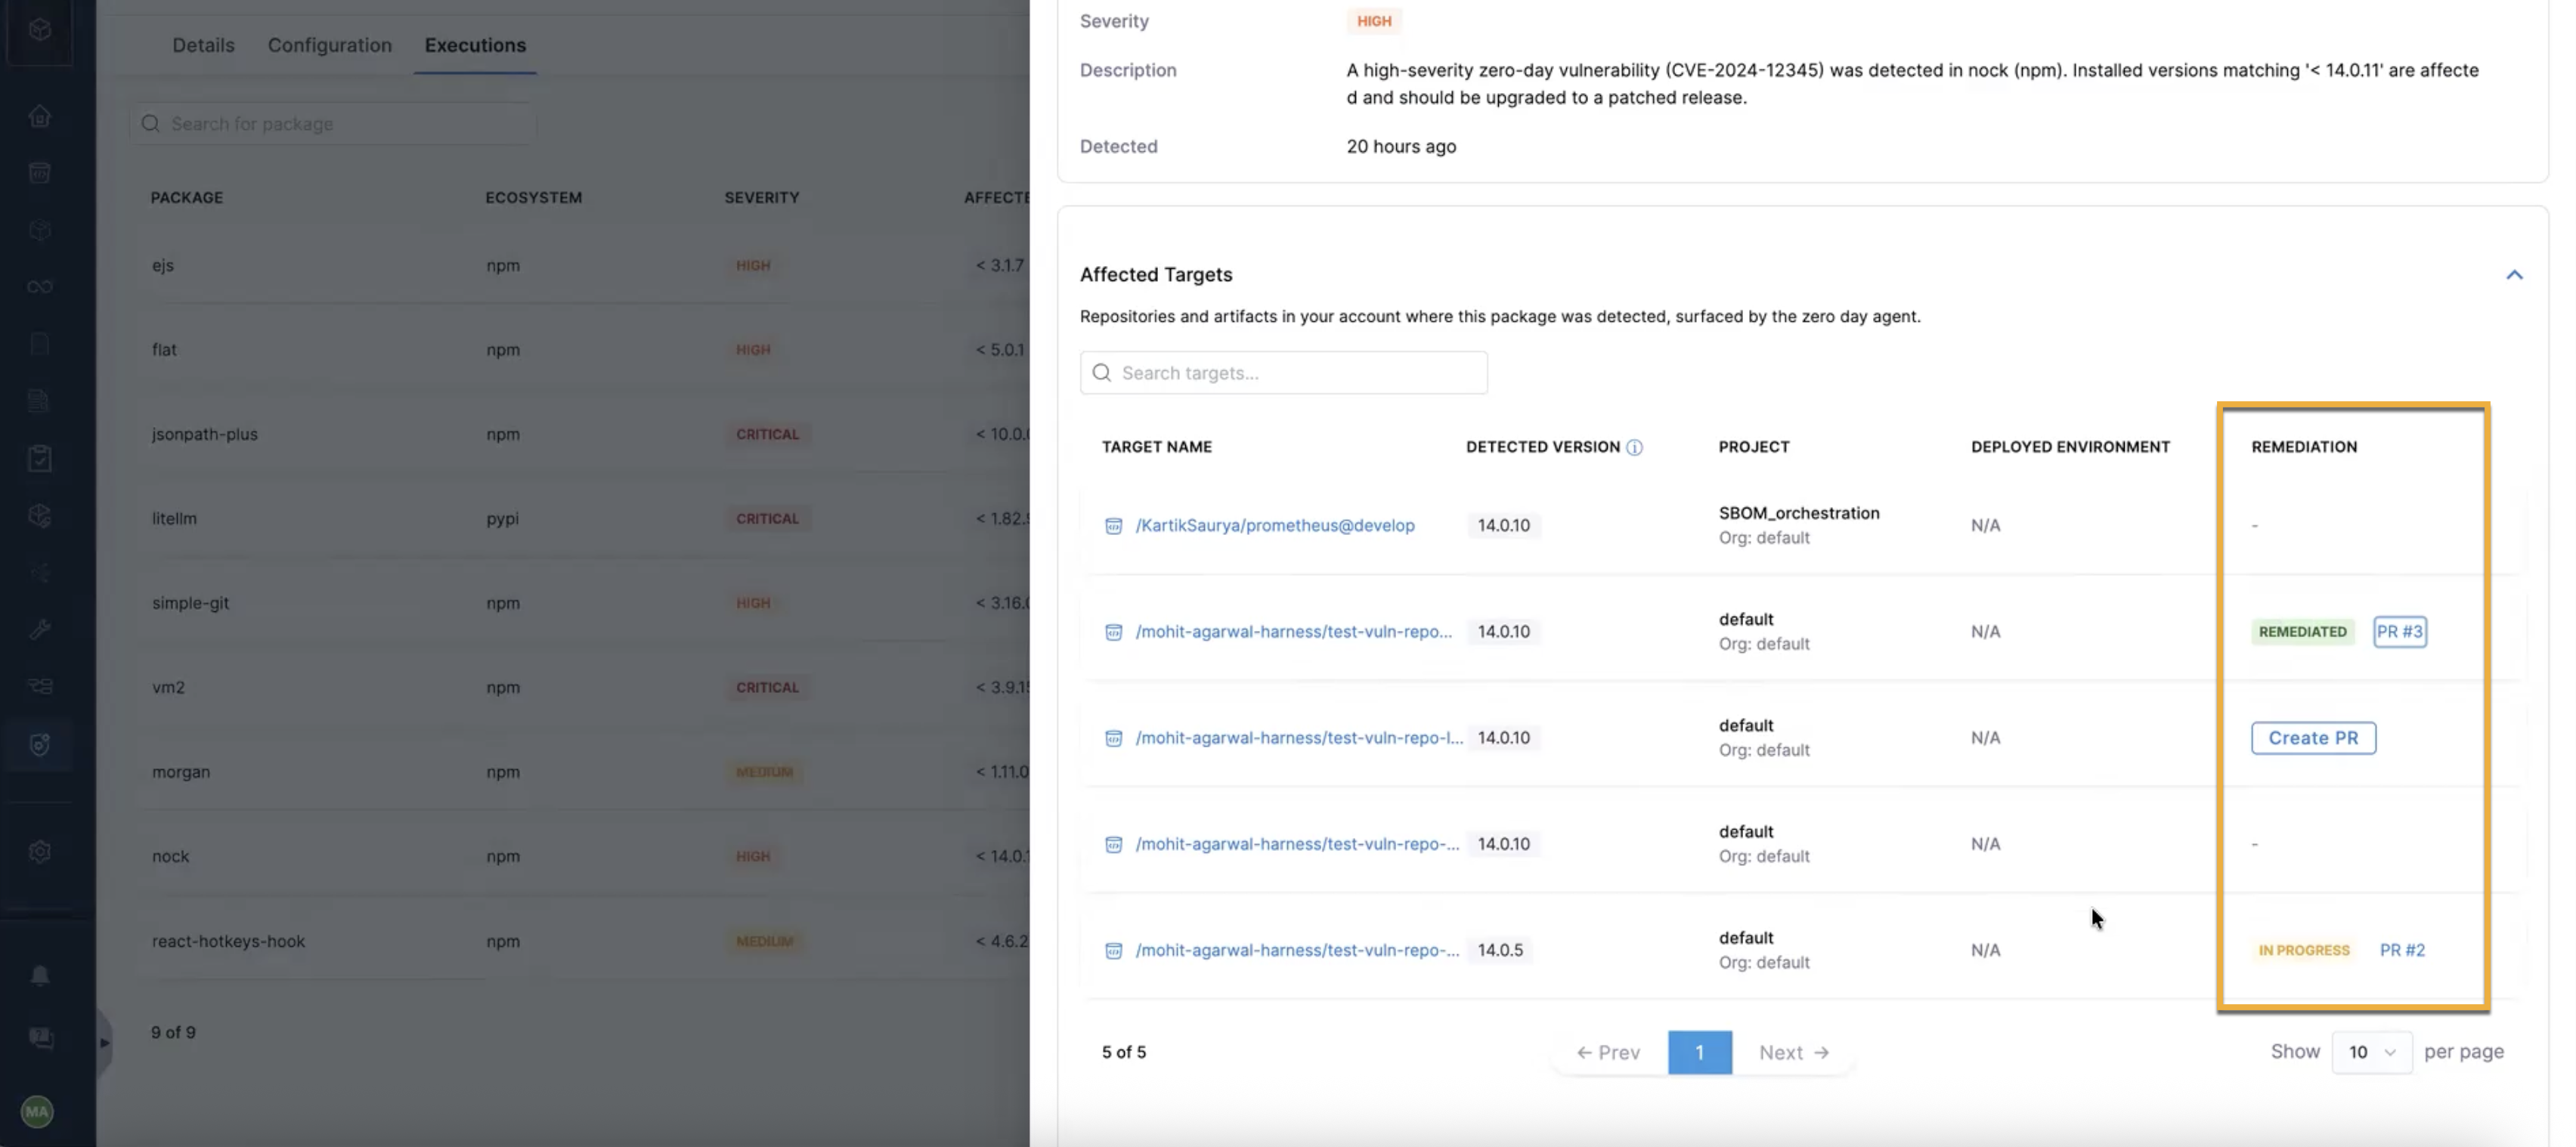
In the Affected Targets section, review the repositories and artifacts where the package was detected, along with the detected version, project, deployed environment, and the current remediation status.
noteThe Zero Day Agent identifies packages across your account. At the Account scope, the Affected Targets section displays all affected repositories and artifacts. At the Project scope, it displays only the repositories and artifacts associated with the selected project.
-
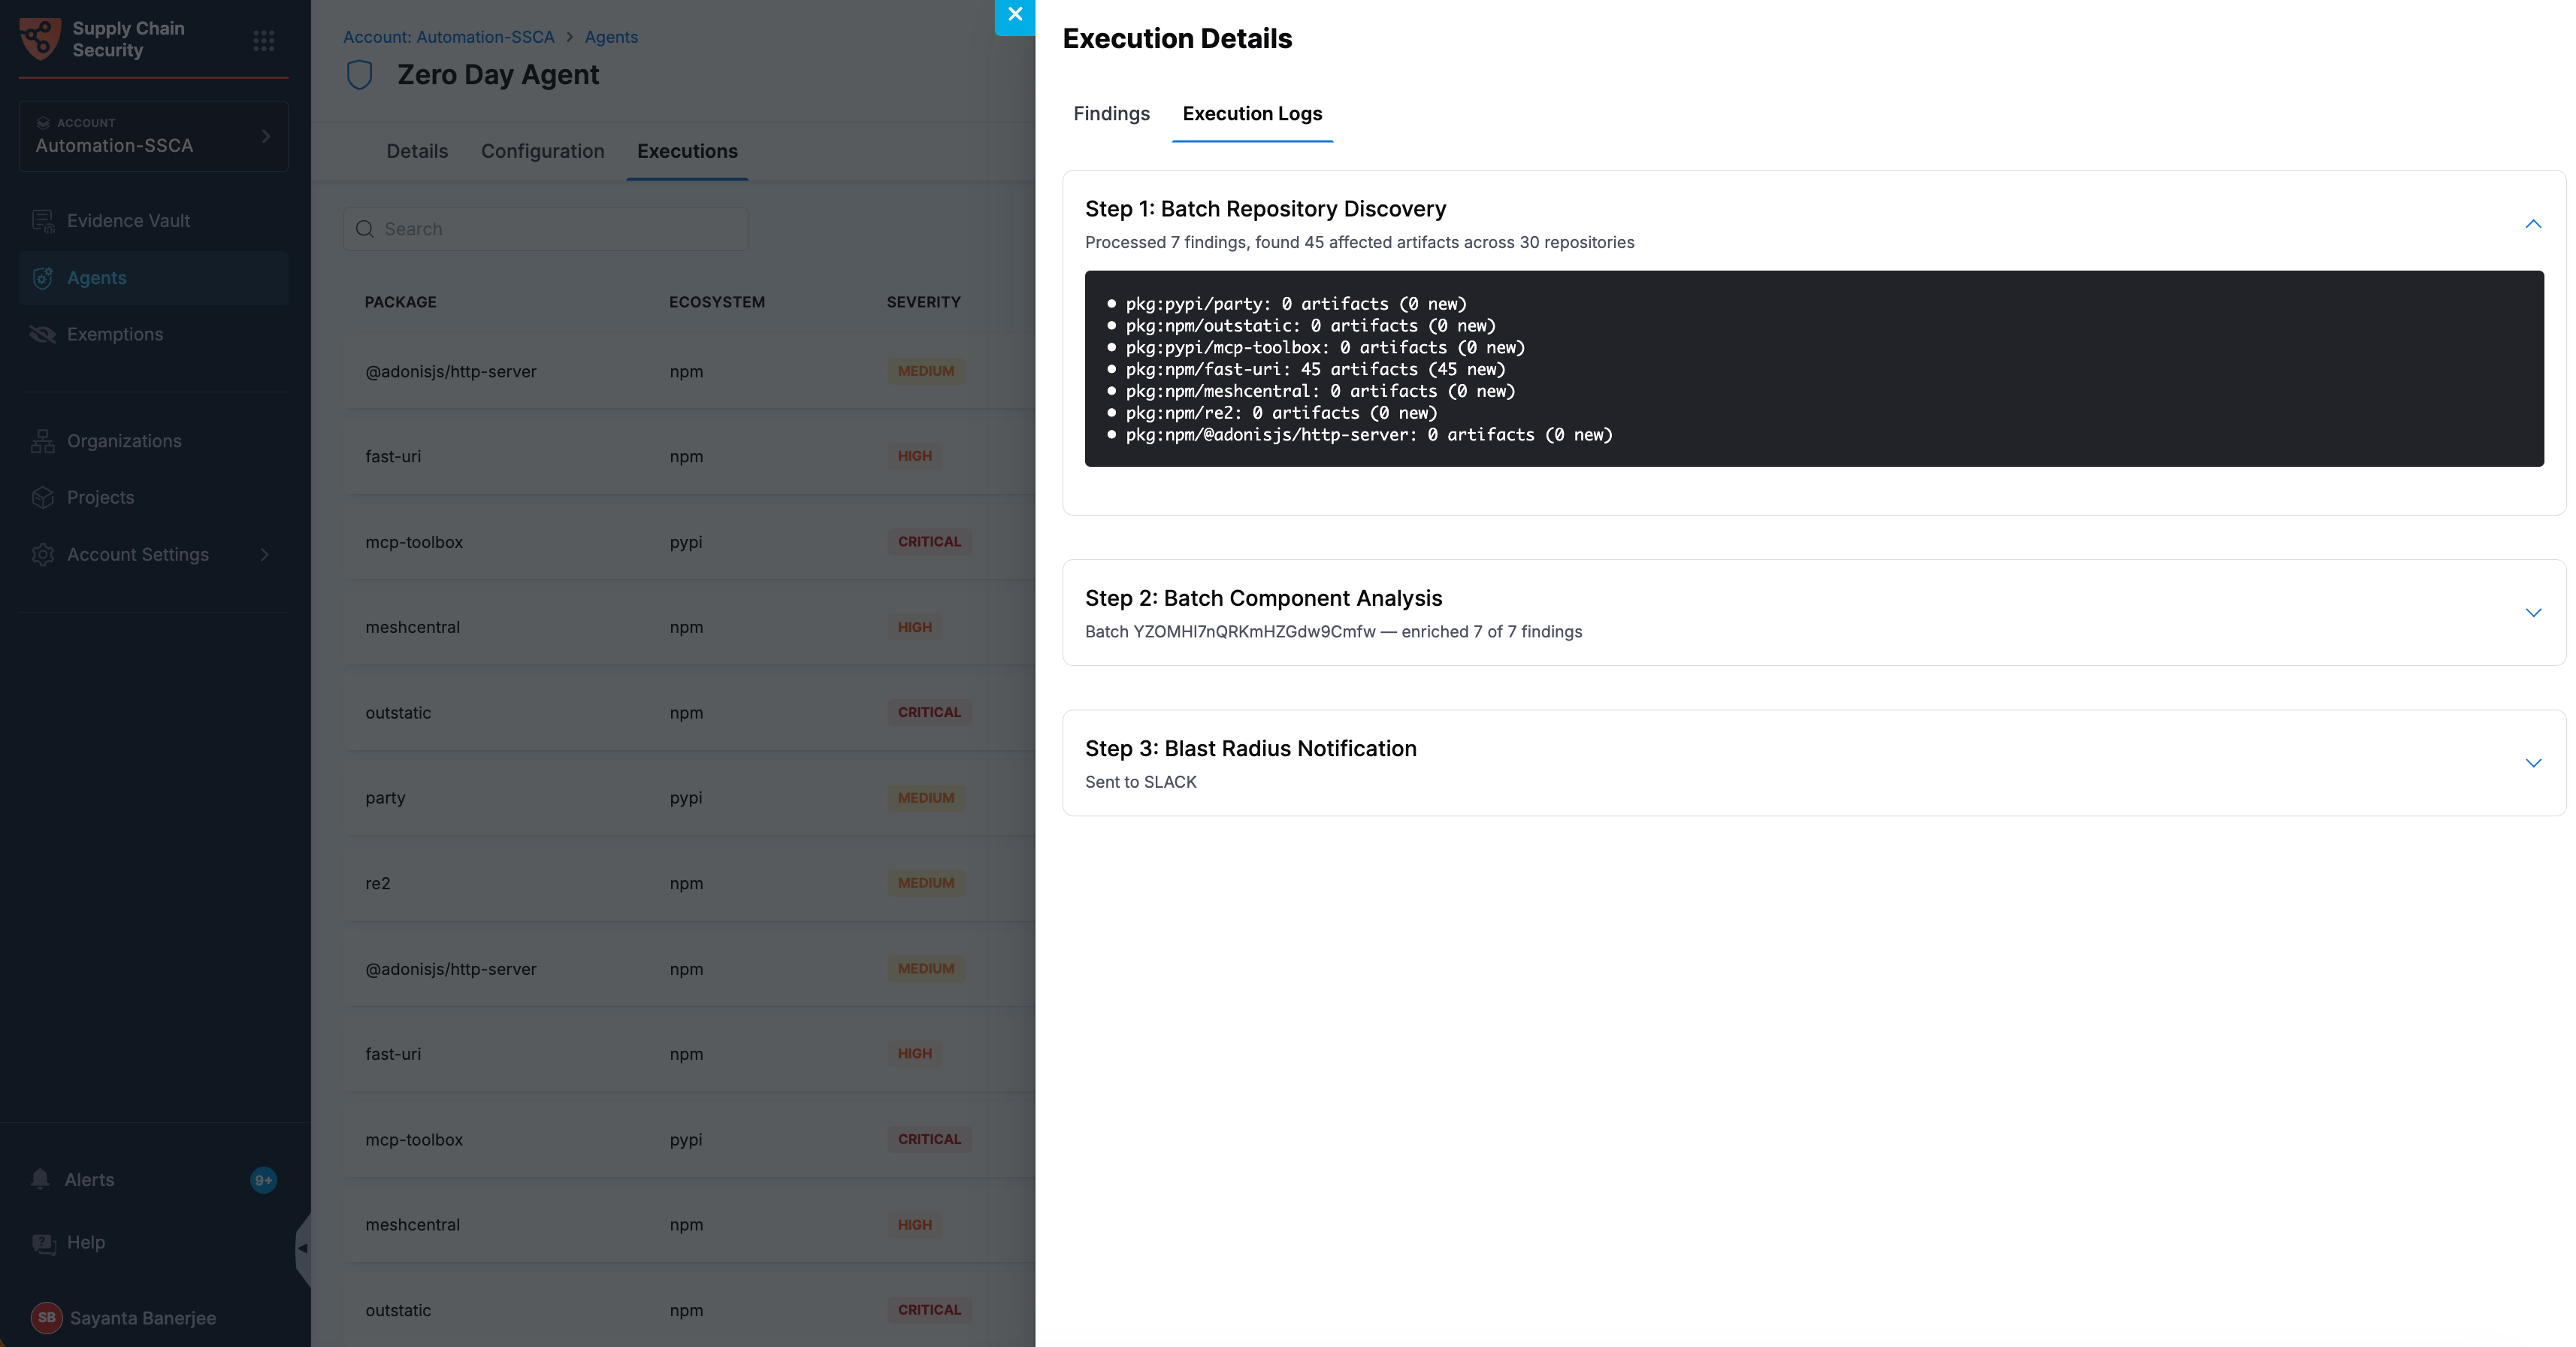
Select the Execution Logs tab to view the step-by-step run details, including repository discovery, component analysis, and notification steps.
Expand each step to view the actions performed by the agent and the output generated during the execution.- Expand the Step 1: Batch Repository Discovery card to review the repositories and artifacts where the affected packages were detected.
- Expand the Step 2: Batch Component Analysis card to review the analysis for each affected package, including package details, dependency footprint, security relevance, and a summary of the analyzed findings.
- Expand the Step 3: Blast Radius Notification card to review the notification generated by the agent, including the affected packages, impacted repositories and artifacts, severity, and notification details.
Remediate an affected package
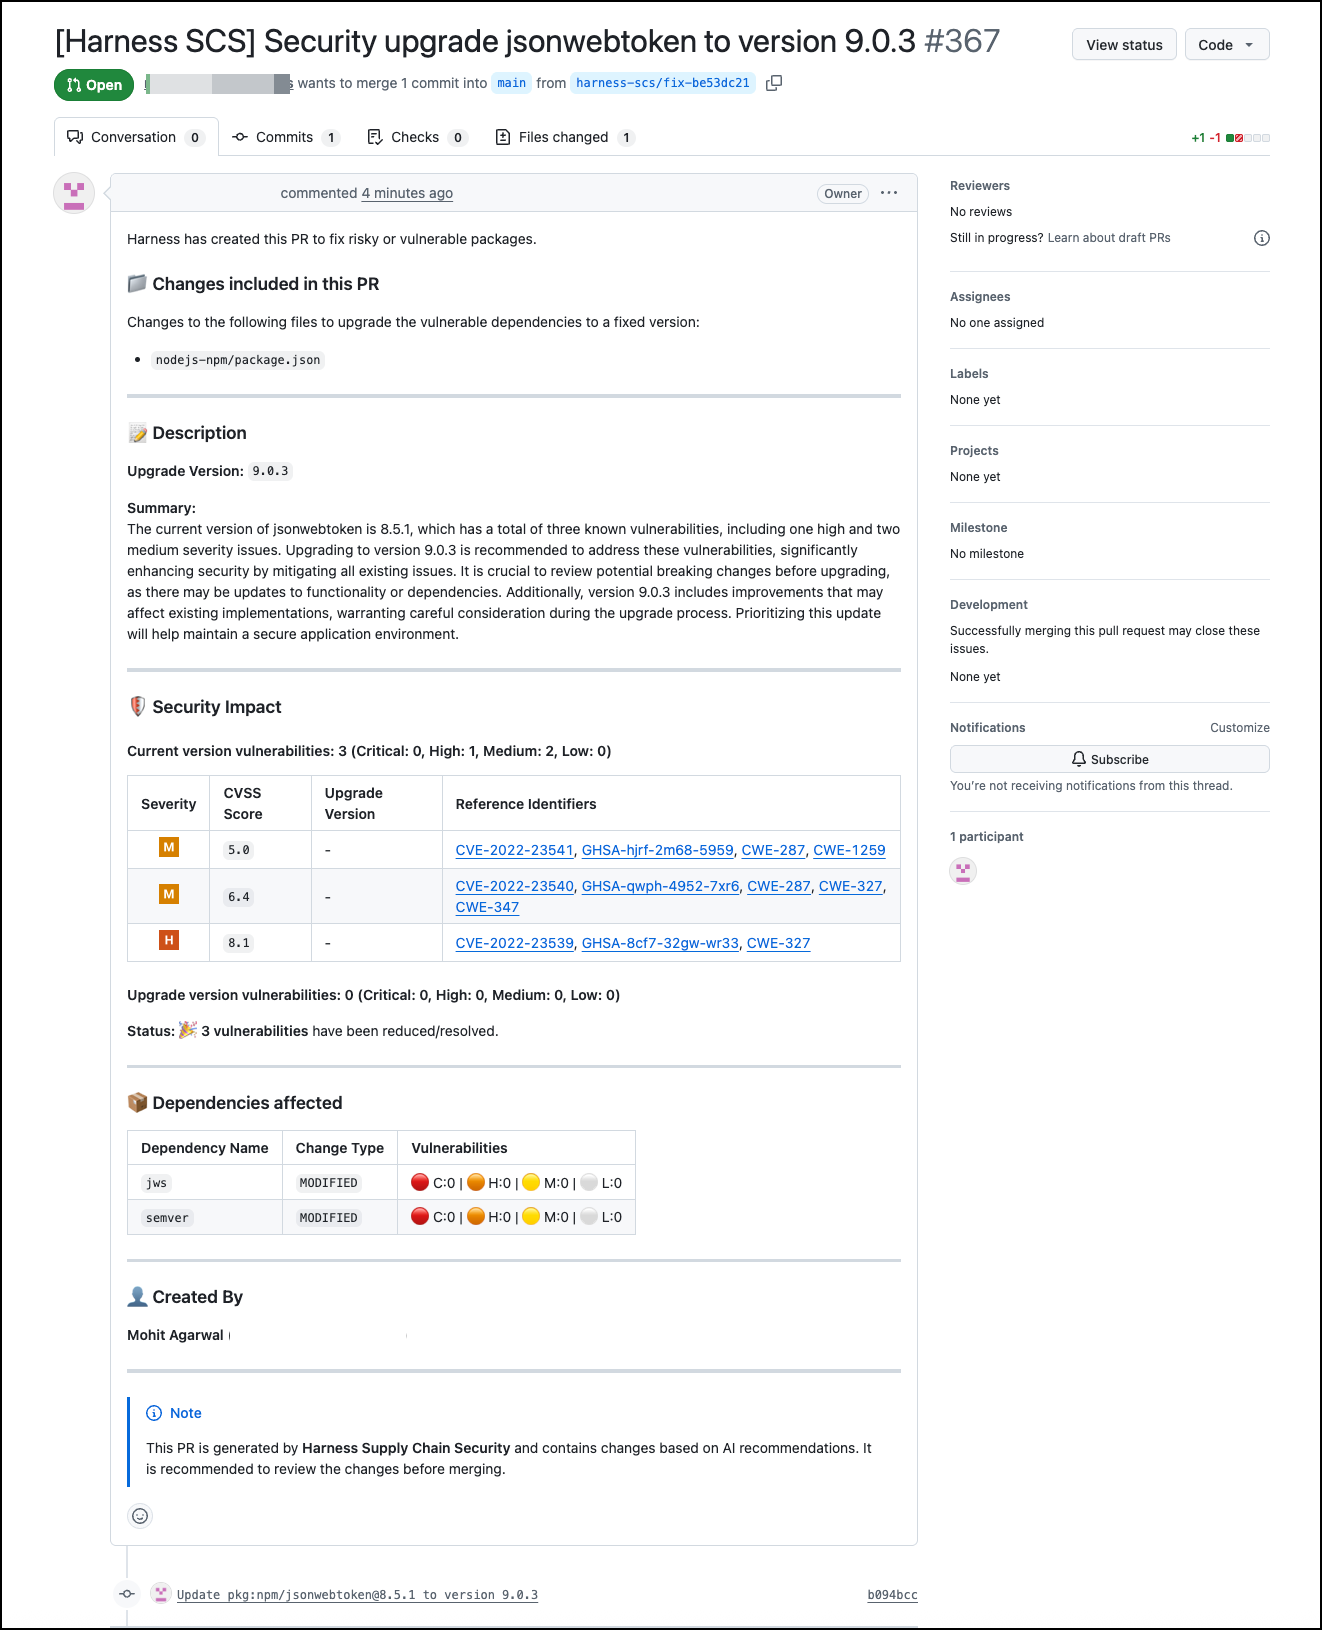
After reviewing the affected packages, you can remediate a package by creating a pull request with the recommended dependency update for an affected repository.
Creating remediation pull requests is currently supported only for direct dependencies. Remediation pull requests are not supported for indirect dependencies or artifacts.
To create remediation pull requests, complete the following steps:
-
Navigate to the Agents page under the Manage section from the sidebar navigation of your SCS account.
-
Click the Zero-Day Agent card to open the agent. The Details tab opens by default.
-
Select the Executions tab to open the table of affected packages.
-
Click a package row to open the Execution Details side panel. The Findings tab opens by default.
-
In the Affected Targets section, review the repositories where the detected package can be remediated.
-
In the Remediation column, click the
Create PRbutton to open a remediation pull request that updates the affected package manifest to the fixed version.-
Targets with an open pull request show its status (for example, IN PROGRESS) and a link to the pull request.
-
Targets with a merged pull request show its status (for example, REMEDIATED) and a link to the pull request.
-
-
Open the generated pull request from the Remediation column to review the change before merging.
Next steps
- OSS Risks Remediation - Remediate detected open-source software (OSS) risks across your repositories and artifacts to strengthen your software supply chain security.
- Direct/Indirect Dependency - Learn how direct and indirect dependencies affect OSS risk remediation and how to filter SBOM dependencies by dependency type.