Signing the Artifact
Protect your software supply chain by safeguarding your artifacts from being compromised. Attackers may attempt to inject malicious code into your artifacts, aiming to tamper with your software supply chain. One of the primary goals of attackers is to get you to deploy compromised (or "poisoned") artifacts into your environments. In the worst-case scenario, your deployments could become a distribution channel for these poisoned artifacts, putting your customers and users at risk.
As artifacts pass through multiple stages in the software lifecycle, ensuring they remain secure and untampered is critical. Artifact signing provides a reliable way to guarantee that the artifact built at one stage is the exact same artifact consumed or deployed at the next, with no chance of compromise. This process builds trust, ensures integrity, and strengthens the security of your software supply chain.
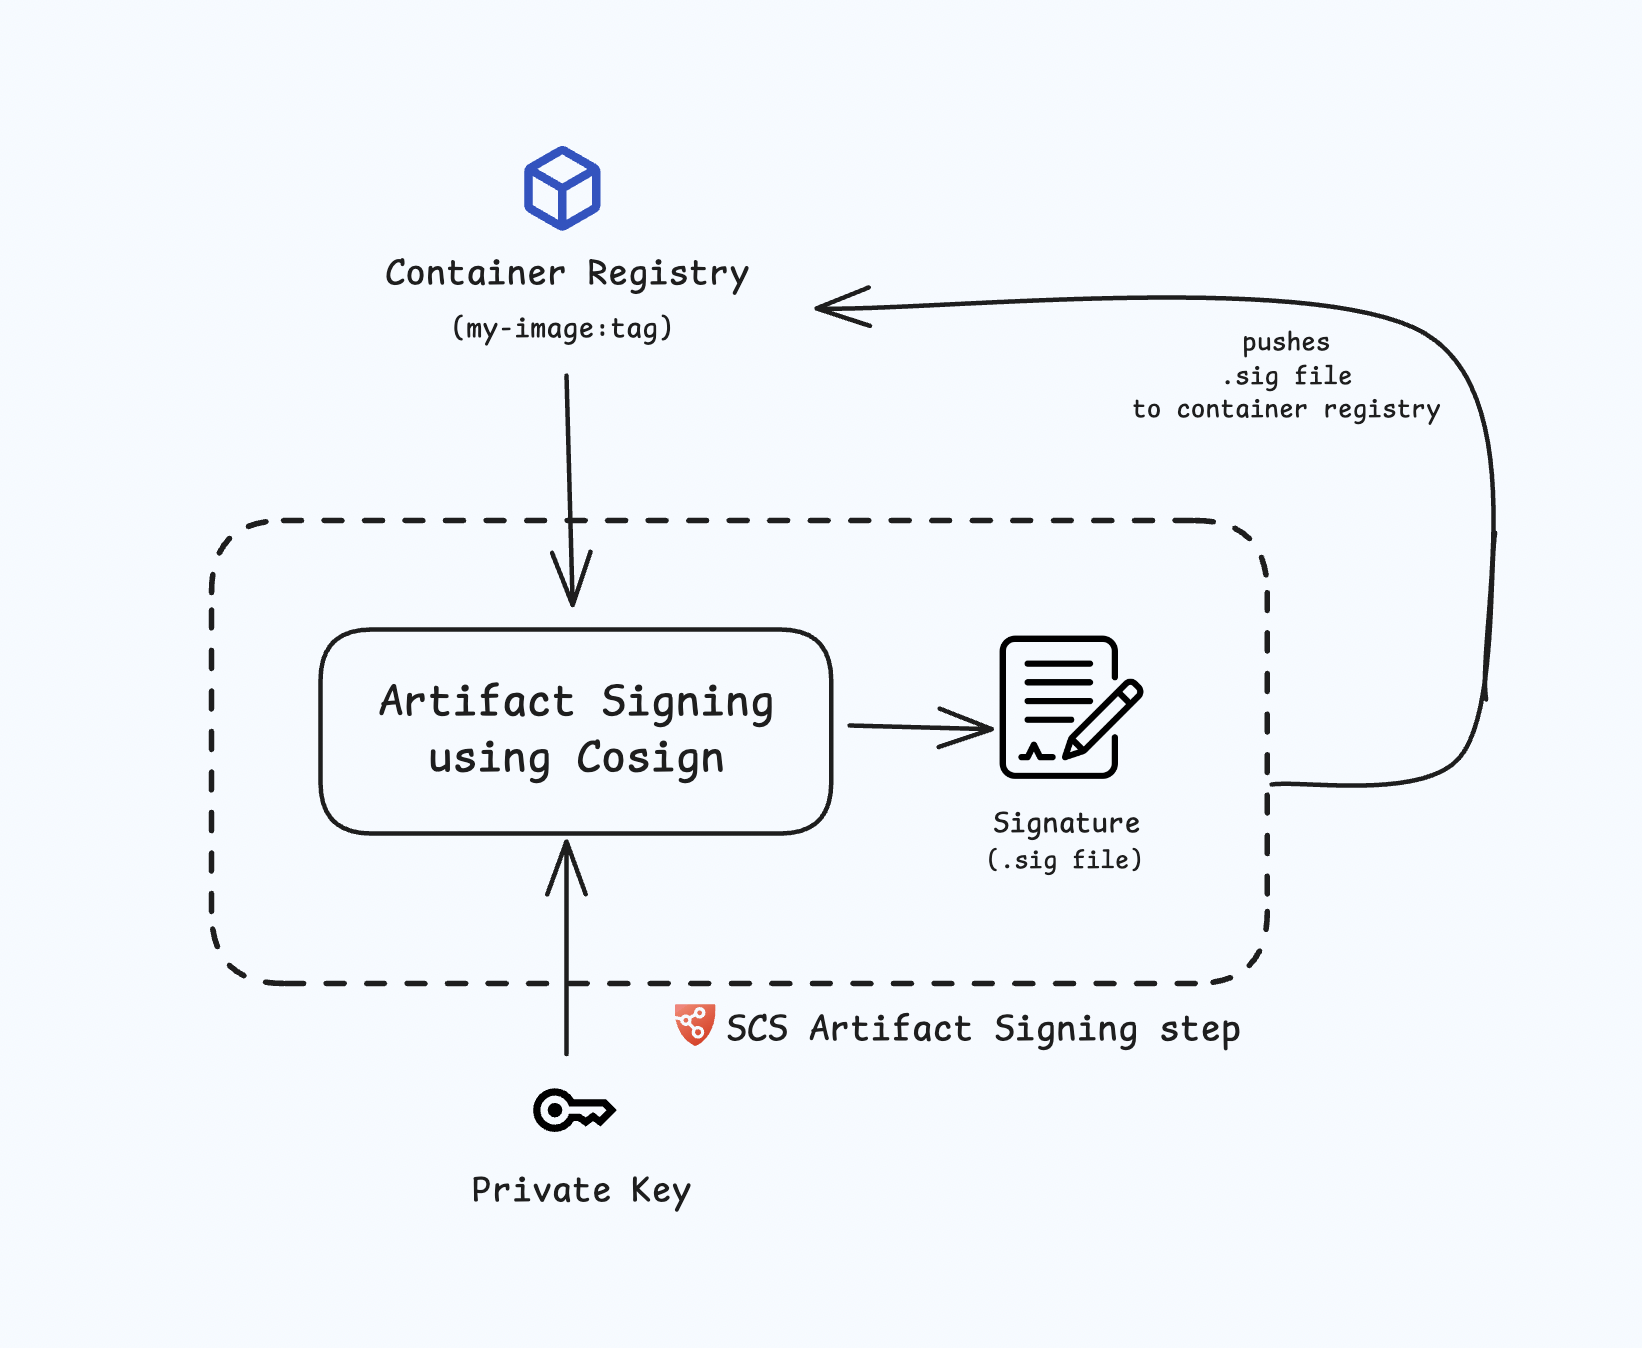
Artifact Signing Process in SCS
In the Artifact Signing step, artifact is pulled from the container registry and it is digitally signed using Cosign with a private key pair. After you sign the artifact the .sig file is then pushed back to the same container registry, ensuring the integrity and authenticity of the artifact throughout the software supply chain.

Artifact Signing step configuration
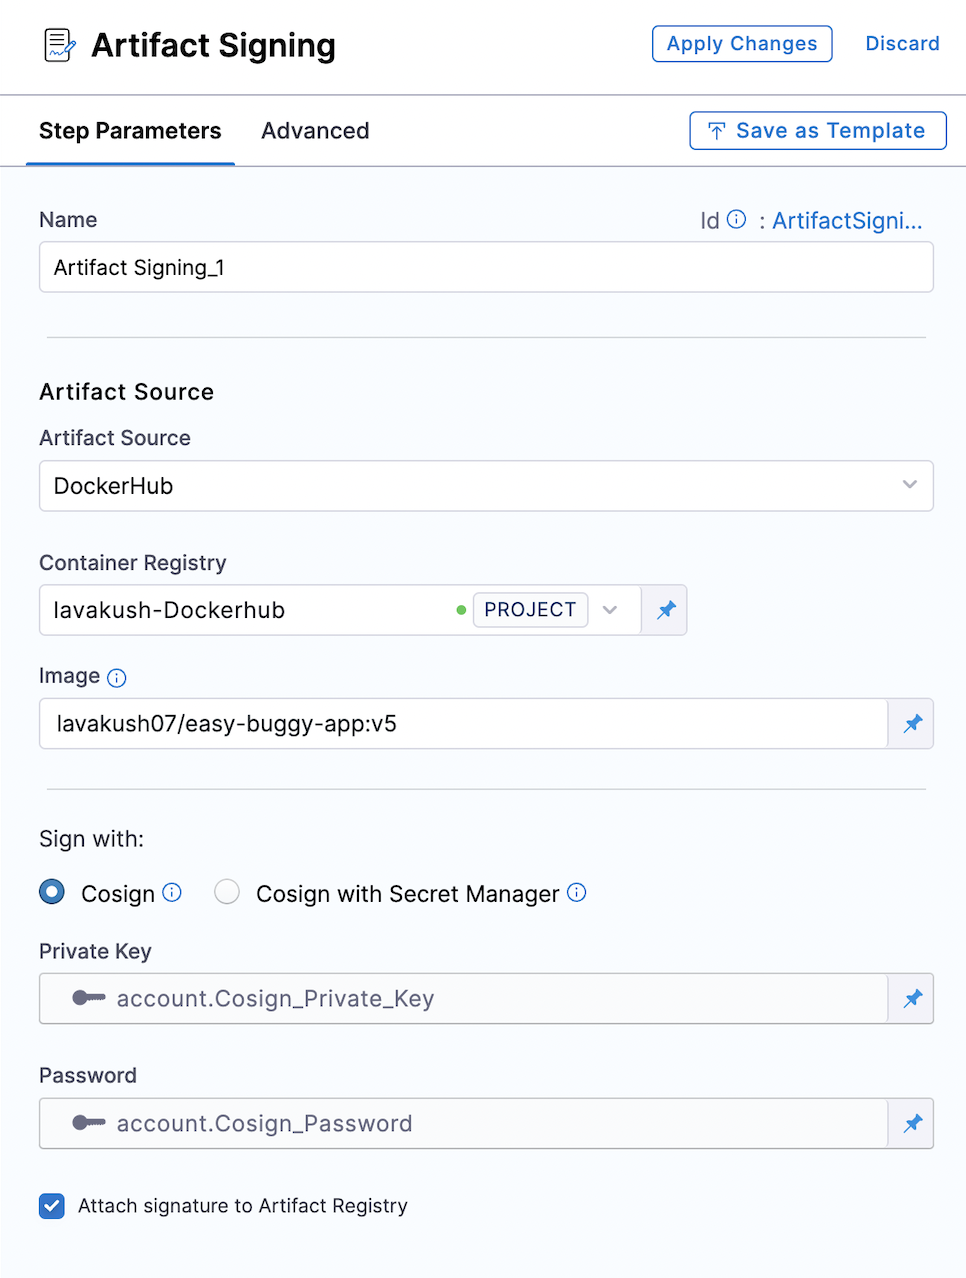
The Artifact Signing step enables you to sign your artifacts and optionally you can push the signature as a .sig file to the same artifact registry from which it was pulled.
Follow the instructions below to configure the Artifact Signing step.
-
Name: Provide a name for the signing step.
-
Artifact Source: Select the source container registry (e.g., DockerHub, ACR, GCR, ECR, etc.).
- DockerHub
- ECR
- GCR
- ACR
- GAR
-
Container Registry: Select the Docker Registry connector that is configured for the DockerHub container registry where the artifact is stored.
-
Image: Enter the name of your image using a tag or digest, example
my-docker-org/repo-name:tagor you can use the digestmy-docker-org/repo-name@sha256:<digest>
-
Container Registry: Select the Docker Registry connector that is configured for the Elastic container registry where the artifact is stored.
-
Image: Enter the name of your image using a tag or digest, example
my-docker-repo/my-artifact:tagor you can use the digestmy-docker-repo/my-artifact@sha256:<digest> -
Artifact Digest: Specify the digest of your artifact. After building your image using the Build and Push step or a Run step, save the digest in a variable. You can then reference it here using a Harness expression. Refer to the workflows described below for detailed guidance.
-
Region: The geographical location of your ECR repository, example
us-east-1 -
Account ID: The unique identifier associated with your AWS account.
-
Container Registry: Select the Docker Registry connector that is configured for the Google container registry where the artifact is stored.
-
Image: Enter the name of your image using a tag or digest, example
my-image:tagor you can use digestmy-image@sha256:<digest> -
Artifact Digest: Specify the digest of your artifact. After building your image using the Build and Push step or a Run step, save the digest in a variable. You can then reference it here using a Harness expression. Refer to the workflows described below for detailed guidance.
-
Host: Enter your GCR Host name. The Host name is regional-based. For instance, a common Host name is
gcr.io, which serves as a multi-regional hostname for the United States. -
Project ID: Enter the unique identifier of your Google Cloud Project. The Project-ID is a distinctive string that identifies your project across Google Cloud services. example:
my-gcp-project
-
Container Registry: Select the Docker Registry connector that is configured for the Azure container registry where the artifact is stored.
-
Image: Enter your image details in the format
<registry-login-server>/<repository>. The<registry-login-server>is a fully qualified name of your Azure Container Registry. It typically follows the format<registry-name>.azurecr.io, where<registry-name>is the name you have given to your container registry instance in Azure. Example input:automate.azurecr.io/<my-repo>:tagor you can use digestautomate.azurecr.io/<my-repo>@sha256:<digest> -
Artifact Digest: Specify the digest of your artifact. After building your image using the Build and Push step or a Run step, save the digest in a variable. You can then reference it here using a Harness expression. Refer to the workflows described below for detailed guidance.
-
Subscription Id: Enter the unique identifier that is associated with your Azure subscription.
-
Container Registry: Select the Docker Registry connector that is configured for the Google container registry where the artifact is stored.
-
Image:: Enter the name of your image using tag or digest, example
repository-name/image:tagor you can use digestrepository-name/image:digest. -
Artifact Digest: Specify the digest of your artifact. After building your image using the Build and Push step or a Run step, save the digest in a variable. You can then reference it here using a Harness expression. Refer to the workflows described below for detailed guidance.
-
Host: Enter your GAR Host name. The Host name is regional-based. For example,
us-east1-docker.pkg.dev. -
Project ID: Enter the unique identifier of your Google Cloud Project. The Project-ID is a distinctive string that identifies your project across Google Cloud services. example:
my-gcp-project
You can securely sign the artifacts using Cosign or Cosign with Secret Manager
- Cosign
- Cosign with Secret Manager
To perform Artifact Signing with Cosign selected, you need a key pair. Follow the instructions below to generate the key pair. To perform the attestation process, you need to input the private key and password. Use Cosign to generate the keys in the ecdsa-p256 format. Here’s how to generate them:Generate key pairs using Cosign for Artifact Signing
cosign generate-key-pair to generate the key pairs..key file and a public key as a .pub file. To securely store these files, use Harness file secret.
- Private Key: Input your Private key from the Harness file secret.
- Password: Input your Password for the Private key from the Harness file secret.
In this mode, you can pass your Cosign keys using a Secret Manager. Currently, SCS supports only the HashiCorp Vault secret manager. You can connect your Vault with Harness using the Harness HashiCorp Vault connector. Here are the key points to consider when connecting your Vault:
Ensure your Harness delegate is version 24.11.84200 or higher. Upgrade if you're using an older version to enable this feature.
- Enable the Transit Secrets Engine on your HashiCorp Vault. This is essential for key management and cryptographic operations.
- Configure your HashiCorp Vault connector using the following authentication methods AppRole, Token or Vault Agent.
- Create a Cosign key pair of type
ecdsa-p256in the Transit Secrets Engine. You can do this in two ways:- CLI: Run the command:
vault write -f <transit_name>/<key_name> type=ecdsa-p256 - Vault UI: Create the key pair directly from the Vault interface.
- CLI: Run the command:
- Ensure the Vault token generated has the required policy applied for Cosign to perform attestation operations.
Configure the following fields in the step to perform the attestation
- Connector: Select the HashiCorp Vault connector.
- Key: Enter the path to the Transit Secrets Engine in your HashiCorp Vault where the keys are stored.

Attach Signature to Artifact Registry (Optional): By default, this option is unchecked which means the signature will not be uploaded to the artifact registry and checking this option will push the signature as a .sig file to the registry.
View Signed Artifacts
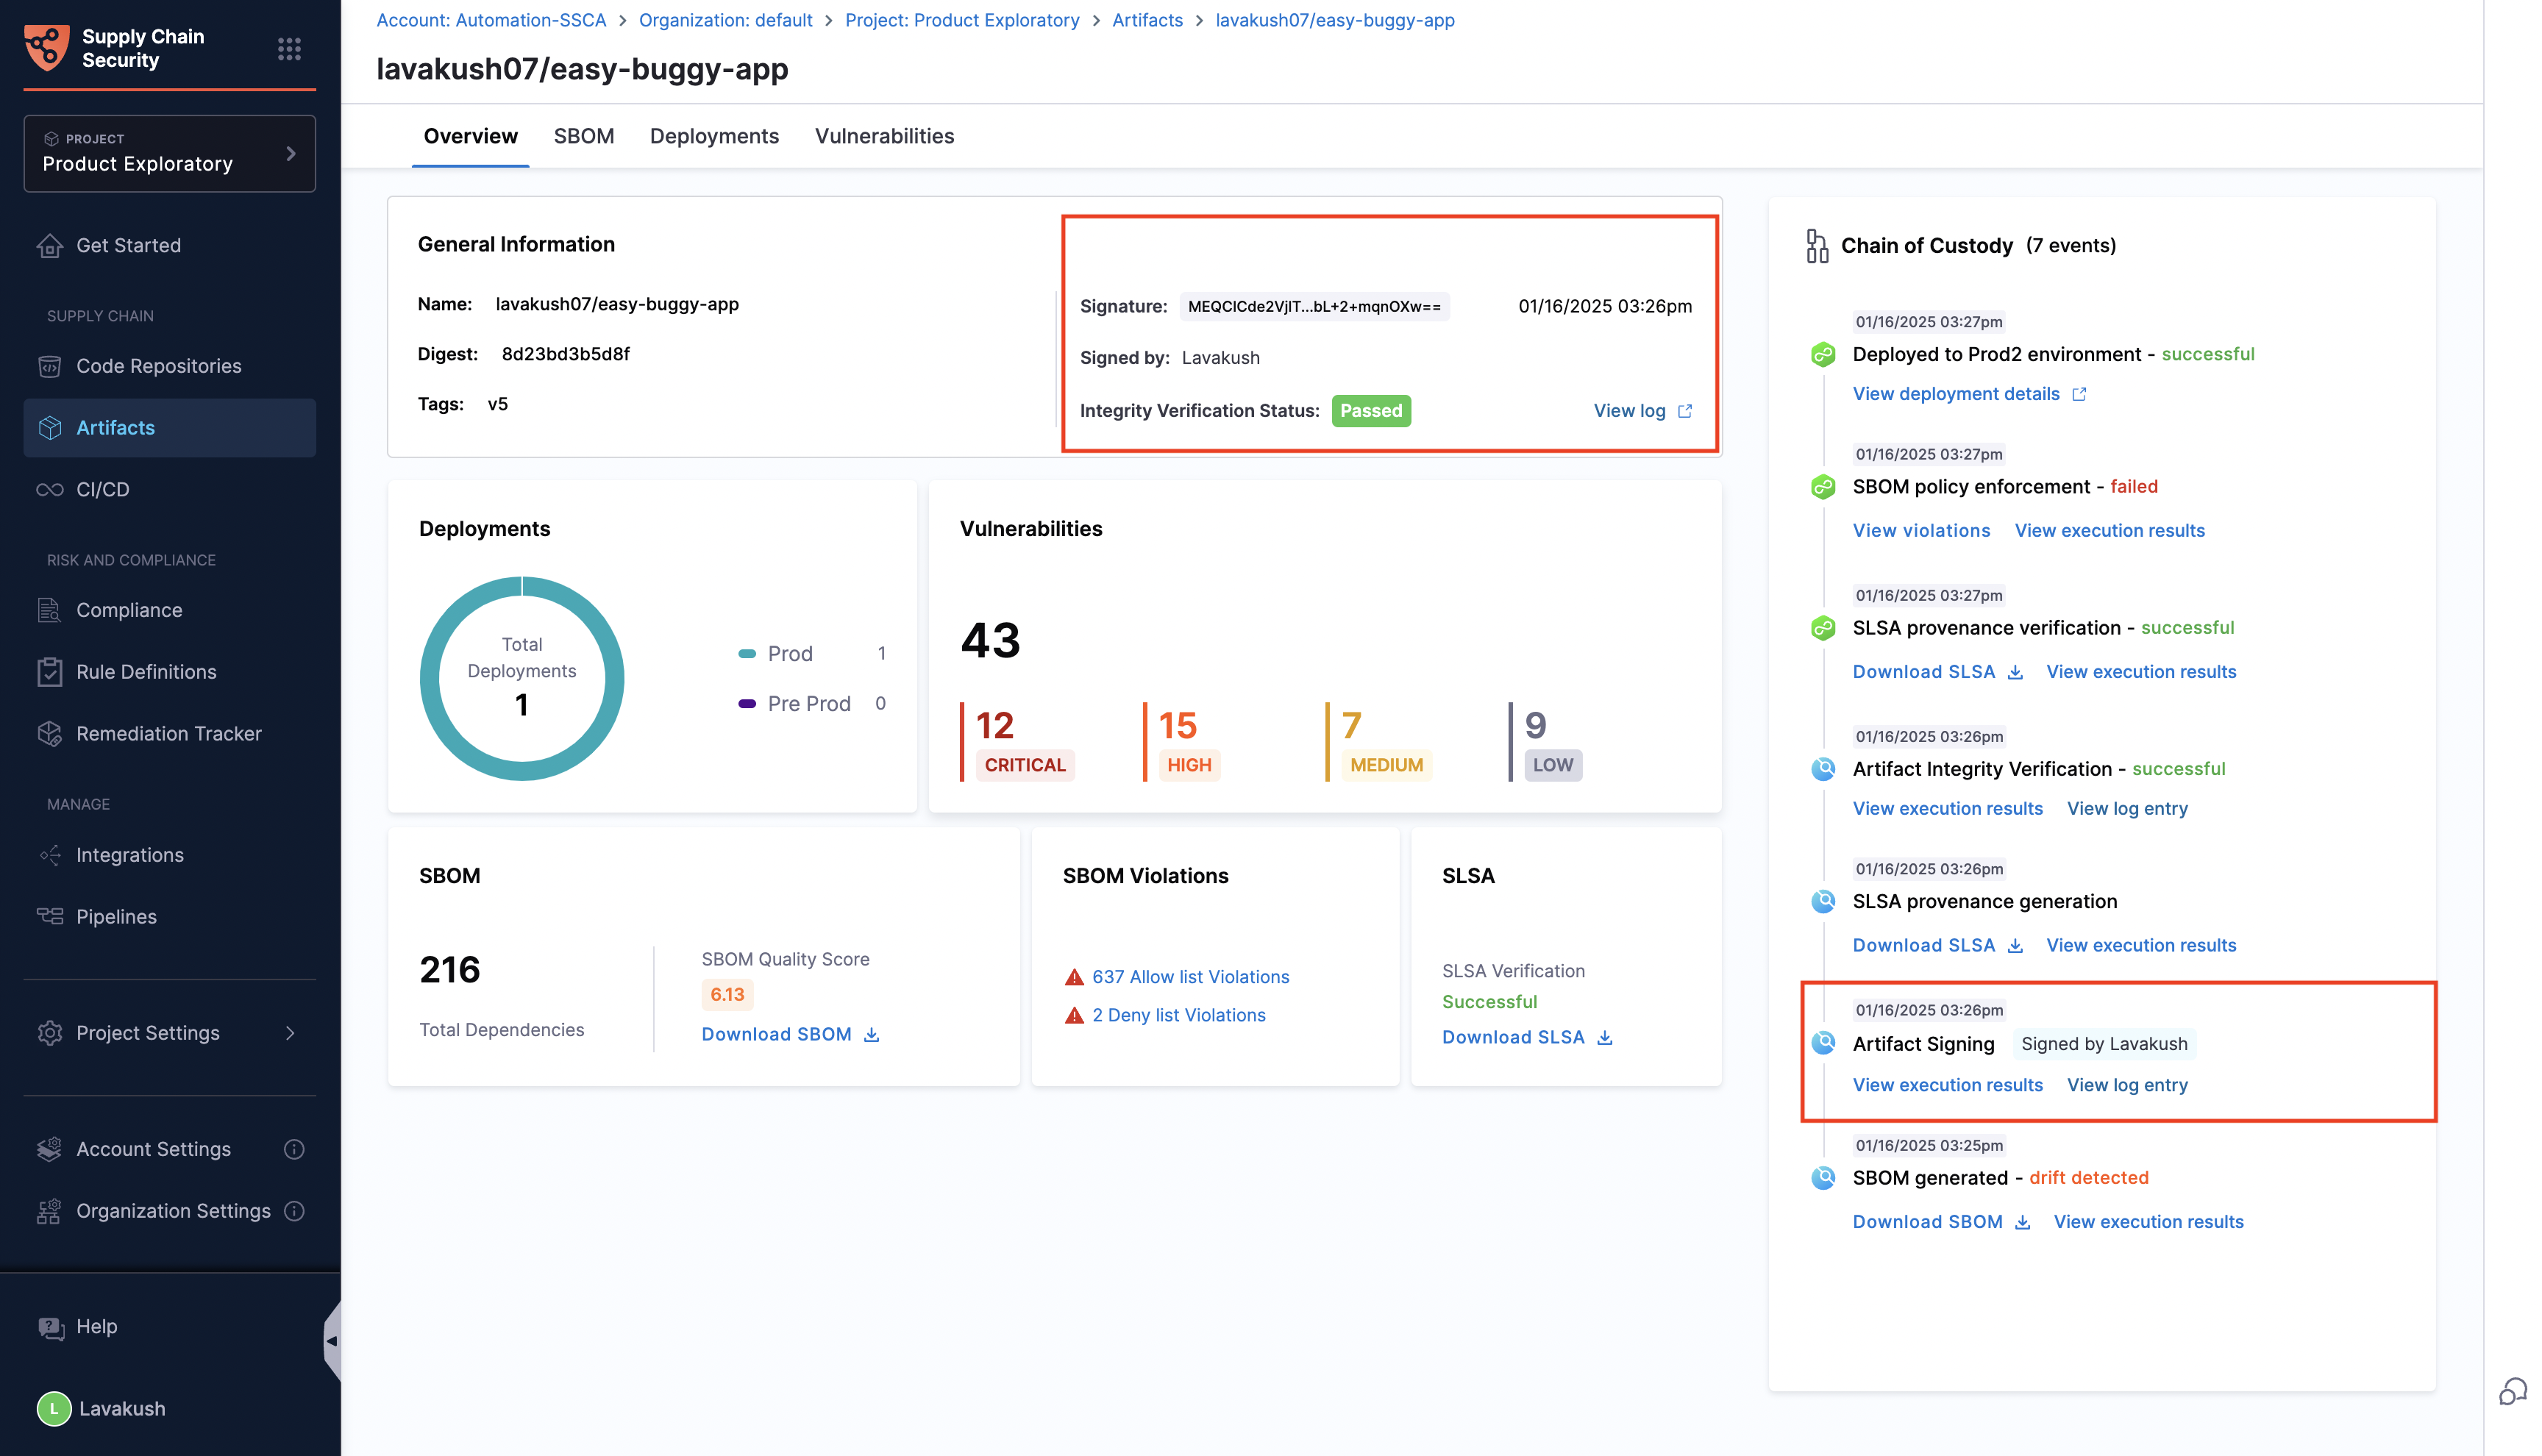
You can easily access the signed artifact details from the Artifacts Overview tab.This section shows the signature and who signed the artifact. Additionally you can also verify the artifact signing details in the Chain of Custody, where a new entry is logged every time you sign an artifact. This entry includes a link to the execution results and rekor log entry, allowing you to track the signing activity and cross-check the details.

You are allowed to re-sign the same image multiple times, with each new signing overwriting the previous one. The Artifacts Overview tab will always display the most up-to-date signing details, reflecting the latest signature information for the artifact.
Example Pipeline For Artifact Signing
This example demonstrates how to implement artifact signing in the Build stage of the pipeline.
At present, Harness does not support artifact signing in the deployment stage, However this is part of our roadmap.
This example Build stage has two steps:
-
Build and Push an Image to Docker Registry: This process pulls the code, build the image and push it to a Docker registry (e.g., DockerHub, ACR, GCR, etc.).
-
Artifact Signing: Pulls the artifact from the registry and signs it with a private key pair and pushes the .sig file back to the artifact registry.

To replicate the Artifact Signing step you can use the below sample pipeline YAML
Sample Pipeline YAML
pipeline:
  name: Artifact Signing
  identifier: Artifact Signing
  tags: {}
  projectIdentifier: Harness
  orgIdentifier: default
  properties:
    ci:
      codebase:
        connectorRef: Harnessgithub
        build: <+input>
  stages:
    - stage:
        name: Build
        identifier: Build
        description: ""
        type: CI
        spec:
          cloneCodebase: true
          caching:
            enabled: true
          buildIntelligence:
            enabled: true
          execution:
            steps:
              - step:
                  type: BuildAndPushDockerRegistry
                  name: BuildAndPushDockerRegistry_1
                  identifier: BuildAndPushDockerRegistry_1
                  spec:
                    connectorRef: lavakushDockerhub
                    repo: lavakush07/easy-buggy-app
                    tags:
                      - v5
                    caching: true
              - step:
                  type: SscaArtifactSigning
                  name: Artifact Signing_1
                  identifier: ArtifactSigning_1
                  spec:
                    source:
                      type: docker
                      spec:
                        connector: lavakushDockerhub
                        image: lavakush07/easy-buggy-app:v5
                    signing:
                      type: cosign
                      spec:
                        private_key: account.Cosign_Private_Key
                        password: account.Cosign_Password
                    uploadSignature:
                      upload: true
          infrastructure:
            type: KubernetesDirect
            spec:
              connectorRef: account.harness_kubernetes_connector
              namespace: artifact-signing
              automountServiceAccountToken: true
              nodeSelector: {}
              os: Linux
        variables:
          - name: LOG_LEVEL
            type: String
            description: ""
            required: false
            value: TRACE
Verify Artifact Signing
You can verify the signed artifacts using the Artifact verification step. Refer to configure your pipeline to verify the artifact Signing