> For the complete documentation index, see [llms.txt](https://developer.harness.io/llms.txt). Markdown versions of documentation pages are available by appending `.md` to page URLs; this page is available as [Markdown](https://developer.harness.io/harness-platform/3.0/harness-platform-resources/notifications-and-banners/centralised-notification.md).
# Centralised notification
Configure notifications based on specific rules and conditions in pipelines, delegates, GitOps applications, and other Harness components to keep teams informed of critical events.
Centralised notifications send alerts based on rules and conditions that you define once and apply to many resources at the same time. Instead of configuring notifications on each pipeline, delegate, or application, you create a rule at the **Account**, **Organization**, or **Project** scope and Harness applies it to every resource that matches the rule.
Each rule combines three things: the resources it watches, the conditions that trigger it, and the channels it delivers to. You can create rules for pipelines, delegates, AI Test Automation, Artifact Registry, GitOps applications, and service account tokens.
{% hint style="info" %}
Currently, this feature is behind the feature flag `PL_CENTRAL_NOTIFICATIONS`. Contact [Harness Support](mailto:support@harness.io) to enable it.
{% endhint %}
***
### What will you learn in this topic?
By the end of this topic, you will be able to:
* [Connect channels to user groups](#notification-channels-and-user-groups) correctly so that notifications actually reach their recipients.
* [Create pipeline notification rules](#pipeline-notifications) for pipeline and stage events across many pipelines at once.
* [Create AI Test Automation notification rules](#ai-test-automation-notifications) for Playwright run outcomes.
* [Create delegate notification rules](#delegate-notifications) for disconnection, expiration, and blocked registration events.
* [Create Artifact Registry notification rules](#artifact-registry-notifications) for dependency firewall and lifecycle policy events.
* [Create GitOps application notification rules](#gitops-application-notifications) for sync and health events.
* [Create service account token notification rules](#service-account-token-notifications) to stay ahead of token expiration.
***
### Before you begin
Before you create a notification rule, ensure you have the following:
* **Feature flag enablement**: The `PL_CENTRAL_NOTIFICATIONS` feature flag enabled on your account, plus any resource-specific flag listed in the section you follow.
* **Notification rule permissions**: View and Create/Edit permissions on notification rules at the scope where you create the rule. Go to [RBAC in Harness](/harness-platform/3.0/harness-platform-resources/platform-access-control/rbac-in-harness.md) to configure roles.
* **Resource view permissions**: View permission on the resource type the rule watches, such as pipelines, delegates, or service accounts.
* **A notification channel**: At least one channel at or above the rule scope. Go to [Configure new channels](#notification-channels-and-user-groups) to create one.
***
### Notification channels and user groups
A notification rule delivers through a channel, and a channel can target either an email address that you enter directly or a Harness user group. Understanding this difference matters, because the two options fail in different ways.
When a channel targets a user group, Harness delivers the notification through the channels configured in that group's **Notification Preferences**.
{% hint style="warning" %}
A channel that is configured for a user group does not send a notification until that group has a notification preference configured for the channel type you selected. Harness does not report an error in this case, so the rule appears to be configured correctly but no notification arrives.
Add the preference to the user group before you rely on the rule. Go to [Edit notification preferences](/harness-platform/3.0/harness-platform-resources/platform-access-control/add-user-groups.md#edit-notification-preferences) to add a channel to a user group.
{% endhint %}
Channels that specify an email address directly do not depend on user group notification preferences, so they deliver as soon as you enable the rule. If a rule delivers to a directly configured email address but not to a user group, check the notification preferences of that group first.
This requirement applies to every resource type in this topic, including pipelines, delegates, Artifact Registry, GitOps applications, and service account tokens.
***
### Pipeline notifications
Pipeline notification rules track pipeline health across many pipelines at once, so you do not configure a notification strategy on each pipeline individually. Create the rule at the **Account**, **Organization**, or **Project** scope, and each scope offers the targeting options that apply to the pipelines below it.
Use these rules for pipeline start, success, and failure events, as well as stage-level start, success, and failure events. This helps you monitor pipeline health and quickly identify issues across your deployment processes.
You can also configure the **Waiting for User Action** event, which fires whenever a pipeline pauses for user input, such as an Approval step, Manual Intervention, or runtime execution input. When you add this event as a condition, Harness sends alerts for every pipeline that matches the rule scope, with no per-pipeline configuration.
{% hint style="info" %}
Pipeline notification rules require two additional feature flags. Contact [Harness Support](mailto:support@harness.io) to enable them.
* `PIPE_CENTRALISED_NOTIFICATION`: Required for centralised pipeline notifications.
* `PIPE_PIPELINE_RESUME_NOTIFICATION`: Required for the **Pipeline Resumed** event.
{% endhint %}
Follow the interactive walkthrough to see the flow end to end, or the manual steps for the same configuration.
{% tabs %}
{% tab title="Interactive" %}
{% embed url="" %}
{% endtab %}
{% tab title="Manual" %}
1. **Open Notification Rules**
* Navigate to **Account Settings**, then under **Notifications and alerts**, select **Notification Rules**.
* Click **+ New Notification** to open the **New Notification Setup** wizard.
2. **Name the rule (Overview)**
* Enter a **Notification Name**, then click **Continue**.
3. **Select pipelines (Resources)**
* From **Select Resource Type**, select **Pipeline**.
* Under **Select Organizations**, select **All Organizations** or **Specified Organizations**.
* Click **Continue**.
4. **Define conditions (Conditions)**
* Click **+ Add Condition**.
* Enter a **Condition Name**. Harness derives the condition **Id** from the name, and you can edit the **Id** before you save.
* Open the **Select Pipeline Events** dropdown and select the events you want to be alerted on: **Pipeline Start**, **Pipeline Success**, **Pipeline Failed**, **Stage Start**, **Stage Success**, **Stage Failed**, **Trigger Failed**, **Waiting for User Action**, or **Pipeline Resumed**.
* Click **Apply**, then click **Continue**.
5. **Select a template (Template (optional))**
* Click **Select Template** to define the notification content with a [custom notification template](broken://pages/61BgDK9ZvZzzBW9Czl6a), or click **Continue** to use the default template.
6. **Configure channels (Channels)**
* Click **Select Channels**, then select an existing channel, or click **New Channel** to [create one](#notification-channels-and-user-groups).
* Click **Apply Selected** to confirm the delivery channels.
* If a channel targets a user group, confirm that the group has a matching notification preference. Go to [Notification channels and user groups](#notification-channels-and-user-groups) to review this requirement.
* Keep **Enable on Save** turned on to activate the rule immediately.
* Click **Submit** to save the rule.
{% endtab %}
{% endtabs %}
***
### AI Test Automation notifications
AI Test Automation notification rules alert you when Playwright test runs finish, so test failures reach your team without anyone watching the run list. Create the rule with the same steps as [Pipeline notifications](#pipeline-notifications), but select **AI Test Automation** as the resource type in the **Resources** step.
The following events are available:
* **Playwright Run Completed**
* **Playwright Run Failed**
* **Playwright Run Aborted**
Go to [Set up notifications for Playwright runs](/ai-test-automation/use-ai-test-automation/test-suites/create-and-run/playwright-builds.md#set-up-notifications-for-playwright-runs) to complete the AI Test Automation side of the setup.
***
### Delegate notifications
Delegate notification rules give you proactive monitoring of Harness delegates, so you learn about connectivity and version problems before a deployment fails because of them. Rules configured at higher scopes apply automatically to delegates at lower scopes, based on your rule configuration.
Use these rules to track delegate disconnection, expiration, expiring soon, and blocked registration events.
Follow the interactive walkthrough to see the flow end to end, or the manual steps for the same configuration.
{% tabs %}
{% tab title="Interactive" %}
{% embed url="" %}
{% endtab %}
{% tab title="Manual" %}
1. **Open Notification Rules**
* Navigate to **Account Settings**, then under **Notifications and alerts**, select **Notification Rules**.
* Click **+ New Notification** to open the **New Notification Setup** wizard.
2. **Name the rule (Overview)**
* Enter a **Notification Name**, then click **Continue**.
3. **Select delegates (Resources)**
* From **Select Resource Type**, select **Delegate**.
* Select **Select All Delegates** to monitor every delegate in the scope, or **Only use Delegates with all of the following tags** to target delegates by tag.
* If you target delegates by tag, enter up to five tags in **Select Delegates**.
* Click **Continue**.
4. **Define conditions (Conditions)**
* Click **+ Add Condition**.
* Enter a **Condition Name**. Harness derives the condition **Id** from the name, and you can edit the **Id** before you save.
* Open the **Add Events** dropdown and select the delegate events you want to be alerted on:
* **Delegate Disconnected**: Notifies you when a delegate unexpectedly loses connection to the Harness Platform. This helps you identify connectivity issues that may impact your deployments. This event does not trigger for normal delegate shutdowns.
* **Delegate Expired**: Sends a daily notification when your delegate version reaches the end of its support lifecycle. Upgrade your delegate to continue operations. Go to [Delegate expiration support policy](/harness-ai/use-harness-platform/delegates/delegate/install-delegates/delegate-upgrades-and-expiration.md#delegate-expiration-support-policy) to review the policy.
* **Delegate Expires in \[X] Weeks**: Sends an advance warning 1 to 4 weeks before your delegate version expires, so you have time to plan and schedule upgrades.
* **Delegate Registration Blocked**: Notifies you when a delegate is prevented from registering with your account.
* Click **Apply**, then click **Continue**.
5. **Configure channels (Channels)**
* Click **Select Channels**, then select an existing channel, or click **New Channel** to [create one](#notification-channels-and-user-groups).
* Click **Apply Selected** to confirm the delivery channel.
* If a channel targets a user group, confirm that the group has a matching notification preference. Go to [Notification channels and user groups](#notification-channels-and-user-groups) to review this requirement.
* Keep **Enable on Save** turned on to activate the rule immediately.
* Click **Submit** to save the rule.
{% endtab %}
{% endtabs %}
{% hint style="info" %}
The **Delegate Disconnected** notification alerts you about unexpected connectivity issues only. Planned delegate shutdowns during maintenance or scaling operations do not trigger this notification.
{% endhint %}
***
### Artifact Registry notifications
Artifact Registry notification rules alert teams when dependency firewall and lifecycle policy events occur, without a rule per registry. These rules are scoped at the organization level and apply to every project under the organizations you select. Project-level scoping is not available for Artifact Registry rules.
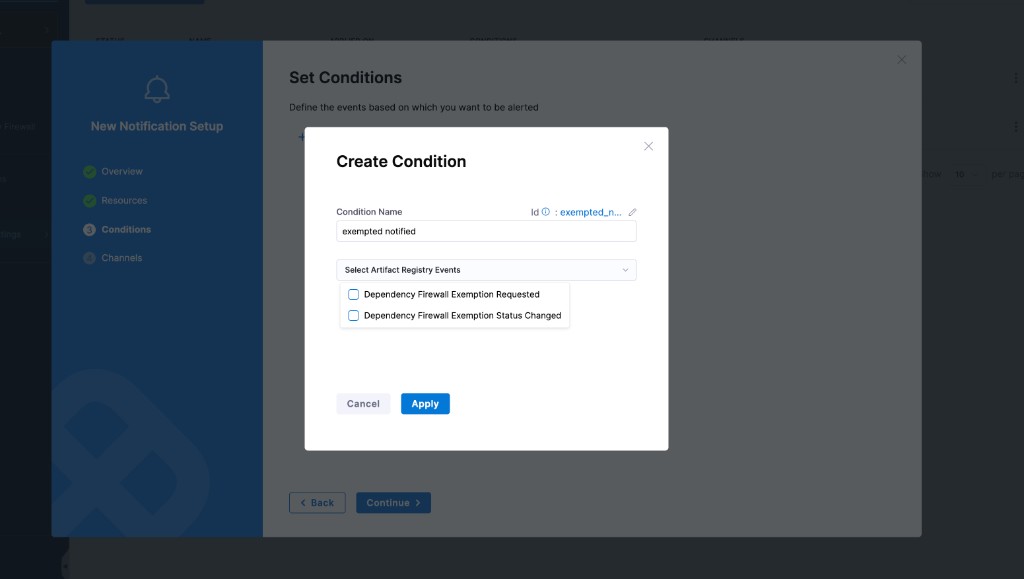
The following Artifact Registry events are available as conditions:
* **Dependency Firewall Exemption Requested**: Fires when a developer submits a new exemption request from the **Policy Violations** tab.
* **Dependency Firewall Exemption Status Changed**: Fires when an existing exemption transitions to `APPROVED` or `REJECTED`.
* **Lifecycle Policy Execution Completed**: Fires when a scheduled cleanup rule finishes executing.
* **Lifecycle Policy Dry Run Execution Completed**: Fires when a dry run, either manual or scheduled, finishes.
Go to [Dependency exemptions](/artifact-registry/use-artifact-registry/dependency-firewall/exemptions.md) to review the exemption workflow, and [Lifecycle rules](/artifact-registry/use-artifact-registry/lifecycle-rules.md) to review lifecycle policies.
1. **Open Notification Rules**
* Navigate to **Account Settings**, then under **Notifications and alerts**, select **Notification Rules**.
* Click **+ New Notification** to open the **New Notification Setup** wizard.
2. **Name the rule (Overview)**
* Enter a **Notification Name**, then click **Continue**.
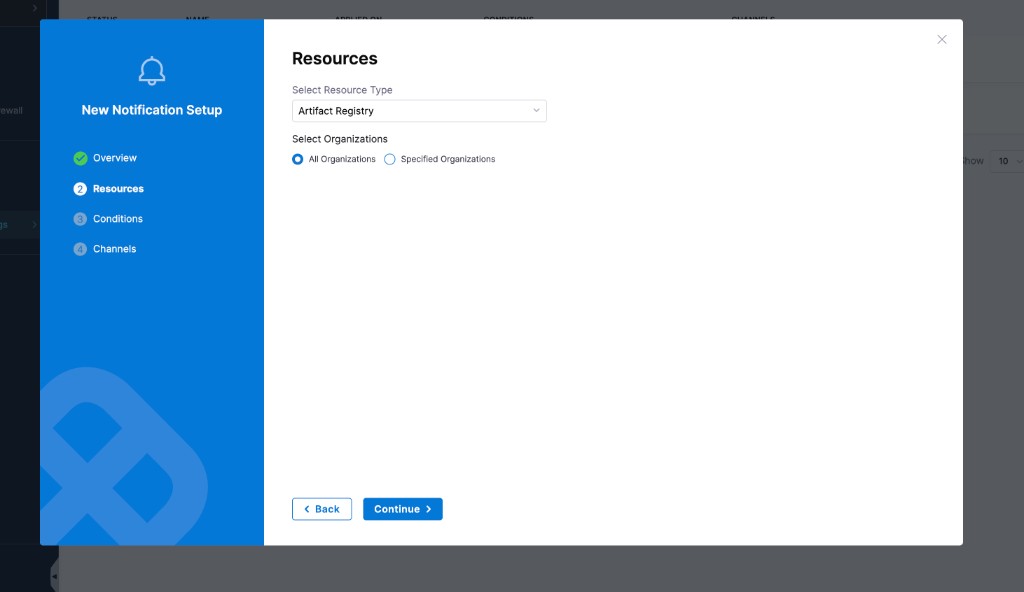
3. **Select organizations (Resources)**
* From **Select Resource Type**, select **Artifact Registry**.
* Select your scope: **All Organizations** or **Specified Organizations**.
* Click **Continue**.
Artifact Registry notification rule: resource and scope
4. **Define conditions (Conditions)**
* Click **+ Add Condition**.
* Enter a **Condition Name**.
* From **Select Artifact Registry Events**, select the relevant events: **Dependency Firewall Exemption Requested**, **Dependency Firewall Exemption Status Changed**, **Lifecycle Policy Execution Completed**, or **Lifecycle Policy Dry Run Execution Completed**.
* Click **Apply**, then click **Continue**.
Artifact Registry notification rule: conditions
5. **Configure channels (Channels)**
* Select an existing channel, or click **New Channel** to [create one](#notification-channels-and-user-groups).
* If a channel targets a user group, confirm that the group has a matching notification preference. Go to [Notification channels and user groups](#notification-channels-and-user-groups) to review this requirement.
* Keep **Enable on Save** turned on to activate the rule immediately.
* Click **Submit** to save the rule.
***
### GitOps application notifications
GitOps application notification rules give you visibility into sync and health events across your GitOps environment, without notifications on individual applications or pipelines. All five notification channels are supported: Slack, Microsoft Teams, email, webhooks, and PagerDuty.
The following events are available for GitOps application notification rules:
| Event | Description |
| ------------------------------- | -------------------------------------------------------------------------------------- |
| **Application Sync Succeeded** | Fires when a sync operation completes successfully. |
| **Application Sync Failed** | Fires when a sync operation fails. |
| **Application Out Of Sync** | Fires when the live cluster state of an application drifts from the desired Git state. |
| **Application Health Degraded** | Fires when the health status of an application changes to degraded. |
{% hint style="info" %}
Custom notification templates are not supported for GitOps application notifications. These notifications always use the default template.
{% endhint %}
1. **Open Notification Rules**
* Navigate to **Account Settings**, then under **Notifications and alerts**, select **Notification Rules**.
* Click **+ New Notification** to open the **New Notification Setup** wizard.
2. **Name the rule (Overview)**
* Enter a **Notification Name**, then click **Continue**.
3. **Select organizations (Resources)**
* From **Select Resource Type**, select **GitOps Application**.
* Select your scope: **All Organizations** or **Specified Organizations**.
* Click **Continue**.
4. **Define conditions (Conditions)**
* Click **+ Add Condition**.
* Enter a **Condition Name**.
* Select the relevant GitOps events: **Application Sync Succeeded**, **Application Sync Failed**, **Application Out Of Sync**, or **Application Health Degraded**.
* Click **Continue**.
5. **Configure channels (Channels)**
* Select an existing channel, or click **New Channel** to [create one](#notification-channels-and-user-groups).
* If a channel targets a user group, confirm that the group has a matching notification preference. Go to [Notification channels and user groups](#notification-channels-and-user-groups) to review this requirement.
* Click **Submit** to save the rule.
***
### Service account token notifications
Service account token notification rules alert you when tokens are created, updated, rotated, deleted, or nearing expiration. Expired tokens cause pipeline and automation failures, so advance warning gives you time to rotate or renew a token before it disrupts your workflows.
{% hint style="info" %}
Currently, this feature is behind the feature flag `PL_SERVICE_ACCOUNT_NOTIFICATION`. Contact [Harness Support](mailto:support@harness.io) to enable it.
{% endhint %}
You can configure notifications for an existing service account or create a new one. Go to [Create a service account](/harness-platform/3.0/harness-platform-resources/platform-access-control/add-and-manage-service-account.md#create-a-service-account) to create one.
Keep the following behavior in mind before you create a rule:
* When a service account is deleted, Harness updates its notification rules asynchronously. If the deleted service account was the only one in a rule, Harness removes that rule automatically.
* All timestamps in notification messages are in UTC.
Follow the interactive walkthrough to see the flow end to end, or the manual steps for the same configuration.
{% tabs %}
{% tab title="Interactive" %}
{% embed url="" %}
{% endtab %}
{% tab title="Manual" %}
1. **Open Notification Rules**
* Navigate to **Account Settings**, **Organization Settings**, or **Project Settings**, depending on the scope you want, then under **Notifications and alerts**, select **Notification Rules**.
* Click **+ New Notification** to open the **New Notification Setup** wizard.
2. **Name the rule (Overview)**
* Enter a **Notification Name**, for example `SA Token Expiration Alerts`, then click **Continue**.
3. **Select service accounts (Resources)**
* From **Select Resource Type**, select **Service Account**.
* Select **All Service Accounts** to monitor every account in the scope, or **Specified Service Accounts** to target accounts by name. You can select service accounts only at the current scope.
* For specified accounts, click **Select Service Account(s)**, select the accounts, then click **Apply Selected**.
* Click **Continue**.
4. **Define conditions (Conditions)**
* Click **+ Add Condition**. One rule can have multiple conditions.
* Enter a **Condition Name**, for example `Critical Expiration Warnings`.
* Open the **Add Events** dropdown and select the events you want notifications for:
* **Token Created**: A new service account token is generated.
* **Token Edited**: An existing token or its settings are updated.
* **Token Deleted**: A token is permanently removed.
* **Token Expired**: A token reaches its expiration date and can no longer be used.
* **Token Rotated**: A token is replaced with a new one.
* **Token Expires in 1 to 4 weeks**: Set the number of weeks before expiration. Harness sends notifications daily during the selected week. For example, if you select 4 weeks, you receive a daily notification during the fourth week before the token expires.
* **Token Expires in 1 day**: A final reminder sent one day before expiration.
* Click **Apply**, then click **Continue**.
5. **Configure channels (Channels)**
* Click **Select Channels**, then select an existing channel, or click **New Channel** to [create one](#notification-channels-and-user-groups).
* Click **Apply Selected** to confirm the delivery channels.
* If a channel targets a user group, confirm that the group has a matching notification preference. Go to [Notification channels and user groups](#notification-channels-and-user-groups) to review this requirement.
* Keep **Enable on Save** turned on to activate the rule immediately.
* Click **Submit** to save the rule.
{% endtab %}
{% endtabs %}
***
### Related articles
* [Configure notifications](/harness-platform/3.0/harness-platform-resources/notifications-and-banners/centralised-notification.md): Create the notification channels that a rule delivers to.
* [Default notification template](/harness-platform/3.0/harness-platform-resources/notifications-and-banners/default-notification-template.md): Apply a template automatically when a rule does not specify one.
* [Custom notification templates](broken://pages/61BgDK9ZvZzzBW9Czl6a): Customize the content of a notification based on the event that triggers it.
* [Edit notification preferences](/harness-platform/3.0/harness-platform-resources/platform-access-control/add-user-groups.md#edit-notification-preferences): Configure the channel preferences that a user group needs before it receives notifications.
* [Notifications](/harness-platform/3.0/harness-platform-resources/notifications-and-banners/notifications.md): Review the supported channels and account-level notification controls.
{% @harness-feedback/feedback %}