> For the complete documentation index, see [llms.txt](https://developer.harness.io/llms.txt). Markdown versions of documentation pages are available by appending `.md` to page URLs; this page is available as [Markdown](https://developer.harness.io/harness-platform/new-to-harness-platform/get-started.md).
# Getting started with Harness Platform
A self-service onboarding guide for Harness Platform
Use this guide to set up Harness Platform so your teams can start using any Harness module.
### What you will learn in this topic
By the end of this topic, you will be able to:
* [Access a Harness account](#step-1-access-your-harness-account).
* [Create organization](#create-an-organization), [projects](#create-a-project) and [invite collaborators](#invite-collaborators).
* [Manage users](#step-3-manage-users) and [shared resources](#step-4-manage-shared-resources).
* Understand the path to become a [Harness certified expert](#become-a-harness-certified-expert).
***
### Before you begin
Before you set up Harness Platform, ensure you have an understanding of the following:
* [Harness Platform overview: The foundation layer on top of which all modules are built.](/harness-platform/new-to-harness-platform/overview.md)
* [Harness UI overview: The interaction layer between Harness Platform and you.](https://github.com/harness/harness-developer-hub/tree/main/docs/platform/new-to-harness-platform/get-started/harness-ui-overview.md)
***
### Set up the Harness Platform
Follow the steps below to understand the platform and complete the initial setup so you can start using other Harness modules.
#### Step 1: Access your Harness account
[Sign up for a free account](https://app.harness.io/auth/#/signup/&?utm_source=website\&utm_medium=harness-developer-hub\&utm_campaign=plt-plg\&utm_content=get-started) or sign in to your existing Harness account to get started.
If you have signed up for a free account, go to [Account license limits ](/harness-platform/use-harness-platform/account-license-limits.md)to know the limitations on actions that you can perform.
After you log in to your account, select a module and you are redirected to the platform user interface.
***
#### Step 2: Create organization, project, and invite collaborators
Once you have created an account, you can begin creating organizations and projects. If you are part of a team account, contact your administrator to get the necessary permissions to create organizations and projects.
* With a free account, a default organization and project are already created for you.
* You **cannot** create another new organization. However, you can create multiple projects within the default organization, and invite collaborators into the default organization.
**Create an organization**
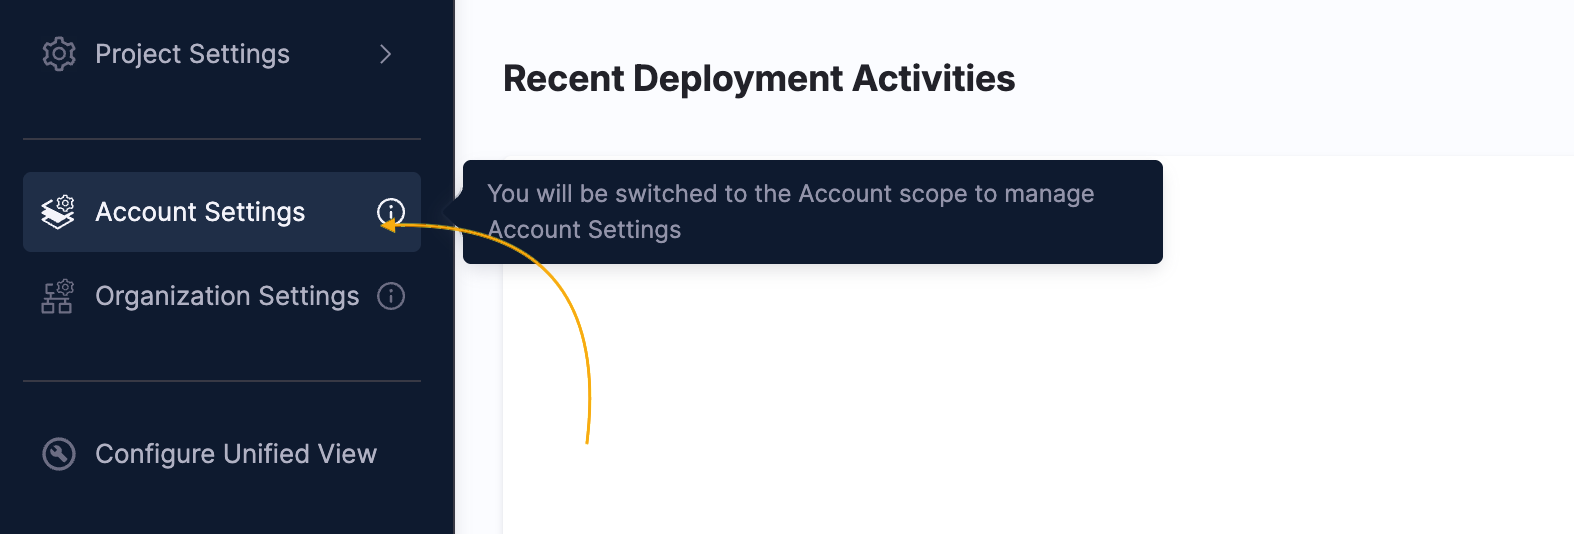
1. In Harness, select **Account Settings** to switch to account scope.
The **Organizations** tab appears on top of **Account Settings**. Click **Organizations**.
Click to view full size image
**(OR)**
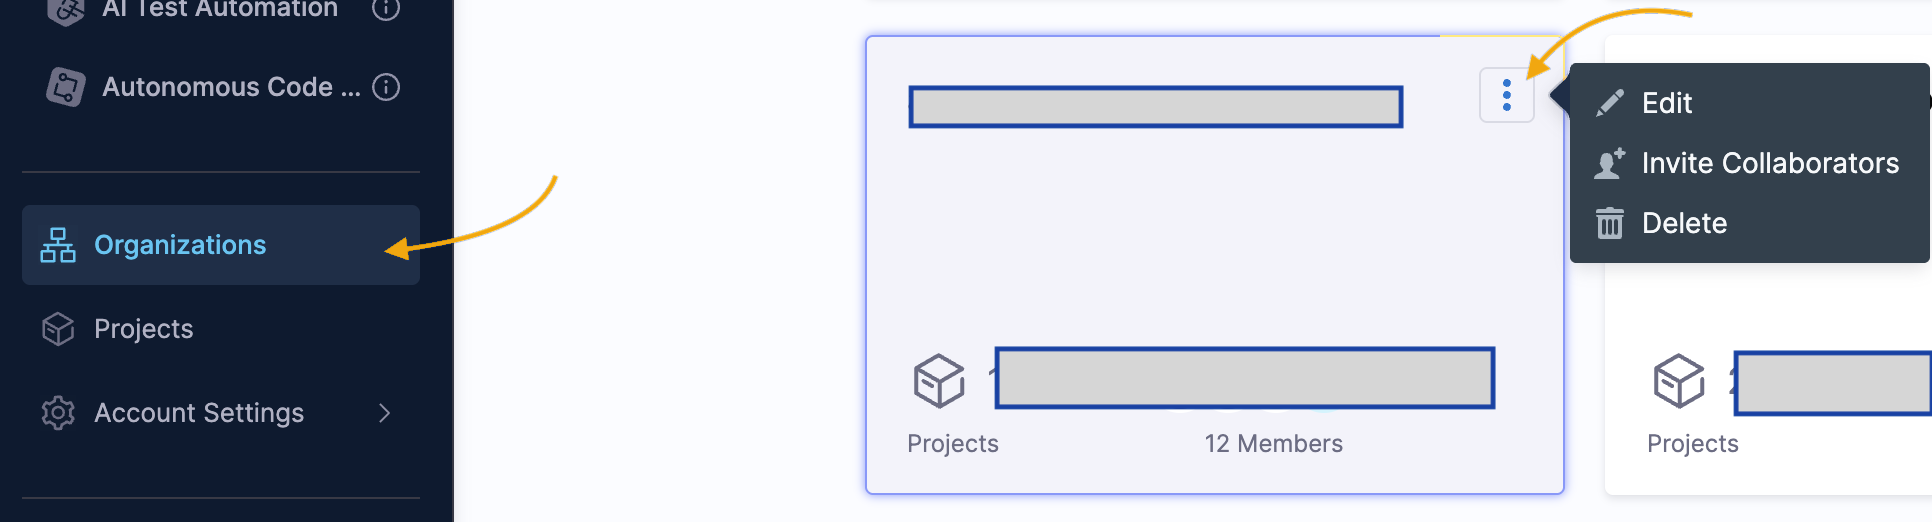
1. Click the **Account**, select **Organizations**, click **View All Orgs**, and click **Organizations**.
Click to view full size image
2. Click **+New Organization**.
The new organization settings appear.
3. In **Name**, enter a name for your organization. Enter **Description**, and [Tags](/harness-platform/use-harness-platform/tags/overview.md) for your new org. Click **Save and Continue**.
The organization is created and you can now invite collaborators.
**Invite collaborators**
You do not have to add the same members to an org and its projects. You can add org-level members, and then add project-level members later when you set up or edit a project.
The org and any projects added to the org are used by their members only.
1. Click **Organizations**, and then select the three-dot menu (**⋮**) of the org you want to invite people to.
Click to view full size image
2. Select **Invite People to Collaborate**, type a member's name and select it.
3. In **Role**, select the role the member will have in this org, such as Organization Admin or Organization Member.\
You can select multiple people and assign **Role**.
4. Click **Add**.
Members receive invites via their email addresses.
You can invite more members from within the org later.
5. Click **Finish**.
The org is added to the list under **Organizations**.
**Create a project**
You can create projects from the **Projects** section or from within the organization. You will set up user permissions in the next step.
The following steps show you how to create a project from the **Project** section:
1. Click Projects and click **+New Project**.
2. Name the project, and select a color(default-blue). Harness automatically generates the project ID. See [Harness Entity Reference](/harness-platform/use-harness-platform/references/harness-entity-reference.md).
3. In **Organization**, select the org you created.
4. Add a Description and Tags if required.
5. Click **Save and Continue**.
To invite collaborators, follow the steps from [Invite Collaborators](#invite-collaborators).
The project will be listed under **Projects**.
You can create additional organizations and projects to represent your business units and product development initiatives.
{% hint style="info" %}
* Harness recommends creating a sample project with a few pilot users to get familiar with the Platform.
* Once your initial setup is ready, choose a module from the left navigation bar.
{% endhint %}
***
#### Step 3: Manage users
To control user access at a granular level, configure [authentication](/harness-platform/3.0/harness-platform-resources/authentication/authentication-overview.md) and [role-based access control (RBAC)](/harness-platform/3.0/harness-platform-resources/platform-access-control/rbac-in-harness.md) for your Harness account.
You can also automate user provisioning from external sources, including user group memberships and role assignments. The following methods are supported:
* [Okta](/harness-platform/use-harness-platform/platform-access-control/provision-users-with-okta-scim.md)
* [Microsoft Entra ID](/harness-platform/use-harness-platform/platform-access-control/provision-users-and-groups-using-azure-ad-scim.md)
* [OneLogin](/harness-platform/use-harness-platform/platform-access-control/provision-users-and-groups-with-one-login-scim.md)
* [Just-in-time user provisioning](/harness-platform/3.0/harness-platform-resources/platform-access-control/provision-use-jit.md)
To add users manually, go to [add users manually](/harness-platform/use-harness-platform/platform-access-control/add-users.md#add-users-manually).
***
#### Step 4: Manage shared resources
Shared resources are the connections between Harness and your infrastructure. Most modules require at least one delegate and a connector to function.
* **Delegate**: A lightweight worker you install in your environment (Kubernetes, Docker, virtual machine (VM)). It executes tasks on behalf of Harness using outbound-only HTTPS. You do not need one immediately, but you will need one when running pipelines. For more information, go to [Delegates](/harness-platform/use-harness-platform/delegates/delegate/delegate-concepts/delegate-overview.md).
* **Connector**: Stores credentials and connection information for third-party tools like GitHub, AWS, GCP, and DockerHub. For more information, go to [connectors](/harness-platform/use-harness-platform/connectors.md).
* **Secret**: An encrypted storage for sensitive values like API keys and passwords. Harness has a built-in secret manager and integrates with Vault, AWS Secrets Manager, and others. For more information, go to [secrets](/harness-platform/use-harness-platform/secrets/secrets-management/harness-secret-manager-overview.md).
As an administrator, you can configure shared resources at the account, organization, or project scope, depending on how you want to facilitate their availability.
{% hint style="info" %}
* For teams managing Harness at scale, you can automate the configuration of shared resources using the Harness Terraform Provider or REST API.
* Shared resources created at the account scope are available to all organizations and projects in your account.
{% endhint %}
***
### Explore Harness modules
Once the platform is set up, you can start using Harness modules to automate your software delivery lifecycle. Each module is built for a specific part of the software delivery lifecycle (SDLC) and can be used independently or together.
| If you want to | Start with |
| ------------------------------------- | --------------------------------------------------------------------------------------------- |
| Build and test code automatically | [Continuous Integration (CI)](https://app.gitbook.com/s/qKtVmwAGTfGQS1MVC97G/README) |
| Deploy services to any environment | [Continuous Delivery & GitOps (CD)](https://app.gitbook.com/s/y1JhZ4oKIppwY7d5AhPj/README) |
| Manage cloud infrastructure costs | [Cloud Cost Management (CCM)](https://app.gitbook.com/s/O2HVWkYMptNUG08jo8hr/README) |
| Safely roll out features with flags | [Feature Flags (FF)](https://app.gitbook.com/s/8hMqy7cgSxMJvSqtZuUT/README) |
| Find and fix security vulnerabilities | [Security Testing Orchestration (STO)](https://app.gitbook.com/s/na57sNwixrWxOX8cOMRg/README) |
| Run chaos experiments on your systems | [Chaos Engineering (CE)](https://app.gitbook.com/s/lSkpbpeYJ3rfGUkIrcyQ/README) |
| Track engineering metrics and DORA | [Software Engineering Insights (SEI)](https://app.gitbook.com/s/EYDRcFDt1JPlcws7L5VL/README) |
***
### Become a Harness Certified Expert
{% hint style="info" icon="diploma" %}
For an interactive onboarding experience with additional use cases and features, go to [**Harness University**](https://developer.harness.io/university).
{% endhint %}
***
### Next steps
* [Authentication in Harness Platform](/harness-platform/use-harness-platform/authentication.md)
* [Platform access control](/harness-platform/use-harness-platform/platform-access-control.md)
* [Supported platforms and technologies](/harness-platform/new-to-harness-platform/platform-whats-supported.md)
* [Automate configuring shared resources using Terraform](/harness-platform/use-harness-platform/automation/terraform-provider/harness-terraform-provider-overview.md)
* [Automate configuring shared resources using REST API](/harness-platform/use-harness-platform/automation/api/api-quickstart.md)
{% @harness-feedback/feedback module="harness-ai" pagePath="harness-ai/new-to-harness-platform/get-started" %}