> For the complete documentation index, see [llms.txt](https://developer.harness.io/llms.txt). Markdown versions of documentation pages are available by appending `.md` to page URLs; this page is available as [Markdown](https://developer.harness.io/harness-platform/use-harness-ai/connect-with-ai/index.md).
# Harness MCP Server
Give AI agents full access to the Harness platform through 11 consolidated tools and 142 resource types using the Model Context Protocol (MCP).
The Harness MCP Server is an open-source [Model Context Protocol](https://modelcontextprotocol.io/introduction) server that gives AI agents full access to the Harness platform. It uses a registry-based dispatch system that routes 11 consolidated tools (`harness_list`, `harness_get`, `harness_create`, and others) to 142 resource types across 30 toolsets, covering CI/CD, GitOps, Feature Management & Experimentation, Cloud Cost Management, Security Testing, Chaos Engineering, Internal Developer Portal, Software Supply Chain, and more.
Unlike MCP servers that map one tool per API endpoint (which degrades LLM tool-selection accuracy as tool count grows), this server keeps the tool count small and the schema footprint minimal. Agents discover organizations and projects dynamically, so multi-project workflows work out of the box without hardcoded environment variables. Twenty-seven pre-built prompt templates cover common workflows such as debugging failed pipelines, reviewing DORA metrics, triaging vulnerabilities, and optimizing cloud costs.
* **Source code**: [github.com/harness/mcp-server](https://github.com/harness/mcp-server)
* **npm package**: [harness-mcp-v2 on npm](https://www.npmjs.com/package/harness-mcp-v2)
***
### What you will learn in this topic
By the end of this topic, you will be able to:
* [Configure your AI client](/harness-platform/use-harness-ai/connect-with-ai/index/configure-ai-clients.md) by adding the server to Claude Desktop, Claude Code, Cursor, VS Code, Windsurf, Gemini CLI, and Amazon Q Developer CLI with an API key.
* [Connect to the Harness-managed endpoint](/harness-platform/use-harness-ai/connect-with-ai/index/hosted-mcp.md) with OAuth instead of an API key.
* [Run the server](/harness-platform/use-harness-ai/connect-with-ai/index/self-hosted-deployment.md) with Docker, Kubernetes, MCP gateways, or HTTP transport in multi-user mode.
* [Use pre-built workflow prompts](/harness-platform/use-harness-ai/connect-with-ai/index/prompt-templates.md).
* [Elicitate](/harness-platform/use-harness-ai/connect-with-ai/index/approvals-and-safety.md) risk-based auto-approve, and platform safeguards.
* [Troubleshoot common errors](/harness-platform/use-harness-ai/connect-with-ai/index/troubleshooting.md) and interactive debugging with MCP Inspector.
***
### Before you begin
Before you configure MCP server, ensure you have the following:
* **Harness API key**: A personal access token (PAT) in the format `pat...`. The account ID is auto-extracted from PAT tokens. To create one, go to **My Profile** > **API Keys** > **+ New API Key**, then create a **Token**. Go to [Manage API Keys](/harness-platform/use-harness-platform/automation/api/add-and-manage-api-keys.md) to review detailed instructions.
* **Node.js**: Required when you use `npx` or `npm install`. This is not required for Docker.
{% hint style="info" %}
If you use the [Harness Hosted MCP](/harness-platform/use-harness-ai/connect-with-ai/index/hosted-mcp.md) endpoint, you need to authenticate with OAuth through Harness ID. This does not need an API key in your client configuration.
If your Harness account signs in through a SAML or OIDC Identity Provider, an administrator must add the MCP-specific ACS URL or redirect URI to that Identity Provider before you connect. For more information, see [Single Sign-On (SSO) for Harness MCP](/harness-platform/use-harness-platform/authentication/single-sign-on-for-harness-mcp.md).
{% endhint %}
***
### Quick start
This set up does not require any installation. Run the server directly with `npx` command described below:
```bash
HARNESS_API_KEY=pat.xxx.xxx.xxx npx harness-mcp-v2@latest
```
The server defaults to **stdio** transport (for Claude Desktop, Cursor, Windsurf, and similar clients). For remote or shared deployments, use **http** as described below:
```bash
# Stdio transport (default)
HARNESS_API_KEY=pat.xxx npx harness-mcp-v2
# HTTP transport
HARNESS_API_KEY=pat.xxx npx harness-mcp-v2 http --port 8080
```
Once the server runs, go to [Configure your AI client](/harness-platform/use-harness-ai/connect-with-ai/index/configure-ai-clients.md) to connect your editor or terminal.
***
### Install with an alternative method
In this set up, use a global install or a source build when `npx` does not fit your environment.
#### Global install
```bash
npm install -g harness-mcp-v2
harness-mcp-v2
```
#### Build from source
```bash
git clone https://github.com/harness/mcp-server.git
cd mcp-server
pnpm install
pnpm build
pnpm start # Stdio transport
pnpm start:http # HTTP transport
pnpm inspect # Test with MCP Inspector
```
***
### CLI usage
```bash
harness-mcp-v2 [stdio|http] [--port ]
```
| Option | Description |
| ----------------- | ------------------------------------------------------------ |
| `--port ` | Port for HTTP transport (default: `3000`, or `PORT` env var) |
| `--help` | Show help message and exit |
| `--version` | Print version and exit |
***
### How it works
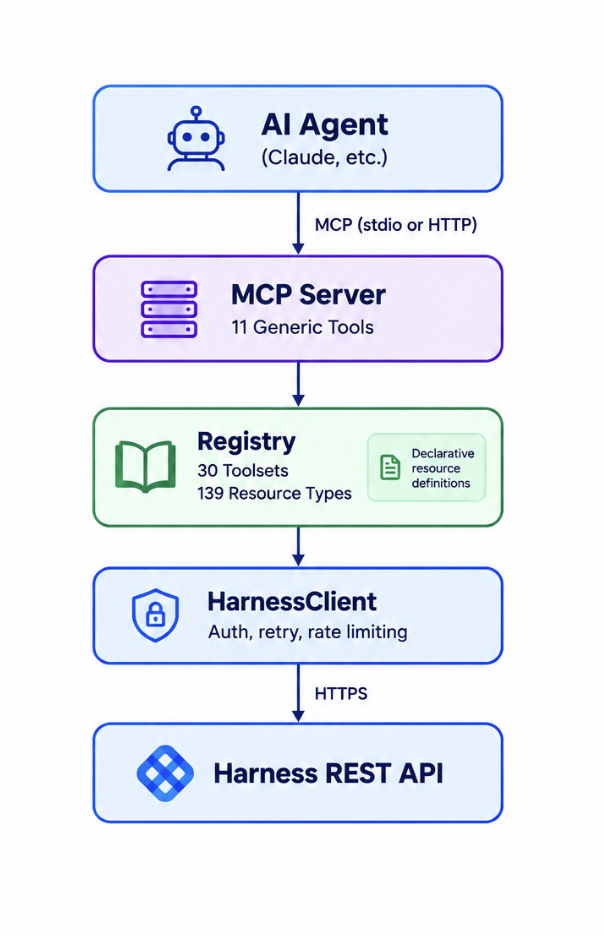
The image below describes the flow of control from AI agent (such as Claude) to Harness REST API.
Click to view full size image
1. **Tools** are generic verbs (`harness_list`, `harness_get`, and others) that accept a `resource_type` parameter to route to the correct API endpoint.
2. **The Registry** maps each `resource_type` to a declarative `ResourceDefinition` specifying the HTTP method, URL path, parameter mappings, and response extraction.
3. **Dispatch** resolves the resource definition, builds the HTTP request, calls the Harness API, and extracts the relevant response data.
4. **Toolset filtering** controls which resource definitions load at startup.
5. **Deep links** are automatically appended to responses, providing direct Harness UI URLs.
6. **Compact mode** strips verbose metadata from list results to minimize token usage.
***
### Next steps
* [Configure your AI client](/harness-platform/use-harness-ai/connect-with-ai/index/configure-ai-clients.md): Add the server to your editor or terminal.
* [Tools reference](/harness-platform/use-harness-ai/connect-with-ai/index/tools-reference.md): Review the 11 tools and their parameters.
* [Model Context Protocol specification](https://modelcontextprotocol.io/introduction): Understand the underlying protocol.
{% @harness-feedback/feedback module="harness-ai" pagePath="harness-ai/use-harness-ai/connect-with-ai/index" %}