> For the complete documentation index, see [llms.txt](https://developer.harness.io/llms.txt). Markdown versions of documentation pages are available by appending `.md` to page URLs; this page is available as [Markdown](https://developer.harness.io/harness-platform/use-harness-platform/authentication/single-sign-on-saml/keycloak.md).
# Keycloak
Connect Keycloak to Harness with SAML to sign in with existing credentials, and optionally sync groups for access control.
This guide walks you through using Keycloak as the SAML identity provider for Harness. This allows Keycloak users to log in to Harness with their existing credentials.
Keycloak acts as a SAML identity provider for Harness, allowing users to authenticate with their existing Keycloak credentials. When a user attempts to log in to Harness, they are redirected to Keycloak for authentication. After successful authentication, Keycloak sends a signed SAML assertion back to Harness, which validates it and grants access. Optionally, Keycloak can sync user group memberships to Harness for role-based access control, and supports Just-in-Time (JIT) provisioning to automatically create users on their first login.
{% hint style="info" %}
**NOTE**
If you use [Harness Self-Managed Enterprise Edition](/self-managed-enterprise-edition/new-to-self-managed-enterprise-edition/smp-overview.md), your instance must be accessed via an HTTPS load balancer, otherwise SAML authentication will fail over HTTP.
{% endhint %}
***
### What you will learn in this topic
By the end of this topic, you will be able to:
* [Set up a Keycloak SAML client](#set-up-a-client-in-keycloak).
* [Configure Harness to use Keycloak SAML client as an SSO provider](#set-up-keycloak-saml-sso-in-harness).
* [Enable group-based authorization](#optional-add-group-membership-in-saml).
* [Use Just-in-Time (JIT) provisioning to automatically create users](#just-in-time-jit-provisioning).
***
### Before you begin
Before you configure Keycloak as the SAML identity provider for Harness, check that you have:
* A Harness account with Account Admin permissions.
* An existing Keycloak instance with admin access to create and configure SAML clients.
***
### Step 1: Set up a client in Keycloak
To register Harness as a SAML service provider in Keycloak, follow the steps below:
1. Sign in to the Keycloak admin console.
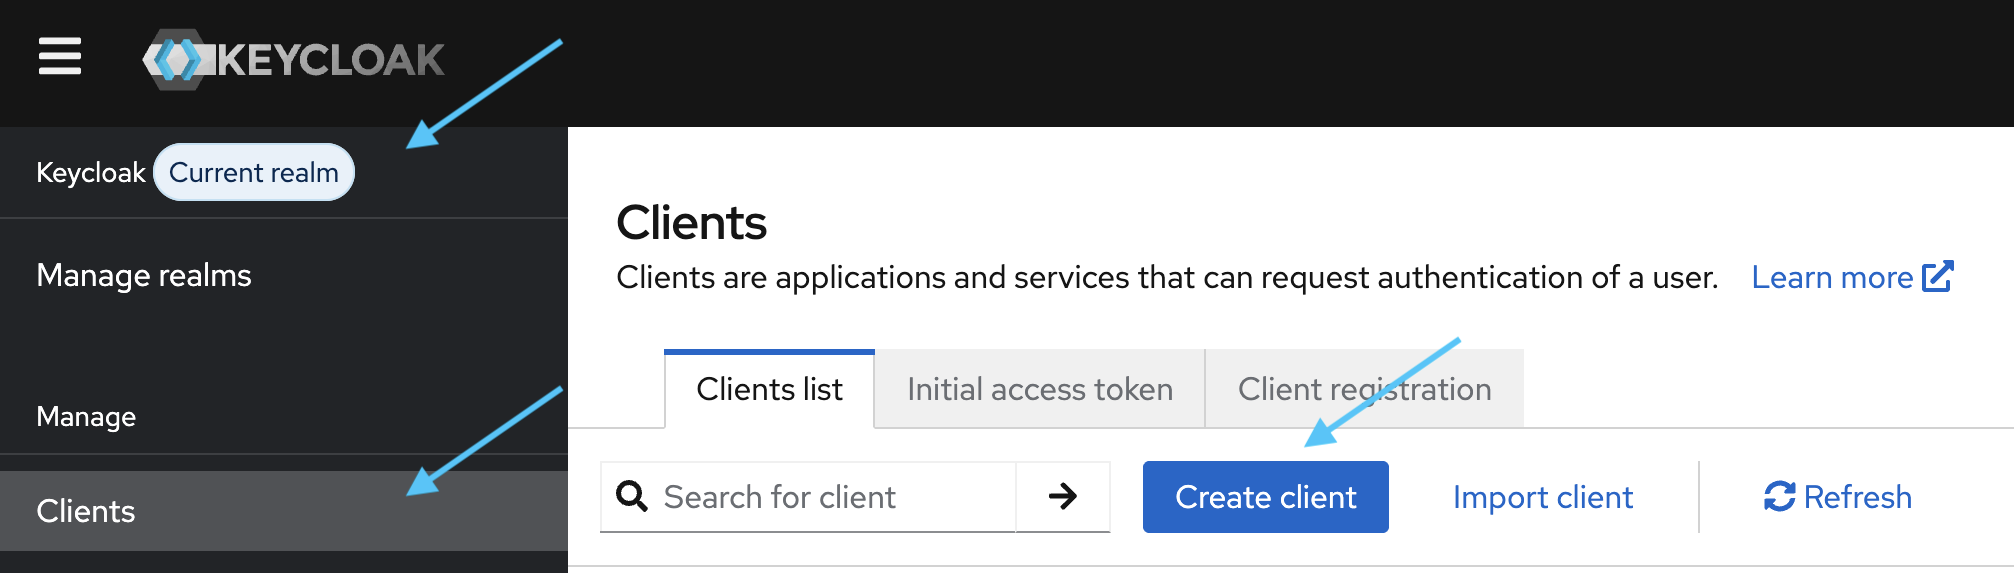
2. Switch to your target Realm, then select **Clients**.
Click to view full size image
The **General Settings** page appears.
3. Select **Create client**. Set **Client type** to **SAML** and **Client ID** to `app.harness.io`, then select **Next**.
Replace `` with your Harness account ID.
* **Root URL:** `https://app.harness.io/`
* **Home URL:** `https://app.harness.io/ng/account//main-dashboard`
* **Valid post logout redirect URIs:** `https://app.harness.io/ng/account//main-dashboard`
* **Master SAML processing URL:** `https://app.harness.io/gateway/api/users/saml-login?accountId=`
4. Click **Save**.
{% hint style="info" %}
**VANITY HOSTNAMES**
If your Harness account uses a vanity URL, replace `https://app.harness.io` with your base URL in every field above. Example ACS URL shape: `https:///gateway/api/users/saml-login?accountId=`.
{% endhint %}
***
### Step 2: Configure client settings
Apply the following settings on the client you just created.
5. Under **Settings** tab, navigate to **Signature and Encryption** section, and enter the following values:
* **Name ID format:** `email`
* **Force POST binding:** On
* **Include AuthnStatement:** On
* **All other toggles in this block:** Off
6. Under **Settings**, open **Signature and encryption** and set:
* **Sign documents:** On
* **Sign assertions:** On
* **Signature algorithm:** `RSA_SHA256`
* **SAML signature key name:** `NONE`
* **Canonicalization method:** `EXCLUSIVE`
7. Under the **Keys** tab, set **'Client signature required'** to Off.
8. Open the **Advanced** tab, then **Fine grain SAML endpoint configuration**. Set **'Assertion consumer service POST binding URL'** to `https://app.harness.io/gateway/api/users/saml-login?accountId=` (or the same path on your vanity host).
9. Click **Save**.
#### Step 3: Download IdP metadata for Harness
Harness imports Keycloak as an IdP from a metadata XML file.
1. In the left nav, under **Configure**, select **Realm settings**.
2. In the **Endpoints** section, select **SAML 2.0 Identity Provider Metadata**. A new tab opens with XML data.
3. Save that document as an `.xml` file. Upload this file when you add the provider in Harness.
Click to view full size image
***
### Optional: add group membership in SAML
To automatically sync group memberships in Harness based on group memberships in Keycloak, perform the following steps:
1. Under **Manage** tab, select **Clients**.
2. Select your newly-created Client, and then select the **Client Scopes** tab.
3. In the first row, select the value in the **Assigned client scope** field.
4. Select **Mappers** tab, and then select **Configure a new mapper**.
5. Select **Group list** and configure the following settings:
* **Name**: grouplist
* **Group attribute name**: member
* **SAML Attribute NameFormat**: Basic
* **Single Group Attribute**: On
* **Full group path**: Off
6. Select **Save**.
***
### Step 4: Set up Keycloak SAML SSO in Harness
Once you have the client set up in Keycloak, configure and enable Keycloak as an SAML provider in Harness. This way, Keycloak users can use the same credentials to sign in to Harness.
1. In your Harness account, go to **Account Settings**, and then select **Authentication**.
2. In **Identity Provider metadata XML downloaded from your app (Optional)**, select **Upload**, then select the XML file you added when you set your Keycloak configuration steps.
3. Select **+ SAML Provider**, then enter the following values:
* **Name**: Keycloak
* **Select an SAML Provider**: Other
* **Enable Authorization**: *Enable if you want to automatically sync group memberships in Harness based on group memberships in Keycloak*
* **Group Attribute Name**: member *(only available if Enable Authorization is selected)*
* **Add Entity Id**: *Enabled*
* **Entity Id**: app.harness.io
* **Enable JIT Provisioning**: *Enable if Just In Time user provisioning is desired*
4. Select **Add**.
You should see the new provider under **Login via SAML**; you might need to expand this section using the arrow on the right-hand side of the screen..
***
### Step 5: Enable and test SSO
Enable your SSO configuration and verify users can authenticate successfully by following the steps below:
1. Under **Account Settings** in Harness, select **Authentication**, and then open **Login via SAML** for the Keycloak provider.
2. In the **Enable SAML provider** dialog, select **Test** so Harness validates the exchange.
3. When the test passes, Harness shows **SAML test successful** banner at the top.
4. Select **Confirm** to enable the provider for sign-in.
***
### Just-in-time (JIT) provisioning
Harness supports SAML configuration [with or without JIT user provisioning](/harness-platform/use-harness-platform/authentication/single-sign-on-saml.md#just-in-time-jit-provisioning). Go to [Just-in-Time (JIT) user provisioning](/harness-platform/3.0/harness-platform-resources/platform-access-control/provision-use-jit.md) to understand how Harness creates users on first SAML login when JIT is enabled.
***
### Troubleshooting SAML authentication fails with Keycloak
Ensure the Client ID is set to app.harness.io and Client type is set to SAML when creating the Keycloak client. Verify the Master SAML processing URL is set to . If using a vanity URL or Harness Self-Managed Enterprise Edition, replace with your custom base URL in all fields.
***
### Related articles
For related SAML provider setups, go to the following topics:
* [SAML SSO with Okta](/harness-platform/use-harness-platform/authentication/single-sign-on-saml/okta.md) - Create an SAML integration in Okta for Harness.
* [SAML SSO with Microsoft Entra ID](/harness-platform/use-harness-platform/authentication/single-sign-on-saml/microsoft-entra-id.md) - Configure Microsoft Entra ID as a SAML SSO provider in Harness.
* [SAML SSO with OneLogin](/harness-platform/use-harness-platform/authentication/single-sign-on-saml/onelogin.md) - Configure OneLogin as a SAML SSO provider in Harness.
* [Advanced SAML configuration](/harness-platform/use-harness-platform/authentication/single-sign-on-saml/advanced-saml-configuration.md) - Configure advanced SAML options in Harness.
{% @harness-feedback/feedback module="harness-ai" pagePath="harness-ai/use-harness-platform/authentication/single-sign-on-saml/keycloak" %}