> For the complete documentation index, see [llms.txt](https://developer.harness.io/llms.txt). Markdown versions of documentation pages are available by appending `.md` to page URLs; this page is available as [Markdown](https://developer.harness.io/harness-platform/use-harness-platform/authentication/single-sign-on-saml/microsoft-entra-id.md).

# Microsoft Entra ID

Microsoft Entra ID acts as a SAML identity provider for Harness, allowing users to authenticate with their existing Microsoft credentials. When a user attempts to log in to Harness, they are redirected to Microsoft Entra ID for authentication. After successful authentication, Entra ID sends a signed SAML assertion containing user attributes back to Harness, which validates it and grants access. Optionally, Entra ID can send group membership information in the SAML token, allowing Harness to automatically assign users to the appropriate Harness User Groups for role-based access control.

***

### What you will learn in this topic <a href="#what-you-will-learn-in-this-topic" id="what-you-will-learn-in-this-topic"></a>

By the end of this topic, you will be able to:

* [Configure Microsoft Entra ID as a SAML SSO provider in Harness](#endpoint-url-for-azure).
* [Set up authentication and user attribute mapping](#user-attributes-and-claims).
* [Enable and test SAML authorization with Azure](#enable-and-test-sso-with-azure).
* [Use Just-in-Time (JIT) provisioning](#just-in-time-jit-provisioning) to automatically create users on first login.

***

### Before you begin <a href="#before-you-begin" id="before-you-begin"></a>

Before you configure Microsoft Entra ID app to be the SAML identity provider for Harness, ensure you have the following:

* A Harness account with Account Admin permissions.
* A Microsoft Entra ID tenant with permissions to create and configure enterprise applications.
* Users provisioned in Microsoft Entra ID with the same email addresses they use in Harness.
* At least two user accounts in both Harness and your Azure app; one Harness Administrator and one standard user.

***

Users are not created as part of the SAML SSO integration. They are invited to Harness using their email addresses, and once they log in, Harness registers their email addresses. For more information, go to [Overview of SAML SSO with Harness](https://github.com/iKettles/harness-gitbook/tree/main/docs/platform/authentication/single-sign-on-saml/overview/README.md#saml-sso-with-harness).

For detailed steps on adding SAML SSO with Microsoft Entra ID, follow Microsoft's tutorial on [Microsoft Entra single sign-on (SSO) integration with Harness](https://docs.microsoft.com/en-us/azure/active-directory/saas-apps/harness-tutorial).

{% hint style="info" %}
**NOTE**

If you use [Harness Self-Managed Enterprise Edition](/self-managed-enterprise-edition/new-to-self-managed-enterprise-edition/smp-overview.md), your instance must be accessed via an HTTPS load balancer, otherwise SAML authentication will fail over HTTP.
{% endhint %}

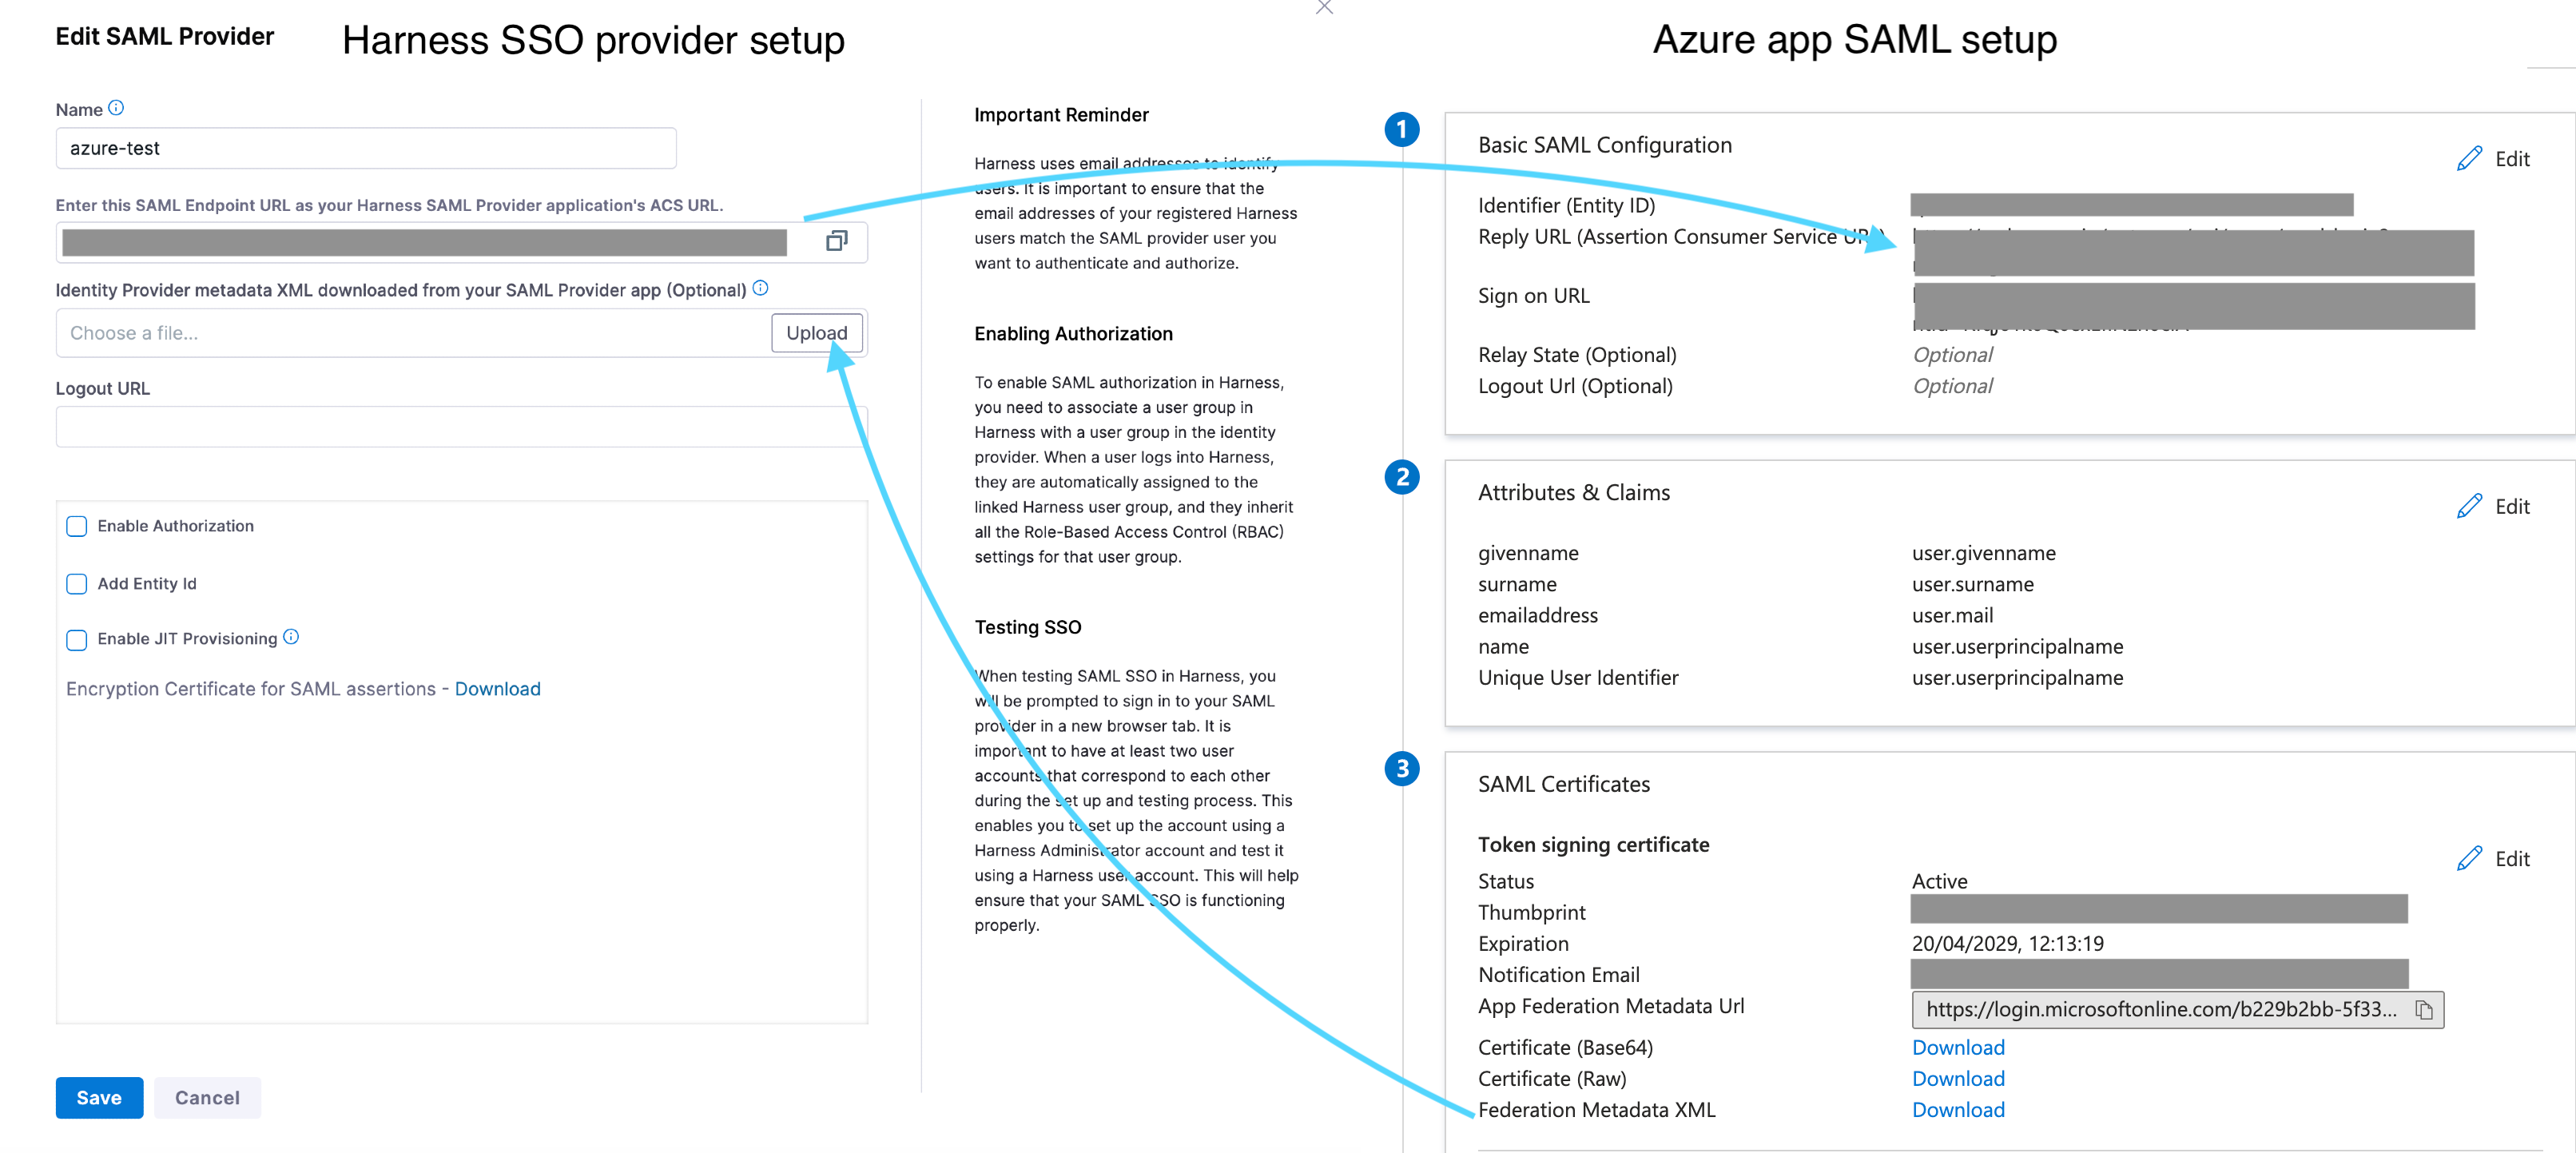
The following diagram shows how Harness and Microsoft Entra ID exchange information during SAML SSO setup:

<figure><img src="/files/NIu7d4e751Ouys0uRUgn" alt="Diagram showing the SAML SSO information exchange between Harness and Microsoft Entra ID"><figcaption><p>Click to view full size image</p></figcaption></figure>

***

### Azure user accounts <a href="#azure-user-accounts" id="azure-user-accounts"></a>

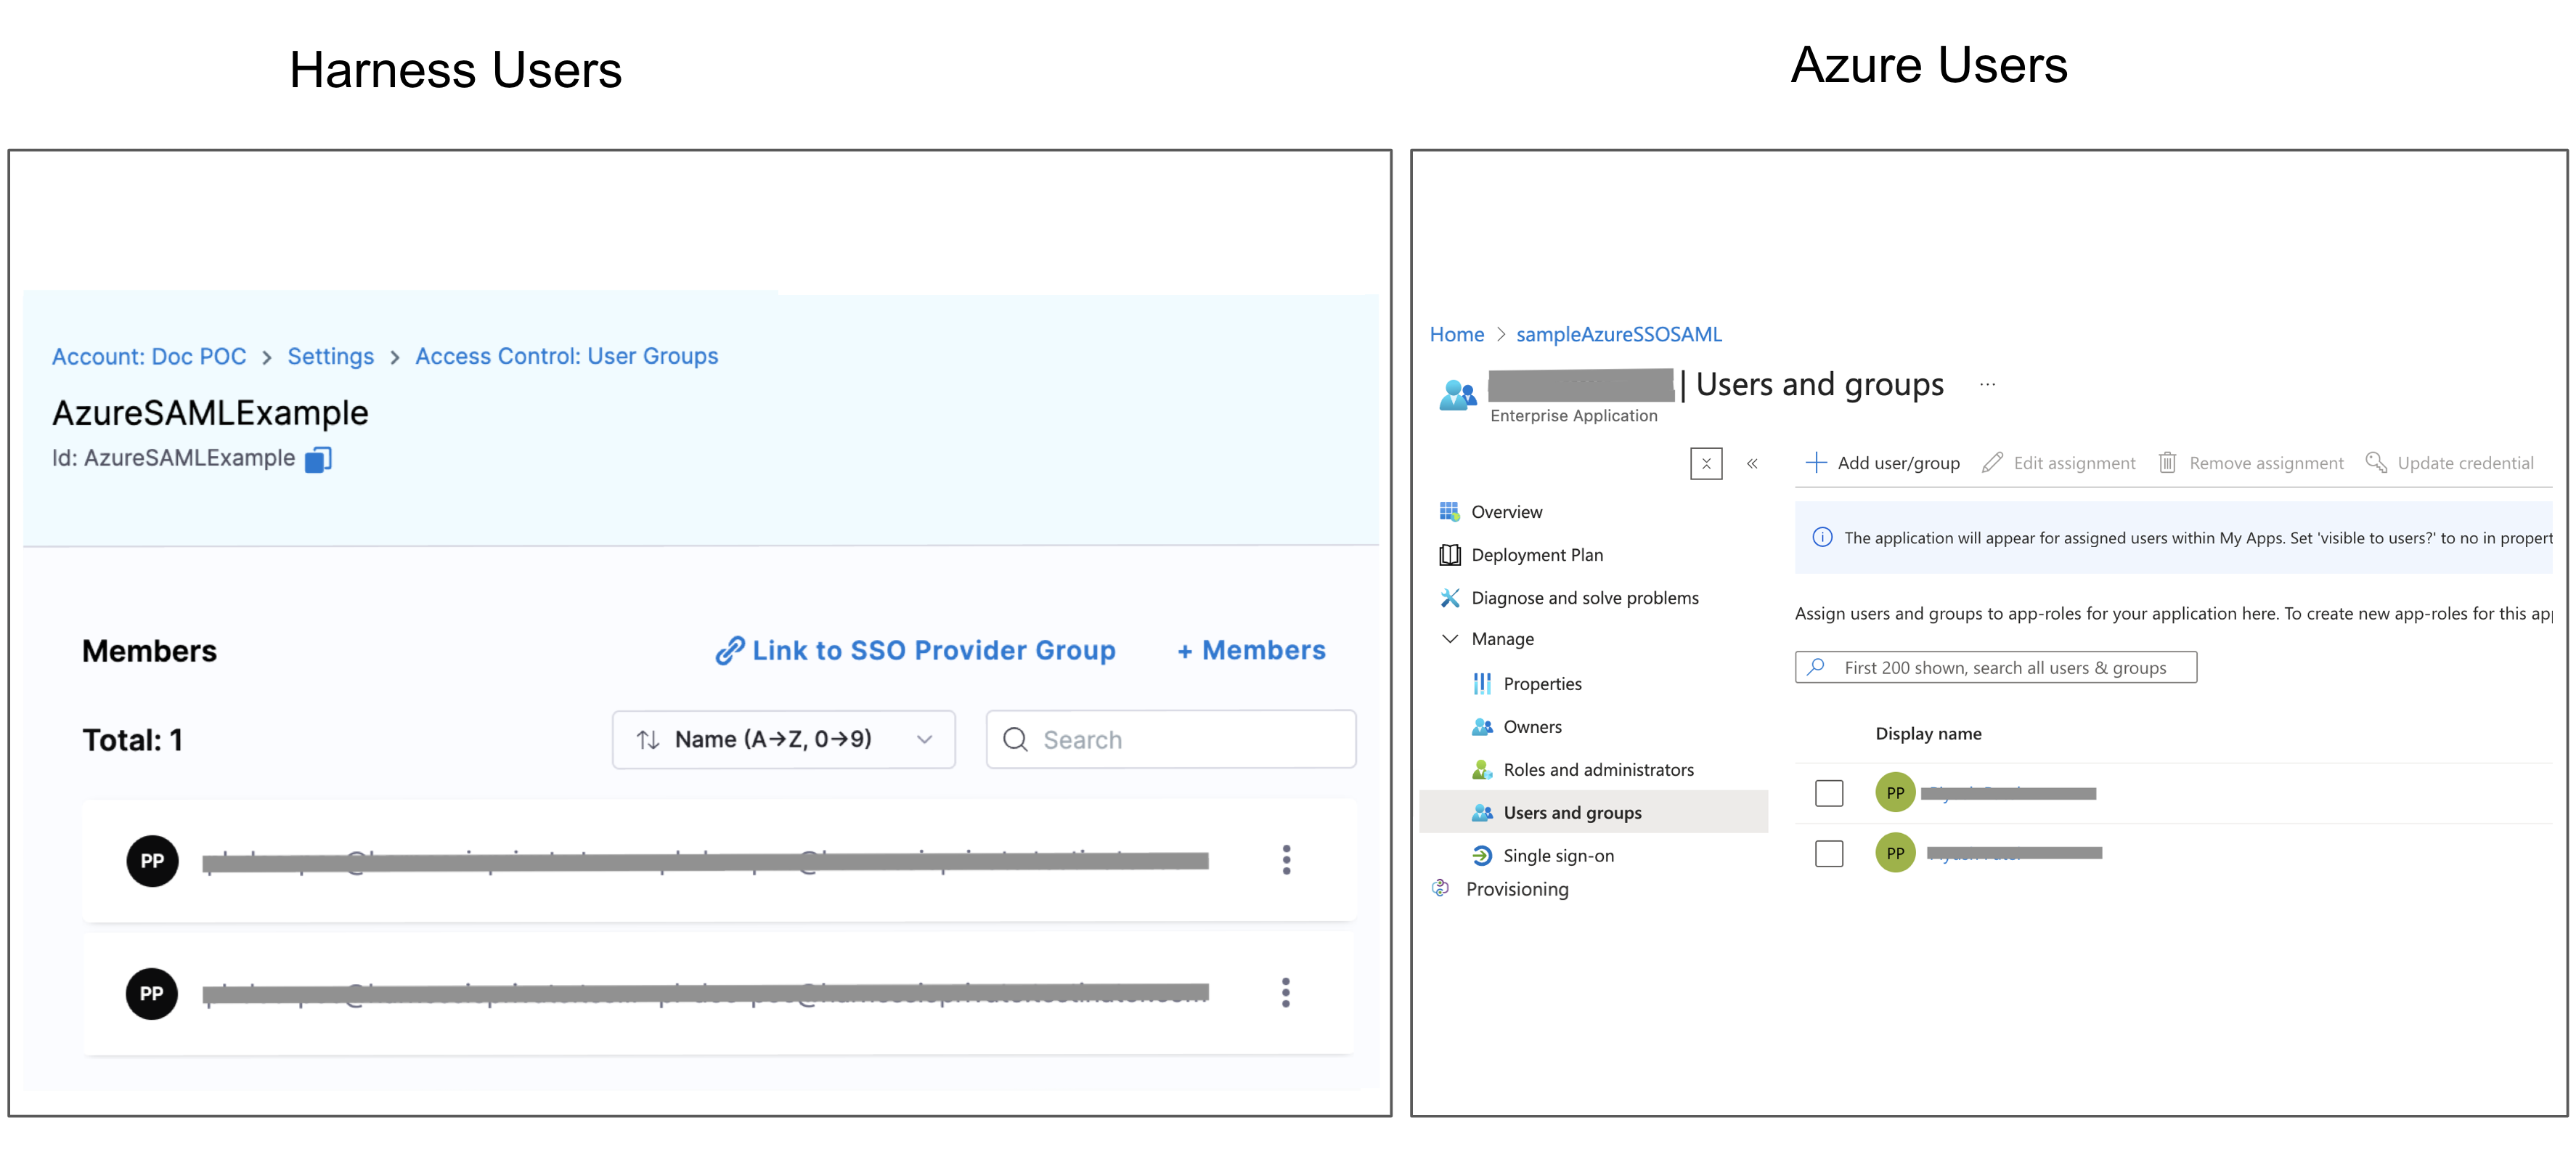
To set up and test SAML SSO, you need at least two accounts each in Harness and in your Azure app. This allows you to set up an administrator and test it with a user.

These user accounts should share the same email address so you can configure SSO without locking yourself out and verify it works for a regular user.

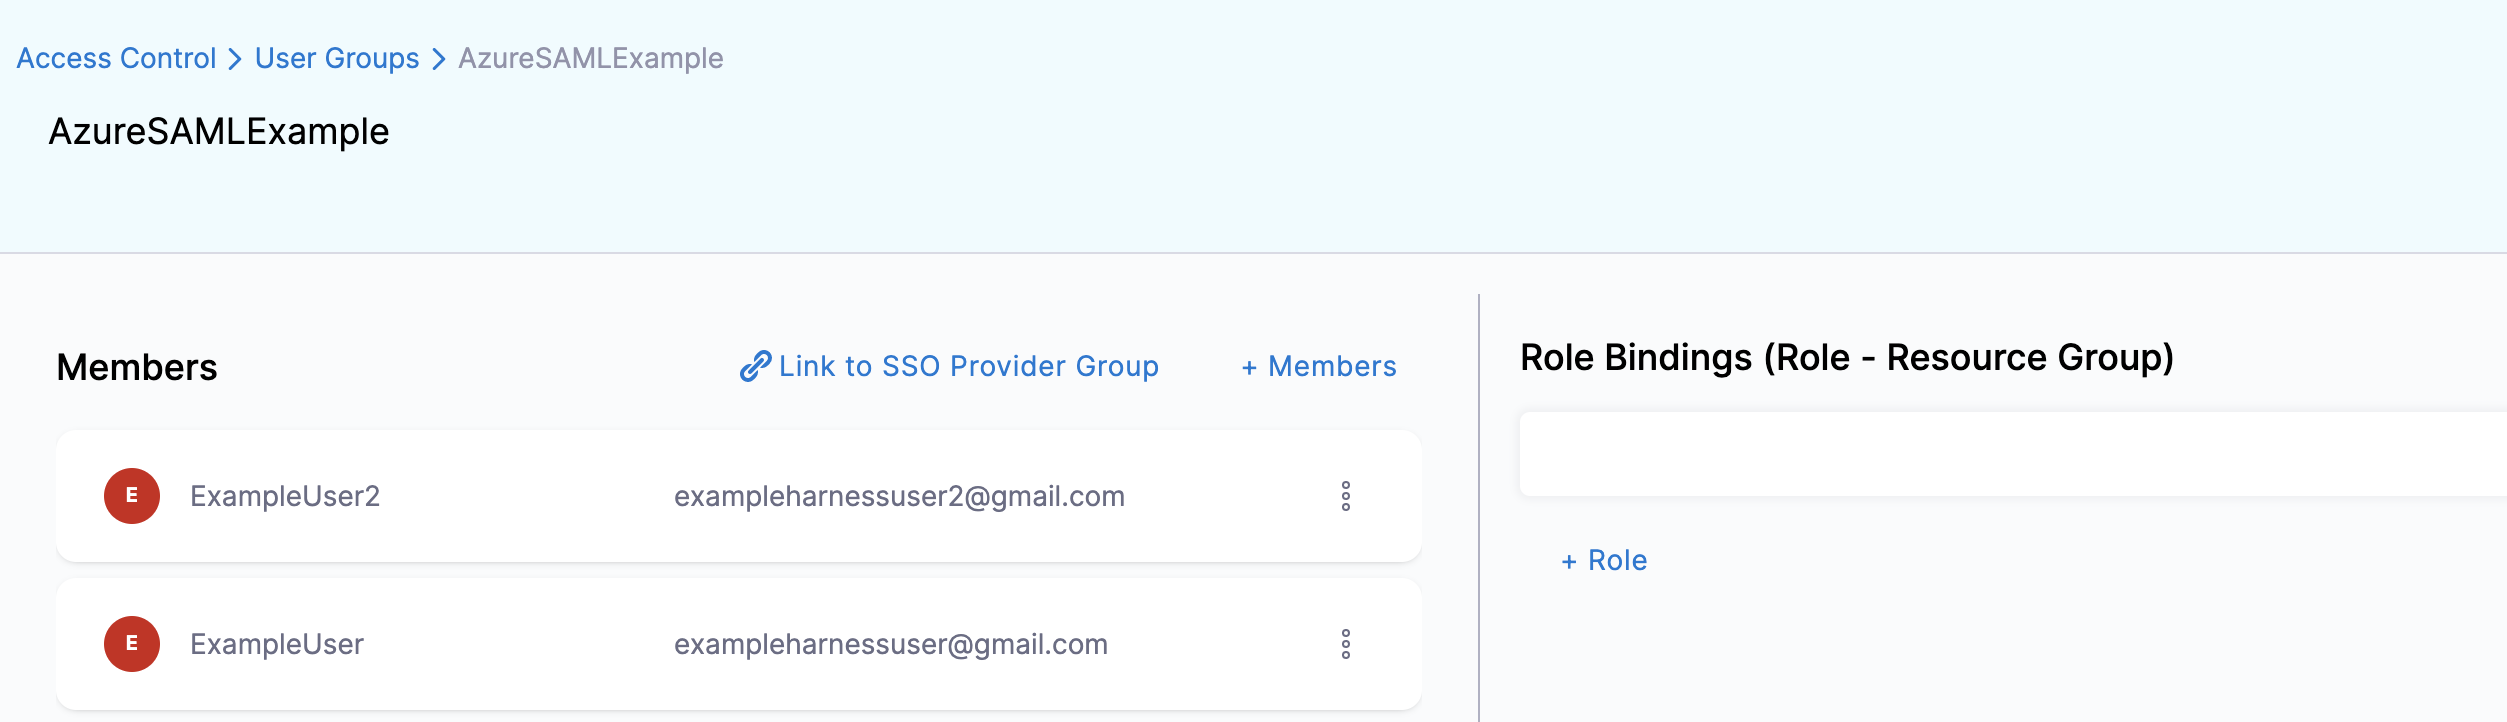
The following image shows a Harness User Group with two users and their corresponding Azure accounts:

<figure><img src="/files/jIuBHvfqNQK7VatMPz1K" alt="Harness User Group with two users and their corresponding Microsoft Entra ID accounts"><figcaption><p>Click to view full size image</p></figcaption></figure>

***

Use two browser windows or tabs for the following steps. Open Azure app in one tab and Harness in the other.

### Step 1. Add entity ID in Harness <a href="#step-1-add-entity-id-in-harness" id="step-1-add-entity-id-in-harness"></a>

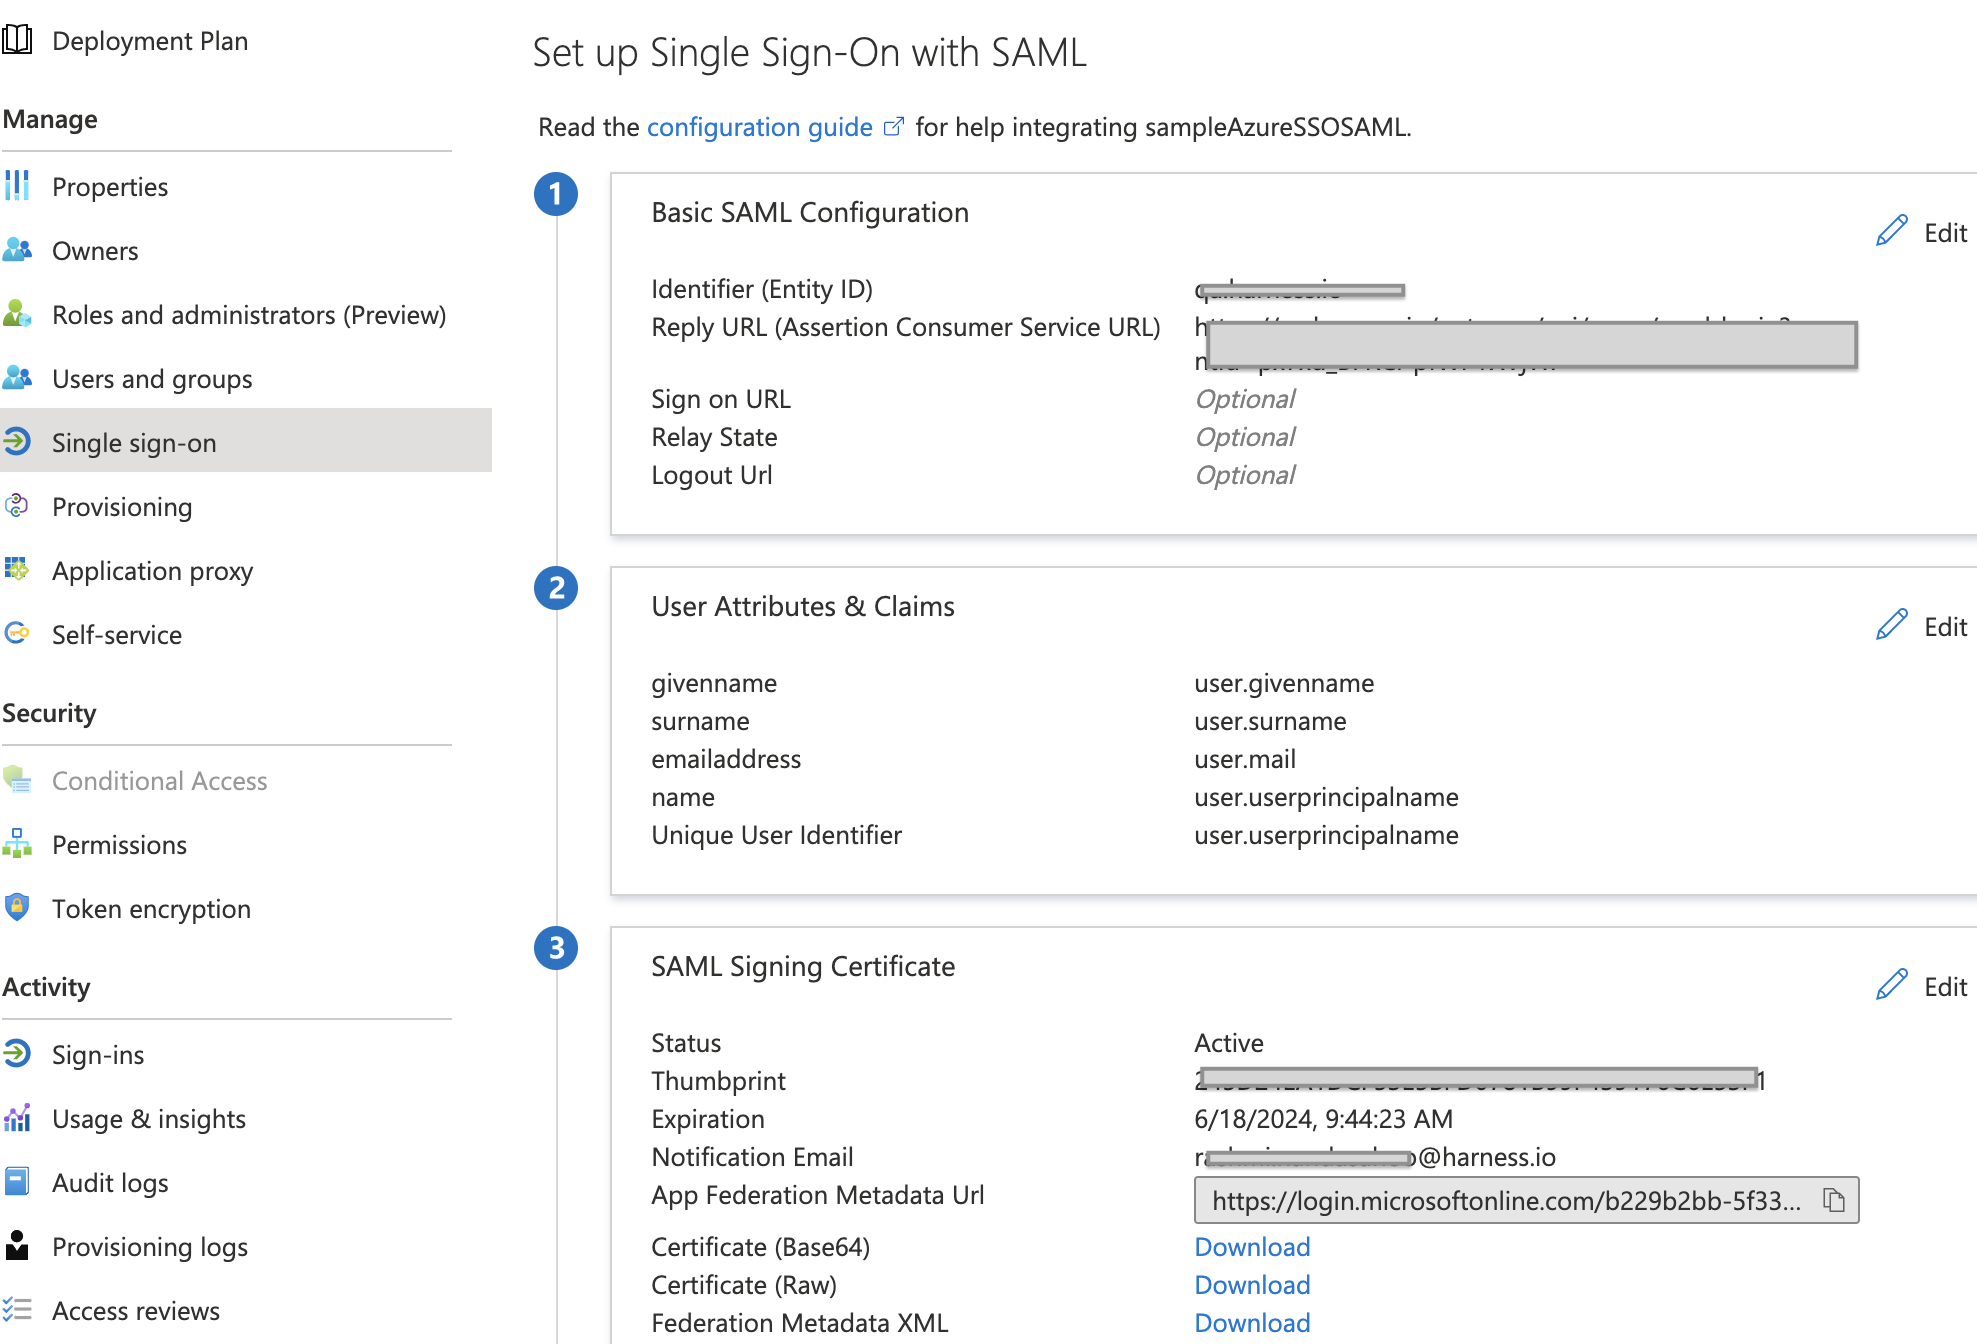
You must enter the **Harness SAML Endpoint URL** from Harness in your Azure app **Reply URL**. The **Reply URL** tells Azure where to send the SAML response after user authentication. Without it, Azure has no destination to redirect the user to after login.

1. In your Azure app, select **Single sign-on**. The SSO settings for the Azure app are displayed.

   <figure><img src="/files/s1Z5rZsLoYYoSEsKaA2P" alt=""><figcaption><p>Click to view full size image</p></figcaption></figure>
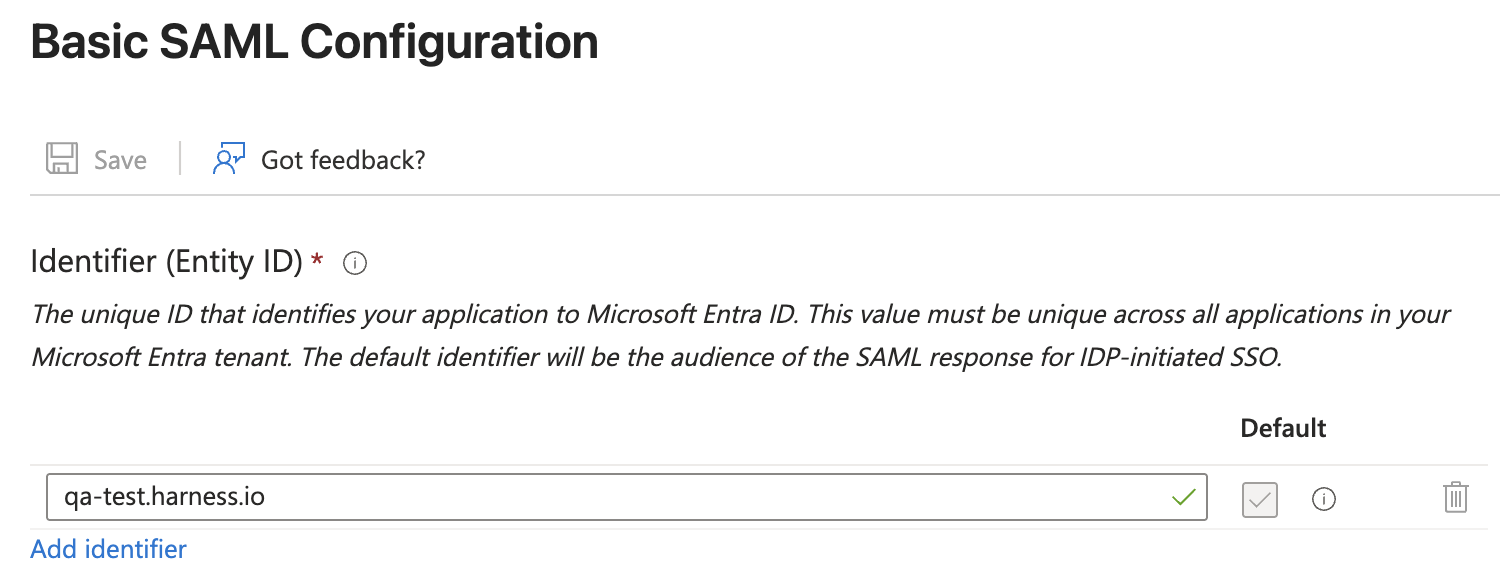
2. In **Basic SAML Configuration**, select the edit icon (pencil).
3. Enter a unique identifier in the **Identifier (Entity ID)** field. When your tenant only has one SAML application, this can be `app.harness.io`. If there are several SAML applications in the same tenant, this should be a unique identifier. While setting up SAML in Harness, the same identifier should be configured in the **Entity ID** field. Keep this tab open.

   <figure><img src="/files/cKTCqsDs6iN27xetjvRL" alt=""><figcaption><p>Click to view full size image</p></figcaption></figure>

{% hint style="info" %}
**NOTE**

For [Harness Self-Managed Enterprise Edition](/self-managed-enterprise-edition/new-to-self-managed-enterprise-edition/smp-overview.md), replace **app.harness.io** with your custom URL. For example, if you use a custom Harness subdomain in any Harness version, such as **example.harness.io**, use that URL.
{% endhint %}

***

### Step 2. Fetch Harness SAML endpoint URL <a href="#step-2-fetch-harness-saml-endpoint-url" id="step-2-fetch-harness-saml-endpoint-url"></a>

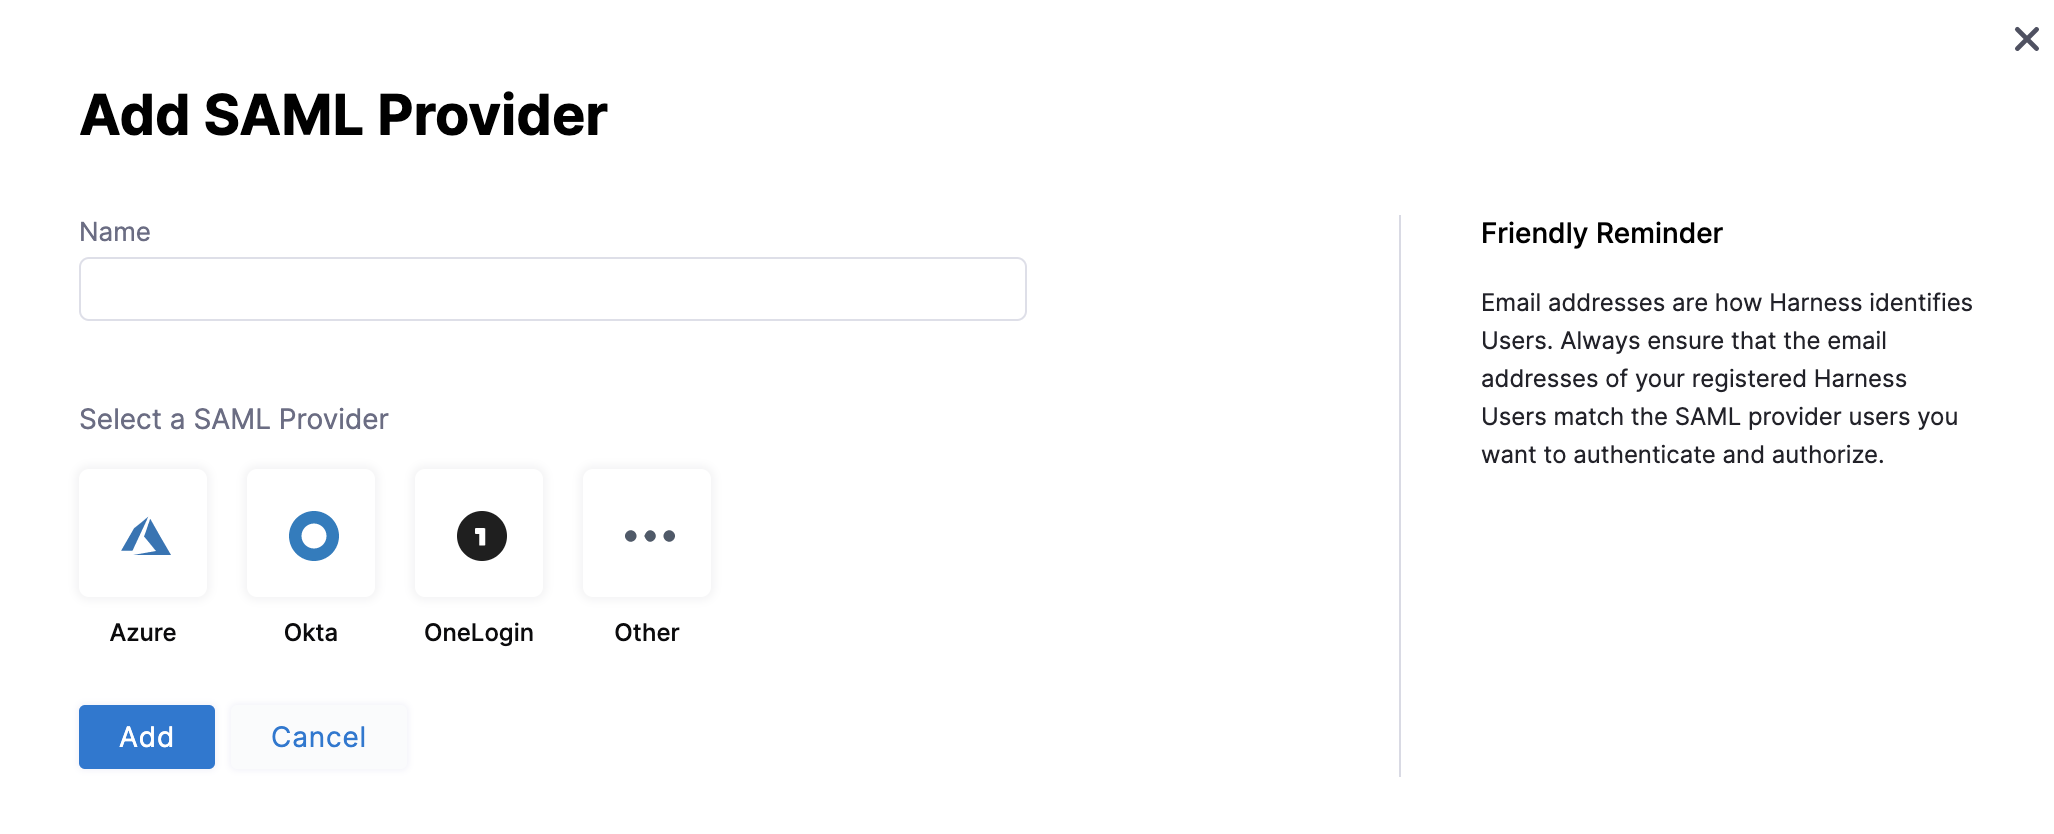
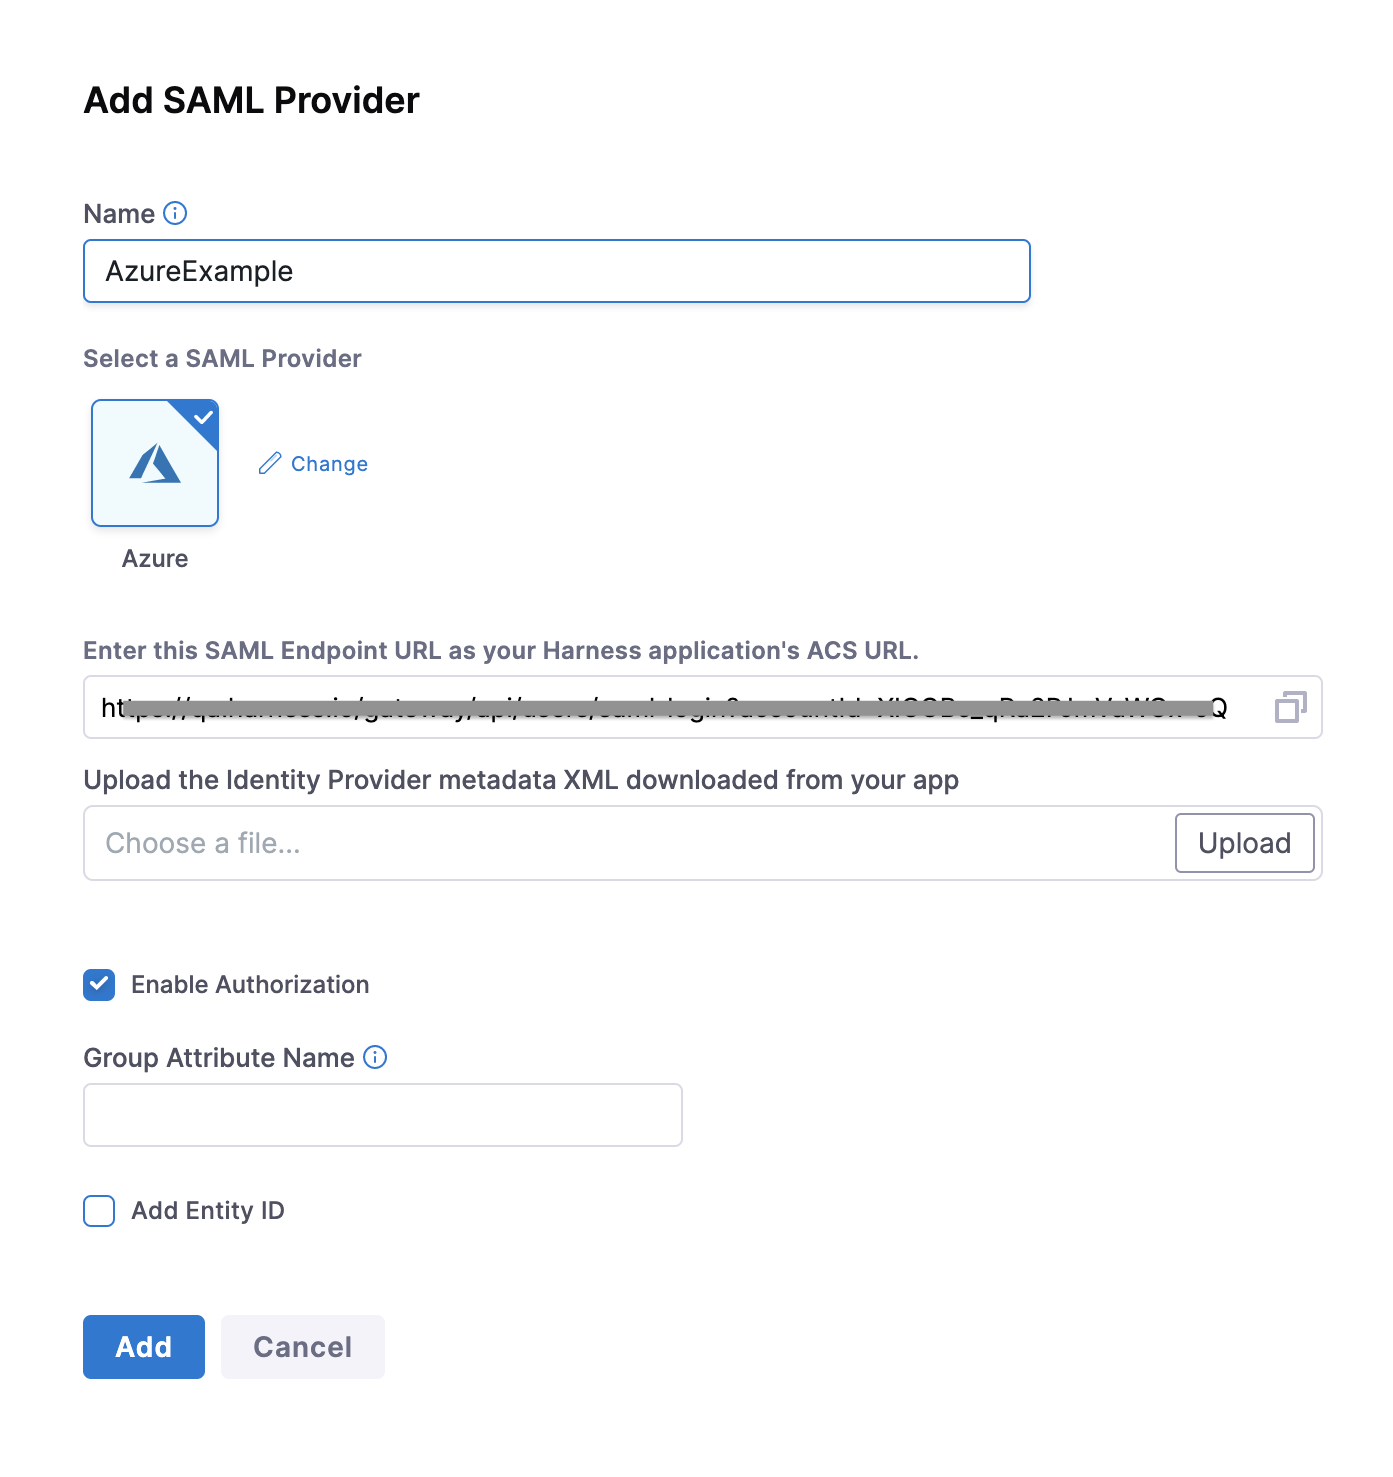
Next, use the **SAML SSO Provider** settings in Harness to set up your Azure app **Single sign-on**. 4. In Harness, under **Account Settings**, select **Authentication**. The authentication configuration page appears. 5. Select **SAML Provider**. The **Add SAML Provider** page opens.

<figure><img src="/files/2uRoKUF6cZ0y5Z1klg1h" alt=""><figcaption><p>Click to view full size image</p></figcaption></figure>

6\. In **Name**, enter a name for the SAML SSO Provider. 7. Under **Select a SAML Provider**, select **Azure**. The settings for Azure setup are displayed:

<figure><img src="/files/8II4FK4O1KaoMDF5yHIl" alt=""><figcaption><p>Click to view full size image</p></figcaption></figure>

***

### Step 3. Add endpoint URL in Azure <a href="#step-3-add-endpoint-url-in-azure" id="step-3-add-endpoint-url-in-azure"></a>

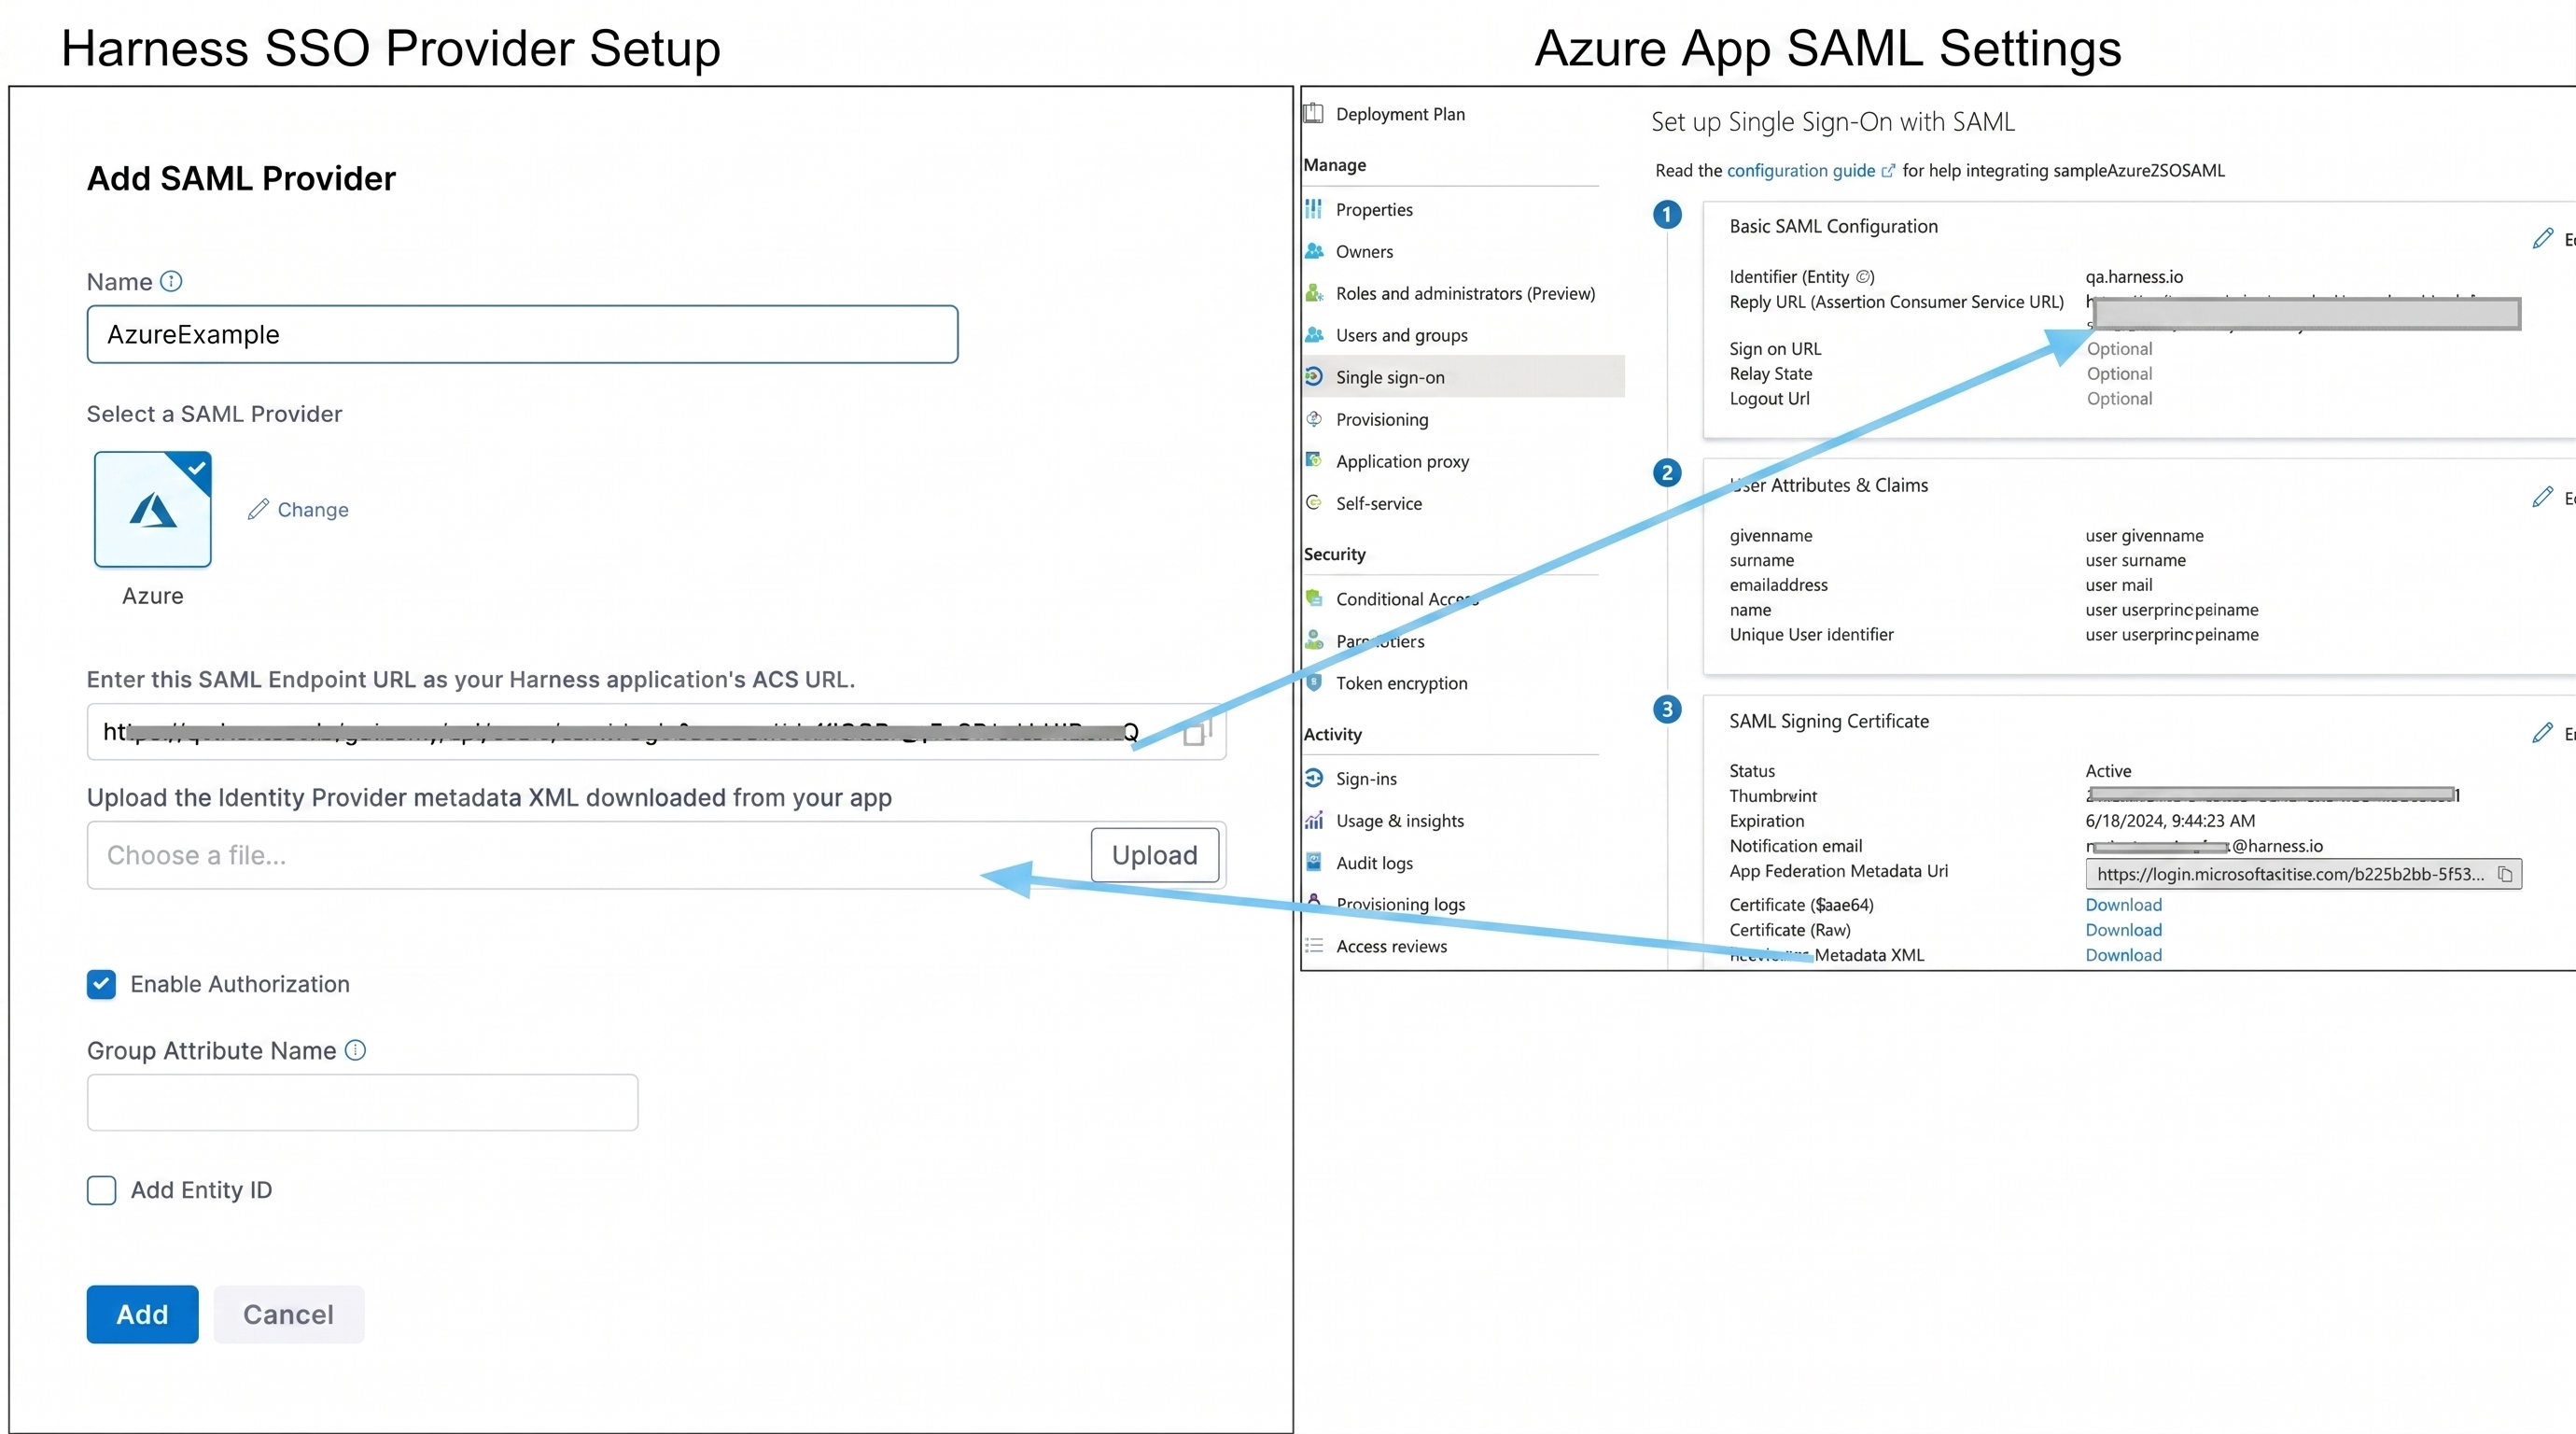
8. Copy the **Harness SAML Endpoint URL** from the **Add SAML Provider** dialog, and paste it in the **Reply URL** in your Azure app.

   <figure><img src="/files/lO4a6aesu4X3ztXj3t9I" alt=""><figcaption><p>Click to view full size image</p></figcaption></figure>
9. Click **Save** on the Azure App SAML Settings page.

***

### Step 4: User attributes and claims <a href="#step-4-user-attributes-and-claims" id="step-4-user-attributes-and-claims"></a>

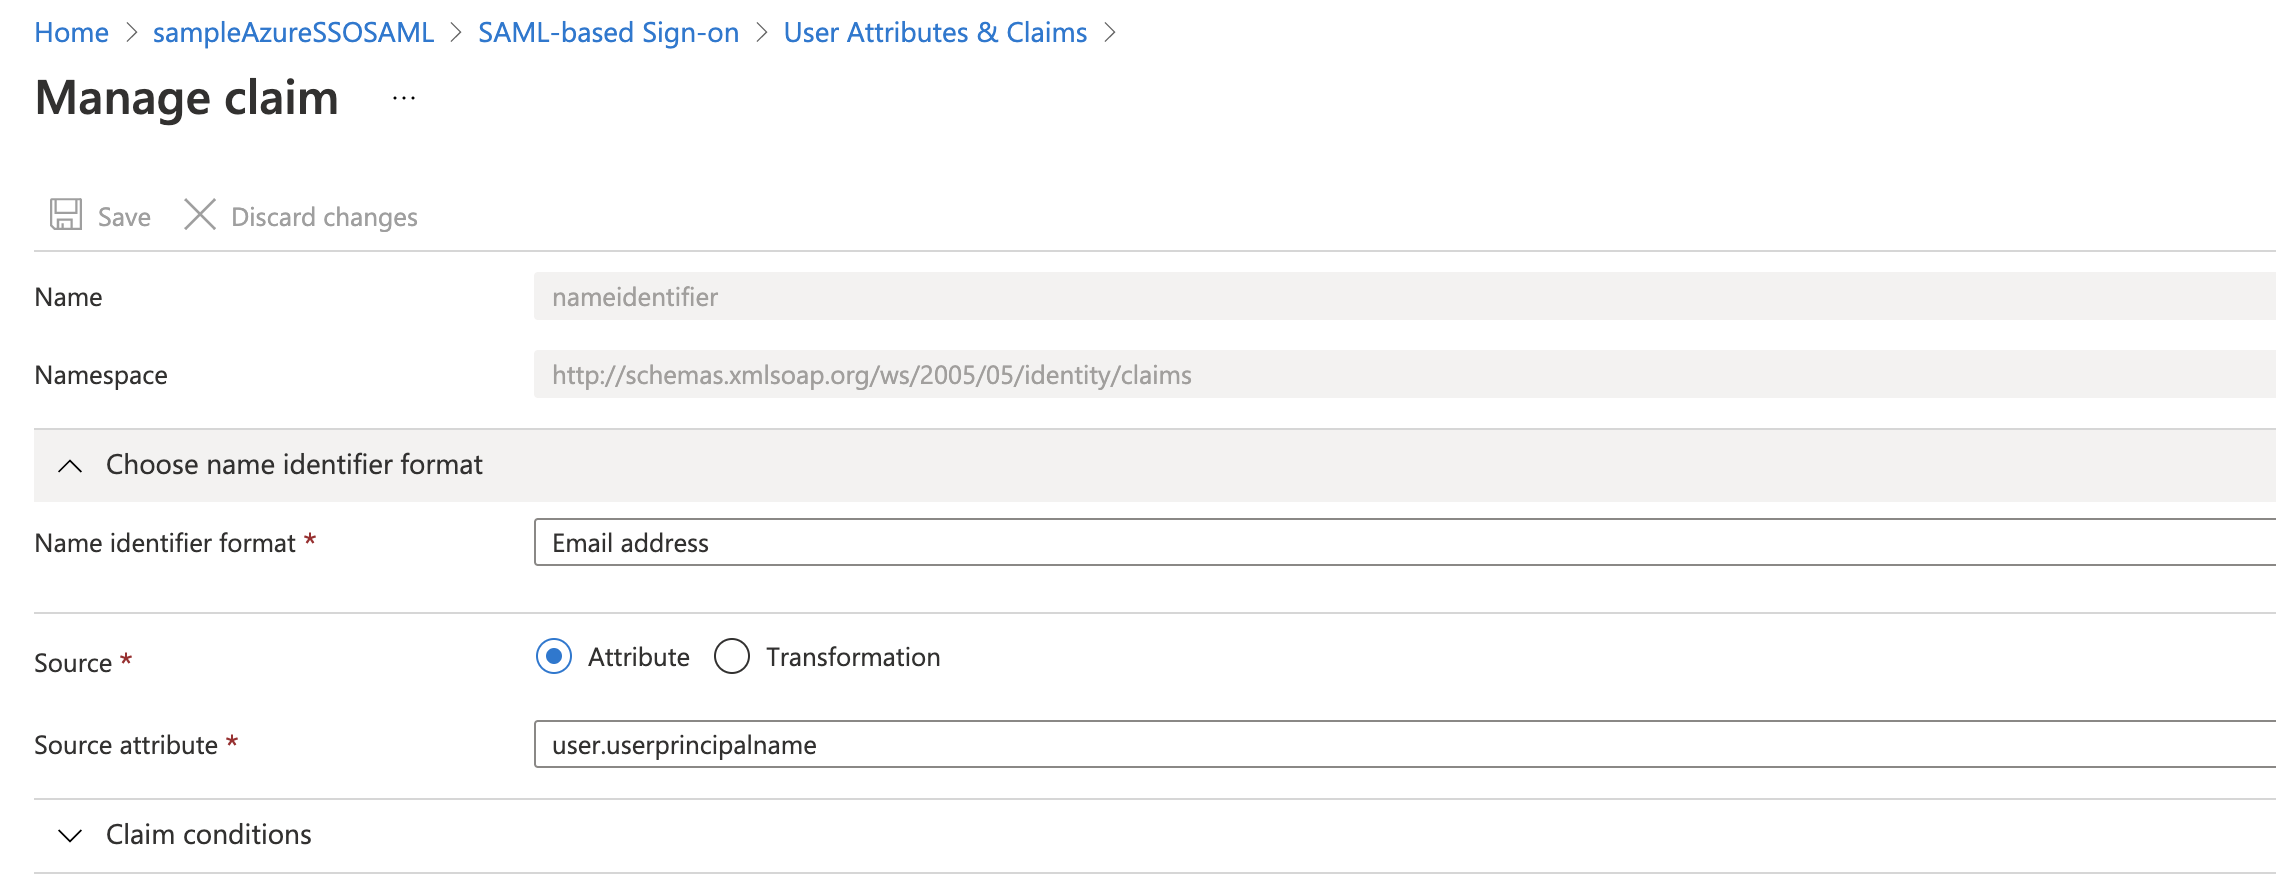
To ensure that Harness Users' email addresses are identified when they log in via Azure, set up the **Single sign-on** section of your Azure app to use the **User name** email address as the method to identify users. This step ensures Azure sends the right email as the unique identifier so Harness can match the incoming SAML assertion to the correct Harness account. The Azure users that are added to your Azure app must have their email addresses listed as their **User name.** To set this **User name** email address as the method for identifying users, in the Azure app **Single sign-on** section, the Azure app must use the **user.userprincipalname** as the **Unique User Identifier**, and **user.userprincipalname** must use **Email address** as the **name identifier format**.

{% hint style="info" %}
**NOTE**

* If **user.userprincipalname** cannot use an email address as the **Name ID format**, then **user.mail** should be used as the unique identifier in the **Identifier (Entity ID)** field.
* If your Azure users are set up with their email addresses in some field other than **User name**, ensure that the field is mapped to the **Unique User Identifier** in the Azure app and the **name identifier format** is **Email address**.
  {% endhint %}

To set this up in your Azure app, do the following:

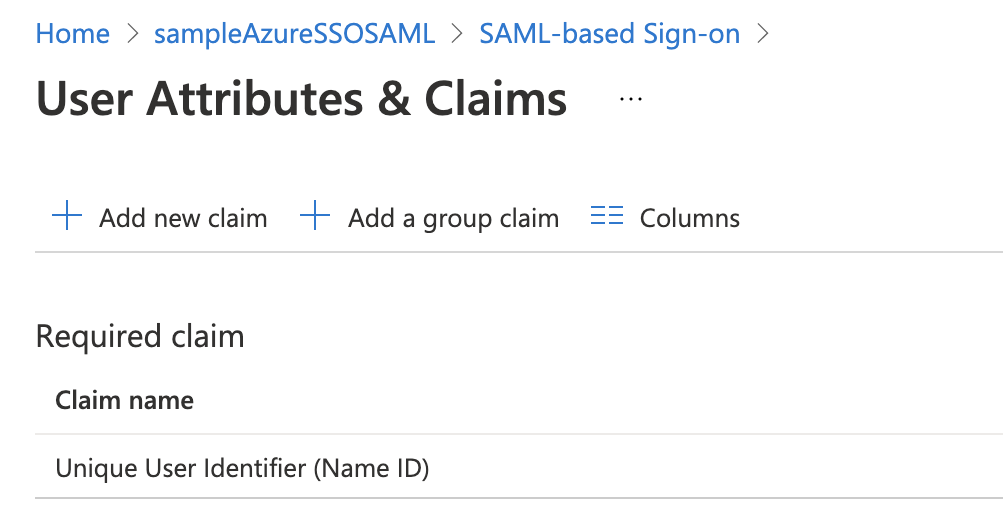
1. In your Azure app, in the **Single sign-on** blade, in **User Attributes & Claims**, click the edit icon (pencil). The **User Attributes & Claims** settings appear.

   <figure><img src="/files/ZuYX3SQ7GTNmf9bD9yXD" alt=""><figcaption><p>Click to view full size image</p></figcaption></figure>
2. For **Unique User identifier value**, select the edit icon. The **Manage claims** settings appear.

   <figure><img src="/files/IjtR3F1LH2tPhXyV1OdO" alt=""><figcaption><p>Click to view full size image</p></figcaption></figure>
3. Select **Choose name identifier format**, and select **Email address**.
4. In **Source attribute**, select **user.userprincipalname**.
5. Click **Save**, and then close **User Attributes & Claims**.

***

### Step 5: Azure SAML metadata file <a href="#step-5-azure-saml-metadata-file" id="step-5-azure-saml-metadata-file"></a>

The Federation Metadata XML contains Azure's signing certificate and endpoint URLs. Harness needs this file to validate that the SAML responses it receives actually came from your Azure tenant and have not been tampered with. Download the **Federation Metadata XML** from your Azure app to upload the file into Harness.

1. Download the **Federation Metadata XML** from your Azure app and upload it using **Upload the identity Provider metadata xml downloaded from your Azure App** in the **Add SAML Provider** settings in Harness.

   <figure><img src="/files/bJ8n6G1Tm0DXfWUumtJO" alt=""><figcaption><p>Click to view full size image</p></figcaption></figure>
2. Select **Add Entity ID** and enter your custom Entity ID. The default Entity ID is **app.harness.io**. The value you enter here overrides the default Entity ID.
3. Select **Add**. The new Azure SAML Provider is added under **Login via SAML**.

   <figure><img src="/files/JF3uMowap0nINJZF6sZb" alt=""><figcaption><p>Click to view full size image</p></figcaption></figure>

***

### Step 6: Enable and test SSO with Azure <a href="#step-6-enable-and-test-sso-with-azure" id="step-6-enable-and-test-sso-with-azure"></a>

Now that Azure is set up in Harness as a SAML SSO provider, you can enable and test it. Testing before you enforce SSO for all users prevents lockouts. You can test the Azure app SSO from within Azure if you are logged into Azure using an Azure user account that has the following:

* A Harness user with the same email address as your Azure user.
* Your Azure user added to the Azure app **Users and groups**.
* Global Administrator Directory role assigned to your Azure user. To test Azure SSO using Azure, do the following:

1. In the Azure app, select **Single sign-on**, and at the bottom of the **Single sign-on** settings, select **Test**.

   <figure><img src="/files/FqxTPD4pG7uXU2QJdDUp" alt=""><figcaption><p>Click to view full size image</p></figcaption></figure>
2. In the **Test** panel, select **Sign in as current user**. If the settings are correct, you are logged into Harness. If you cannot log into Harness, the **Test** panel provides debugging information. For more information, go to [Debug SAML-based single sign-on to applications](https://learn.microsoft.com/en-us/entra/identity/enterprise-apps/debug-saml-sso-issues?WT.mc_id=UI_AAD_Enterprise_Apps_Testing_Experience) from Microsoft Entra ID.

To test Azure SSO using Harness, do the following:

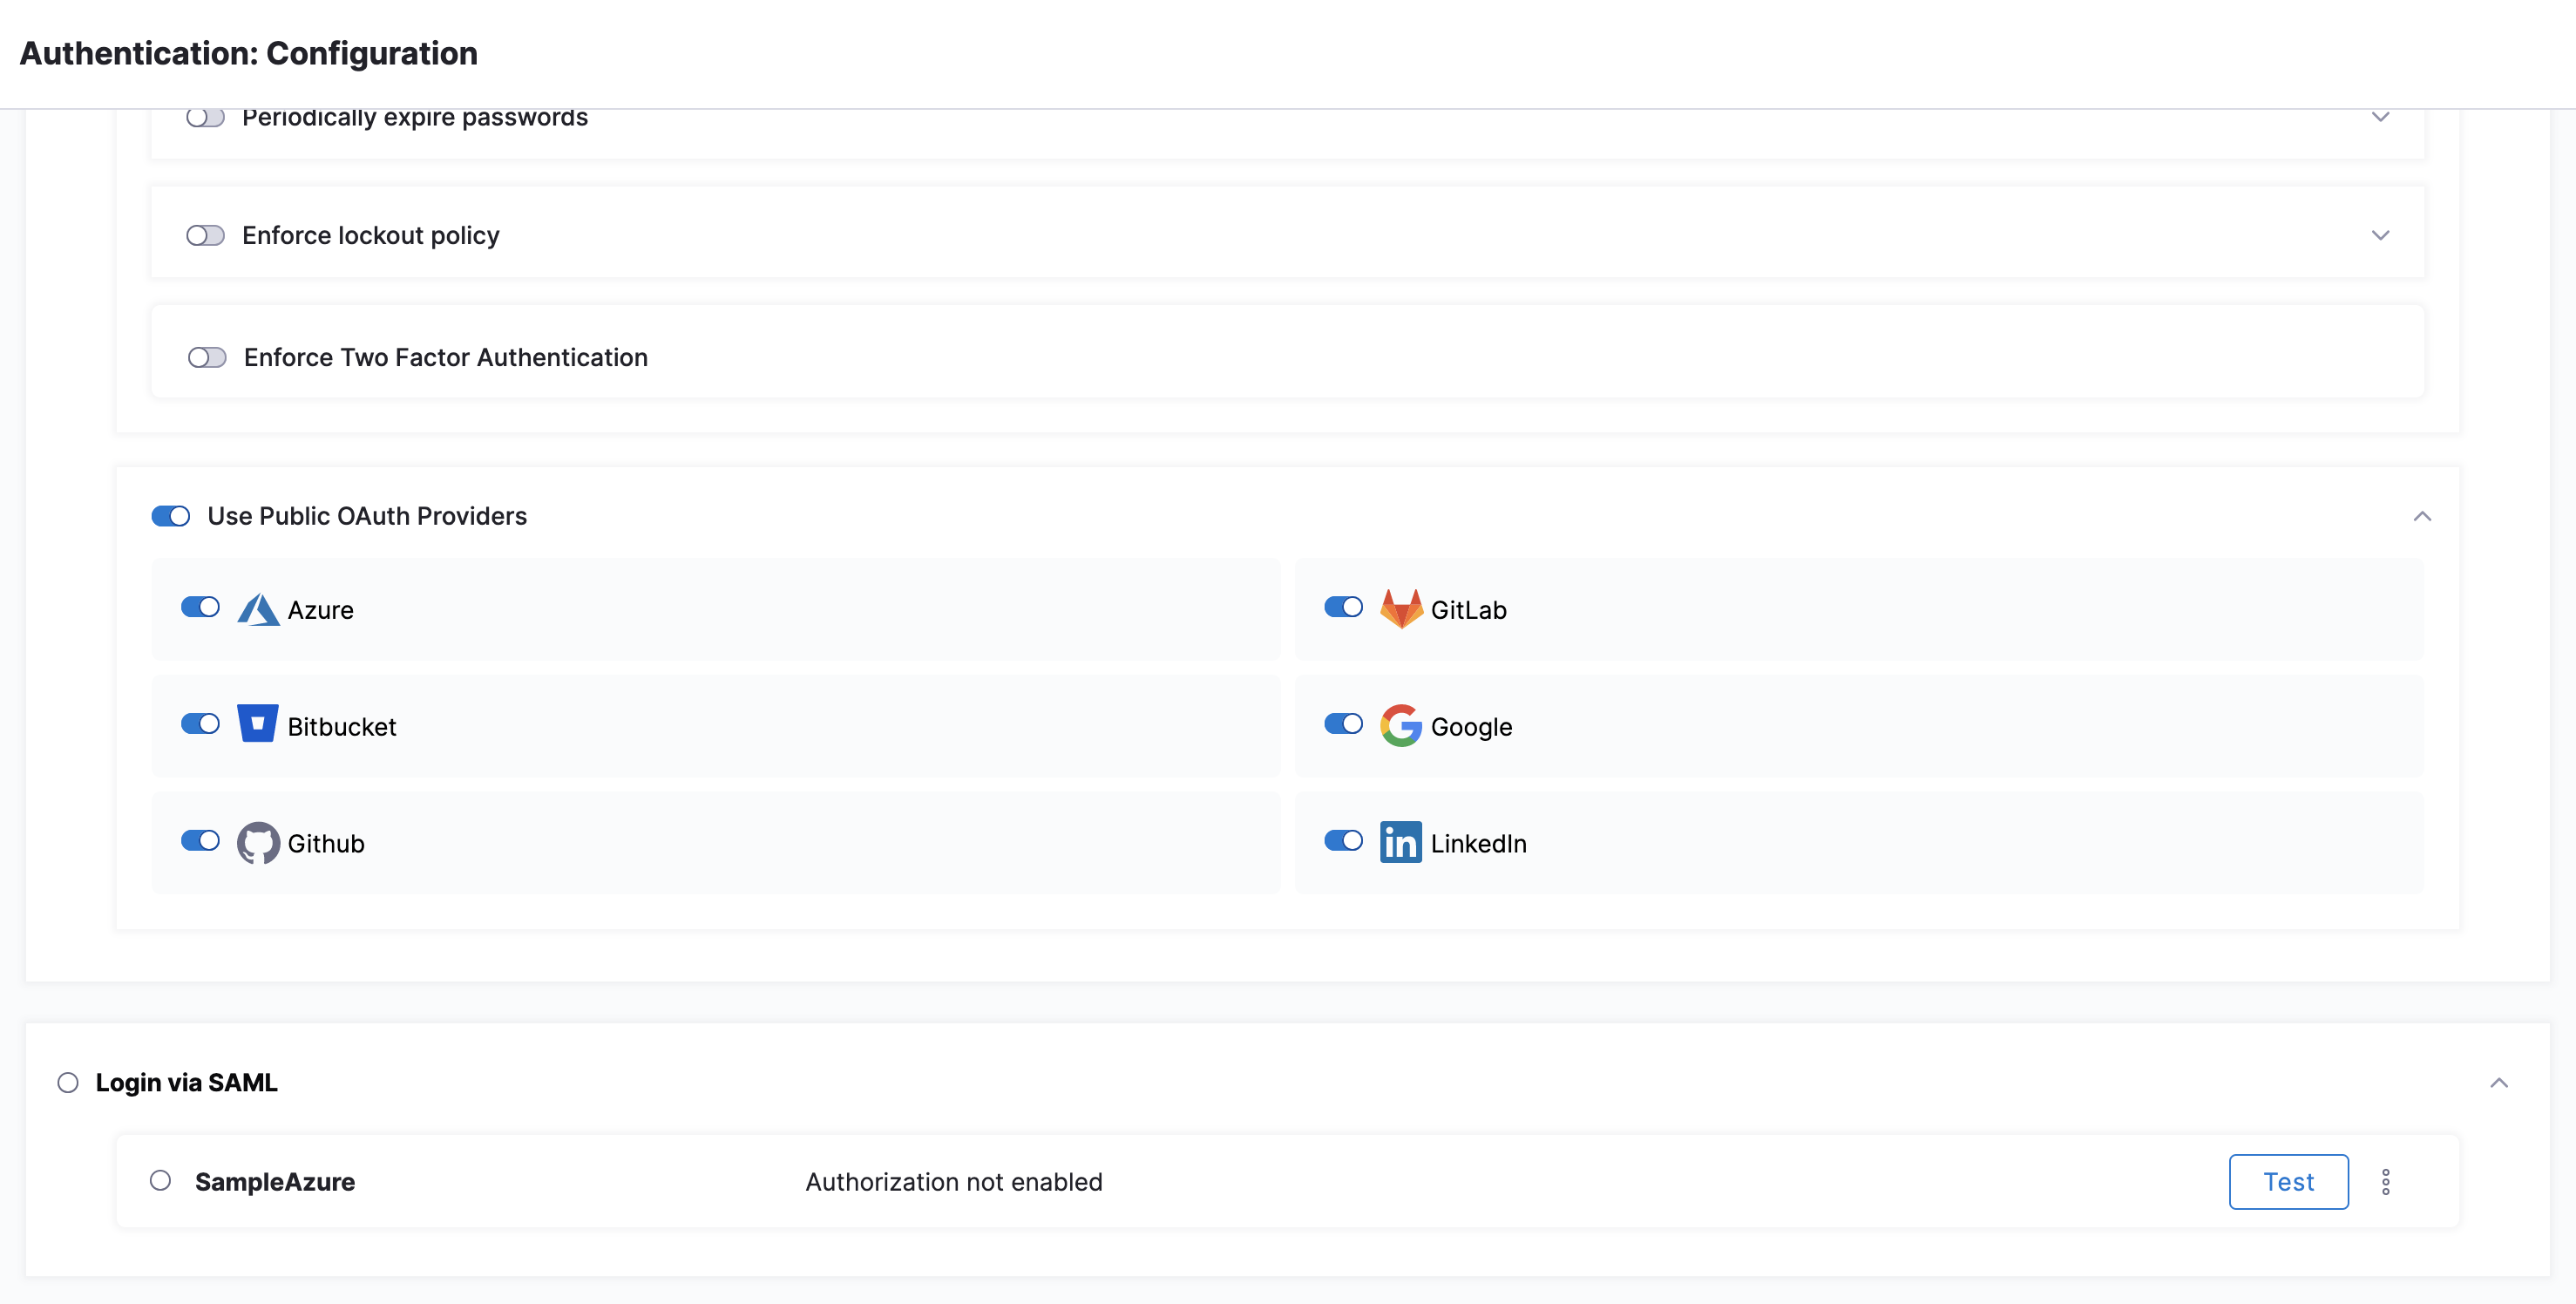
1. In **Harness**, in **Account Settings** > **Authentication**, select **Login via SAML**, to enable SAML SSO using the Azure provider.
2. Open a new Chrome Incognito window to test the SSO login using a Harness User account other than the one you are currently logged in with.
3. Sign into Harness using one of the user account email addresses shared by Harness and Azure. When you sign into Harness, you are prompted with the Microsoft Sign in dialog.
4. Enter the Azure username (most often, the email address), enter the Azure password, and select **Sign in**.

***

### SAML authorization with Azure <a href="#saml-authorization-with-azure" id="saml-authorization-with-azure"></a>

Once you have enabled Harness SSO with your Azure app, you can set up and enable SAML authorization in Harness using Azure.

To set up SAML authorization in Harness, you link a Harness User Group to a user group assigned to your Azure app. When a user from your Azure app logs into Harness, they are automatically added to the linked Harness User Group and inherit all the RBAC settings for that Harness User Group.

**Authentication** confirms who the user is and **authorization** determines what they can access.

Below are the Harness SAML settings you need from Azure to set up SAML authorization in Harness:

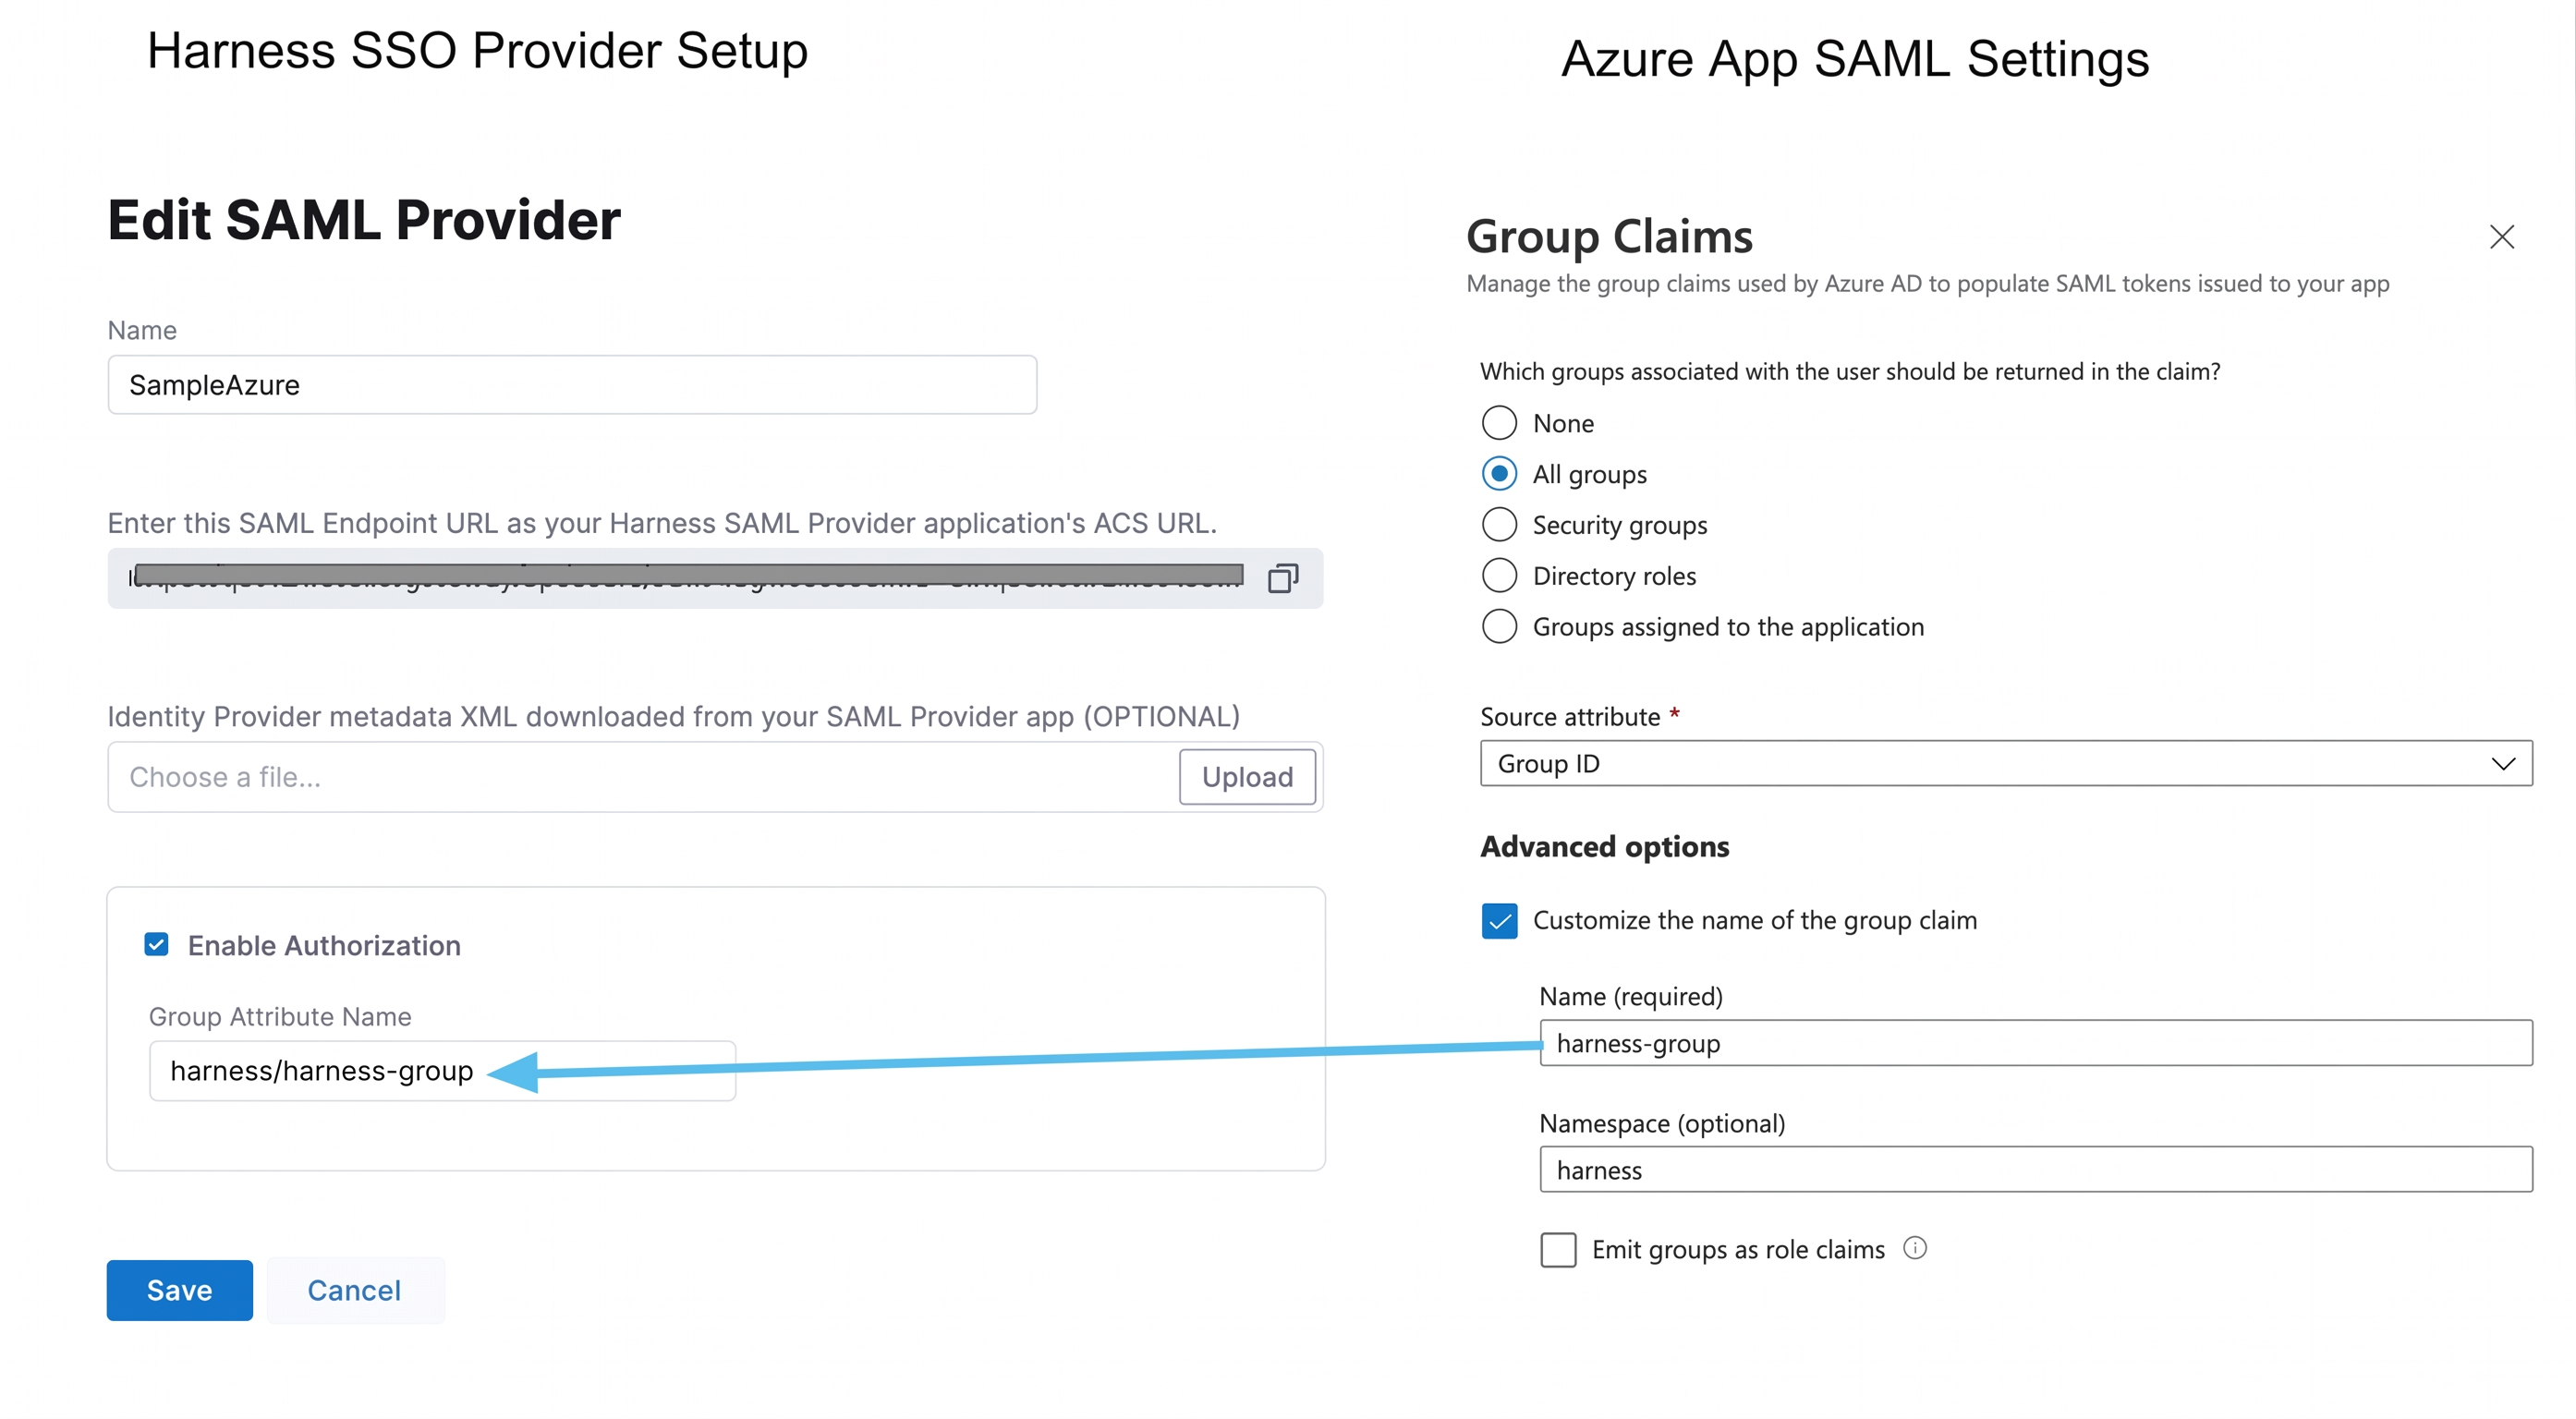
* **Group Attribute Name** - In Azure, this value is obtained from the **Group Claims** in the Azure app **User Attributes & Claims** settings. For Harness **Group Attribute Name**, here is the Harness **SAML Provider** setting on the left and their corresponding Azure **Group Claims** settings on the right:

  <figure><img src="/files/RuZ54zJ8zs5uvyiLKdhZ" alt=""><figcaption><p>Click to view full size image</p></figcaption></figure>

To set up Azure Authorization in Harness, do the following:

1. In Azure, add the **Group Claim** (Name and Namespace) to the Azure app.
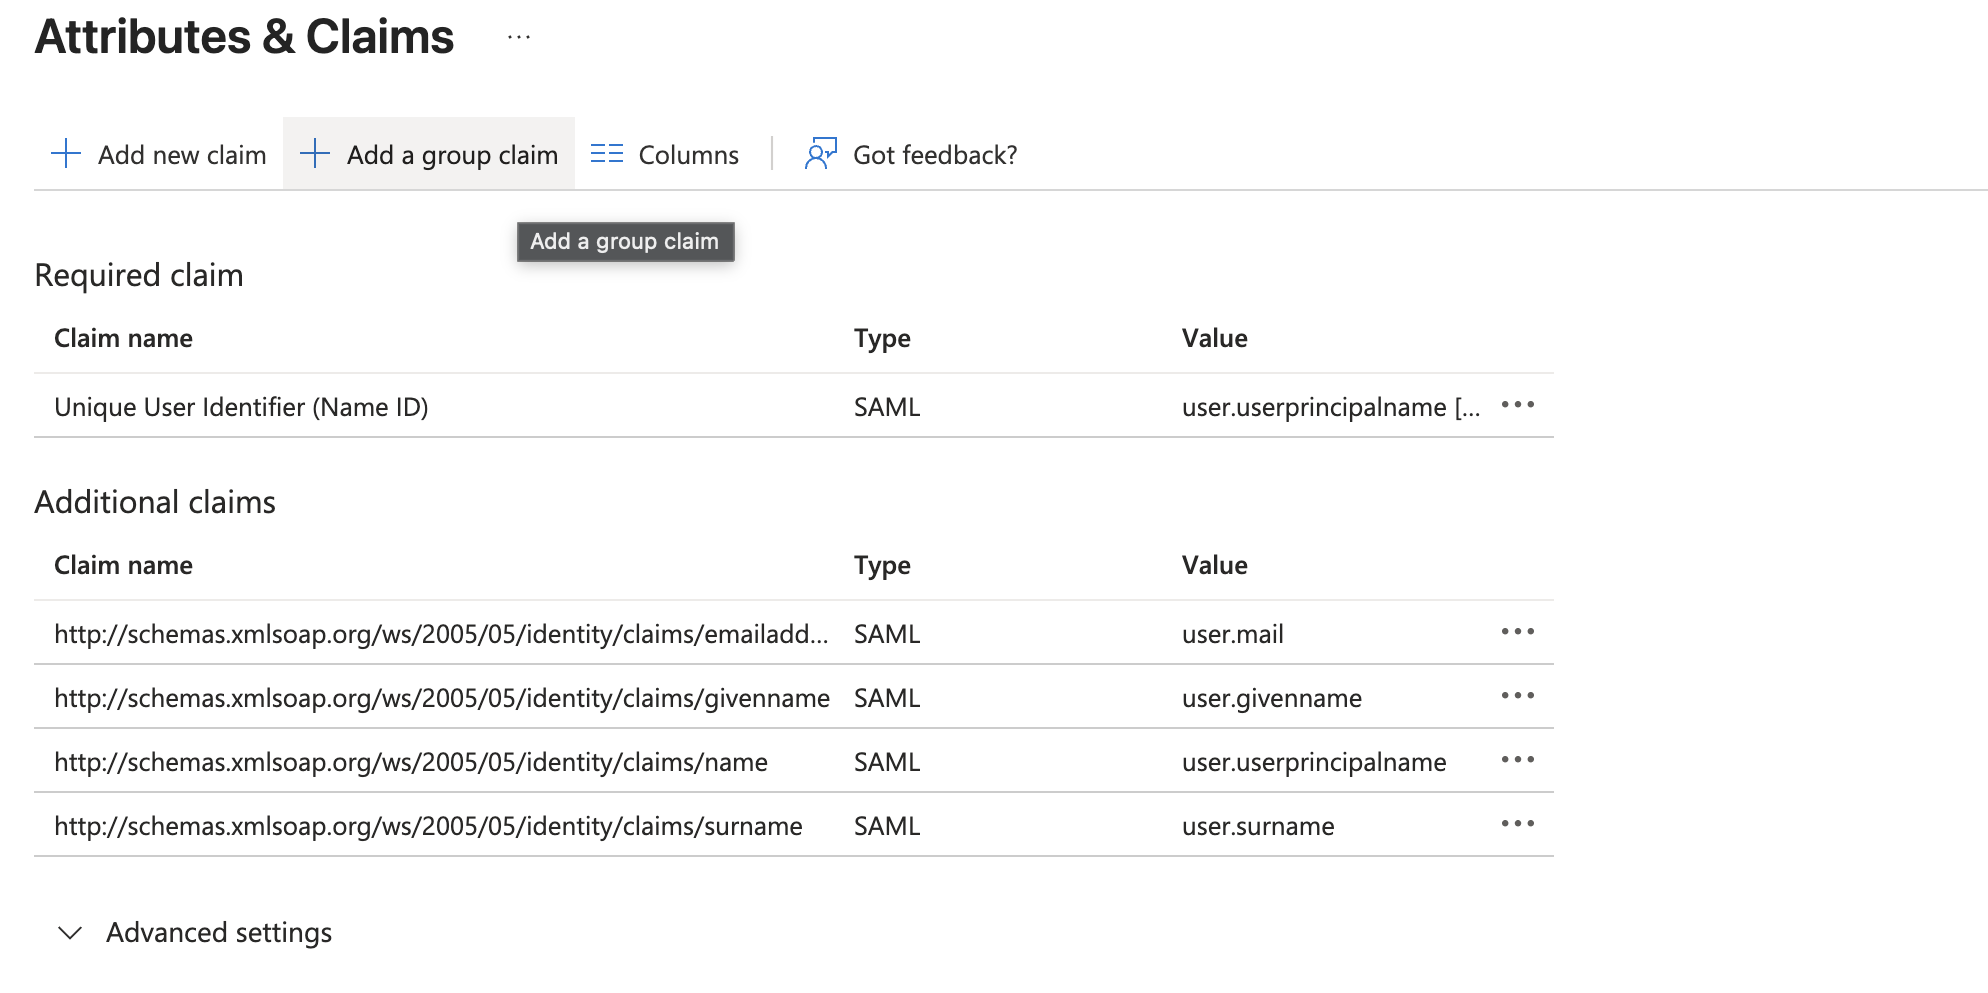
   1. In your Azure app, select **Single sign-on**, and then select edit (pencil icon) for **Attributes & Claims**.

      <figure><img src="/files/Z6ltGKF0VL6uRpBB8XwW" alt=""><figcaption><p>Click to view full size image</p></figcaption></figure>
   2. Select **Add a group claim**. The **Group Claims** settings appear.
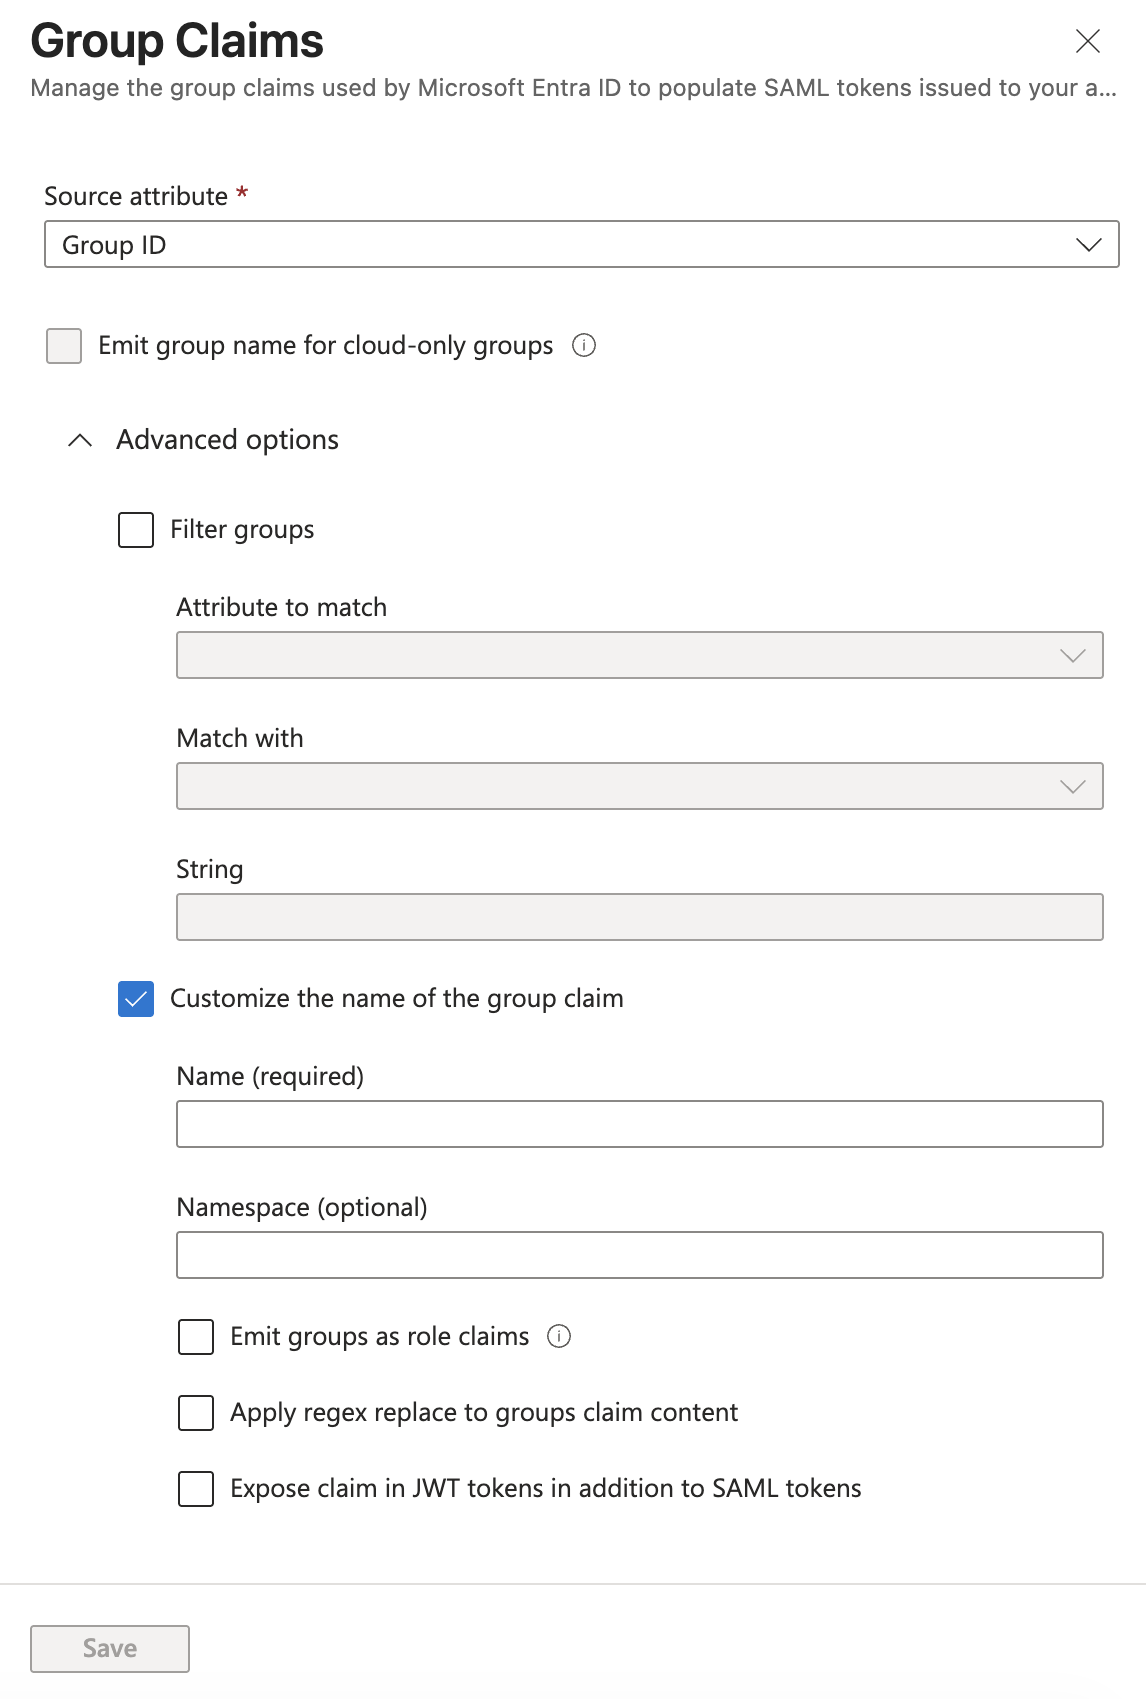
   3. Select the **All groups** option and expand the **Advanced options** and enable **Customize the name of the group claim**.

      <figure><img src="/files/quBrjOl5bYWHU2JnCntS" alt=""><figcaption><p>Click to view full size image</p></figcaption></figure>
   4. In **Name**, enter a name to use to identify the Harness Group Attribute Name.
   5. In **Namespace**, enter a namespace name.
   6. Click **Save**. **User Attributes & Groups** now display the group claim you created.
   7. Close **User Attributes & Groups**.
2. In Harness, enter the Group Claim name and namespace in the SAML SSO Provider **Group Attribute Name** field.
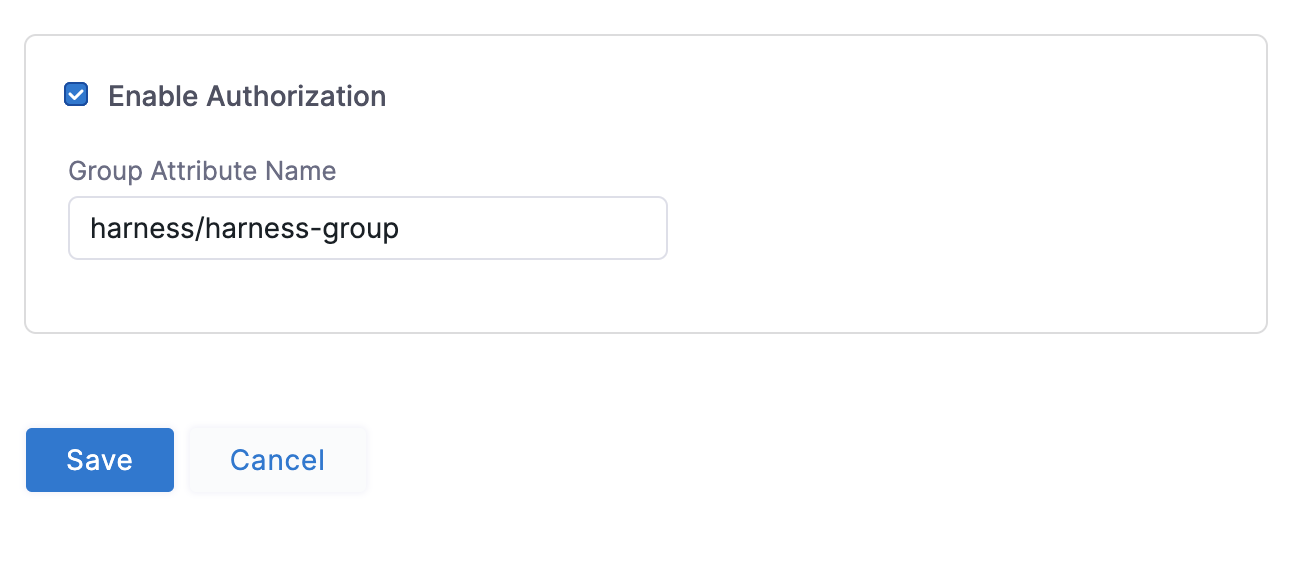
   1. Open the SAML SSO Provider dialog, and enable the **Enable Authorization** setting. You must turn on **Enable Authorization** to link this SSO Provider to a Harness User Group for authorization.
   2. Enter the Group Claim name and namespace in the **Group Attribute Name** field in the same format as a Claim Name (`namespace/name`). The SAML SSO Provider dialog looks something like this:

      <figure><img src="/files/HcGABxcif54JqQSGVsZK" alt=""><figcaption><p>Click to view full size image</p></figcaption></figure>
   3. Click **Save**. Authorization and the Group Attribute Name are set up. Next, set up your Azure and Harness groups.
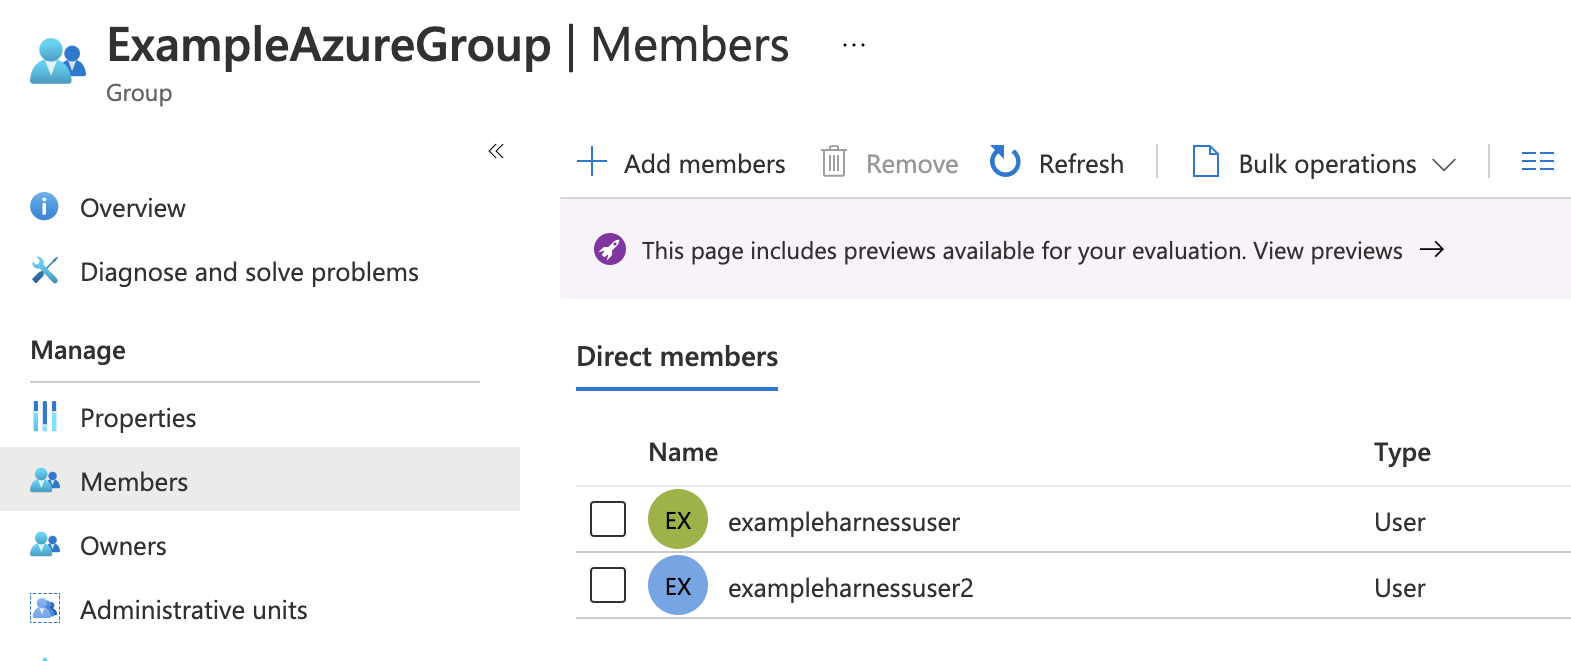
3. In Azure, ensure the Azure users with corresponding Harness accounts belong to an Azure group. Here is an Azure group named **ExampleAzureGroup** with two members:

   <figure><img src="/files/RFyhBT6fR6b7nhdCCaM1" alt=""><figcaption><p>Click to view full size image</p></figcaption></figure>
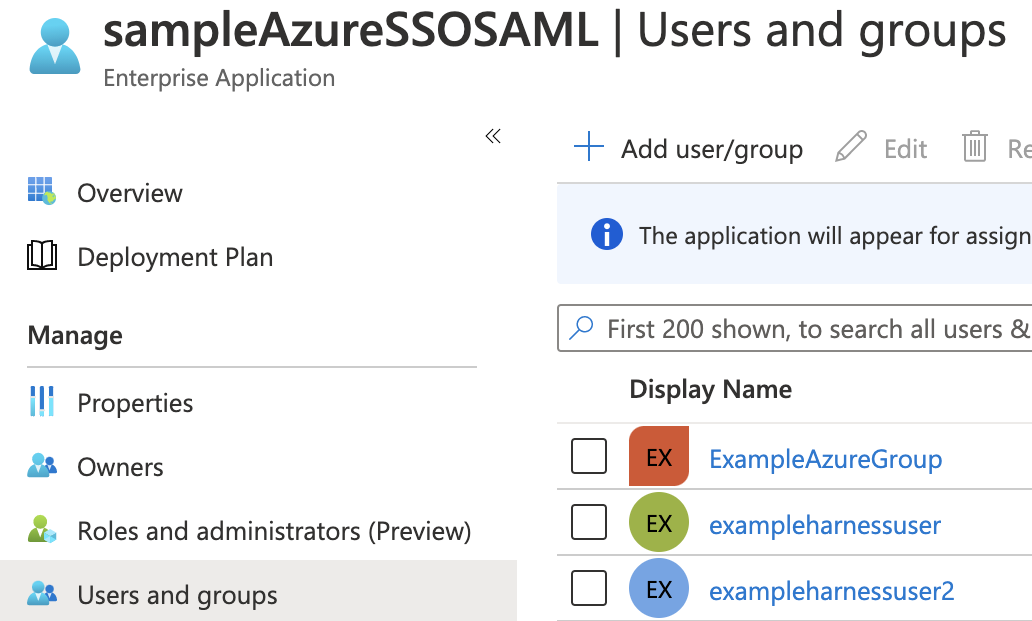
4. Ensure that the Azure group is assigned to the Azure app. Here you can see the **ExampleAzureGroup** group in the Azure app's **Users and groups**.

   <figure><img src="/files/3pJ62EfQHhIHHT2iLbAK" alt=""><figcaption><p>Click to view full size image</p></figcaption></figure>
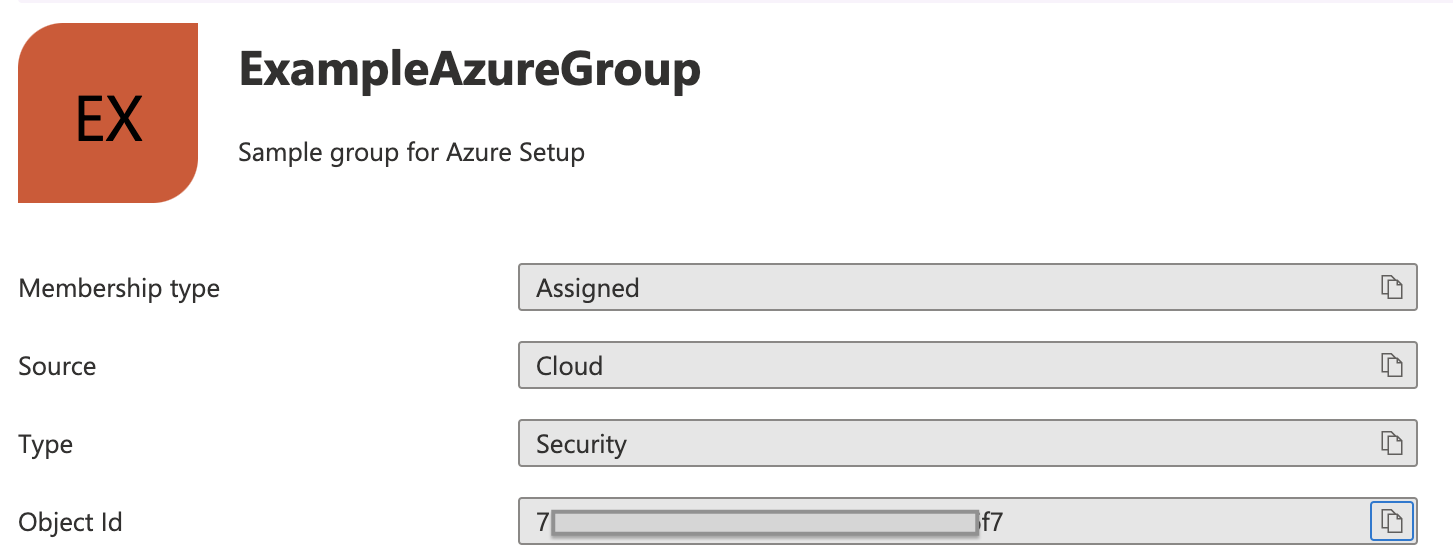
5. Link the Harness User Group to the Azure group using the Azure group Object ID.
   1. In Azure, copy the Azure group **Object ID**.

      <figure><img src="/files/8WeEtR2ijcM8SAJcBbSt" alt=""><figcaption><p>Click to view full size image</p></figcaption></figure>
   2. In Harness, create a new User Group or open an existing User Group.
   3. In **Account Settings**, select **User Groups** and then select the User Group you want to link the SAML SSO Provider to.
   4. Select **Link to SSO Provider Group**.

      <figure><img src="/files/1oOsqugBfYORhA3viYlA" alt=""><figcaption><p>Click to view full size image</p></figcaption></figure>
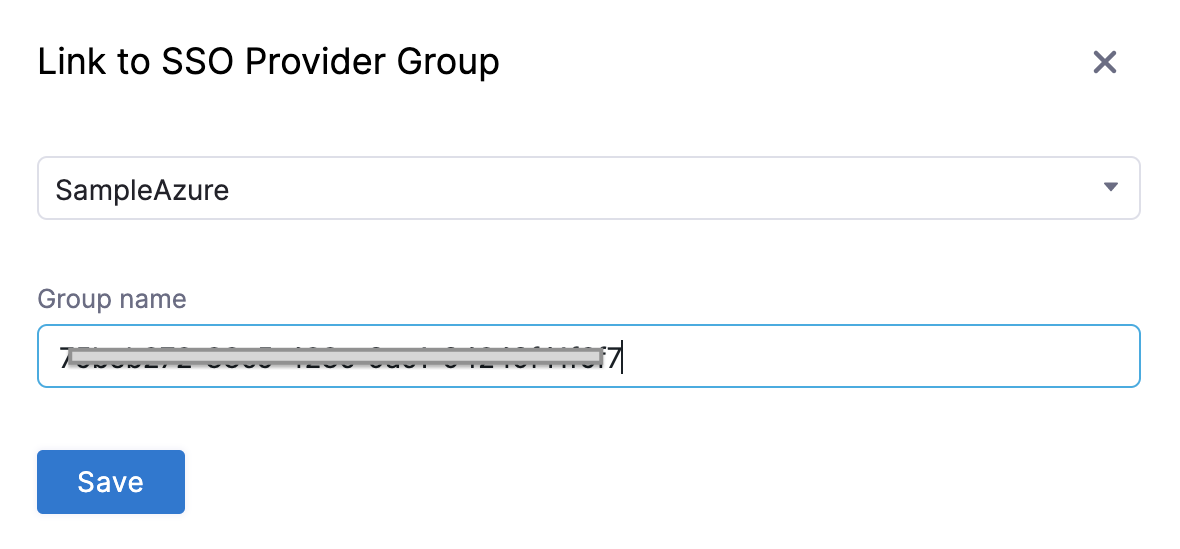
   5. In the **Link to SSO Provider Group** dialog, in **SSO Provider**, select the Azure SSO Provider you set up, and in **Group Name**, paste the Object ID you copied from Azure. When you are done, the dialog will look something like this:

      <figure><img src="/files/Y8kmT5hJi4vcxUby1AB0" alt=""><figcaption><p>Click to view full size image</p></figcaption></figure>
   6. Click **Save**. The User Group is now linked to the SAML SSO Provider and Azure group Object ID.
6. Test Authorization.
   1. Open a new Chrome Incognito window to test the authorization using a Harness User account other than the one you are currently logged in with.
   2. Log into Harness using the user email address, and sign in using the Azure username and password. If you are already logged into Azure in Chrome, you might be logged into Harness automatically.
   3. In the linked Harness User Group, confirm that the Harness user account appears in the group. The Harness User is now added and the RBAC settings for the Harness User Group are applied to its account. For more information, go to [Manage User Groups](/harness-platform/use-harness-platform/platform-access-control/add-user-groups.md).

***

### Users in over 150 groups <a href="#users-in-over-150-groups" id="users-in-over-150-groups"></a>

When a user logs in via SAML SSO, Microsoft Entra ID sends Harness a token. A token is a packet of information about who the user is and what groups they belong to. That token has a size limit.

When a user has more than 150 group memberships, the number of groups listed in the token can grow the token size. Microsoft Entra ID limits the number of groups it will emit in a token to 150 for SAML assertions. Instead of sending the group list, Microsoft Entra ID just sends a link to fetch the group information from this API endpoint.

Harness uses those groups to map the user to the right Harness User Groups (for RBAC). If the group list is missing from the token, Harness cannot map a user to the Harness User Group. Harness invokes Microsoft's API directly to get the full list.

To configure Harness to handle users in more than 150 groups, do the following:

1. In your Azure account, go to **App registrations**.
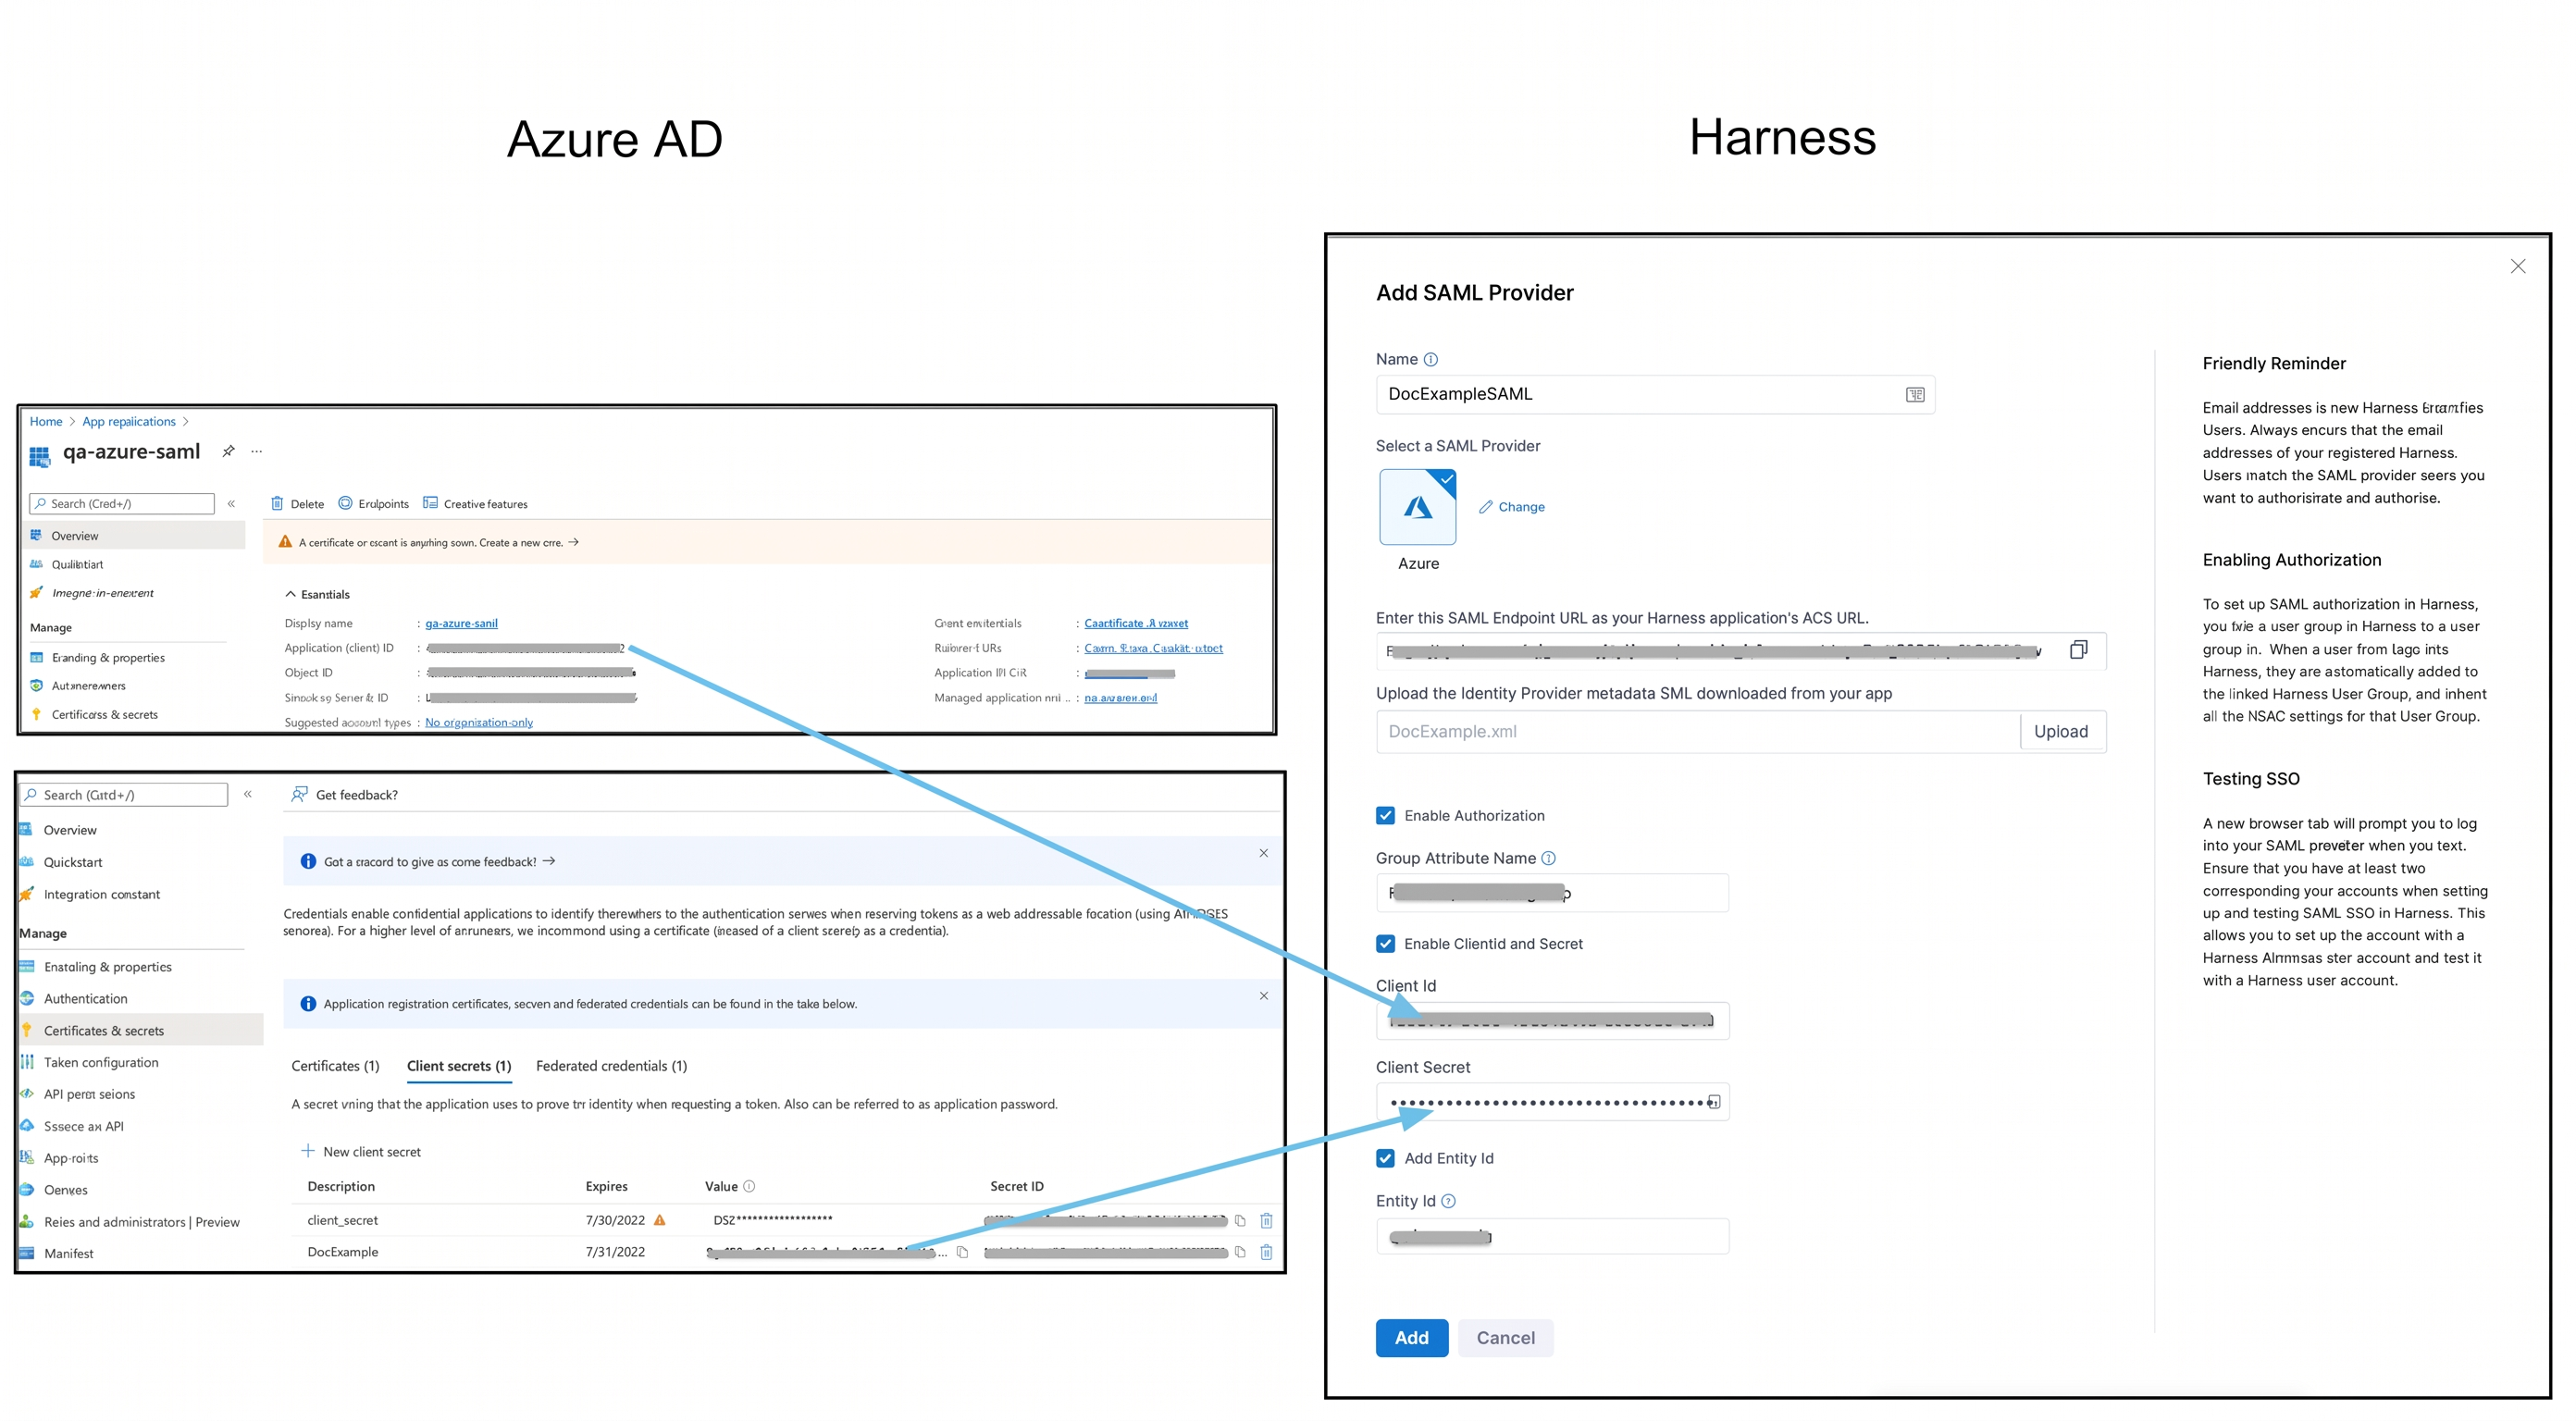
2. Select your app. Copy the **Application (client) ID** and paste it in the **Client ID** field in your Harness account.
3. Select **Certificates & secrets** > **New Client Secret**, add a description, and select **Add**.
4. Copy the secret value immediately as Azure only shows it once. Save it as an encrypted text secret in Harness. For details, go to [Use encrypted text secrets](/harness-platform/use-harness-platform/secrets/add-use-text-secrets.md).
5. Select the secret reference in the **Client Secret** field in your Harness account.

   <figure><img src="/files/GYfrbQby5vOCcPr5Mc47" alt=""><figcaption><p>Click to view full size image</p></figcaption></figure>
6. In your Azure app, go to **Manage** > **API Permissions**.
7. Select **Add a permission** > **Microsoft Graph** > **Application permissions**.
8. Add the following permissions. You must enable each for both **Delegated permissions** and **Application permissions**:
   * `Directory.Read.All`
   * `Group.Read.All`
   * `GroupMember.Read.All`
   * `User.Read.All` For more information on Azure application permissions, go to [Application permissions](https://learn.microsoft.com/en-us/graph/permissions-reference#application-permissions-93) in the Azure documentation.

***

### Just-In-Time (JIT) provisioning <a href="#just-in-time-jit-provisioning" id="just-in-time-jit-provisioning"></a>

Harness supports SAML configuration [with or without JIT user provisioning](/harness-platform/use-harness-platform/authentication/single-sign-on-saml.md#just-in-time-jit-provisioning). Go to [Just-in-Time (JIT) user provisioning](/harness-platform/3.0/harness-platform-resources/platform-access-control/provision-use-jit.md) to understand how Harness creates users on first SAML login when JIT is enabled.

***

### Troubleshooting <a href="#troubleshooting" id="troubleshooting"></a>

<details>

<summary>SAML authentication fails with Microsoft Entra ID (Azure AD)</summary>

Ensure the Harness SAML Endpoint URL is added as a Reply URL (Assertion Consumer Service URL) in the Azure app's Basic SAML Configuration. Verify the Identifier (Entity ID) is set to app.harness.io. If multiple SAML applications exist in the same tenant, use a unique identifier instead. Ensure the Federated Metadata XML downloaded from Entra ID has been uploaded to Harness.

</details>

***

### Related articles <a href="#related-articles" id="related-articles"></a>

* [SAML SSO with Okta](/harness-platform/use-harness-platform/authentication/single-sign-on-saml/okta.md): Set up Harness with Okta as a SAML SSO provider
* [SAML SSO with OneLogin](https://github.com/harness/harness-developer-hub/tree/fix/iain-taran-richard/docs/platform/authentication/single-sign-on-saml/saml-sso-with-onelogin/README.md): Set up Harness with OneLogin as a SAML SSO provider
* [SAML SSO with Keycloak](/harness-platform/use-harness-platform/authentication/single-sign-on-saml/keycloak.md): Set up Harness with Keycloak as a SAML SSO provider
* [Advanced SAML configuration](/harness-platform/use-harness-platform/authentication/single-sign-on-saml/advanced-saml-configuration.md): Use local login and encrypted SAML with Harness