> For the complete documentation index, see [llms.txt](https://developer.harness.io/llms.txt). Markdown versions of documentation pages are available by appending `.md` to page URLs; this page is available as [Markdown](https://developer.harness.io/harness-platform/use-harness-platform/authentication/single-sign-on-saml/onelogin.md).

# OneLogin

OneLogin acts as a SAML identity provider for Harness, enabling users to authenticate with their existing OneLogin credentials. When a user attempts to log in to Harness, they are redirected to OneLogin for authentication. After successful authentication, OneLogin sends a signed SAML assertion back to Harness, which validates it and grants access. Optionally, OneLogin can include role information in the SAML assertion through custom parameters, allowing Harness to automatically assign users to corresponding Harness user groups based on their OneLogin roles for role-based access control.

{% hint style="info" %}
**NOTE**

If you use [Harness Self-Managed Enterprise Edition](/self-managed-enterprise-edition/new-to-self-managed-enterprise-edition/smp-overview.md), your instance must be accessed via an HTTPS load balancer, otherwise SAML authentication will fail over HTTP.
{% endhint %}

***

### What you will learn in this topic <a href="#what-you-will-learn-in-this-topic" id="what-you-will-learn-in-this-topic"></a>

By the end of this topic, you will be able to:

* [Set up the Harness application in OneLogin with SAML configuration](#onelogin-authentication-on-harness).
* [Enable SSO authentication](#enable-onelogin-as-a-harness-sso-provider).
* [Configure OneLogin roles and parameters to sync user permissions with Harness user groups](#assign-roles-to-users).
* [Test and verify OneLogin authentication and authorization](#test-the-integration).
* [Use Just-in-Time (JIT) provisioning](#just-in-time-jit-provisioning) to automatically create users on first login.

***

### Before you begin <a href="#before-you-begin" id="before-you-begin"></a>

Before you configure OneLogin as the SAML identity provider for Harness, ensure you have the following:

* A Harness account with Account Admin permissions.
* An existing OneLogin account with admin access to create and configure applications.
* A [user group ](/harness-platform/use-harness-platform/platform-access-control/add-user-groups.md#create-user-groups-manually)in Harness to link to OneLogin.
* Understand [SAML SSO with Harness ](https://github.com/iKettles/harness-gitbook/tree/main/docs/platform/authentication/single-sign-on-saml/overview/README.md#saml-sso-with-harness).

***

### OneLogin authentication on Harness <a href="#onelogin-authentication-on-harness" id="onelogin-authentication-on-harness"></a>

Enabling OneLogin authentication on Harness requires configuration on both Harness and OneLogin.

Use two browser windows or tabs for this process. Open OneLogin in one tab and Harness in the other.

#### Step 1: Obtain SAML endpoint URL <a href="#step-1-obtain-saml-endpoint-url" id="step-1-obtain-saml-endpoint-url"></a>

To get the SAML Endpoint URL from Harness to configure OneLogin:

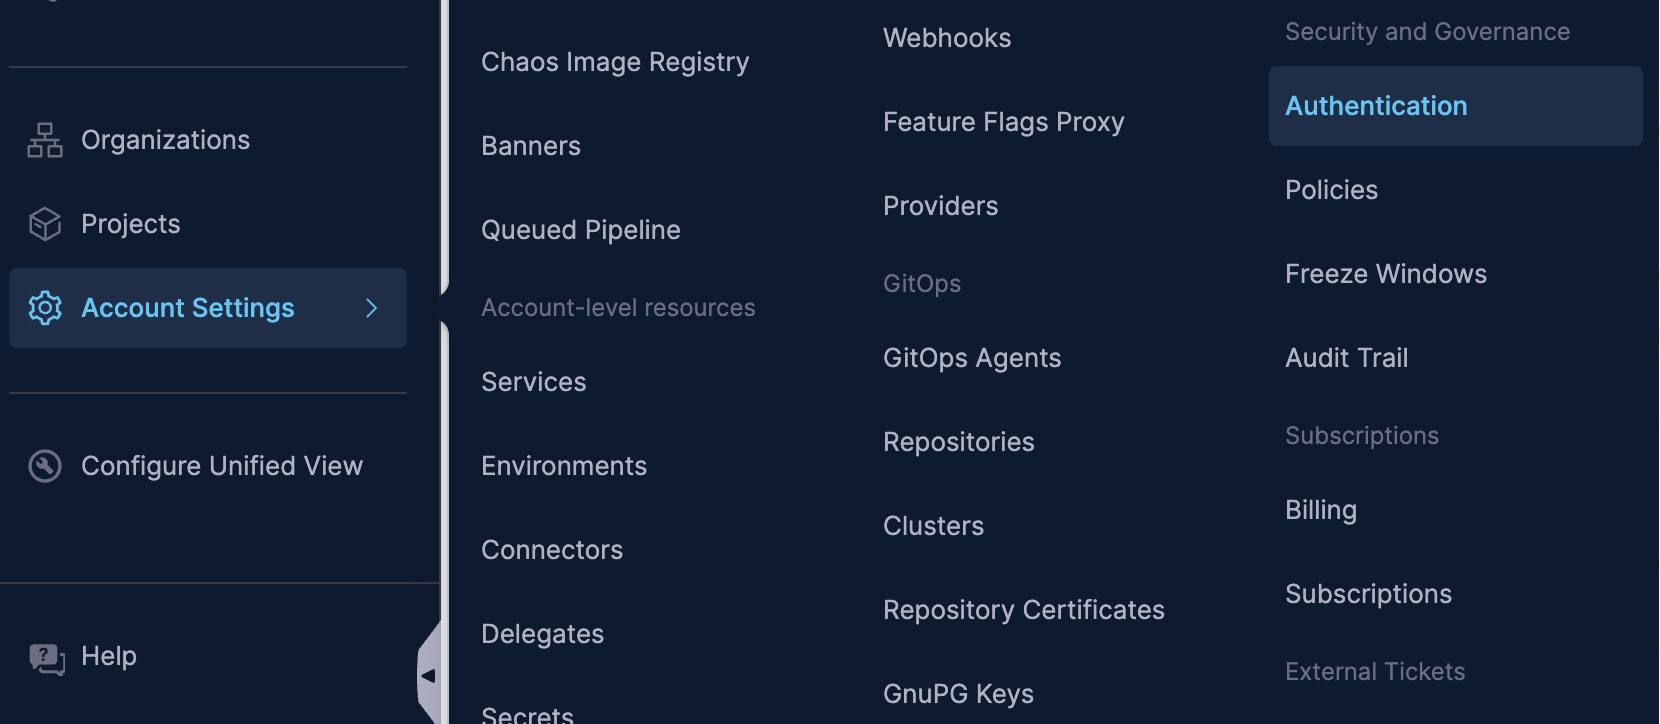
1. In Harness, go to **Account Settings** and select **Authentication**.

   <figure><img src="/files/pFy3pOulPWHtpvjGv5wY" alt=""><figcaption><p>Click to view full size image</p></figcaption></figure>

The Authentication page appears.

2. Click **+ SAML Provider** (if you are configuring SAML for the first time) or **Login via SAML** (if you have already configured SAML providers). Select **Add SAML Provider**.

<figure><img src="/files/JYWJpDp0zcuePefV108a" alt=""><figcaption><p>Click to view full size image</p></figcaption></figure>

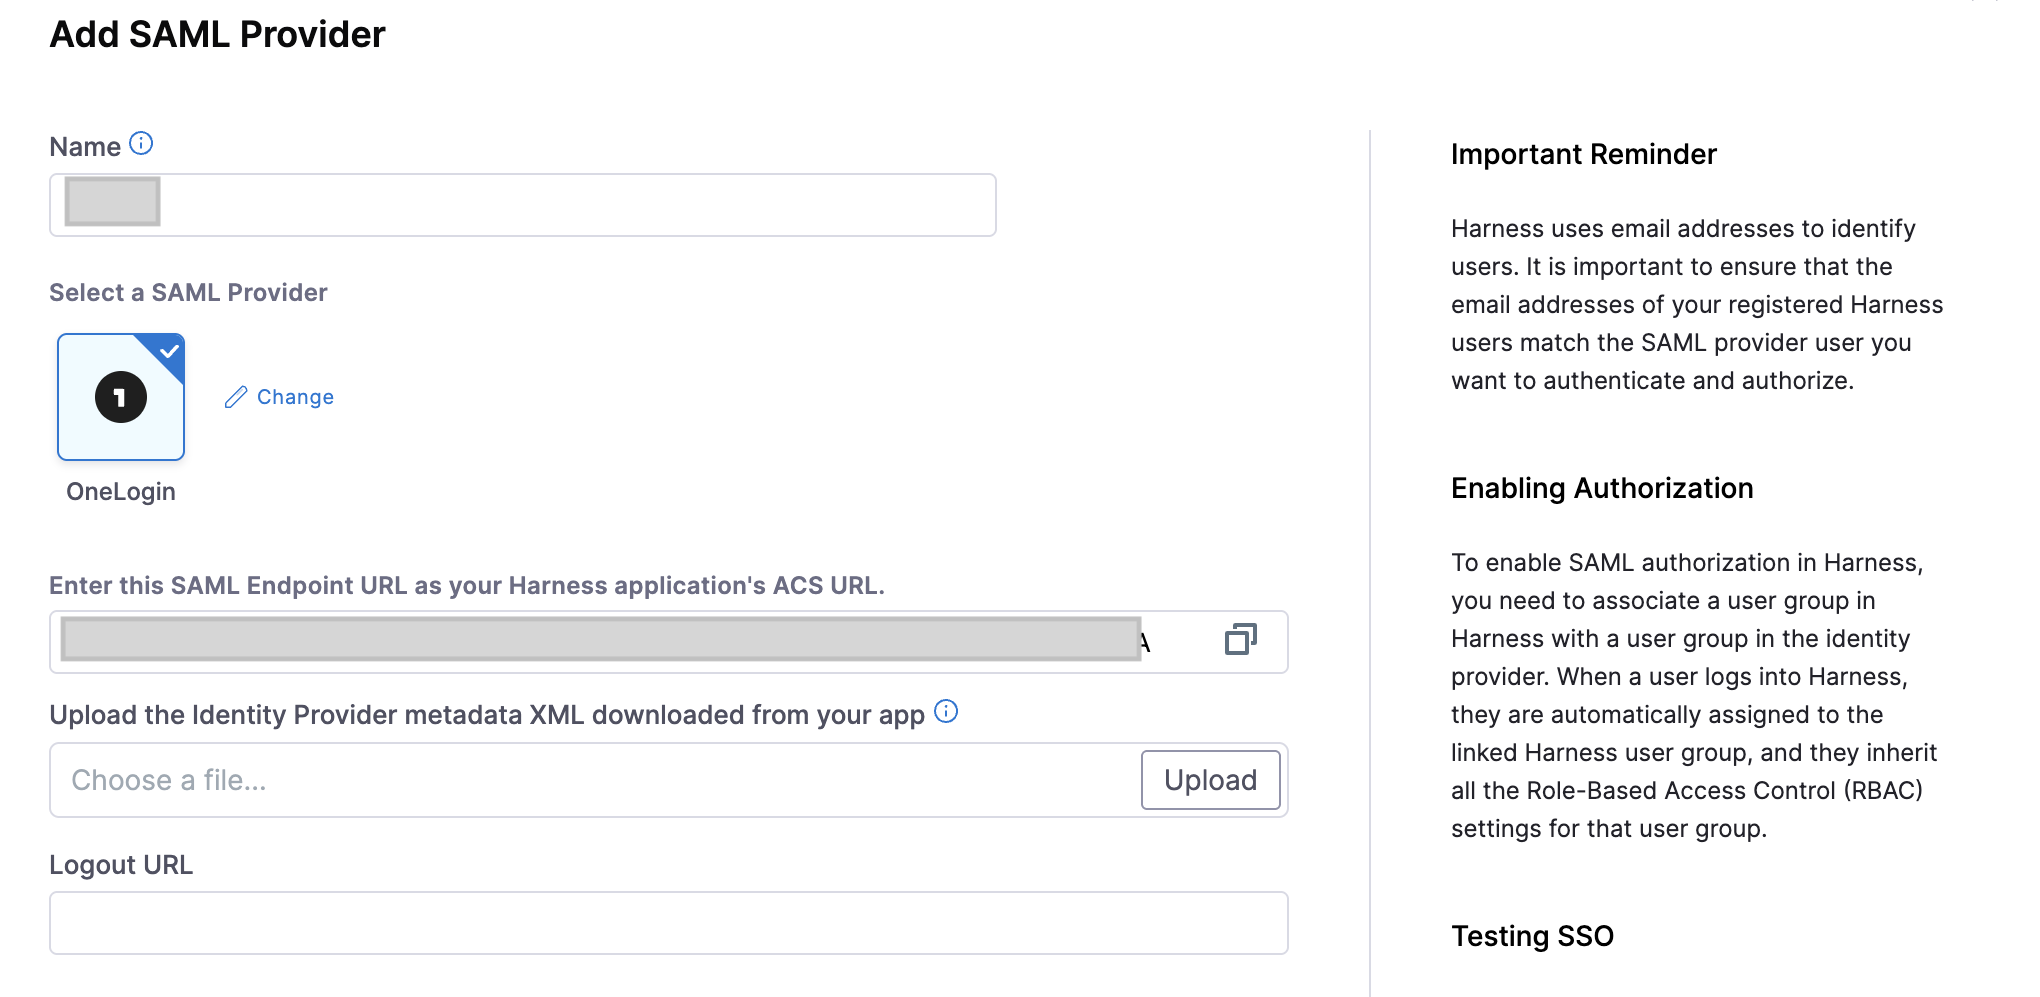
3. In **Name**, enter a name for the SAML SSO Provider. Select **Continue**.
4. Select **OneLogin** under **Select a SAML Provider**. Select **Continue**.

The settings to configure OneLogin setup are displayed.

5. Copy the URL provided under **Enter the SAML Endpoint URL, as your Harness OneLogin application's ACS URL**, to clipboard.

<figure><img src="/files/Gd8QsVjT2O4tXokZayx0" alt=""><figcaption><p>Click to view full size image</p></figcaption></figure>

```
After copying the URL in step 5, keep the tab open, and [Add Harness app to OneLogin](#add-harness-app-to-onelogin).
```

#### Step 2: Add Harness app to OneLogin <a href="#step-2-add-harness-app-to-onelogin" id="step-2-add-harness-app-to-onelogin"></a>

Add the **Harness** app (for SaaS setup) (or **Harness (On Prem)** app for Harness Self-Managed Enterprise Edition setup) and configure it inside OneLogin so OneLogin knows where to send SAML metadata.

1. Log in to OneLogin. Under the **Applications** tab, click **Applications**.

<figure><img src="/files/dHRKJIKPf2zbsGr3ueCT" alt=""><figcaption><p>Click to view full size image</p></figcaption></figure>

2. Select **Add App**.

<figure><img src="/files/w0IRB9gL4zjFDaJC6AIi" alt=""><figcaption><p>Click to view full size image</p></figcaption></figure>

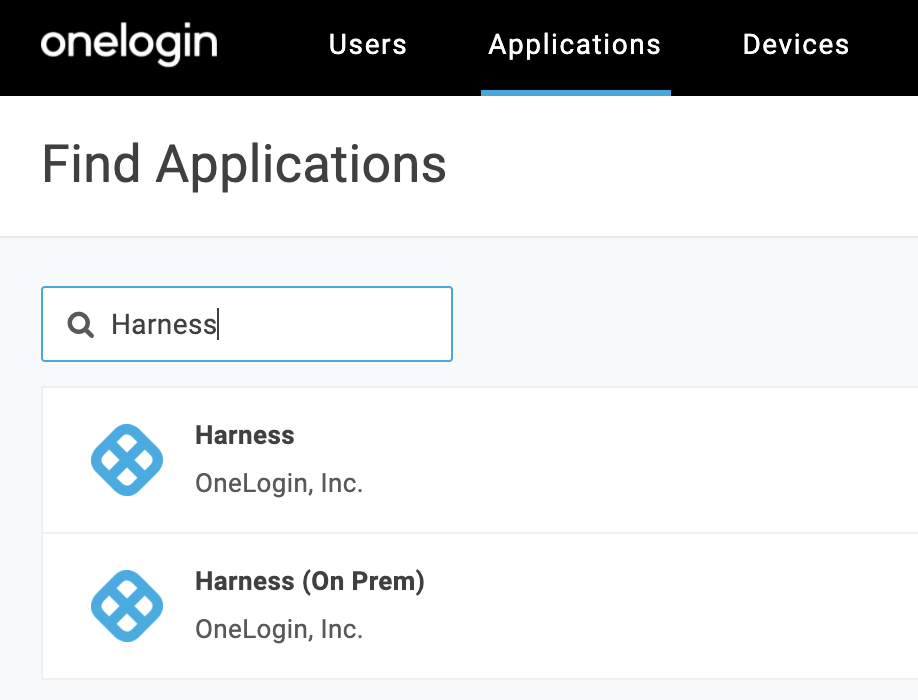
3. Find **Harness** or **Harness (On Prem)** based on your setup, and then select it.

   <figure><img src="/files/6eN1bua95KCeDvYKm4zh" alt=""><figcaption><p>Click to view full size image</p></figcaption></figure>
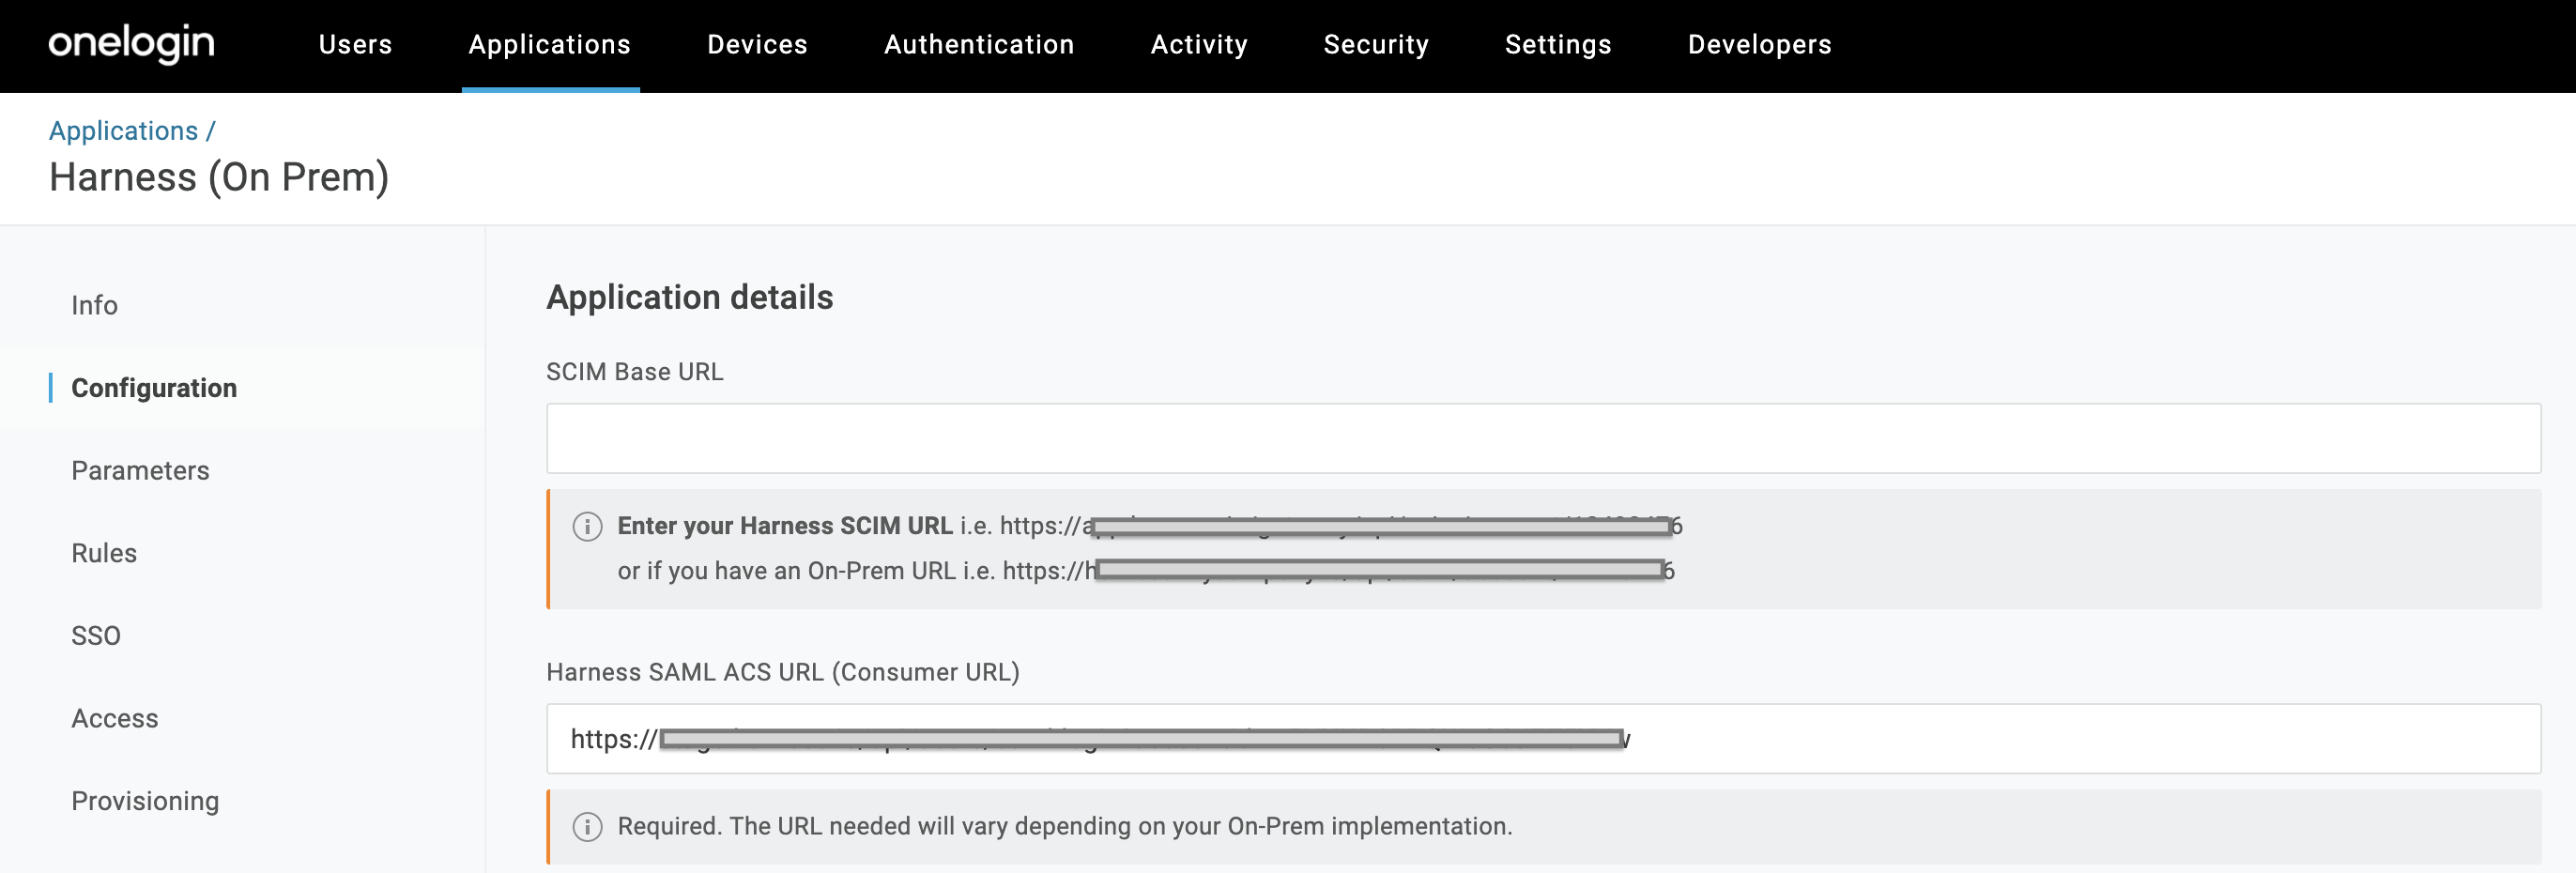
4. In **Configuration**, paste this URL into the **SCIM Base URL** field. Skip all other **Application Details** fields, and click **Save**.

<figure><img src="/files/ueGLiGZovgkOn4Qeedei" alt=""><figcaption><p>Click to view full size image</p></figcaption></figure>

5. Navigate to **SSO** tab. At the upper right corner, select **More Actions** and then select **SAML Metadata**. This downloads the .xml authentication file that you'll need to upload to Harness when you [enable OneLogin as a Harness SSO provider](#enable-onelogin-as-a-harness-sso-provider).

   <figure><img src="/files/WbqTJceZO4iNMEEblrRn" alt=""><figcaption><p>Click to view full size image</p></figcaption></figure>

#### Step 3: Assign users to roles <a href="#step-3-assign-users-to-roles" id="step-3-assign-users-to-roles"></a>

To provide a OneLogin user access to the Harness application to authenticate via SSO:

1. In OneLogin, under **Users** tab, select **Users**.

   <figure><img src="/files/Ek4zmwRORsWud5V94vzp" alt=""><figcaption><p>Click to view full size image</p></figcaption></figure>
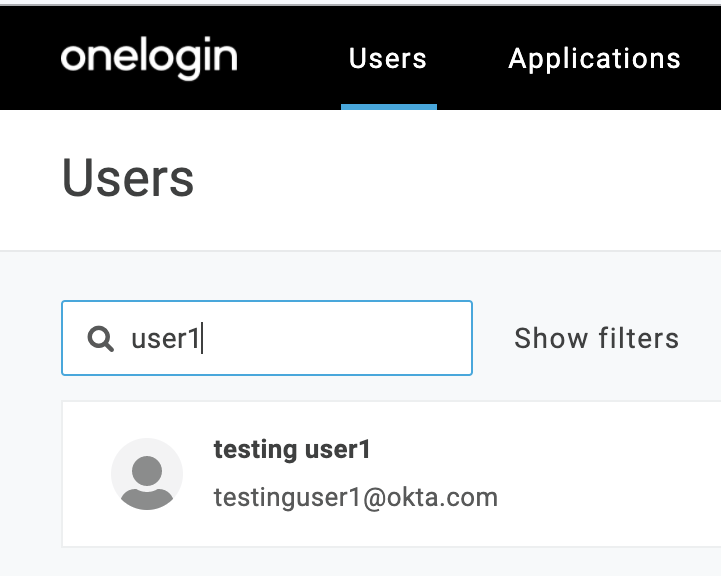
2. Search for a user that you want to add to Harness. Select the user.

   <figure><img src="/files/XZYqibSs4Us9UqaA2vAd" alt=""><figcaption><p>Click to view full size image</p></figcaption></figure>
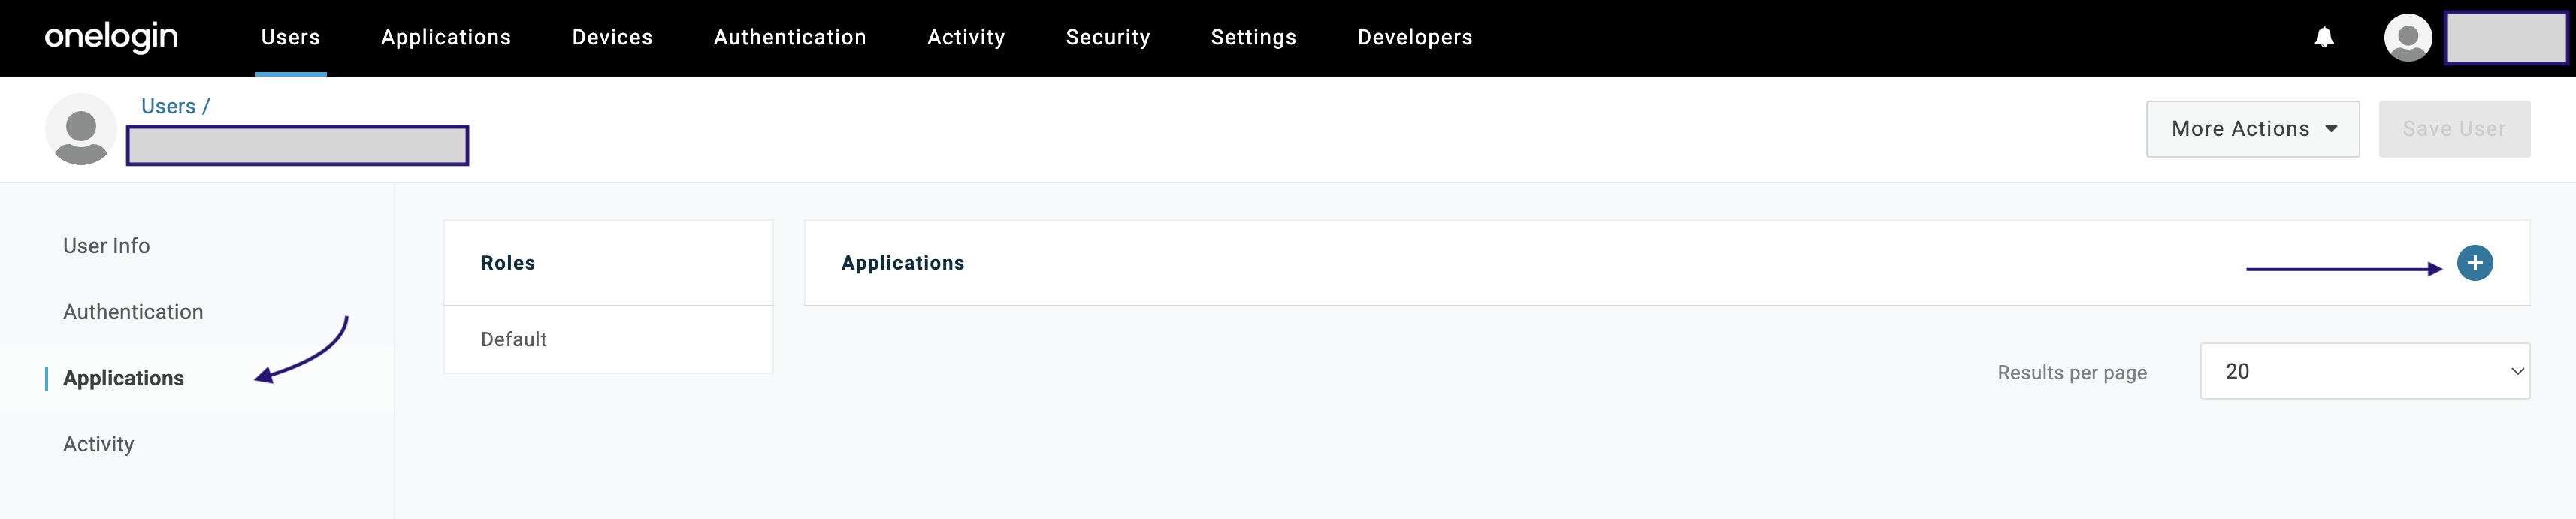
3. The **Users** page appears. Click the **Applications** tab. Click the **+** button at the upper right to assign an Application.

<figure><img src="/files/PvLN9uZD2nh3cJo7A7xH" alt=""><figcaption><p>Click to view full size image</p></figcaption></figure>

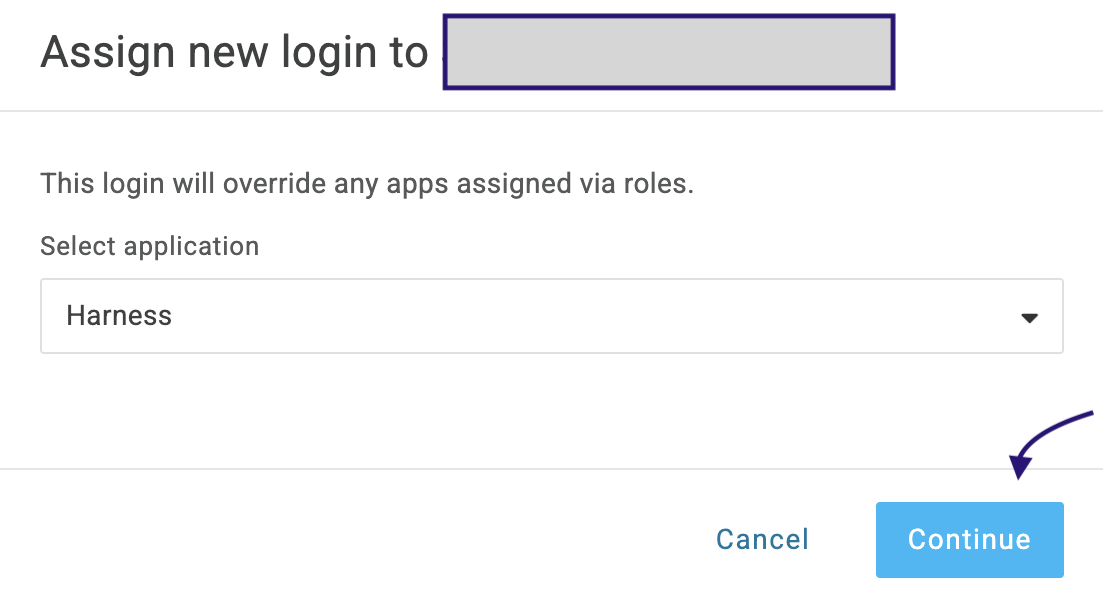
4. Select the Application, then select **Continue**.

<figure><img src="/files/uOiVUZyKYiNNlleuA18a" alt=""><figcaption><p>Click to view full size image</p></figcaption></figure>

5. Repeat this section for other users (or groups) that you want to add to Harness.

#### Step 4: Assign users to groups <a href="#step-4-assign-users-to-groups" id="step-4-assign-users-to-groups"></a>

If you have multiple users requiring OneLogin access, you can (optionally) create a group and add multiple users into it. To create a group:

1. In OneLogin, under **Users**, select **Groups**.
2. Select **New Group** on upper right to create a group.
3. Provide a **Name**, select the green check mark. Click **Save**.
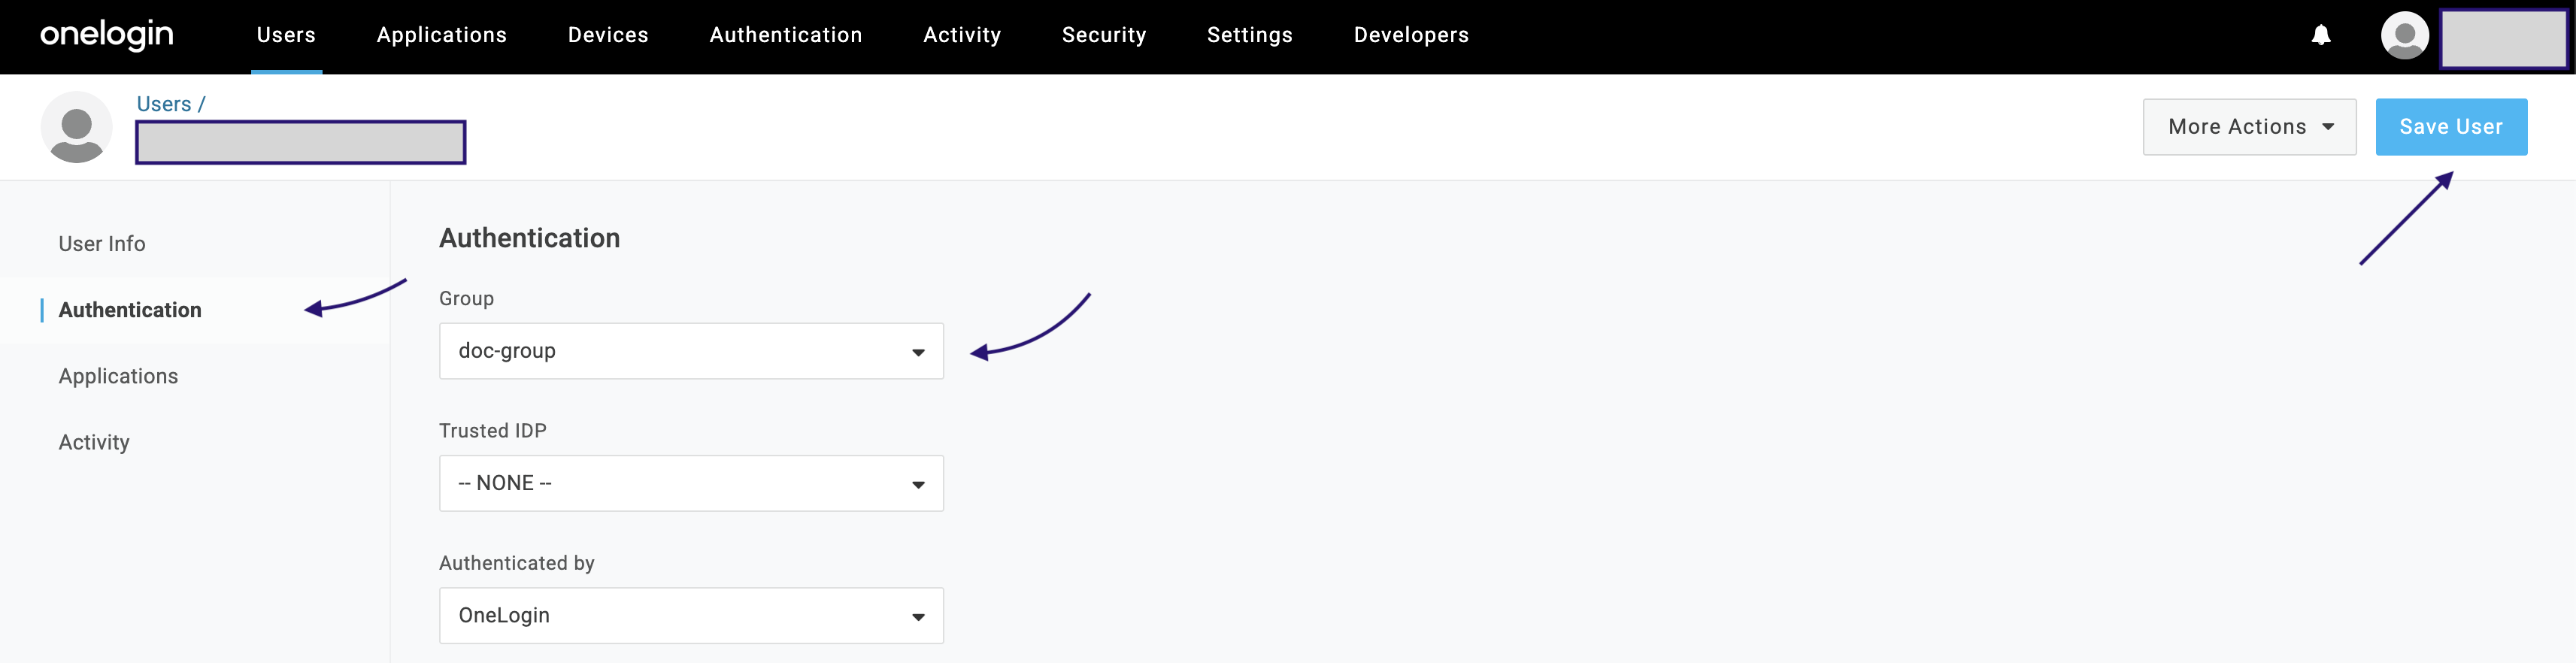
4. Under **Users** tab, select **Users** and select the user you want to add to a group. Go to **Authentication** tab and select the group from the dropdown, and select **Save User**.

<figure><img src="/files/gnXS2GNCfOa39ebu0UcK" alt=""><figcaption><p>Click to view full size image</p></figcaption></figure>

#### Step 5: Enable OneLogin as a Harness SSO provider <a href="#step-5-enable-onelogin-as-a-harness-sso-provider" id="step-5-enable-onelogin-as-a-harness-sso-provider"></a>

To upload the OneLogin metadata into Harness and activate the SAML connection to complete the authentication setup:

Return to the Harness browser tab you left open in step 5 of [Obtain SAML endpoint URL from Harness](#obtain-saml-endpoint-url).

1. Select **Upload** to upload the .xml file that you obtained from OneLogin.
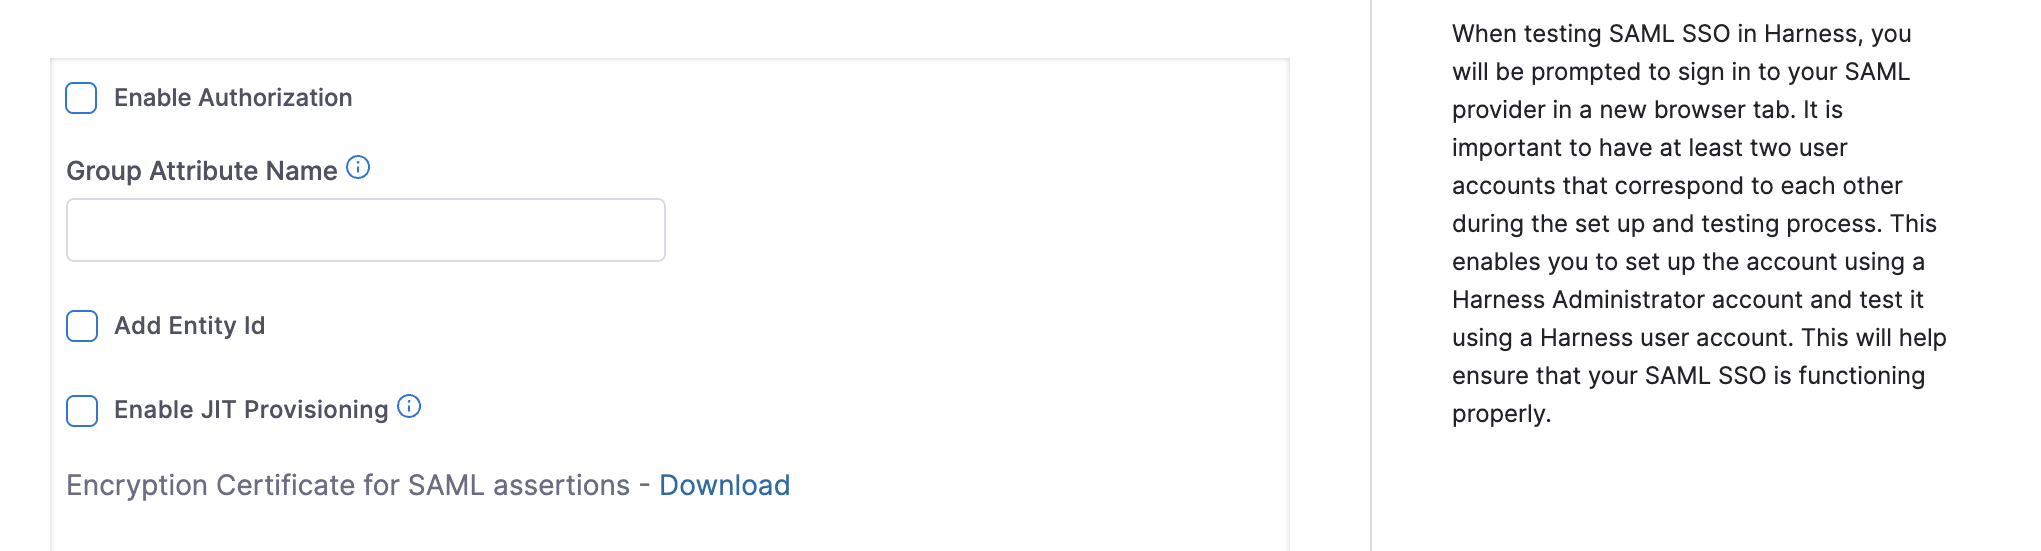
2. Deselect **Enable Authorization**. Select **Add Entity ID** and enter your custom Entity ID. The default Entity ID is **app.harness.io**. The value you enter here overrides the default Entity ID. Select **Add**.

<figure><img src="/files/oHdv5hbbMkvrpVV5vo3C" alt=""><figcaption><p>Click to view full size image</p></figcaption></figure>

```
This configures a new OneLogin provider that you can use to log in to Harness.
```

3\. To enable the new provider that you configured, click **Login via SAML** toggle.

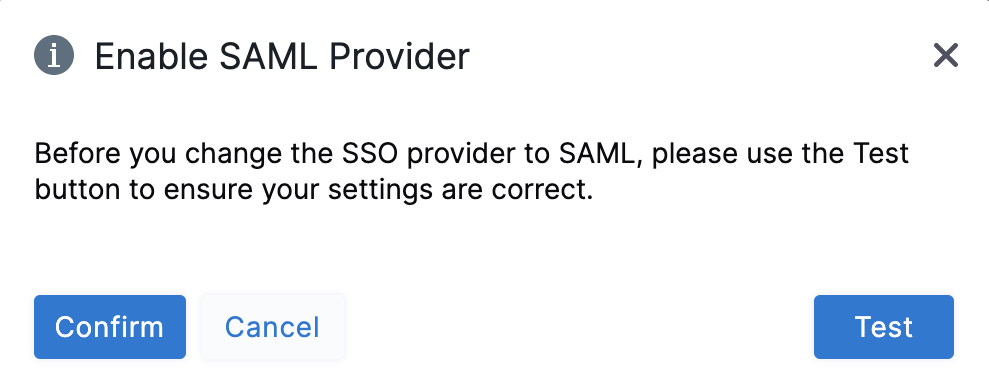
4. In the resulting **Enable SAML Provider** dialog, click **Test** to verify the SAML connection you've configured.

   <figure><img src="/files/Xn0ivCSrjSUu31Lspeq9" alt=""><figcaption><p>Click to view full size image</p></figcaption></figure>
5. Once the test is successful, select **Confirm** to finish setting up OneLogin authentication.

***

### OneLogin authorization on Harness <a href="#onelogin-authorization-on-harness" id="onelogin-authorization-on-harness"></a>

Once you've enabled [OneLogin authentication](#onelogin-authentication-on-harness) on Harness, refer to the below sections to enable authorization between the two platforms to control what users can do inside Harness.

#### Step 1: Assign roles to users <a href="#step-1-assign-roles-to-users" id="step-1-assign-roles-to-users"></a>

Harness' SAML authorization replicates [**OneLogin Roles**](https://onelogin.service-now.com/support?id=kb_article\&sys_id=cc2e602a973b2150c90c3b0e6253af3c\&kb_category=566ffd6887332910695f0f66cebb3556) as **Harness User Groups**.

**Harness User Groups** is a collection of multiple Harness users. You assign roles and resource groups to a user group, and the permissions and access granted by those assignments are automatically applied to all members of the group. For more information, go to [Manage Harness Groups](/harness-platform/use-harness-platform/platform-access-control/add-user-groups.md).

Follow the steps below to map these entities:

1. From OneLogin's menu, under **Users** tab, select **Users**.
2. Find and select a user that is assigned to Harness, to assign appropriate OneLogin Roles. Select the **Applications** tab of the user you selected. Select the specific Roles you want to assign to this user. Select **Save User** at the upper right.

   <figure><img src="/files/C5DvAe4l4gVDBIRDacRi" alt=""><figcaption><p>Click to view full size image</p></figcaption></figure>

Repeat this section for other users to whom you want to assign Roles.

#### Step 2: Define parameters <a href="#step-2-define-parameters" id="step-2-define-parameters"></a>

Before defining parameters, enable provisioning in your OneLogin application. Go to **Applications** → your application → **Provisioning**, and under **Workflows**, select the **Enable provisioning** checkbox.

Once provisioning is enabled, define a parameter to include role information in the SAML assertion so Harness can map users to the correct User Groups.

1. Under **Applications**, select your application.

   <figure><img src="/files/ZqgTkCK35rkX1bW7zQda" alt=""><figcaption><p>Click to view full size image</p></figcaption></figure>

Your application page appears in OneLogin.

2. Select the **Parameters** tab in your application, then select the `+` button to add a new Parameter.
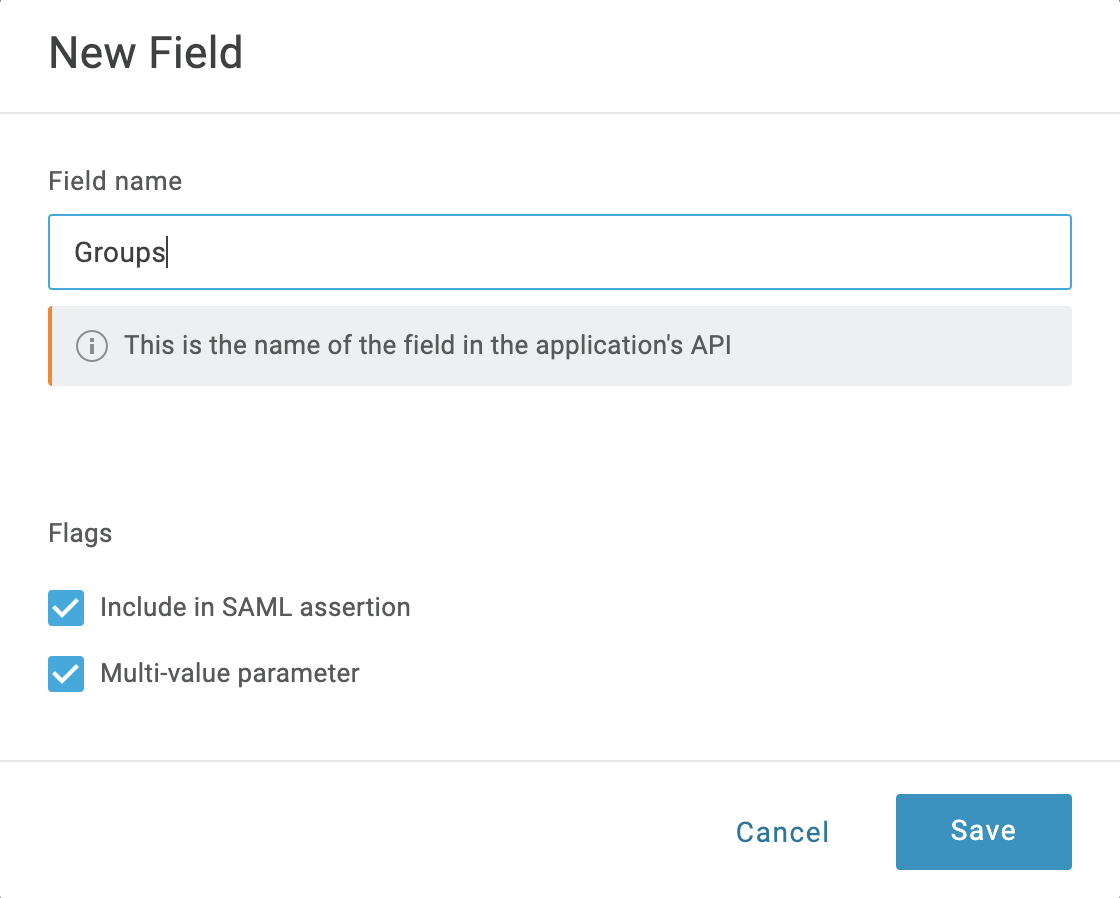
3. In the resulting **New Field** dialog, assign a **Field name** (for example **Groups**).

   <figure><img src="/files/ypMH5GoGtUq5AhwBAYWB" alt=""><figcaption><p>Click to view full size image</p></figcaption></figure>
4. Select **Include in SAML assertion** and **Multi-value parameter**. Then click **Save**.
5. Back on the **Parameters** tab, select your new **Groups** field.
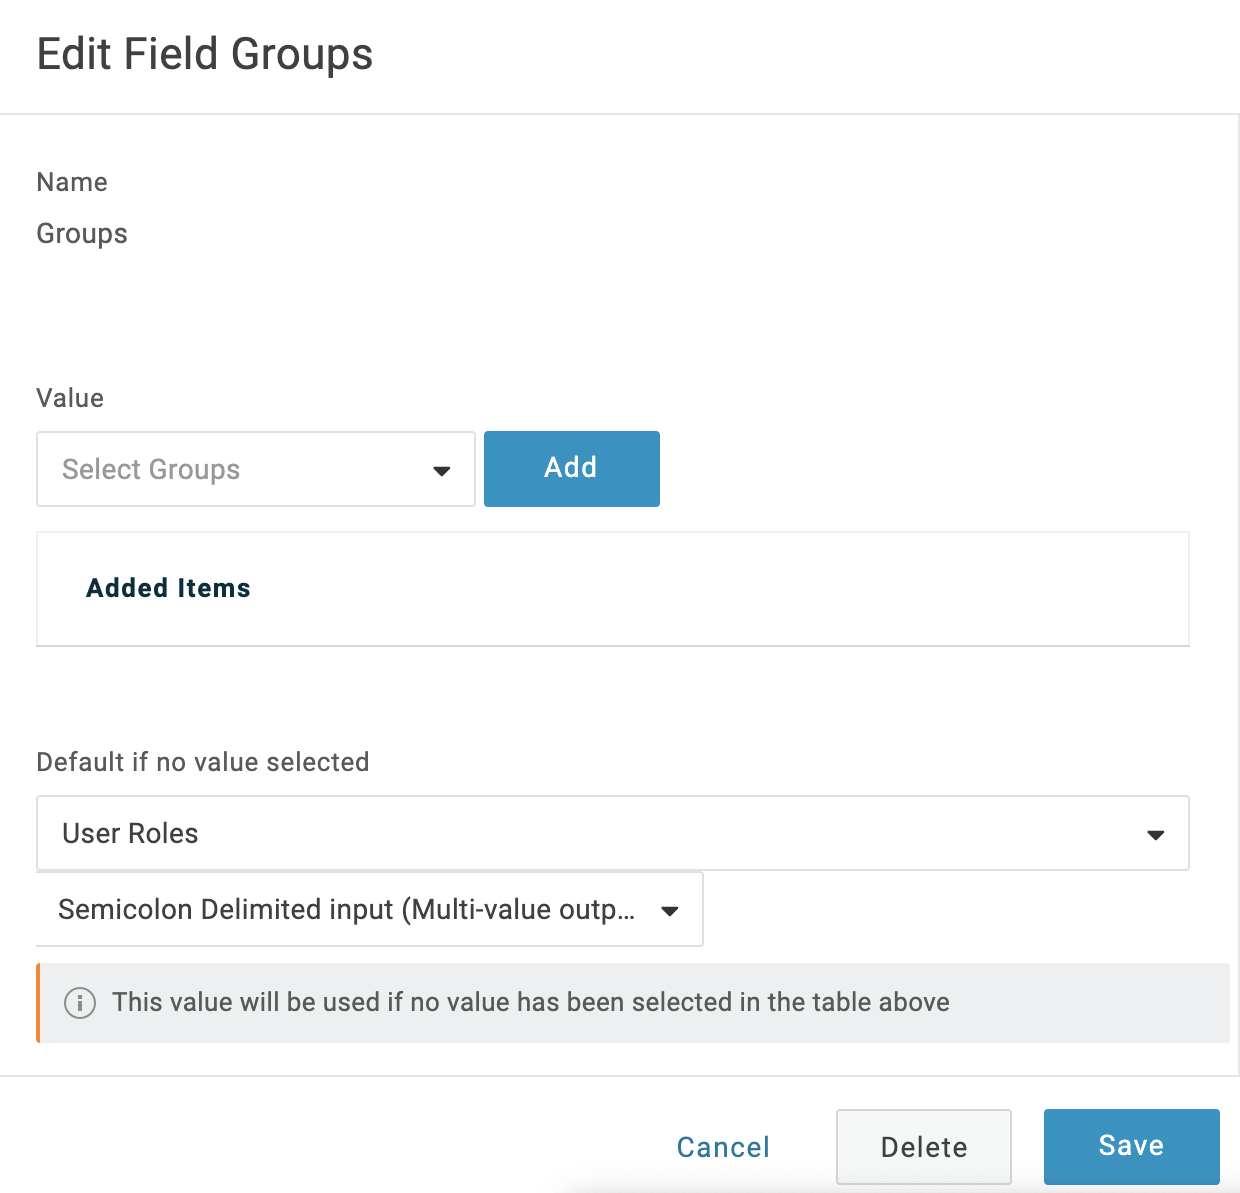
6. In the resulting **Edit Field Groups** dialog, set **Default if no value selected** to **User Roles**. Below that, select **Semicolon Delimited input (Multi-value output)**. Click **Save**.

   <figure><img src="/files/yfjeMqZgIbLnM6pIVZ4d" alt=""><figcaption><p>Click to view full size image</p></figcaption></figure>
7. Click **Save** again at the **Parameters** page's upper right.

#### Step 3: Sync users in Harness <a href="#step-3-sync-users-in-harness" id="step-3-sync-users-in-harness"></a>

Configure Harness to recognize the OneLogin group and link it to a Harness user group so permissions are inherited on login.

1. In **Account Settings**, select **Authentication**.
2. Click to expand the **Login via SAML** section.
3. You can see the SSO Provider you have set up listed in this section. Select the vertical ellipsis (**︙**) next to the SSO Provider you have set up for SSO authentication, and select **Edit**.

   <figure><img src="/files/Dqc8zt1orwmgivaUGqsQ" alt=""><figcaption><p>Click to view full size image</p></figcaption></figure>
4. In the **Edit SAML Provider** dialog, enable **Enable Authorization**. In **Group Attribute Name**, enter the name of the **Field Group** you configured in OneLogin. Click **Save**.
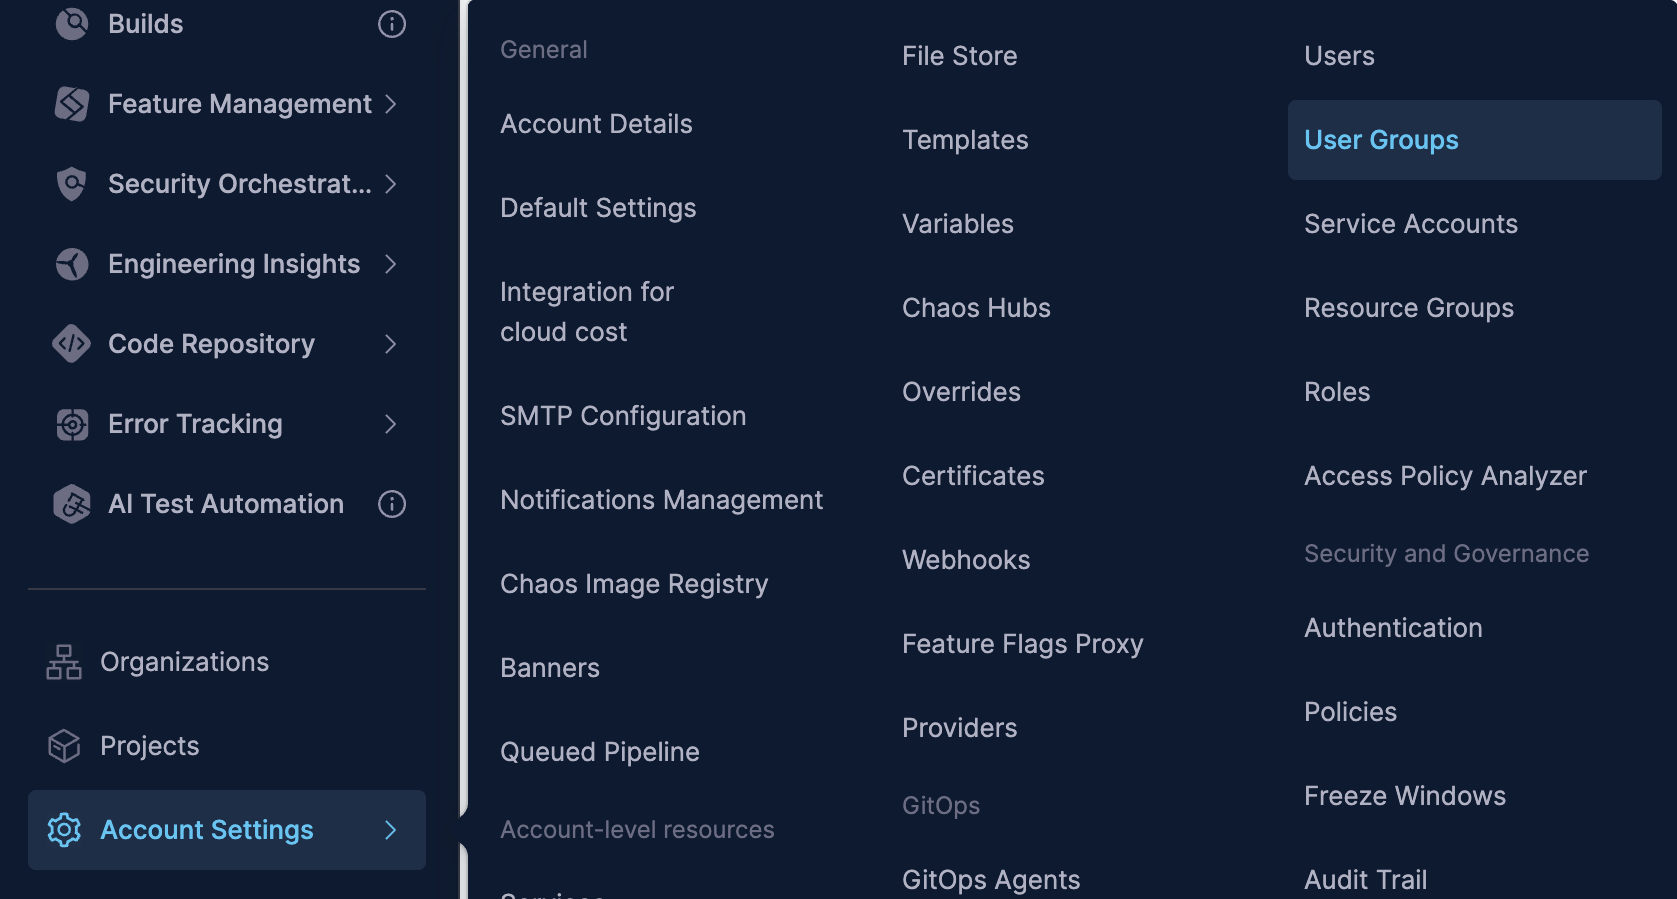
5. Under **Account Settings**, under **Users**, select **User Groups**.

<figure><img src="/files/duMbBGgxOauEpj2FZKjW" alt=""><figcaption><p>Click to view full size image</p></figcaption></figure>

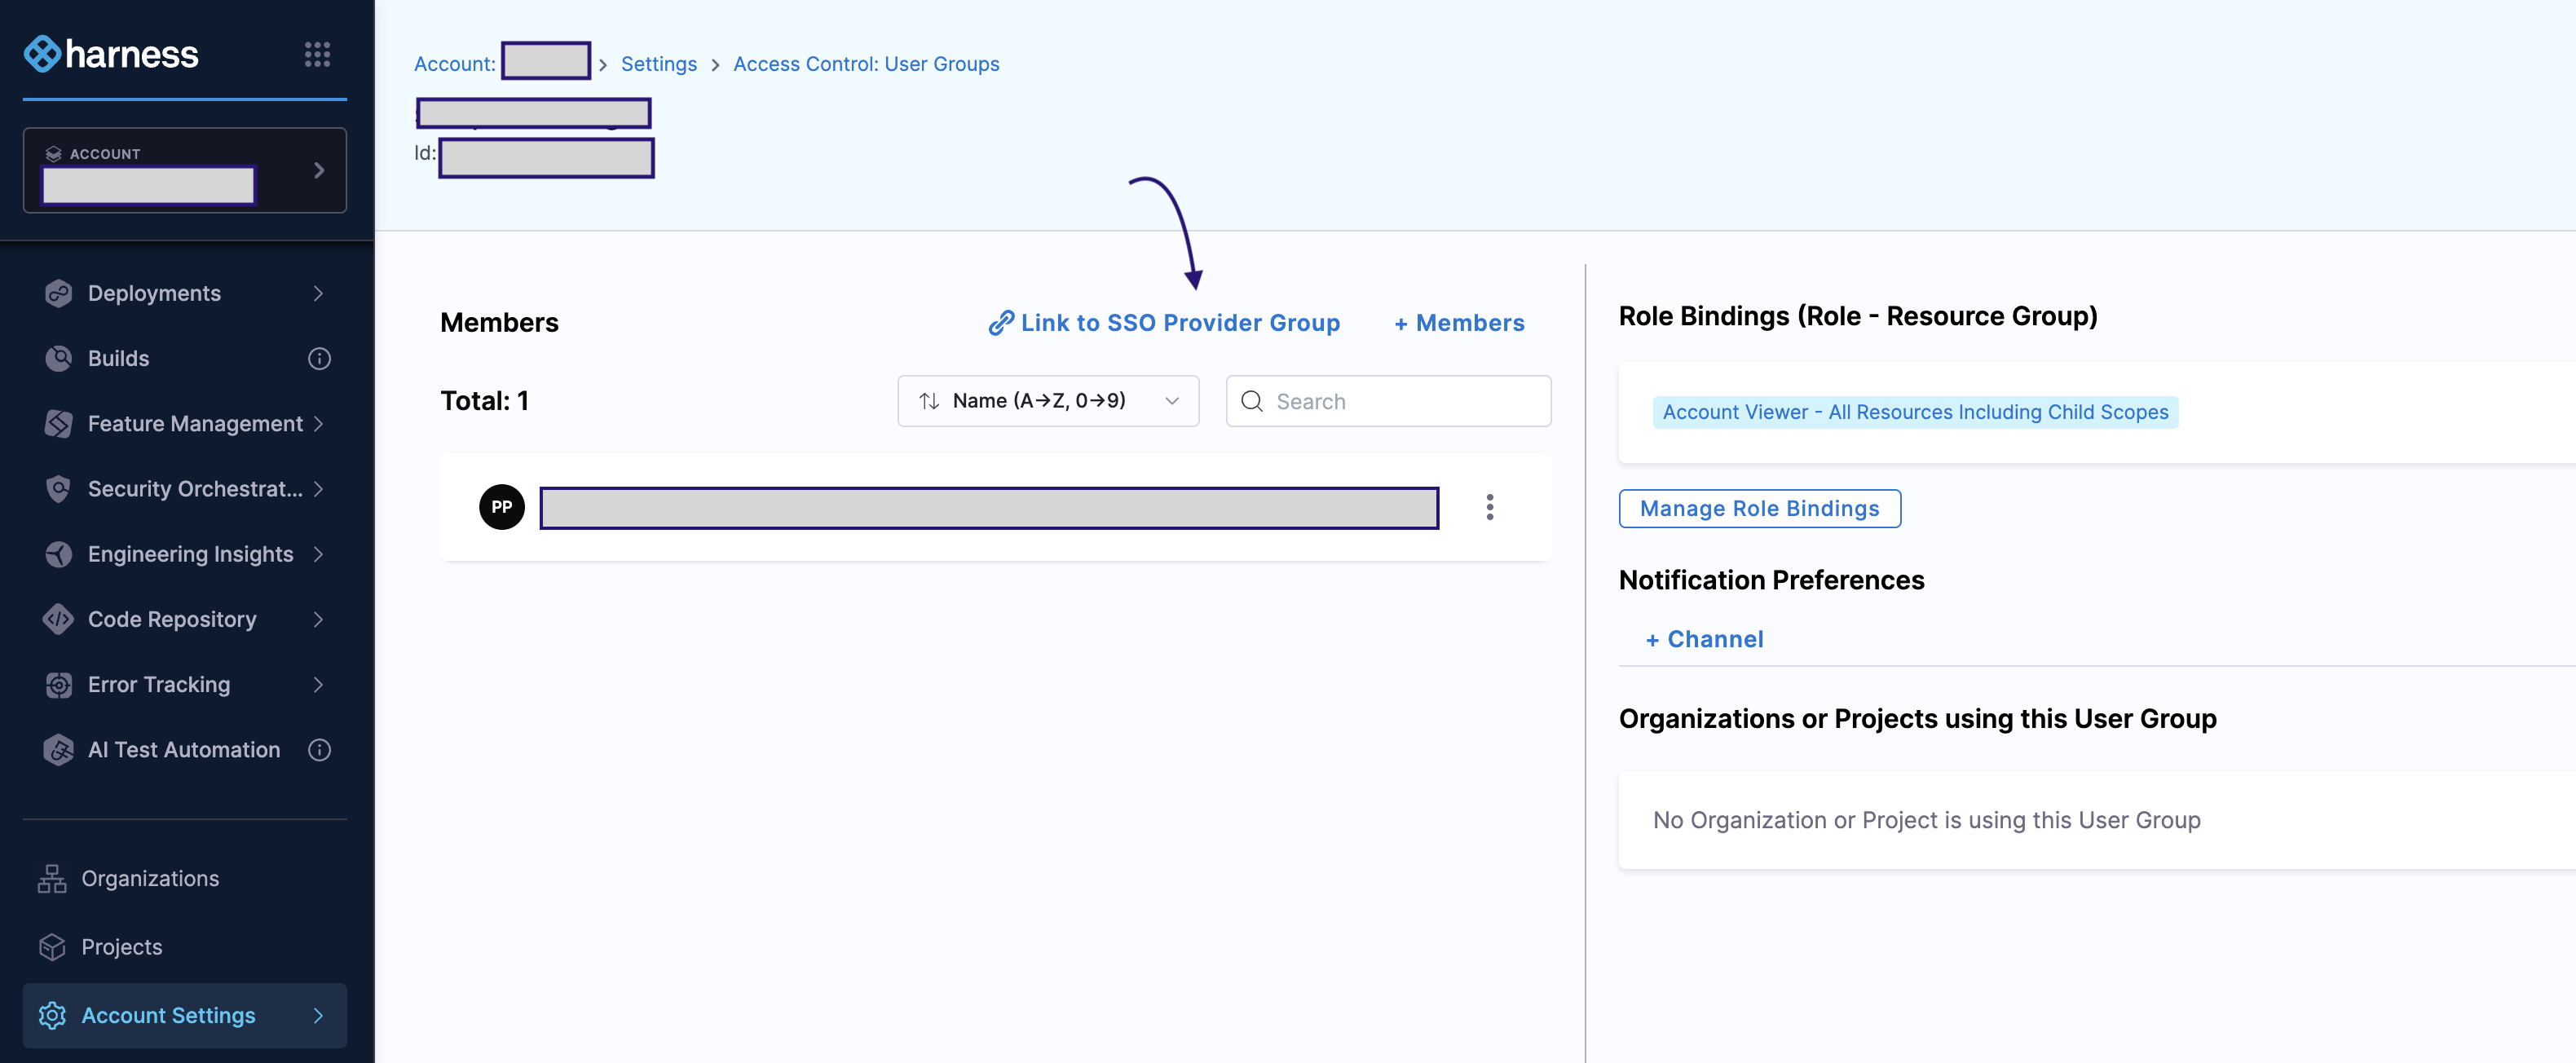
6. Click on the **User Group** that you want to link the SAML SSO Provider to. To create a new user group, go to [Create User Groups manually ](/harness-platform/use-harness-platform/platform-access-control/add-user-groups.md#create-user-groups-manually).
7. Select **Link to SSO Provider Group**.

<figure><img src="/files/9O7CzPsmBFe4qfa48mhN" alt=""><figcaption><p>Click to view full size image</p></figcaption></figure>

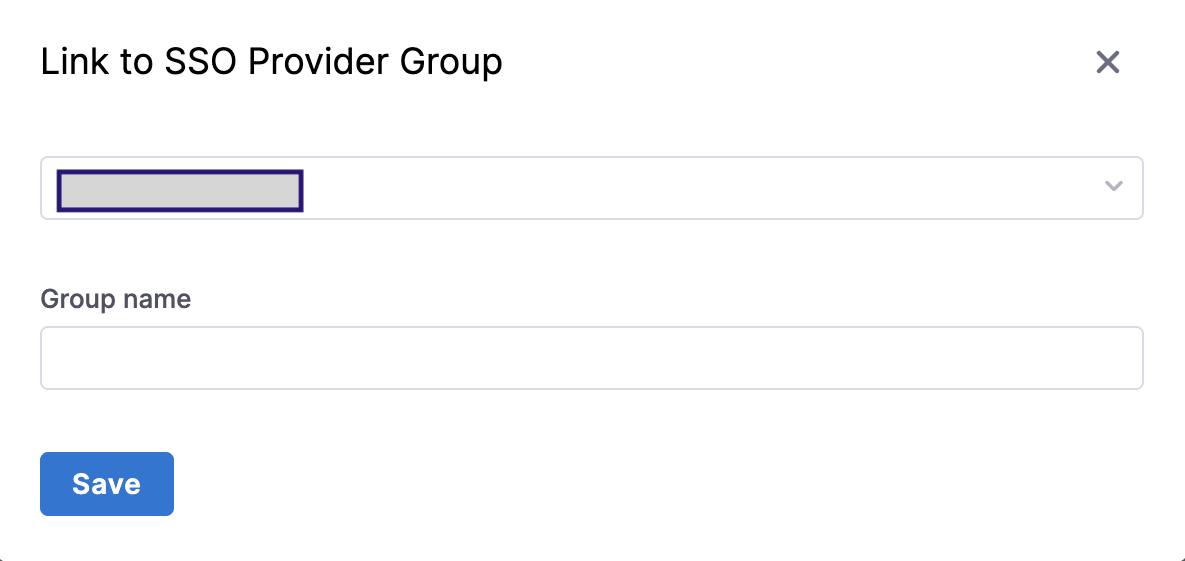
8. In the **Link to SSO Provider Group** dialog, in **Search SSO Settings**, select the SAML SSO Provider you have set up. In the **Group Name**, enter the name of the **Field Groups** you configured in OneLogin. Click **Save**.

<figure><img src="/files/0NqJC81DQj94z93qJq53" alt=""><figcaption><p>Click to view full size image</p></figcaption></figure>

#### Step 4: Test the integration <a href="#step-4-test-the-integration" id="step-4-test-the-integration"></a>

After you've synced Users between OneLogin and Harness, users will be assigned to the designated Harness User Group upon your next login to Harness. To test whether OneLogin authentication and authorization on Harness are fully functional do the following:

1. In Chrome, open an Incognito window, and navigate to Harness.
2. Log into Harness using the email address of a Harness User that is also used in the SAML provider group linked to the Harness User Group.

   **Result:** When the user submits their email address in Harness Manager, the user is redirected to the SAML provider to log in.
3. Log into the SAML provider using the same email that the user is registered with, within Harness.

   **Result:** Once the user logs in, the user is redirected to Harness and logged into Harness using the SAML credentials.
4. In your Harness account in the other browser window, check the User Group you linked with your SAML provider.

   **Result:** The user that logged in is now added to the User Group, receiving the authorization associated with that User Group.

{% hint style="info" %}
**NOTE**

You cannot delete a SAML SSO Provider from Harness that is linked to a Harness Group. You must first remove the link to the SSO Provider from the Group.
{% endhint %}

***

### Just-In-Time (JIT) provisioning <a href="#just-in-time-jit-provisioning" id="just-in-time-jit-provisioning"></a>

Harness supports SAML configuration [with or without JIT user provisioning](/harness-platform/use-harness-platform/authentication/single-sign-on-saml.md#just-in-time-jit-provisioning). Go to [Just-in-Time (JIT) user provisioning](/harness-platform/3.0/harness-platform-resources/platform-access-control/provision-use-jit.md) to understand how Harness creates users on first SAML login when JIT is enabled.

***

### Troubleshooting <a href="#troubleshooting" id="troubleshooting"></a>

<details>

<summary>SAML authentication fails with OneLogin</summary>

Ensure the SAML Endpoint URL from Harness is pasted into the SCIM Base URL field in OneLogin's Configuration tab. Verify the SAML Metadata XML file has been downloaded from OneLogin's SSO tab and uploaded to Harness.

</details>

***

### Related articles <a href="#related-articles" id="related-articles"></a>

* [SAML SSO with Okta](/harness-platform/use-harness-platform/authentication/single-sign-on-saml/okta.md)
* [SAML SSO with Microsoft Entra ID](https://github.com/harness/harness-developer-hub/tree/fix/iain-taran-richard/docs/platform/authentication/single-sign-on-saml/ms-entra-id/README.md)
* [SAML SSO with Keycloak](/harness-platform/use-harness-platform/authentication/single-sign-on-saml/keycloak.md)
* [Advanced SAML configuration](/harness-platform/use-harness-platform/authentication/single-sign-on-saml/advanced-saml-configuration.md)