> For the complete documentation index, see [llms.txt](https://developer.harness.io/llms.txt). Markdown versions of documentation pages are available by appending `.md` to page URLs; this page is available as [Markdown](https://developer.harness.io/harness-platform/use-harness-platform/connectors/cloud-providers/add-a-microsoft-azure-connector.md).
# Add a Microsoft Azure connector
Connect Harness to your Azure accounts and services for artifact pulls, infrastructure provisioning, and application deployments.
Use the Microsoft Azure connector to connect Harness to your Azure accounts and services. With this connector, Harness pipelines can pull artifacts from Azure Container Registry (ACR), provision infrastructure with Azure Resource Manager (ARM) and Azure Blueprints, and deploy applications to Azure Kubernetes Service (AKS), Azure Web Apps, Azure App Service Environments, and virtual machines using SSH or WinRM.
{% hint style="info" %}
If you use Harness Cloud Cost Management (CCM), go to [Set up Cloud Cost Management for Azure](https://developer.harness.io/cloud-cost-management/integrations/cloud-providers/azure) to configure the Azure connector for CCM.
{% endhint %}
## What you will learn from this topic
* How to [add an Azure connector](#overview) at the account, org, or project scope.
* How to [configure credentials](#details) using Specify Credentials, OIDC authentication, or inherited delegate credentials.
* How to [select a connectivity mode](#select-connectivity-mode) and complete the connector setup.
* How to configure [roles and permissions](/harness-platform/use-harness-platform/connectors/cloud-providers/add-a-microsoft-azure-connector/azure-connector-settings-reference.md#roles-permissions-and-cluster-requirements) for ACR, AKS, Azure Web Apps, ARM, and Blueprints.
* How to [install the kubelogin plugin](/harness-platform/use-harness-platform/connectors/cloud-providers/add-a-microsoft-azure-connector/azure-connector-settings-reference.md#install-the-kubelogin-client-go-credential-exec-plugin-on-the-delegate) on a delegate for AKS authentication using Kubernetes 1.22 and later.
* How to define an Azure connector using a [YAML example](#yaml-examples).
## Before you begin
* **Azure subscription**: Owner or Contributor access on the subscription or resource group where you want Harness to operate.
* **Microsoft Entra ID**: Permission to create App Registrations or Managed Identities and assign roles. Go to [Create a Microsoft Entra application and service principal](https://docs.microsoft.com/en-us/azure/active-directory/develop/howto-create-service-principal-portal) to understand the required setup.
* **Harness delegate**: A running Harness delegate connected to your Azure environment for delegate-based connectivity. Go to [Delegate installation overview](/harness-platform/use-harness-platform/delegates/delegate/install-delegates/overview.md) to install one.
* **Harness account ID** (OIDC only): Navigate to **Account Settings** in Harness to find your account ID.
## Add an Azure connector
Perform the following steps to create the Azure connector.
The connector wizard guides you through five steps: **Overview**, **Details**, **Select Connectivity Mode**, **Delegates Setup**, and **Connection Test**.
### Overview
Perform the following steps to add an Azure connector:
1. Navigate to **Project Setup** (or **Account Settings** or **Organization Settings**), then select **Connectors**.
2. Select **New Connector**, then under **Cloud Providers**, select **Azure Cloud Provider**.
3. Enter a **Name**. Harness automatically creates an **Id** based on the name using the [Entity Identifier](/harness-platform/use-harness-platform/references/entity-identifier-reference.md) format. You can edit the ID before saving; once saved, the ID is immutable.
4. Optionally, add a description and [tags](/harness-platform/use-harness-platform/tags/overview.md#create-tags-for-pipelines).
5. Select **Continue** to configure credentials.

5. Select **Continue** to proceed to **Details**.
### Details

{% tabs %}
{% tab title="Specify Credentials" %}
#### Specify credentials
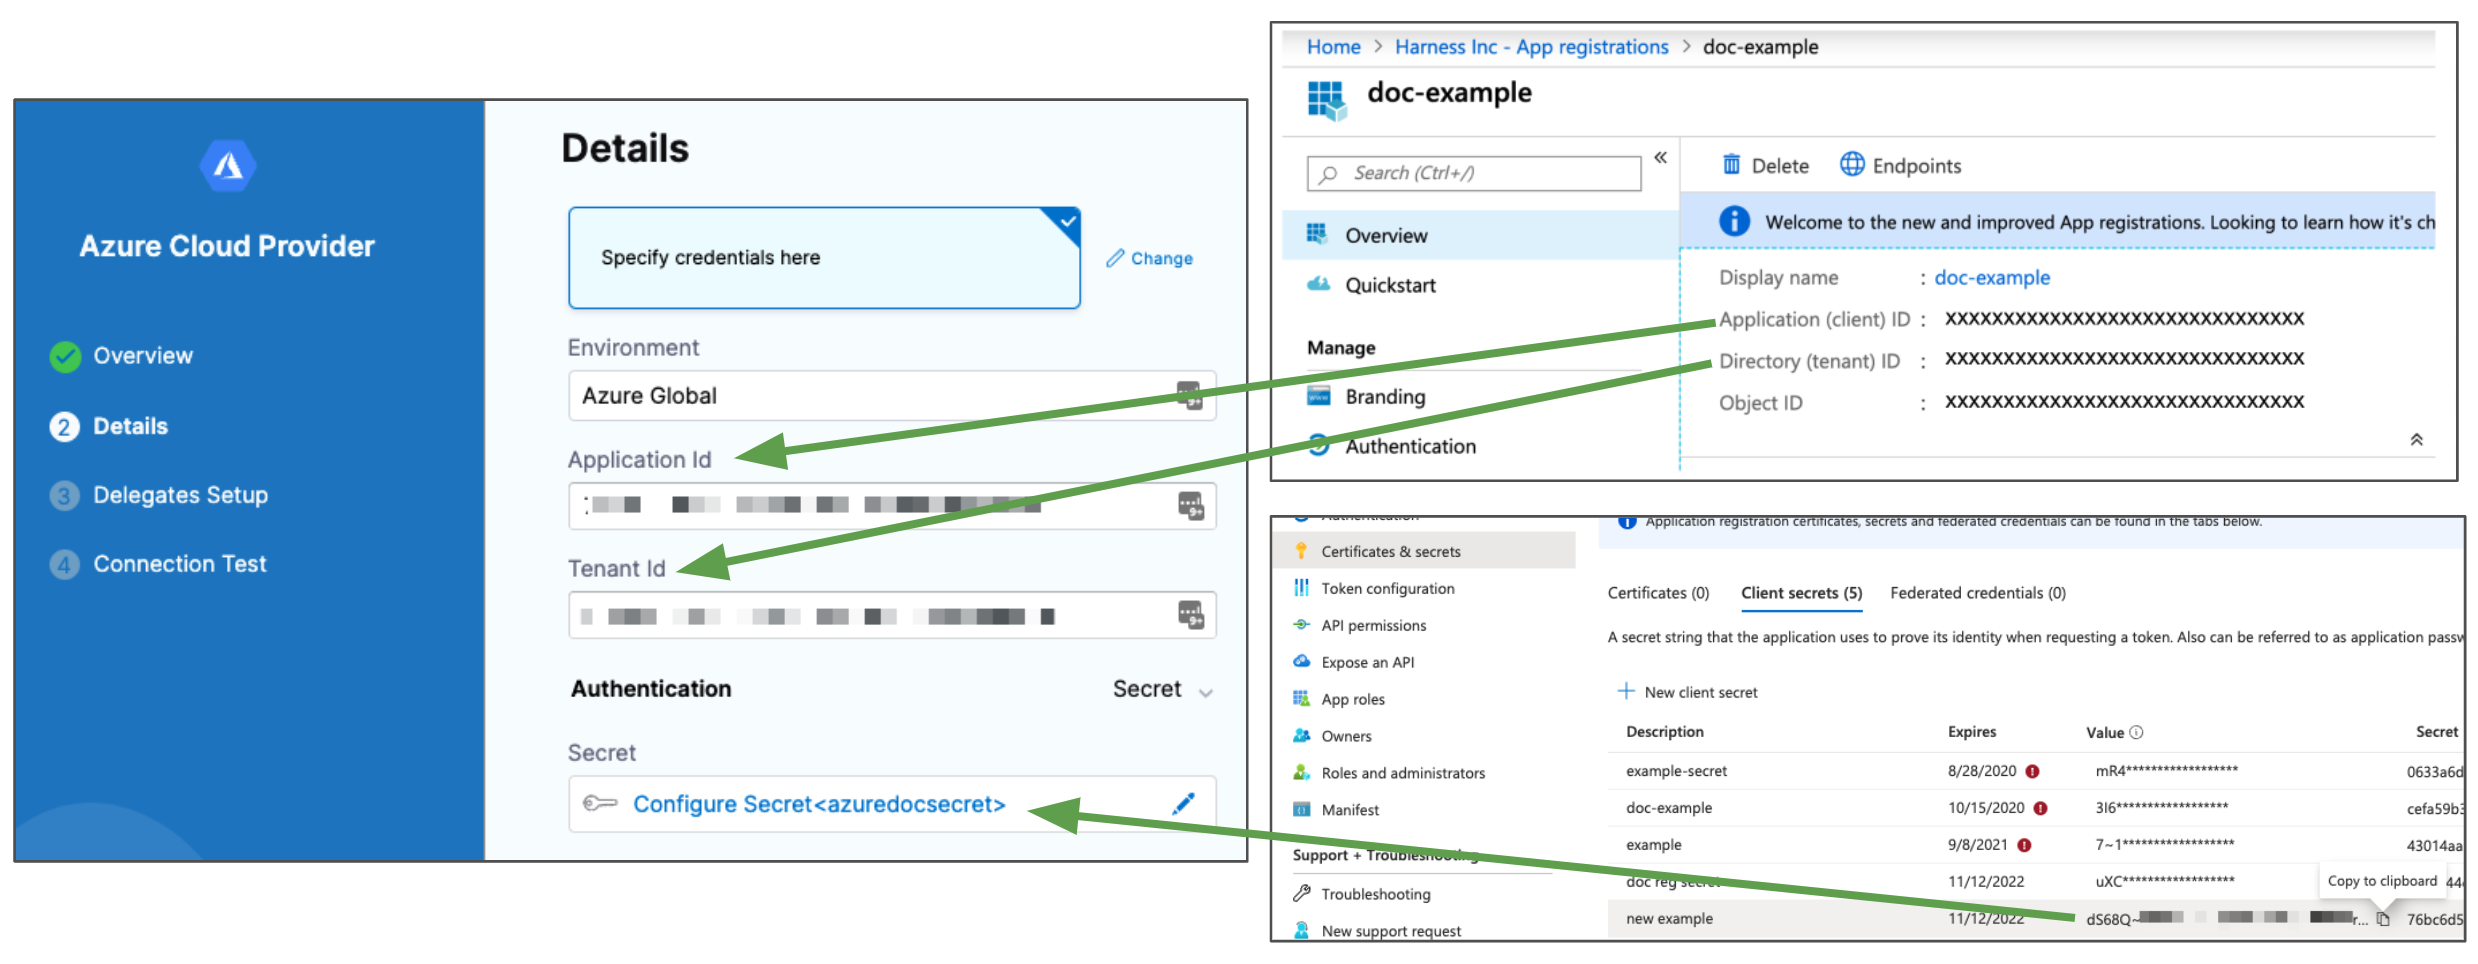
Select **Specify credentials here** to authenticate using an Azure App Registration with a client secret or certificate. Provide the App Registration's Application (client) ID and Directory (tenant) ID.
Perform the following steps to configure credentials:
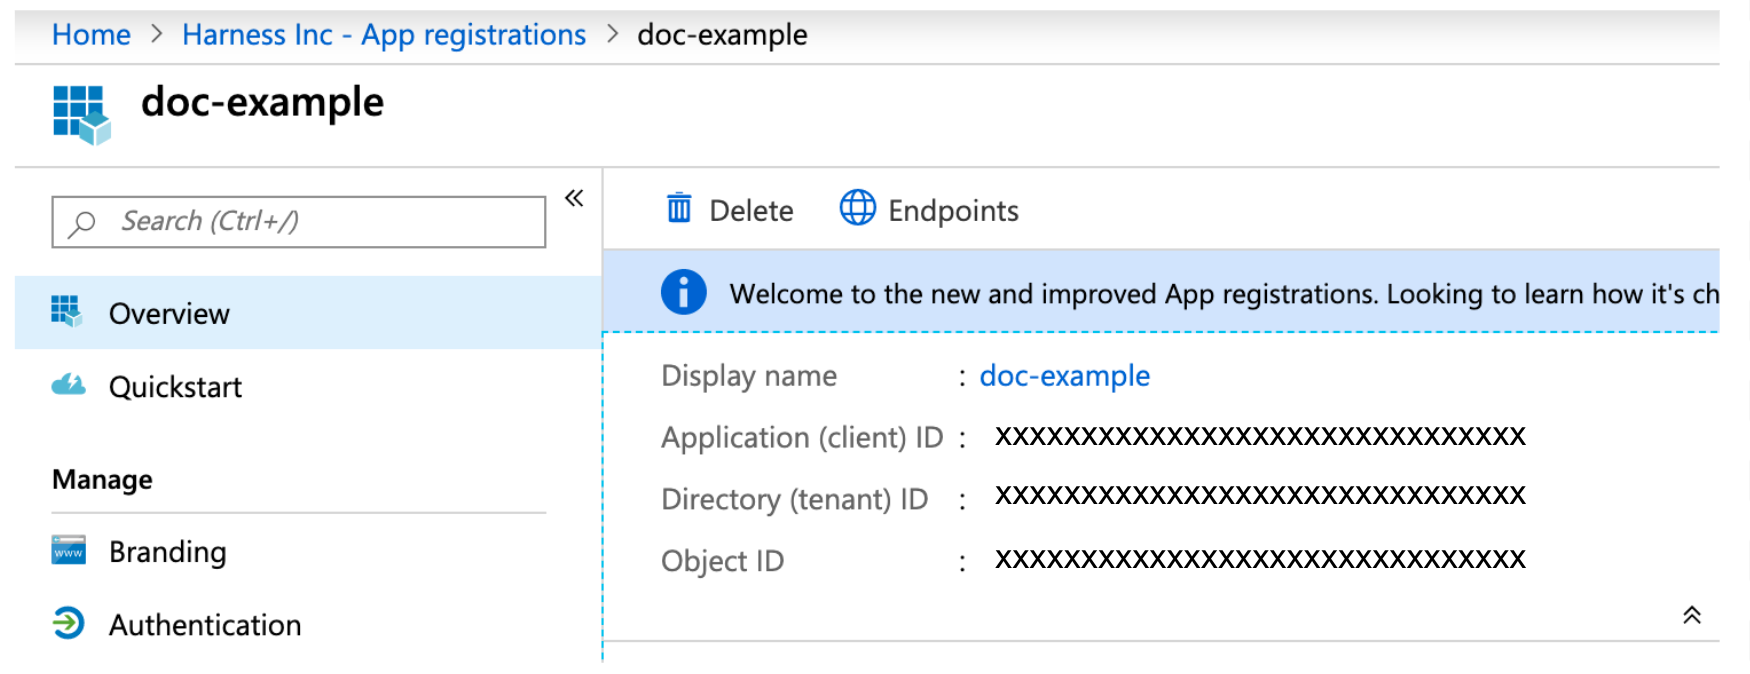
1. In Microsoft Azure, go to the App Registration **Overview** page and note the **Application (client) ID** and **Directory (tenant) ID**.
* **Application (client) ID**: the ID of the App Registration Harness will use. Assign this App Registration a role in your Azure subscription to grant access. Go to [Register an application with the Microsoft identity platform](https://docs.microsoft.com/en-us/azure/active-directory/develop/quickstart-v1-add-azure-ad-app) and [Assign the application to a role](https://docs.microsoft.com/en-us/azure/active-directory/develop/howto-create-service-principal-portal#assign-the-application-to-a-role) for steps.
* **Directory (tenant) ID**: the ID for the Microsoft Entra ID tenant that contains your app. Go to [Get tenant ID](https://docs.microsoft.com/en-us/azure/azure-resource-manager/resource-group-create-service-principal-portal#get-tenant-id) for steps.
2. In the Harness Azure connector settings, select the **Environment**: **Azure Global** or **US Government**.
3. Enter the **Application (client) ID** in the **Application Id** field.
4. Enter the **Directory (tenant) ID** in the **Tenant Id** field.
5. For **Authentication**, select **Secret** or **Certificate**, then select or create a [Harness Text Secret](/harness-platform/use-harness-platform/secrets/add-use-text-secrets.md) or [Harness File Secret](/harness-platform/use-harness-platform/secrets/add-file-secrets.md).
Harness supports PEM files only. PFX files are not supported.
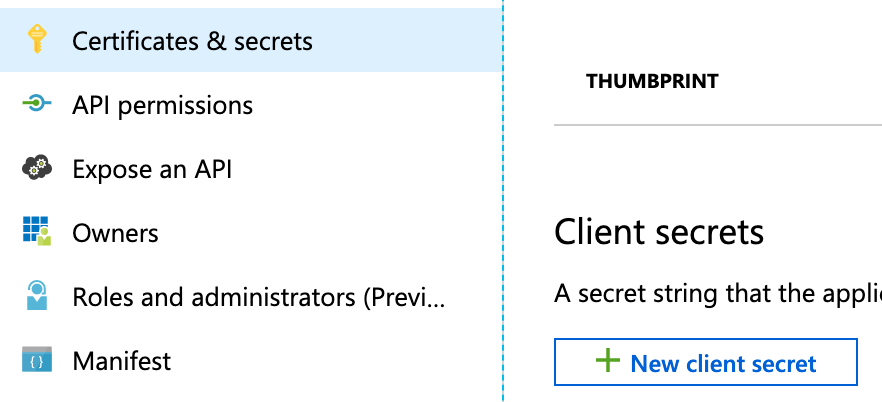
To create a new client secret, go to **App Registrations** in Microsoft Entra ID, select your app, select **Certificates & secrets**, then select **New client secret**. Go to [Creating a new application secret](https://docs.microsoft.com/en-us/azure/active-directory/develop/howto-create-service-principal-portal#create-a-new-application-secret) for steps.
6. Select **Continue**.
{% endtab %}
{% tab title="OIDC Authentication" %}
#### OIDC authentication
Select **OIDC Authentication** to connect Harness to Azure without storing client secrets or certificates. Harness acts as an identity provider and issues short-lived JSON Web Tokens (JWTs) that Azure Active Directory (AD) validates directly using workload identity federation. Supported services: ACR, AKS, and Azure Web Apps. Go to [Workload identity federation](https://learn.microsoft.com/en-us/entra/workload-id/workload-identity-federation) in the Microsoft documentation to understand the underlying Azure mechanism.
{% hint style="info" %}
Azure OIDC authentication is behind the feature flag `CDS_AZURE_OIDC_AUTHENTICATION`. Contact [Harness Support](mailto:support@harness.io) to enable it on your account.
{% endhint %}
**How OIDC authentication works**
When a CD pipeline runs a stage that uses an Azure connector with OIDC authentication:
1. Harness generates a short-lived ID token (valid for 60 minutes) for the pipeline execution.
2. The delegate presents this token to Azure AD.
3. Azure AD validates the token against the federated credential you configured on the App Registration or Managed Identity.
4. Azure AD issues an access token that grants access to Azure resources based on the RBAC roles you assigned.
**Issuer URL**
The Harness OIDC issuer URL format depends on the environment cluster where your Harness account resides. To find your cluster, navigate to **Account Settings**, then select **Overview**. The cluster hosting your account is displayed on the account details page.
The issuer URL format is:
```
https:///ng/api/oidc/account/
```
Use the hostname that matches your cluster, even if a vanity URL is set up for your account:
| Cluster | Hostname |
| ----------- | ---------------------- |
| Prod1/Prod2 | app.harness.io |
| Prod3 | app3.harness.io |
| Prod0/Prod4 | accounts.harness.io |
| EU clusters | accounts.eu.harness.io |
{% hint style="info" %}
To find your Harness Account ID, navigate to **Account Settings**, then select **Overview**. Your account ID is also visible in your browser URL: `app.harness.io/ng/account//...`.
You can test connectivity to the issuer URL by running:
```bash
curl https:///ng/api/oidc/account//.well-known/openid-configuration
```
This should return valid information from the endpoint, including the issuer, JWKS URI, and supported claims.
{% endhint %}
**Subject identifier**
The **subject** claim in the Harness-issued token uses this format:
```
Provider:Harness:Account:
```
Enter this exact value as the **Subject identifier** when configuring federated credentials in Azure. Azure uses it to match the incoming token to the correct identity.
**Step 1: Configure federated credentials in Azure**
You can configure OIDC using an App Registration (Service Principal) or a User-Assigned Managed Identity. Use **App Registration** when you need a service principal with explicit RBAC role assignments across one or more subscriptions. Use **User-Assigned Managed Identity** when the delegate runs inside an AKS cluster and you want tighter integration with Azure's managed identity service.
{% tabs %}
{% tab title="App Registration" %}
Perform the following steps to add a federated credential to an App Registration:
1. In the [Azure portal](https://portal.azure.com), navigate to **Microsoft Entra ID**, then select **App registrations**.
2. Select **New registration**, enter a name (for example, `harness-oidc`), and select **Register**.
3. On the **Overview** page, note the **Application (client) ID** and **Directory (tenant) ID**.
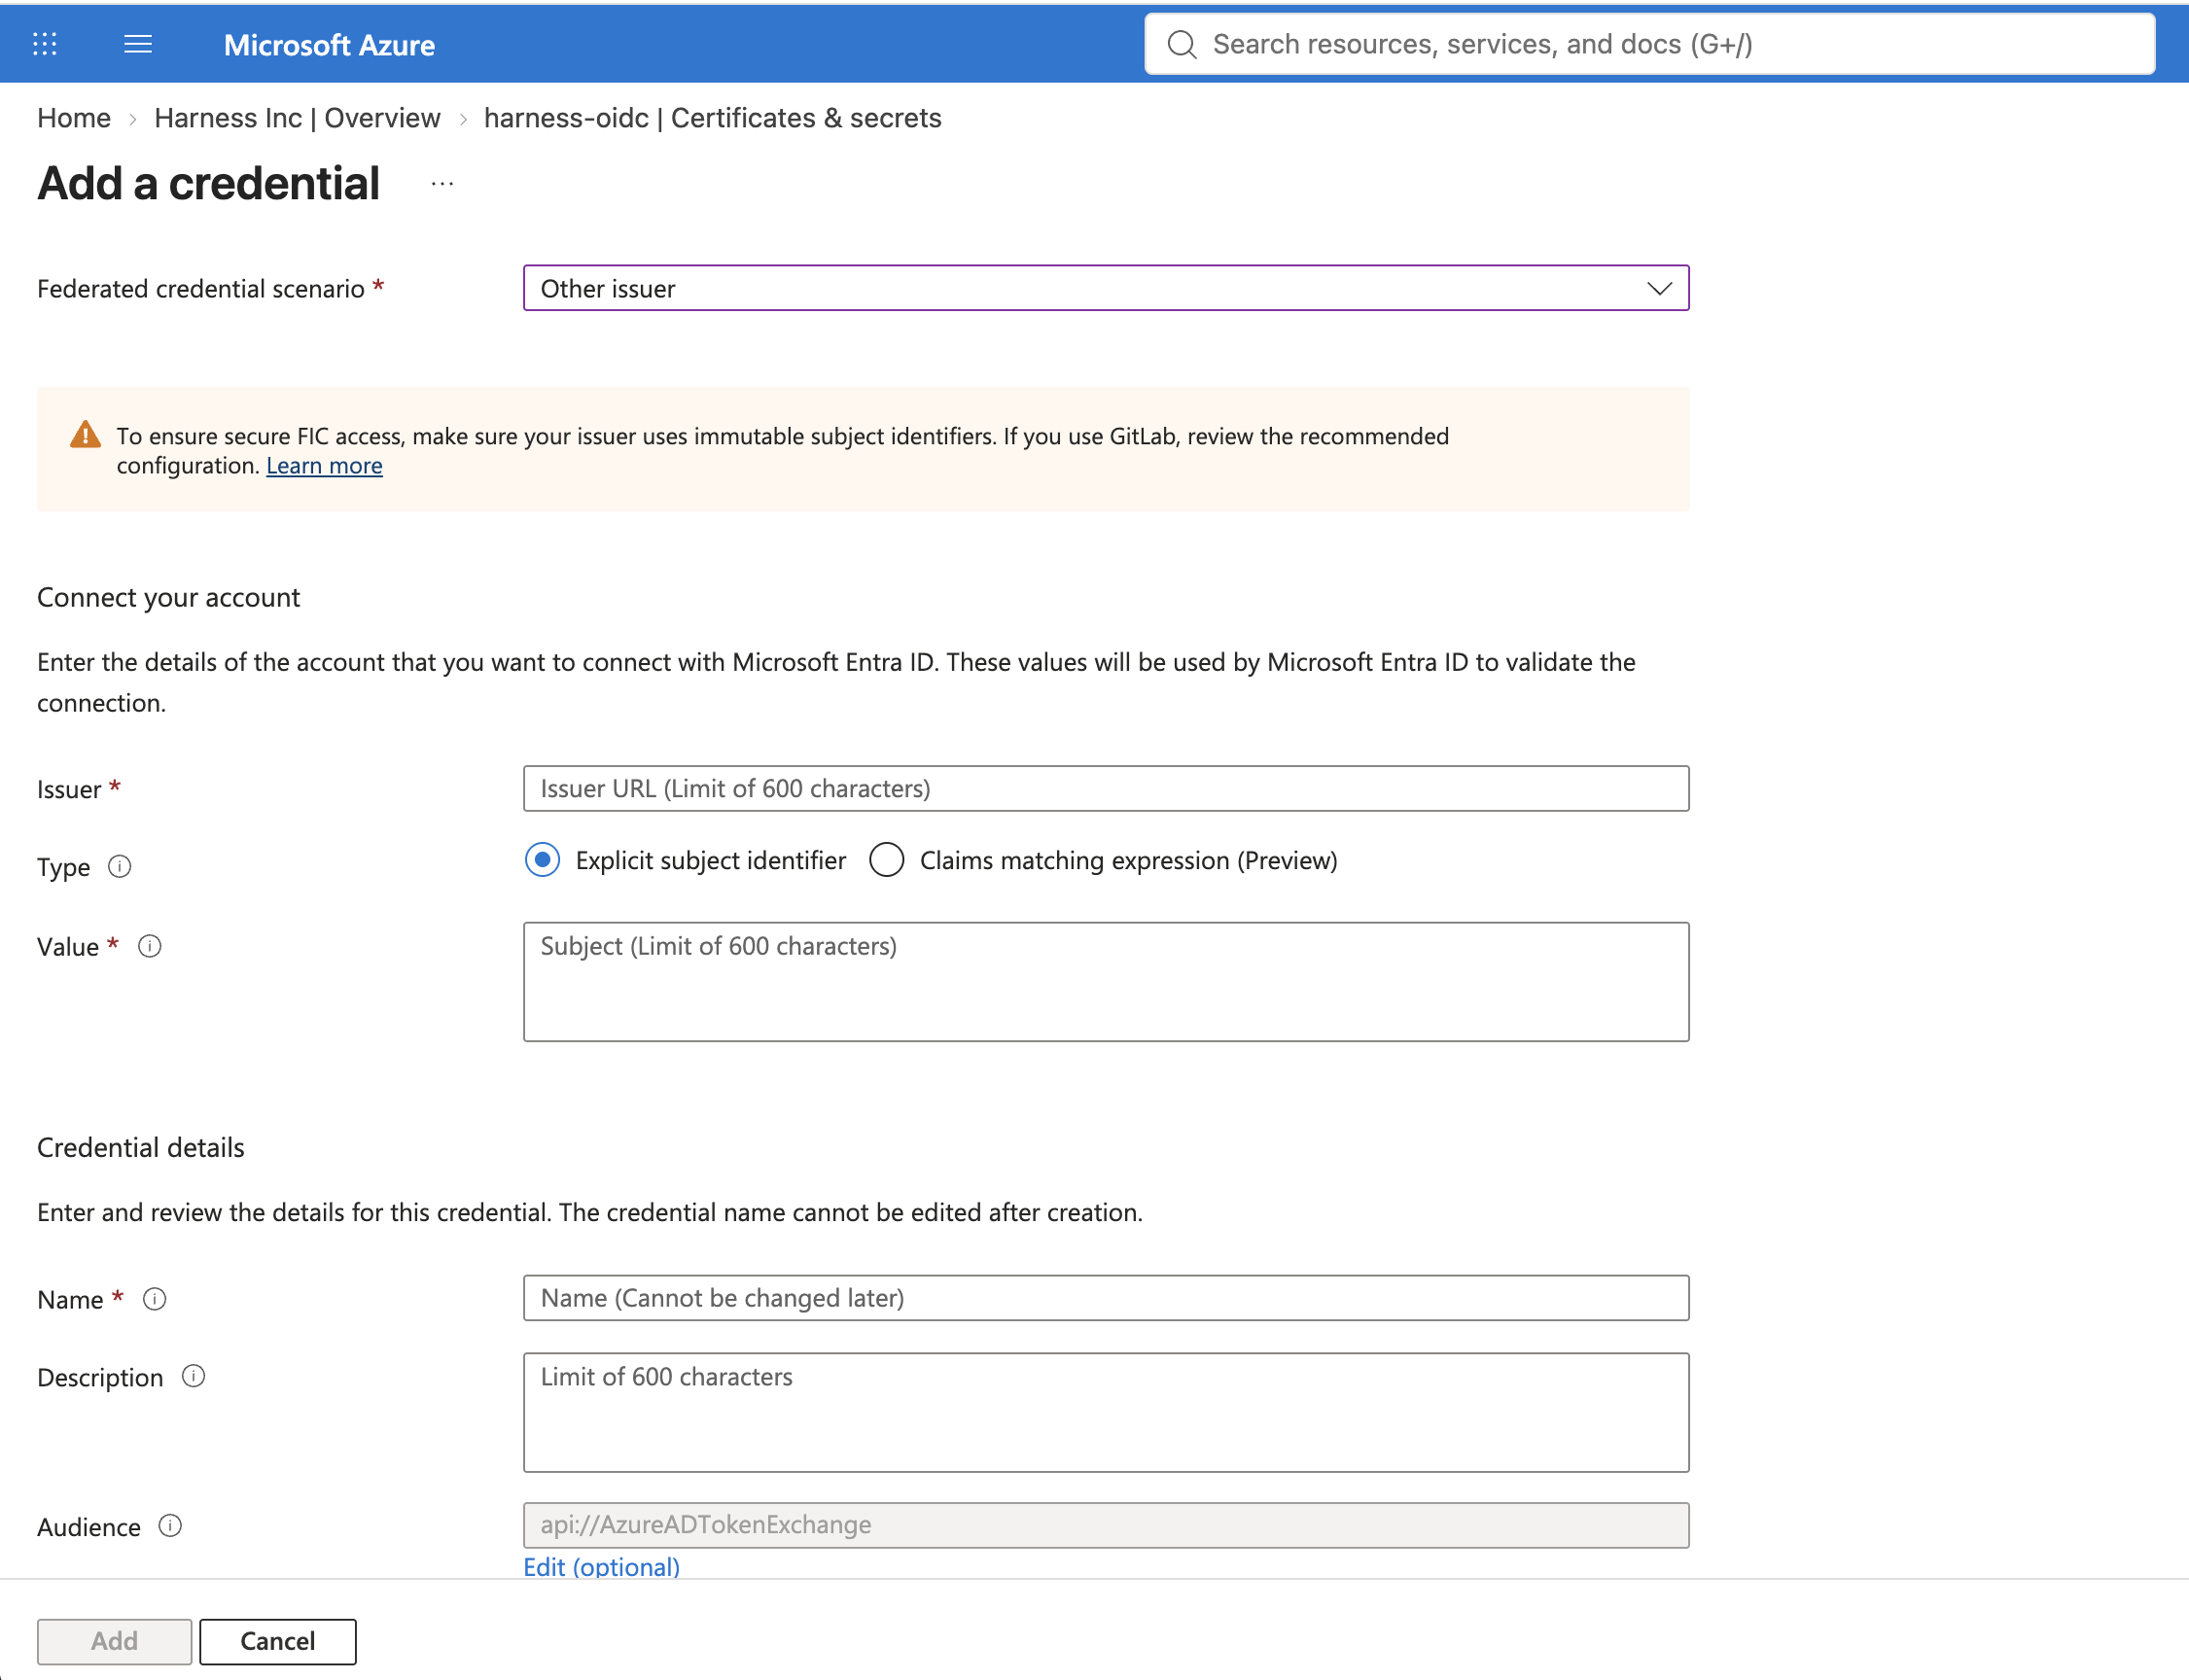
4. Select **Certificates & secrets**, then select the **Federated credentials** tab.
5. Select **Add credential**, then for **Federated credential scenario**, select **Other issuer**.
6. Enter the following values:
| Field | Value |
| ---------------------- | ------------------------------------------------------------------------------------------------------------------------------------------------------------- |
| **Issuer** | `https:///ng/api/oidc/account/` (Replace `` with your cluster hostname from the [Issuer URL](#issuer-url) table) |
| **Subject identifier** | `Provider:Harness:Account:` |
| **Audience** | `api://AzureADTokenExchange` |
| **Name** | A descriptive name, for example `harness-pipeline` |
7. Select **Add**.
Go to [Configure an app to trust an external identity provider](https://learn.microsoft.com/en-us/entra/workload-id/workload-identity-federation-create-trust?pivots=identity-wif-apps-methods-azp) in the Microsoft documentation for additional configuration options.
To add the federated credential using the Azure CLI instead, run the following command:
```bash
az ad app federated-credential create \
--id \
--parameters @federated-credential.json
```
Where `federated-credential.json` contains:
```json
{
"name": "harness-pipeline",
"issuer": "https:///ng/api/oidc/account/",
"subject": "Provider:Harness:Account:",
"audiences": ["api://AzureADTokenExchange"]
}
```
Replace `` with your cluster hostname from the [Issuer URL](#issuer-url) table.
{% endtab %}
{% tab title="User-Assigned Managed Identity" %}
Perform the following steps to add a federated credential to a User-Assigned Managed Identity:
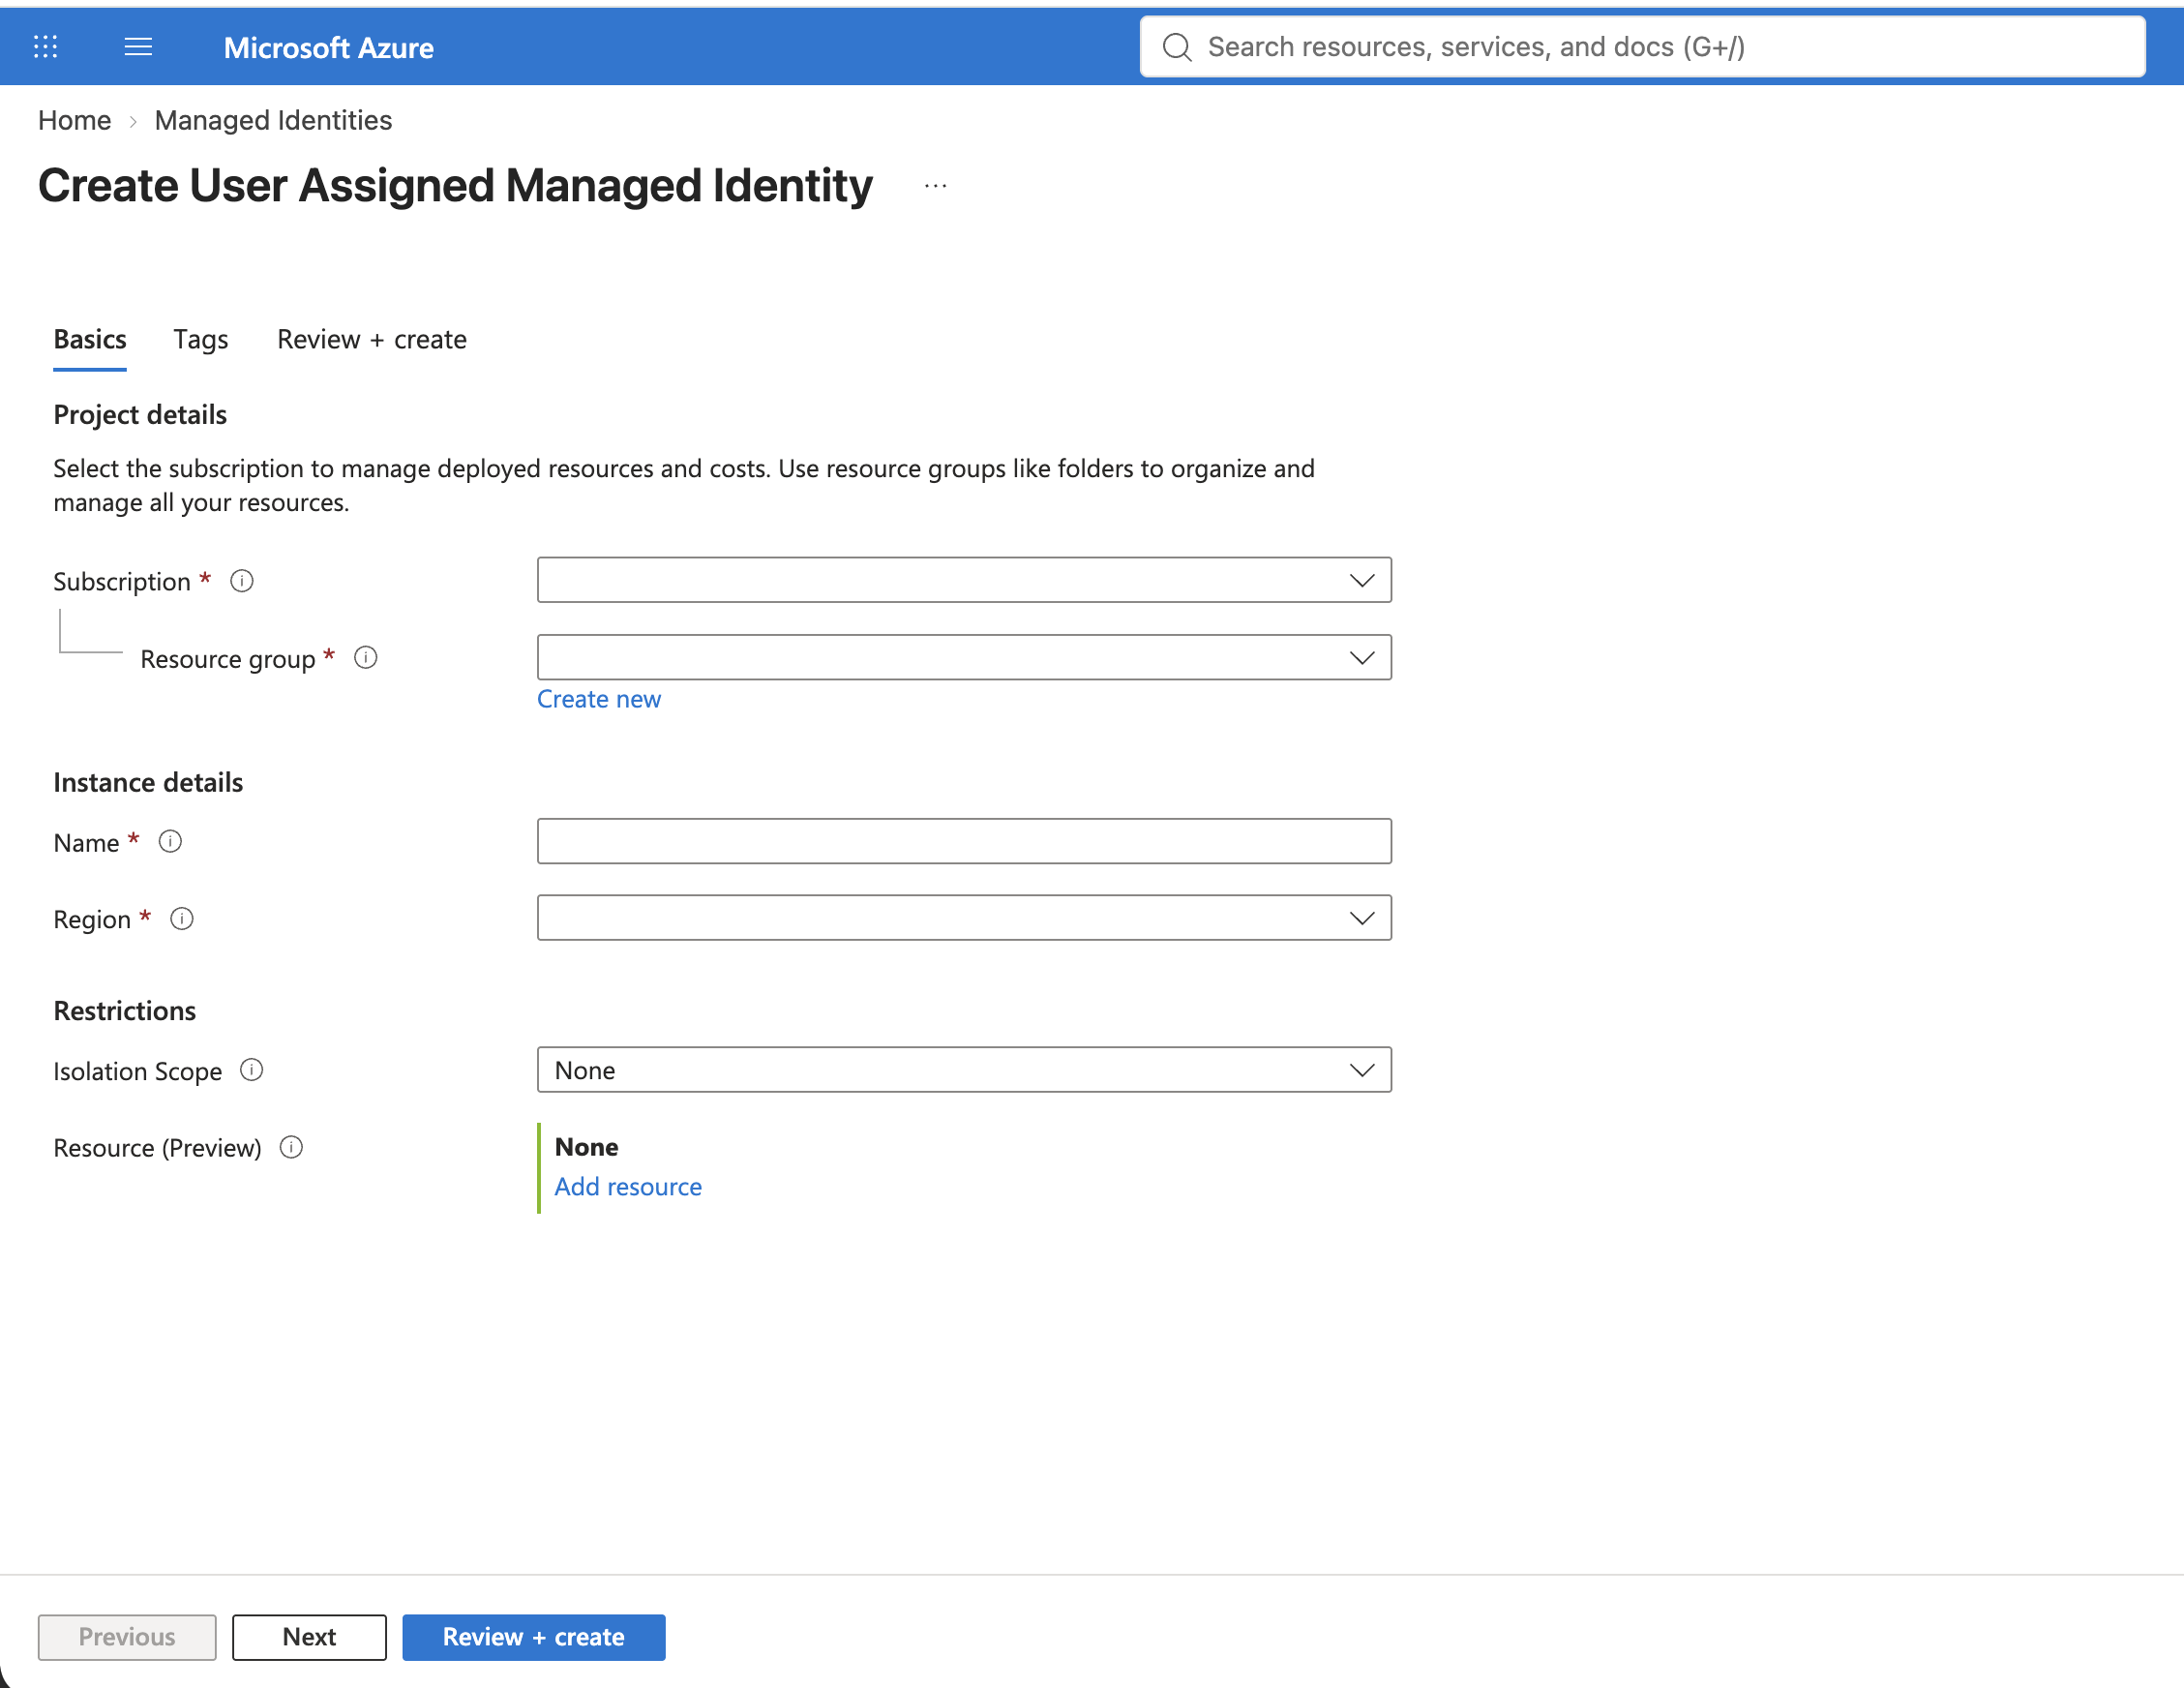
1. In the [Azure portal](https://portal.azure.com), navigate to **Managed Identities**.
2. Select **Create**, choose your subscription, resource group, and region, enter a name, and select **Review + create**.
3. On the managed identity **Overview** page, note the **Client ID**.
4. Navigate back to **Managed Identities**, select the identity you created, then select **Federated credentials** under **Settings**.
5. Select **Add credential**, then enter the following values:
| Field | Value |
| --------------------------------- | ------------------------------------------------------------------------------------------------------------------------------------------------------------- |
| **Federated credential scenario** | **Other issuer** |
| **Issuer** | `https:///ng/api/oidc/account/` (Replace `` with your cluster hostname from the [Issuer URL](#issuer-url) table) |
| **Subject identifier** | `Provider:Harness:Account:` |
| **Audience** | `api://AzureADTokenExchange` |
| **Name** | A descriptive name, for example `harness-pipeline` |
6. Select **Add**.
Go to [Configure a user-assigned managed identity to trust an external identity provider](https://learn.microsoft.com/en-us/entra/workload-id/workload-identity-federation-create-trust-user-assigned-managed-identity?pivots=identity-wif-mi-methods-azp) in the Microsoft documentation for additional configuration options.
To add the federated credential using the Azure CLI instead, run the following command:
```bash
az identity federated-credential create \
--name harness-pipeline \
--identity-name \
--resource-group \
--issuer "https:///ng/api/oidc/account/" \
--subject "Provider:Harness:Account:" \
--audiences "api://AzureADTokenExchange"
# Replace with your cluster hostname (see Issuer URL section above)
```
{% endtab %}
{% endtabs %}
**Assign Azure RBAC roles**
Assign the App Registration or Managed Identity the minimum role required for each Azure service you intend to use with this connector:
| Service | Minimum role | Assign at scope |
| ------------------------------ | -------------------------- | ------------------------------ |
| Azure Container Registry (ACR) | Reader | Subscription or Resource Group |
| Azure Kubernetes Service (AKS) | Owner or custom equivalent | Subscription or Resource Group |
| Azure Web Apps | Contributor | Subscription or Resource Group |
Go to [Roles, permissions, and cluster requirements](#roles-permissions-and-cluster-requirements) for the full role details and custom role JSON examples.
**Step 2: Configure the OIDC connector in Harness**
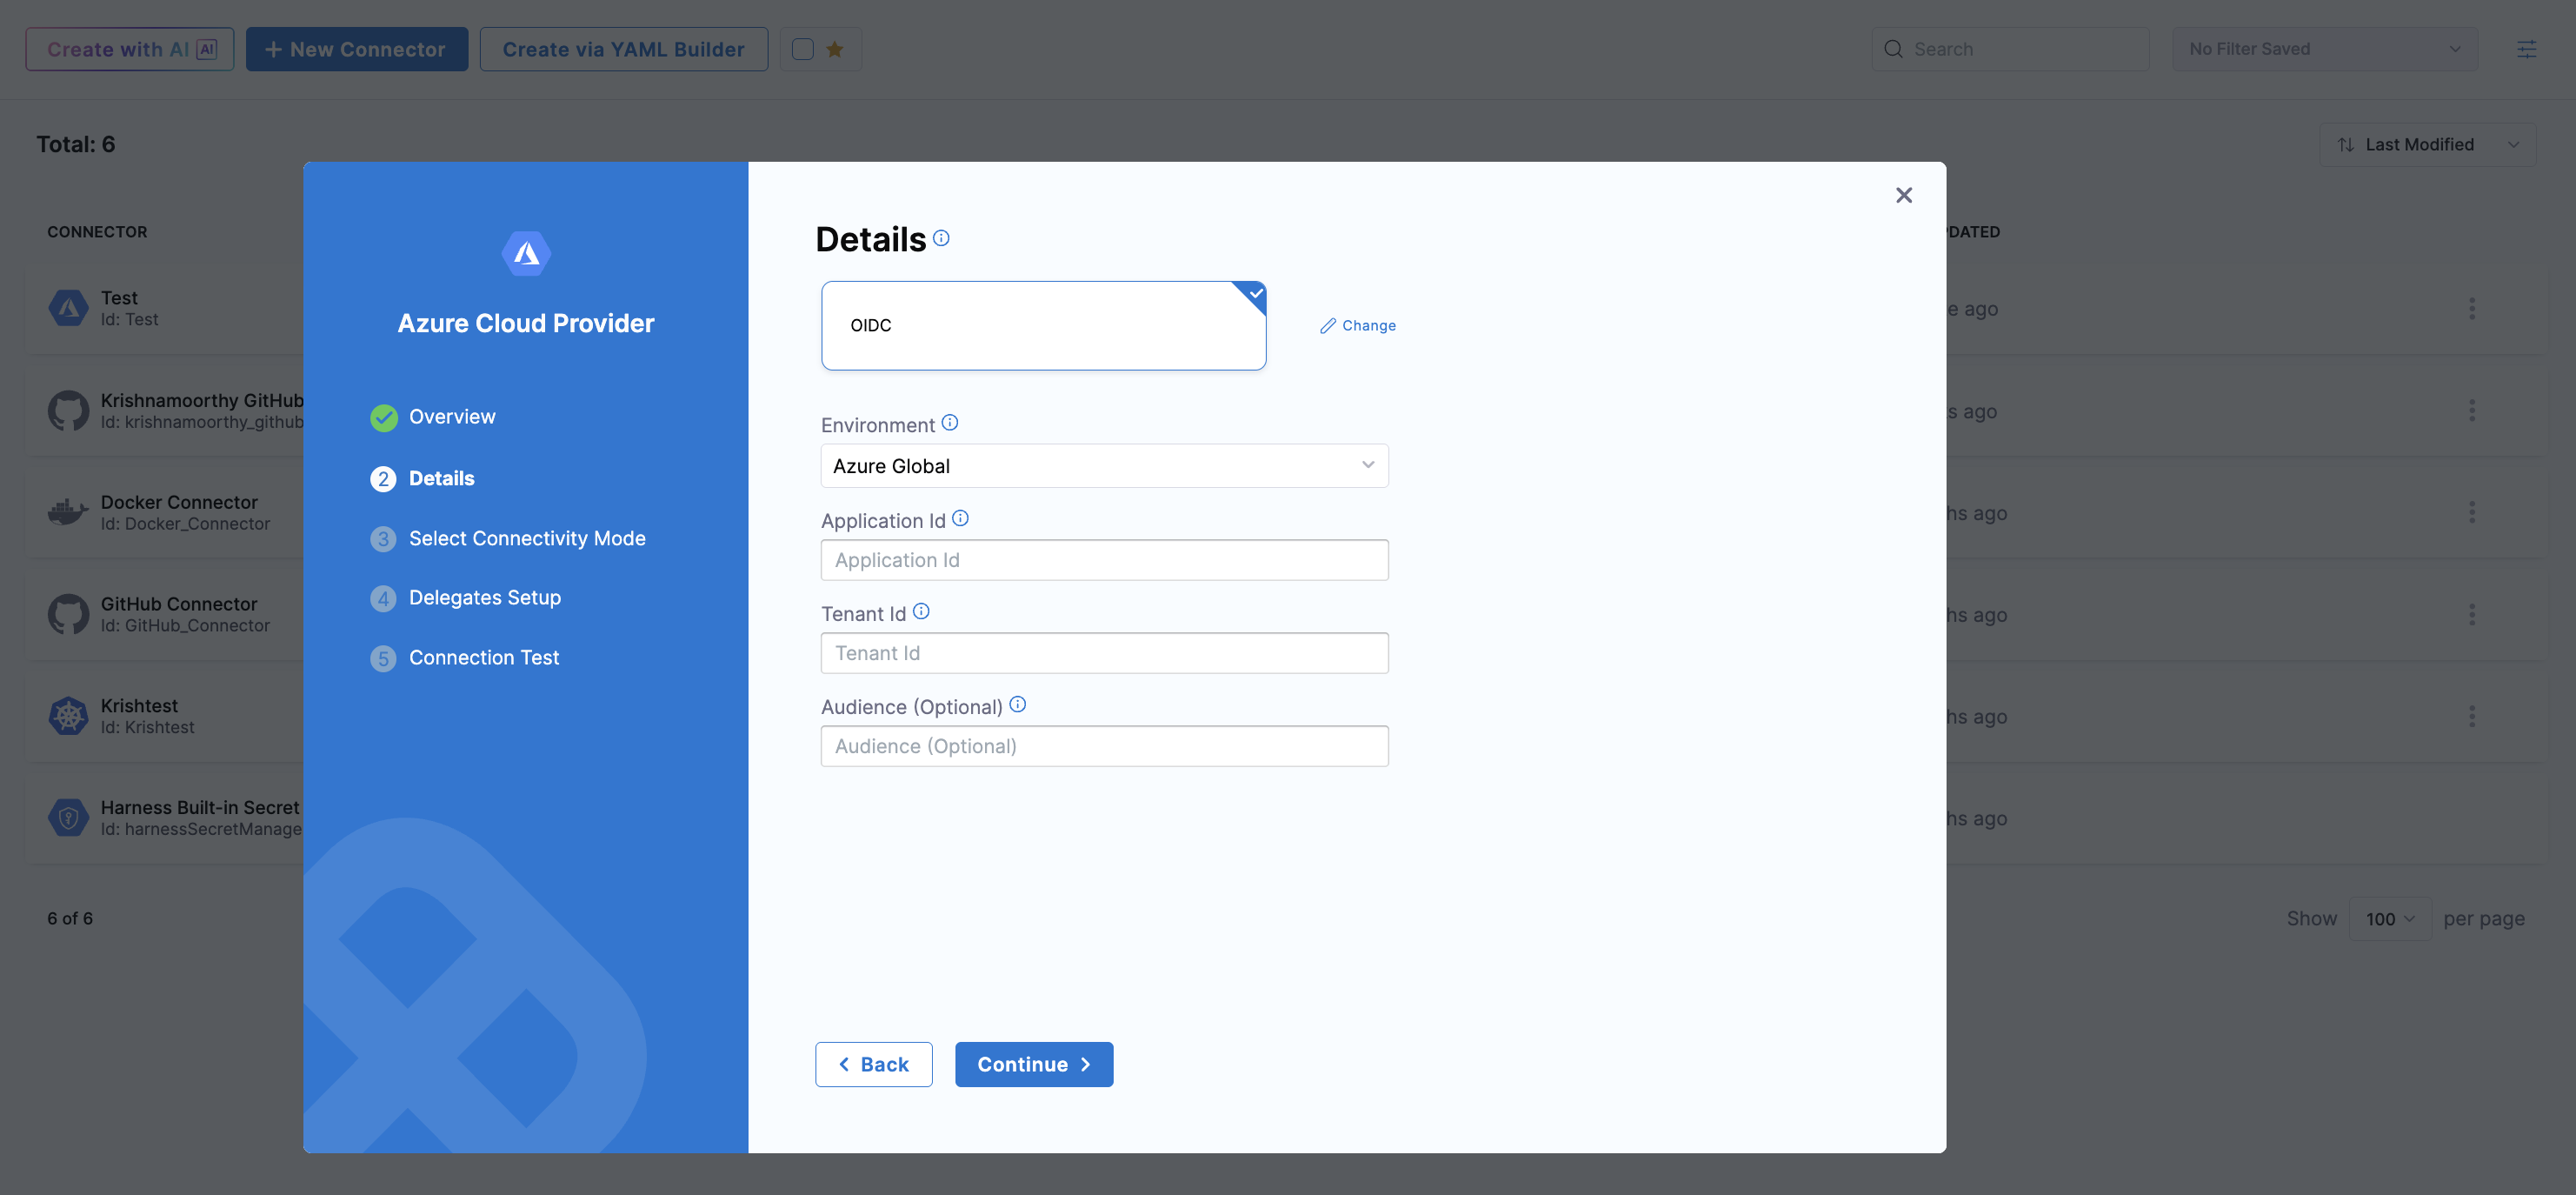
After completing the Azure setup above, return to the **Details** screen in the Harness connector wizard (the screen where you selected **OIDC** authentication).
Perform the following steps to complete the configuration:
1. Select the **Environment**: **Azure Global** or **US Government**.
2. Enter the **Application (client) ID** of the App Registration or User-Assigned Managed Identity in the **Application Id** field.
3. Enter the **Directory (tenant) ID** in the **Tenant Id** field.
4. Optionally, enter the **Subscription ID**.
5. Leave **Audience** as `api://AzureADTokenExchange` unless you configured a custom audience in Azure.
6. Select **Continue**.
{% hint style="info" %}
OIDC authentication requires **Connect through a Harness Delegate** as the connectivity mode. **Connect through Harness Platform** is not supported with OIDC.
{% endhint %}
YAML reference
```yaml
connector:
name: azure-oidc # Replace with your connector name
identifier: azure_oidc # Replace with your connector identifier
type: Azure
spec:
environment: AZURE
credential:
type: OidcAuthentication
spec:
tenantId: # Replace with your Directory (tenant) ID
applicationId: # Replace with your Application (client) ID
audience: api://AzureADTokenExchange
azureEnvironmentType: AZURE
delegateSelectors:
- # Replace with your delegate tag
executeOnDelegate: true
```
{% endtab %}
{% tab title="Inherit from Delegate" %}
#### Inherit from delegate
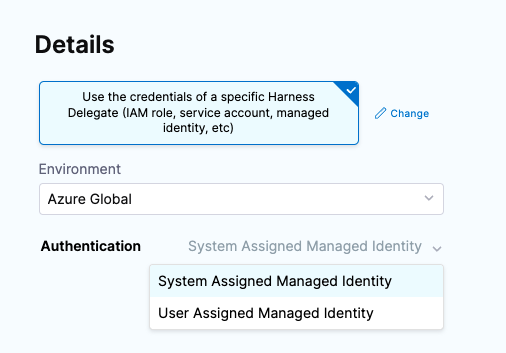
Select **Use the credentials of a specific Harness Delegate** to allow the connector to inherit authentication credentials from a Harness delegate running in your Azure subscription or AKS cluster. This option is useful when the delegate itself has the appropriate Managed Identity or service account permissions.
Perform the following steps to configure inherited credentials:
1. For **Environment**, select **Azure Global** or **US Government**.
2. For **Authentication**, select **System Assigned Managed Identity** or **User Assigned Managed Identity**.
**System Assigned Managed Identity** uses the AKS cluster's predefined [Kubelet Managed Identity](https://docs.microsoft.com/en-us/azure/aks/use-managed-identity#summary-of-managed-identities). The Control plane AKS Managed Identity (named ``) must have the **Reader** permission on the AKS cluster itself. If used for image storage, the Kubelet Managed Identity (named `-agentpool`) must have the **acrPull** permission on ACR.
Go to [Use managed identities in Azure Kubernetes Service](https://docs.microsoft.com/en-us/azure/aks/use-managed-identity) and [How to use managed identities with Azure Container Instances](https://docs.microsoft.com/en-us/azure/container-instances/container-instances-managed-identity) for further details.
3. If you selected **User Assigned Managed Identity**, enter the Managed Identity's **Client Id** from your Azure **Managed Identities**. You can also use a [Pod Assigned Managed Identity](https://docs.microsoft.com/en-us/azure/aks/use-azure-ad-pod-identity).
4. Select **Continue**.
{% endtab %}
{% endtabs %}
Select **Continue** to proceed to **Select Connectivity Mode**.
On the **Connect to the provider** page, Harness connects to Azure through a Harness Delegate you install in your environment, behind your corporate firewall:

* **Connect through a Harness Delegate**: Required when using inherited delegate credentials or OIDC authentication.
Select **Continue** to proceed to **Delegates Setup**.
**Delegates Setup**
Select the Delegates this connector will use:

* **Use any available Delegate**: Harness selects an available delegate at runtime.
* **Only use Delegates with all of the following tags**: Use tags to target one or more specific delegates. You can also install a new delegate at this time.
Select **Save and Continue** to proceed to **Connection Test**.
### Connection Test
Harness validates the Azure connector authentication and permissions and shows the delegate that executed the check. If the test succeeds, select **Finish** to complete the connector setup.

## YAML examples
The following YAML examples show how to configure an Azure connector for each credential type.
**Specify Credentials**
The following YAML defines an Azure connector that uses the **Specify Credentials** credential type with a client secret, connects through a Harness Delegate, and runs the connection test on save.
Azure connector YAML
```yaml
connector:
name: CDCNGAuto_AccountLevelAzureConnectorrU1 # Connector display name shown in the Harness UI
identifier: CDCNGAuto_AccountLevelAzureConnectorrU1 # Unique connector identifier, cannot be changed after creation
description: CDCNGAuto_AccountLevelAzureConnectorrU1 # Optional connector description
accountIdentifier: # Harness account identifier that owns the connector
type: Azure # Connector type
spec:
credential:
type: ManualConfig # Use the Specify Credentials credential type
spec:
applicationId: # Application (client) ID of the Azure App Registration
tenantId: # Directory (tenant) ID of the Microsoft Entra ID tenant
auth:
type: Secret # Authenticate using a client secret
spec:
secretRef: account. # Identifier of the Harness secret storing the client secret
azureEnvironmentType: AZURE # Azure Global environment
executeOnDelegate: true # Connect through a Harness Delegate
ignoreTestConnection: false # Run the connection test when the connector is saved
```
**OIDC Authentication**
The following YAML defines an Azure connector that uses the **OIDC Authentication** credential type to authenticate through workload identity federation.
Azure connector YAML
```yaml
connector:
name: azure-oidc # Connector display name shown in the Harness UI
identifier: azure_oidc # Unique connector identifier, cannot be changed after creation
type: Azure # Connector type
spec:
environment: AZURE # Azure Global environment
credential:
type: OidcAuthentication # Use the OIDC Authentication credential type
spec:
tenantId: # Directory (tenant) ID of the Microsoft Entra ID tenant
applicationId: # Application (client) ID of the App Registration or User-Assigned Managed Identity
audience: api://AzureADTokenExchange # Audience configured on the federated credential in Azure
azureEnvironmentType: AZURE # Azure Global environment
delegateSelectors:
- # Delegate tag used to select a delegate for this connector
executeOnDelegate: true # Connect through a Harness Delegate
```
**Inherit from Delegate**
The following YAML defines an Azure connector that uses the **Inherit from Delegate** credential type with a User Assigned Managed Identity, and selects a delegate by tag.
Azure connector YAML
```yaml
connector:
name: CDP_API_PipelineAzureProjectJj0YiDkEst # Connector display name shown in the Harness UI
identifier: CDP_API_PipelineAzureProject3C267xtdoc # Unique connector identifier, cannot be changed after creation
description: CDP_API_PipelineAzureProjectJj0YiDkEst # Optional connector description
accountIdentifier: # Harness account identifier that owns the connector
type: Azure # Connector type
spec:
credential:
type: InheritFromDelegate # Use the Inherit from Delegate credential type
spec:
auth:
type: UserAssignedManagedIdentity # Authenticate using a User Assigned Managed Identity
spec:
clientId: # Client ID of the User Assigned Managed Identity
delegateSelectors:
- # Delegate tag used to select a delegate for this connector
azureEnvironmentType: AZURE # Azure Global environment
executeOnDelegate: true # Connect through a Harness Delegate
ignoreTestConnection: false # Run the connection test when the connector is saved
```
## Troubleshooting The connection test fails due to a credentials issue
Confirm that your delegate is running and that your credentials are valid. For example, check that the client secret has not expired in your App Registration.
***
## Next steps
* [Azure ACR to AKS CD quickstart](/continuous-delivery/use-continuous-delivery/deploy-services-on-different-platforms/azure/azure-cd-quickstart.md): deploy a containerized application from ACR to AKS using a CD pipeline.
* [Kubernetes CD quickstart](/continuous-delivery/use-continuous-delivery/deploy-services-on-different-platforms/kubernetes/kubernetes-cd-quickstart.md): deploy to Kubernetes using the platform-agnostic Kubernetes cluster connector.
* [Azure OIDC token plugin for CI](/continuous-integration/use-harness-ci/secure-harness-ci/azure-oidc-token-plugin.md): use OIDC to authenticate with Azure services in Harness CI pipelines.
* [Harness key concepts](/service-reliability-management/new-to-srm/get-started/key-concepts.md): understand the core Harness platform concepts.
* [CD pipeline basics](/continuous-delivery/new-to-continuous-delivery/overview.md#pipeline): understand the structure of a Harness CD pipeline.
***
{% @harness-feedback/feedback module="harness-ai" pagePath="harness-ai/use-harness-platform/connectors/cloud-providers/add-a-microsoft-azure-connector" %}