> For the complete documentation index, see [llms.txt](https://developer.harness.io/llms.txt). Markdown versions of documentation pages are available by appending `.md` to page URLs; this page is available as [Markdown](https://developer.harness.io/harness-platform/use-harness-platform/git-experience/oauth-integration.md).

# Integrate OAuth with Git experience

You can store configurations for your resources, such as pipelines and input sets, in Git using Harness Git Experience. Harness fetches user credentials from the Harness account and uses the corresponding user name as the author of the commit.

You can push configuration changes using your own credentials by integrating OAuth with Git. When you integrate OAuth with Git Experience, the credentials are stored in your Harness account user profile. These credentials are used for any subsequent commits.

{% hint style="info" %}
**IMPORTANT**

Harness will continue to use the user name corresponding to the account if you do not integrate OAuth with Git Experience.
{% endhint %}

This topic explains how to configure OAuth for Git Experience in Harness.

### Configure OAuth for Git provider <a href="#configure-oauth-for-git-provider" id="configure-oauth-for-git-provider"></a>

Harness supports OAuth integration for the following Git providers:

* GitHub
* GitLab
* Bitbucket SaaS
* Self-hosted Bitbucket

{% hint style="info" %}
**NOTE**

Harness does not support OAuth integration for Azure Repos or on-premises Git systems.
{% endhint %}

This topic explains how to configure OAuth for GitHub.

To configure your credentials for Git:

1. Go to your user profile in Harness.
2. In **Connect to a Git Provider**, select **GitHub**.

   ![](/files/BENpQX6Cv7RdbDJGnSFG)
3. Click **Connect**. The OAuth settings for the selected Git provider appear.

   ![](/files/e3wS5Y9fUrOUKhVvPBGI)
4. Click **Authorize**. Harness fetches the corresponding OAuth token associated with the Git provider and displays it under **Access token for Git providers**.

   ![](/files/iNPkZFlKI8jbW3Mtc3ld)

{% hint style="info" %}
**NOTE**

You can delete access tokens you no longer need. Under **Access tokens for Git providers**, click the **Delete** icon for the Git provider token. A confirmation message appears. After you confirm, Harness removes the configuration.
{% endhint %}

#### Configure OAuth for GitHub Enterprise <a href="#configure-oauth-for-github-enterprise" id="configure-oauth-for-github-enterprise"></a>

Harness supports OAuth integration for GitHub Enterprise. **As a prerequisite, you need to create an OAuth App in your GitHub Enterprise instance.**

Go to [Creating an OAuth App](https://docs.github.com/en/apps/oauth-apps/building-oauth-apps/creating-an-oauth-app) to create an OAuth App.

As you begin setting up the OAuth App:

* You must **provide the Authorization callback URL**. Initially, you can **provide any valid URL to proceed**. Later, this URL will be updated to the URL provided during **New Provider** set-up.
* Keep the **Client ID** and **Client Secret** handy. You will need them to create the provider in Harness.

{% hint style="info" %}
**NOTE**

OAuth for GitHub Enterprise requires the `PIPE_ENABLE_GITHUB_ENTERPRISE_PROVIDER_FLOW` feature flag. Contact [Harness Support](mailto:support@harness.io) to enable the feature.
{% endhint %}

To configure your credentials for GitHub Enterprise:

1. Navigate to **Account Settings** in Harness.
2. Select **Providers**, then click **New Provider**.

![](/files/vb5JCL7pa2cHSMPqbw77)

3. Select **GitHub** as a provider.
4. Enter the **Name** and **Domain URL** of the provider. The **Domain URL** is the URL of your GitHub Enterprise instance.
5. Specify the **Secret Manager**. This is where the token related to GitHub Enterprise will be stored.
6. Specify the **Delegate Selector**, then click **Continue**.

![](/files/wSxfqhEjQHxHkLYk3R6Z)

7. Copy the Redirect URL provided on the Harness Credentials page and use it to update the Authorization callback URL in your GitHub Enterprise OAuth App.

![](/files/gTscwT3uL1yLtmCaSLcG)

8. Copy the Client ID and generated Client Secret from your GitHub Enterprise OAuth App and use them to complete the provider's setup.

After you configure the GitHub Enterprise provider, navigate to your user profile. Select **Profile Overview**. Under **Connect to a Provider**, click **Select a Provider**. Select **Custom Provider**, select the provider you created, then click **Connect**.

![](/files/Qn9PVdYuliX07bX0sw2Z)

On the GitHub authorization page, click **Authorize**. Harness creates the access token.

#### Configure OAuth for Self-hosted Bitbucket provider <a href="#configure-oauth-for-self-hosted-bitbucket-provider" id="configure-oauth-for-self-hosted-bitbucket-provider"></a>

To configure your credentials for a self-hosted Bitbucket provider:

1. Go to your user profile in Harness.
2. Under **Account providers**, click **New Provider**.

![](/files/uZaRWJ8ZHTgYKmA2lavj)

3. Select **Bitbucket** as a provider.
4. Enter the **Name** and **Domain URL** of the provider.
5. Specify the **Secret Manager**. This is where you have the access token related to the BitBucket stored.
6. Specify the **Delegate Selector**, then click **Continue**.

![](/files/z1xtJTv6waGVjX3kHR37)

7. Copy the Redirect URL provided on the Harness Credentials page.
8. Navigate to the settings for your self-hosted Bitbucket instance. Select **Application Links**, then click **Create Link**.
9. Enter the **Name**. Under **Redirect URL**, enter the URL from the Bitbucket Configuration step, then save it.
10. Return to **Application Links**. Open the settings for the application, then click **View Credentials**. Copy the **Client ID** and **Client Secret**. Use them to configure the provider on the Harness Credentials page, then save it.

After you configure the Bitbucket provider, navigate to your user profile. Select **Profile Overview**. Under **Connect to a Provider**, click **Select a Provider**. Select **On-Prem**, select the provider you created, then click **Connect**.

![](/files/RDGsULd6ejUeXuK0w0I2)

On the Bitbucket page, click **Allow**. Harness creates the access token.

#### Configure OAuth for Self-hosted Gitlab provider <a href="#configure-oauth-for-self-hosted-gitlab-provider" id="configure-oauth-for-self-hosted-gitlab-provider"></a>

{% hint style="info" %}
OAuth configuration for self-hosted and on-premises GitLab requires the `PIPE_ENABLE_GITLAB_ON_PREM_FLOW` feature flag. Contact [Harness Support](mailto:support@harness.io) to enable the feature.

Harness Delegate version 843xx or later is required for this feature.
{% endhint %}

To configure your credentials for a self-hosted GitLab provider:

1. Go to your user profile in Harness.
2. Under **Account providers**, click **New Provider**.

![](/files/72hNY25DK0v4anvPVfel)

3. Select **GitLab** as a provider.
4. Enter the **Name** and **Domain URL** of the provider.
5. Specify the **Secret Manager**. This is where you have the access token related to the Gitlab stored.
6. Specify the **Delegate Selector**, then click **Continue**.

![](/files/7QTMPGywULgdQCokIE1i)

7. Go to **User Settings**, then select **Applications**. Enter the **Name** and **Redirect URI** from the GitLab Configuration step. Add the **Scopes**, then click **Save Application**.

![](/files/yp0ROGS6d2nDOkjzjy0v)

8. Once you save the application, copy the **Application ID** and **Secret** and use these to configure the provider on the Harness Credentials page.

After you configure the GitLab provider, navigate to your user profile. Select **Profile Overview**. Under **Connect to a Provider**, click **Select a Provider**. Select **On-Prem**, select the provider you created, then click **Connect**.

![](/files/YpaeMFjtmJ1X2ko1OYv4)

On the GitLab page, click **Authorize**. Harness creates the access token.

### Commit changes to Git with the configured OAuth token <a href="#commit-changes-to-git-with-the-configured-oauth-token" id="commit-changes-to-git-with-the-configured-oauth-token"></a>

To commit changes to Git using the configured OAuth token:

1. Go to an existing remote pipeline or [create](/harness-platform/use-harness-platform/git-experience/configure-git-experience-for-harness-entities.md#add-a-remote-pipeline) a new one.
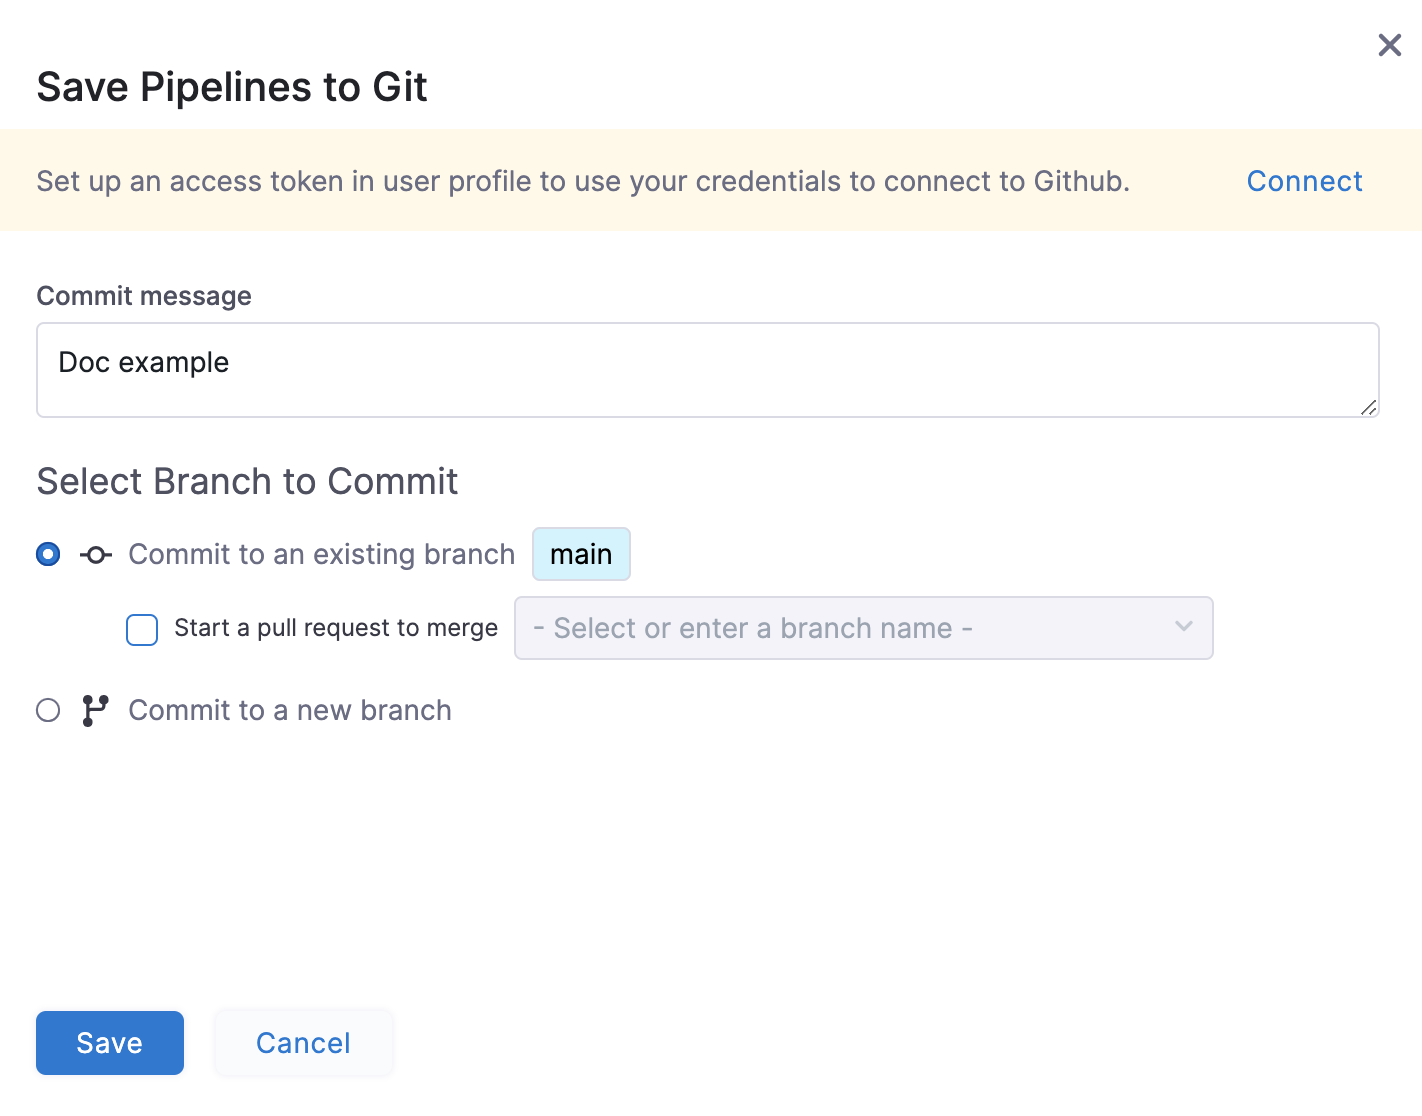
2. Edit the pipeline and select **Save**. The **Save Pipelines to Git** settings appear. Harness displays the user name being used for this commit.

   ![](/files/mUSs3UgVpEwmVHPYd4Lc)
3. Select **Save**.

   <div data-gb-custom-block data-tag="hint" data-style="info" class="hint hint-info"><p><strong>Configure OAuth or use connector credentials</strong></p><p>If you have not configured OAuth for Git, Harness prompts you to set up an access token in your user profile. To commit changes, choose one option:</p><ul><li>Click <strong>Connect</strong> to configure OAuth for Git. Use your Git credentials for the commit, then click <strong>Save</strong>.</li><li>Click <strong>Save</strong> to use the credentials from the Git connector.</li></ul><p><img src="/files/1FEoUdfJ0FWOAUrCATA0" alt="" data-size="original"></p></div>
4. Go to your branch in the Git repository. It now displays the author details beside the commit.

{% hint style="info" %}
**NOTE**

Harness does not support OAuth authentication for Git providers that use vanity URLs.
{% endhint %}

### Generate an OAuth access token with vanity URLs <a href="#generating-an-oauth-access-token-with-vanityurls-as-the-host" id="generating-an-oauth-access-token-with-vanityurls-as-the-host"></a>

Harness supports OAuth access tokens with vanity URLs for **GitHub** and **GitLab**.

#### GitHub <a href="#github" id="github"></a>

For [GitHub](https://docs.github.com/en/apps/oauth-apps/building-oauth-apps/authorizing-oauth-apps#redirect-urls), follow [Configure OAuth for Git provider](#configure-oauth-for-git-provider). Harness updates the configuration automatically.

#### GitLab <a href="#gitlab" id="gitlab"></a>

For [GitLab](https://docs.gitlab.com/ee/integration/oauth_provider.html#adding-an-application), customers need to ensure that their Vanity URL is added to the OAuth application's redirect URI list. The OAuth application is set up by Harness, so customers will need to contact [Harness Support](mailto:support@harness.io) to complete this process. They must provide their subdomain to have the Vanity URL whitelisted.

Example: If your subdomain is `yourcompany.harness.io`, the redirect URI would be:

`https://yourcompany.harness.io/gateway/api/secret/oauth2/gitlab`

#### Supported Vanity URL Format <a href="#supported-vanity-url-format" id="supported-vanity-url-format"></a>

Harness supports vanity URLs in the format `https://<YOUR_SUBDOMAIN>.harness.io`. The following combinations are invalid:

1. `https://<YOUR_SUBDOMAIN_1>.<YOUR_SUBDOMAIN_2>.harness.io`
2. `https://app.harness.io/<YOUR_SUBDOMAIN>`

### Enforce OAuth for commits <a href="#enforce-oauth-for-commits" id="enforce-oauth-for-commits"></a>

You can enforce OAuth for commits pushed from Harness to your Git provider.

To enable this setting:

Navigate to **Account Settings** → **General** → **Default Setting** → **Git Experience** → **Enable OAuth for Commits**.

![](/files/rLTcthV4d40DJS3eb88o)

If this setting is enabled but OAuth is not configured for your account, commits from Harness to Git fail.

![](/files/vEPsgCT9ez7BySiNQiZJ)

To resolve this, [configure OAuth for your Git provider](#configure-oauth-for-git-provider) before making changes.