> For the complete documentation index, see [llms.txt](https://developer.harness.io/llms.txt). Markdown versions of documentation pages are available by appending `.md` to page URLs; this page is available as [Markdown](https://developer.harness.io/harness-platform/use-harness-platform/platform-access-control/provision-users-with-okta-scim.md).
# Provision users and groups with Okta (SCIM)
Provision and manage Harness users and user groups with Okta's SCIM integration.
System for Cross-domain Identity Management (SCIM) is an open standard protocol for automated user provisioning. If Okta is your identity provider, a SCIM integration lets Okta serve as the single source of truth for Harness users and user groups, so you create, update, and remove them in Okta instead of in Harness. This page shows you how to configure that integration, which requires steps in both Okta and Harness.
***
## What you will learn from this topic
By the end of this topic, you will be able to:
* **Create an Okta app integration:** Add a Harness SAML app in Okta and turn on SCIM provisioning for it.
* **Authorize the integration:** Connect Okta to your Harness SCIM endpoint with an API token and confirm the connection.
* **Provision users and groups:** Assign individual users and push Okta groups into Harness.
* **Manage the lifecycle:** Update user attributes and deactivate or remove provisioned users.
***
## Before you begin
Before you configure SCIM provisioning with Okta, ensure you have the following:
* **Okta administrator access:** Administrator permissions in your Okta account to create app integrations and push groups.
* **Harness Account Admin role:** The **Account Admin** role in Harness. Go to [Manage roles](/harness-platform/use-harness-platform/platform-access-control/add-manage-roles.md) to assign it.
* **Harness API key and token:** An unexpired [API key and token](/harness-platform/use-harness-platform/automation/api/add-and-manage-api-keys.md) with all **Users** and **User Groups** [permissions](/harness-platform/use-harness-platform/automation/api/api-permissions-reference.md).
* **Service account permissions (optional):** The same **Users** and **User Groups** permissions on the [service account](/harness-platform/use-harness-platform/platform-access-control/add-and-manage-service-account.md), if the token belongs to one. API keys inherit the permissions of their owner.
* **Your Harness cluster:** The value of the **Harness Cluster** field in **Account Settings** > **Account Details**. SCIM URLs differ by cluster.
* **Background knowledge:** Familiarity with SCIM and Harness access control. Go to [Harness key concepts](/harness-platform/new-to-harness-platform/overview.md) and [RBAC in Harness](/harness-platform/use-harness-platform/platform-access-control/configure-rbac.md) to review the fundamentals.
***
## Create an Okta app integration
To enable automated provisioning, add a Harness SAML app to your Okta administrator account and turn on SCIM provisioning for it.
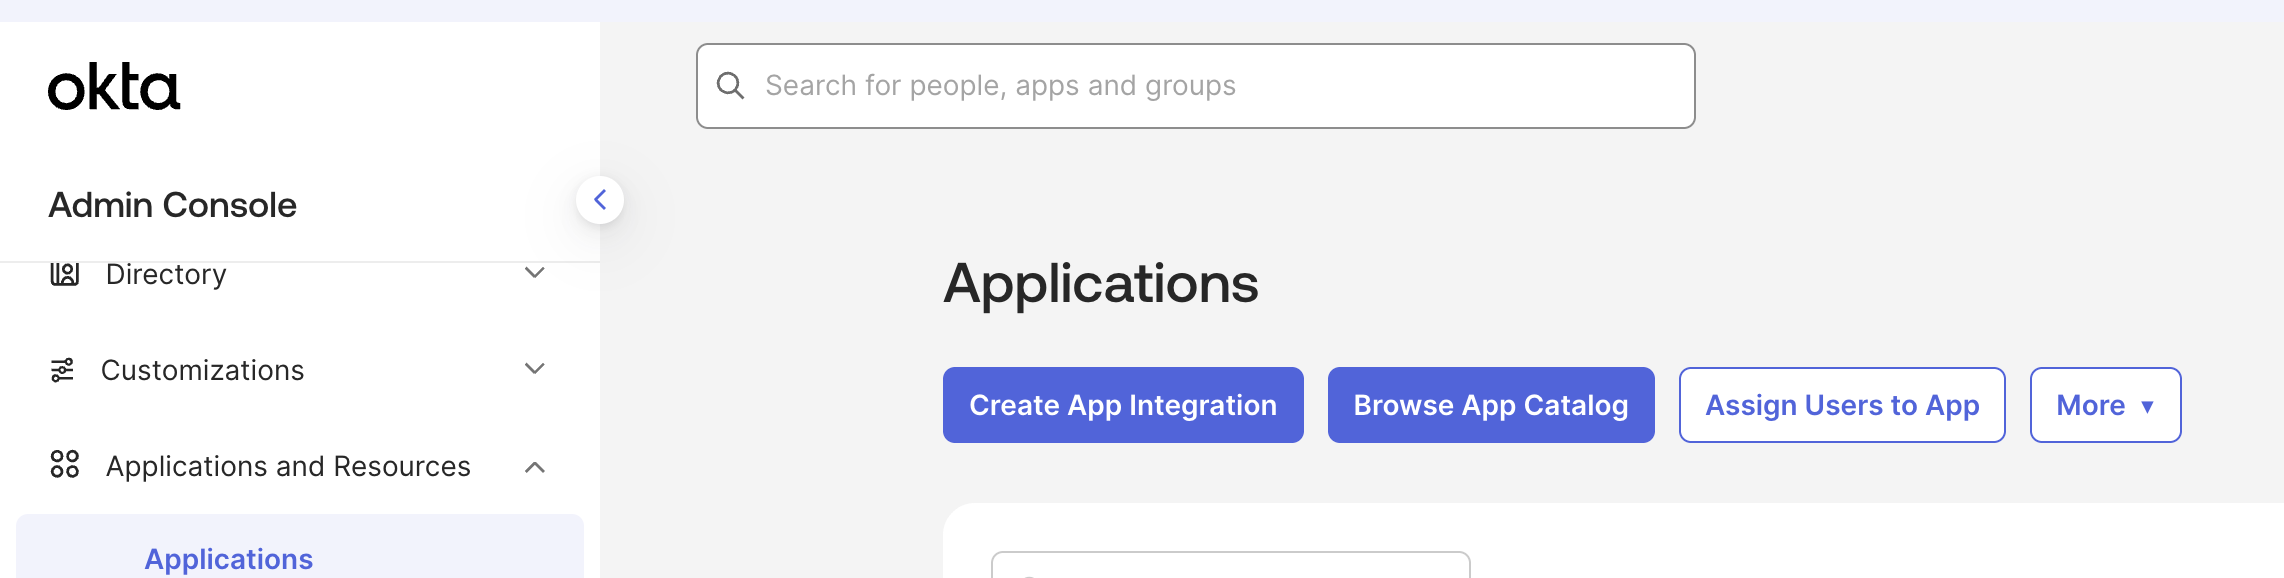
1. Log in to your Okta Admin Console, expand **Applications and Resources** in the left nav, select **Applications**, and then click **Create App Integration**.
Start from the Applications page under Applications and Resources in the Okta Admin Console.
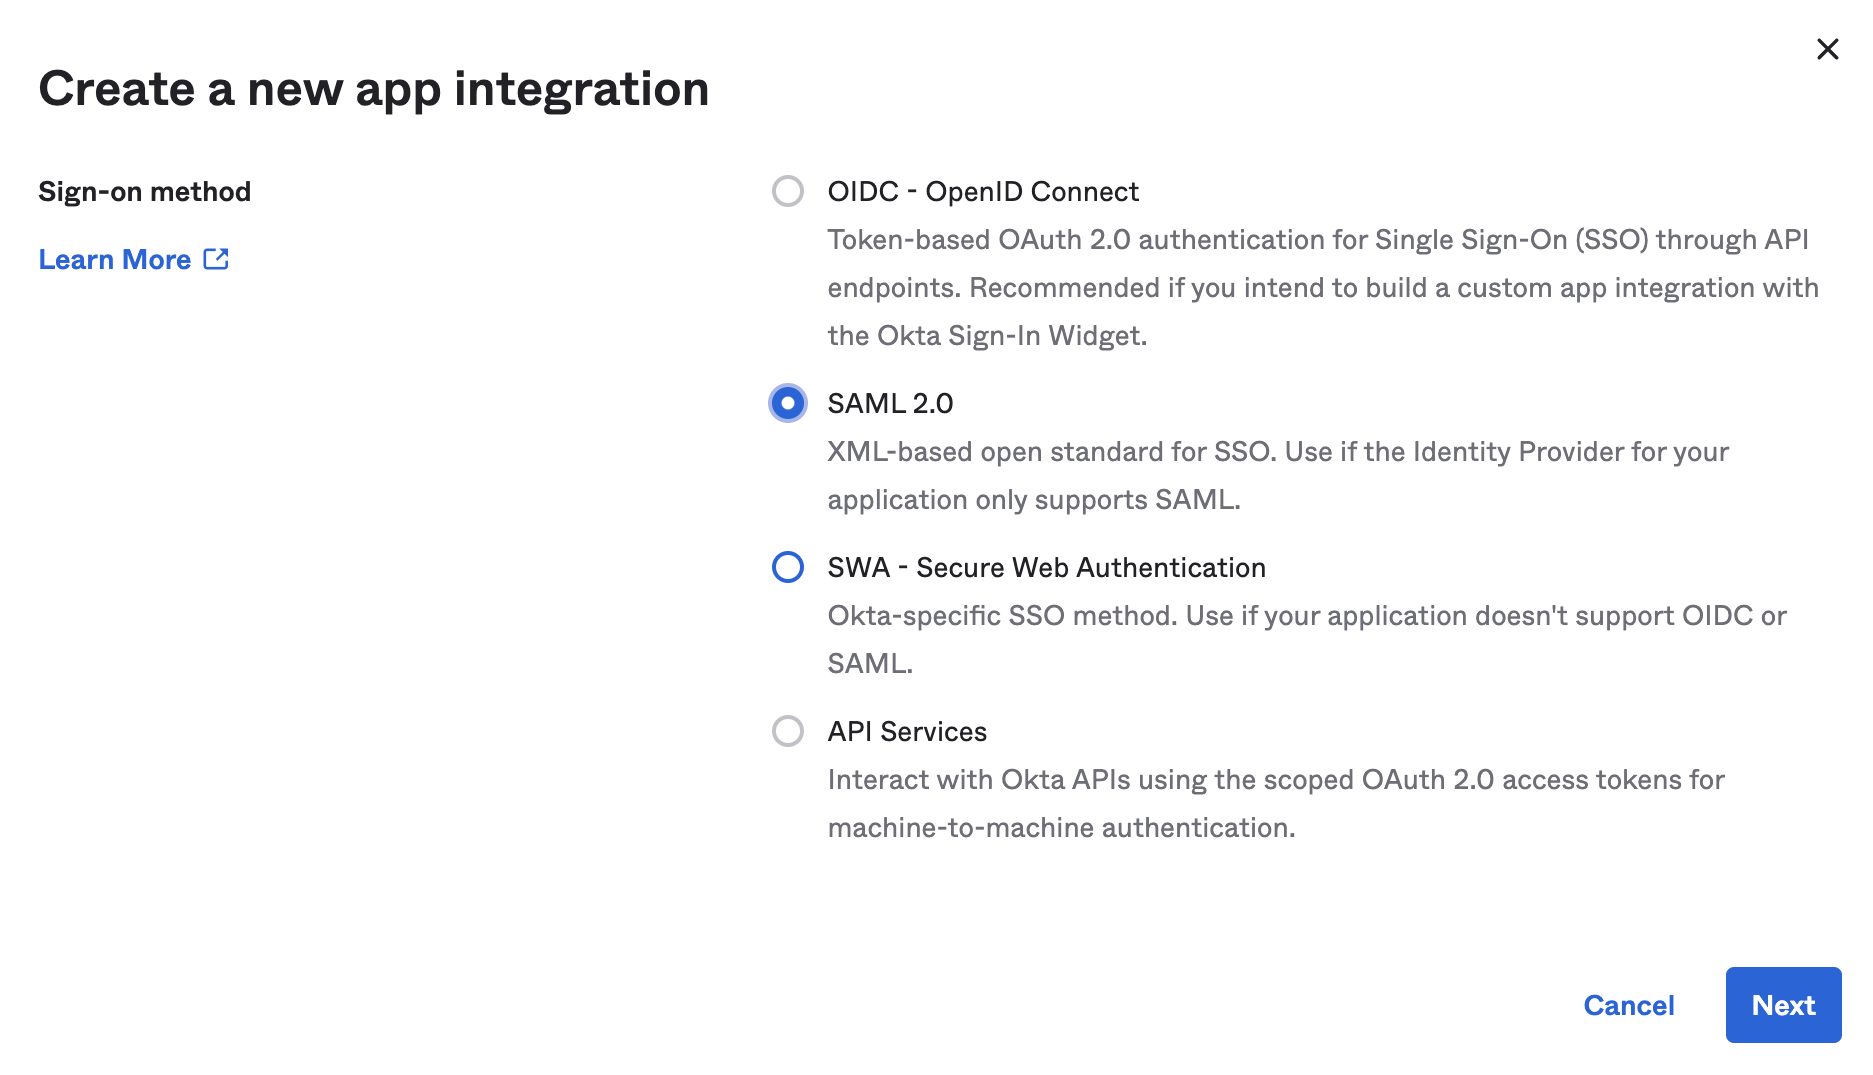
2. In the **Create a new app integration** dialog, select **SAML 2.0** for the **Sign-on method**, and then click **Next**.
SCIM provisioning for Harness requires a SAML 2.0 app, not OIDC or SWA.
3. In **General Settings**, enter a name in the **Application label** field, and then click **Next**.
4. In **SAML Settings**, under **General**, enter your Harness SAML endpoint URL in the **Single sign-on URL** field, and keep **Use this for Recipient URL and Destination URL** selected.
To get the SAML endpoint URL, open Harness in a second browser tab, navigate to **Account Settings**, select **Authentication**, select **SAML Provider**, enter a **Name** for the configuration, select **Okta**, and then copy the URL shown under **Enter this SAML Endpoint URL as your Harness application's ACS URL**. Keep that tab open, because you finish the SAML setup there. Go to [Okta SAML SSO](/harness-platform/use-harness-platform/authentication/single-sign-on-saml/okta.md) to complete the full SAML configuration.
The Single sign-on URL is the Harness SAML endpoint (ACS) URL, not your SCIM base URL. The SCIM base URL belongs in the SCIM connector base URL field, which you configure in Authorize the Okta integration.
5. In the **Audience URI (SP Entity ID)** field, enter `app.harness.io`. This identifier is always `app.harness.io`, regardless of cluster.
6. Leave the **Default RelayState** field empty. Okta sends a blank RelayState when no value is set.
7. For **Name ID format**, select **Unspecified**.
8. For **Application username**, select **Okta username**.
9. For **Update application username on**, select **Create and update**.
10. For **Attribute Statements (optional)**, enter a name in the **Name** field, select **Basic** for the **Name format**, and set the **Value** to `user.email`.
11. For **Group Attribute Statements (optional)**, enter a name in the **Name** field, select **Basic** for the **Name format (optional)**, select a **Filter**, and enter the corresponding filter value.
12. Click **Next**.
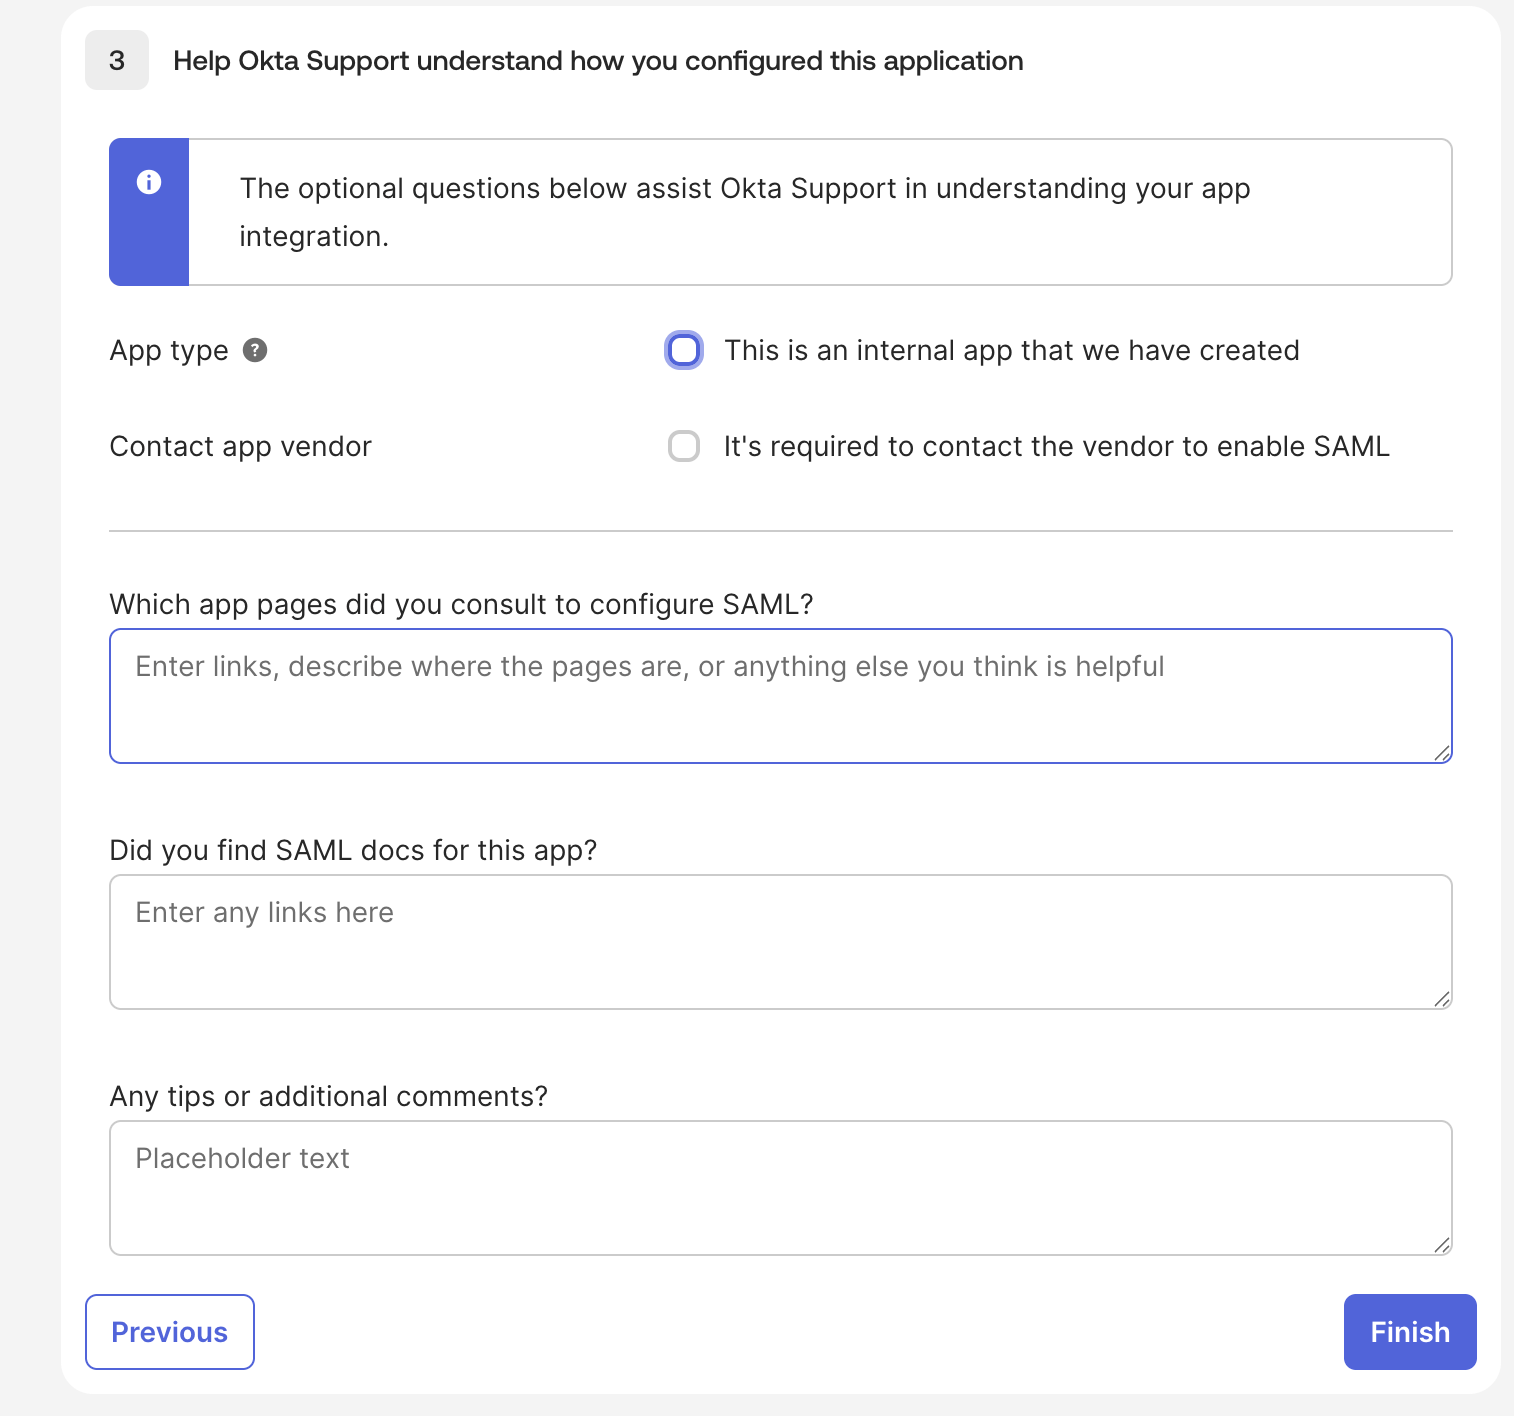
13. Under **Help Okta Support understand how you configured this application**, select **This is an internal app that we have created** for **App type**. The remaining questions on this step are optional and do not affect the integration.
14. Click **Finish**.
The feedback questions on this step are optional. Only App type affects how Okta support reads your configuration.
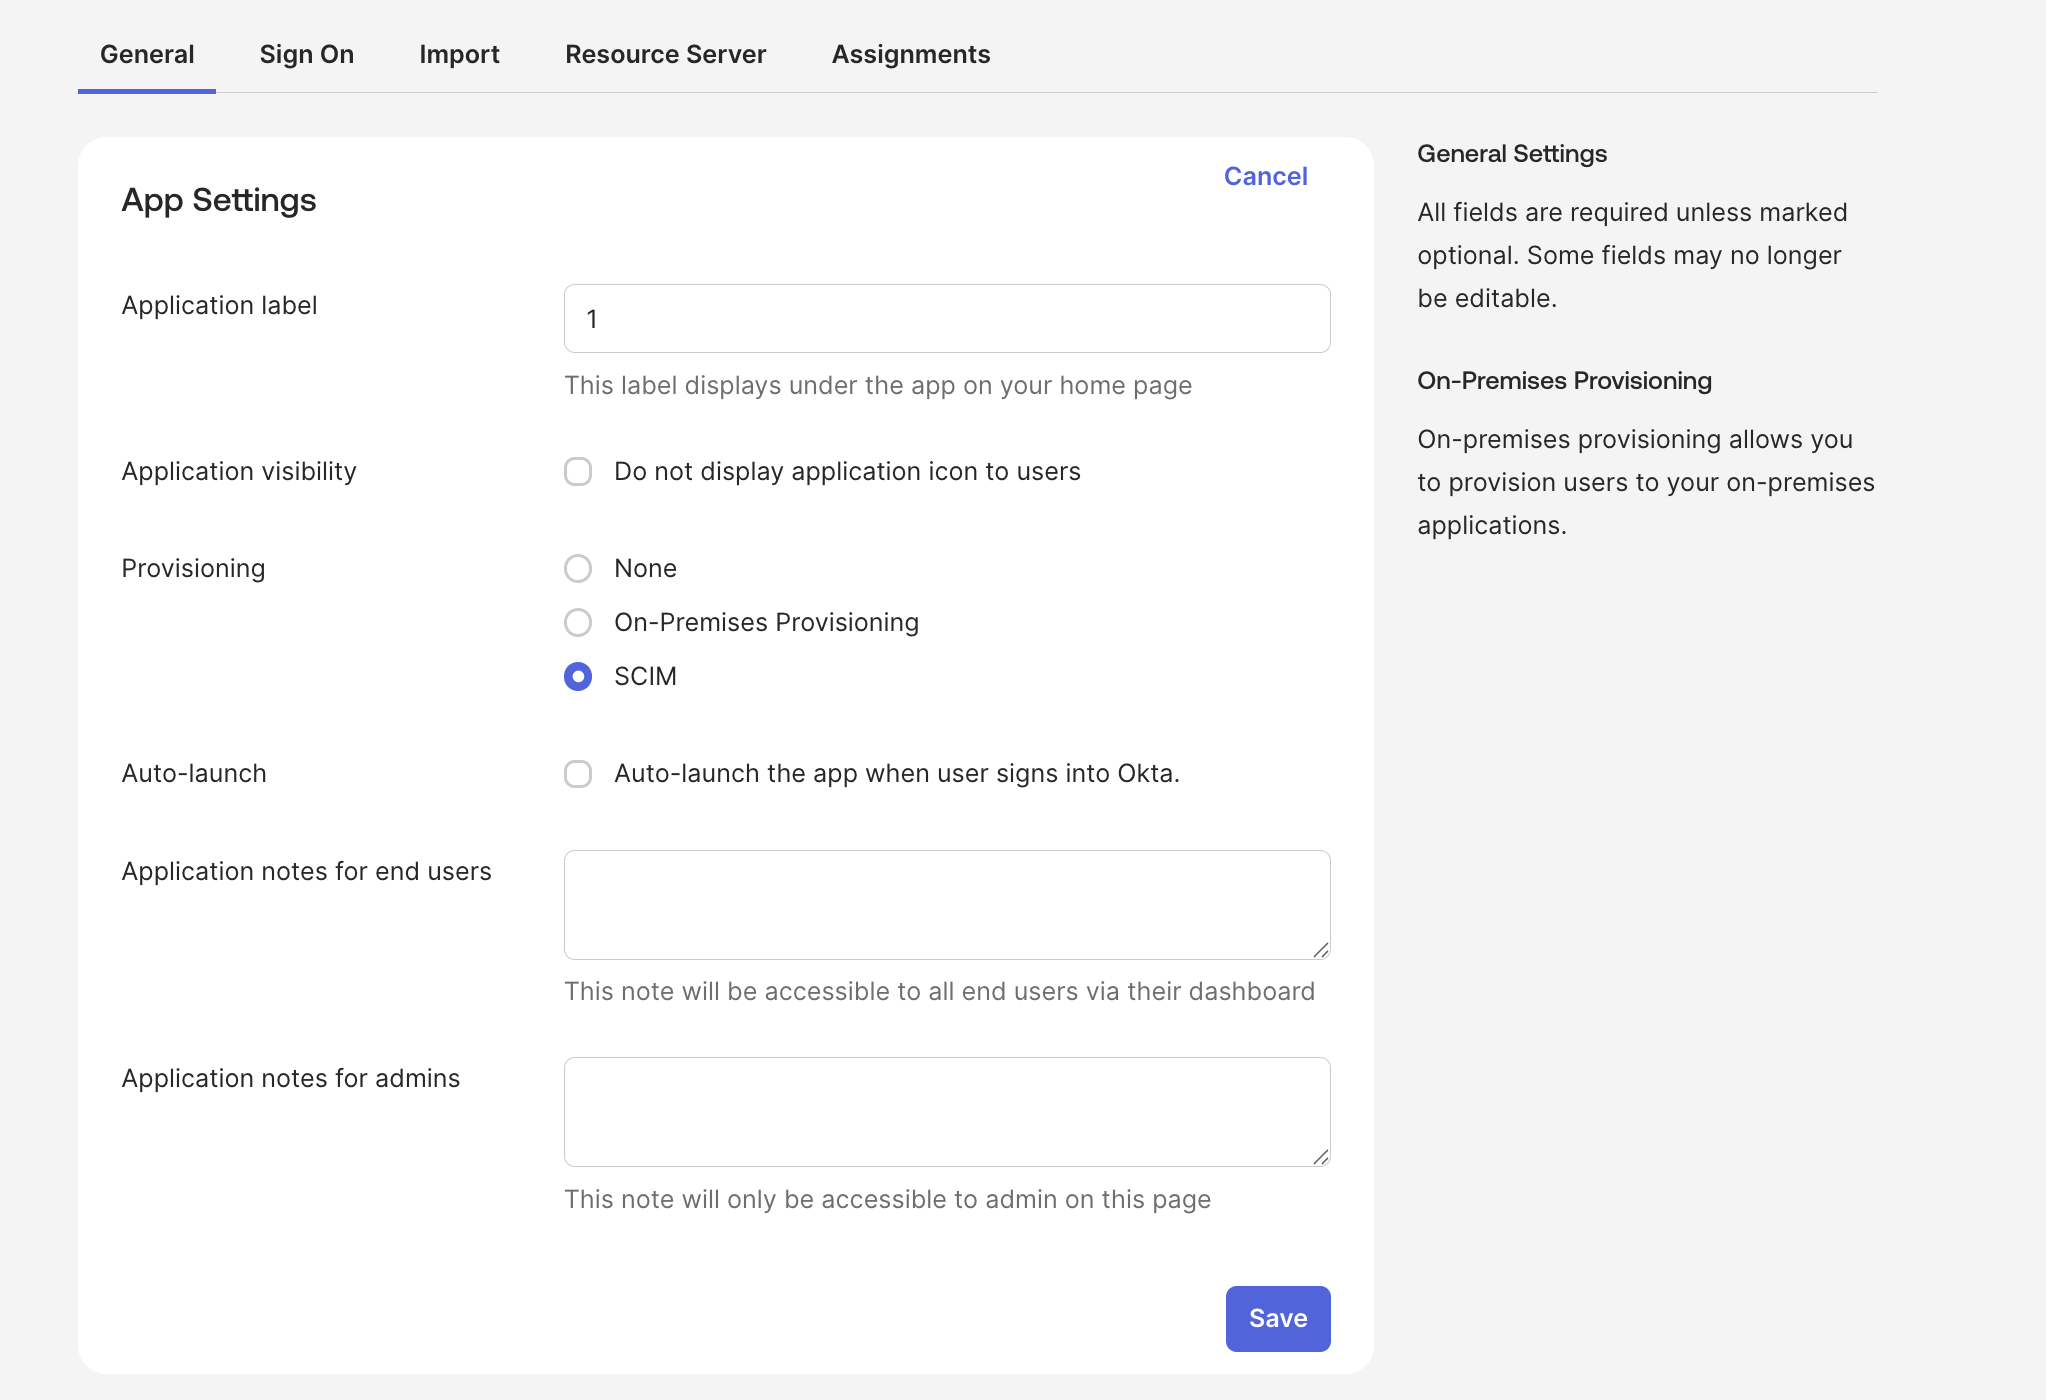
15. In your new app, select the **General** tab, and then under **App Settings**, click **Edit**.
16. For **Provisioning**, select **SCIM**, and then click **Save**.
Selecting SCIM adds a Provisioning tab to the app, where you configure the connection to Harness.
{% hint style="info" %}
**Existing Harness FirstGen integration**
If you already have a Harness FirstGen app integration in Okta and you are adding one for Harness NextGen, Harness authenticates SSO logins through the FirstGen integration as long as it exists. Add every user to the FirstGen app integration as well, or they cannot log in through SSO even after SCIM provisions them into Harness.
{% endhint %}
***
## Authorize the Okta integration
Connect your Okta app to your Harness SCIM endpoint so Okta can create and update Harness users and groups.
1. In your Okta administrator account, expand **Applications and Resources**, select **Applications**, and then select your Harness app.
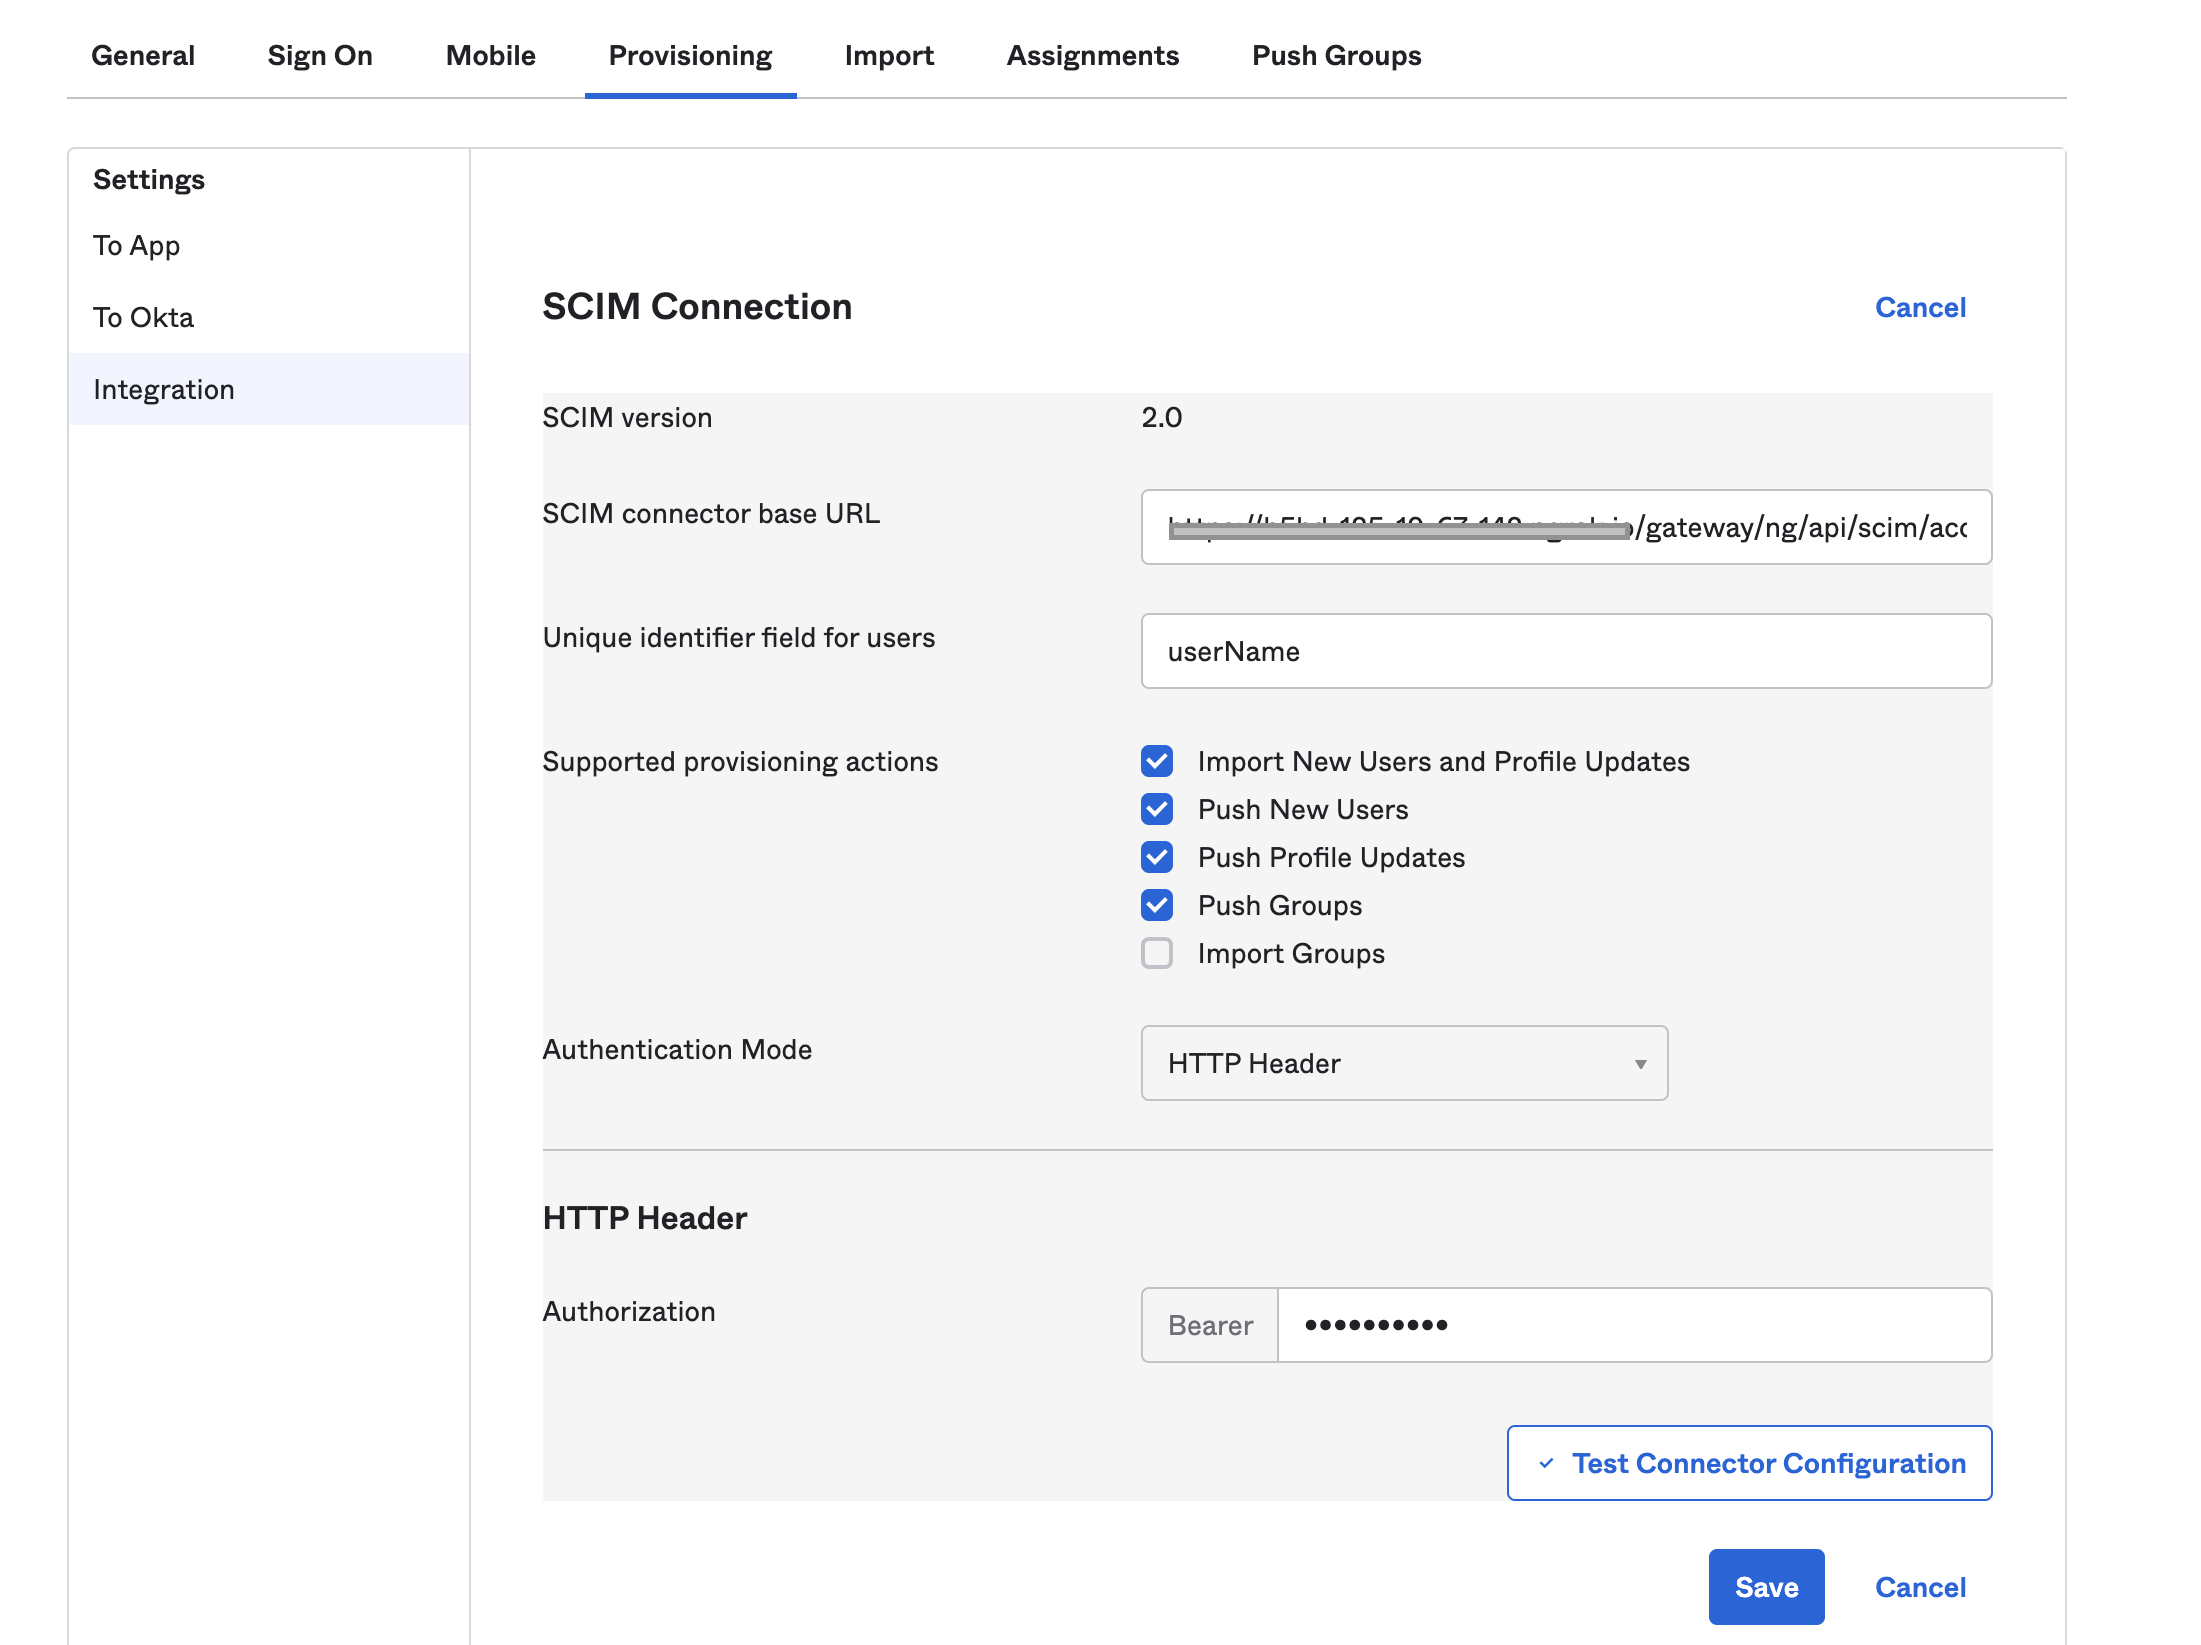
2. Select the **Provisioning** tab, select **Integration**, and then click **Edit**.
3. In the **SCIM connector base URL** field, enter the SCIM base URL for your Harness cluster.
The base URL follows this format: `https://app.harness.io/gateway/ng/api/scim/account/[YOUR_ACCOUNT_ID]`, for example `https://app.harness.io/gateway/ng/api/scim/account/9999aaaa9999AA`.
The exact host and path depend on which cluster your account lives in. Verify your cluster in **Account Settings** > **Account Details**, in the **Harness Cluster** field.
| Cluster | URL format |
| ----------- | ----------------------------------------------------------------------------- |
| Prod1 | `https://app.harness.io/gateway/ng/api/scim/account/[YOUR_ACCOUNT_ID]` |
| Prod2 | `https://app.harness.io/gateway/gratis/ng/api/scim/account/[YOUR_ACCOUNT_ID]` |
| Prod3 | `https://app3.harness.io/gateway/ng/api/scim/account/[YOUR_ACCOUNT_ID]` |
| Prod0/Prod4 | `https://accounts.harness.io/gateway/ng/api/scim/account/[YOUR_ACCOUNT_ID]` |
| EU clusters | `https://accounts.eu.harness.io/ng/api/scim/account/[YOUR_ACCOUNT_ID]` |
If you select the incorrect cluster, your changes do not appear in your environment, even when Harness returns a successful response.
If your environment is Self-Managed Enterprise Edition, the URL uses your custom domain name and omits `gateway`. For example, if your domain name is `harness.mycompany.com`, your SCIM base URL is `https://harness.mycompany.com/ng/api/scim/account/[YOUR_ACCOUNT_ID]`.
4. In the **Unique identifier field for users** field, enter `userName`.
5. For **Supported provisioning actions**, select the following:
* Import new users and profile updates
* Push new users
* Push profile updates
* Push groups
6. For **Authentication Mode**, select **HTTP Header**, and then enter your Harness API token in the **Bearer** field. Go to [Manage API keys](/harness-platform/use-harness-platform/automation/api/add-and-manage-api-keys.md) to create a key and token.
The Bearer field takes a Harness API token with all Users and User Groups permissions.
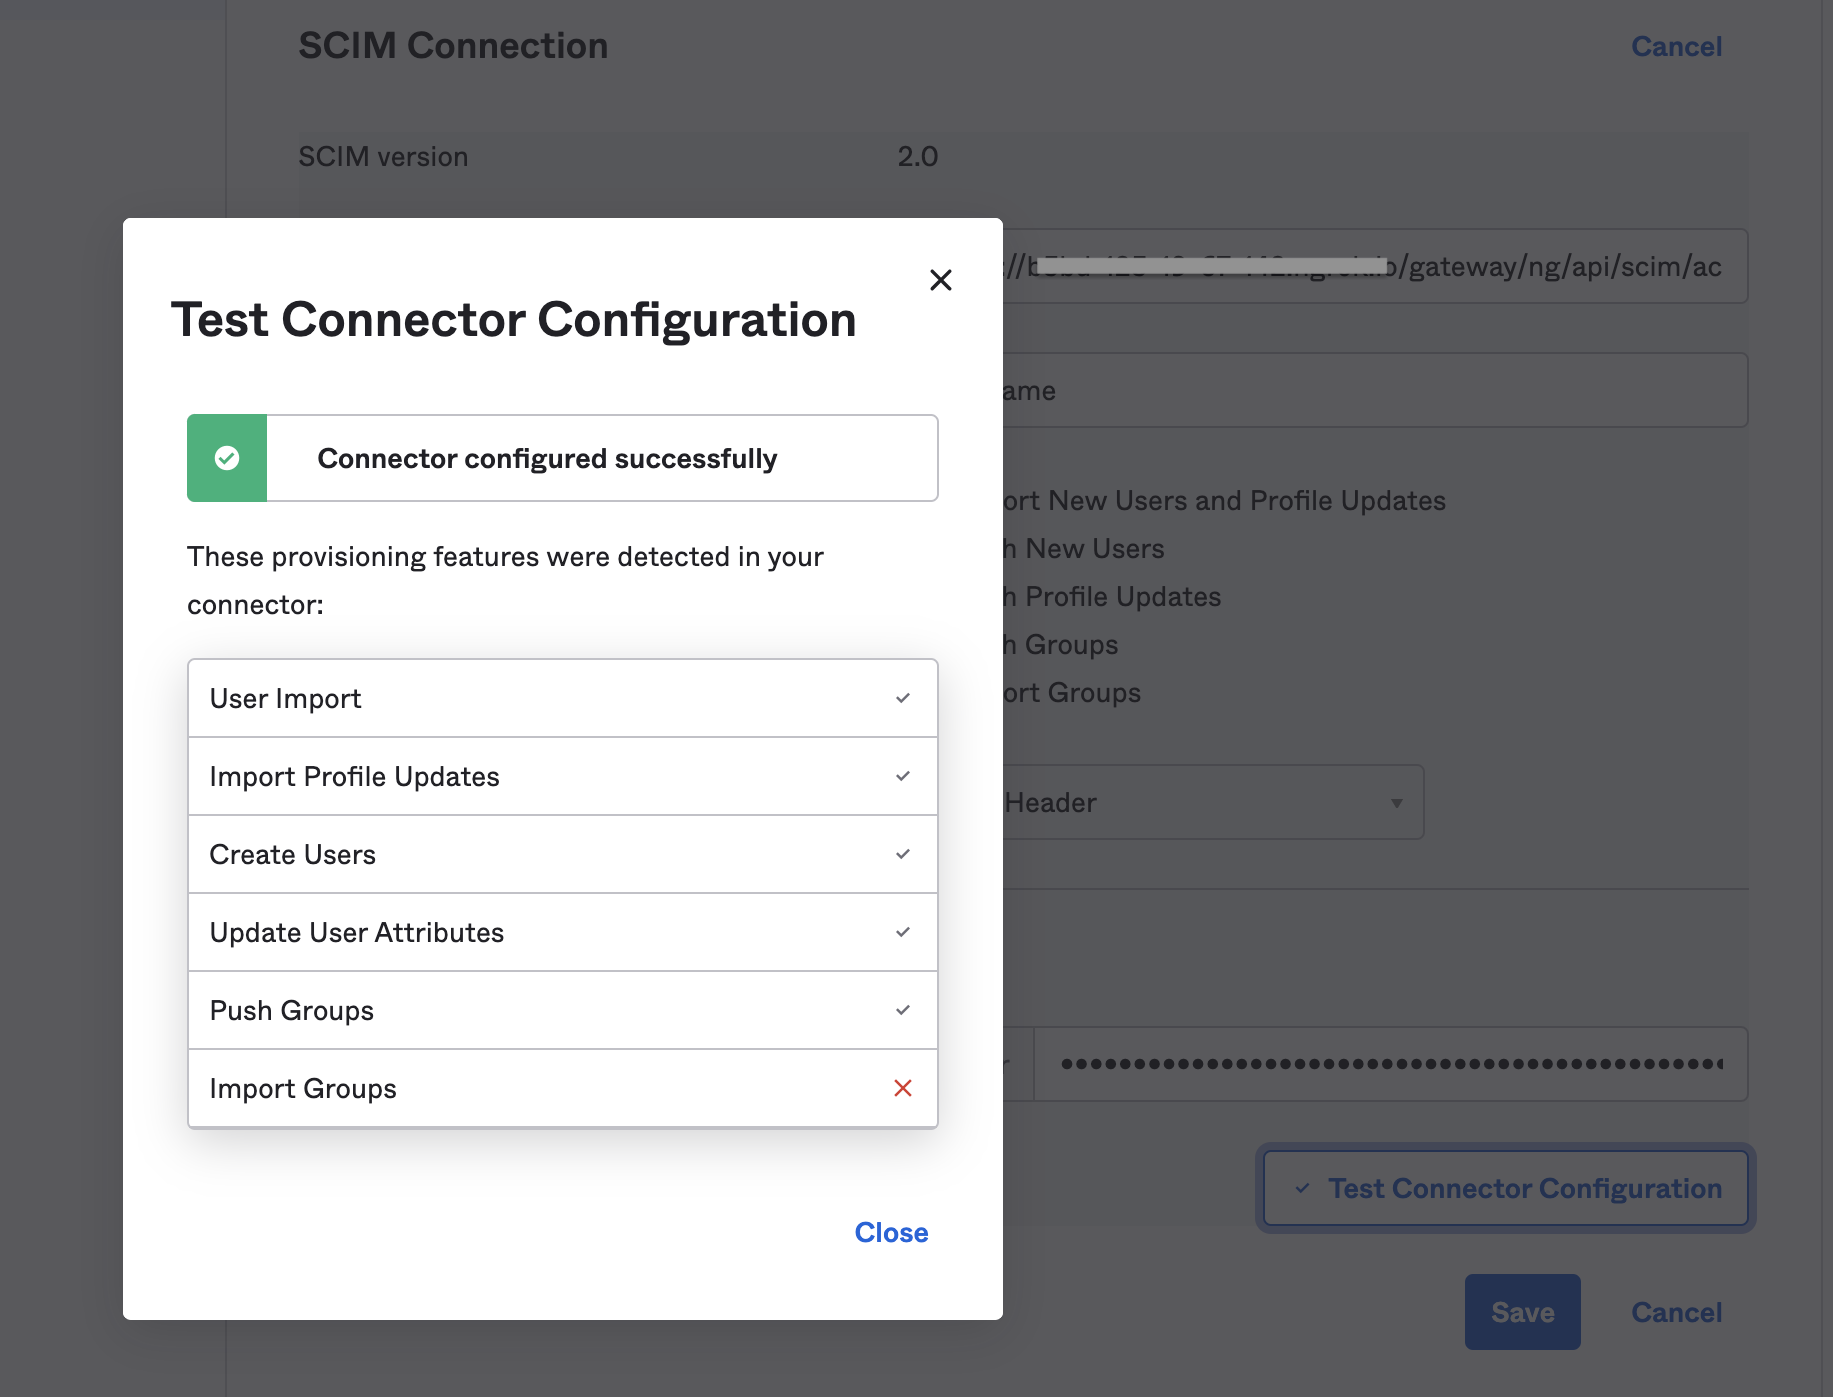
7. Click **Test Connection**.
8. If the test succeeds, click **Save**.
A failed test almost always means a wrong cluster URL or an expired token.
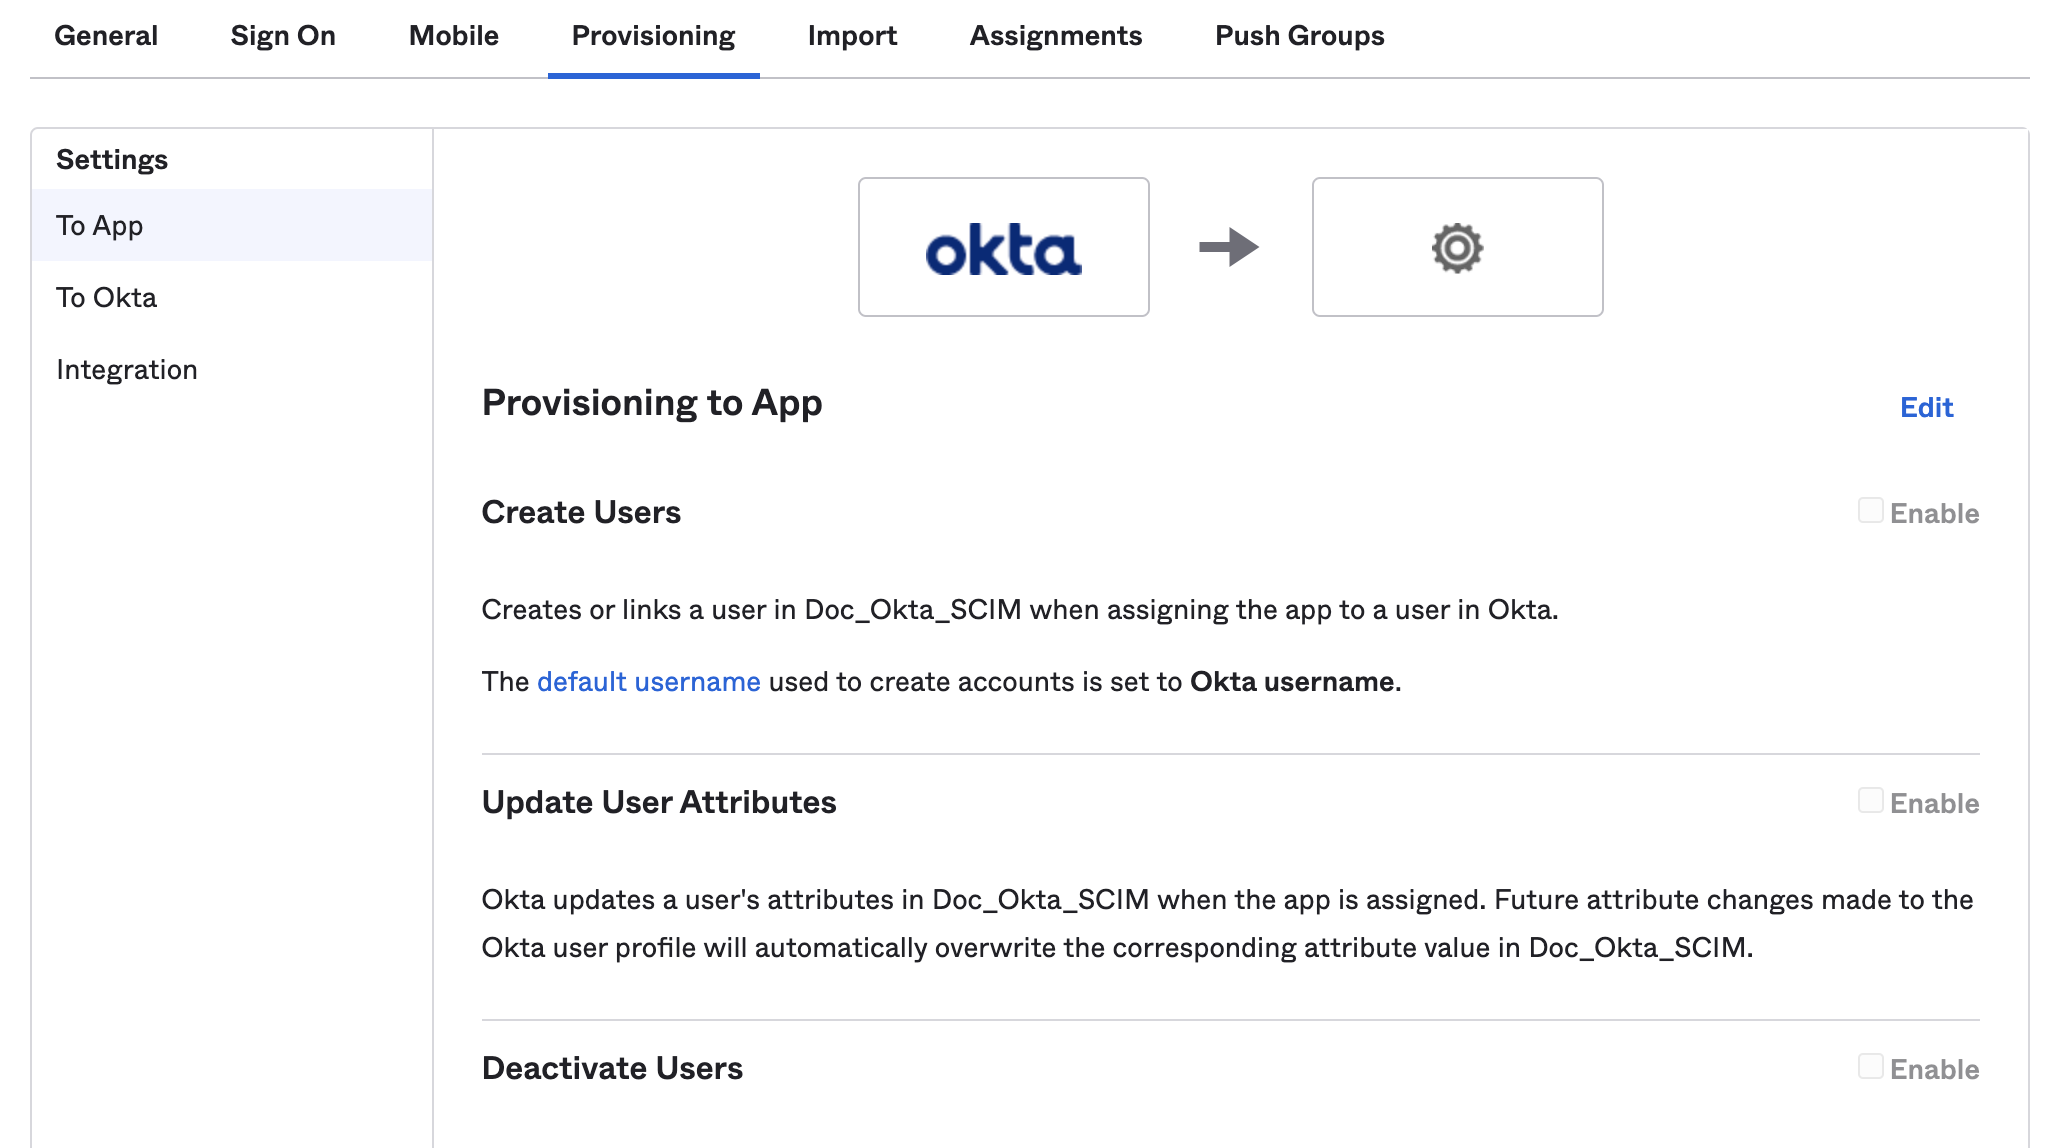
9. Select the **Provisioning** tab, and then select **To App**.
10. Click **Edit**, and then enable **Create Users**, **Update User Attributes**, and **Deactivate Users**.
Without these three actions enabled, Okta connects to Harness but never writes to it.
11. Click **Save**.
***
## Manage Harness users and groups from Okta
Once the integration is live, Okta owns a defined set of user and group attributes. You manage the following in Okta rather than in Harness:
* **Group membership:** Add, remove, and edit group members in Okta only.
* **Group names:** Rename user groups in Okta only.
* **Group deletion:** Delete user groups in Okta only.
* **User details:** Edit email addresses, full names, and group assignments in Okta. You cannot edit these details in Harness for a user provisioned as part of an Okta-provisioned group.
* **User removal:** Delete Okta-provisioned users from Harness by removing them from the corresponding Okta app or group.
* **Group changes:** To move a user between groups, for example to change their permissions, change their group membership in Okta.
Roles and resource groups are the exception. Okta does not control them, so you [assign permissions](#assign-permissions) to provisioned groups in Harness.
Okta can provision either individual users or groups of users, and the two paths behave differently. A user provisioned individually arrives in Harness with no group assignment, so you must assign them to a group in either Okta or Harness. Provisioning individually is the only way to change an Okta user's Harness group membership from Harness. When a user is provisioned as part of an Okta group, their membership is always managed through Okta.
### Provision individual users
Provision individual users when you want them in Harness without a group affiliation. Users who belong to groups are [provisioned with their group](#provision-groups) instead.
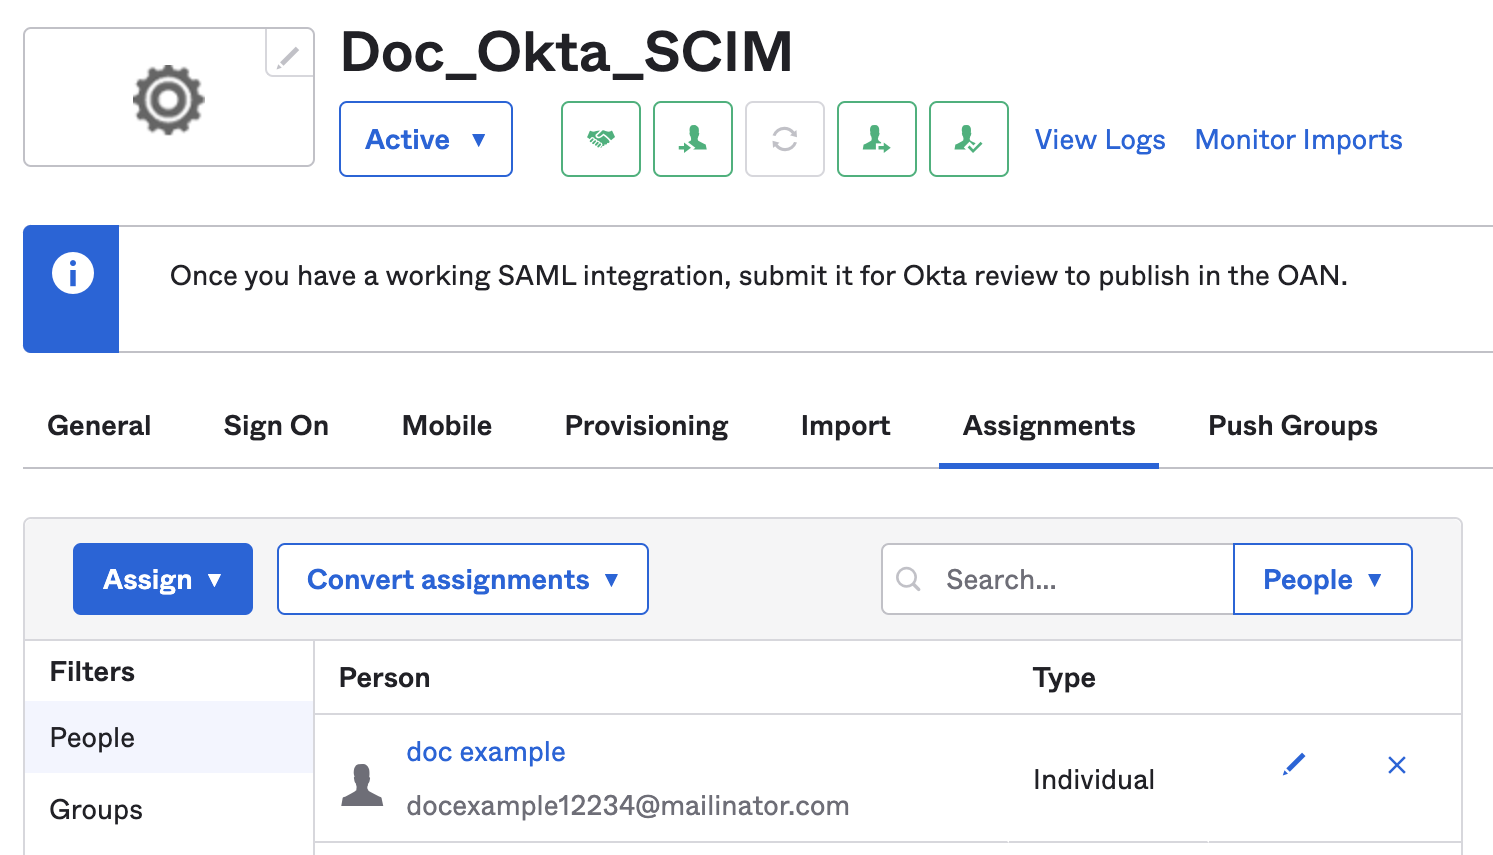
1. In your Harness Okta app, select **Assignments**, and then select **People**.
2. Click **Assign**, and then select **Assign to People**.
3. Select the users you want to provision, and then click **Assign**.
4. Click **Save and Go Back**.
5. Click **Done** when you finish assigning users.
Users with the Harness app assignment appear under **People**, where you can also edit or delete them.
The Assignments tab is the source of truth for which individual users exist in Harness.
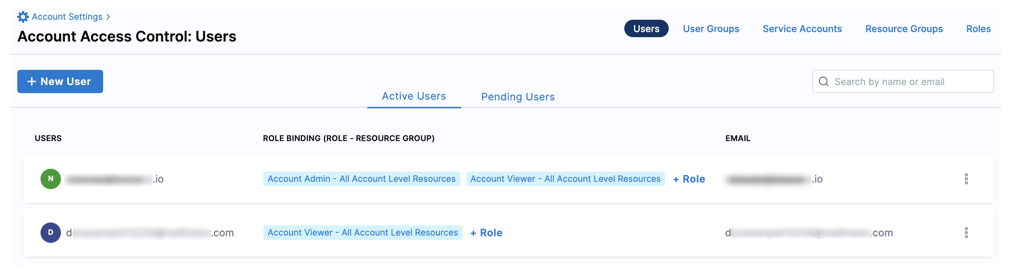
The same users then appear in your Harness account under **Account Settings** > **Access Control** > **Users**.
Individually provisioned users arrive with no user group, so assign them one before they can do anything.
### Provision groups
To provision an Okta user group in Harness, assign the group to your Harness Okta app and then push the group, along with its members, to Harness.
{% hint style="info" %}
**Group names**
Harness derives a user group ID from the group name in Okta. Periods, dashes, and spaces become underscores, so a group named `example-group` in Okta has the Harness ID `example_group`.
A push does not always create a new Harness user group. When the Okta group name matches an existing Harness user group exactly, including case, the push can link to that group instead. After your first push, open **Account Settings** > **Access Control** > **User Groups** and check for a duplicate group. If you find one, rename the existing Harness group to avoid confusion.
{% endhint %}
1. In your Harness Okta app, select **Assignments**, and then select **Groups**.
2. Click **Assign**, and then select **Assign to Groups**.
3. Select the groups you want to provision, and then click **Assign**.
4. Click **Save and Go Back**.
5. Click **Done** when you finish assigning groups.
Groups with the Harness app assignment appear under **Groups**, where you can also edit or delete them.
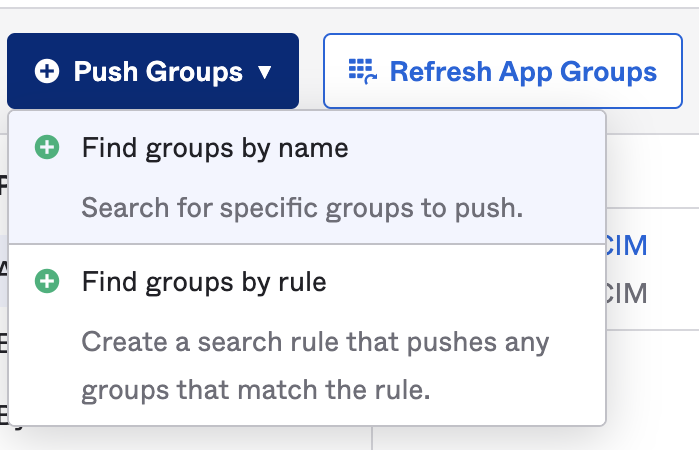
6. Select **Push Groups**, click **Push Groups**, and then select **Find groups by name** or **Find groups by rule**.
Assigning a group is not enough. Harness only receives the group after you push it.
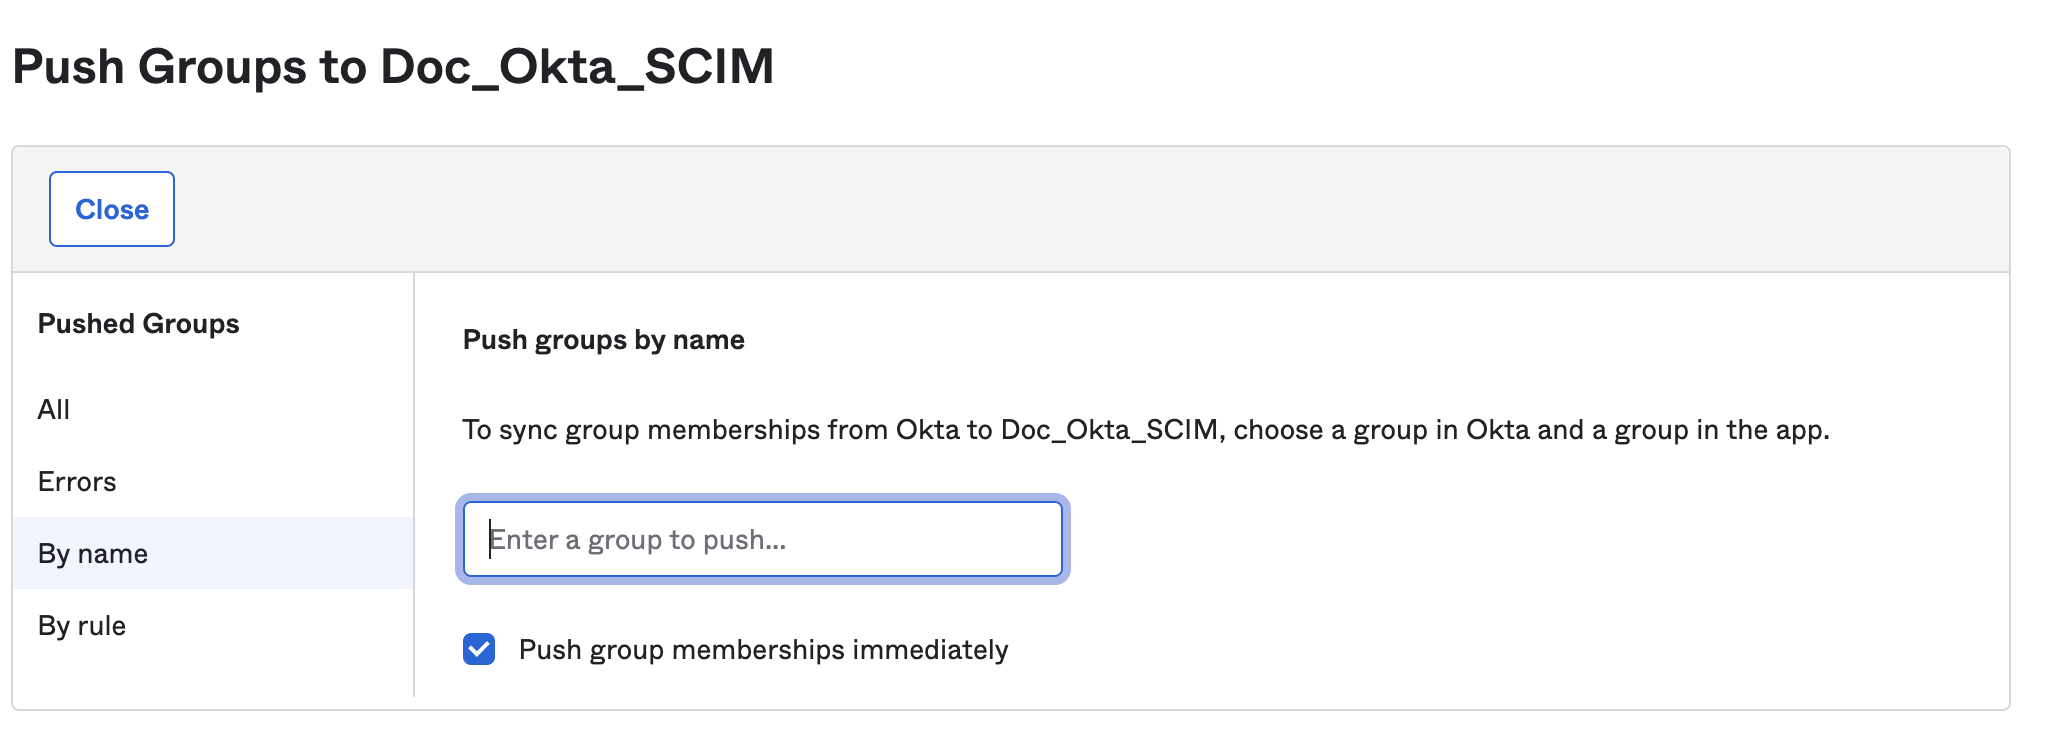
7. Find the groups you want to push.
Search by name to push a fixed set of groups, or by rule to push everything matching a pattern.
8. Click **Save** once you have found every group you want to push.
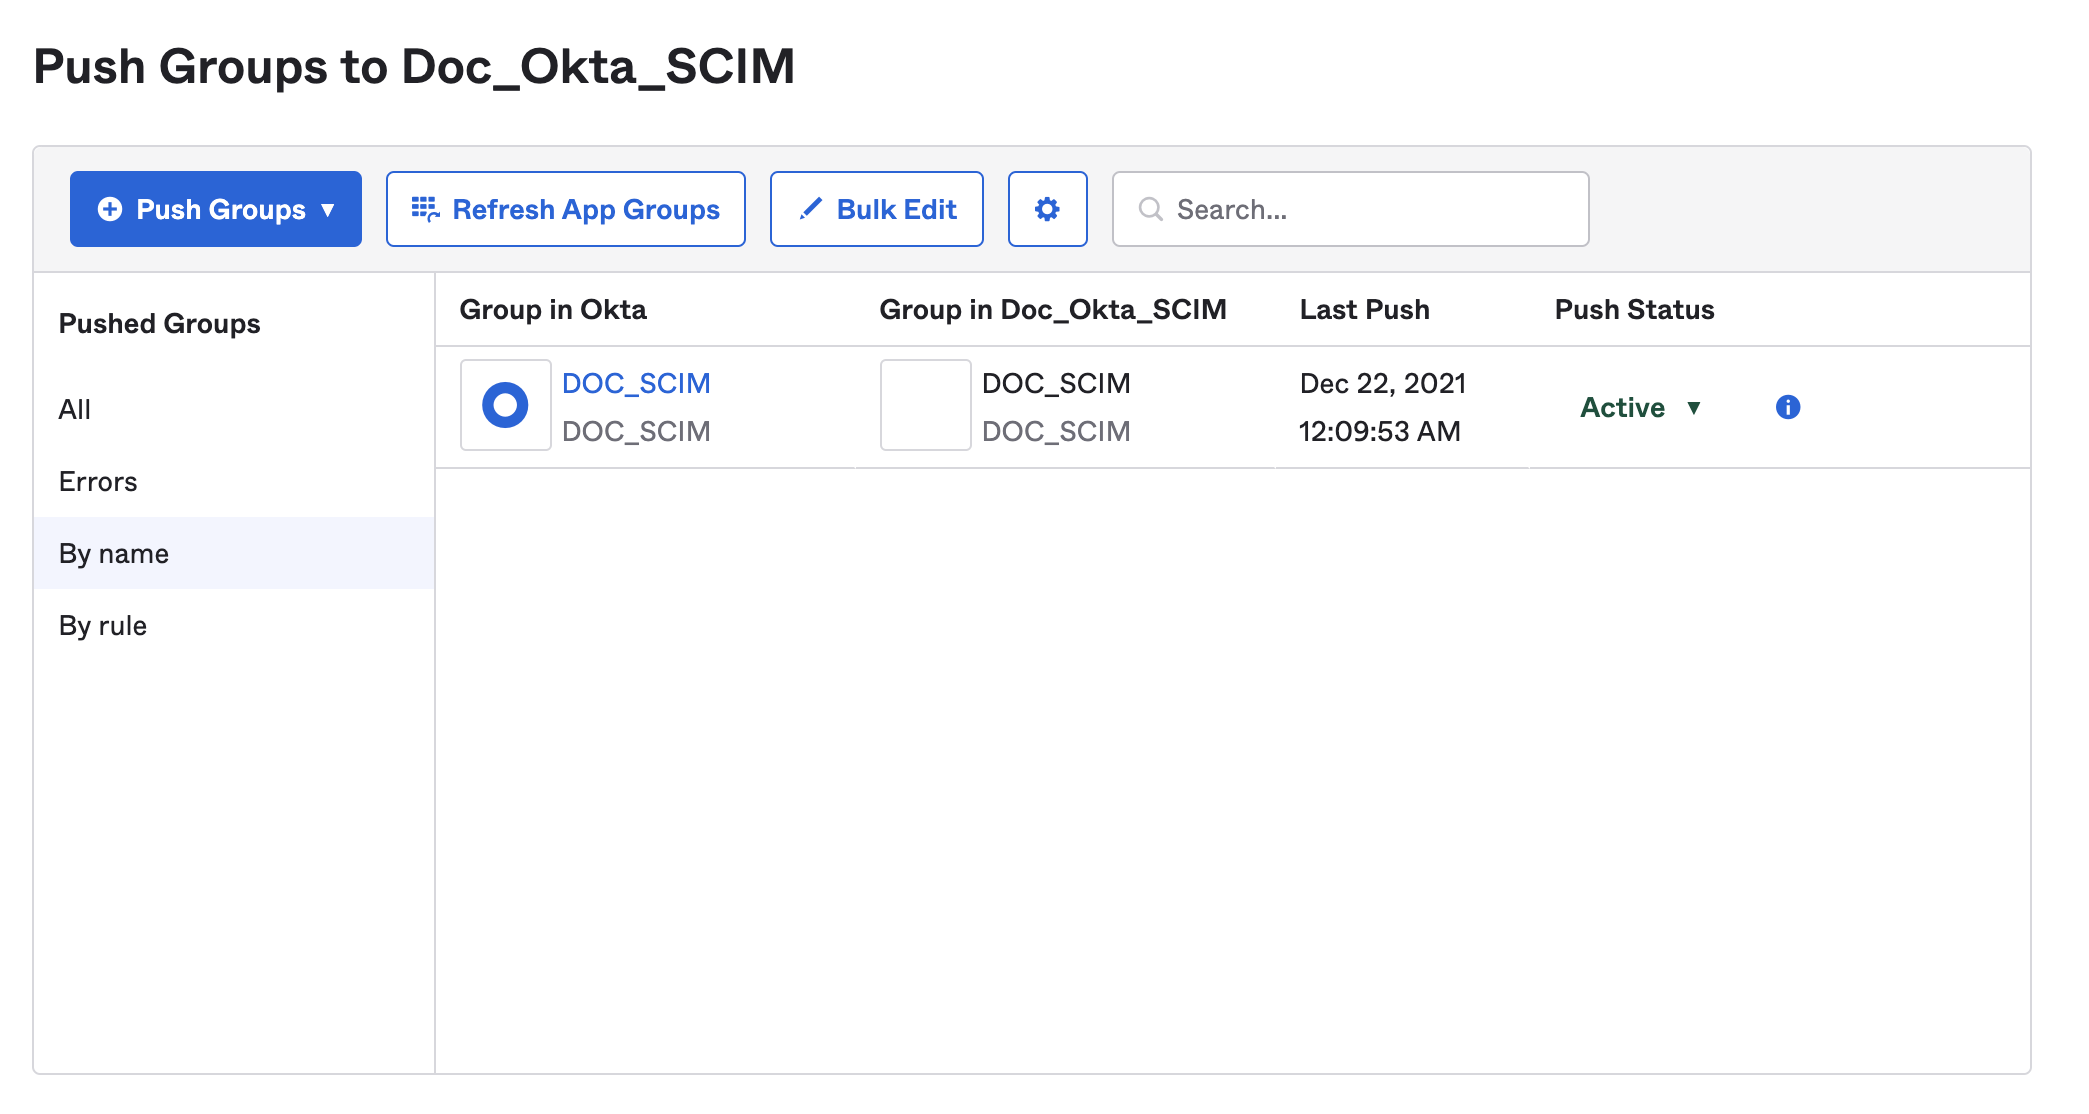
Check the status of pushed groups on the **Push Groups** tab of your Harness Okta app.
Watch the push status column. A group in an error state never reaches Harness.
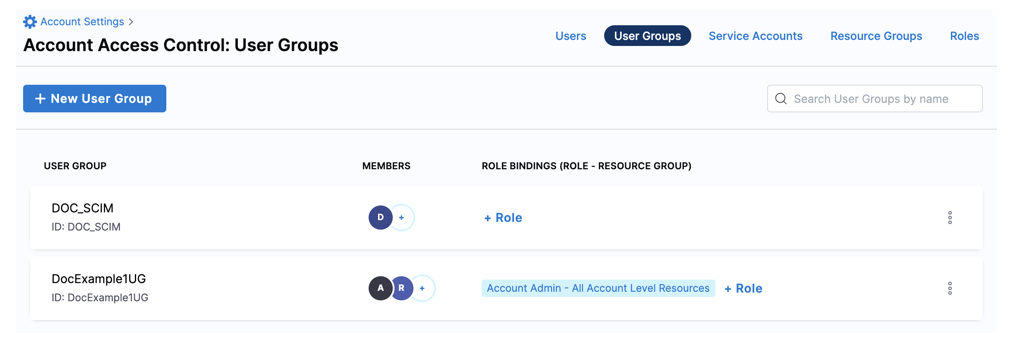
Groups that are active and pushed successfully appear in Harness under **Account Settings** > **Access Control** > **User Groups**, and the group members are provisioned as Harness users at the same time. Each group shows its Harness **ID**, its **Members**, and its **Role Bindings**. A newly provisioned group has no role bindings, so click **+ Role** to grant permissions. Go to [Assign permissions](#assign-permissions) to review that step.
A SCIM-provisioned group arrives with members but no role bindings until you add one.
{% hint style="warning" %}
If an error prevents Harness from adding, deleting, or updating a group member, resolve the underlying issue and then retry [provisioning the user](#provision-individual-users). Go to the Okta documentation on [group push troubleshooting](https://help.okta.com/en-us/Content/Topics/users-groups-profiles/usgp-group-push-troubleshoot.htm) to diagnose the error.
{% endhint %}
### Assign permissions
Once a group is provisioned through SCIM, grant its members access by assigning [roles](/harness-platform/use-harness-platform/platform-access-control/add-manage-roles.md) and [resource groups](/harness-platform/use-harness-platform/platform-access-control/manage-resource-groups.md) to the group in Harness. Go to the [permissions reference](/harness-platform/use-harness-platform/platform-access-control/permissions-reference.md) to review what each permission allows.
Harness roles and resource groups are never managed in Okta, so this step always happens on the Harness side.
### Update user attributes
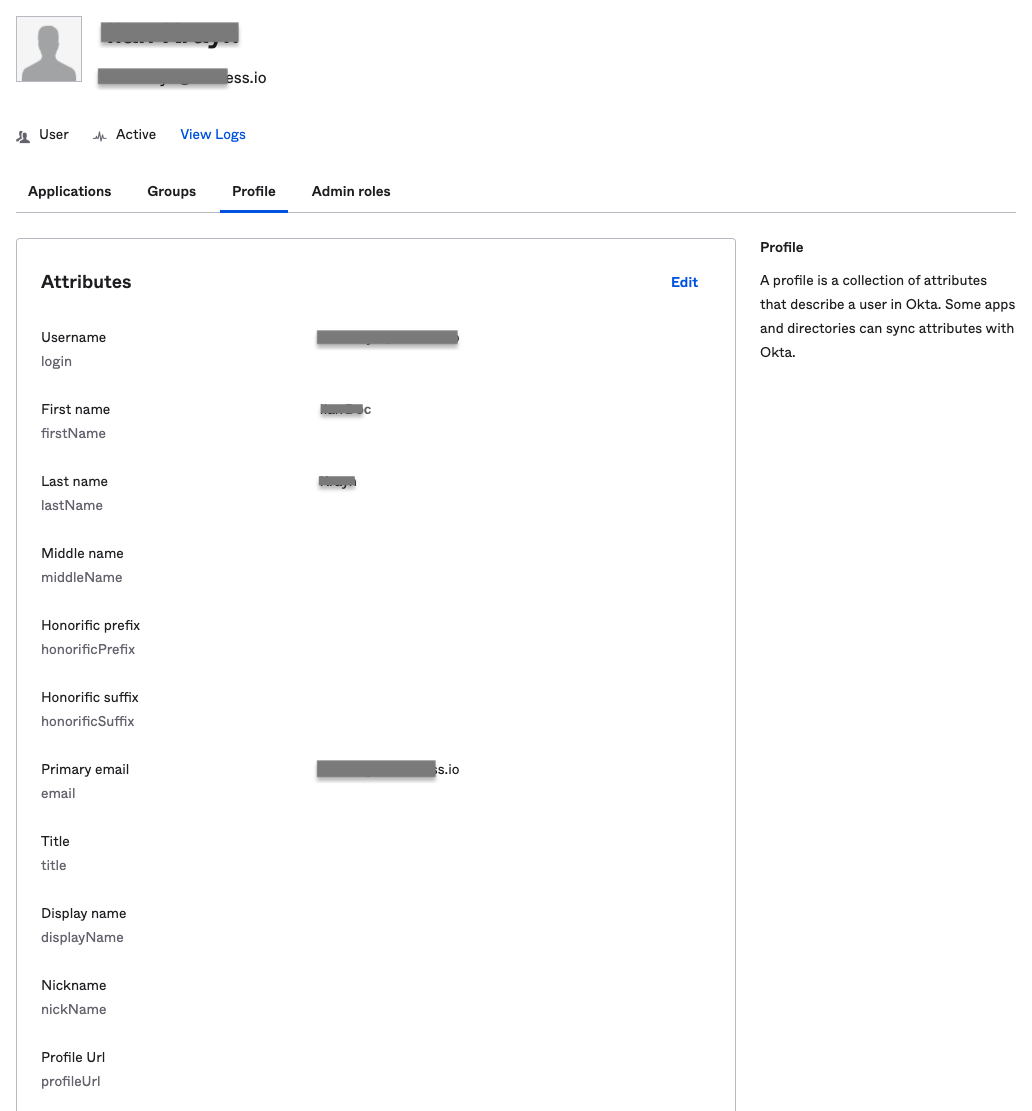
Editing any of the following attributes in a user's Okta profile updates the corresponding value in Harness:
* Given name
* Family name
* Primary email
* Primary email type
* Display name, which becomes the user's Harness user name
These are the only fields that sync. Editing any other field in an Okta profile does not change it in Harness, even when an equivalent Harness field exists.
To update user attributes:
1. In your Okta administrator account, select **Directory**, and then select **People**.
2. Locate the user you want to edit, and then select their name.
3. Select the **Profile** tab, and then click **Edit**.
4. Update the profile, and then click **Save**.
Only the five synced fields propagate to Harness. Everything else stays in Okta.
### Deactivate or remove users
Okta-provisioned users are always removed from Harness through Okta. Which action you take depends on how far you want the removal to reach.
| Goal | Action in Okta |
| ---------------------------------------------------------- | ------------------------------------------- |
| Remove an individual user who has no group affiliation | Remove the user from your Harness Okta app. |
| Remove a user who was provisioned through a group | Remove the user from that group in Okta. |
| Remove a user from Harness and every other provisioned app | Deactivate the user's Okta profile. |
{% hint style="warning" %}
Deactivating a user removes them from *all provisioned apps*, not just Harness. You cannot change a deactivated account while it stays deactivated.
{% endhint %}
To deactivate a user:
1. In your Okta administrator account, select **Directory**, and then select **People**.
2. Locate the user you want to deactivate, and then select their name.
3. On the user's profile, select **More Actions**, and then select **Deactivate**.
4. Click **Deactivate** in the confirmation dialog.
To reactivate the user later, return to their profile, select **More Actions**, and then select **Activate**.
***
## Troubleshooting
Most SCIM problems trace back to a mismatched cluster URL, an expired API token, or a group that was assigned but never pushed. Expand an issue below to resolve it.
Test Connection fails with an authentication error when configuring Okta SCIM provisioning for Harness
Confirm the SCIM connector base URL matches your Harness cluster, and that the Bearer token is an unexpired Harness API token with all **Users** and **User Groups** permissions.
Okta SCIM provisioning returns a success response but the users or groups never appear in the Harness account
This almost always means the SCIM connector base URL points at the wrong Harness cluster. Check the **Harness Cluster** field in **Account Settings** > **Account Details** and correct the URL.
An Okta group push to Harness fails, or a group member is not added, deleted, or updated
Check the push status on the **Push Groups** tab, resolve the reported error, and then retry the push. Group names containing periods, dashes, or spaces are converted to underscores in the Harness group ID.
Users provisioned individually from Okta appear in Harness with no user group assignment
This is expected. Individually provisioned users have no group, so assign them to a group in Okta or in Harness before they can access anything.
Editing a field in an Okta user profile does not update the corresponding field in Harness
Only given name, family name, primary email, primary email type, and display name sync to Harness. All other Okta profile fields are ignored.
***
## Next steps
* [Okta SAML SSO](/harness-platform/use-harness-platform/authentication/single-sign-on-saml/okta.md): Complete the SAML configuration so provisioned users can log in.
* [SCIM migration guide](/harness-platform/use-harness-platform/platform-access-control/scim-migration-guide.md): Move an existing SCIM setup to a new identity provider or account.
* [Just-in-time provisioning](/harness-platform/use-harness-platform/platform-access-control/just-in-time-user-provisioning.md): Provision users on first login instead of pushing them in advance.
{% @harness-feedback/feedback module="harness-ai" pagePath="harness-ai/use-harness-platform/platform-access-control/provision-users-with-okta-scim" %}