> For the complete documentation index, see [llms.txt](https://developer.harness.io/llms.txt). Markdown versions of documentation pages are available by appending `.md` to page URLs; this page is available as [Markdown](https://developer.harness.io/harness-platform/use-harness-platform/platform-access-control/scim-migration-guide.md).
# Migrate from manual user management to SCIM
Step-by-step guide for transitioning existing Harness users to SCIM provisioning with Okta or Azure AD without access disruption.
Migrating from manual user management to SCIM (System for Cross-domain Identity Management) lets your identity provider (IdP) automatically provision, update, and deprovision Harness users. This guide walks you through the migration for Okta and Azure AD (Entra ID) without disrupting existing user access.
***
### What you will learn in this topic
By the end of this topic, you will be able to:
* Understand [why SCIM automates user lifecycle management](#why-migrate-to-scim).
* Migrate users to SCIM with [Okta](#migration-steps-for-okta).
* Migrate users to SCIM with [Azure AD (Entra ID)](#migration-steps-for-azure-ad-entra-id).
* [Verify the migration](#verify-the-migration) and resolve common issues.
***
### Why migrate to SCIM?
SCIM automates user lifecycle management in Harness. Instead of manually adding and removing users, your IdP pushes changes to Harness automatically. This is especially valuable when you:
* Have a growing team and need to scale user onboarding.
* Want to enforce consistent access policies across tools.
* Need to ensure offboarded employees lose Harness access immediately.
* Are required to meet compliance standards for user provisioning.
***
### Before you begin
Before you migrate to SCIM, ensure you have the following:
* **Harness Account Admin access**: Permissions to configure SCIM tokens and manage users.
* **IdP admin access**: Admin access to Okta or Azure AD to configure SCIM applications and assign users.
* **A list of existing Harness users**: The users and their email addresses. Export this list from Harness under **Account Settings** > **Access Control** > **Users**.
* **A documented group mapping**: The Harness user groups that map to IdP groups. Document the mapping before you start.
* **Matching email addresses**: User email addresses in your IdP that exactly match the email addresses in Harness. Mismatches cause duplicate accounts.
{% hint style="warning" %}
Back up your current user and group assignments before you start. Screenshot or export the current role bindings and group memberships so you can verify nothing is lost after migration.
{% endhint %}
***
### Migration steps for Okta
Complete these steps to hand Okta control of your existing Harness users through SCIM.
#### Step 1: Add the Harness integration in Okta
1. In the Okta Admin Console, go to **Applications** > **Applications**.
2. Select **Browse App Integration Catalog** and search for **Harness** in the catalog. Select the **Harness** result, which lists **SAML** and **SCIM**.
3. On the Harness integration page, select **Add Integration**.
#### Step 2: Enable API integration for provisioning
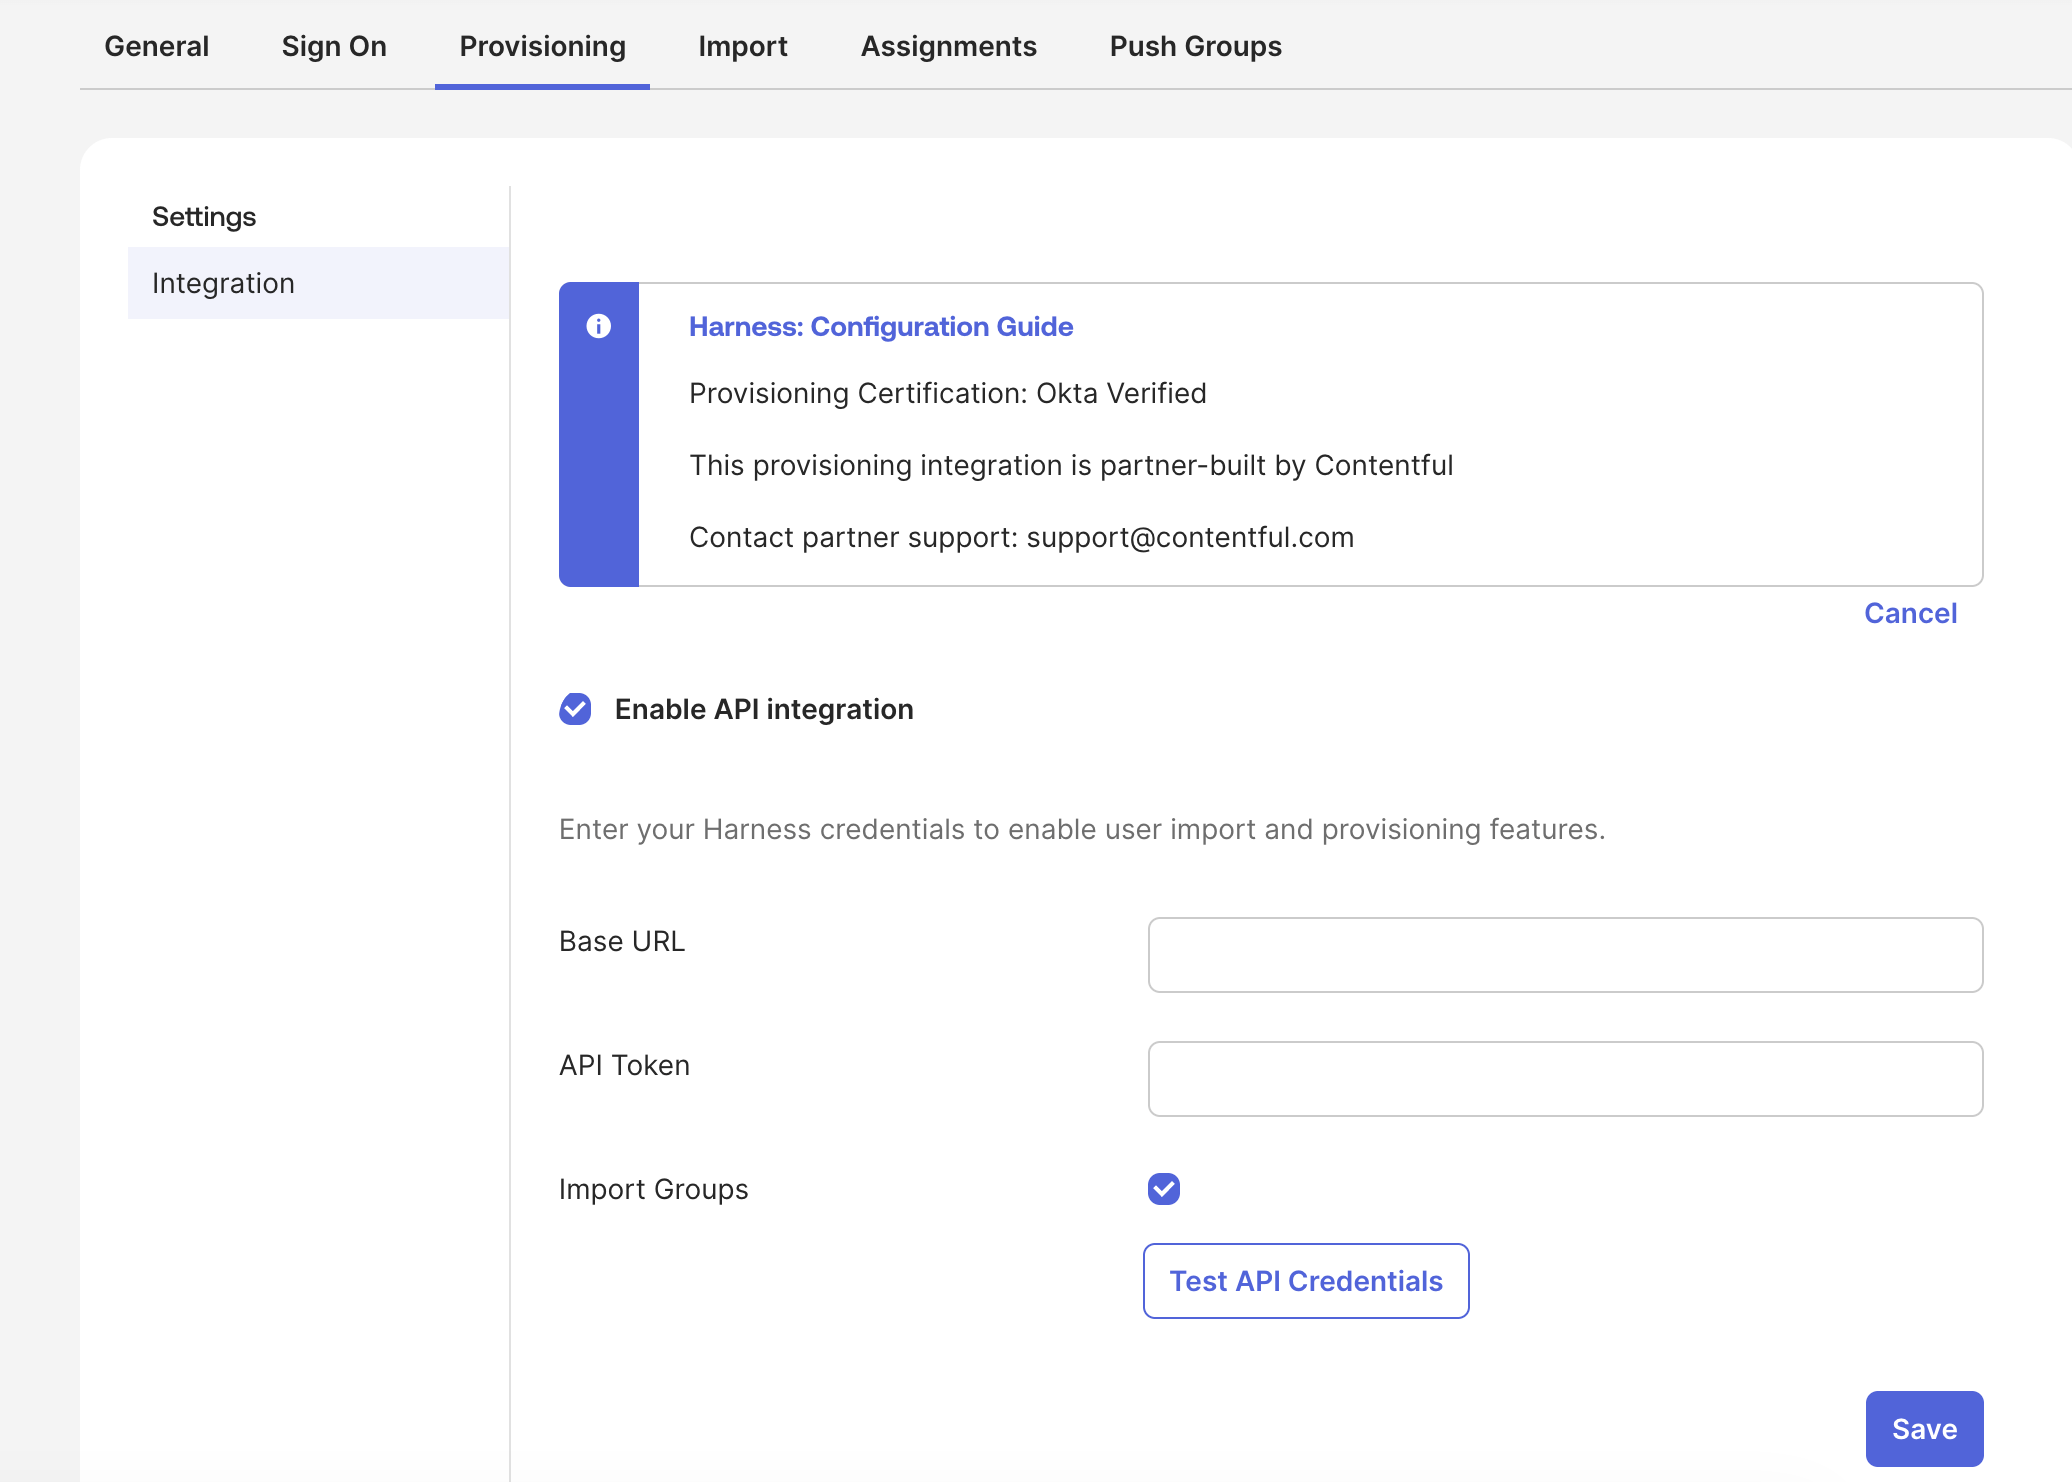
1. In the Harness app, go to the **Provisioning** tab and select **Integration** in the left menu.
2. Select **Configure API Integration**.
3. Select **Enable API integration**.
4. In Harness, create an API key token with all **Users** and **User Groups** permissions under **Account Settings** > **Access Control** > **API Keys**. Copy the token.
5. Enter your Harness credentials:
* **Base URL:** The Harness SCIM endpoint URL.
* **API Token:** The Harness API token you copied.
Click to view full size image
6. Leave **Import Groups** selected to import existing groups from Harness.
7. Select **Test API Credentials** to confirm the connection succeeds, and then select **Save**.
8. After the integration is enabled, go to **Provisioning** > **To App** and enable the provisioning features you need: **Create Users**, **Update User Attributes**, and **Deactivate Users**.
#### Step 3: Assign existing users to the Okta app
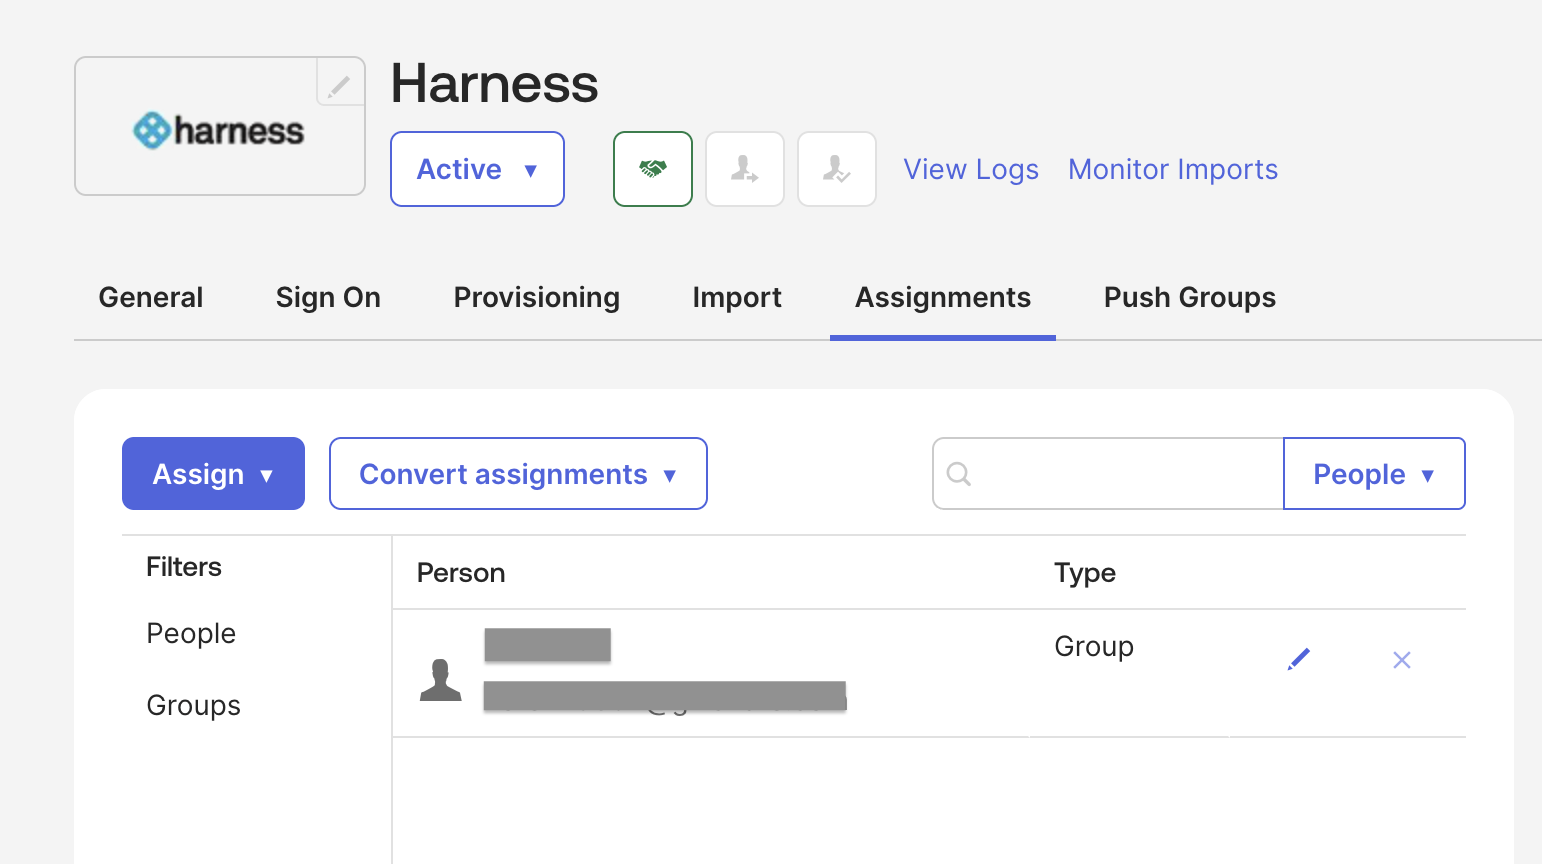
1. In Okta, go to the Harness application's **Assignments** tab.
Click to view full size image
2. Select **Assign** and assign the users or groups that already exist in Harness. Make sure email addresses match exactly.
3. When you assign users that already exist in Harness, Okta takes over management of those users through SCIM without recreating them.
#### Step 4: Push groups (optional)
1. Go to the **Push Groups** tab in the Okta Harness application.
2. Select **Push Groups** and choose the IdP groups to push to Harness.
3. If a Harness user group with the same name already exists, Okta links to it rather than creating a duplicate.
#### Step 5: Verify user access
1. In Harness, go to **Account Settings** > **Access Control** > **Users** and confirm that migrated users show the SCIM provisioning source.
2. Have a few users log in to verify their access and role assignments are intact.
3. Check that group memberships in Harness match the expected IdP group mappings.
Go to [Provision users with Okta SCIM](/harness-platform/use-harness-platform/platform-access-control/provision-users-with-okta-scim.md) to complete the detailed Okta SCIM setup.
***
### Migration steps for Azure AD (Entra ID)
Complete these steps to hand Azure AD control of your existing Harness users through SCIM.
#### Step 1: Register the SCIM enterprise application
1. In the [Azure portal](https://portal.azure.com/), go to **Enterprise applications** > **All applications** > **New application**.
2. Search for **Harness**, select it in the results, and select **Add** to add it to your managed applications.
3. Open the Harness application and select **Provisioning**.
4. Set **Provisioning Mode** to **Automatic**.
5. In Harness, create an API key token with all **Users** and **User Groups** permissions under **Account Settings** > **Access Control** > **API Keys**. Copy the token.
6. Under **Admin Credentials**, enter:
* **Tenant URL:** The Harness SCIM base URL for your cluster.
* **Secret Token:** The Harness API token you copied.
7. Select **Test Connection** to confirm Azure AD can reach Harness, and then select **Save**.
#### Step 2: Configure attribute mappings
1. Under **Provisioning** > **Mappings**, enable **Provision Azure Active Directory Users** and **Provision Azure Active Directory Groups**.
2. Open **Provision Azure Active Directory Users** and review the attribute mappings. Confirm that the attribute marked **Matching** (by default `userName`) resolves to the same email address your existing Harness users have. Correct matching is what lets Azure AD link to existing users instead of creating duplicates.
3. Review the group attribute mappings and make any changes your directory requires.
#### Step 3: Assign and provision existing users and groups
1. Go to **Users and groups** in the Harness enterprise application and assign the users and groups that already exist in Harness.
2. Under **Settings**, set the **Scope** to control which users and groups sync.
3. Switch **Provisioning Status** to **On**, and then select **Save** to start the initial provisioning sync.
4. During the first sync, Azure AD matches assigned users to existing Harness users by the matching attribute and links them rather than creating duplicates.
#### Step 4: Verify user access
1. Monitor the sync under **Provisioning** and review the provisioning logs for any errors.
2. In Harness, confirm that users show the SCIM provisioning source.
3. Verify group memberships and role assignments are intact.
Go to [Provision users and groups using Azure AD SCIM](/harness-platform/use-harness-platform/platform-access-control/provision-users-and-groups-using-azure-ad-scim.md) to complete the detailed Azure AD SCIM setup.
***
### Verify the migration
After you complete the migration steps, verify everything works correctly:
1. **User count check**: Compare the number of active users in Harness with your pre-migration list. No users should be missing.
2. **Provisioning source**: In the Harness Users list, SCIM-managed users display the IdP as their provisioning source.
3. **Login test**: Have representative users from different groups log in and confirm they see the correct projects and resources.
4. **Group membership**: Verify that Harness user groups match the IdP group assignments.
5. **Role bindings**: Confirm that role assignments on resource groups are still intact. SCIM manages users and group membership, not Harness role bindings, so your existing role bindings should be unaffected.
{% hint style="info" %}
SCIM manages user and group membership only. Role bindings and resource group assignments in Harness are not affected by SCIM provisioning. You still manage roles and permissions in Harness.
{% endhint %}
***
### Troubleshooting Duplicate users after migration
If you see duplicate users, the email address in the IdP does not exactly match the email in Harness. To fix this:
1. Delete the duplicate user in Harness (the one without existing role bindings).
2. Correct the email address in the IdP to match the original Harness user.
3. Re-trigger provisioning from the IdP.
Users lost access after migration
If users report losing access:
1. Check that the user is still assigned to the Harness application in the IdP.
2. Verify that the user's group membership in the IdP maps to the correct Harness user group.
3. Confirm that the Harness user group still has the expected role bindings.
Group mapping conflicts
If an IdP group push creates a new Harness user group instead of linking to an existing one:
1. The group names might not match exactly, including case sensitivity.
2. Delete the newly created group in Harness.
3. Rename the IdP group to match the existing Harness group name exactly, and then re-push.
SCIM token expiration
SCIM tokens in Harness have an expiration date. If provisioning stops working:
1. Generate a new SCIM token in Harness.
2. Update the token in your IdP's SCIM application settings.
3. Test the connection to confirm it works.
***
### Related articles
Go to the following articles for detailed SCIM setup and user management steps.
* [Provision users with Okta SCIM](/harness-platform/use-harness-platform/platform-access-control/provision-users-with-okta-scim.md): Set up SCIM provisioning with Okta.
* [Provision users and groups using Azure AD SCIM](/harness-platform/use-harness-platform/platform-access-control/provision-users-and-groups-using-azure-ad-scim.md): Set up SCIM provisioning with Azure AD.
* [Manage users](/harness-platform/use-harness-platform/platform-access-control/add-users.md): Add and manage users in Harness.
* [Manage user groups](/harness-platform/use-harness-platform/platform-access-control/add-user-groups.md): Create and manage user groups in Harness.
{% @harness-feedback/feedback module="harness-ai" pagePath="harness-ai/use-harness-platform/platform-access-control/scim-migration-guide" %}