CONTACT HARNESS SUPPORT
If IaCM does not appear, go to Get started with IaCM, or contact your account administrator or Harness Support.
Sample OpenTofu
The following example OpenTofu (.tf) file declares: * **Provider Configuration:** Specifies the AWS provider and sets the region to "us-east-1". Go to [AWS Regions & Availability Zones](https://docs.aws.amazon.com/AmazonRDS/latest/UserGuide/Concepts.RegionsAndAvailabilityZones.html) for a complete region list. * **Resource Definition:** Creates an EC2 instance with the identifier `my_first_ec2_instance`. * **AMI:** Utilizes ami-123abc321cba18, go to [AWS EC2 User Guide](https://docs.aws.amazon.com/AWSEC2/latest/UserGuide/finding-an-ami.html) to find your AMI image ID. * **Instance Type:** Configures the instance to use a t2.micro. Go to the [AWS t2 instances list](https://aws.amazon.com/ec2/instance-types/t2/).\ Tags: To facilitate easy identification and management within AWS resources, a tag name with the value `my_first_ec2_instance` is applied. ```hcl provider "aws" { region = "us-east-1" } resource "aws_instance" "my_first_ec2_instance" { ami = "ami-123abc321cba18" instance_type = "t2.micro" # Go to https://aws.amazon.com/ec2/instance-types/t2/ for a full T2 instance type list. tags = { Name = "my_first_ec2_instance" } } ``` Go to [OpenTofu Documentation](https://opentofu.org/docs/) to review currently supported workspace types.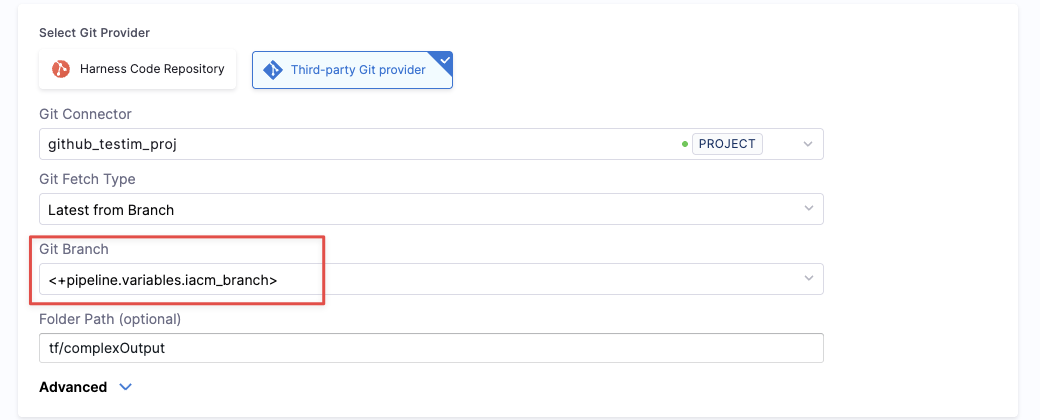 Set your branch variable as a runtime input in the pipeline:
```yaml
variables:
- name: iacm_branch
type: String
description: ""
required: true
value: <+input>.default(main)
```
{% endhint %}
* **Folder Path**: Specify the folder path to the OpenTofu configuration files in the repository.
**Advanced** options allow you to **include submodules** if your code repository includes modules and submodules. Go to [Module Registry](/infrastructure-as-code-management/registry/module-registry.md) to review module registry concepts.
### Provisioner
* **Connector**: Select the cloud provider connector you created in the previous step.
* **Cloud Cost Estimation**: Toggle the **Enable Cost Estimation** switch to enable cloud cost estimation. This lets you estimate the cost of your infrastructure changes before you apply them.
* **Workspace Type**: Select **OpenTofu** as the workspace type you want to use for the workspace.
* **OpenTofu Version**: Select the OpenTofu version you want to use for the workspace
### Add variable set (optional)
If you have configured variable sets for reuse, select the variable set you want to use for the workspace.
5. Select **Create**.
{% endtab %}
{% endtabs %}
***
### Step 3: add a provision pipeline
A pipeline structures workflows to manage tasks like planning infrastructure changes, enforcing policies, and approvals. Go to [Harness Pipelines](/harness-ai/use-harness-platform/pipelines.md) to review pipeline concepts. You can also add pipelines through the Harness Platform or [use a code-first approach with YAML](/harness-ai/use-harness-platform/pipelines/create-pipeline-quickstart.md).
### Harness AI pipeline generation
{% tabs %}
{% tab title="Interactive Guide" %}
{% embed url="
Set your branch variable as a runtime input in the pipeline:
```yaml
variables:
- name: iacm_branch
type: String
description: ""
required: true
value: <+input>.default(main)
```
{% endhint %}
* **Folder Path**: Specify the folder path to the OpenTofu configuration files in the repository.
**Advanced** options allow you to **include submodules** if your code repository includes modules and submodules. Go to [Module Registry](/infrastructure-as-code-management/registry/module-registry.md) to review module registry concepts.
### Provisioner
* **Connector**: Select the cloud provider connector you created in the previous step.
* **Cloud Cost Estimation**: Toggle the **Enable Cost Estimation** switch to enable cloud cost estimation. This lets you estimate the cost of your infrastructure changes before you apply them.
* **Workspace Type**: Select **OpenTofu** as the workspace type you want to use for the workspace.
* **OpenTofu Version**: Select the OpenTofu version you want to use for the workspace
### Add variable set (optional)
If you have configured variable sets for reuse, select the variable set you want to use for the workspace.
5. Select **Create**.
{% endtab %}
{% endtabs %}
***
### Step 3: add a provision pipeline
A pipeline structures workflows to manage tasks like planning infrastructure changes, enforcing policies, and approvals. Go to [Harness Pipelines](/harness-ai/use-harness-platform/pipelines.md) to review pipeline concepts. You can also add pipelines through the Harness Platform or [use a code-first approach with YAML](/harness-ai/use-harness-platform/pipelines/create-pipeline-quickstart.md).
### Harness AI pipeline generation
{% tabs %}
{% tab title="Interactive Guide" %}
{% embed url="