> For the complete documentation index, see [llms.txt](https://developer.harness.io/llms.txt). Markdown versions of documentation pages are available by appending `.md` to page URLs; this page is available as [Markdown](https://developer.harness.io/internal-developer-portal/3.0/troubleshooting-and-resources/idp-tutorials/service-onboarding-with-idp-stage.md).
# Create a service onboarding pipeline (using IDP Stage)
Create a basic service onboarding pipeline in Harness IDP
This tutorial is designed to help a platform engineer to get started with Harness IDP. We will create a basic service onboarding pipeline that uses a Workflow and provisions an application templated by cookiecutter for a developer. After you create the Workflow, developers can choose the Workflow on the **Workflows Overview** page and enter details such as a name for the application and the path to their Git repository. The service onboarding pipeline creates a new repository and adds a `catalog-info.yaml` to it and registers it back into your software catalog all using the new **Developer Portal** stage.
Users (developers) must perform a sequence of tasks to create the application. First, they interact with a workflow. A workflow is a form that collects a user's requirements. After a user submits the form, IDP executes a Harness pipeline that onboards the new service. Usually the pipeline fetches a cookiecutter template code, creates a new repository, and interacts with third-party providers such as cloud providers, Jira, and Slack.
### Before you begin
Before you begin this tutorial, make sure that you have completed the following requirements:
* Enable Harness IDP for your account.
* Make sure you are assigned the [IDP Admin Role](/internal-developer-portal/3.0/admin-and-customization/rbac/scopes.md#roles) or another role that has full access to all IDP resources.
* Create a **GitHub** connector named `democonnector` at the account scope. This connector should be configured for a GitHub organization (personal accounts are currently not supported by this tutorial).
### Create a pipeline
Begin by creating a pipeline for onboarding the service.
To create a **Developer Portal** stage, perform the following steps:
1. Go to **Configure** section under IDP, select **Projects**, and then select a project.
You can also create a new project for the service onboarding pipelines. Eventually, all the users in your account should have permissions to execute the pipelines in this project. For information about creating a project, go to [Create organizations and projects](/harness-ai/new-to-harness-platform/get-started.md).

2. Then select **Create a Pipeline**, add a name for the pipeline and select the type as **Inline**

3. The YAML below defines an IDP Stage with a number of steps ([as described here](/internal-developer-portal/3.0/use-idp/self-service-workflows/create-workflow/harness-pipeline.md#execution-steps)) that will perform the actions to onboard the new service. Copy the YAML below, then in the Harness Pipeline Studio go to the YAML view and paste below the existing YAML.
{% hint style="info" %}
You need to have completed all the steps under [**PreRequisites**](#before-you-begin) for the below given YAML to work properly
Update the `connectorRef: ` for all the steps it is used, also here we are assuming the git provider to be GitHub update the `connectorType` for `CreateRepo`, `DirectPush` and `RegisterCatalog` step in case it is other than GitHub. Also under the slack notify step for `token` add the token identifier, you have created above as part of prerequisites.
{% endhint %}
```yaml
stages:
- stage:
name: self-service-flow
identifier: selfserviceflow
description: ""
type: IDP
spec:
execution:
steps:
- step:
type: CookieCutter
name: CookieCutter
identifier: idpcookiecutter
spec:
templateType: public
publicTemplateUrl: <+pipeline.variables.public_cookiecutter_template_url>
cookieCutterVariables:
app_name: <+pipeline.variables.project_name>
- step:
type: CreateRepo
name: Create Repo
identifier: createrepo
spec:
connectorType: Github
connectorRef: account.democonnector
organization: <+pipeline.variables.organization>
repository: <+pipeline.variables.project_name>
repoType: public
description: <+pipeline.variables.repository_description>
defaultBranch: <+pipeline.variables.repository_default_branch>
- step:
type: CreateCatalog
name: Create IDP Component
identifier: createcatalog
spec:
fileName: <+pipeline.variables.catalog_file_name>
filePath: <+pipeline.variables.project_name>
fileContent: |-
apiVersion: backstage.io/v1alpha1
kind: Component
metadata:
name: <+pipeline.variables.project_name>
description: <+pipeline.variables.project_name> created using self service flow
annotations:
backstage.io/techdocs-ref: dir:.
spec:
type: service
owner: test
lifecycle: experimental
- step:
type: DirectPush
name: Push Code into Repo
identifier: directpush
spec:
connectorType: Github
connectorRef: account.democonnector
organization: <+pipeline.variables.organization>
repository: <+pipeline.variables.project_name>
codeDirectory: <+pipeline.variables.project_name>
branch: <+pipeline.variables.direct_push_branch>
- step:
type: RegisterCatalog
name: Register Component in IDP
identifier: registercatalog
spec:
connectorType: Github
connectorRef: account.democonnector
organization: <+pipeline.variables.organization>
repository: <+pipeline.variables.project_name>
filePath: <+pipeline.variables.catalog_file_name>
branch: <+pipeline.variables.direct_push_branch>
cloneCodebase: false
caching:
enabled: false
paths: []
platform:
os: Linux
arch: Amd64
runtime:
type: Cloud
spec: {}
variables:
- name: test_content
type: String
description: ""
required: false
value: devesh
- name: project_name
type: String
description: ""
required: false
value: <+input>
- name: organization
type: String
description: ""
required: false
value: <+input>
- name: public_cookiecutter_template_url
type: String
description: ""
required: false
value: <+input>
- name: repository_type
type: String
description: ""
required: false
value: <+input>.default(private).allowedValues(private,public)
- name: repository_description
type: String
description: ""
required: false
value: <+input>
- name: repository_default_branch
type: String
description: ""
required: false
value: <+input>
- name: direct_push_branch
type: String
description: ""
required: false
value: <+input>
- name: catalog_file_name
type: String
description: ""
required: false
value: catalog-info.yaml
```
4. Now Save the pipeline.
{% hint style="info" %}
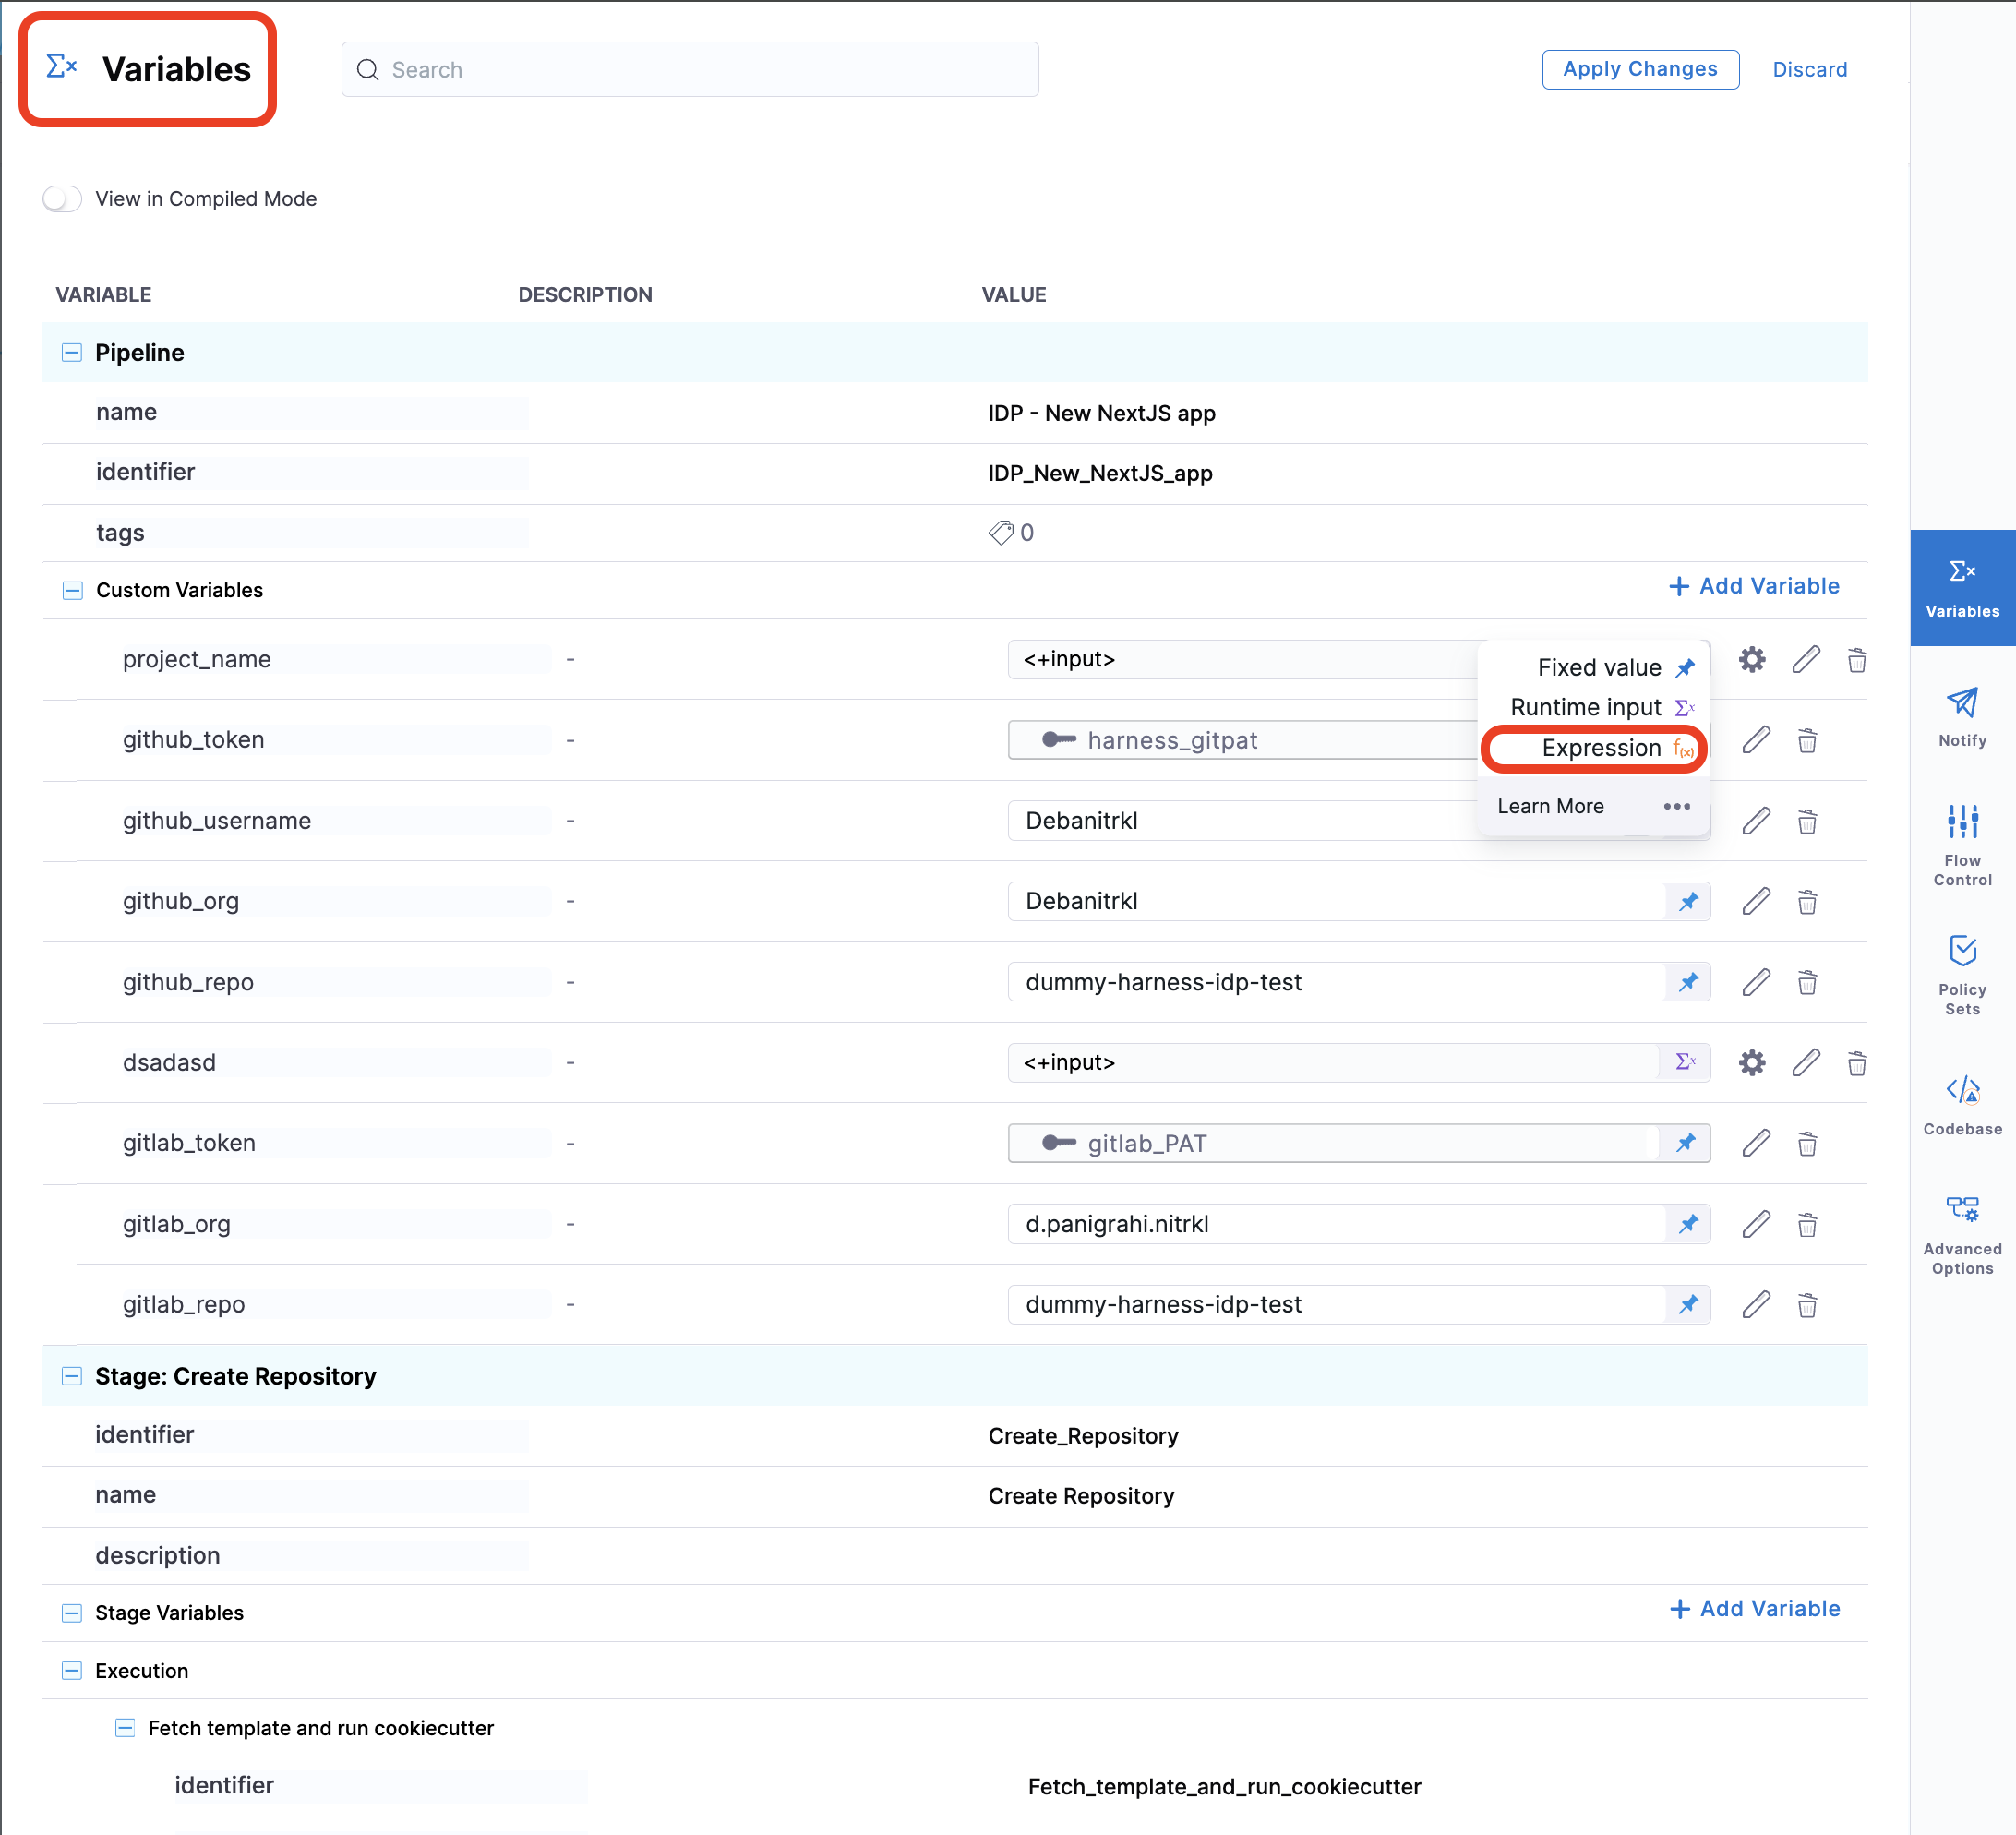
Software Templates currently support pipelines that are comprised only of [IDP Stage](/internal-developer-portal/3.0/use-idp/self-service-workflows/create-workflow/harness-pipeline.md)[custom stage](broken://spaces/iHCl4N3pQkjhOYjQoOs7/pages/ZHnD2cHONQag7IAmb1nA#add-a-custom-stage) and [CI stage with Run step](/continuous-integration/3.0/use-harness-ci/use-harness-ci/run-step-settings.md#add-the-run-step) with codebase disabled. Additionally, all inputs, except for [pipeline input as variables](/harness-ai/use-harness-platform/variables-and-expressions/harness-variables.md#pipeline-expressions), must be of [fixed value](/harness-platform/3.0/harness-platform-resources/variables-and-expressions/runtime-inputs.md#fixed-values).
 {% endhint %}
### Create a workflow
Now that our pipeline is ready to execute when a project name and a GitHub repository name are provided, let us create the UI counterpart of it in IDP. Create a `workflow.yaml` file anywhere in your Git repository. Usually, that would be the same place as your cookiecutter template. We use the [react-jsonschema-form playground](https://rjsf-team.github.io/react-jsonschema-form/) to build the template. [Nunjucks](https://mozilla.github.io/nunjucks/) is templating engine for the IDP Workflows.
[Source](https://github.com/harness-community/idp-samples/blob/main/tutorial-self-service-flow-template.yaml)
```yaml
apiVersion: scaffolder.backstage.io/v1beta3
kind: Template
metadata:
name: new-service
title: Create a new service
description: A Workflow to create a new service
tags:
- nextjs
- react
- javascript
spec:
owner: owner@company.com
type: service
parameters:
- title: Service Details
required:
- project_name
- organization_name
- public_template_url
- repository_type
- repository_description
- repository_default_branch
- direct_push_branch
properties:
public_template_url:
title: Public Cookiecutter Template URL
type: string
default: https://github.com/devesh-harness/test-cookicutter
description: URL to a Cookiecutter template. For the tutorial you can use the default input
organization_name:
title: Git Organization
type: string
description: Name of your organization in Git
project_name:
title: Name of your service
type: string
description: Your repo will be created with this name
repository_type:
type: string
title: Repository Type
enum:
- public
- private
default: public
repository_description:
type: string
title: Add a description to your repo
repository_default_branch:
title: Name of your Default Branch
type: string
default: main
direct_push_branch:
title: Name of your Develop branch
type: string
default: develop
owner:
title: Choose an Owner for the Service
type: string
ui:field: OwnerPicker
ui:options:
allowedKinds:
- Group
# This field is hidden but needed to authenticate the request to trigger the pipeline
token:
title: Harness Token
type: string
ui:widget: password
ui:field: HarnessAuthToken
steps:
- id: trigger
name: Bootstrapping your new service
action: trigger:harness-custom-pipeline
input:
url: "YOUR PIPELINE URL HERE"
inputset:
organization: ${{ parameters.organization_name }}
project_name: ${{ parameters.project_name }}
public_cookiecutter_template_url: ${{ parameters.public_template_url }}
repository_type: ${{ parameters.repository_type }}
repository_description: ${{ parameters.repository_description }}
repository_default_branch: ${{ parameters.repository_default_branch }}
direct_push_branch: ${{ parameters.direct_push_branch }}
apikey: ${{ parameters.token }}
output:
links:
- title: Pipeline Details
url: ${{ steps.trigger.output.PipelineUrl }}
```
Replace the `YOUR PIPELINE URL HERE` with the pipeline URL that you created.

This YAML code is governed by Backstage. You can change the name and description of the Workflow. The Workflow has the following parts:
1. Input from the user
2. Execution of pipeline
 
Let us take a look at the inputs that the Workflow expects from a developer. The inputs are written in the `spec.parameters` field. It has two parts, but you can combine them. The keys in `properties` are the unique IDs of fields (for example, `github_repo` and `project_name`). If you recall, they are the pipeline variables that we set as runtime inputs earlier. This is what we want the developer to enter when creating their new application.
The YAML definition includes fields such as cloud provider and database choice. They are for demonstration purposes only and are not used in this tutorial.
#### Authenticate the request to the pipeline
The Workflow contains a single action which is designed to trigger the pipeline you created via an API call. Since the API call requires authentication, Harness has created a custom component to authenticate based of the logged-in user's credentials.
The following YAML snippet under `spec.parameters.properties` automatically creates a token field without exposing it to the end user.
```yaml
token:
title: Harness Token
type: string
ui:widget: password
ui:field: HarnessAuthToken
```
That token is then used as part of `steps` as `apikey`
```yaml
steps:
- id: trigger
name: ...
action: trigger:harness-custom-pipeline
input:
url: ...
inputset:
key: value
...
apikey: ${{ parameters.token }}
```
#### Register the workflow in IDP
Use the URL to the `workflow.yaml` created above and register it by using the same process for [registering a new software component](/internal-developer-portal/3.0/new-to-idp/get-started.md).
### Use the self service workflows
Now navigate to the **Workflows** page in IDP. You will see the newly created Workflow appear. Click on **Choose**, fill in the form, click **Next Step**, then **Create** to trigger the automated pipeline. Once complete, you should be able to see the new repo created and bootstrapped in your target GitHub organization!
### Additional information
#### Conditional inputs in workflows
1. One Of: Helps you create a dropdown in the workflow, where only one of all the options available could be selected.
```yaml
dependencies:
technology:
oneOf:
- properties:
technology:
enum:
- java
java version:
type: "string"
enum:
- java8
- java11
```
2. All Of: Helps you create a dropdown in the workflow, where only all the options available could be selected.
```yaml
type: object
allOf:
- properties:
lorem:
type:
- string
- boolean
default: true
- properties:
lorem:
type: boolean
ipsum:
type: string
```
3. Any Of: Helps you to select from multiple properties where both cannot be selected together at once.
```yaml
type: object
properties:
age:
type: integer
title: Age
items:
type: array
items:
type: object
anyOf:
- properties:
foo:
type: string
- properties:
bar:
type: string
anyOf:
- title: First method of identification
properties:
firstName:
type: string
title: First name
default: Chuck
lastName:
type: string
title: Last name
- title: Second method of identification
properties:
idCode:
type: string
title: ID code
```
For more such references and validate your conditional steps take a look at the [react-json schema project](https://rjsf-team.github.io/react-jsonschema-form/).
#### Upload a file in a workflow
There are 3 types of file upload.
1. Single File
2. Multiple Files
3. Single File with Accept Attribute
```yaml
#Example
title: Files
type: object
properties:
file:
type: string
format: data-url
title: Single file
files:
type: array
title: Multiple files
items:
type: string
format: data-url
filesAccept:
type: string
format: data-url
title: Single File with Accept attribute
```
#### Pass an array of inputs to a Harness pipeline
Harness Pipelines variables can only be 3 types, string, number and secrets, in case you want to add multiple strings and comma separated values you need to [join](https://mozilla.github.io/nunjucks/templating.html#join) them and send as single input parameters.
In the following workflow I want to pick the enum and parse the `exampleVar` as a string and use it as comma separated value in the inputset for pipeline. As you could see in the example below under `inputset`, `exampleVar` takes input as `${{ parameters.exampleVar.join(',') }}`.
```yaml
- title: Pass Variables Here
properties:
exampleVar:
title: Select an option
type: array
items:
type: string
enum:
- Option1
- Option2
- Option3
default:
- Option1
ui:
exampleVar:
title: Select Options
multi: true
steps:
- id: trigger
name: Call a harness pipeline, and pass the variables from above
action: trigger:harness-custom-pipeline
input:
url: 'https://app.harness.io/ng/account/*********/home/orgs/default/projects/*************/pipelines/*************/pipeline-studio/?storeType=INLINE'
inputset:
exampleVar: ${{ parameters.exampleVar.join(',') }}
owner: ${{ parameters.owner }}
apikey: ${{ parameters.token }}
```
#### Unregister/Delete workflow
1. Navigate to the **Catalog** page, and select **Template** under Kind.

2. Select the Template Name you want to Unregister.
3. Now on the Template overview page, click on the 3 dots on top right corner and select **Unregister Entity**.

4. Now on the Dialog box select **Unregister Location**.

5. This will delete the Template.
{% @harness-feedback/feedback %}
{% endhint %}
### Create a workflow
Now that our pipeline is ready to execute when a project name and a GitHub repository name are provided, let us create the UI counterpart of it in IDP. Create a `workflow.yaml` file anywhere in your Git repository. Usually, that would be the same place as your cookiecutter template. We use the [react-jsonschema-form playground](https://rjsf-team.github.io/react-jsonschema-form/) to build the template. [Nunjucks](https://mozilla.github.io/nunjucks/) is templating engine for the IDP Workflows.
[Source](https://github.com/harness-community/idp-samples/blob/main/tutorial-self-service-flow-template.yaml)
```yaml
apiVersion: scaffolder.backstage.io/v1beta3
kind: Template
metadata:
name: new-service
title: Create a new service
description: A Workflow to create a new service
tags:
- nextjs
- react
- javascript
spec:
owner: owner@company.com
type: service
parameters:
- title: Service Details
required:
- project_name
- organization_name
- public_template_url
- repository_type
- repository_description
- repository_default_branch
- direct_push_branch
properties:
public_template_url:
title: Public Cookiecutter Template URL
type: string
default: https://github.com/devesh-harness/test-cookicutter
description: URL to a Cookiecutter template. For the tutorial you can use the default input
organization_name:
title: Git Organization
type: string
description: Name of your organization in Git
project_name:
title: Name of your service
type: string
description: Your repo will be created with this name
repository_type:
type: string
title: Repository Type
enum:
- public
- private
default: public
repository_description:
type: string
title: Add a description to your repo
repository_default_branch:
title: Name of your Default Branch
type: string
default: main
direct_push_branch:
title: Name of your Develop branch
type: string
default: develop
owner:
title: Choose an Owner for the Service
type: string
ui:field: OwnerPicker
ui:options:
allowedKinds:
- Group
# This field is hidden but needed to authenticate the request to trigger the pipeline
token:
title: Harness Token
type: string
ui:widget: password
ui:field: HarnessAuthToken
steps:
- id: trigger
name: Bootstrapping your new service
action: trigger:harness-custom-pipeline
input:
url: "YOUR PIPELINE URL HERE"
inputset:
organization: ${{ parameters.organization_name }}
project_name: ${{ parameters.project_name }}
public_cookiecutter_template_url: ${{ parameters.public_template_url }}
repository_type: ${{ parameters.repository_type }}
repository_description: ${{ parameters.repository_description }}
repository_default_branch: ${{ parameters.repository_default_branch }}
direct_push_branch: ${{ parameters.direct_push_branch }}
apikey: ${{ parameters.token }}
output:
links:
- title: Pipeline Details
url: ${{ steps.trigger.output.PipelineUrl }}
```
Replace the `YOUR PIPELINE URL HERE` with the pipeline URL that you created.

This YAML code is governed by Backstage. You can change the name and description of the Workflow. The Workflow has the following parts:
1. Input from the user
2. Execution of pipeline
 
Let us take a look at the inputs that the Workflow expects from a developer. The inputs are written in the `spec.parameters` field. It has two parts, but you can combine them. The keys in `properties` are the unique IDs of fields (for example, `github_repo` and `project_name`). If you recall, they are the pipeline variables that we set as runtime inputs earlier. This is what we want the developer to enter when creating their new application.
The YAML definition includes fields such as cloud provider and database choice. They are for demonstration purposes only and are not used in this tutorial.
#### Authenticate the request to the pipeline
The Workflow contains a single action which is designed to trigger the pipeline you created via an API call. Since the API call requires authentication, Harness has created a custom component to authenticate based of the logged-in user's credentials.
The following YAML snippet under `spec.parameters.properties` automatically creates a token field without exposing it to the end user.
```yaml
token:
title: Harness Token
type: string
ui:widget: password
ui:field: HarnessAuthToken
```
That token is then used as part of `steps` as `apikey`
```yaml
steps:
- id: trigger
name: ...
action: trigger:harness-custom-pipeline
input:
url: ...
inputset:
key: value
...
apikey: ${{ parameters.token }}
```
#### Register the workflow in IDP
Use the URL to the `workflow.yaml` created above and register it by using the same process for [registering a new software component](/internal-developer-portal/3.0/new-to-idp/get-started.md).
### Use the self service workflows
Now navigate to the **Workflows** page in IDP. You will see the newly created Workflow appear. Click on **Choose**, fill in the form, click **Next Step**, then **Create** to trigger the automated pipeline. Once complete, you should be able to see the new repo created and bootstrapped in your target GitHub organization!
### Additional information
#### Conditional inputs in workflows
1. One Of: Helps you create a dropdown in the workflow, where only one of all the options available could be selected.
```yaml
dependencies:
technology:
oneOf:
- properties:
technology:
enum:
- java
java version:
type: "string"
enum:
- java8
- java11
```
2. All Of: Helps you create a dropdown in the workflow, where only all the options available could be selected.
```yaml
type: object
allOf:
- properties:
lorem:
type:
- string
- boolean
default: true
- properties:
lorem:
type: boolean
ipsum:
type: string
```
3. Any Of: Helps you to select from multiple properties where both cannot be selected together at once.
```yaml
type: object
properties:
age:
type: integer
title: Age
items:
type: array
items:
type: object
anyOf:
- properties:
foo:
type: string
- properties:
bar:
type: string
anyOf:
- title: First method of identification
properties:
firstName:
type: string
title: First name
default: Chuck
lastName:
type: string
title: Last name
- title: Second method of identification
properties:
idCode:
type: string
title: ID code
```
For more such references and validate your conditional steps take a look at the [react-json schema project](https://rjsf-team.github.io/react-jsonschema-form/).
#### Upload a file in a workflow
There are 3 types of file upload.
1. Single File
2. Multiple Files
3. Single File with Accept Attribute
```yaml
#Example
title: Files
type: object
properties:
file:
type: string
format: data-url
title: Single file
files:
type: array
title: Multiple files
items:
type: string
format: data-url
filesAccept:
type: string
format: data-url
title: Single File with Accept attribute
```
#### Pass an array of inputs to a Harness pipeline
Harness Pipelines variables can only be 3 types, string, number and secrets, in case you want to add multiple strings and comma separated values you need to [join](https://mozilla.github.io/nunjucks/templating.html#join) them and send as single input parameters.
In the following workflow I want to pick the enum and parse the `exampleVar` as a string and use it as comma separated value in the inputset for pipeline. As you could see in the example below under `inputset`, `exampleVar` takes input as `${{ parameters.exampleVar.join(',') }}`.
```yaml
- title: Pass Variables Here
properties:
exampleVar:
title: Select an option
type: array
items:
type: string
enum:
- Option1
- Option2
- Option3
default:
- Option1
ui:
exampleVar:
title: Select Options
multi: true
steps:
- id: trigger
name: Call a harness pipeline, and pass the variables from above
action: trigger:harness-custom-pipeline
input:
url: 'https://app.harness.io/ng/account/*********/home/orgs/default/projects/*************/pipelines/*************/pipeline-studio/?storeType=INLINE'
inputset:
exampleVar: ${{ parameters.exampleVar.join(',') }}
owner: ${{ parameters.owner }}
apikey: ${{ parameters.token }}
```
#### Unregister/Delete workflow
1. Navigate to the **Catalog** page, and select **Template** under Kind.

2. Select the Template Name you want to Unregister.
3. Now on the Template overview page, click on the 3 dots on top right corner and select **Unregister Entity**.

4. Now on the Dialog box select **Unregister Location**.

5. This will delete the Template.
{% @harness-feedback/feedback %}