> For the complete documentation index, see [llms.txt](https://developer.harness.io/llms.txt). Markdown versions of documentation pages are available by appending `.md` to page URLs; this page is available as [Markdown](https://developer.harness.io/internal-developer-portal/3.0/use-idp/self-service-workflows/create-workflow/harness-pipeline.md).
# Setting Up the Backend with IDP Pipeline
Get started with setting up your Workflow's backend with Harness Pipeline.
Self-service workflows in Harness IDP are powered by **Harness Pipelines**. Each workflow’s backend is configured using Actions and Harness Pipelines. Below is a detailed guide to setting this up in Harness IDP.
### Harness pipelines: Backend orchestration
Harness Pipeline acts as a robust orchestration engine for self-service workflows in Harness IDP. It is directly connected to executing specific tasks in your workflow via defined actions and pipelines.
#### Connect inputs, actions and Harness pipelines
When a workflow is executed, users provide input details required for pipeline execution. These inputs are passed into the pipeline through a workflow action, which triggers specific steps in the pipeline. These steps can perform tasks such as launching a CI/CD process, registering a service in the catalog, setting up infrastructure, etc.
The action accepts the **Harness Pipeline URL** as input, along with an authentication token that is automatically inserted into the parameters section. This seamless integration is enabled by Harness IDP being part of the broader Harness SaaS ecosystem. Users can also manage workflows via pipelines’ RBAC.
#### IDP stage
Harness IDP includes a native IDP Stage where all IDP-specific tasks required for pipeline execution are pre-configured as pipeline steps within the stage. This enables quick and efficient creation of self-service workflows.
The IDP Stage provides built-in support for:
* Git cloning
* Cookiecutter templating
* Repository creation
* Catalog creation and registration
* Slack notifications
* Resource creation using Harness IaCM powered by OpenTofu
Currently, Harness-specific workflow actions support:
* IDP Stage
* Custom Stage (Available with Harness CD License or Free Tier)
* Codebase-disabled CI Stage with Run Step (Available with Harness CI License)
### Create a Harness pipeline from Harness IDP
To create a Harness Pipeline using the IDP Stage, follow these steps:
1. In your Harness IDP, go to **Configure** → **Select Project**.
2. Now start with **Create a Pipeline**. 
3. Add a **Name**, select the type as **Inline** and **Continue**. 
4. Now **Select Stage Type** as **Developer Portal** and add a [name for your stage](broken://spaces/iHCl4N3pQkjhOYjQoOs7/pages/ZHnD2cHONQag7IAmb1nA#stage-names) to **Set Up Stage**.  
#### Infrastructure
Under **Infrastructure** tab, Harness recommends [Harness Cloud](/continuous-integration/3.0/use-harness-ci/use-harness-ci/set-up-build-infrastructure/use-harness-cloud-build-infrastructure.md#use-harness-cloud), but you can also use a [Kubernetes cluster](/continuous-integration/3.0/use-harness-ci/use-harness-ci/set-up-build-infrastructure/k8s-build-infrastructure/set-up-a-kubernetes-cluster-build-infrastructure.md), [local runner](/continuous-integration/3.0/use-harness-ci/use-harness-ci/set-up-build-infrastructure/define-a-docker-build-infrastructure.md) or [self-managed AWS/GCP/Azure VM](/continuous-integration/3.0/use-harness-ci/use-harness-ci/set-up-build-infrastructure/vm-build-infrastructure.md) build infrastructure.

#### Pipeline variables
Before adding the execution steps, we need to create some pipeline variables with runtime inputs, which will be used as expression inputs in various steps during execution.
To add pipeline variables:
1. Navigate to the right-hand side of your page and click on the **Variables** icon.
2. Under **Custom Variables**, select **+Add Variable**.\

3. Assign a name to the variable and set the input type to **Runtime**. 
#### Pass inputs
The `spec.parameters` field in `workflow.yaml` contains the inputs required for the configuration. The keys under `properties` represent unique IDs for various input fields. These keys correspond to the pipeline variables that must be set as runtime inputs when configuring the pipeline. These inputs are designed to prompt the developer to provide necessary details when creating a new application.
The `spec.steps` field specifies a single action: triggering a Harness pipeline. This action requires mainly three inputs:
* **Pipeline URL**: The endpoint for the pipeline to be triggered.
* **Input Set**: A collection of runtime input variables that the pipeline requires.
* **API Key**: Used to authenticate and authorize the pipeline trigger.
All pipeline variables must be declared in the `inputset` within `workflow.yaml`, with their values aligned to the input parameters specified in the `spec.parameters` properties section.
**Example `workflow.yaml`**
{% hint style="info" %}
The syntax `{{ parameters.x }}` is only supported within the `steps` section when configuring the Workflows Backend. It cannot be used in the `properties` section to reference another parameter.
{% endhint %}
```yaml
...
spec:
parameters:
- title: Service Details
properties:
projectId:
title: Project Identifier
description: Harness Project Identifier
type: string
ui:field: HarnessProjectPicker
template_type:
title: Type of the Template
type: string
description: Type of the Template
ui:readonly: $${{ parameters.another_field}} ## NOT SUPPORTED
steps:
- id: trigger
name: Creating your react app
action: trigger:harness-custom-pipeline
input:
url: "https://app.harness.io/ng/account/account_id/module/idp/orgs/org_id/projects/project_id/pipelines/pipeline_id/pipeline-studio/?storeType=INLINE"
inputset:
project_id: ${{ parameters.projectId }} ## SUPPORTED
template_type: ${{ parameters.template_type }} ## SUPPORTED
...
```
#### Fetch outputs
You can configure your workflows to fetch output from the **Harness Pipeline** and display pipeline output variables using `workflow.yaml`. Here’s how you can do it:
1. In your `workflow.yaml`, under the `steps` property field, set `showOutputVariables` to `true`.
2. Define pipeline output variables under the `output` field in your YAML configuration.
There are two ways to add output variables in the workflow syntax:
1. **Directly referencing the output variable name:**
```yaml
${{ steps.trigger.output.test2 }}
```
Here, `test2` is the output variable created in the pipeline.
2. **Using the JEXL expression from execution logs:**
* Copy the JEXL expression of the output variable and remove the JEXL constructs.
* Example:
```yaml
${{ steps.trigger.output['pipeline.stages.testci.spec.execution.steps.Run_1.output.outputVariables.test1'] }}
```
* In this case, `pipeline.stages.testci.spec.execution.steps.Run_1.output.outputVariables.test1` is derived from:
```yaml
<+pipeline.stages.testci.spec.execution.steps.Run_1.output.outputVariables.test2>
```

This approach ensures that pipeline outputs are correctly fetched and displayed.
**Example `workflow.yaml`**
```yaml
steps:
- id: trigger
name: Creating your react app
action: trigger:harness-custom-pipeline
input:
url: "https://app.harness.io/ng/account/vpCkHKsDSxK9_KYfjCTMKA/home/orgs/default/projects/communityeng/pipelines/IDP_New_NextJS_app/pipeline-studio/?storeType=INLINE"
inputset:
project_name: ${{ parameters.project_name }}
github_repo: ${{ parameters.github_repo }}
cloud_provider: ${{ parameters.provider }}
db: ${{ parameters.db }}
cache: ${{ parameters.cache }}
apikey: ${{ parameters.token }}
showOutputVariables: true
output:
text:
- title: Output Variable
content: |
Output Variable **test2** is `${{ steps.trigger.output.test2 }}`
- title: Another Output Variable
content: |
Output Variable **test1** with fqnPath is `${{ steps.trigger.output['pipeline.stages.testci.spec.execution.steps.Run_1.output.outputVariables.test1'] }}`
```
{% hint style="info" %}
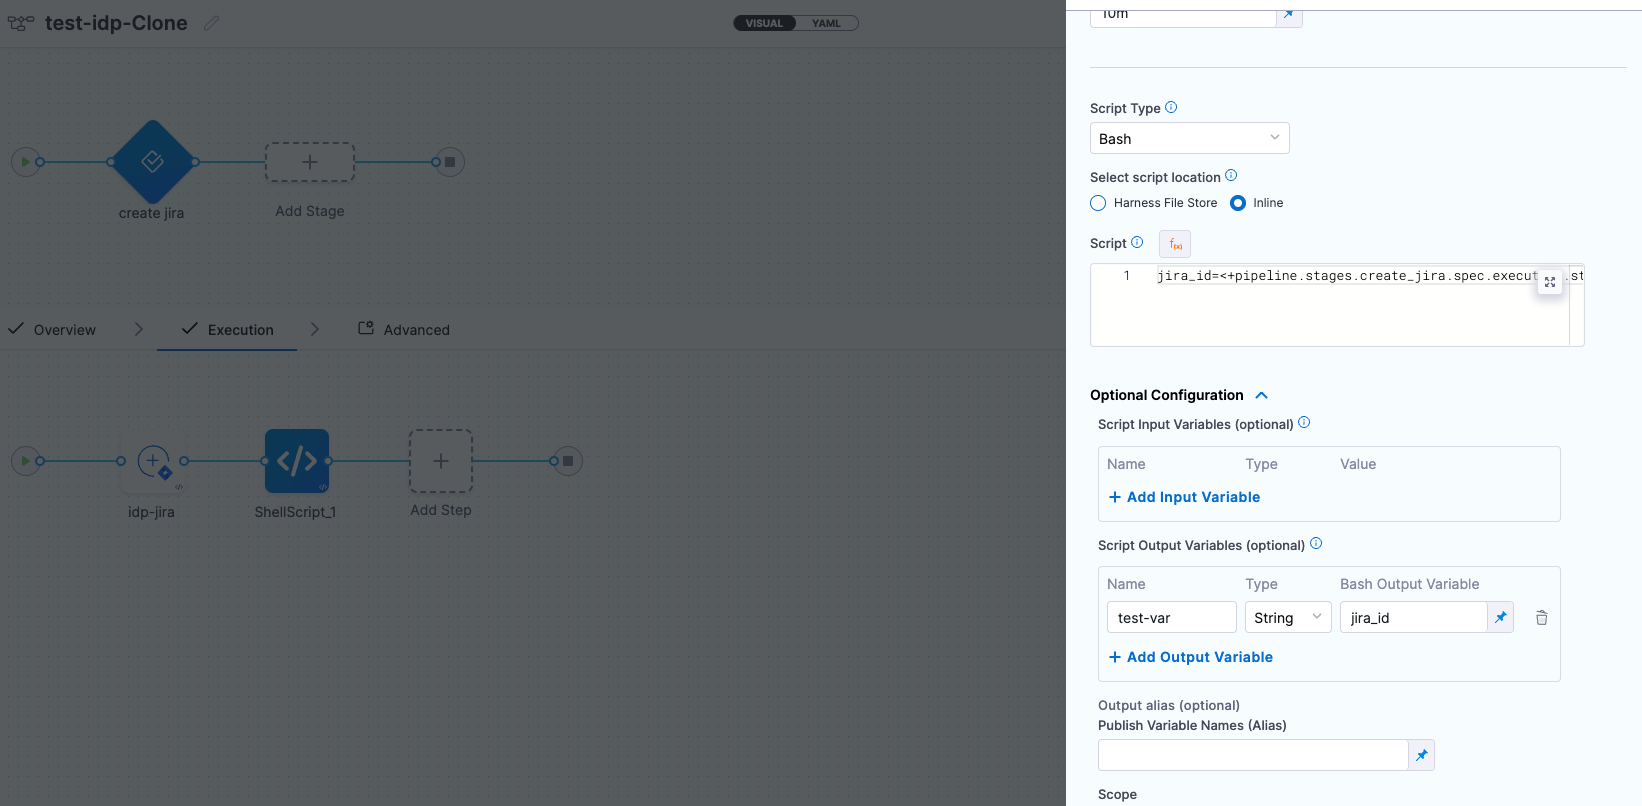
Note that while **user-defined output variables** are allowed for the above use-case, you can also use **system-generated variables** by assigning them as a new variable under the **Shell Script** step, as shown below.
For example, if a system-generated output variable is **`jira_id`**, you can define it as a **user-defined output variable** under **Optional Configuration** by assigning it to a new variable, such as `test-var`. This newly defined variable (`test-var`) can then be displayed as output in the **IDP workflows**.
 {% endhint %}
#### Execution steps
You can add various **execution steps** (pre-included with the **IDP stage**) under the **Execution** tab. Refer to the detailed guide below for step-by-step instructions on adding and implementing **IDP stage execution steps**.

### IDP stage
The self-service flow in IDP is powered by the Harness Pipelines. A stage is a part of a pipeline that contains the logic to perform a major segment of a larger workflow defined in a pipeline. Stages are often based on the different workflow milestones, such as building, approving, and delivering.
The process of adding a stage to a pipeline is the same for all Harness modules. When you add a stage to a pipeline, you select the stage type, such as **Developer Portal** for IDP or **Build** for CI or **Deploy** for CD. The available stage settings are determined by the stage type, and, if applicable, the module associated with the selected stage type.
This functionality is limited to the modules and settings that you have access to.
{% hint style="info" %}
**Limitations**
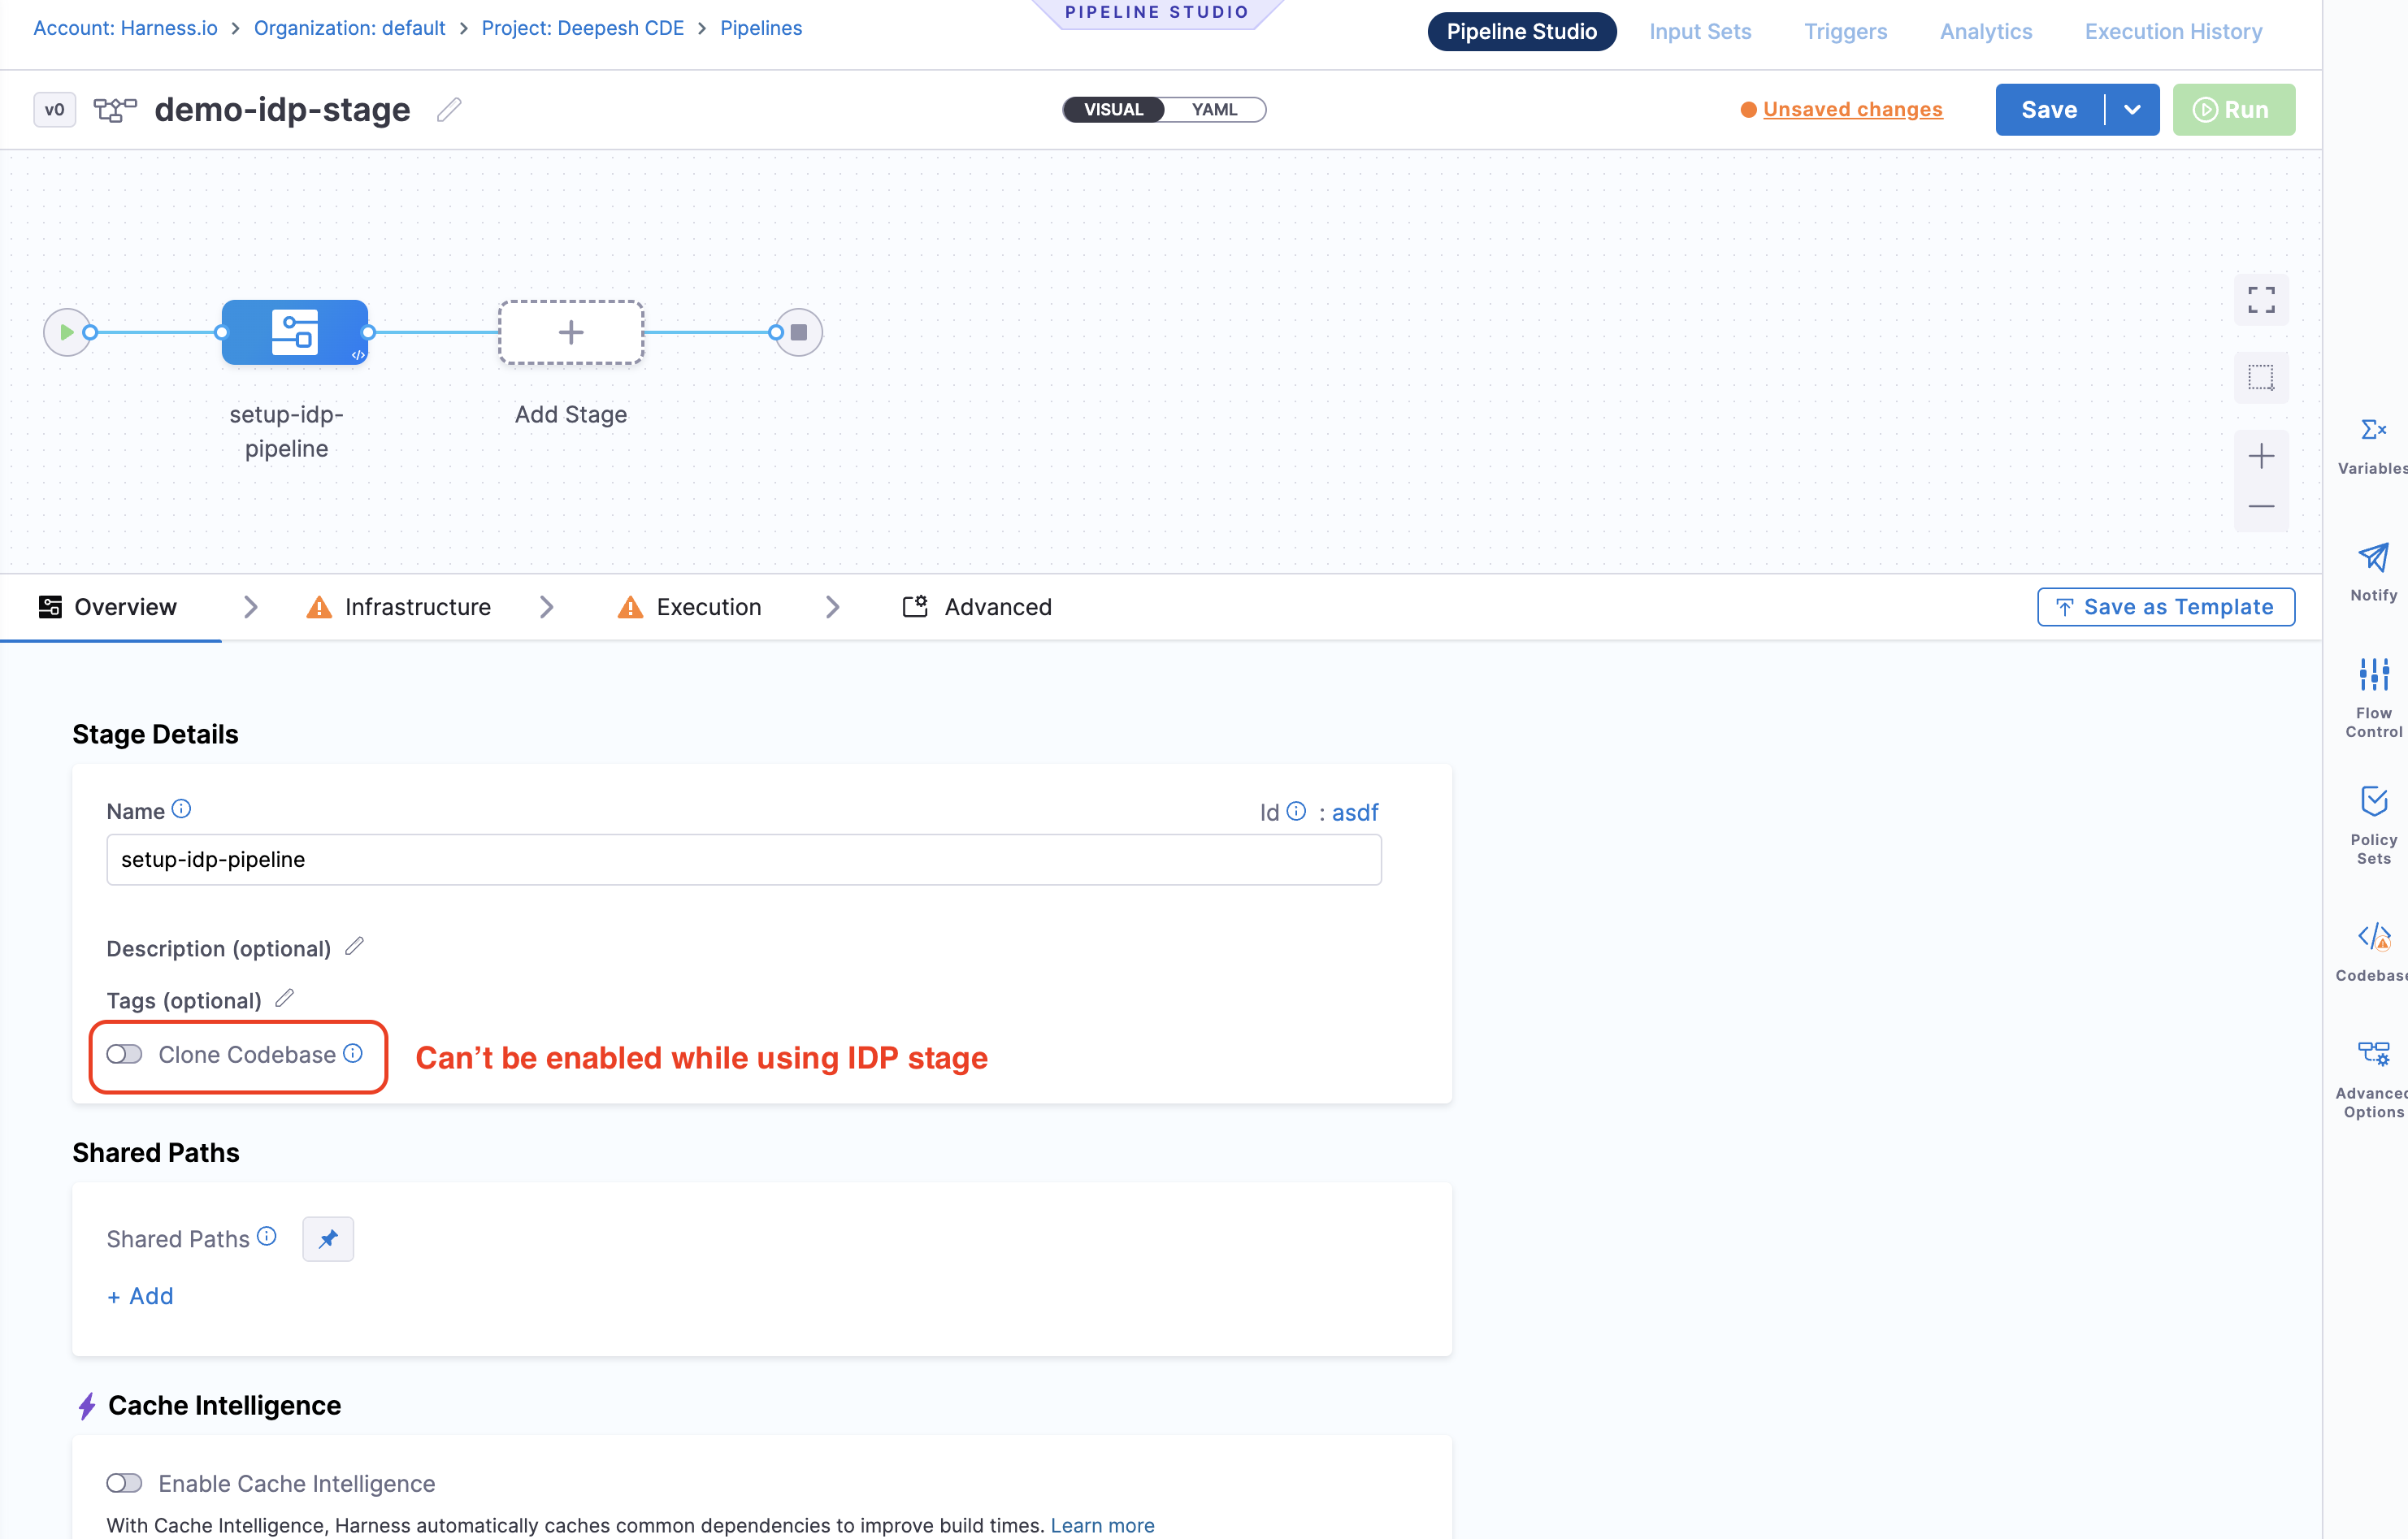
* The "Clone Codebase (Git Clone)" action is not supported at the stage level for the IDP stage.
{% endhint %}
#### Execution steps
You can add various **execution steps** (pre-included with the **IDP stage**) under the **Execution** tab. Refer to the detailed guide below for step-by-step instructions on adding and implementing **IDP stage execution steps**.

### IDP stage
The self-service flow in IDP is powered by the Harness Pipelines. A stage is a part of a pipeline that contains the logic to perform a major segment of a larger workflow defined in a pipeline. Stages are often based on the different workflow milestones, such as building, approving, and delivering.
The process of adding a stage to a pipeline is the same for all Harness modules. When you add a stage to a pipeline, you select the stage type, such as **Developer Portal** for IDP or **Build** for CI or **Deploy** for CD. The available stage settings are determined by the stage type, and, if applicable, the module associated with the selected stage type.
This functionality is limited to the modules and settings that you have access to.
{% hint style="info" %}
**Limitations**
* The "Clone Codebase (Git Clone)" action is not supported at the stage level for the IDP stage.
 * [Looping strategies](broken://spaces/iHCl4N3pQkjhOYjQoOs7/pages/J6FJCm3Cd6uO7cL6oq7i) (Parallelism, Matrix, Repeat) are not supported for the IDP stage.
{% endhint %}
#### 1. Git clone
*(Ignore this step if your repository containing the cookiecutter template is public)*
Add a Git Clone step to clone a repository into the Developer Portal stage's workspace. By cloning the repository, you gain access to the necessary code, scripts, or configurations, enabling various actions.
The Git Clone step uses a containerized step group. For more information, go to [Containerize Step Groups](/continuous-delivery/use-continuous-delivery/cd-building-blocks/cd-steps/containerized-steps/containerized-step-groups.md).
{% tabs %}
{% tab title="Pipeline Studio" %}
1. In your Developer Portal stage, under Execution, select Add Step.
2. Select Git Clone.
3. Configure the step using the settings described below.
**Configuration Settings**
1. **Select Git Provider**: You can choose **Third-party Git Provider** if your code is not hosted in the Harness Code Repository.
2. **Connector**: You can select a connector for the source control provider hosting the code repository that you want to clone.
{% hint style="info" %}
* For authentication, **Username-Password** and **GitHub App** methods are supported. The connection type `ssh` is currently not supported for Connectors.
* You can use a **GitHub App** to authenticate the Harness GitHub connector. Refer to this [detailed guide](/harness-platform/3.0/harness-platform-resources/connectors/code-repositories/git-hub-app-support.md) on how to use a GitHub App with a GitHub connector in the IDP stage.
* The [Bitbucket connector](/harness-platform/3.0/harness-platform-resources/connectors/code-repositories/ref-source-repo-provider/bitbucket-connector-settings-reference.md#credentials-settings) supports both **Access Token** and **API Token** authentication modes. For more details, see the reference documentation on [Access Token mode](/release-notes/internal-developer-portal.md#new-feature-support-for-bitbucket-access-token-authentication-mode) and [API Token mode](/release-notes/internal-developer-portal.md#new-feature-increased-bitbucket-api-rate-limits).
**Note**: Ensure that you have **admin permissions** on a GitHub repository within your GitHub organization and that you are able to install **GitHub Apps** in that repository. This setup is only supported for **organization accounts**, not personal GitHub accounts.
{% endhint %}
You can refer to the following resources for more information on creating code repo connectors:
* Azure Repos: [Connect to Azure Repos](/harness-platform/3.0/harness-platform-resources/connectors/code-repositories/connect-to-a-azure-repo.md)
* Bitbucket: [Bitbucket Connector Settings Reference](/harness-platform/3.0/harness-platform-resources/connectors/code-repositories/ref-source-repo-provider/bitbucket-connector-settings-reference.md)
* GitHub: [GitHub Connector Settings Reference](/harness-platform/3.0/harness-platform-resources/connectors/code-repositories/ref-source-repo-provider/git-hub-connector-settings-reference.md)
* GitLab: [GitLab Connector Settings Reference](/harness-platform/3.0/harness-platform-resources/connectors/code-repositories/ref-source-repo-provider/git-lab-connector-settings-reference.md)
* Other Git Providers:
* [Git Connector Settings Reference](/harness-platform/3.0/harness-platform-resources/connectors/code-repositories/ref-source-repo-provider/git-connector-settings-reference.md)
* [Connect to an AWS CodeCommit Repo](/harness-platform/3.0/harness-platform-resources/connectors/code-repositories/connect-to-code-repo.md)
3. **Repository Name**:
* If the connector's URL Type is set to **Repository**, the Repository Name is automatically populated based on the connector's configuration.
* If the connector's URL Type is set to **Account**, you must manually specify the repository name to clone into the stage workspace.
4. **Build Type, Branch Name, and Tag Name**: For Build Type, choose:
* Git Branch to clone code from a specific branch.
* Git Tag to clone code from a specific commit tag. Based on your selection, specify the Branch Name or Tag Name.
{% hint style="info" %}
You can use fixed values, runtime inputs, or variable expressions for branch and tag names. For instance, you can enter input for the branch or tag name to specify them at runtime.
{% endhint %}
5. **Clone Directory** (Optional): You can specify the target path in the stage workspace where the repository should be cloned.
6. **Depth**: You should specify the number of commits to fetch when cloning the repository. The default depth is 0, which fetches all commits from the specified branch. For more details, refer to the [Git Clone Documentation](https://git-scm.com/docs/git-clone).
{% endtab %}
{% tab title="YAML" %}
```yaml
- step:
type: GitClone
name: GitClone_1
identifier: GitClone_1
spec:
connectorRef: account.GitConnectorBzGN8G1COj
repoName: myrepo
build:
type: branch
spec:
branch: main
```
{% endtab %}
{% endtabs %}
#### 2. Cookiecutter
Cookiecutter step is used to take inputs for the cookiecutter template.
{% hint style="warning" %}
In the example provided for this step we have used pipeline variables as input for many fields, make sure you have the corresponding pipeline variable created with proper value [as described under pipeline variables](#pipeline-variables).
{% endhint %}
{% tabs %}
{% tab title="Pipeline Studio" %}

**Repository type**
Select the repository type in which your template is stored, which could be public or private git repository.
{% hint style="info" %}
In case it is **Private** make sure you have added the **gitclone step** and the **path for template** should be the **Clone Directory** added in **gitclone step**
In case of public templates you just need to add the public URL of the template path stored in your git provider. eg `https://github.com/devesh-harness/test-cookicutter`
{% endhint %}
In case you have your own cookiecutter template, make sure the directory structure in the repository should be as follows
```sh
cookiecutter-something/
├── {{ cookiecutter.project_name }}/ <--------- Project template
│ └── ...
├── blah.txt <--------- Non-templated files/dirs
│ go outside
│
└── cookiecutter.json <--------- Prompts & default values
```
You must have:
* A `cookiecutter.json` file.
* A `{{ cookiecutter.project_name }}/` directory, where `project_name` is defined in your `cookiecutter.json`.
Beyond that, you can have whatever files/directories you want.
{% hint style="info" %}
Cookiecutter runs only on the **Project Template** and use values mentioned in `cookiecutter.json`, hence when you add it on git it is suggested to have **one cookiecutter template per repository** with the `cookiecutter.json` on the root. Also in case you do not want to render a file on the execution of cookiecuuter template, but that file is inside your Project Template, add it under `_copy_without_render` key in your `cookiecutter.json`
```json
{
"project_slug": "sample",
"_copy_without_render": [
"*.html",
"*not_rendered_dir",
"rendered_dir/not_rendered_file.ini"
]
}
```
{% endhint %}
**Path for template**
First select the type of the input it could be a [Fixed Value](/harness-platform/3.0/harness-platform-resources/variables-and-expressions/runtime-inputs.md#fixed-values), [Runtime input](/harness-platform/3.0/harness-platform-resources/variables-and-expressions/runtime-inputs.md#runtime-inputs) or [Expression](/harness-platform/3.0/harness-platform-resources/variables-and-expressions/runtime-inputs.md#expressions)
In case of **Fixed Value** provide the absolute value of template URL, for e.g. `https://github.com/devesh-harness/test-cookicutter`
In case of **Runtime Input** provide the absolute value of the template URL after you run the pipeline.
In case of **Expression** provide the pipeline variable in JEXL format which takes the template URL as an input, this is widely used while implementing the [self-service flow](/internal-developer-portal/3.0/troubleshooting-and-resources/idp-tutorials/service-onboarding-pipeline.md).
**Configure template**
Provide the input required the template in terms of key value pairs in this step.

{% endtab %}
{% tab title="YAML" %}
```yaml
- step:
type: CookieCutter
name: CookieCutter
identifier: idpcookiecutter
spec:
templateType: public
publicTemplateUrl: <+pipeline.variables.public_template_url>
cookieCutterVariables:
app_name: <+pipeline.variables.project_name>
```
{% endtab %}
{% endtabs %}
#### 3. Create repo
This step is to create the repository in your git provider which will be later used to add the service/app created using cookiecutter step along with the catalog which will be created in the **Create Catalog** step.
{% hint style="warning" %}
In the example provided for this step we have used pipeline variables as input for many fields, make sure you have the corresponding pipeline variable created with proper value [as described under pipeline variables](#pipeline-variables).
{% endhint %}
{% hint style="info" %}
The git connector used under [**Connectors Page**](/internal-developer-portal/3.0/new-to-idp/get-started.md) in IDP Admin should have fetch access to the repository getting created in this step.
{% endhint %}
{% tabs %}
{% tab title="Pipeline Studio" %}

**Repository type**
Select the repository type you want to create, which could be public or private.
**Connector**
{% hint style="info" %}
* For authentication, **Username-Password** and **GitHub App** methods are supported. The connection type `ssh` is currently not supported for Connectors.
* You can use a **GitHub App** to authenticate the Harness GitHub connector. Refer to this [detailed guide](/harness-platform/3.0/harness-platform-resources/connectors/code-repositories/git-hub-app-support.md) on how to use a GitHub App with a GitHub connector in the IDP stage.
* The [Bitbucket connector](/harness-platform/3.0/harness-platform-resources/connectors/code-repositories/ref-source-repo-provider/bitbucket-connector-settings-reference.md#credentials-settings) supports only **API Token** authentication mode for this step. This is due to a known [Bitbucket bug](https://jira.atlassian.com/browse/BCLOUD-22568) where repository creation is not supported with access tokens. For more details, see the reference documentation for [API Token mode](/release-notes/internal-developer-portal.md#new-feature-increased-bitbucket-api-rate-limits).
**Note**: Ensure that you have **admin permissions** on a GitHub repository within your GitHub organization and that you are able to install **GitHub Apps** in that repository. This setup is only supported for **organization accounts**, not personal GitHub accounts.
* [Looping strategies](broken://spaces/iHCl4N3pQkjhOYjQoOs7/pages/J6FJCm3Cd6uO7cL6oq7i) (Parallelism, Matrix, Repeat) are not supported for the IDP stage.
{% endhint %}
#### 1. Git clone
*(Ignore this step if your repository containing the cookiecutter template is public)*
Add a Git Clone step to clone a repository into the Developer Portal stage's workspace. By cloning the repository, you gain access to the necessary code, scripts, or configurations, enabling various actions.
The Git Clone step uses a containerized step group. For more information, go to [Containerize Step Groups](/continuous-delivery/use-continuous-delivery/cd-building-blocks/cd-steps/containerized-steps/containerized-step-groups.md).
{% tabs %}
{% tab title="Pipeline Studio" %}
1. In your Developer Portal stage, under Execution, select Add Step.
2. Select Git Clone.
3. Configure the step using the settings described below.
**Configuration Settings**
1. **Select Git Provider**: You can choose **Third-party Git Provider** if your code is not hosted in the Harness Code Repository.
2. **Connector**: You can select a connector for the source control provider hosting the code repository that you want to clone.
{% hint style="info" %}
* For authentication, **Username-Password** and **GitHub App** methods are supported. The connection type `ssh` is currently not supported for Connectors.
* You can use a **GitHub App** to authenticate the Harness GitHub connector. Refer to this [detailed guide](/harness-platform/3.0/harness-platform-resources/connectors/code-repositories/git-hub-app-support.md) on how to use a GitHub App with a GitHub connector in the IDP stage.
* The [Bitbucket connector](/harness-platform/3.0/harness-platform-resources/connectors/code-repositories/ref-source-repo-provider/bitbucket-connector-settings-reference.md#credentials-settings) supports both **Access Token** and **API Token** authentication modes. For more details, see the reference documentation on [Access Token mode](/release-notes/internal-developer-portal.md#new-feature-support-for-bitbucket-access-token-authentication-mode) and [API Token mode](/release-notes/internal-developer-portal.md#new-feature-increased-bitbucket-api-rate-limits).
**Note**: Ensure that you have **admin permissions** on a GitHub repository within your GitHub organization and that you are able to install **GitHub Apps** in that repository. This setup is only supported for **organization accounts**, not personal GitHub accounts.
{% endhint %}
You can refer to the following resources for more information on creating code repo connectors:
* Azure Repos: [Connect to Azure Repos](/harness-platform/3.0/harness-platform-resources/connectors/code-repositories/connect-to-a-azure-repo.md)
* Bitbucket: [Bitbucket Connector Settings Reference](/harness-platform/3.0/harness-platform-resources/connectors/code-repositories/ref-source-repo-provider/bitbucket-connector-settings-reference.md)
* GitHub: [GitHub Connector Settings Reference](/harness-platform/3.0/harness-platform-resources/connectors/code-repositories/ref-source-repo-provider/git-hub-connector-settings-reference.md)
* GitLab: [GitLab Connector Settings Reference](/harness-platform/3.0/harness-platform-resources/connectors/code-repositories/ref-source-repo-provider/git-lab-connector-settings-reference.md)
* Other Git Providers:
* [Git Connector Settings Reference](/harness-platform/3.0/harness-platform-resources/connectors/code-repositories/ref-source-repo-provider/git-connector-settings-reference.md)
* [Connect to an AWS CodeCommit Repo](/harness-platform/3.0/harness-platform-resources/connectors/code-repositories/connect-to-code-repo.md)
3. **Repository Name**:
* If the connector's URL Type is set to **Repository**, the Repository Name is automatically populated based on the connector's configuration.
* If the connector's URL Type is set to **Account**, you must manually specify the repository name to clone into the stage workspace.
4. **Build Type, Branch Name, and Tag Name**: For Build Type, choose:
* Git Branch to clone code from a specific branch.
* Git Tag to clone code from a specific commit tag. Based on your selection, specify the Branch Name or Tag Name.
{% hint style="info" %}
You can use fixed values, runtime inputs, or variable expressions for branch and tag names. For instance, you can enter input for the branch or tag name to specify them at runtime.
{% endhint %}
5. **Clone Directory** (Optional): You can specify the target path in the stage workspace where the repository should be cloned.
6. **Depth**: You should specify the number of commits to fetch when cloning the repository. The default depth is 0, which fetches all commits from the specified branch. For more details, refer to the [Git Clone Documentation](https://git-scm.com/docs/git-clone).
{% endtab %}
{% tab title="YAML" %}
```yaml
- step:
type: GitClone
name: GitClone_1
identifier: GitClone_1
spec:
connectorRef: account.GitConnectorBzGN8G1COj
repoName: myrepo
build:
type: branch
spec:
branch: main
```
{% endtab %}
{% endtabs %}
#### 2. Cookiecutter
Cookiecutter step is used to take inputs for the cookiecutter template.
{% hint style="warning" %}
In the example provided for this step we have used pipeline variables as input for many fields, make sure you have the corresponding pipeline variable created with proper value [as described under pipeline variables](#pipeline-variables).
{% endhint %}
{% tabs %}
{% tab title="Pipeline Studio" %}

**Repository type**
Select the repository type in which your template is stored, which could be public or private git repository.
{% hint style="info" %}
In case it is **Private** make sure you have added the **gitclone step** and the **path for template** should be the **Clone Directory** added in **gitclone step**
In case of public templates you just need to add the public URL of the template path stored in your git provider. eg `https://github.com/devesh-harness/test-cookicutter`
{% endhint %}
In case you have your own cookiecutter template, make sure the directory structure in the repository should be as follows
```sh
cookiecutter-something/
├── {{ cookiecutter.project_name }}/ <--------- Project template
│ └── ...
├── blah.txt <--------- Non-templated files/dirs
│ go outside
│
└── cookiecutter.json <--------- Prompts & default values
```
You must have:
* A `cookiecutter.json` file.
* A `{{ cookiecutter.project_name }}/` directory, where `project_name` is defined in your `cookiecutter.json`.
Beyond that, you can have whatever files/directories you want.
{% hint style="info" %}
Cookiecutter runs only on the **Project Template** and use values mentioned in `cookiecutter.json`, hence when you add it on git it is suggested to have **one cookiecutter template per repository** with the `cookiecutter.json` on the root. Also in case you do not want to render a file on the execution of cookiecuuter template, but that file is inside your Project Template, add it under `_copy_without_render` key in your `cookiecutter.json`
```json
{
"project_slug": "sample",
"_copy_without_render": [
"*.html",
"*not_rendered_dir",
"rendered_dir/not_rendered_file.ini"
]
}
```
{% endhint %}
**Path for template**
First select the type of the input it could be a [Fixed Value](/harness-platform/3.0/harness-platform-resources/variables-and-expressions/runtime-inputs.md#fixed-values), [Runtime input](/harness-platform/3.0/harness-platform-resources/variables-and-expressions/runtime-inputs.md#runtime-inputs) or [Expression](/harness-platform/3.0/harness-platform-resources/variables-and-expressions/runtime-inputs.md#expressions)
In case of **Fixed Value** provide the absolute value of template URL, for e.g. `https://github.com/devesh-harness/test-cookicutter`
In case of **Runtime Input** provide the absolute value of the template URL after you run the pipeline.
In case of **Expression** provide the pipeline variable in JEXL format which takes the template URL as an input, this is widely used while implementing the [self-service flow](/internal-developer-portal/3.0/troubleshooting-and-resources/idp-tutorials/service-onboarding-pipeline.md).
**Configure template**
Provide the input required the template in terms of key value pairs in this step.

{% endtab %}
{% tab title="YAML" %}
```yaml
- step:
type: CookieCutter
name: CookieCutter
identifier: idpcookiecutter
spec:
templateType: public
publicTemplateUrl: <+pipeline.variables.public_template_url>
cookieCutterVariables:
app_name: <+pipeline.variables.project_name>
```
{% endtab %}
{% endtabs %}
#### 3. Create repo
This step is to create the repository in your git provider which will be later used to add the service/app created using cookiecutter step along with the catalog which will be created in the **Create Catalog** step.
{% hint style="warning" %}
In the example provided for this step we have used pipeline variables as input for many fields, make sure you have the corresponding pipeline variable created with proper value [as described under pipeline variables](#pipeline-variables).
{% endhint %}
{% hint style="info" %}
The git connector used under [**Connectors Page**](/internal-developer-portal/3.0/new-to-idp/get-started.md) in IDP Admin should have fetch access to the repository getting created in this step.
{% endhint %}
{% tabs %}
{% tab title="Pipeline Studio" %}

**Repository type**
Select the repository type you want to create, which could be public or private.
**Connector**
{% hint style="info" %}
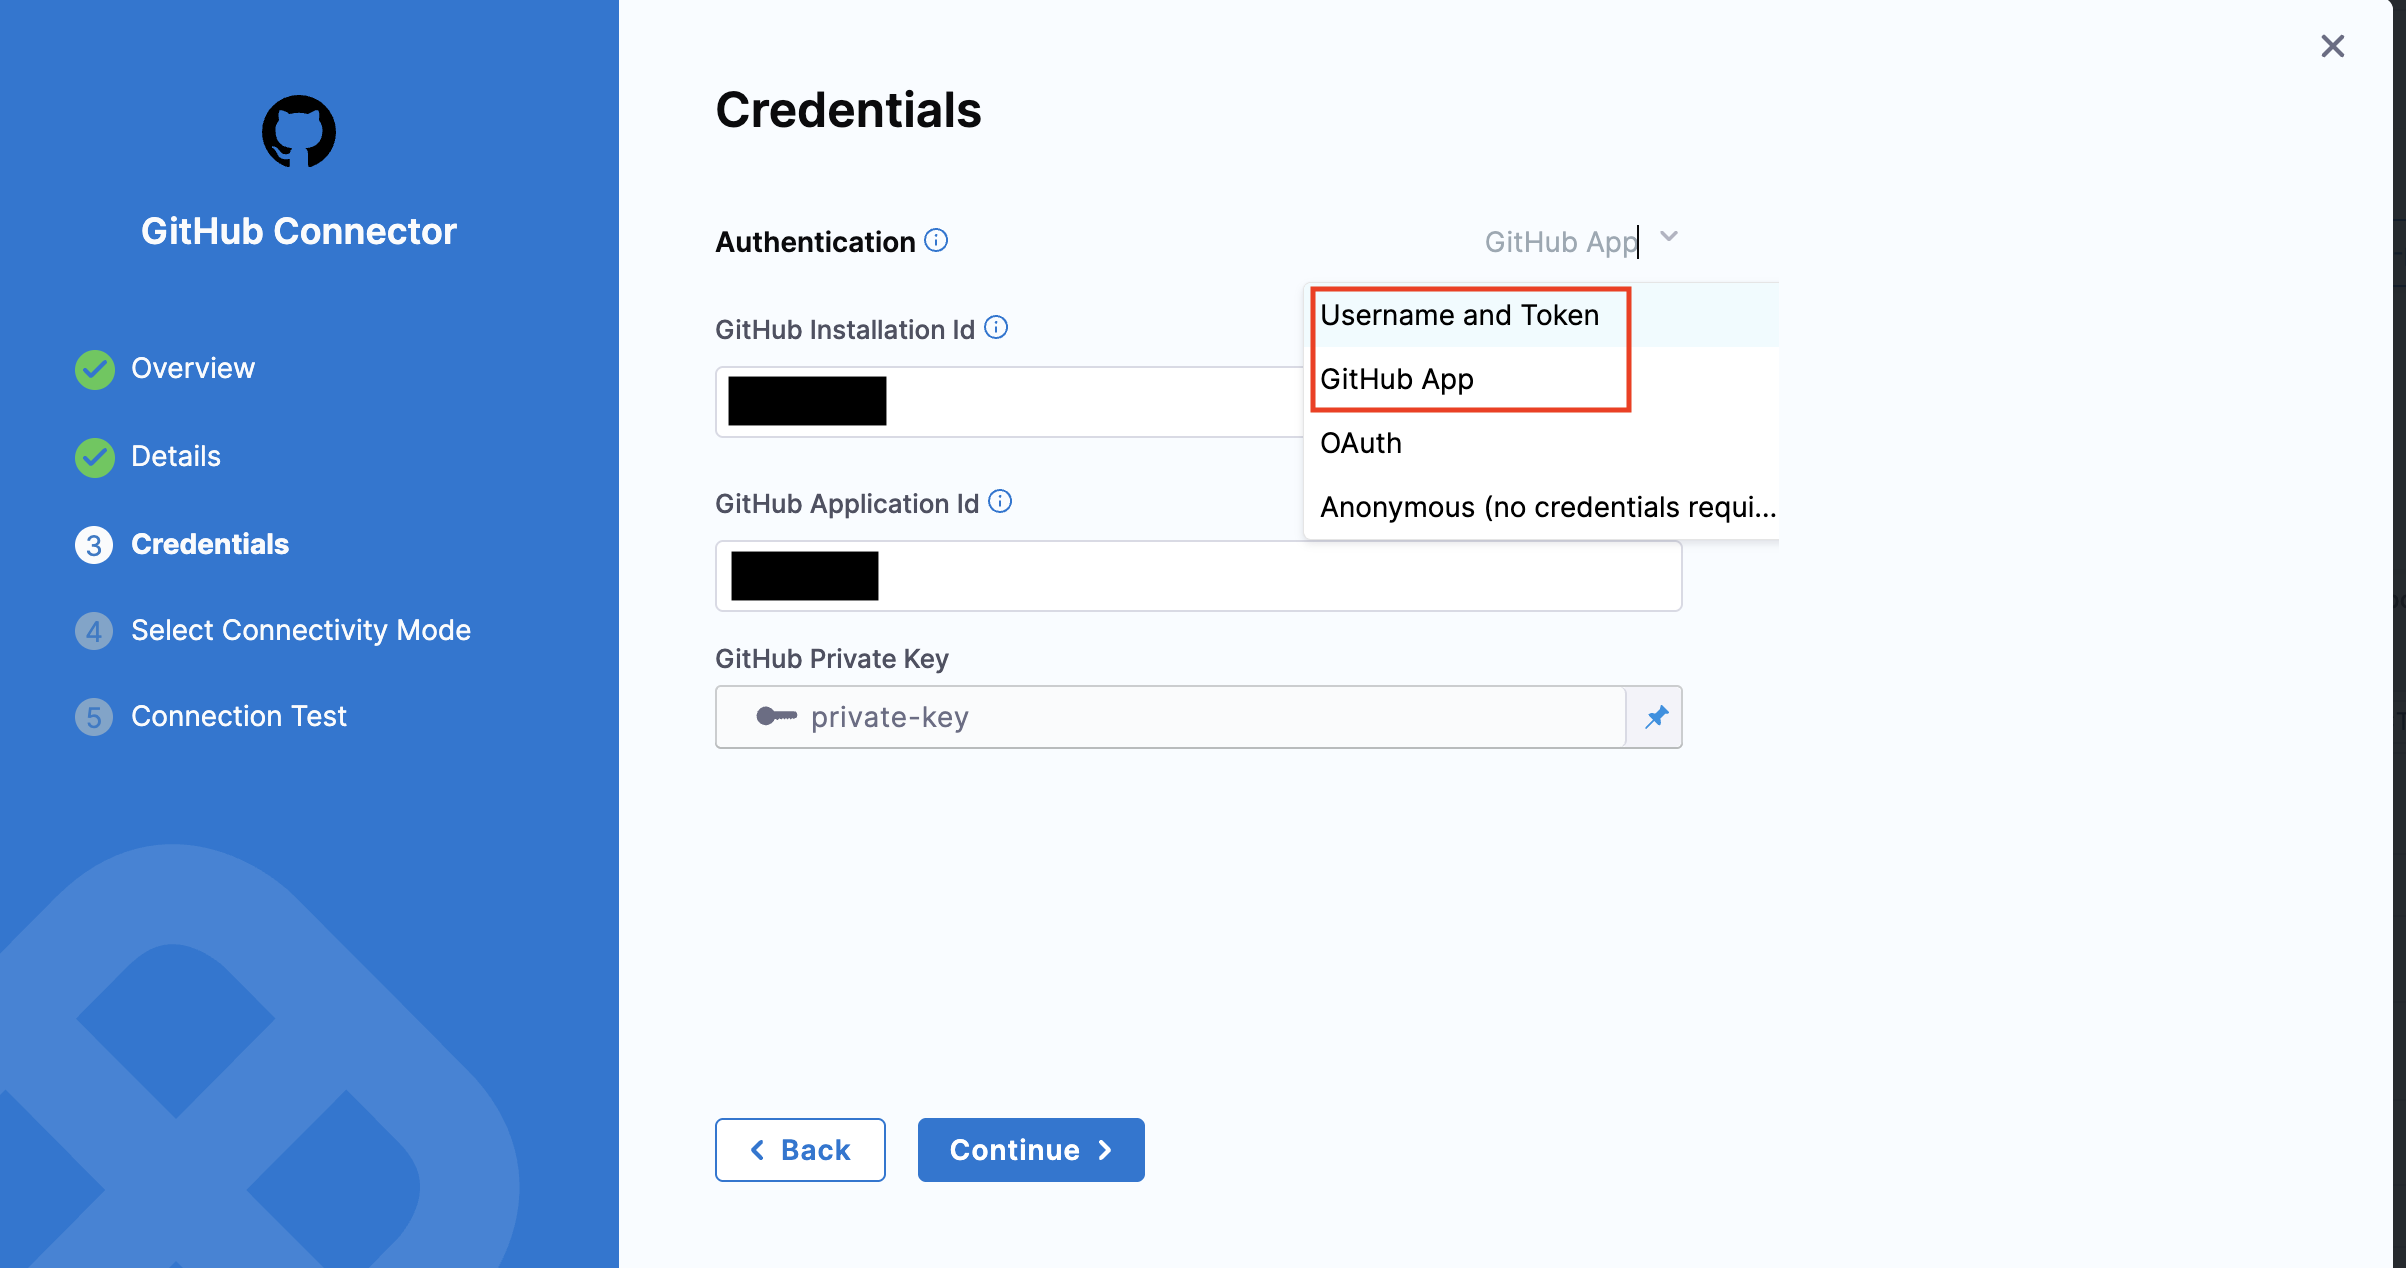
* For authentication, **Username-Password** and **GitHub App** methods are supported. The connection type `ssh` is currently not supported for Connectors.
* You can use a **GitHub App** to authenticate the Harness GitHub connector. Refer to this [detailed guide](/harness-platform/3.0/harness-platform-resources/connectors/code-repositories/git-hub-app-support.md) on how to use a GitHub App with a GitHub connector in the IDP stage.
* The [Bitbucket connector](/harness-platform/3.0/harness-platform-resources/connectors/code-repositories/ref-source-repo-provider/bitbucket-connector-settings-reference.md#credentials-settings) supports only **API Token** authentication mode for this step. This is due to a known [Bitbucket bug](https://jira.atlassian.com/browse/BCLOUD-22568) where repository creation is not supported with access tokens. For more details, see the reference documentation for [API Token mode](/release-notes/internal-developer-portal.md#new-feature-increased-bitbucket-api-rate-limits).
**Note**: Ensure that you have **admin permissions** on a GitHub repository within your GitHub organization and that you are able to install **GitHub Apps** in that repository. This setup is only supported for **organization accounts**, not personal GitHub accounts.
 {% endhint %}
Select a connector for the git provider that will host the code repository.
The following topics provide more information about creating code repo connectors:
* Azure Repos: [Connect to Azure Repos](/harness-platform/3.0/harness-platform-resources/connectors/code-repositories/connect-to-a-azure-repo.md)
* Bitbucket: [Bitbucket connector settings reference](/harness-platform/3.0/harness-platform-resources/connectors/code-repositories/ref-source-repo-provider/bitbucket-connector-settings-reference.md)
* GitHub: [GitHub connector settings reference](/harness-platform/3.0/harness-platform-resources/connectors/code-repositories/ref-source-repo-provider/git-hub-connector-settings-reference.md)
* GitLab: [GitLab Connector Settings reference](/harness-platform/3.0/harness-platform-resources/connectors/code-repositories/ref-source-repo-provider/git-lab-connector-settings-reference.md)
**Org, repo, description, default branch**
{% hint style="info" %}
For GitLab integration, you need to add the [group](https://docs.gitlab.com/ee/user/group/) path as well, in case it is not a personal account
{% endhint %}
Select a connector for the git provider that will host the code repository.
The following topics provide more information about creating code repo connectors:
* Azure Repos: [Connect to Azure Repos](/harness-platform/3.0/harness-platform-resources/connectors/code-repositories/connect-to-a-azure-repo.md)
* Bitbucket: [Bitbucket connector settings reference](/harness-platform/3.0/harness-platform-resources/connectors/code-repositories/ref-source-repo-provider/bitbucket-connector-settings-reference.md)
* GitHub: [GitHub connector settings reference](/harness-platform/3.0/harness-platform-resources/connectors/code-repositories/ref-source-repo-provider/git-hub-connector-settings-reference.md)
* GitLab: [GitLab Connector Settings reference](/harness-platform/3.0/harness-platform-resources/connectors/code-repositories/ref-source-repo-provider/git-lab-connector-settings-reference.md)
**Org, repo, description, default branch**
{% hint style="info" %}
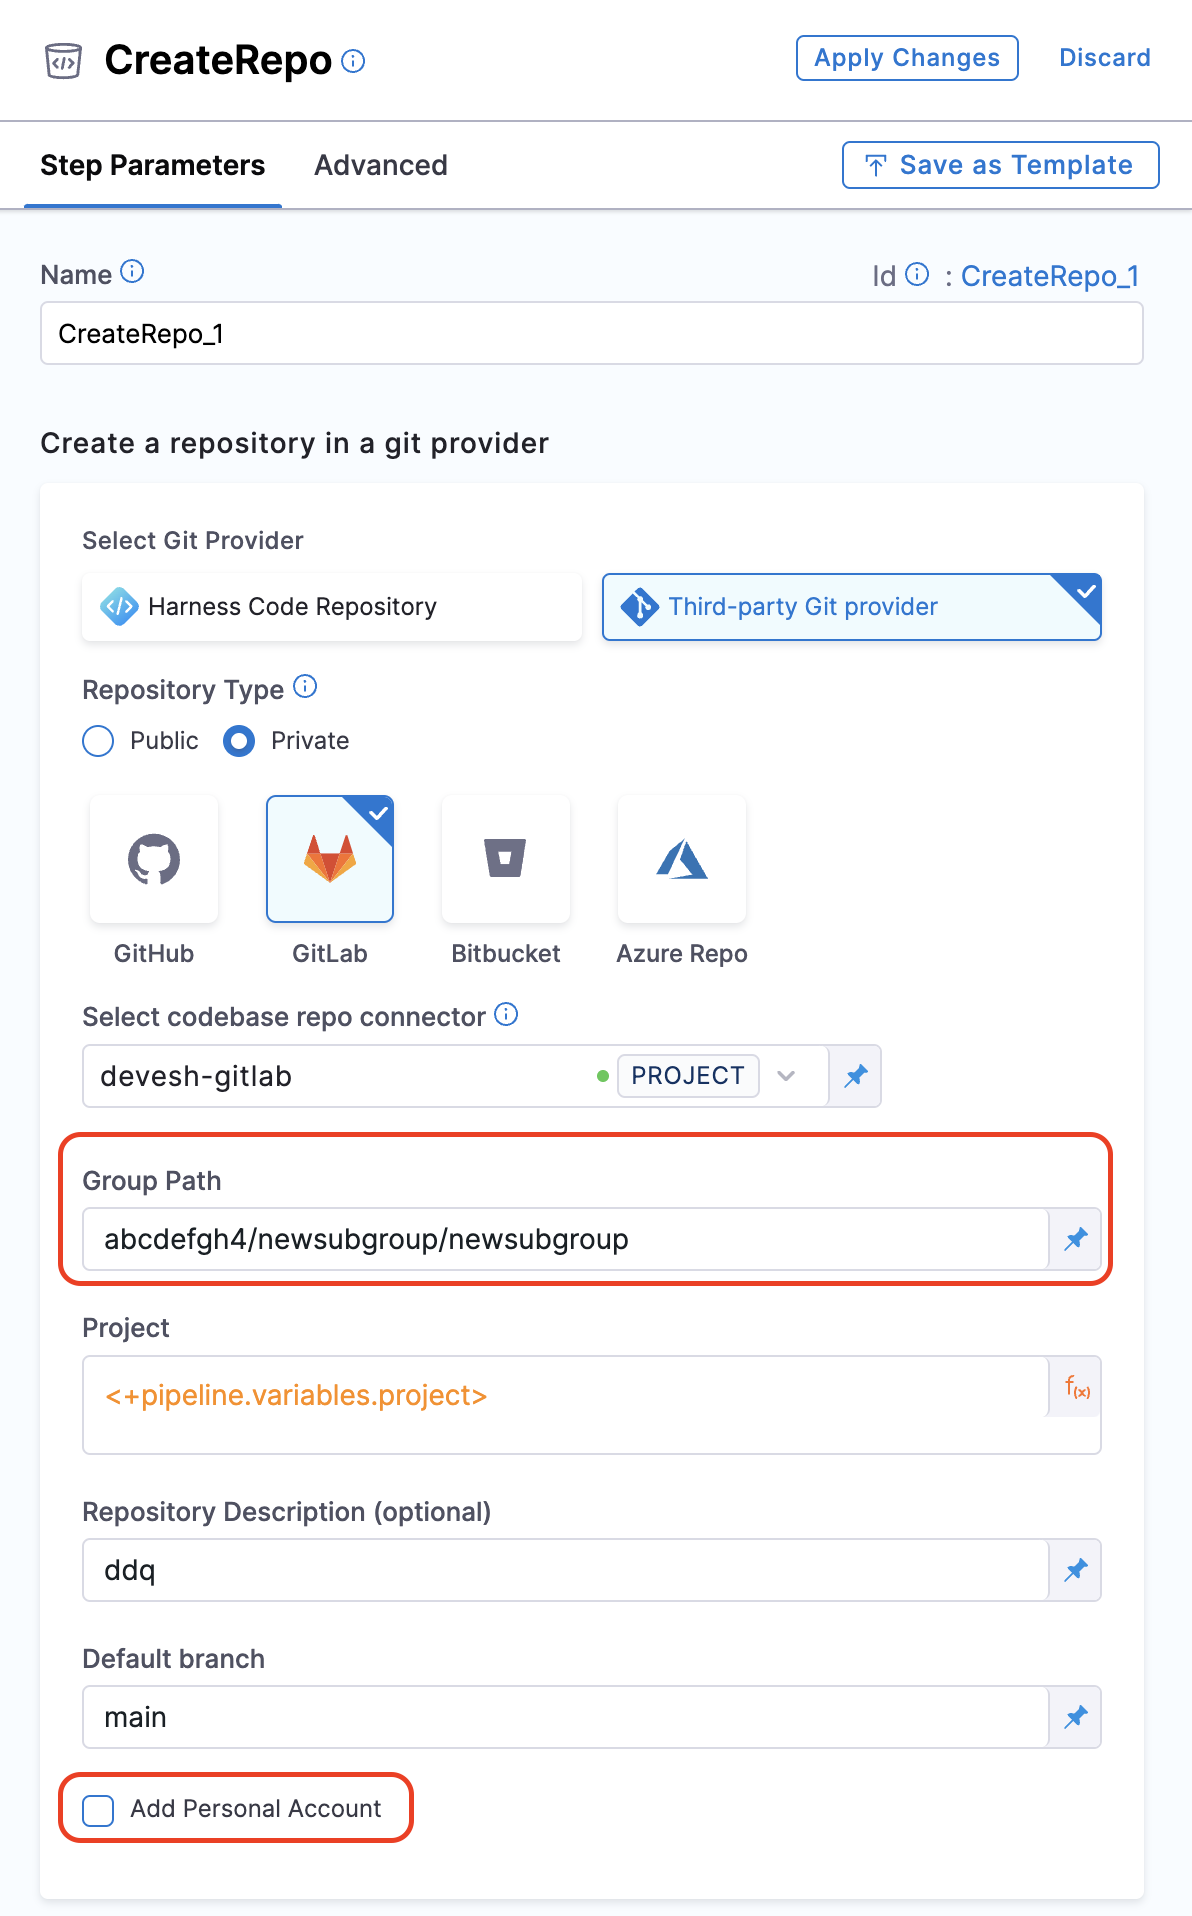
For GitLab integration, you need to add the [group](https://docs.gitlab.com/ee/user/group/) path as well, in case it is not a personal account
 {% endhint %}
Add the org, repo name, Repo Description and Default branch for the repo you want to create.
{% endtab %}
{% tab title="YAML" %}
```yaml
- step:
type: CreateRepo
name: CreateRepo
identifier: createrepo
spec:
connectorRef: account.testdev
organization: <+pipeline.variables.organization>
repository: <+pipeline.variables.project_name>
repoType: <+pipeline.variables.repository_type>
description: <+pipeline.variables.repository_description>
defaultBranch: <+pipeline.variables.repository_default_branch>
```
{% endtab %}
{% endtabs %}
**Output**
Following is the output variable of this step.
1. **repositoryUrl** : The URL of the repository created eg; `https://github.com/org-name/repo-name` and this variable could be used in other steps in the pipeline by using this **JEXL** expression as a stage variable `<+pipeline.stages.idp.spec.execution.steps.createrepo.output.outputVariables.repositoryUrl>`
These output variable could be viewed under the output tab in 
#### 4. Create catalog
This step is used to create the `catalog-info.yaml/idp.yaml` to be ued to register the software component we have created in previous step in our IDP catalog.
{% hint style="warning" %}
In the example provided for this step we have used pipeline variables as input for many fields, make sure you have the corresponding pipeline variable created with proper value [as described under pipeline variables](#pipeline-variables).
{% endhint %}
{% hint style="info" %}
The git connector used under [**Connectors Page**](/internal-developer-portal/3.0/new-to-idp/get-started.md) in IDP Admin should have fetch access to the repository the `catalog-info.yaml` is getting published to, for it to be registered in the catalog.
{% endhint %}
{% tabs %}
{% tab title="Pipeline Studio" %}

**File name, path**
Name the `catalog-info.yaml` followed by providing a path if you do not want to register in the root of the repo created in the `Create Repo` step.
**File content**
Add the YAML content to be added in your `catalog-info.yaml` file, For eg.,
```yaml
apiVersion: backstage.io/v1alpha1
kind: Component
metadata:
name: <+pipeline.variables.project_name>
description: <+pipeline.variables.project_name> created using self service flow
annotations:
backstage.io/techdocs-ref: dir:.
spec:
type: service
owner: test
lifecycle: experimental
```
> Ensure your `identifier` follows [naming rules](/harness-platform/3.0/harness-platform-resources/references/entity-identifier-reference.md#identifier-naming-rules). Invalid identifiers may lead to entity registration errors.
> {% endtab %}
{% tab title="YAML" %}
```yaml
- step:
type: CreateCatalog
name: createcatalog
identifier: createcatalog
spec:
fileName: <+pipeline.variables.catalog_file_name>
filePath: <+pipeline.variables.project_name>
fileContent: |-
apiVersion: backstage.io/v1alpha1
kind: Component
metadata:
name: <+pipeline.variables.project_name>
description: <+pipeline.variables.project_name> created using self service flow
annotations:
backstage.io/techdocs-ref: dir:.
spec:
type: service
owner: test
lifecycle: experimental
```
{% endtab %}
{% endtabs %}
**Output**
Following is the output variable of this step.
1. **registeredCatalogUrl** : The URL of the software component registered in the catalog of IDP eg; `https://app.harness.io/ng/account/**************/module/idp/catalog/default/component/component-name` and this variable could be used in other steps in the pipeline by using this **JEXL** expression as a stage variable `<<+pipeline.stages.idp.spec.execution.steps.createcatalog.output.outputVariables.registeredCatalogUrl>>`
These output variable could be viewed under the output tab in 
#### 5. Direct push
This step is used to push the `service/application` created using Cookiecutter step along with the `catalog-info.yaml` in the repo you created in previous step.
{% hint style="warning" %}
You can only push the `service/application` created above to repositories within the same project where the **Direct Push** step is being executed.
In the example provided for this step, we have used pipeline variables as input for multiple fields. Ensure that the corresponding pipeline variables are created with the appropriate values, as described in the [Pipeline Variables](#pipeline-variables) documentation.
{% endhint %}
{% tabs %}
{% tab title="Pipeline Studio" %}

**Connector**
{% hint style="info" %}
* For authentication, **Username-Password** and **GitHub App** methods are supported. The connection type `ssh` is currently not supported for Connectors.
* You can use a **GitHub App** to authenticate the Harness GitHub connector. Refer to this [detailed guide](/harness-platform/3.0/harness-platform-resources/connectors/code-repositories/git-hub-app-support.md) on how to use a GitHub App with a GitHub connector in the IDP stage.
* The [Bitbucket connector](/harness-platform/3.0/harness-platform-resources/connectors/code-repositories/ref-source-repo-provider/bitbucket-connector-settings-reference.md#credentials-settings) supports both **Access Token** and **API Token** authentication modes. For more details, see the reference documentation on [Access Token mode](/release-notes/internal-developer-portal.md#new-feature-support-for-bitbucket-access-token-authentication-mode) and [API Token mode](/release-notes/internal-developer-portal.md#new-feature-increased-bitbucket-api-rate-limits).
**Note**: Ensure that you have **admin permissions** on a GitHub repository within your GitHub organization and that you are able to install **GitHub Apps** in that repository. This setup is only supported for **organization accounts**, not personal GitHub accounts.
{% endhint %}
Select a connector for the git provider where you want to push the code.
The following topics provide more information about creating code repo connectors:
* Azure Repos: [Connect to Azure Repos](/harness-platform/3.0/harness-platform-resources/connectors/code-repositories/connect-to-a-azure-repo.md)
* Bitbucket: [Bitbucket connector settings reference](/harness-platform/3.0/harness-platform-resources/connectors/code-repositories/ref-source-repo-provider/bitbucket-connector-settings-reference.md)
* GitHub: [GitHub connector settings reference](/harness-platform/3.0/harness-platform-resources/connectors/code-repositories/ref-source-repo-provider/git-hub-connector-settings-reference.md)
* GitLab: [GitLab Connector Settings reference](/harness-platform/3.0/harness-platform-resources/connectors/code-repositories/ref-source-repo-provider/git-lab-connector-settings-reference.md)
**Org, repo, code directory, branch**
{% hint style="info" %}
For GitLab integration, you need to add the [group](https://docs.gitlab.com/ee/user/group/) path as well. In case of using the personal account, make sure you add the `account-id` in the path
{% endhint %}
Add the Org, Repo Name, Repo Description and Branch Name where you want to push the code.
**Allow force push**
This when enabled or set to `true`, will be able to overwrite the changes to **Default branch** set in the **Create Repo** step.
{% endtab %}
{% tab title="YAML" %}
```yaml
- step:
type: DirectPush
name: DirectPush
identifier: directpush
spec:
connectorType: Github
forcePush: true
connectorRef: account.testdev
organization: <+pipeline.variables.organization>
repository: <+pipeline.variables.project_name>
codeDirectory: <+pipeline.variables.project_name>
branch: <+pipeline.variables.direct_push_branch>
```
{% endtab %}
{% endtabs %}
#### 6. Register catalog
This step is used to register the software component created in the Catalog of Harness IDP using `catalog-info.yaml`.
{% hint style="warning" %}
In the example provided for this step we have used pipeline variables as input for many fields, make sure you have the corresponding pipeline variable created with proper value [as described under pipeline variables](#pipeline-variables).
{% endhint %}
{% tabs %}
{% tab title="Pipeline Studio" %}

**Connector**
{% hint style="info" %}
* For authentication, **Username-Password** and **GitHub App** methods are supported. The connection type `ssh` is currently not supported for Connectors.
* You can use a **GitHub App** to authenticate the Harness GitHub connector. Refer to this [detailed guide](/harness-platform/3.0/harness-platform-resources/connectors/code-repositories/git-hub-app-support.md) on how to use a GitHub App with a GitHub connector in the IDP stage.
* The [Bitbucket connector](/harness-platform/3.0/harness-platform-resources/connectors/code-repositories/ref-source-repo-provider/bitbucket-connector-settings-reference.md#credentials-settings) supports both **Access Token** and **API Token** authentication modes. For more details, see the reference documentation on [Access Token mode](/release-notes/internal-developer-portal.md#new-feature-support-for-bitbucket-access-token-authentication-mode) and [API Token mode](/release-notes/internal-developer-portal.md#new-feature-increased-bitbucket-api-rate-limits).
**Note**: Ensure that you have **admin permissions** on a GitHub repository within your GitHub organization and that you are able to install **GitHub Apps** in that repository. This setup is only supported for **organization accounts**, not personal GitHub accounts.
{% endhint %}
Select a connector for the git provider where your `catalog-info.yaml` is stored.
The following topics provide more information about creating code repo connectors:
* Azure Repos: [Connect to Azure Repos](/harness-platform/3.0/harness-platform-resources/connectors/code-repositories/connect-to-a-azure-repo.md)
* Bitbucket: [Bitbucket connector settings reference](/harness-platform/3.0/harness-platform-resources/connectors/code-repositories/ref-source-repo-provider/bitbucket-connector-settings-reference.md)
* GitHub: [GitHub connector settings reference](/harness-platform/3.0/harness-platform-resources/connectors/code-repositories/ref-source-repo-provider/git-hub-connector-settings-reference.md)
* GitLab: [GitLab Connector Settings reference](/harness-platform/3.0/harness-platform-resources/connectors/code-repositories/ref-source-repo-provider/git-lab-connector-settings-reference.md)
**Org, repo, branch, file path**
{% hint style="info" %}
For GitLab integration, you need to add the [group](https://docs.gitlab.com/ee/user/group/) path as well. In case of using the personal account, make sure you add the `account-id` in the path
{% endhint %}
Add the Org, Repo Name, Branch and the File path relative to the root of the repository, where your `catalog-info.yaml` is present.
{% endtab %}
{% tab title="YAML" %}
```yaml
- step:
type: RegisterCatalog
name: registercatalog
identifier: registercatalog
spec:
connectorRef: account.testdev
repository: <+pipeline.variables.project_name>
organization: <+pipeline.variables.organization>
filePath: <+pipeline.variables.catalog_file_name>
branch: <+pipeline.variables.direct_push_branch>
```
{% endtab %}
{% endtabs %}
**API key support**
Harness IDP now supports the use of a **Harness API Key** in the **Register Catalog** step.
With this feature, users can configure the **API Key** by selecting the **"API Token"** field in the Harness UI. This option is available under **Advanced Settings** in the **Pipelines** tab. Enabling this ensures that the API Key is utilized for catalog registration in IDP.
By integrating the API Key, the pipeline execution remains seamless, ensuring it functions correctly when triggered from another pipeline or through a trigger.

This step is optional. You can proceed with executing your pipeline without an API key. In that case, the user context will be used for catalog registration.
**Output variable**
Following is the output variable of this step.
1. **catalogInfoUrl** : The URL of the `catalog-info.yaml` stored in your git provider where you created the repo in the **CreateRepo step** eg; `https://github.com/org-name/repo-name/blob/code/catalog-info.yaml` and this variable could be used in other steps in the pipeline by using this **JEXL** expression as a stage variable `<<+pipeline.stages.idp.spec.execution.steps.registercatalog.output.outputVariables.catalogInfoUrl>>`
These output variable could be viewed under the output tab in 
#### 7. Slack notify
This step is used to notify individual developers once the pipeline is executed successfully and your Software component is registered successfully in your Software Catalog.
{% hint style="warning" %}
In the example provided for this step we have used pipeline variables as input for many fields, make sure you have the corresponding pipeline variable created with proper value [as described under pipeline variables](#pipeline-variables).
{% endhint %}
{% tabs %}
{% tab title="YAML" %}
```yaml
- step:
type: SlackNotify
name: slacknotify
identifier: slacknotify
spec:
emailId: <+pipeline.variables.email_id>
messageContent: " Hello <+pipeline.variables.project_name> project is created using flows in Harness IDP,\\n*Created Catalog Yaml -* <<+pipeline.stages.serviceonboarding.spec.execution.steps.registercatalog.output.outputVariables.catalogInfoUrl>|Link>\\n*Created Repository -* <<+pipeline.stages.serviceonboarding.spec.execution.steps.createrepo.output.outputVariables.repositoryUrl>|Link>\\n*Registered Catalog -* <<+pipeline.stages.serviceonboarding.spec.execution.steps.createcatalog.output.outputVariables.registeredCatalogUrl>|Link>"
token: slacksecrettestws
```
The output of the steps like **Create Repo**, **Register Catalog** in the `JEXL` format has been used to construct the `messageContent` for slack notification.
The `token` is the [Bot-tokens](https://api.slack.com/authentication/token-types#bot)
{% endtab %}
{% tab title="Pipeline Studio" %}
1. Add the **Name** of the Step

The output of the steps like **Create Repo**, **Register Catalog** in the `JEXL` format has been used to construct the `Message` for Slack notification.
{% endtab %}
{% endtabs %}
**Slack email ID**
Use the email ID you have used to register in Slack.
**Slack secret key**
The Slack Secret Key are the [Bot-tokens](https://api.slack.com/authentication/token-types#bot) created with the following permissions.
1. chat:write
2. chat:write.public
3. users:read.email
4. users:read

Read more on [how to create bot-tokens](https://api.slack.com/start/quickstart#scopes).
1. Now create a new secret and add this as a **Secret** under the **Slack Secret Key**.
#### 8. Create resource
This step in developer portal stage allows you to **execute only OpenTofu (Open Source Terraform) module related to** [**Harness Terraform Provider**](https://registry.terraform.io/providers/harness/harness/latest/docs) to create or update resources. You can use this step to create Harness entities like projects, users, connectors, pipelines, secrets, etc.
{% tabs %}
{% tab title="YAML" %}
```yaml
- step:
type: CreateResource
name: CreateResource_1
identifier: CreateResource_1
spec:
resourceDefinition: |-
resource "harness_platform_pipeline" "pipeline" {
identifier = "identifier"
org_id = "orgIdentifier"
project_id = "projectIdentifier"
name = "name"
yaml = <<-EOT
pipeline:
name: name
identifier: identifier
projectIdentifier: projectIdentifier
orgIdentifier: orgIdentifier
stages:
- stage:
name: idp
identifier: idp
description: ""
type: IDP
spec:
platform:
os: Linux
arch: Amd64
runtime:
type: Cloud
spec: {}
execution:
steps:
- step:
type: Run
name: Run_1
identifier: Run_1
description: <+input>
spec:
shell: Sh
command: echo "Hello"
tags: {}
EOT
}
xApiKey: Harness PAT for the account you want to create the pipeline
```
This step comes with a sample **Resource Definition** to create a Harness Pipeline with a Run Step. This contains dummy values, hence will not work consider replacing it with the resource definition of yours. Also go to [Harness Terraform Provider](https://registry.terraform.io/providers/harness/harness/latest/docs) to help you with Harness Resource definitions.
The `xApiKey` is the [Harness PAT](/harness-platform/3.0/harness-platform-resources/automation/api/add-and-manage-api-keys.md) for the account where you want to create the pipeline.
{% endtab %}
{% tab title="Pipeline Studio" %}
* You can select the step **Create Resource** from the **Step Library**.

* You can add a **Name** to the step followed by adding the **Resource Definition** and create a Harness Entity using Resources supported by our [Harness Terraform Provider](https://registry.terraform.io/providers/harness/harness/latest/docs). Likewise, you will find an already existing sample **Resource Definition** by default, that can create a Harness Pipeline with a **Run Step**.

{% endtab %}
{% endtabs %}
#### 9. Update catalog property
This step is used to update the catalog metadata for your entities. For example, you want to add the latest build version for your service in your catalog using this step in your CI pipeline and update the data in your catalog.
* You can select the step **Update Catalog Property** from the **Step Library**.

* Now under the **Select the Catalog entity and the properties to be updated** you have two options
* Update single Catalog Entity
* Update multiple catalog Entities
* **Permission:** For anyone to update catalog property need to have [edit catalog permission](/internal-developer-portal/3.0/admin-and-customization/rbac/scopes.md#permissions-and-resources-idp-20).
{% tabs %}
{% tab title="Update a single Catalog Entity" %}
* To **update a single Catalog Entity**, select the Catalog Entity from the dropdown. You need to type at least the first three characters in the field for the entity options to appear.

* Now add the **property**, you want to update/add and the **value** against it. e.g., `<+metadata.testCoverage>`, `<+metadata.additionalInfo.onShorelead>`.
* The **API Key** field is optional. If left empty, the credentials of the user executing the pipeline will be used to update the catalog entity.
{% endtab %}
{% tab title="Update Multiple Catalog Entities" %}
* To **update multiple Catalog entities**, you need to add the **property** to be updated across the entities followed by `entity-ref` and corresponding values.
* In case you want to add a default value across all the entities then update the field under Default Value.
* The **API Key** field is optional. If left empty, the credentials of the user executing the pipeline will be used to update the catalog entity.
* Under Advanced you can select the mode
* Available Modes:
* replace (default): Completely replaces the existing value with the new one provided in the value field.
* append: Adds new values to the existing array (or other types to be appended like maps or key-value pairs).
> Note: `append` only works with data types that can hold multiple values, such as arrays or maps. It does not apply to simple data types like strings.
> {% endtab %}
> {% endtabs %}
#### 10. Run step
You can use the **Run step** to run commands or scripts in your Harness Pipeline.
In order for the Run step to execute your commands, the build environment must have the necessary binaries for those commands. Depending on the stage's build infrastructure, Run steps can use binaries that exist in the build environment or pull an image, such as a public or private Docker image, that contains the required binaries.
Refer to detailed steps and settings here to understand this step in detail: [Run Step Settings](/continuous-integration/3.0/use-harness-ci/use-harness-ci/run-step-settings.md#run-step-settings)
#### 11. Plugin step
You can use the **Plugin step** to run different plugins in your Harness Pipeline.
Refer to detailed steps and settings here to understand this step in detail: [Plugin Step Settings](/continuous-integration/3.0/use-harness-ci/use-harness-ci/use-drone-plugins/plugin-step-settings-reference.md)
### Example pipeline
{% tabs %}
{% tab title="YAML" %}
```yaml
pipeline:
name: Self-Service-flow-repo-setup
identifier: SelfServiceflowreposetup
projectIdentifier: projctidp
orgIdentifier: default
tags: {}
stages:
- stage:
name: service-onboarding
identifier: serviceonboarding
description: ""
type: IDP
spec:
infrastructure:
type: KubernetesDirect
spec:
connectorRef: idptest
namespace: harness-delegate
automountServiceAccountToken: true
nodeSelector: {}
os: Linux
execution:
steps:
- step:
type: CookieCutter
name: CookieCutter
identifier: idpcookiecutter
spec:
templateType: <+pipeline.variables.template_type>
publicTemplateUrl: <+pipeline.variables.public_template_url>
cookieCutterVariables:
app_name: <+pipeline.variables.project_name>
- step:
type: CreateRepo
name: CreateRepo
identifier: createrepo
spec:
connectorRef: account.testdev
organization: <+pipeline.variables.organization>
repository: <+pipeline.variables.project_name>
repoType: <+pipeline.variables.repository_type>
description: <+pipeline.variables.repository_description>
defaultBranch: <+pipeline.variables.repository_default_branch>
- step:
type: CreateCatalog
name: createcatalog
identifier: createcatalog
spec:
fileName: <+pipeline.variables.catalog_file_name>
filePath: <+pipeline.variables.project_name>
fileContent: |-
apiVersion: backstage.io/v1alpha1
kind: Component
metadata:
name: <+pipeline.variables.project_name>
description: <+pipeline.variables.project_name> created using self service flow
annotations:
backstage.io/techdocs-ref: dir:.
spec:
type: service
owner: test
lifecycle: experimental
- step:
type: DirectPush
name: DirectPush
identifier: directpush
spec:
connectorRef: account.testdev
repository: <+pipeline.variables.project_name>
organization: <+pipeline.variables.organization>
codeDirectory: <+pipeline.variables.project_name>
branch: <+pipeline.variables.direct_push_branch>
- step:
type: RegisterCatalog
name: registercatalog
identifier: registercatalog
spec:
connectorRef: account.testdev
repository: <+pipeline.variables.project_name>
organization: <+pipeline.variables.organization>
filePath: <+pipeline.variables.catalog_file_name>
branch: <+pipeline.variables.direct_push_branch>
- step:
type: SlackNotify
name: slacknotify
identifier: slacknotify
spec:
email: <+pipeline.variables.email_id>
messageContent: " Hello <@<+pipeline.variables.email_id>>, <+pipeline.variables.project_name> project is created using flows in Harness IDP,\\n*Created Catalog Yaml -* <<+pipeline.stages.serviceonboarding.spec.execution.steps.registercatalog.output.outputVariables.catalogInfoUrl>|Link>\\n*Created Repository -* <<+pipeline.stages.serviceonboarding.spec.execution.steps.createrepo.output.outputVariables.repositoryUrl>|Link>\\n*Registered Catalog -* <<+pipeline.stages.serviceonboarding.spec.execution.steps.createcatalog.output.outputVariables.registeredCatalogUrl>|Link>"
token: slacksecrettestws
cloneCodebase: false
caching:
enabled: false
paths: []
variables:
- name: test_content
type: String
description: ""
required: false
value: devesh
- name: project_name
type: String
description: ""
required: false
value: <+input>
- name: organization
type: String
description: ""
required: false
value: test-org-devesh
- name: template_type
type: String
description: ""
required: false
value: <+input>.default(public).allowedValues(public,private)
- name: public_template_url
type: String
description: ""
required: false
value: <+input>
- name: repository_type
type: String
description: ""
required: false
value: <+input>.default(private).allowedValues(private,public)
- name: repositoty_description
type: String
description: ""
required: false
value: <+input>
- name: repository_default_branch
type: String
description: ""
required: false
value: <+input>
- name: direct_push_branch
type: String
description: ""
required: false
value: <+input>
- name: catalog_file_name
type: String
description: ""
required: false
value: catalog-info.yaml
- name: email_id
type: String
description: ""
required: false
value: <+input>
```
{% endtab %}
{% tab title="Pipeline Studio" %}

{% endtab %}
{% endtabs %}
### Specify the Harness IDP images used in your pipeline
You can use the Harness IDP `execution-config` API to specify or update the Harness IDP images used in your infrastructure by specifying image tags.
{% hint style="info" %}
Certain steps are common across different stages in Harness Pipeline, but the images used in each of them is specific to the stage they are part of, like `Run Step`.
{% endhint %}
Here is a list of Harness IDP images used in the IDP stage:
1. [`cookieCutter`](https://console.cloud.google.com/gcr/images/gcr-prod/global/harness/cookiecutter): Used to take inputs for the cookiecutter template.
2. [`createRepo`](https://console.cloud.google.com/gcr/images/gcr-prod/global/harness/createrepo): Used to create the repository in your git provider
3. [`directPush`](https://console.cloud.google.com/gcr/images/gcr-prod/global/harness/directpush): Used to push the service/application created using Cookiecutter step along with the catalog-info.yaml in the repo you created in previous step.
4. [`registerCatalog`](https://console.cloud.google.com/gcr/images/gcr-prod/global/harness/registercatalog?project=gcr-prod): Used to register the software component created in the Harness IDP Catalog.
5. [`slackNotify`](https://console.cloud.google.com/gcr/images/gcr-prod/global/harness/slacknotify): Used to notify individual developers once the pipeline is executed successfully and your Software component is registered successfully in your Software Catalog.
6. [`createResource`](https://console.cloud.google.com/gcr/images/gcr-prod/global/harness/createresource): Used to create Harness entities like projects, users, connectors, pipelines, secrets, etc.
7. [`updateCatalogProperty`](https://console.cloud.google.com/gcr/images/gcr-prod/global/harness/updatecatalogproperty): Used to update the catalog metadata for your entities
8. [`createOrganisation`](https://console.cloud.google.com/gcr/images/gcr-prod/global/harness/createorganisation)
9. [`createProject`](https://console.cloud.google.com/gcr/images/gcr-prod/global/harness/createproject)
10. [`createCatalog`](https://console.cloud.google.com/gcr/images/gcr-prod/global/harness/createcatalog)
API key authentication is required. For more information about API keys, go to [Manage API keys](/harness-platform/3.0/harness-platform-resources/automation/api/add-and-manage-api-keys.md). For more information about authentication, go to the [Harness API documentation](https://apidocs.harness.io/#section/Introduction/Authentication).
1. Send a `get-default-config` request to get a list of the latest Harness IDP Workflows executed. You can use the `infra` parameter to get `k8` images or `VM` images.
```json
curl --location --request GET "https://app.harness.io/gateway/idp/execution-config/get-default-config?accountIdentifier=$YOUR_HARNESS_ACCOUNT_ID&infra=K8" \
--header 'X-API-KEY: $API_KEY'
```
The response payload shows the latest supported images and their tags, for example:
```json
{
"status": "SUCCESS",
"data": {
"cookieCutter": "harness/cookiecutter:1.9.1",
"createRepo": "harness/createrepo:1.9.0",
"directPush": "harness/directpush:1.9.0",
"registerCatalog": "harness/registercatalog:1.9.0",
"createCatalog": "harness/createcatalog:1.9.0",
"slackNotify": "harness/slacknotify:1.9.0",
"createOrganisation": "harness/createorganisation:1.9.0",
"createProject": "harness/createproject:1.9.0"
},
"metaData": null,
"correlationId": "08919155-a6d6-4bd3-8401-6b86318c85ca"
}
```
2. Send a `get-customer-config` request to get the build images that your IDP pipelines currently use. When `overridesOnly` is `true`, which is the default value, this endpoint returns the non-default images that your pipeline uses.
```json
curl --location --request GET "https://app.harness.io/gateway/idp/execution-config/get-customer-config?accountIdentifier=$YOUR_HARNESS_ACCOUNT_ID&infra=K8&overridesOnly=true" \
--header 'X-API-KEY: $API_KEY'
```
If the response contains `null`, your pipeline is using all default images, for example:
```json
{
"status": "SUCCESS",
"data": {},
"metaData": null,
"correlationId": "11ce1bc8-b337-4687-9ab9-e13d553ae82f"
}
```
3. Send a `update-config` (POST) request with a list of the images you want to update and the new tags to apply.
```json
curl --location --request POST "https://app.harness.io/gateway/idp/execution-config/update-config?accountIdentifier=$YOUR_HARNESS_ACCOUNT_ID&infra=K8" \
--header 'X-API-KEY: $API_KEY' \
--header 'Content-Type: application/json' \
--data-raw '[
{
"field": "registerCatalog",
"value": "harness/registercatalog:1.9.0"
},
{
"field": "slackNotify",
"value": "harness/slacknotify:1.9.0"
}
]'
```
4. To reset one or more images to their defaults, send a `reset-config` (POST) request with a list of the images to reset.
```json
curl --location --request POST "https://app.harness.io/gateway/idp/execution-config/reset-config?accountIdentifier=$YOUR_HARNESS_ACCOUNT_ID&infra=K8" \
--header 'X-API-KEY: $API_KEY' \
--header 'Content-Type: application/json' \
--data-raw '[
{
"field": "registerCatalog"
},
{
"field": "createRepo"
}
]'
```
{% @harness-feedback/feedback %}
{% endhint %}
Add the org, repo name, Repo Description and Default branch for the repo you want to create.
{% endtab %}
{% tab title="YAML" %}
```yaml
- step:
type: CreateRepo
name: CreateRepo
identifier: createrepo
spec:
connectorRef: account.testdev
organization: <+pipeline.variables.organization>
repository: <+pipeline.variables.project_name>
repoType: <+pipeline.variables.repository_type>
description: <+pipeline.variables.repository_description>
defaultBranch: <+pipeline.variables.repository_default_branch>
```
{% endtab %}
{% endtabs %}
**Output**
Following is the output variable of this step.
1. **repositoryUrl** : The URL of the repository created eg; `https://github.com/org-name/repo-name` and this variable could be used in other steps in the pipeline by using this **JEXL** expression as a stage variable `<+pipeline.stages.idp.spec.execution.steps.createrepo.output.outputVariables.repositoryUrl>`
These output variable could be viewed under the output tab in 
#### 4. Create catalog
This step is used to create the `catalog-info.yaml/idp.yaml` to be ued to register the software component we have created in previous step in our IDP catalog.
{% hint style="warning" %}
In the example provided for this step we have used pipeline variables as input for many fields, make sure you have the corresponding pipeline variable created with proper value [as described under pipeline variables](#pipeline-variables).
{% endhint %}
{% hint style="info" %}
The git connector used under [**Connectors Page**](/internal-developer-portal/3.0/new-to-idp/get-started.md) in IDP Admin should have fetch access to the repository the `catalog-info.yaml` is getting published to, for it to be registered in the catalog.
{% endhint %}
{% tabs %}
{% tab title="Pipeline Studio" %}

**File name, path**
Name the `catalog-info.yaml` followed by providing a path if you do not want to register in the root of the repo created in the `Create Repo` step.
**File content**
Add the YAML content to be added in your `catalog-info.yaml` file, For eg.,
```yaml
apiVersion: backstage.io/v1alpha1
kind: Component
metadata:
name: <+pipeline.variables.project_name>
description: <+pipeline.variables.project_name> created using self service flow
annotations:
backstage.io/techdocs-ref: dir:.
spec:
type: service
owner: test
lifecycle: experimental
```
> Ensure your `identifier` follows [naming rules](/harness-platform/3.0/harness-platform-resources/references/entity-identifier-reference.md#identifier-naming-rules). Invalid identifiers may lead to entity registration errors.
> {% endtab %}
{% tab title="YAML" %}
```yaml
- step:
type: CreateCatalog
name: createcatalog
identifier: createcatalog
spec:
fileName: <+pipeline.variables.catalog_file_name>
filePath: <+pipeline.variables.project_name>
fileContent: |-
apiVersion: backstage.io/v1alpha1
kind: Component
metadata:
name: <+pipeline.variables.project_name>
description: <+pipeline.variables.project_name> created using self service flow
annotations:
backstage.io/techdocs-ref: dir:.
spec:
type: service
owner: test
lifecycle: experimental
```
{% endtab %}
{% endtabs %}
**Output**
Following is the output variable of this step.
1. **registeredCatalogUrl** : The URL of the software component registered in the catalog of IDP eg; `https://app.harness.io/ng/account/**************/module/idp/catalog/default/component/component-name` and this variable could be used in other steps in the pipeline by using this **JEXL** expression as a stage variable `<<+pipeline.stages.idp.spec.execution.steps.createcatalog.output.outputVariables.registeredCatalogUrl>>`
These output variable could be viewed under the output tab in 
#### 5. Direct push
This step is used to push the `service/application` created using Cookiecutter step along with the `catalog-info.yaml` in the repo you created in previous step.
{% hint style="warning" %}
You can only push the `service/application` created above to repositories within the same project where the **Direct Push** step is being executed.
In the example provided for this step, we have used pipeline variables as input for multiple fields. Ensure that the corresponding pipeline variables are created with the appropriate values, as described in the [Pipeline Variables](#pipeline-variables) documentation.
{% endhint %}
{% tabs %}
{% tab title="Pipeline Studio" %}

**Connector**
{% hint style="info" %}
* For authentication, **Username-Password** and **GitHub App** methods are supported. The connection type `ssh` is currently not supported for Connectors.
* You can use a **GitHub App** to authenticate the Harness GitHub connector. Refer to this [detailed guide](/harness-platform/3.0/harness-platform-resources/connectors/code-repositories/git-hub-app-support.md) on how to use a GitHub App with a GitHub connector in the IDP stage.
* The [Bitbucket connector](/harness-platform/3.0/harness-platform-resources/connectors/code-repositories/ref-source-repo-provider/bitbucket-connector-settings-reference.md#credentials-settings) supports both **Access Token** and **API Token** authentication modes. For more details, see the reference documentation on [Access Token mode](/release-notes/internal-developer-portal.md#new-feature-support-for-bitbucket-access-token-authentication-mode) and [API Token mode](/release-notes/internal-developer-portal.md#new-feature-increased-bitbucket-api-rate-limits).
**Note**: Ensure that you have **admin permissions** on a GitHub repository within your GitHub organization and that you are able to install **GitHub Apps** in that repository. This setup is only supported for **organization accounts**, not personal GitHub accounts.
{% endhint %}
Select a connector for the git provider where you want to push the code.
The following topics provide more information about creating code repo connectors:
* Azure Repos: [Connect to Azure Repos](/harness-platform/3.0/harness-platform-resources/connectors/code-repositories/connect-to-a-azure-repo.md)
* Bitbucket: [Bitbucket connector settings reference](/harness-platform/3.0/harness-platform-resources/connectors/code-repositories/ref-source-repo-provider/bitbucket-connector-settings-reference.md)
* GitHub: [GitHub connector settings reference](/harness-platform/3.0/harness-platform-resources/connectors/code-repositories/ref-source-repo-provider/git-hub-connector-settings-reference.md)
* GitLab: [GitLab Connector Settings reference](/harness-platform/3.0/harness-platform-resources/connectors/code-repositories/ref-source-repo-provider/git-lab-connector-settings-reference.md)
**Org, repo, code directory, branch**
{% hint style="info" %}
For GitLab integration, you need to add the [group](https://docs.gitlab.com/ee/user/group/) path as well. In case of using the personal account, make sure you add the `account-id` in the path
{% endhint %}
Add the Org, Repo Name, Repo Description and Branch Name where you want to push the code.
**Allow force push**
This when enabled or set to `true`, will be able to overwrite the changes to **Default branch** set in the **Create Repo** step.
{% endtab %}
{% tab title="YAML" %}
```yaml
- step:
type: DirectPush
name: DirectPush
identifier: directpush
spec:
connectorType: Github
forcePush: true
connectorRef: account.testdev
organization: <+pipeline.variables.organization>
repository: <+pipeline.variables.project_name>
codeDirectory: <+pipeline.variables.project_name>
branch: <+pipeline.variables.direct_push_branch>
```
{% endtab %}
{% endtabs %}
#### 6. Register catalog
This step is used to register the software component created in the Catalog of Harness IDP using `catalog-info.yaml`.
{% hint style="warning" %}
In the example provided for this step we have used pipeline variables as input for many fields, make sure you have the corresponding pipeline variable created with proper value [as described under pipeline variables](#pipeline-variables).
{% endhint %}
{% tabs %}
{% tab title="Pipeline Studio" %}

**Connector**
{% hint style="info" %}
* For authentication, **Username-Password** and **GitHub App** methods are supported. The connection type `ssh` is currently not supported for Connectors.
* You can use a **GitHub App** to authenticate the Harness GitHub connector. Refer to this [detailed guide](/harness-platform/3.0/harness-platform-resources/connectors/code-repositories/git-hub-app-support.md) on how to use a GitHub App with a GitHub connector in the IDP stage.
* The [Bitbucket connector](/harness-platform/3.0/harness-platform-resources/connectors/code-repositories/ref-source-repo-provider/bitbucket-connector-settings-reference.md#credentials-settings) supports both **Access Token** and **API Token** authentication modes. For more details, see the reference documentation on [Access Token mode](/release-notes/internal-developer-portal.md#new-feature-support-for-bitbucket-access-token-authentication-mode) and [API Token mode](/release-notes/internal-developer-portal.md#new-feature-increased-bitbucket-api-rate-limits).
**Note**: Ensure that you have **admin permissions** on a GitHub repository within your GitHub organization and that you are able to install **GitHub Apps** in that repository. This setup is only supported for **organization accounts**, not personal GitHub accounts.
{% endhint %}
Select a connector for the git provider where your `catalog-info.yaml` is stored.
The following topics provide more information about creating code repo connectors:
* Azure Repos: [Connect to Azure Repos](/harness-platform/3.0/harness-platform-resources/connectors/code-repositories/connect-to-a-azure-repo.md)
* Bitbucket: [Bitbucket connector settings reference](/harness-platform/3.0/harness-platform-resources/connectors/code-repositories/ref-source-repo-provider/bitbucket-connector-settings-reference.md)
* GitHub: [GitHub connector settings reference](/harness-platform/3.0/harness-platform-resources/connectors/code-repositories/ref-source-repo-provider/git-hub-connector-settings-reference.md)
* GitLab: [GitLab Connector Settings reference](/harness-platform/3.0/harness-platform-resources/connectors/code-repositories/ref-source-repo-provider/git-lab-connector-settings-reference.md)
**Org, repo, branch, file path**
{% hint style="info" %}
For GitLab integration, you need to add the [group](https://docs.gitlab.com/ee/user/group/) path as well. In case of using the personal account, make sure you add the `account-id` in the path
{% endhint %}
Add the Org, Repo Name, Branch and the File path relative to the root of the repository, where your `catalog-info.yaml` is present.
{% endtab %}
{% tab title="YAML" %}
```yaml
- step:
type: RegisterCatalog
name: registercatalog
identifier: registercatalog
spec:
connectorRef: account.testdev
repository: <+pipeline.variables.project_name>
organization: <+pipeline.variables.organization>
filePath: <+pipeline.variables.catalog_file_name>
branch: <+pipeline.variables.direct_push_branch>
```
{% endtab %}
{% endtabs %}
**API key support**
Harness IDP now supports the use of a **Harness API Key** in the **Register Catalog** step.
With this feature, users can configure the **API Key** by selecting the **"API Token"** field in the Harness UI. This option is available under **Advanced Settings** in the **Pipelines** tab. Enabling this ensures that the API Key is utilized for catalog registration in IDP.
By integrating the API Key, the pipeline execution remains seamless, ensuring it functions correctly when triggered from another pipeline or through a trigger.

This step is optional. You can proceed with executing your pipeline without an API key. In that case, the user context will be used for catalog registration.
**Output variable**
Following is the output variable of this step.
1. **catalogInfoUrl** : The URL of the `catalog-info.yaml` stored in your git provider where you created the repo in the **CreateRepo step** eg; `https://github.com/org-name/repo-name/blob/code/catalog-info.yaml` and this variable could be used in other steps in the pipeline by using this **JEXL** expression as a stage variable `<<+pipeline.stages.idp.spec.execution.steps.registercatalog.output.outputVariables.catalogInfoUrl>>`
These output variable could be viewed under the output tab in 
#### 7. Slack notify
This step is used to notify individual developers once the pipeline is executed successfully and your Software component is registered successfully in your Software Catalog.
{% hint style="warning" %}
In the example provided for this step we have used pipeline variables as input for many fields, make sure you have the corresponding pipeline variable created with proper value [as described under pipeline variables](#pipeline-variables).
{% endhint %}
{% tabs %}
{% tab title="YAML" %}
```yaml
- step:
type: SlackNotify
name: slacknotify
identifier: slacknotify
spec:
emailId: <+pipeline.variables.email_id>
messageContent: " Hello <+pipeline.variables.project_name> project is created using flows in Harness IDP,\\n*Created Catalog Yaml -* <<+pipeline.stages.serviceonboarding.spec.execution.steps.registercatalog.output.outputVariables.catalogInfoUrl>|Link>\\n*Created Repository -* <<+pipeline.stages.serviceonboarding.spec.execution.steps.createrepo.output.outputVariables.repositoryUrl>|Link>\\n*Registered Catalog -* <<+pipeline.stages.serviceonboarding.spec.execution.steps.createcatalog.output.outputVariables.registeredCatalogUrl>|Link>"
token: slacksecrettestws
```
The output of the steps like **Create Repo**, **Register Catalog** in the `JEXL` format has been used to construct the `messageContent` for slack notification.
The `token` is the [Bot-tokens](https://api.slack.com/authentication/token-types#bot)
{% endtab %}
{% tab title="Pipeline Studio" %}
1. Add the **Name** of the Step

The output of the steps like **Create Repo**, **Register Catalog** in the `JEXL` format has been used to construct the `Message` for Slack notification.
{% endtab %}
{% endtabs %}
**Slack email ID**
Use the email ID you have used to register in Slack.
**Slack secret key**
The Slack Secret Key are the [Bot-tokens](https://api.slack.com/authentication/token-types#bot) created with the following permissions.
1. chat:write
2. chat:write.public
3. users:read.email
4. users:read

Read more on [how to create bot-tokens](https://api.slack.com/start/quickstart#scopes).
1. Now create a new secret and add this as a **Secret** under the **Slack Secret Key**.
#### 8. Create resource
This step in developer portal stage allows you to **execute only OpenTofu (Open Source Terraform) module related to** [**Harness Terraform Provider**](https://registry.terraform.io/providers/harness/harness/latest/docs) to create or update resources. You can use this step to create Harness entities like projects, users, connectors, pipelines, secrets, etc.
{% tabs %}
{% tab title="YAML" %}
```yaml
- step:
type: CreateResource
name: CreateResource_1
identifier: CreateResource_1
spec:
resourceDefinition: |-
resource "harness_platform_pipeline" "pipeline" {
identifier = "identifier"
org_id = "orgIdentifier"
project_id = "projectIdentifier"
name = "name"
yaml = <<-EOT
pipeline:
name: name
identifier: identifier
projectIdentifier: projectIdentifier
orgIdentifier: orgIdentifier
stages:
- stage:
name: idp
identifier: idp
description: ""
type: IDP
spec:
platform:
os: Linux
arch: Amd64
runtime:
type: Cloud
spec: {}
execution:
steps:
- step:
type: Run
name: Run_1
identifier: Run_1
description: <+input>
spec:
shell: Sh
command: echo "Hello"
tags: {}
EOT
}
xApiKey: Harness PAT for the account you want to create the pipeline
```
This step comes with a sample **Resource Definition** to create a Harness Pipeline with a Run Step. This contains dummy values, hence will not work consider replacing it with the resource definition of yours. Also go to [Harness Terraform Provider](https://registry.terraform.io/providers/harness/harness/latest/docs) to help you with Harness Resource definitions.
The `xApiKey` is the [Harness PAT](/harness-platform/3.0/harness-platform-resources/automation/api/add-and-manage-api-keys.md) for the account where you want to create the pipeline.
{% endtab %}
{% tab title="Pipeline Studio" %}
* You can select the step **Create Resource** from the **Step Library**.

* You can add a **Name** to the step followed by adding the **Resource Definition** and create a Harness Entity using Resources supported by our [Harness Terraform Provider](https://registry.terraform.io/providers/harness/harness/latest/docs). Likewise, you will find an already existing sample **Resource Definition** by default, that can create a Harness Pipeline with a **Run Step**.

{% endtab %}
{% endtabs %}
#### 9. Update catalog property
This step is used to update the catalog metadata for your entities. For example, you want to add the latest build version for your service in your catalog using this step in your CI pipeline and update the data in your catalog.
* You can select the step **Update Catalog Property** from the **Step Library**.

* Now under the **Select the Catalog entity and the properties to be updated** you have two options
* Update single Catalog Entity
* Update multiple catalog Entities
* **Permission:** For anyone to update catalog property need to have [edit catalog permission](/internal-developer-portal/3.0/admin-and-customization/rbac/scopes.md#permissions-and-resources-idp-20).
{% tabs %}
{% tab title="Update a single Catalog Entity" %}
* To **update a single Catalog Entity**, select the Catalog Entity from the dropdown. You need to type at least the first three characters in the field for the entity options to appear.

* Now add the **property**, you want to update/add and the **value** against it. e.g., `<+metadata.testCoverage>`, `<+metadata.additionalInfo.onShorelead>`.
* The **API Key** field is optional. If left empty, the credentials of the user executing the pipeline will be used to update the catalog entity.
{% endtab %}
{% tab title="Update Multiple Catalog Entities" %}
* To **update multiple Catalog entities**, you need to add the **property** to be updated across the entities followed by `entity-ref` and corresponding values.
* In case you want to add a default value across all the entities then update the field under Default Value.
* The **API Key** field is optional. If left empty, the credentials of the user executing the pipeline will be used to update the catalog entity.
* Under Advanced you can select the mode
* Available Modes:
* replace (default): Completely replaces the existing value with the new one provided in the value field.
* append: Adds new values to the existing array (or other types to be appended like maps or key-value pairs).
> Note: `append` only works with data types that can hold multiple values, such as arrays or maps. It does not apply to simple data types like strings.
> {% endtab %}
> {% endtabs %}
#### 10. Run step
You can use the **Run step** to run commands or scripts in your Harness Pipeline.
In order for the Run step to execute your commands, the build environment must have the necessary binaries for those commands. Depending on the stage's build infrastructure, Run steps can use binaries that exist in the build environment or pull an image, such as a public or private Docker image, that contains the required binaries.
Refer to detailed steps and settings here to understand this step in detail: [Run Step Settings](/continuous-integration/3.0/use-harness-ci/use-harness-ci/run-step-settings.md#run-step-settings)
#### 11. Plugin step
You can use the **Plugin step** to run different plugins in your Harness Pipeline.
Refer to detailed steps and settings here to understand this step in detail: [Plugin Step Settings](/continuous-integration/3.0/use-harness-ci/use-harness-ci/use-drone-plugins/plugin-step-settings-reference.md)
### Example pipeline
{% tabs %}
{% tab title="YAML" %}
```yaml
pipeline:
name: Self-Service-flow-repo-setup
identifier: SelfServiceflowreposetup
projectIdentifier: projctidp
orgIdentifier: default
tags: {}
stages:
- stage:
name: service-onboarding
identifier: serviceonboarding
description: ""
type: IDP
spec:
infrastructure:
type: KubernetesDirect
spec:
connectorRef: idptest
namespace: harness-delegate
automountServiceAccountToken: true
nodeSelector: {}
os: Linux
execution:
steps:
- step:
type: CookieCutter
name: CookieCutter
identifier: idpcookiecutter
spec:
templateType: <+pipeline.variables.template_type>
publicTemplateUrl: <+pipeline.variables.public_template_url>
cookieCutterVariables:
app_name: <+pipeline.variables.project_name>
- step:
type: CreateRepo
name: CreateRepo
identifier: createrepo
spec:
connectorRef: account.testdev
organization: <+pipeline.variables.organization>
repository: <+pipeline.variables.project_name>
repoType: <+pipeline.variables.repository_type>
description: <+pipeline.variables.repository_description>
defaultBranch: <+pipeline.variables.repository_default_branch>
- step:
type: CreateCatalog
name: createcatalog
identifier: createcatalog
spec:
fileName: <+pipeline.variables.catalog_file_name>
filePath: <+pipeline.variables.project_name>
fileContent: |-
apiVersion: backstage.io/v1alpha1
kind: Component
metadata:
name: <+pipeline.variables.project_name>
description: <+pipeline.variables.project_name> created using self service flow
annotations:
backstage.io/techdocs-ref: dir:.
spec:
type: service
owner: test
lifecycle: experimental
- step:
type: DirectPush
name: DirectPush
identifier: directpush
spec:
connectorRef: account.testdev
repository: <+pipeline.variables.project_name>
organization: <+pipeline.variables.organization>
codeDirectory: <+pipeline.variables.project_name>
branch: <+pipeline.variables.direct_push_branch>
- step:
type: RegisterCatalog
name: registercatalog
identifier: registercatalog
spec:
connectorRef: account.testdev
repository: <+pipeline.variables.project_name>
organization: <+pipeline.variables.organization>
filePath: <+pipeline.variables.catalog_file_name>
branch: <+pipeline.variables.direct_push_branch>
- step:
type: SlackNotify
name: slacknotify
identifier: slacknotify
spec:
email: <+pipeline.variables.email_id>
messageContent: " Hello <@<+pipeline.variables.email_id>>, <+pipeline.variables.project_name> project is created using flows in Harness IDP,\\n*Created Catalog Yaml -* <<+pipeline.stages.serviceonboarding.spec.execution.steps.registercatalog.output.outputVariables.catalogInfoUrl>|Link>\\n*Created Repository -* <<+pipeline.stages.serviceonboarding.spec.execution.steps.createrepo.output.outputVariables.repositoryUrl>|Link>\\n*Registered Catalog -* <<+pipeline.stages.serviceonboarding.spec.execution.steps.createcatalog.output.outputVariables.registeredCatalogUrl>|Link>"
token: slacksecrettestws
cloneCodebase: false
caching:
enabled: false
paths: []
variables:
- name: test_content
type: String
description: ""
required: false
value: devesh
- name: project_name
type: String
description: ""
required: false
value: <+input>
- name: organization
type: String
description: ""
required: false
value: test-org-devesh
- name: template_type
type: String
description: ""
required: false
value: <+input>.default(public).allowedValues(public,private)
- name: public_template_url
type: String
description: ""
required: false
value: <+input>
- name: repository_type
type: String
description: ""
required: false
value: <+input>.default(private).allowedValues(private,public)
- name: repositoty_description
type: String
description: ""
required: false
value: <+input>
- name: repository_default_branch
type: String
description: ""
required: false
value: <+input>
- name: direct_push_branch
type: String
description: ""
required: false
value: <+input>
- name: catalog_file_name
type: String
description: ""
required: false
value: catalog-info.yaml
- name: email_id
type: String
description: ""
required: false
value: <+input>
```
{% endtab %}
{% tab title="Pipeline Studio" %}

{% endtab %}
{% endtabs %}
### Specify the Harness IDP images used in your pipeline
You can use the Harness IDP `execution-config` API to specify or update the Harness IDP images used in your infrastructure by specifying image tags.
{% hint style="info" %}
Certain steps are common across different stages in Harness Pipeline, but the images used in each of them is specific to the stage they are part of, like `Run Step`.
{% endhint %}
Here is a list of Harness IDP images used in the IDP stage:
1. [`cookieCutter`](https://console.cloud.google.com/gcr/images/gcr-prod/global/harness/cookiecutter): Used to take inputs for the cookiecutter template.
2. [`createRepo`](https://console.cloud.google.com/gcr/images/gcr-prod/global/harness/createrepo): Used to create the repository in your git provider
3. [`directPush`](https://console.cloud.google.com/gcr/images/gcr-prod/global/harness/directpush): Used to push the service/application created using Cookiecutter step along with the catalog-info.yaml in the repo you created in previous step.
4. [`registerCatalog`](https://console.cloud.google.com/gcr/images/gcr-prod/global/harness/registercatalog?project=gcr-prod): Used to register the software component created in the Harness IDP Catalog.
5. [`slackNotify`](https://console.cloud.google.com/gcr/images/gcr-prod/global/harness/slacknotify): Used to notify individual developers once the pipeline is executed successfully and your Software component is registered successfully in your Software Catalog.
6. [`createResource`](https://console.cloud.google.com/gcr/images/gcr-prod/global/harness/createresource): Used to create Harness entities like projects, users, connectors, pipelines, secrets, etc.
7. [`updateCatalogProperty`](https://console.cloud.google.com/gcr/images/gcr-prod/global/harness/updatecatalogproperty): Used to update the catalog metadata for your entities
8. [`createOrganisation`](https://console.cloud.google.com/gcr/images/gcr-prod/global/harness/createorganisation)
9. [`createProject`](https://console.cloud.google.com/gcr/images/gcr-prod/global/harness/createproject)
10. [`createCatalog`](https://console.cloud.google.com/gcr/images/gcr-prod/global/harness/createcatalog)
API key authentication is required. For more information about API keys, go to [Manage API keys](/harness-platform/3.0/harness-platform-resources/automation/api/add-and-manage-api-keys.md). For more information about authentication, go to the [Harness API documentation](https://apidocs.harness.io/#section/Introduction/Authentication).
1. Send a `get-default-config` request to get a list of the latest Harness IDP Workflows executed. You can use the `infra` parameter to get `k8` images or `VM` images.
```json
curl --location --request GET "https://app.harness.io/gateway/idp/execution-config/get-default-config?accountIdentifier=$YOUR_HARNESS_ACCOUNT_ID&infra=K8" \
--header 'X-API-KEY: $API_KEY'
```
The response payload shows the latest supported images and their tags, for example:
```json
{
"status": "SUCCESS",
"data": {
"cookieCutter": "harness/cookiecutter:1.9.1",
"createRepo": "harness/createrepo:1.9.0",
"directPush": "harness/directpush:1.9.0",
"registerCatalog": "harness/registercatalog:1.9.0",
"createCatalog": "harness/createcatalog:1.9.0",
"slackNotify": "harness/slacknotify:1.9.0",
"createOrganisation": "harness/createorganisation:1.9.0",
"createProject": "harness/createproject:1.9.0"
},
"metaData": null,
"correlationId": "08919155-a6d6-4bd3-8401-6b86318c85ca"
}
```
2. Send a `get-customer-config` request to get the build images that your IDP pipelines currently use. When `overridesOnly` is `true`, which is the default value, this endpoint returns the non-default images that your pipeline uses.
```json
curl --location --request GET "https://app.harness.io/gateway/idp/execution-config/get-customer-config?accountIdentifier=$YOUR_HARNESS_ACCOUNT_ID&infra=K8&overridesOnly=true" \
--header 'X-API-KEY: $API_KEY'
```
If the response contains `null`, your pipeline is using all default images, for example:
```json
{
"status": "SUCCESS",
"data": {},
"metaData": null,
"correlationId": "11ce1bc8-b337-4687-9ab9-e13d553ae82f"
}
```
3. Send a `update-config` (POST) request with a list of the images you want to update and the new tags to apply.
```json
curl --location --request POST "https://app.harness.io/gateway/idp/execution-config/update-config?accountIdentifier=$YOUR_HARNESS_ACCOUNT_ID&infra=K8" \
--header 'X-API-KEY: $API_KEY' \
--header 'Content-Type: application/json' \
--data-raw '[
{
"field": "registerCatalog",
"value": "harness/registercatalog:1.9.0"
},
{
"field": "slackNotify",
"value": "harness/slacknotify:1.9.0"
}
]'
```
4. To reset one or more images to their defaults, send a `reset-config` (POST) request with a list of the images to reset.
```json
curl --location --request POST "https://app.harness.io/gateway/idp/execution-config/reset-config?accountIdentifier=$YOUR_HARNESS_ACCOUNT_ID&infra=K8" \
--header 'X-API-KEY: $API_KEY' \
--header 'Content-Type: application/json' \
--data-raw '[
{
"field": "registerCatalog"
},
{
"field": "createRepo"
}
]'
```
{% @harness-feedback/feedback %}