> For the complete documentation index, see [llms.txt](https://developer.harness.io/llms.txt). Markdown versions of documentation pages are available by appending `.md` to page URLs; this page is available as [Markdown](https://developer.harness.io/internal-developer-portal/use-idp/environment-management/blueprints/create-environment-blueprint.md).
# Create an Environment Blueprint
Step-by-step guide to creating an Environment Blueprint in Harness IDP.
An **Environment Blueprint** is a reusable template that defines the infrastructure, services, dependencies, and lifecycle configuration for environments your team creates. Platform engineers own and maintain blueprints. Developers use them to spin up self-service environments on demand.
This page walks through the full process of creating a blueprint using the Harness IDP UI. Go to [Environment Blueprint YAML](/internal-developer-portal/use-idp/environment-management/blueprints/env-blueprint-yaml.md) to review the complete YAML schema.
***
### Before you begin
* **Permissions:** You have the `Environment Blueprint: Create or Edit` permission in Harness IDP. Go to [Environment Management RBAC](/internal-developer-portal/use-idp/environment-management/blueprints/env-blueprint-yaml.md#environment-management-rbac) to configure roles.
* **Blueprint YAML:** Go to [Environment Blueprint YAML](/internal-developer-portal/use-idp/environment-management/blueprints/env-blueprint-yaml.md) to review the schema before writing your first blueprint.
* **Module prerequisites:** The Harness modules and connectors required for your blueprint are already set up. Go to [Get Started with Environment Management](/internal-developer-portal/use-idp/environment-management/get-started.md#before-you-begin) to verify requirements.
***
### Step 1: Open the create blueprint form
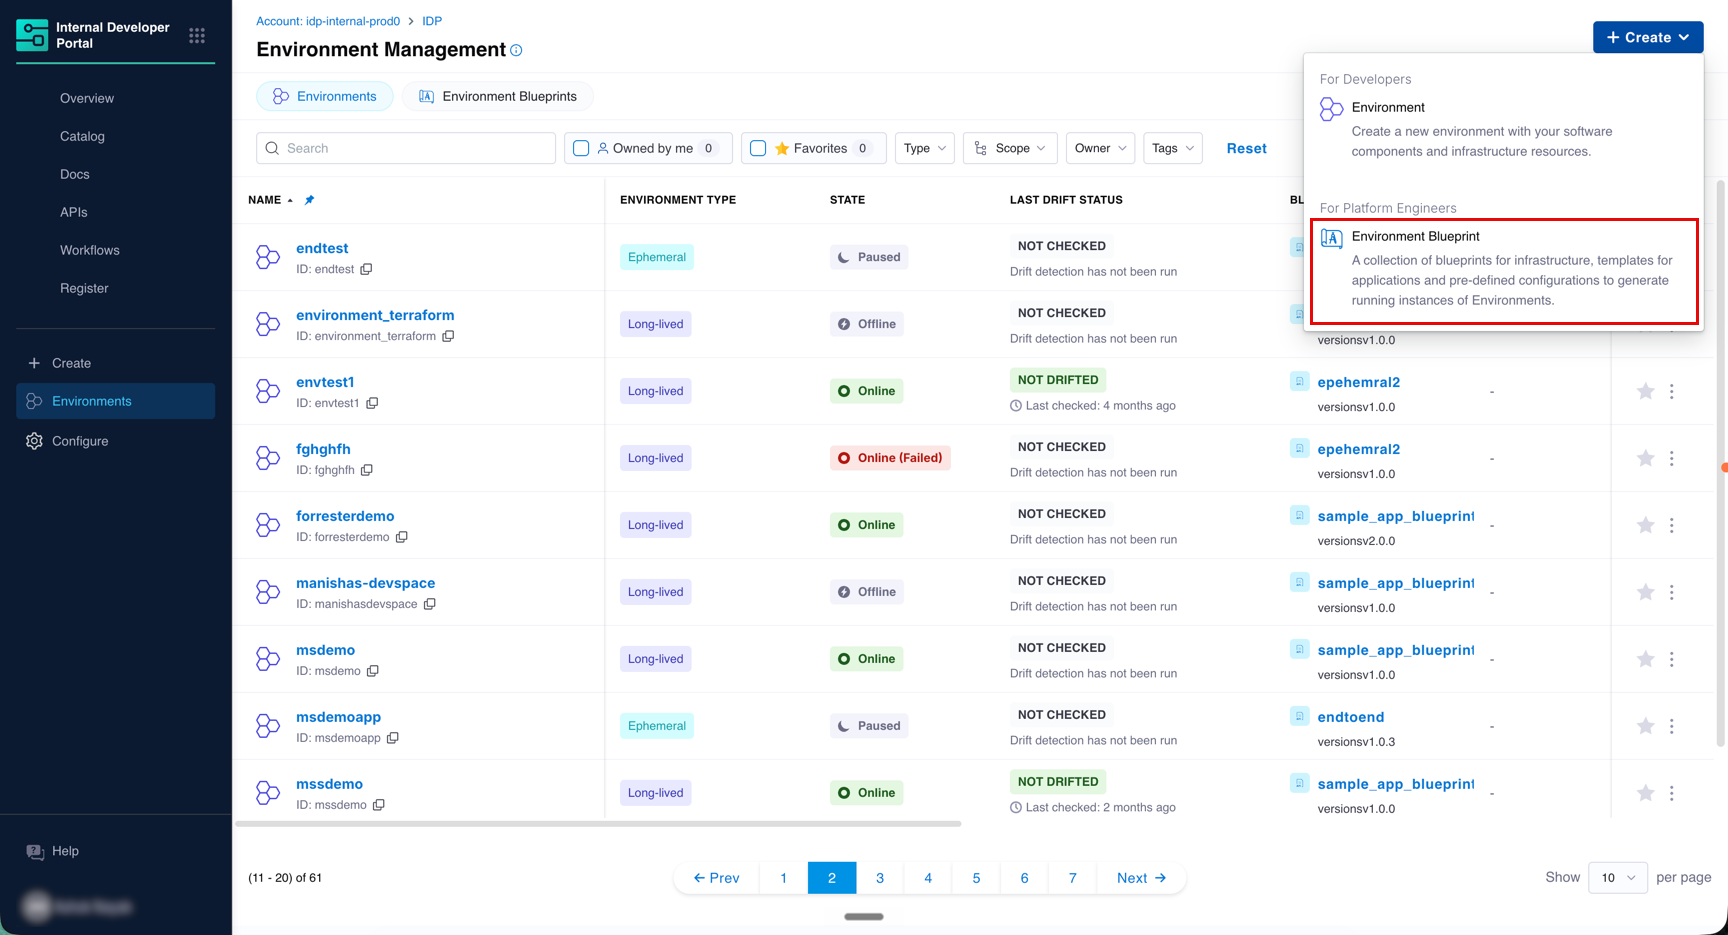
1. In Harness IDP, select **Environments** in the left navigation.
2. Select the **Environment Blueprints** tab.
3. Click **+ Create** in the top right corner.
4. In the dropdown, select **Environment Blueprint**.
{% hint style="info" %}
The **+ Create** dropdown also shows an **Environment** option under **For Developers**. That option is for creating an environment from an existing blueprint, not for creating the blueprint itself.
{% endhint %}
***
### Step 2: Fill in general details
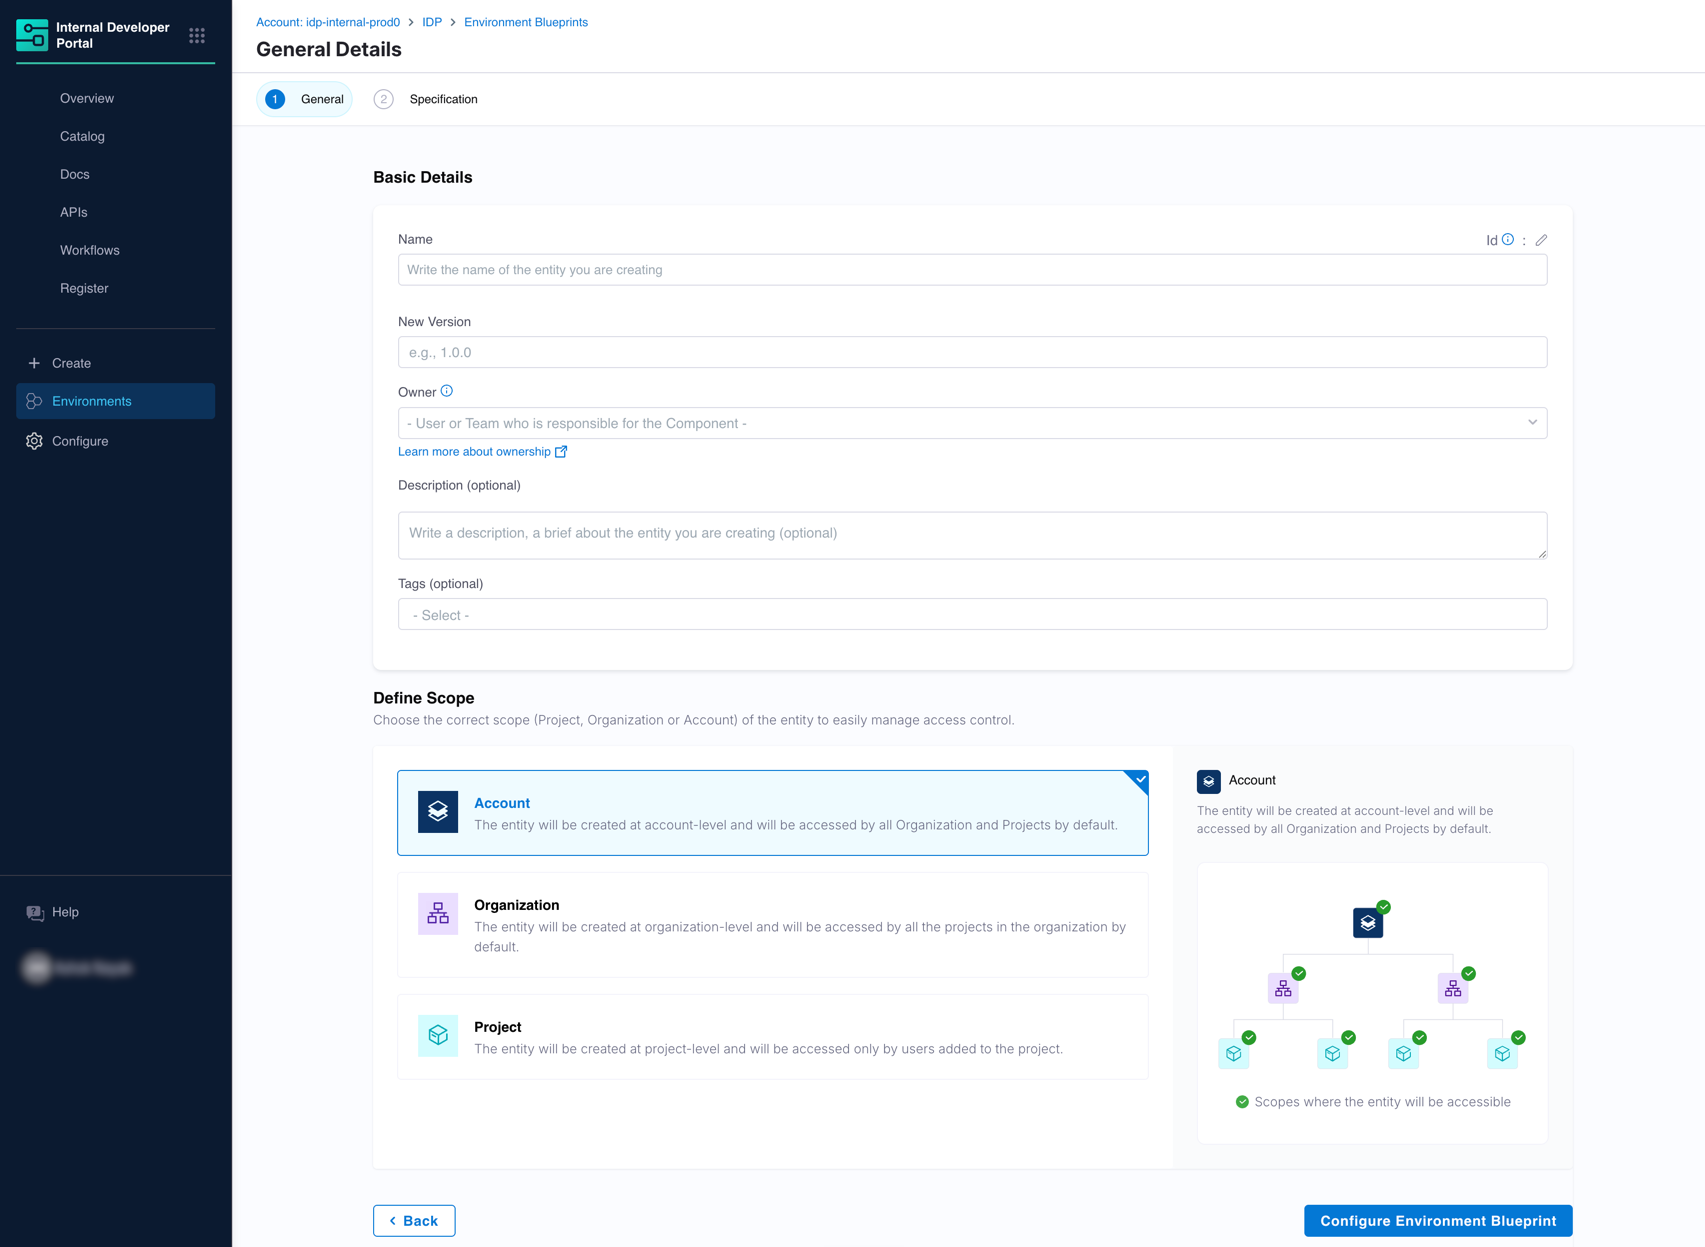
The General Details step collects the blueprint's identity and access scope.
#### Basic details
| Field | Required | Description |
| --------------- | -------- | -------------------------------------------------------------------------------------------------------------------------------------- |
| **Name** | Yes | A human-readable display name for the blueprint (for example, `PR Testing Environment`). |
| **New Version** | Yes | The initial version number for this blueprint (for example, `1.0.0`). This becomes the first entry in the blueprint's version history. |
| **Owner** | No | The user or team responsible for maintaining this blueprint. |
| **Description** | No | A short description of what environments this blueprint creates. |
| **Tags** | No | Labels to help teams filter and discover the blueprint. |
#### Define scope
Choose the scope at which this blueprint will be created. The scope determines which teams and projects can access and use it.
| Scope | Who can access the blueprint |
| ---------------- | --------------------------------------------------------------------------------------------------- |
| **Account** | All organizations and projects in your account. Use this for organization-wide standard blueprints. |
| **Organization** | All projects within the organization. |
| **Project** | Only users in the specified project. |
{% hint style="info" %}
Environments are always created at the project scope. An environment can reference a blueprint from its own project, its parent organization, or the account level. Account-scoped blueprints are the most broadly reusable. Go to [Scope and Hierarchy](/internal-developer-portal/use-idp/environment-management/blueprints/env-blueprint-yaml.md#scope--hierarchy) to learn more.
{% endhint %}
Click **Configure Environment Blueprint** to proceed.
***
### Step 3: Write the blueprint YAML
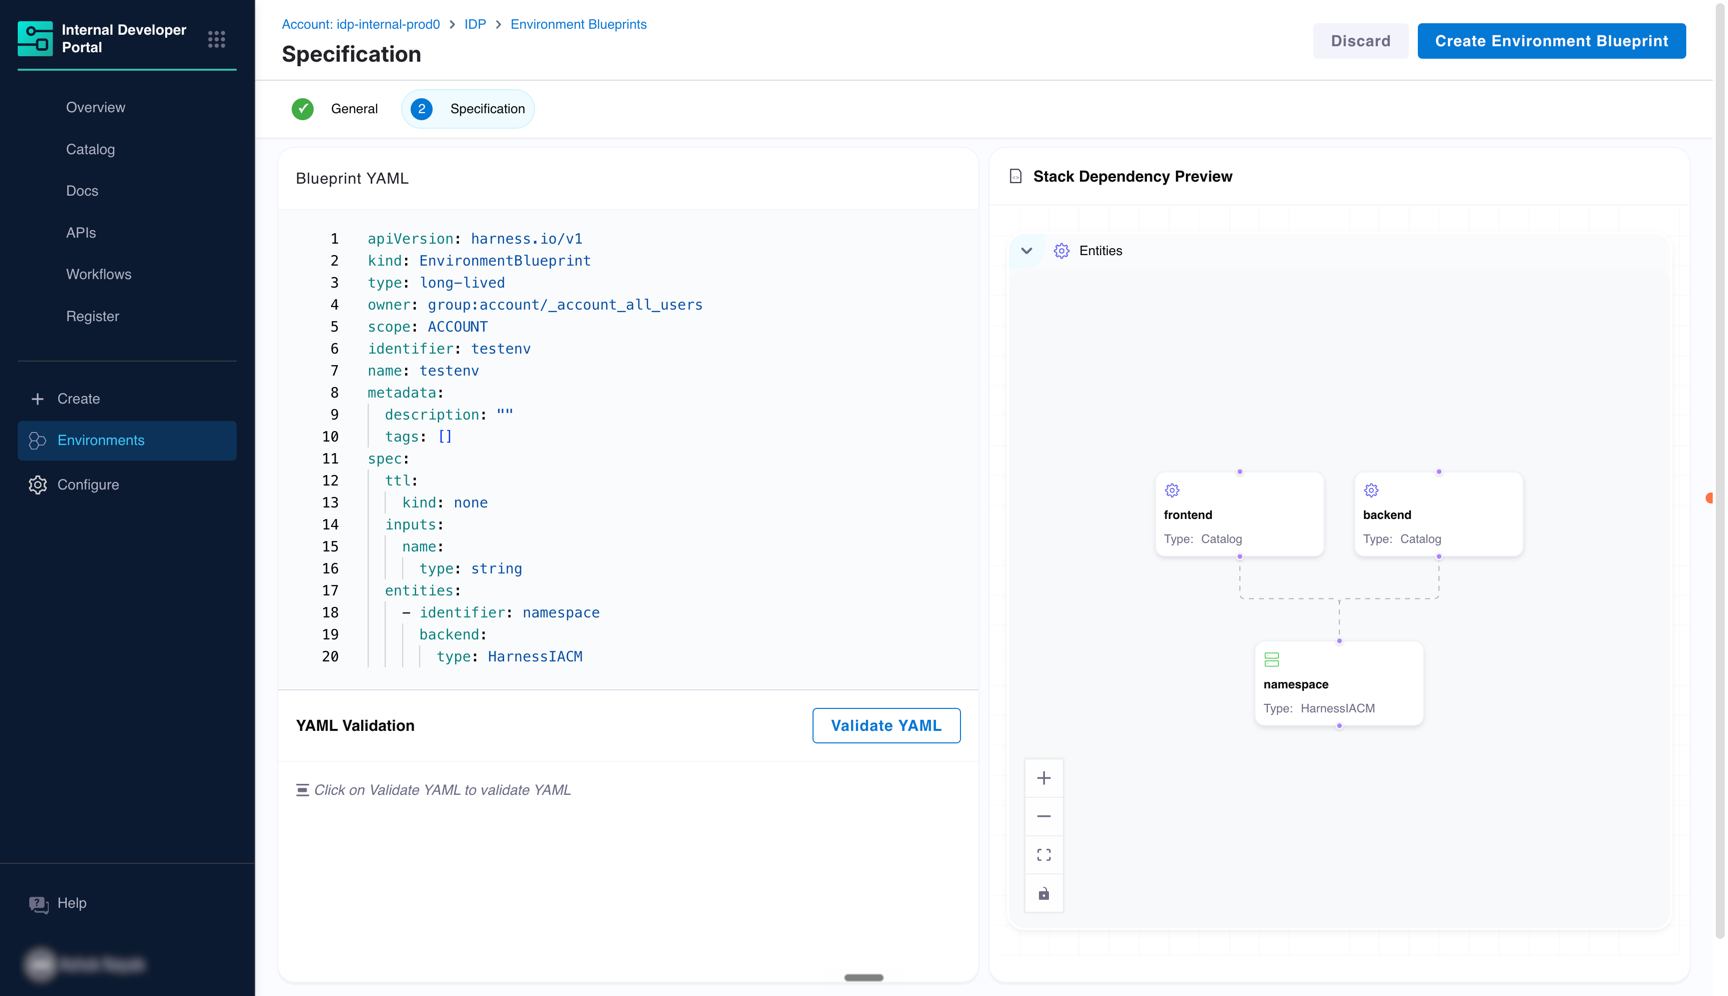
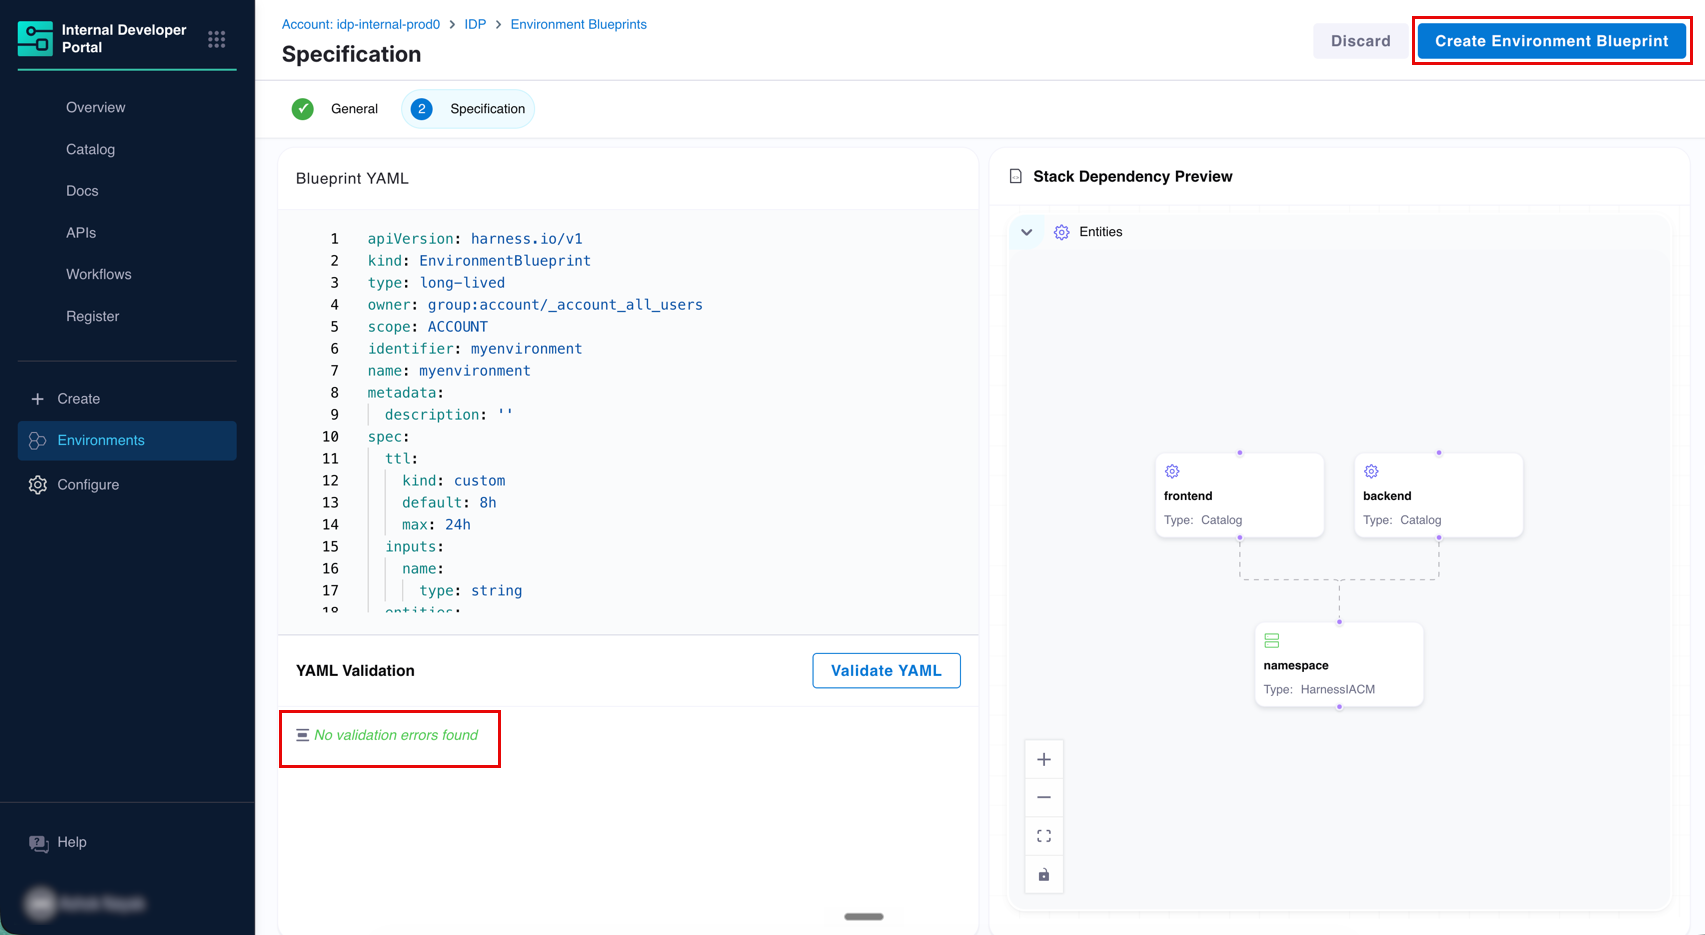
The Specification step has two panels:
* **Blueprint YAML** (left): A code editor where you write or paste the blueprint YAML definition.
* **Stack Dependency Preview** (right): A live visual diagram that updates as you type, showing the dependency graph between the entities you define.
Write your blueprint YAML in the editor. The blueprint defines:
* Infrastructure entities using the `HarnessIACM` backend type
* Service entities using the `Catalog` backend type or `HarnessCD` backend type
* Dependencies between entities
* Blueprint-level and entity-level user inputs
* TTL configuration (for ephemeral environments)
Go to [Environment Blueprint YAML](/internal-developer-portal/use-idp/environment-management/blueprints/env-blueprint-yaml.md) to review the full schema. Go to [Example Blueprint YAML](/internal-developer-portal/use-idp/environment-management/blueprints/env-blueprint-yaml.md#example-blueprint-yaml) to see a complete working reference.
#### Validate the YAML
Before saving, use the built-in YAML validator to check that all referenced entities exist in a target project.
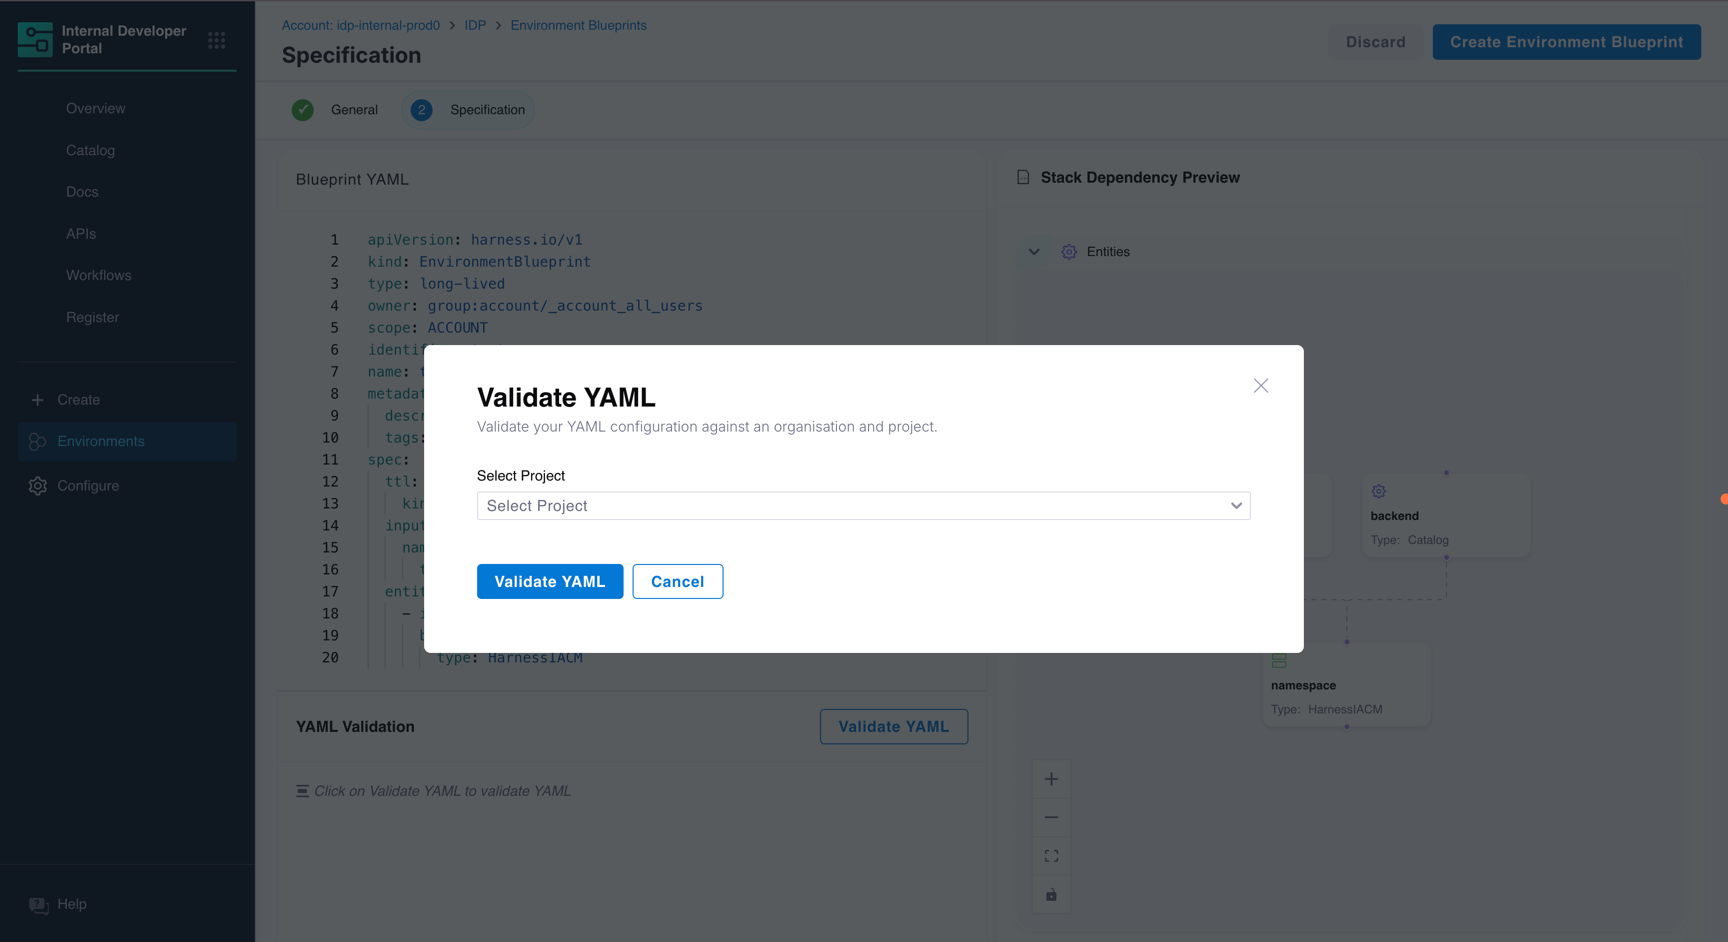
1. In the **YAML Validation** section at the bottom of the page, click **Validate YAML**.
2. In the dialog, select the project to validate against.
3. Click **Validate YAML**.
Validation results appear below the button:
* A passing validation confirms all referenced entities (services, workspace templates, pipelines) exist in the selected project.
* A failing validation shows the specific entity reference that could not be resolved, for example: `NotFound: Entity with entityRef = component:frontend not found`.
{% hint style="info" %}
Validating your blueprint before saving helps catch unresolved entity references early, before developers encounter errors when creating environments. It is recommended to validate against a project where your referenced catalog components, workspace templates, and pipelines already exist.
{% endhint %}
{% hint style="warning" %}
**OPA POLICY ENFORCEMENT**
If your account has OPA governance policies enforced for blueprints, clicking **Create Environment Blueprint** will trigger a **Policy Set Evaluations** modal. If a policy fails, the blueprint will not be saved. For example, a common policy requirement is that blueprints must define a TTL. In that case, setting `ttl.kind: none` in your blueprint YAML will fail such a policy. Update the TTL configuration before saving. Go to [Centralized Policy Governance](/internal-developer-portal/admin-and-customization/governance/opa-governance.md) to learn more.
{% endhint %}
***
### Step 4: Create the blueprint
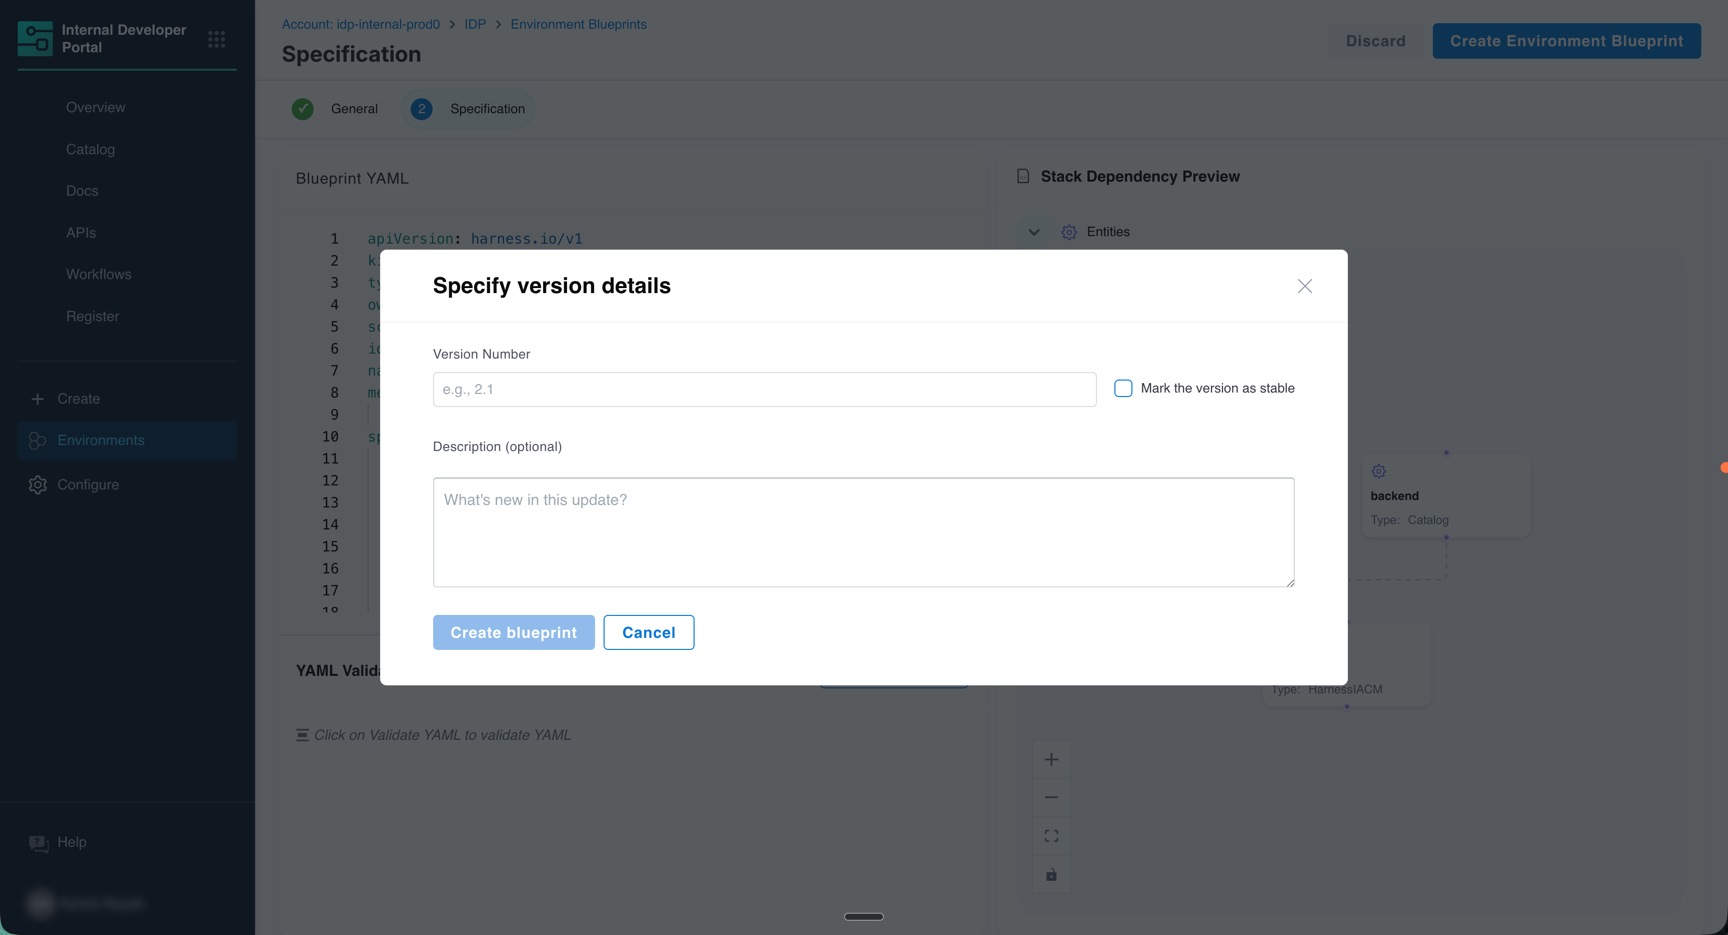
Click **Create Environment Blueprint** in the top right corner. The **Specify version details** dialog appears.
| Field | Description |
| ------------------------------ | ----------------------------------------------------------------------------------------------------------------------------------------------------------------------------------------------------------- |
| **Version Number** | Pre-filled from the value you entered in General Details. You can edit it here before saving. |
| **Mark the version as stable** | Check this to designate this version as the recommended version for new environment creation. Only stable versions appear by default in the version selection dropdown when developers create environments. |
| **Description** | Optional. A changelog note describing what this version introduces. |
Click **Create blueprint** to finalize.
***
### Result
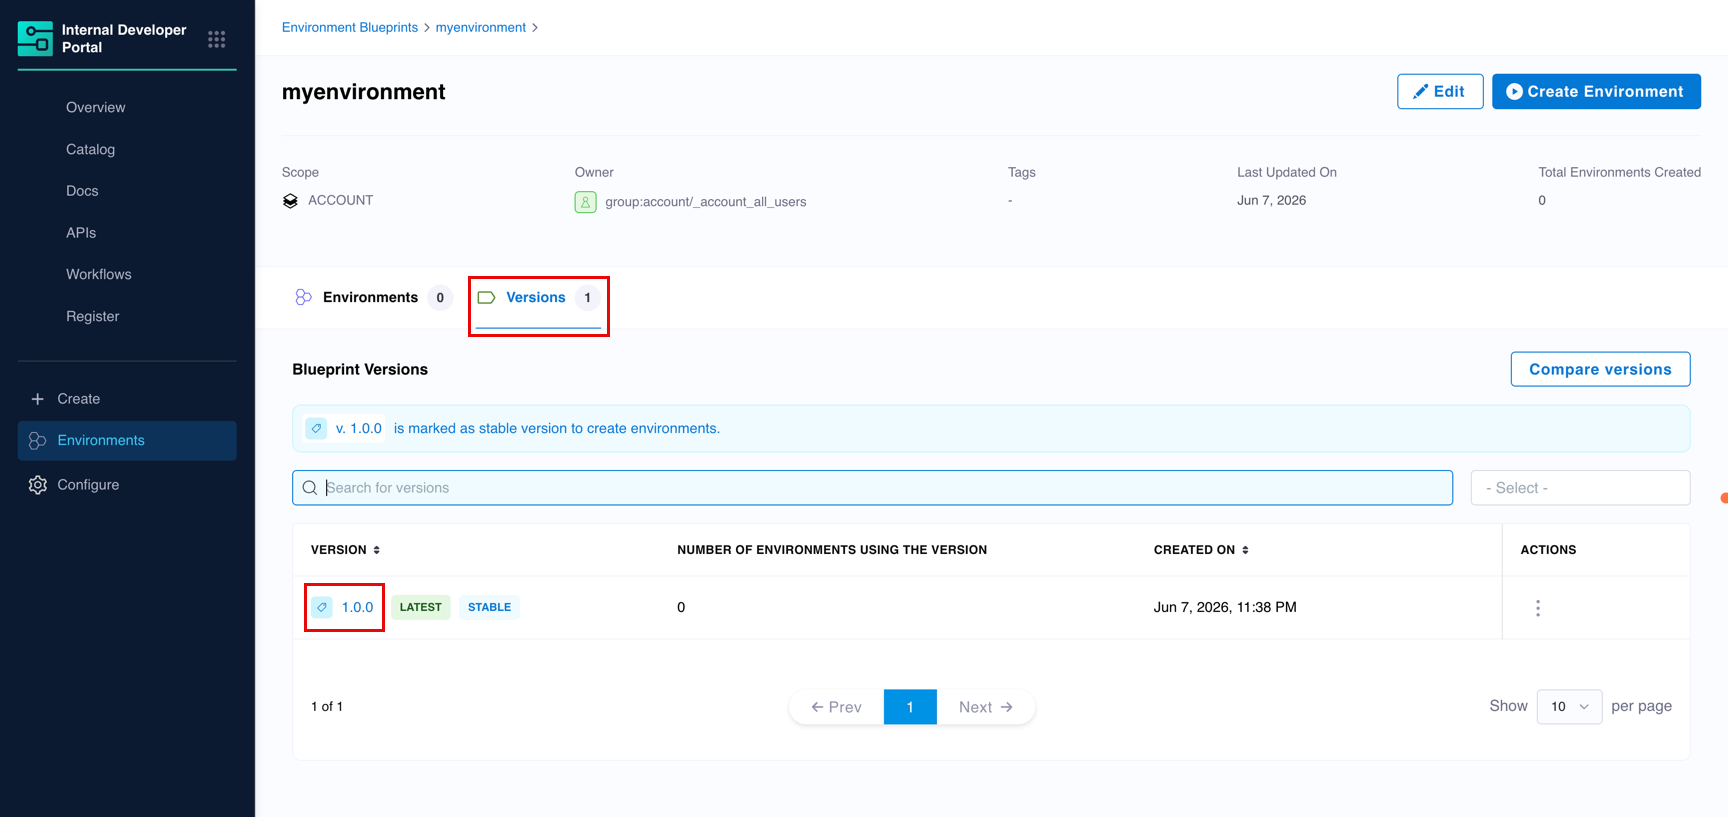
After creation, Harness IDP opens the blueprint detail page. The **Versions** tab shows the version you just created. If you marked it stable, it appears tagged as both **LATEST** and **STABLE**.
From here you can:
* Click **Create Environment** to create an environment using this blueprint.
* Select the **Versions** tab to manage, compare, or deprecate versions. Go to [Versioning](/internal-developer-portal/use-idp/environment-management/blueprints/versioning.md) to learn more.
* Click **Edit** to update the blueprint's general details.
***
### Next steps
* [Create an Environment](/internal-developer-portal/use-idp/environment-management/environments.md#create-environments) using your new blueprint.
* [Manage blueprint versions](/internal-developer-portal/use-idp/environment-management/blueprints/versioning.md) to roll out changes to your blueprint over time.
* [Set up governance policies](/internal-developer-portal/admin-and-customization/governance/opa-governance.md) to enforce blueprint standards using Harness OPA.
{% @harness-feedback/feedback %}