> For the complete documentation index, see [llms.txt](https://developer.harness.io/llms.txt). Markdown versions of documentation pages are available by appending `.md` to page URLs; this page is available as [Markdown](https://developer.harness.io/internal-developer-portal/use-idp/plugins/custom-plugins/custom-plugins-v2.md).

# Custom Plugins V2

{% hint style="info" %}
**BETA FEATURE**

Custom Plugins V2 is available behind the feature flag `IDP_ENABLE_CUSTOM_PLUGINS_V2`. If you wish to try it out, reach out to the IDP team.
{% endhint %}

### Overview <a href="#overview" id="overview"></a>

Custom Plugins V2 is a new approach to building custom plugins in Harness IDP. You build a React-based application using the [`@harnessio/idp-plugins-sdk`](https://www.npmjs.com/package/@harnessio/idp-plugins-sdk) package, compile it into a self-contained HTML file, and upload that file directly to IDP.

The SDK handles communication between your plugin and the IDP host. It provides the entity context your plugin renders on, and it proxies all outbound API calls through the configured [Backend Proxy Plugin](/internal-developer-portal/use-idp/plugins/delegate-proxy.md) so your plugin never handles secrets or makes direct network requests.

### Before you begin <a href="#before-you-begin" id="before-you-begin"></a>

* Node.js and npm installed locally.
* Access to IDP Admin in your Harness account with the `IDP_ENABLE_CUSTOM_PLUGINS_V2` feature flag enabled.

### Set up the boilerplate <a href="#set-up-the-boilerplate" id="set-up-the-boilerplate"></a>

The ['custom-plugins-v2'](https://github.com/harness/custom-plugins-v2) GitHub repository contains a ready-made project skeleton with all the boilerplate already configured.

1. Download or clone the code from [custom-plugins-v2](https://github.com/harness/custom-plugins-v2).

   ```
   git clone https://github.com/harness/custom-plugins-v2.git
   ```
2. Go to the project folder.

   ```
   cd custom-plugins-v2
   ```
3. Install dependencies.

   ```bash
   npm install
   ```
4. Start the development server.

   ```bash
   npm run dev
   ```

   The dev server starts at `https://localhost:5173`. Keep it running while you develop the plugin. [IDP's Dev Mode](#step-2-preview-with-dev-mode) will connect to it for live preview.

### Add the plugin in IDP <a href="#add-the-plugin-in-idp" id="add-the-plugin-in-idp"></a>

#### Step 1: Create the plugin entry <a href="#step-1-create-the-plugin-entry" id="step-1-create-the-plugin-entry"></a>

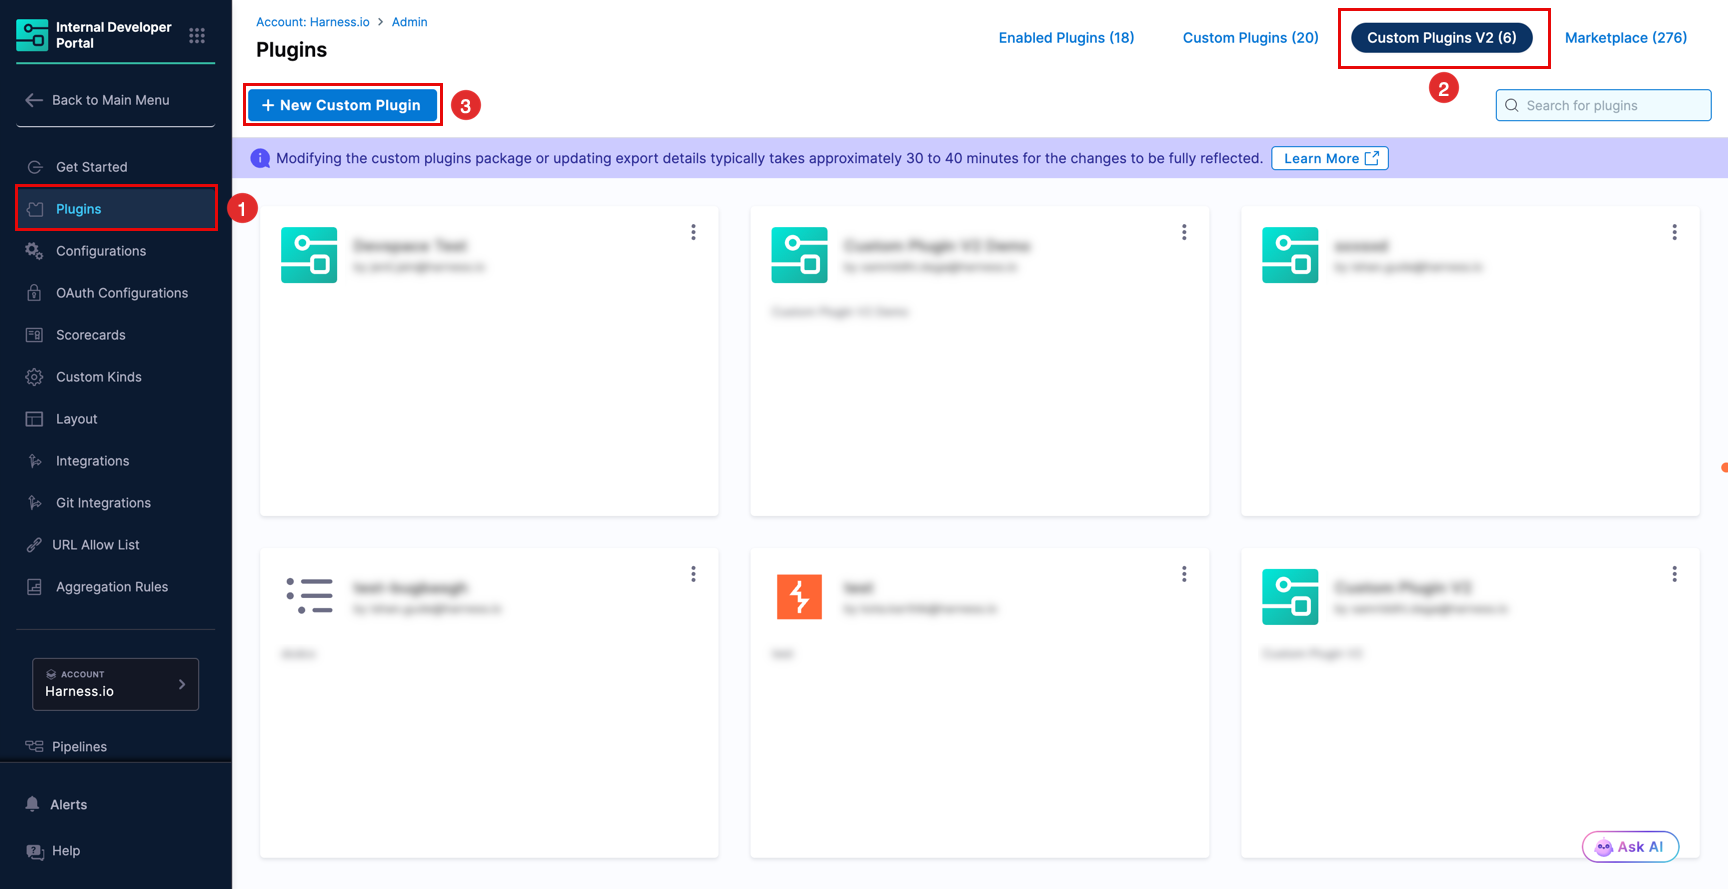
1. In IDP, go to **Configure** and click **Plugins**.
2. Navigate to the **Custom Plugins V2** tab on the top.
3. Click the **+ New Custom Plugin** button.

   <figure><img src="/files/ycnUWG2Ambv2xnAGTFLa" alt=""><figcaption></figcaption></figure>
4. Fill in the basic info fields (icon, name, description). Skip the HTML upload field for now; you will return to it after the build step.

#### Step 2: Preview with dev mode <a href="#step-2-preview-with-dev-mode" id="step-2-preview-with-dev-mode"></a>

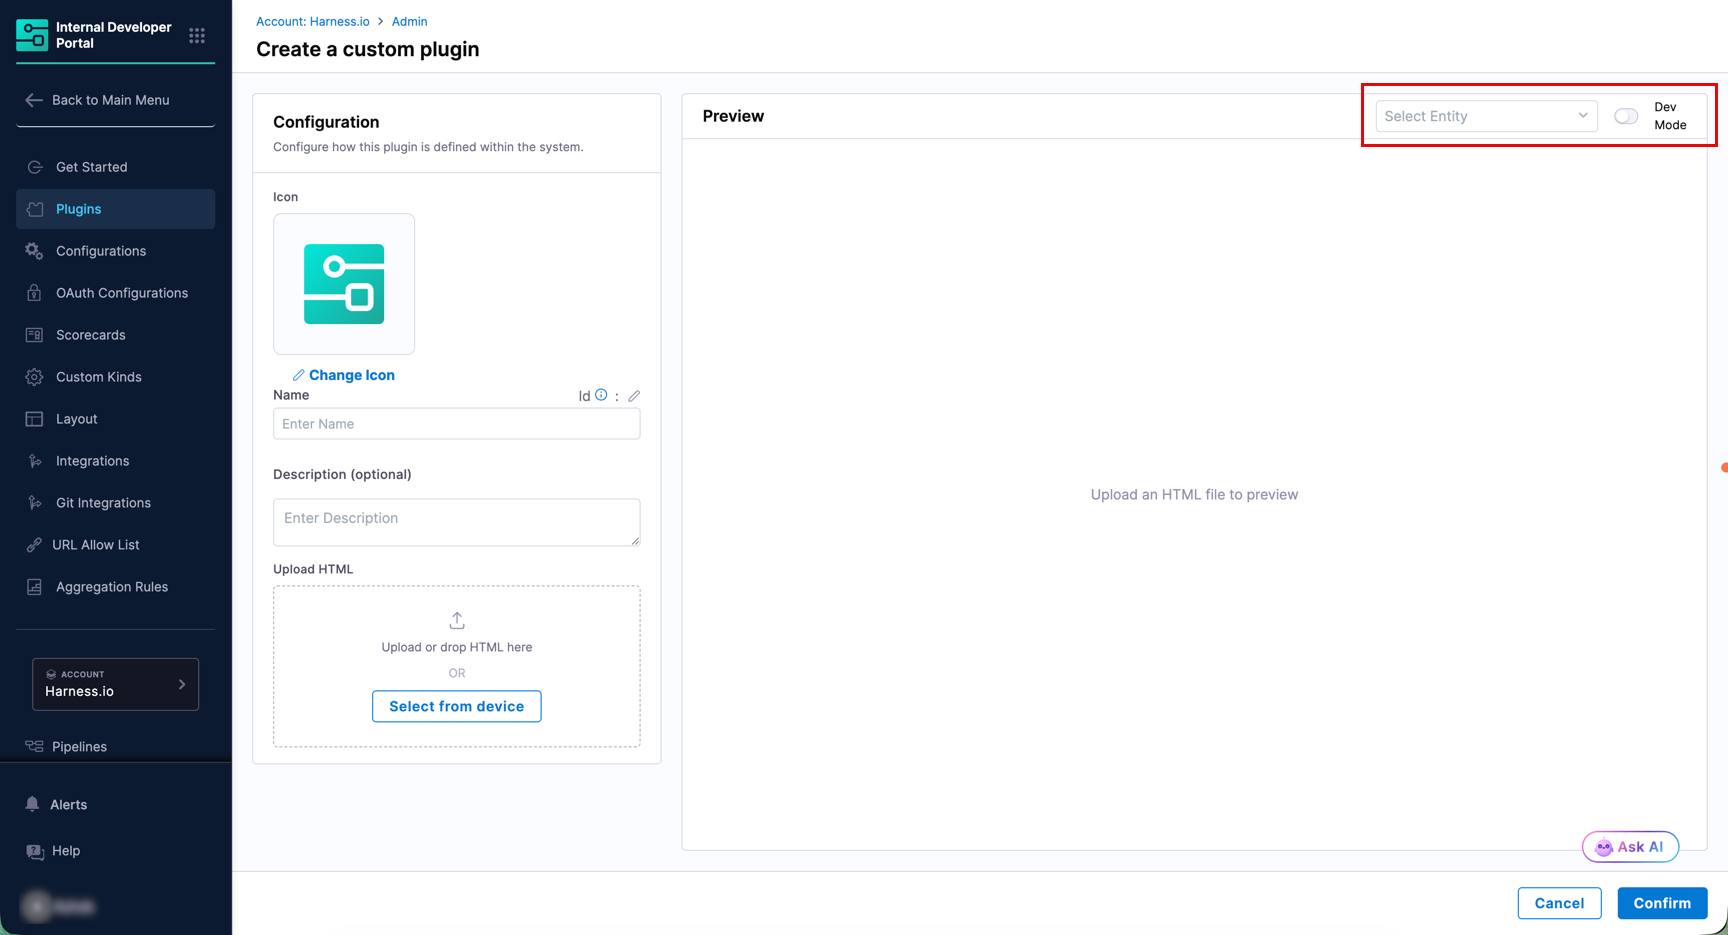
1. In the **Preview** section, select the catalog entity you want to render the plugin on.
2. Enable the **Dev Mode** using the toggle button. IDP connects to your local dev server (`https://localhost:5173`) and shows a live preview of your plugin as you make changes.

   <figure><img src="/files/9Jor4f9tyfOhX0OwAsAK" alt=""><figcaption></figcaption></figure>

#### Step 3: Build and upload <a href="#step-3-build-and-upload" id="step-3-build-and-upload"></a>

1. When you are satisfied with the result, stop the dev server and run the production build.

   ```bash
   npm run build
   ```

   This generates a single `index.html` file in the `dist` folder.
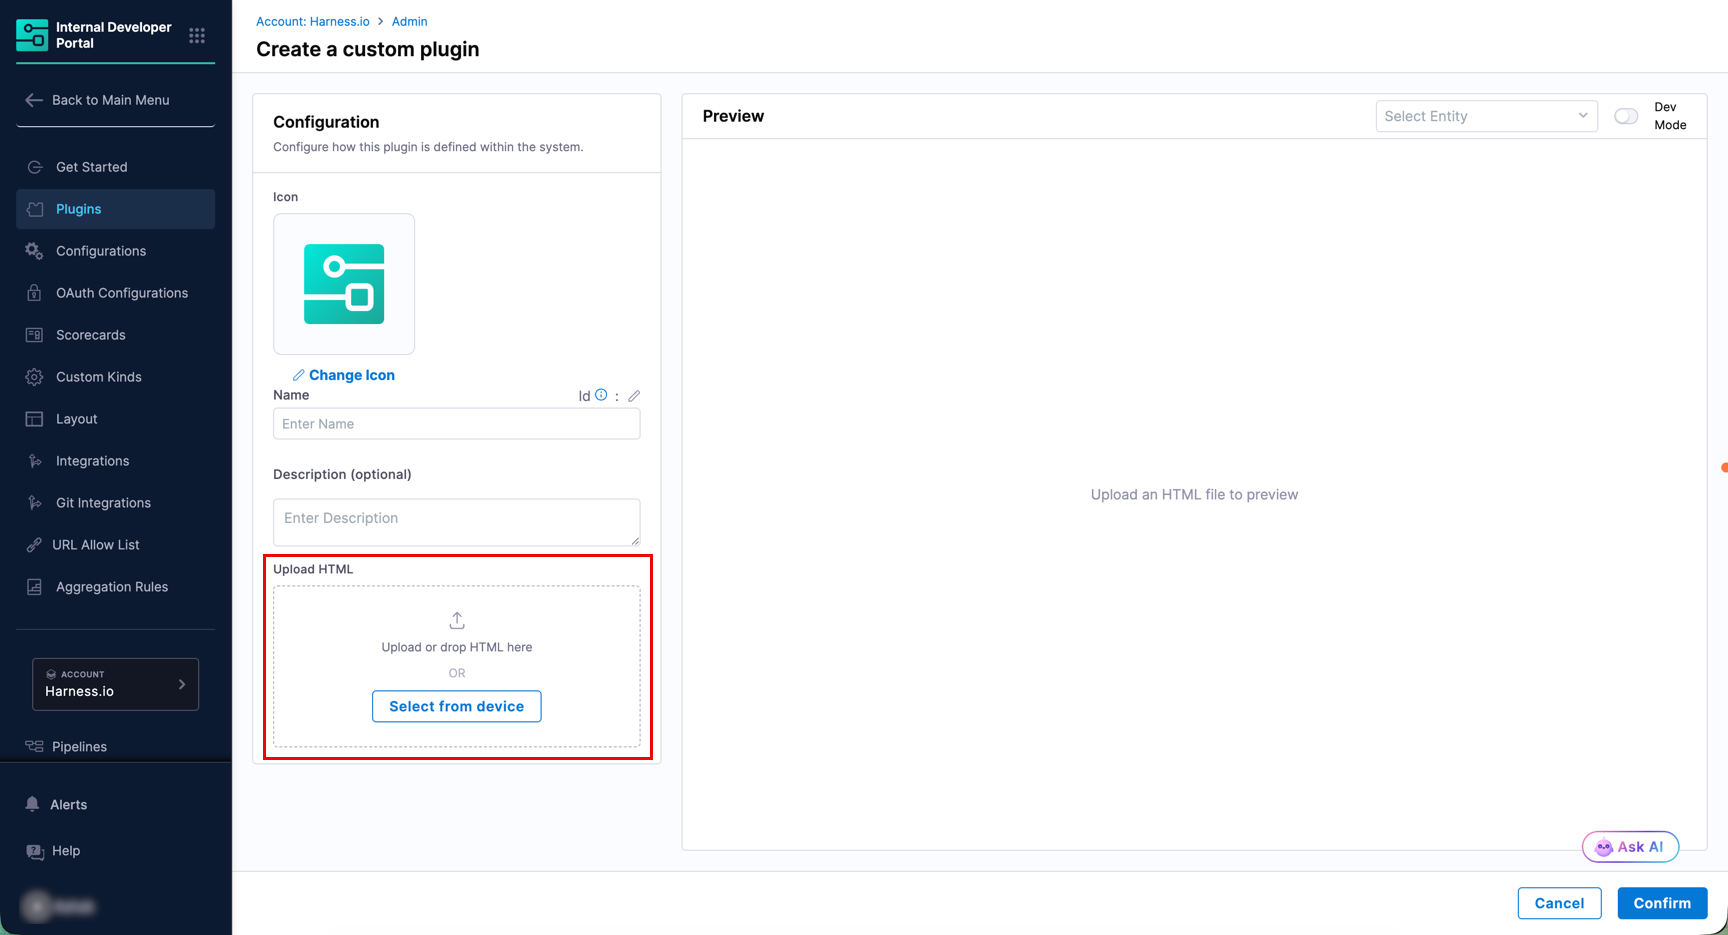
2. Return to your plugin creation page on IDP, upload the `dist/index.html` file in the HTML upload field, and save the plugin.

   <figure><img src="/files/DbaIRxUTKcZE62EQVkvD" alt=""><figcaption></figcaption></figure>

#### Step 4: Add the plugin to a layout <a href="#step-4-add-the-plugin-to-a-layout" id="step-4-add-the-plugin-to-a-layout"></a>

{% hint style="info" %}
A Custom Plugin V2 can be placed in your layout [as a **Tab**](#as-a-tab) or [as a **SideNav**](#as-a-sidenav-item) item. Placing it as a card is currently not supported.
{% endhint %}

**As a tab**

1. In IDP, go to **Configure** and select **Layout**.
2. Select **Catalog Entities**.
3. Select the layout for your intended entity kind and type (for example, `component/service`).
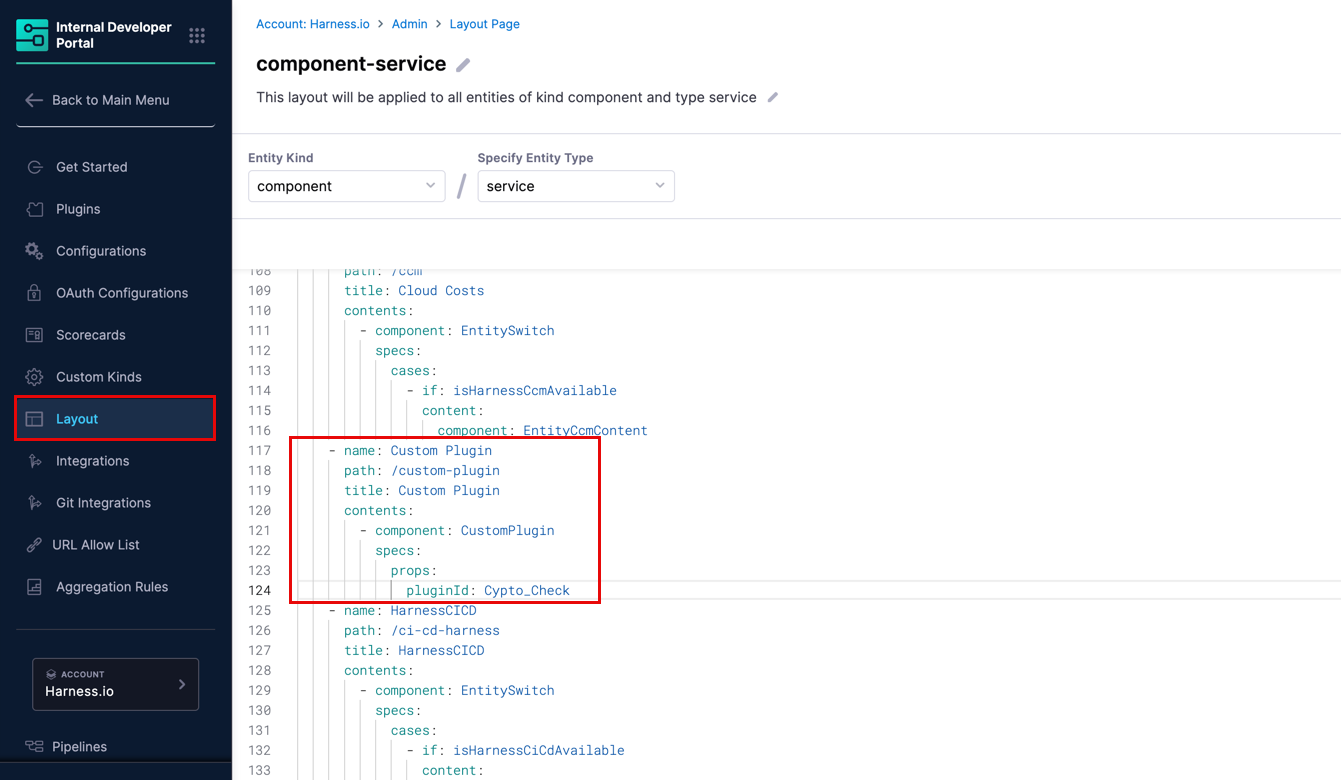
4. In the YAML editor, add the following block under the `tabs` list at the position where you want the plugin tab to appear.

   ```yaml
       - name: Custom Plugin
         path: /custom-plugin
         title: Custom Plugin
         contents:
           - component: CustomPlugin
             specs:
               props:
                 pluginId: <your-plugin-id>
   ```

   Replace `<your-plugin-id>` with the plugin ID assigned when you created the plugin.

   <figure><img src="/files/KYcQyPUIxIPSDTsP96X7" alt=""><figcaption></figcaption></figure>
5. Click **Save**.

**As a SideNav item**

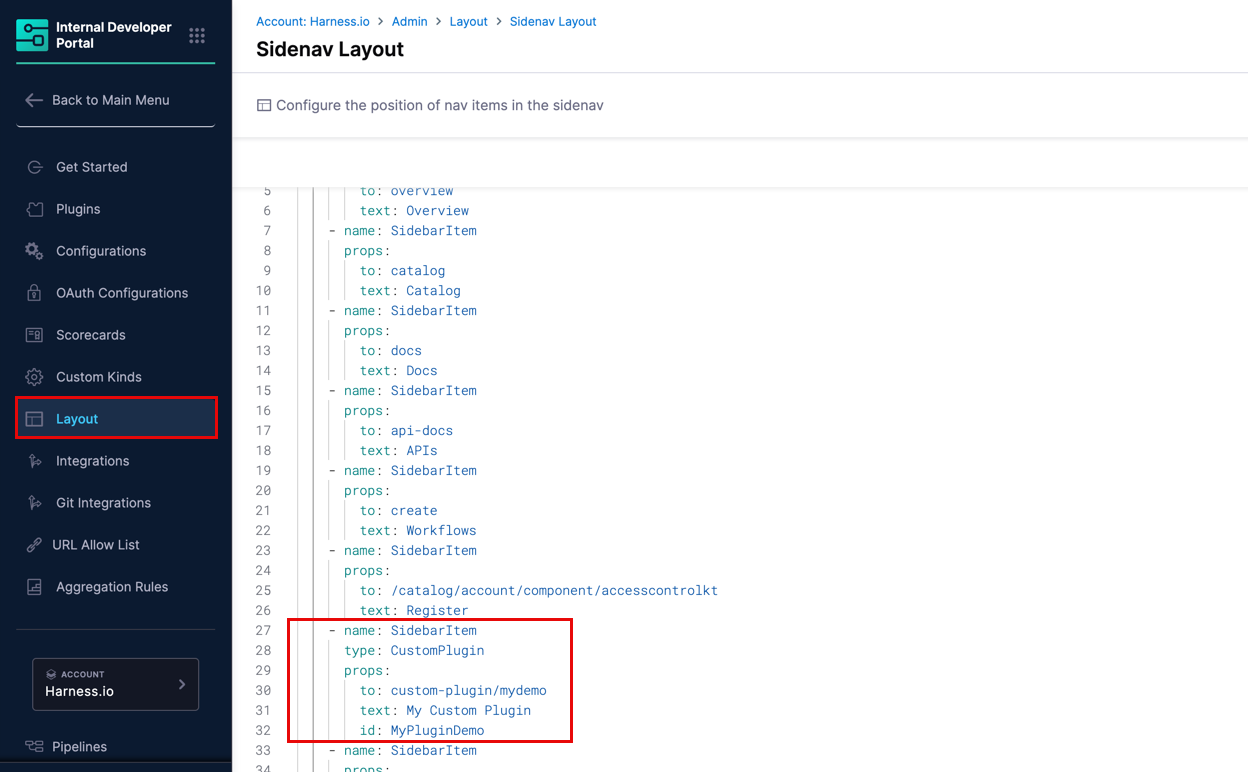
1. In IDP, go to **Configure** and select **Layout**.
2. Select **Side Navigation Bar Layout**.
3. In the YAML editor, add the following block under the `children` list at the position where you want the custom plugin nav to appear.

   ```yaml
       - name: SidebarItem
         type: CustomPlugin
         props:
           to: custom-plugin/mydemo
           text: My Custom Plugin
           id: <your-plugin-id>
   ```

   | Field  | Description                                                                                                                                  |
   | ------ | -------------------------------------------------------------------------------------------------------------------------------------------- |
   | `to`   | The endpoint for this nav item. Starts with `custom-plugin/` followed by a unique string of your choice, for example `custom-plugin/mydemo`. |
   | `text` | The label to be shown for your plugin in the side navigation.                                                                                |
   | `id`   | The plugin ID assigned when you created the plugin.                                                                                          |

   <figure><img src="/files/fJ5h1FI1o0PESAFSXLkE" alt=""><figcaption></figcaption></figure>
4. Click **Save**.

***

### SDK usage guide <a href="#sdk-usage-guide" id="sdk-usage-guide"></a>

The `@harnessio/idp-plugins-sdk` package is already included in the boilerplate. The sections below explain the key APIs it provides.

#### App setup <a href="#app-setup" id="app-setup"></a>

Wrap your app with `PluginContextProvider` and `PluginRouter`, then call `PluginAPI.init()` after the component mounts. The boilerplate `main.tsx` does this for you.

```tsx
// main.tsx
import { PluginAPI, PluginContextProvider, PluginRouter } from '@harnessio/idp-plugins-sdk';
import { createRoot } from 'react-dom/client';
import App from './App';

document.addEventListener('DOMContentLoaded', () => {
  createRoot(document.getElementById('root')!).render(
    <PluginContextProvider>
      <PluginRouter>
        <App />
      </PluginRouter>
    </PluginContextProvider>
  )

  setTimeout(() => {
    PluginAPI.init()
  }, 0)
})
```

#### Use context <a href="#use-context" id="use-context"></a>

After initialization, the IDP host sends your plugin the context for the entity it is rendering on. Access it with the `usePluginContext` hook.

```tsx
import { usePluginContext } from '@harnessio/idp-plugins-sdk';

function MyComponent() {
  const context = usePluginContext()

  if (!context) return <p>Loading...</p>

  const entity = context.entity

  return (
    <div>
      <p>Name: {entity?.metadata?.name}</p>
      <p>Kind: {entity?.kind}</p>
      <p>Owner: {entity?.spec?.owner}</p>
    </div>
  )
}
```

The `entity` object is the standard Harness Entity Object. You can read entity annotations to drive plugin behavior. For example, reading `github.com/project-slug` tells your plugin which GitHub repository to fetch data from.

#### Make proxy fetch calls <a href="#make-proxy-fetch-calls" id="make-proxy-fetch-calls"></a>

Plugins cannot make direct network requests because the production environment blocks them via CSP. Use `PluginAPI.proxyFetch()` to route all API calls through the IDP host instead.

{% hint style="info" %}
You must configure the [Backend Proxy Plugin](/internal-developer-portal/use-idp/plugins/delegate-proxy.md) before making proxy fetch calls. The endpoint paths you pass to `proxyFetch` must match the endpoints you defined there.
{% endhint %}

```tsx
import { PluginAPI } from '@harnessio/idp-plugins-sdk';

// GET request. The path is the endpoint you configured in Backend Proxy Plugin.
const res = await PluginAPI.proxyFetch('/your-configured-endpoint/some-path')
const data = await res.json()

// POST request with body
const res = await PluginAPI.proxyFetch('/your-configured-endpoint/create', {
  method: 'POST',
  headers: { 'Content-Type': 'application/json' },
  body: JSON.stringify({ name: 'example' }),
})
```

The endpoint path (for example, `/github`) corresponds to the endpoint name you configured in the Backend Proxy Plugin. All paths under that endpoint follow the same prefix.

```tsx
// Example: reading the GitHub project slug from entity annotations
// and fetching pull requests through the "/github" proxy endpoint

const context = usePluginContext()
const slug = context.entity?.metadata?.annotations?.['github.com/project-slug']

const res = await PluginAPI.proxyFetch(`/github/repos/${slug}/pulls`)
const pulls = await res.json()
```

**How it works:**

1. Your plugin calls `PluginAPI.proxyFetch(url, init)`.
2. The IDP host makes the actual HTTP request through the Backend Proxy Plugin, which handles authentication and routing.
3. The host returns the response to your plugin.

Your plugin never touches secrets. Authentication is handled entirely by the Backend Proxy Plugin configuration.