> For the complete documentation index, see [llms.txt](https://developer.harness.io/llms.txt). Markdown versions of documentation pages are available by appending `.md` to page URLs; this page is available as [Markdown](https://developer.harness.io/internal-developer-portal/use-idp/self-service-workflows/workflowyaml.md).
# Understanding Workflow YAML
Get started with creating your Workflows using the Workflow YAML configuration.
{% hint style="info" %}
Workflows installed from the [Workflow Library](/internal-developer-portal/use-idp/self-service-workflows/workflow-library/overview.md) are ordinary IDP Workflows and use this same YAML structure. Go to [Customize an installed workflow](/internal-developer-portal/use-idp/self-service-workflows/workflow-library/customize-an-installed-workflow.md) to learn what you can change after install.
{% endhint %}
## Understanding Workflow YAML
Workflows are stored in the Software Catalog under the kind **“Template”.** You can create and configure your own workflows in Harness IDP using a YAML file typically named **`workflow.yaml`.** This YAML file acts as the single source of truth, describing the workflow and its metadata. Below is an overview of its configuration.
#### Workflow YAML definition
A workflow is defined through a YAML configuration file, usually named `workflow.yaml`, which contains all the workflow’s metadata.
The syntax and guidelines for writing this YAML configuration file are inspired by Backstage Templates. Go to [Backstage guidelines](https://backstage.io/docs/features/software-templates/writing-templates#specparameters---formstep--formstep) to review the original template syntax.
#### Components of workflow YAML
The `workflow.yaml` has three main components:
1. **Frontend**: Configures the input fields required for the workflow.
2. **Backend**: Configures the actions to be triggered and the orchestration pipelines to be executed.
3. **Outputs**: Configures output variables to be used after backend execution.

These components work together to facilitate workflow execution. Let’s dive deeper into each.
[**Workflow frontend**](/internal-developer-portal/use-idp/self-service-workflows/create-workflow/flows-input.md)
The frontend of Harness IDP workflows is customizable to accept different types of input fields based on custom requirements. This frontend serves as the entry point, where users fill in the necessary details to execute the workflow using the input parameters described.
**How to define the workflow frontend?**
* You can configure one or more pages of input fields in the frontend using the `spec.parameters` field in your YAML configuration.
* You can define multiple input fields using the `properties` field in your YAML configuration.
{% tabs %}
{% tab title="YAML" %}
**Example Syntax**:
```yaml
spec:
owner: backstage/techdocs-core
type: service
parameters:
- title: A registration form
description: A simple form example.
type: object
required:
- firstName
- lastName
properties:
firstName:
type: string
title: First name
default: Chuck
lastName:
type: string
title: Last name
```
{% endtab %}
{% tab title="Template Playground" %}

{% endtab %}
{% endtabs %}
**Parameter Types**
A workflow definition can accept a wide range of input types, including:
* **String**: Simple text fields used for names, IDs, or environment types.
* **Integer**: Numeric inputs used for values like quotas or age limits.
* **Array**: Useful for handling multiple inputs, such as a list of dependencies or services.
* **Object**: Enables complex data structures, allowing nested fields for detailed configurations.
**User Interaction and Validation**
Here are some ways you can configure your workflow's frontend to enhance user interaction and validation:
* **UI Widgets for User Input:** Inputs can include interactive UI components that simplify user interaction. For example, a string input can use `ui:field: OwnerPicker` to let users select User Groups from a dropdown list.
* **Default Values:** You can set default values for parameters to guide users toward commonly used inputs, streamlining the onboarding process and improving user experience.
* **Field Dependency:** Input fields can be made dynamic using `anyOf` or `allOf`, making certain fields appear only based on previous user selections. For instance, selecting a "production" environment could reveal additional fields for production-specific configurations.
* **Required Fields:** Workflows allow developers to enforce mandatory fields to ensure critical data is collected. For example, fields like age or owner can be marked as required to prevent missing essential information during onboarding.
Go to [Configuring Workflow Inputs](/internal-developer-portal/use-idp/self-service-workflows/create-workflow/flows-input.md) to configure inputs and the frontend for your Workflow.
**Workflow backend**
The backend of Harness IDP workflows includes a library of steps and actions to define the workflow logic. These steps are core execution units used to trigger actions and orchestration pipelines. Input details from the frontend are passed to the backend for task execution.
**How to define the workflow backend?**
You can configure the backend using the `spec.steps` field in your YAML configuration.
**Example Syntax**:
```yaml
steps:
- id: trigger
name: Creating your react app
action: trigger:harness-custom-pipeline
input:
url: "YOUR PIPELINE URL"
inputset:
project_name: ${{ parameters.project_name }}
github_repo: ${{ parameters.github_repo }}
github_org: ${{ parameters.github_org }}
github_token: ${{ parameters.github_token }}
apikey: ${{ parameters.token }}
- id: another-step
name: Clean up # Trigger another pipeline
action: trigger:harness-custom-pipeline
input:
url: "YOUR PIPELINE URL"
apikey: ${{ parameters.token }}
```
[**Supported actions**](/internal-developer-portal/use-idp/self-service-workflows/create-workflow/custom-actions.md)
Workflow Actions are integration points with third-party tools, designed to take inputs from the workflow's frontend and execute specific tasks based on user input. Workflows include several built-in actions for fetching content, registering in the catalog, and performing key operations such as creating and publishing a Git repository.
Here are some examples used in a workflow:
* **Triggering Pipelines**: Using `trigger:harness-custom-pipeline` to trigger pipelines in Harness for various actions, such as creating a repository or onboarding a new service.
* **Creating Repositories**: Using `trigger:harness-custom-pipeline` to execute a pipeline with a `create-repo` stage, generating a new repository based on the provided input.
* **Logging Data**: Using `debug:log` to capture and display specific input details in the IDP Workflows Logs UI.
[**Harness pipeline**](/internal-developer-portal/use-idp/self-service-workflows/create-workflow/harness-pipeline.md)
Self-service workflows in Harness IDP are powered by **Harness Pipeline**. Each workflow’s backend is configured using Actions and Harness Pipelines.
When a workflow is executed, users provide input details required for pipeline execution. These inputs are passed into the pipeline through a workflow action, which triggers specific steps in the pipeline. These steps can perform tasks such as launching a CI/CD process, registering a service in the catalog, setting up infrastructure, etc.
[**Workflow outputs**](/internal-developer-portal/use-idp/self-service-workflows/create-workflow/outputs.md)
After backend execution, each step can produce output variables, which can be displayed in the frontend. These outputs can include links to newly created resources like Git repositories, documentation pages, or CI/CD pipelines.
**Example Syntax**:
```yaml
output:
links:
- title: "Repository Link"
url: "${{ steps['repo-create'].output.repoUrl }}"
- title: "Pipeline Dashboard"
url: "${{ steps['deploy-pipeline'].output.pipelineUrl }}"
```
#### Authentication
There are two ways in which **Workflow to Harness Pipeline authentication** works in **Harness IDP Workflows**. You can trigger a Harness Pipeline in an IDP Workflow using the following modes:
💾 **User Session Token**
* The **user's session token** is used to trigger the Harness Pipeline.
* The user must have **execute permissions** for the underlying pipeline(s) to ensure successful execution.
🔑 **Harness API Key Secret**
* A pre-configured **Harness API Key Secret** is used to trigger the Harness Pipeline.
* The user does **not** need direct access to the underlying pipeline(s); however, the API key must have the **execute permissions** for the underlying pipeline(s).
These authentication modes can be defined while using the following action: [**`trigger:harness-custom-pipeline`**](/internal-developer-portal/use-idp/self-service-workflows/create-workflow/custom-actions.md#1-triggerharness-custom-pipeline).
**Modes**
| | 💾 **User Session Token** | 🔑 **Harness API Key Secret** |
| -------------------------------- | -------------------------------------------------------------------------------------------------------------------------------------------------------------------------------------------------------------------------------------------------------------------------------------------------------------------------------------- | ---------------------------------------------------------------------------------------------------------------------------------------------------------------------------------------------------------------------------------------------------------------------------------------------------------------------------------------- |
| **Overview** | The user who triggers the workflow uses their **own credentials** to trigger the pipeline. The user must have **Execute permission** for the underlying pipeline(s) to ensure successful execution. | The user triggers the workflow using a **dedicated API Key** to initiate the pipeline. In this case, the user **may not have direct access** to the underlying pipeline(s). Platform engineers can generate the necessary API token and configure it within the workflow as default, ensuring no user can access or modify the pipeline. |
| **When to use (Ideal scenario)** | The **workflow** exists in an **open scope**, while the **underlying pipeline(s)** are in a project where **All Account Users (or All Org Users)** have Pipeline Execute permission. | The **Pipeline** lives in a **closed project** where you do not want to give users **direct View and Execute permissions**. This is useful to hide the business/implementation. |
| **Ease of setup** | Easy to set up, requires **adding a field under parameters** in the workflow. | Requires **creation and management of a Harness API Key**, also configuring the workflow with the secret identifier. |
| **RBAC Setup** | Requires adding **All Account** Users (or specific users and groups) to the project where pipeline resides with the **Pipeline Execute** permission. This could be a tedious setup and can expose other pipelines in the project as well. (Ideally such pipelines should live in a dedicated project for IDP Workflows which are open) | The Workflow and Pipeline can live in **different scopes** but can be connected with the **Platform Engineer’s API Key**. |
**💾 Mode 1: User session token**
You can trigger a pipeline in Harness IDP Workflows using the **`user session token`** mode by specifying the **`token`** setup in your **`parameters.properties`** section of the **Workflow YAML**.
**1. Defining the `token` setup:**
This is defined under the `parameter.properties` spec to extract the user session token. This token is then used to execute the pipeline.
{% hint style="warning" %}
The **`token`** property used to fetch the **Harness Auth Token** is hidden on the **Review Step** using **`ui:widget: password`**. However, for this to function correctly in a **multi-page workflow**, the token property must be included under the **first `page`**.
```yaml
parameters:
- title:
properties:
property-1:
title: title-1
type: string
property-2:
title: title-2
token:
title: Harness Token
type: string
ui:widget: password
ui:field: HarnessAuthToken
- title:
properties:
property-1:
title: title-1
type: string
property-2:
title: title-2
- title:
```
{% endhint %}
```yaml
token:
title: Harness Token
type: string
ui:widget: password
ui:field: HarnessAuthToken
```
**2. Referencing the `token` in the `steps` spec of the workflow YAML:**
You will need to reference the **`token`** within the **steps** section using the following format:
```yaml
apikey: ${{ parameters.token }}
```
**Example YAML:**
```yaml
parameters:
- title: Deploy service
required:
- username
properties:
username:
title: Username
type: string
token:
title: Harness Token
type: string
ui:widget: password
ui:field: HarnessAuthToken
steps:
- id: trigger
name: Run Deploy service
action: trigger:harness-custom-pipeline
input:
url: pipeline url
inputset:
username: ${{ parameters.username }}
apikey: ${{ parameters.token }}
output:
links:
- title: Pipeline Details
url: ${{ steps.trigger.output.PipelineUrl }}
```
**YAML breakdown:**
* In the above example, the **`apikey`** parameter retrieves its value from **Harness Token**, which is defined in the **`parameters.properties`** section as a required input.
* Without the **`token`** parameter input, the pipeline will not be executed.
* [Take a look at this example for further clarification.](https://github.com/harness-community/idp-samples/blob/eb9988020d3917c0bca7daccb354ba670626221b/tutorial-self-service-flow-template.yaml#L64-L68)
**🔑 Mode 2: Harness API key secret**
You can also trigger a pipeline in an IDP Workflow using a **pre-configured Harness API Key**. Here is how you can set this up:
* Create a [Harness API Key Secret](https://developer.harness.io/harness-platform/troubleshooting-and-resources/tutorials/add-secrets-manager#create-secrets).
* Store it in [Harness Secret Manager](https://developer.harness.io/harness-platform/use-harness-platform/secrets/secrets-management/harness-secret-manager-overview) or in an external secret manager. Secrets in an external secret manager are resolved through the delegate.
* The secret is supported at any scope: account, organization, or project.
* The secret must have `execute permissions` to the underlying pipeline(s).
**Reference the `secret` in the `steps` spec:**
```yaml
apiKeySecret: "secretId"
```
Here, `secretId` refers to the identifier of the secret which stores the **Harness API Key**. You can retrieve this `secretId` from the **Harness Secret Manager**.
**Example YAML:**
```yaml
parameters:
- title: Deploy service
required:
- username
properties:
username:
title: Username
type: string
steps:
- id: trigger
name: Run Deploy service
action: trigger:harness-custom-pipeline
input:
url: pipeline url
inputset:
username: ${{ parameters.username }}
apiKeySecret: "secretId"
output:
links:
- title: Pipeline Details
url: ${{ steps.trigger.output.PipelineUrl }}
```
The **`apiKeySecret`** field retrieves its value from **`secretId`**, which is the Harness secret identifier.
{% hint style="info" %}
Authentication using the user session token is **no longer required** in case you are using the Harness API Key Secret authentication mode.
{% endhint %}
#### Example YAML
Here is an example of a single-page workflow:
```yaml
apiVersion: harness.io/v1
kind: Workflow
type: service
identifier: reactapp
name: Create a new service
owner: d.p@harness.io
spec:
output:
links:
- title: Pipeline Details
url: ${{ steps.trigger.output.PipelineUrl }}
parameters:
- title: Service Details
required:
- project_name
- template_type
- public_template_url
- repository_type
- repository_description
- repository_default_branch
- direct_push_branch
- slack_id
properties:
token:
title: Harness Token
type: string
ui:widget: password
ui:field: HarnessAuthToken
projectId:
title: Project Identifier
description: Harness Project Identifier
type: string
ui:field: HarnessProjectPicker
template_type:
title: Type of the Template
type: string
description: Type of the Template
public_template_url:
title: Give a Public template URL
type: string
description: Give a Public Cookiecutter Template
repository_type:
type: string
title: Repository Type
enum:
- public
- private
default: Public
repository_description:
type: string
title: Add a description to your repo
description: Auto-generated using Self-Service-Flow of Harness-IDP
owner:
title: Choose an Owner for the Service
type: string
ui:field: OwnerPicker
ui:options:
allowedKinds:
- Group
steps:
- id: trigger
name: Creating your react app
action: trigger:harness-custom-pipeline
input:
url: https://app.harness.io/ng/account/account_id/module/idp/orgs/org_id/projects/project_id/pipelines/pipeline_id/pipeline-studio/?storeType=INLINE
inputset:
project_name: ${{ parameters.project_name }}
template_type: ${{ parameters.template_type }}
public_template_url: ${{ parameters.public_template_url }}
apikey: ${{ parameters.token }}
metadata:
description: A Workflow to create a new service
tags:
- nextjs
- react
- javascript
```
#### Workflows Playground
{% hint style="warning" %}
The Workflows Playground **does not render accurate previews** for **advanced user inputs** and **complex use cases** such as conditional fields or complex input formats. It is recommended to use the editor only for **lightweight input previews**. For accurate validation of **advanced inputs**, test the Workflow Form Inputs in an **actual Workflow execution**.
Also, note that the features [Updating Fields using Form Context](/internal-developer-portal/use-idp/self-service-workflows/workflows-tutorials/dynamic-picker.md#updating-fields-using-form-context) and [Live User Validation](/internal-developer-portal/use-idp/self-service-workflows/workflows-tutorials/dynamic-picker.md#live-user-validation-using-api-requests) are not supported in your **Workflow Playground Editor**. You will not be able to implement or test these features in the playground.
{% endhint %}
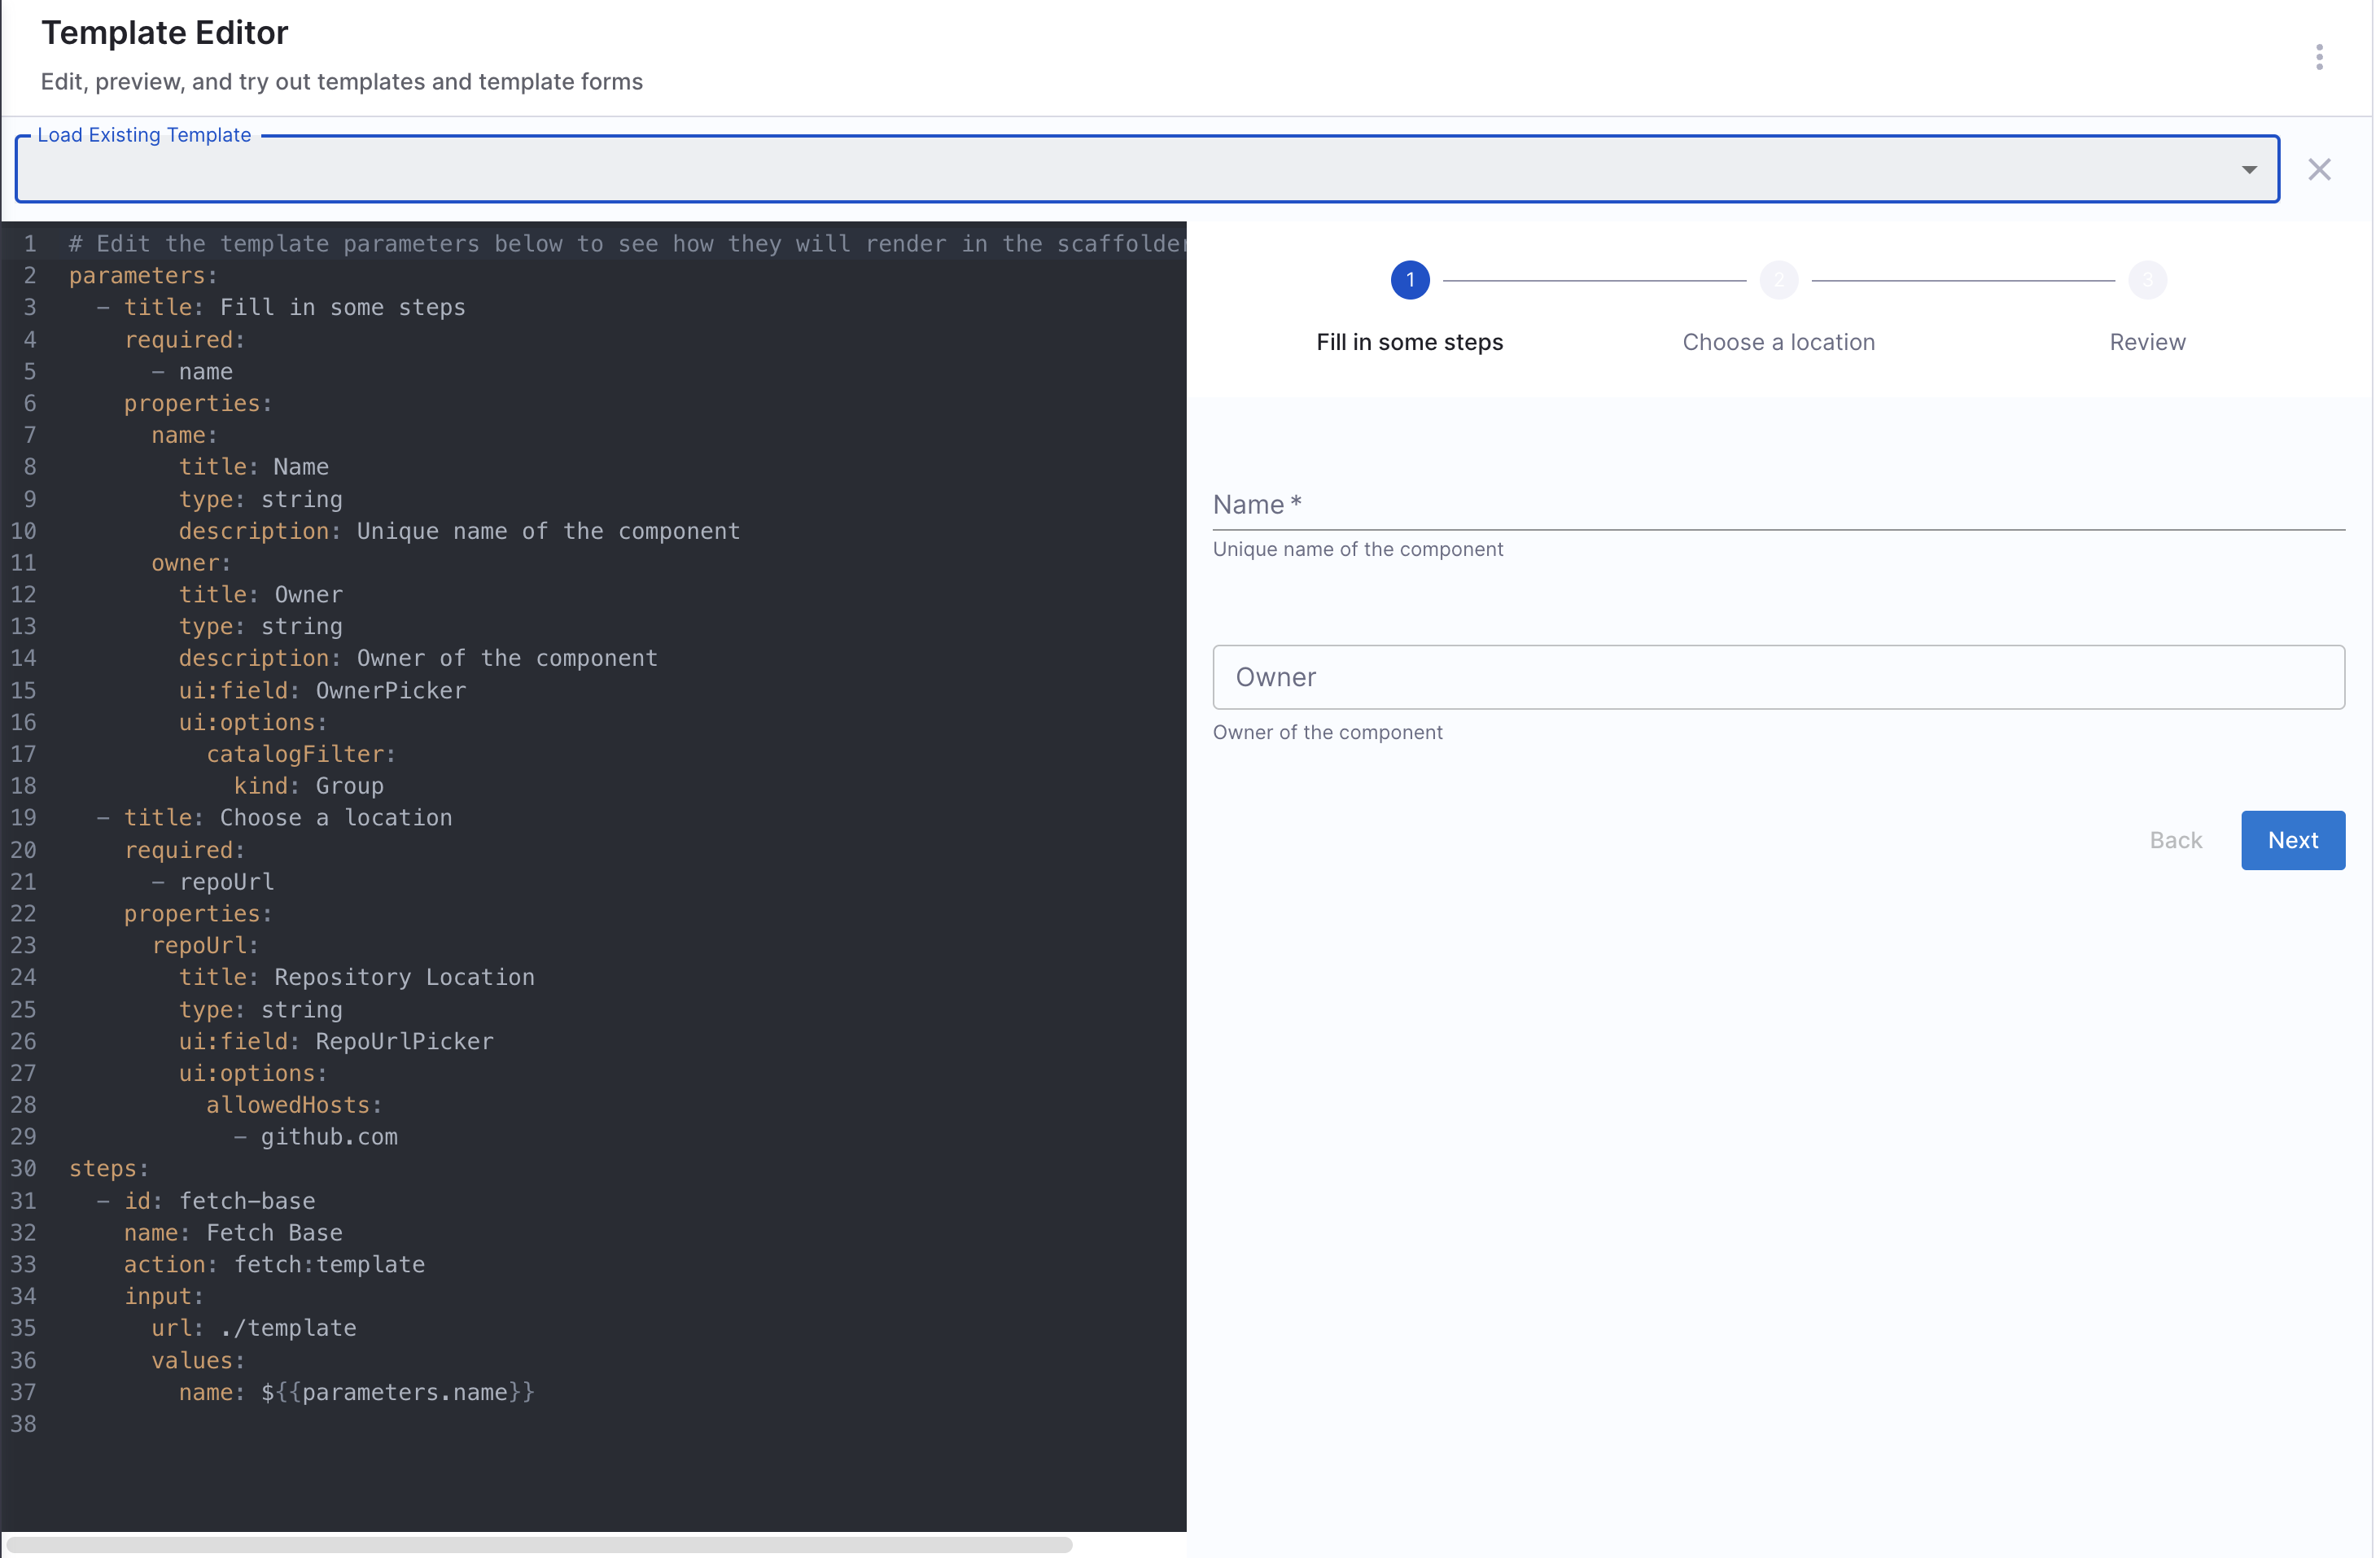
Harness IDP also provides a **built-in editor** to help you build your **Workflow's Frontend**. It offers a real-time preview of the corresponding UI based on the YAML definition. Here, you can create a new workflow or edit an existing one. '
**Note:** The editor is for **preview purposes** only; changes made here cannot be saved. Once you have tested the modifications, you must manually copy the updated YAML and add it to the Workflow definition YAML stored in your Git provider.
Here is how you can access the playground:
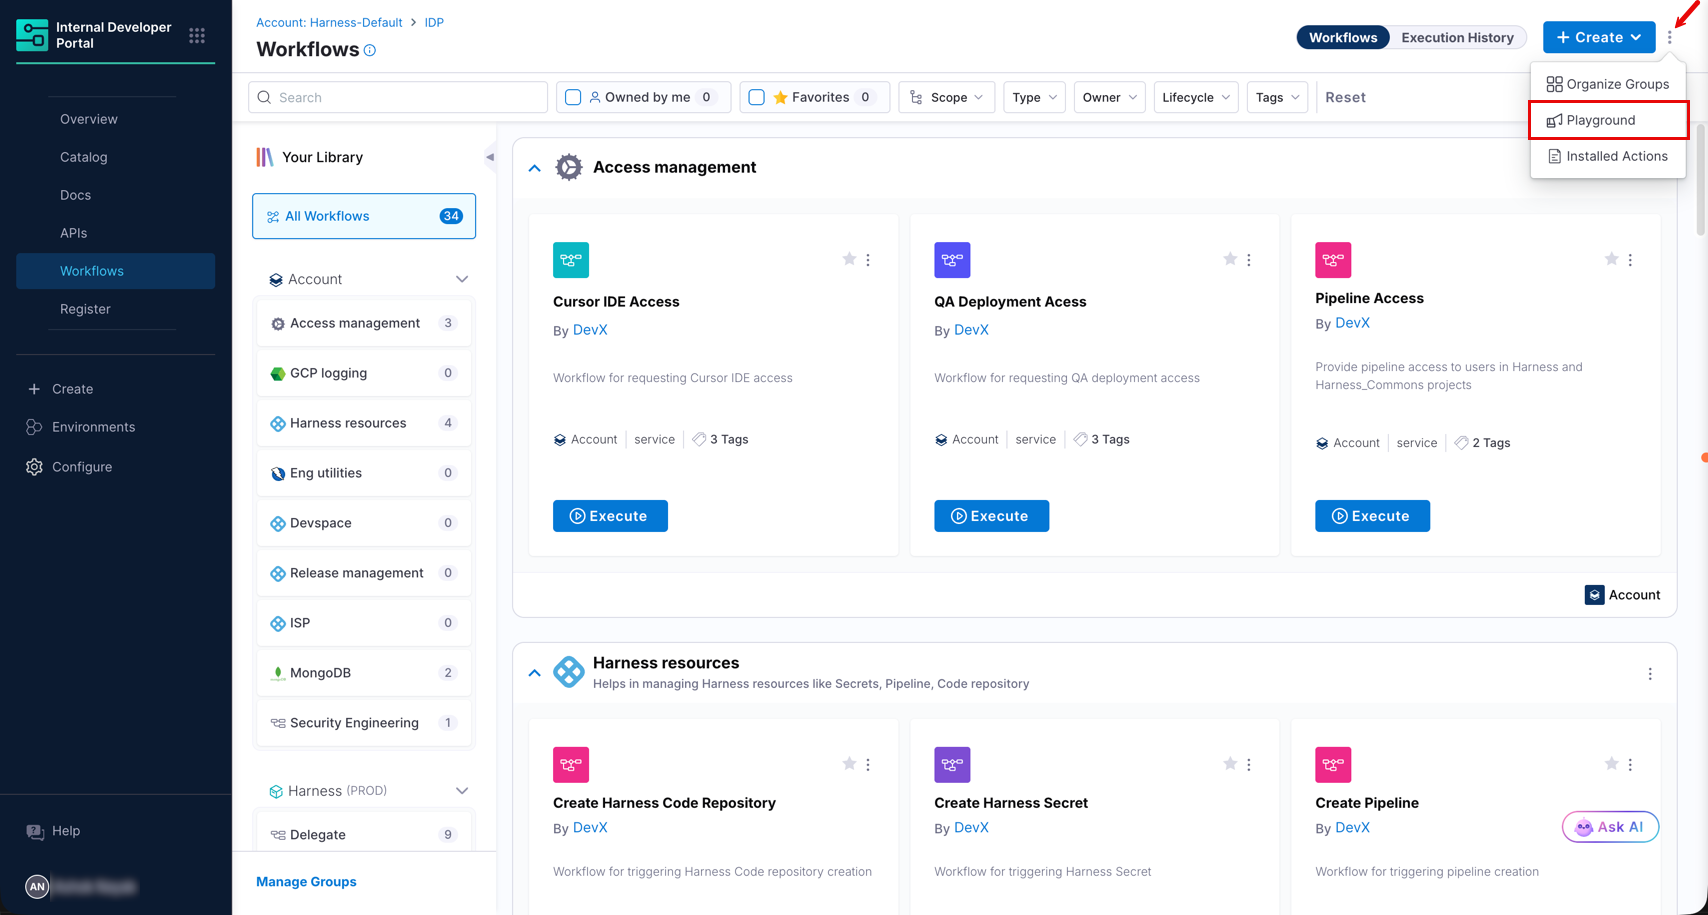
1. Go to your **Workflows** page. Click on the **three dots** in the top right corner and select **Open Playground**.
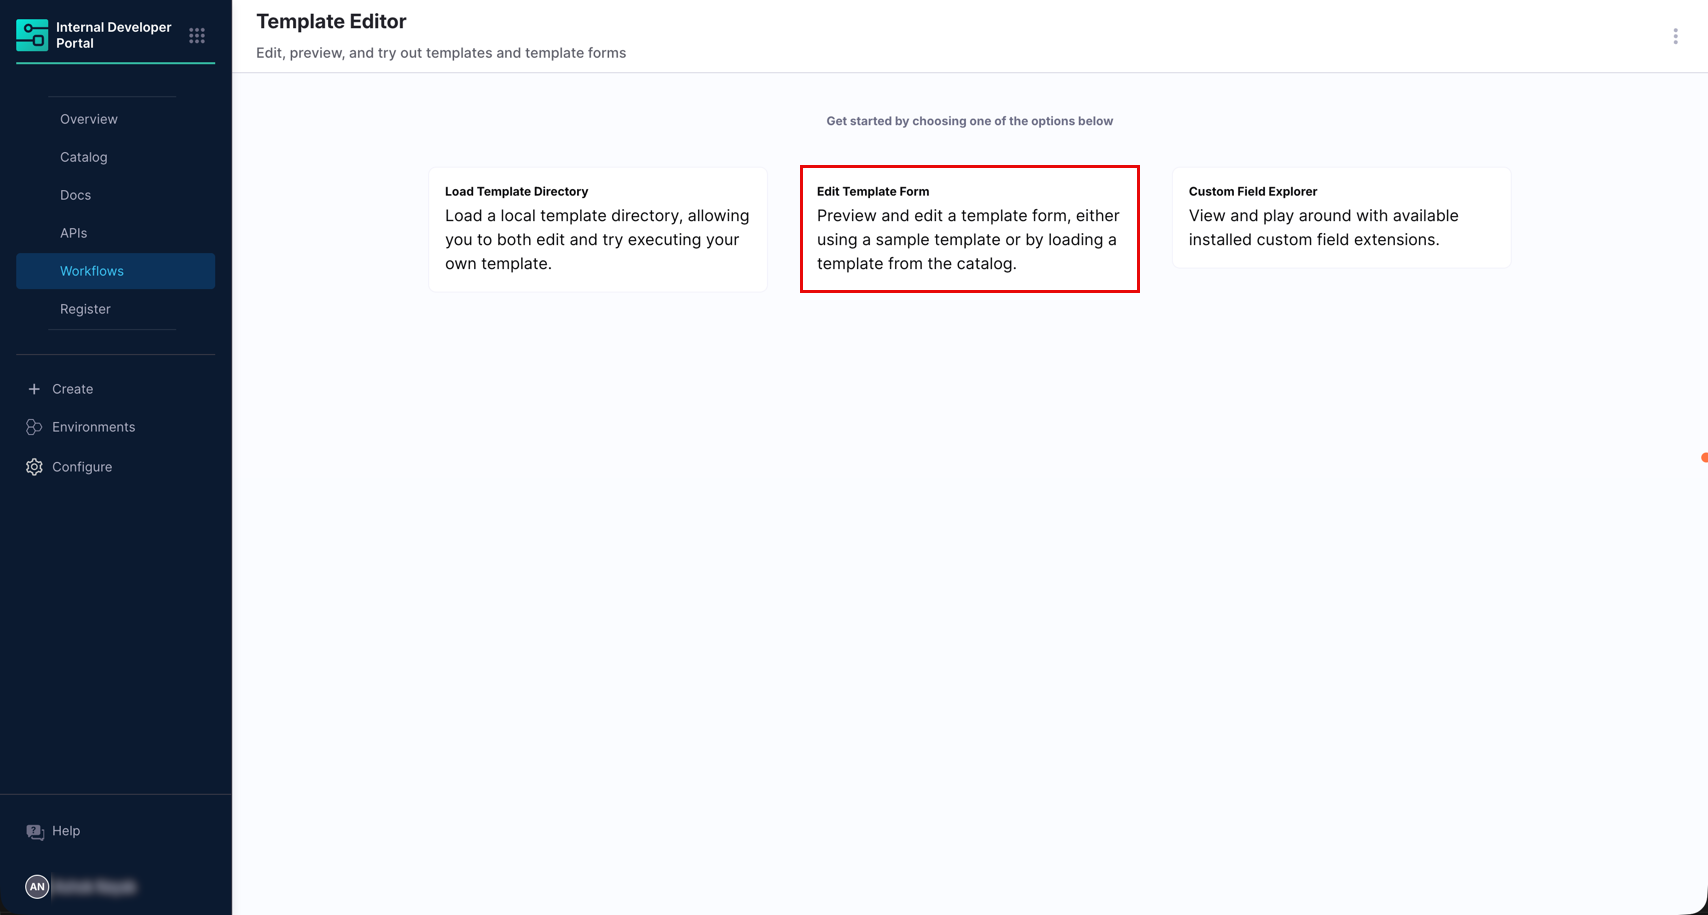
2. Select **Edit Template Form**.
3. Choose an existing workflow or begin creating a new one.
#### Syntax essentials
**Input parameters**
The input fields in **parameters** can be structured sequentially. Since it accepts an array, you can either have all input fields on a single page or divide them into multiple pages, rendering them as different steps in the form.
These fields are built using the [**React JSON Schema**](https://rjsf.netlify.app) library. The library includes many fields which can be used with the `ui:field` property of an input field. `ui:options` in the same field are used to customize the field behavior.
You can explore more about the different input types available in this library. Check out the [documentation](https://rjsf-team.github.io/react-jsonschema-form/docs/) and an interactive [playground](https://rjsf-team.github.io/react-jsonschema-form/) to experiment with various examples.
Example YAML
```yaml
apiVersion: scaffolder.backstage.io/v1beta3
kind: Template
metadata:
name: v1beta3-demo
title: Test Action Workflow
description: Workflow Demo
spec:
owner: backstage/techdocs-core
type: service
parameters:
- title: A registration form
description: A simple form example.
type: object
required:
- firstName
- lastName
properties:
firstName:
type: string
title: First name
default: Chuck
ui:autofocus: true
ui:emptyValue: ''
ui:autocomplete: given-name
lastName:
type: string
title: Last name
ui:emptyValue: ''
ui:autocomplete: family-name
nicknames:
type: array
items:
type: string
ui:options:
orderable: false
telephone:
type: string
title: Telephone
minLength: 10
ui:options:
inputType: tel
# ... pipeline details will follow
```
**Template syntax**
Variables in **Workflow YAML** are wrapped in `${{ }}` and are used to connect different parts of the workflow. All form inputs from the **parameters** section can be accessed using this syntax.
For example, `${{ parameters.project_name }}` inserts the value of `project_name` entered by the user in the UI. This allows seamless passing of values from the form into different workflow steps, making input variables reusable. These strings retain the type of the parameter.
The `${{ parameters.project_name }}` pattern is specifically used in **Workflow YAML** to pass parameters from the UI to the input of the `trigger:harness-custom-pipeline` step.
The templating engine used for this YAML is [**Nunjucks**](https://mozilla.github.io/nunjucks/).
**Important Note:** The `${{ parameters.x }}` syntax is supported only within the **steps** section when configuring the **Workflows Backend**. It **cannot** be used within the **properties** section to reference another parameter.
Example YAML
```yaml
spec:
parameters:
- title: Service Details
properties:
projectId:
title: Project Identifier
description: Harness Project Identifier
type: string
ui:field: HarnessProjectPicker
template_type:
title: Type of the Template
type: string
description: Type of the Template
ui:readonly: $${{ parameters.another_field}} ## NOT SUPPORTED
steps:
- id: trigger
name: Creating your react app
action: trigger:harness-custom-pipeline
input:
url: "https://app.harness.io/ng/account/account_id/module/idp/orgs/org_id/projects/project_id/pipelines/pipeline_id/pipeline-studio/?storeType=INLINE"
inputset:
project_id: ${{ parameters.projectId }} ## SUPPORTED
template_type: ${{ parameters.template_type }} ## SUPPORTED
```
{% @harness-feedback/feedback %}