> For the complete documentation index, see [llms.txt](https://developer.harness.io/llms.txt). Markdown versions of documentation pages are available by appending `.md` to page URLs; this page is available as [Markdown](https://developer.harness.io/internal-developer-portal/use-idp/software-catalog/create-entity/catalog-discovery/integrations/dynatrace.md).

# Dynatrace Integration

The Dynatrace integration automatically discovers services from your [Dynatrace](https://www.dynatrace.com/) account and brings them into the [IDP Catalog](/internal-developer-portal/use-idp/software-catalog/overview.md). Once discovered, entities can be registered as new catalog entries or merged into existing ones.

For each service, the integration collects the following resources from Dynatrace:

| Resource     | What it provides                                                                                    |
| ------------ | --------------------------------------------------------------------------------------------------- |
| **Service**  | Core metadata from Dynatrace such as service name, type, and related entity information.            |
| **Monitor**  | Monitor metrics and health summary using queries.                                                   |
| **Problems** | Issues and anomalies detected by Dynatrace, fetched from the start date you configure during setup. |
| **SLO**      | Service Level Objective data associated with the service. Requires a platform token.                |

***

### Before you begin <a href="#before-you-begin" id="before-you-begin"></a>

The following are needed to get the integration running:

* Ensure the feature flag `IDP_INTEGRATIONS` is enabled. Contact [Harness Support](mailto:support@harness.io) to enable them.
* You have the required RBAC permissions to manage integrations. All integration operations require the `IDP_INTEGRATION_EDIT` permission on the `IDP_INTEGRATION` resource type.
* A [Dynatrace connector](/harness-ai/use-harness-platform/connectors/monitoring-and-logging-systems/connect-to-monitoring-and-logging-systems.md#add-dynatrace) is configured in Harness with Dynatrace Classic URL (format: `https://xxxxxxxx.live.dynatrace.com/`) and an API Token (access token in Dynatrace). You can also create the connector during the integration setup. Ensure the access token must have the following scopes:
  * `entities.read`
  * `problems.read`
  * `metrics.read`
  * Any one of `ReadSyntheticData`, `ExternalSyntheticIntegration`, and `DataExport` (required for monitor data)
* (Optional) A Dynatrace platform token with the `slo:slos:read` scope if you want SLO data to flow into IDP.

{% hint style="info" %}
**PROXY CONFIGURATION**

If your environment blocks outbound third-party traffic and routes it through a proxy, you will need to configure proxy settings on your Harness Delegate. Once configured there, the proxy settings are automatically picked up by IDP integrations. No additional setup is needed on the integration side.

Go to [Configure delegate proxy settings](/harness-ai/use-harness-platform/delegates/delegate/manage-delegates/configure-delegate-proxy-settings.md) to configure proxy settings on your Harness Delegate.
{% endhint %}

***

### Enable the Dynatrace integration <a href="#enable-the-dynatrace-integration" id="enable-the-dynatrace-integration"></a>

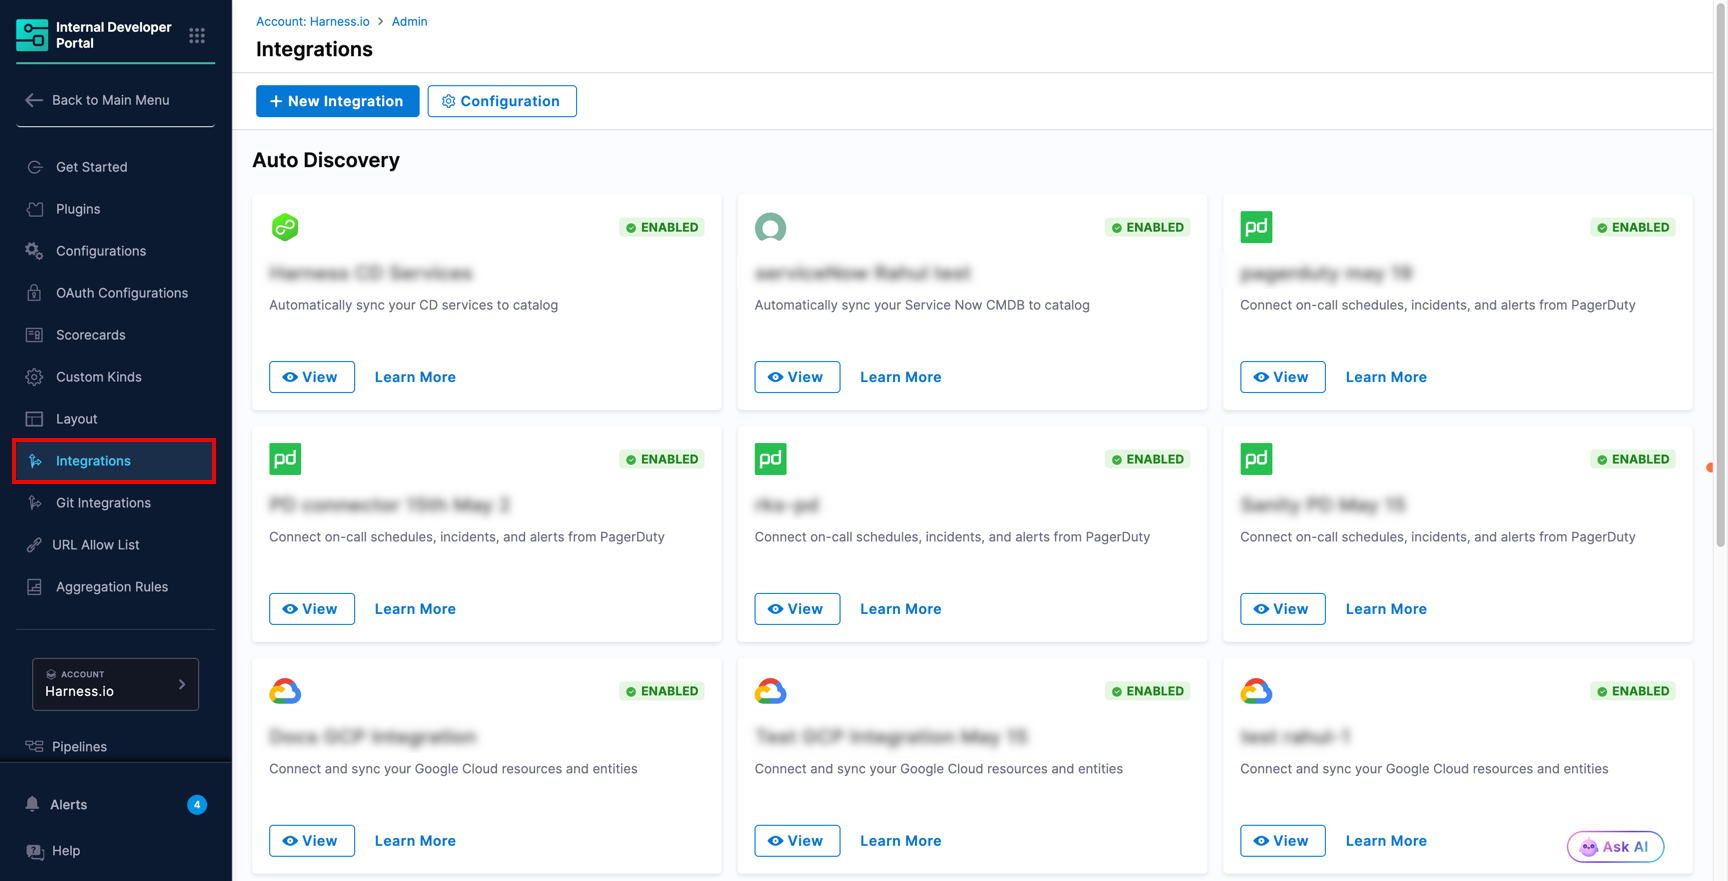
#### 1. Navigate to the integrations page <a href="#id-1-navigate-to-the-integrations-page" id="id-1-navigate-to-the-integrations-page"></a>

1. In Harness, open the **Internal Developer Portal**.
2. From the left sidebar, click **Configure**.
3. In the left navigation menu, click **Integrations**.

   <figure><img src="/files/JCXDe09MlXZgXTbTxPFu" alt=""><figcaption></figcaption></figure>
4. On the Integrations page, click **+ New Integration** at the top.
5. Select **Dynatrace** from the integration type picker. You will be taken to the **Dynatrace Integration** configuration page.

#### 2. Configure setup & connectivity <a href="#id-2-configure-setup-and-connectivity" id="id-2-configure-setup-and-connectivity"></a>

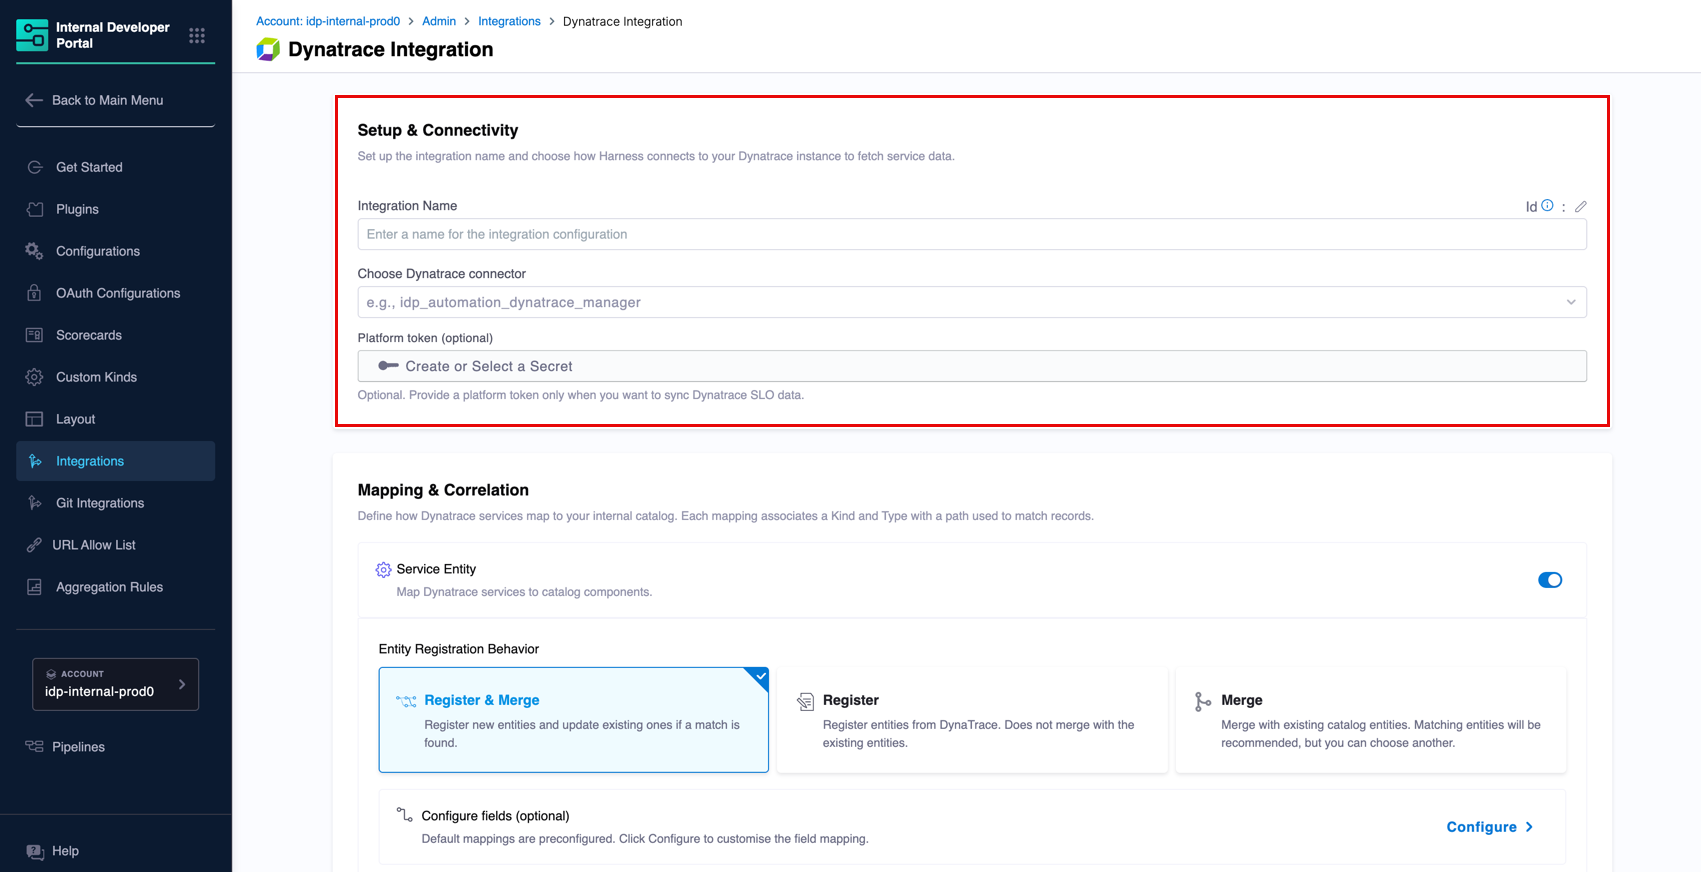
This section connects Harness IDP to your Dynatrace account.

<figure><img src="/files/dVrFUtAbl3Ry3yXdrrfs" alt=""><figcaption></figcaption></figure>

1. Enter a name in the **Integration Name** field. This name appears on the integration card on the **Integrations** page (e.g., `Dynatrace PreQA Observability`).
2. Click the **Choose Dynatrace connector** dropdown and select the Dynatrace connector you want to use to pull data into IDP.

   <div data-gb-custom-block data-tag="hint" data-style="info" class="hint hint-info"><p><strong>DO NOT HAVE A DYNATRACE CONNECTOR YET?</strong></p><p>If no connectors appear in the dropdown, you need to first <a href="/spaces/3F2TpHXhur2QtQnORSM9/pages/oraRWxiUk6jIzBGBwTwa#add-dynatrace">create a Dynatrace connector</a> (classic) in Harness. Once saved, it will appear in the dropdown.</p><div data-gb-custom-block data-tag="embed"><iframe src="https://www.youtube.com/embed/zgeXCSll3Oc"></iframe></div></div>
3. (Optional) In the **Platform token** field, enter a Dynatrace platform token if you want to collect SLO data too. Leave it empty if you do not need SLO data to flow into IDP. The platform token must have the scope `slo:slos:read` included.

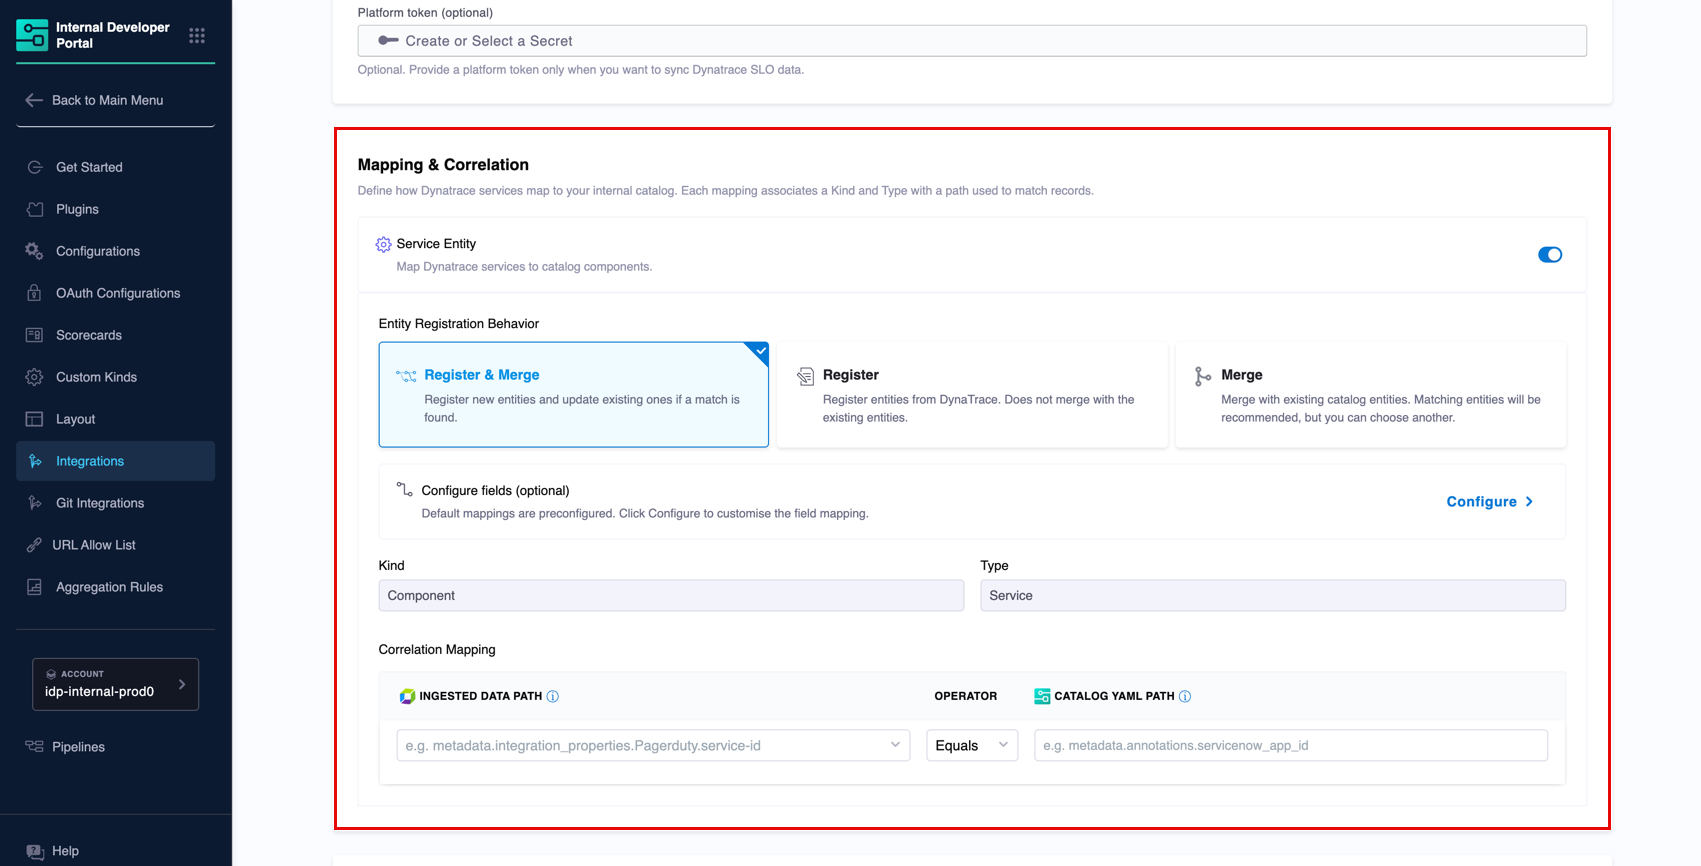
#### 3. Configure mapping & correlation <a href="#id-3-configure-mapping-and-correlation" id="id-3-configure-mapping-and-correlation"></a>

This section defines how Dynatrace services are mapped to IDP catalog entities and how they are correlated with existing records.

<figure><img src="/files/05VVXFv0DCYPBoD6SvaY" alt=""><figcaption></figcaption></figure>

**Service entity**

The Service Entity mapping imports Dynatrace services as catalog components.

1. Ensure the **Service Entity** toggle is turned on.
2. Under **Entity Registration Behavior**, choose how services are brought into the catalog:
   * **Register & Merge** *(Default)* - Registers new entities and updates existing ones when a match is found. This is the recommended option for most setups.
   * **Register** - Creates new catalog entities from Dynatrace. Does not merge with existing entities.
   * **Merge** - Links discovered services to existing catalog entities. Matching entities are recommended automatically, but you can choose a different one.
3. The default **Kind** is `Component` and **Type** is `Service`. These are pre-configured and apply to all Dynatrace service imports.
4. Under **Correlation Mapping**, the **Ingested Data Path** and **Catalog YAML Path** both default to `name`, meaning services are matched by name. You can change this to any other field pair if your setup requires a different matching strategy.
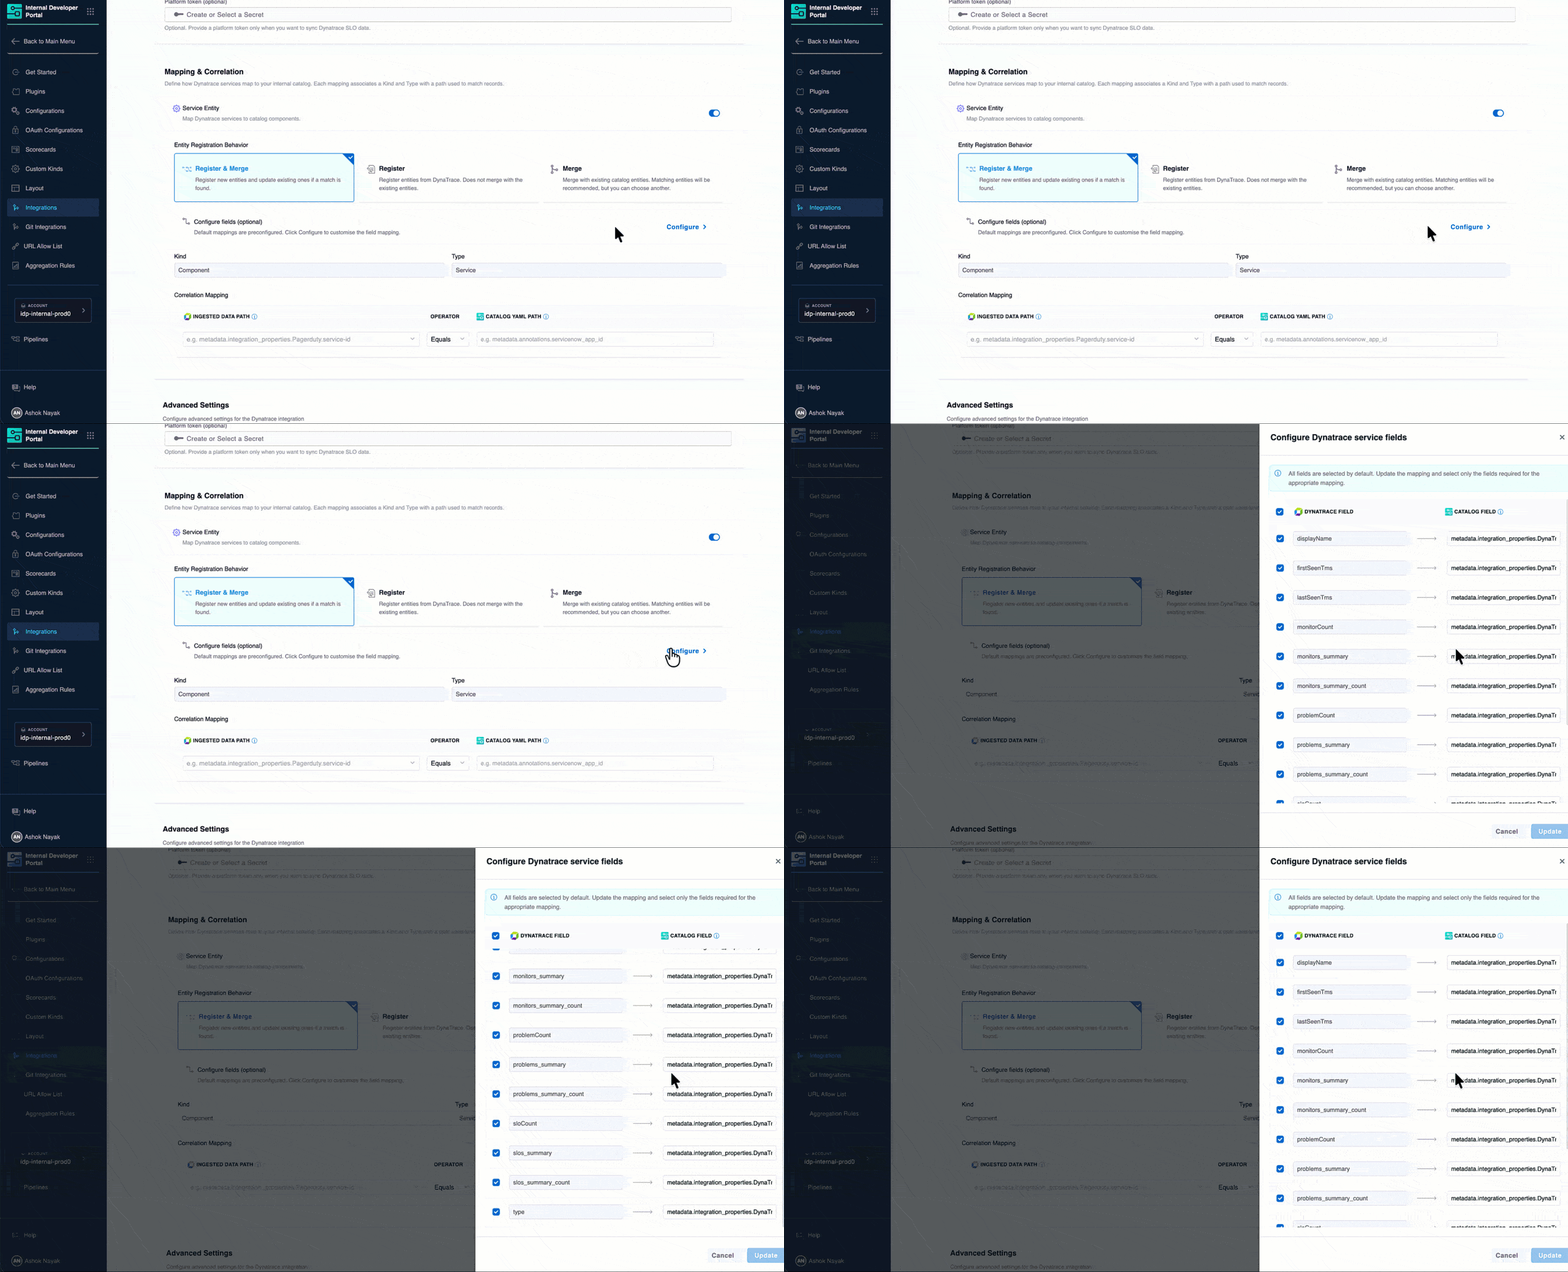
5. Optionally, click **Configure** next to **Configure fields** to customize which Dynatrace fields are synced to the catalog. By default, all available fields are selected.

   <figure><img src="/files/EztE4C9cUDRpv5cxmQCP" alt=""><figcaption></figcaption></figure>

#### 4. Configure advanced settings <a href="#id-4-configure-advanced-settings" id="id-4-configure-advanced-settings"></a>

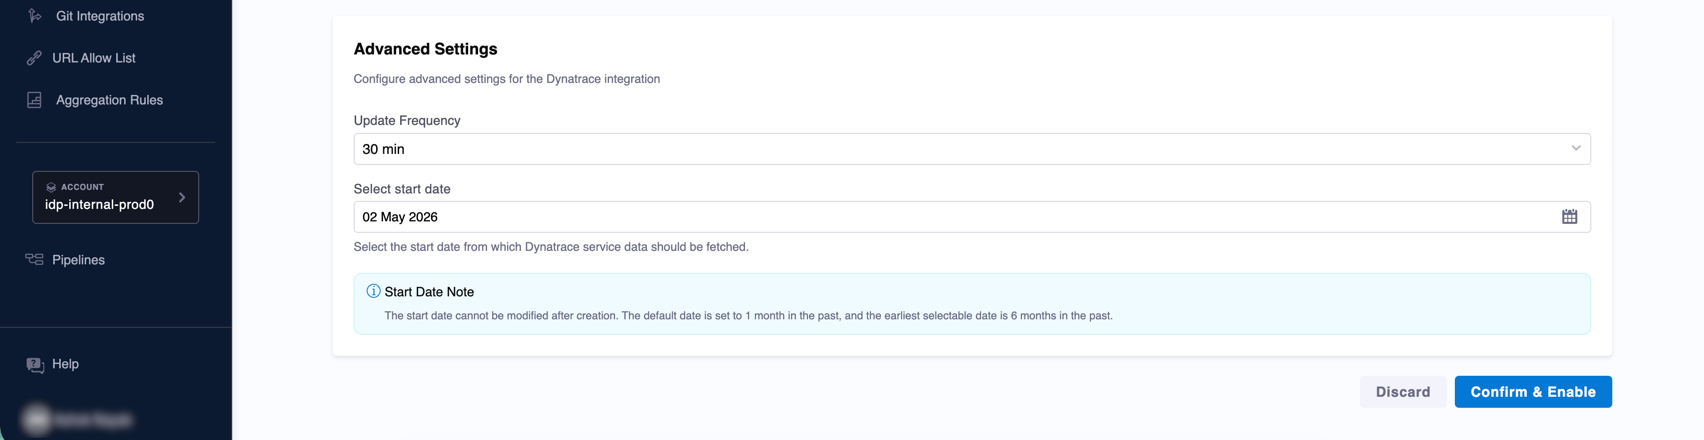
The **Advanced Settings** section controls the sync frequency and how far back in time Dynatrace data is fetched.

<figure><img src="/files/OVecUUio9n0udWCN8Qh7" alt=""><figcaption></figcaption></figure>

1. Select an **Update Frequency** from the dropdown to control how often IDP polls Dynatrace for new data.

   Available options: `10 min`, `30 min`, `1 hour`, `3 hours`, `6 hours`, `12 hours`, `1 day`, `2 days`, `7 days`.
2. Set a **Start date** to define how far back Dynatrace Problems data should be fetched. The default is set to one month before the date of integration creation. The earliest you can go back is six months.

   <div data-gb-custom-block data-tag="hint" data-style="warning" class="hint hint-warning"><p>The start date cannot be changed after the integration is created. Set it carefully before clicking <strong>Confirm &#x26; Enable</strong>.</p></div>
3. Once all sections are configured, click **Confirm & Enable**.

The integration is now enabled and IDP begins syncing data from Dynatrace. Discovered services appear in the [**Discovered** tab](#discovered-tab).

***

### Discover and import Dynatrace entities <a href="#discover-and-import-dynatrace-entities" id="discover-and-import-dynatrace-entities"></a>

This section covers how to view the Dynatrace services discovered by the integration and import them into your IDP Catalog.

#### Discovered tab <a href="#discovered-tab" id="discovered-tab"></a>

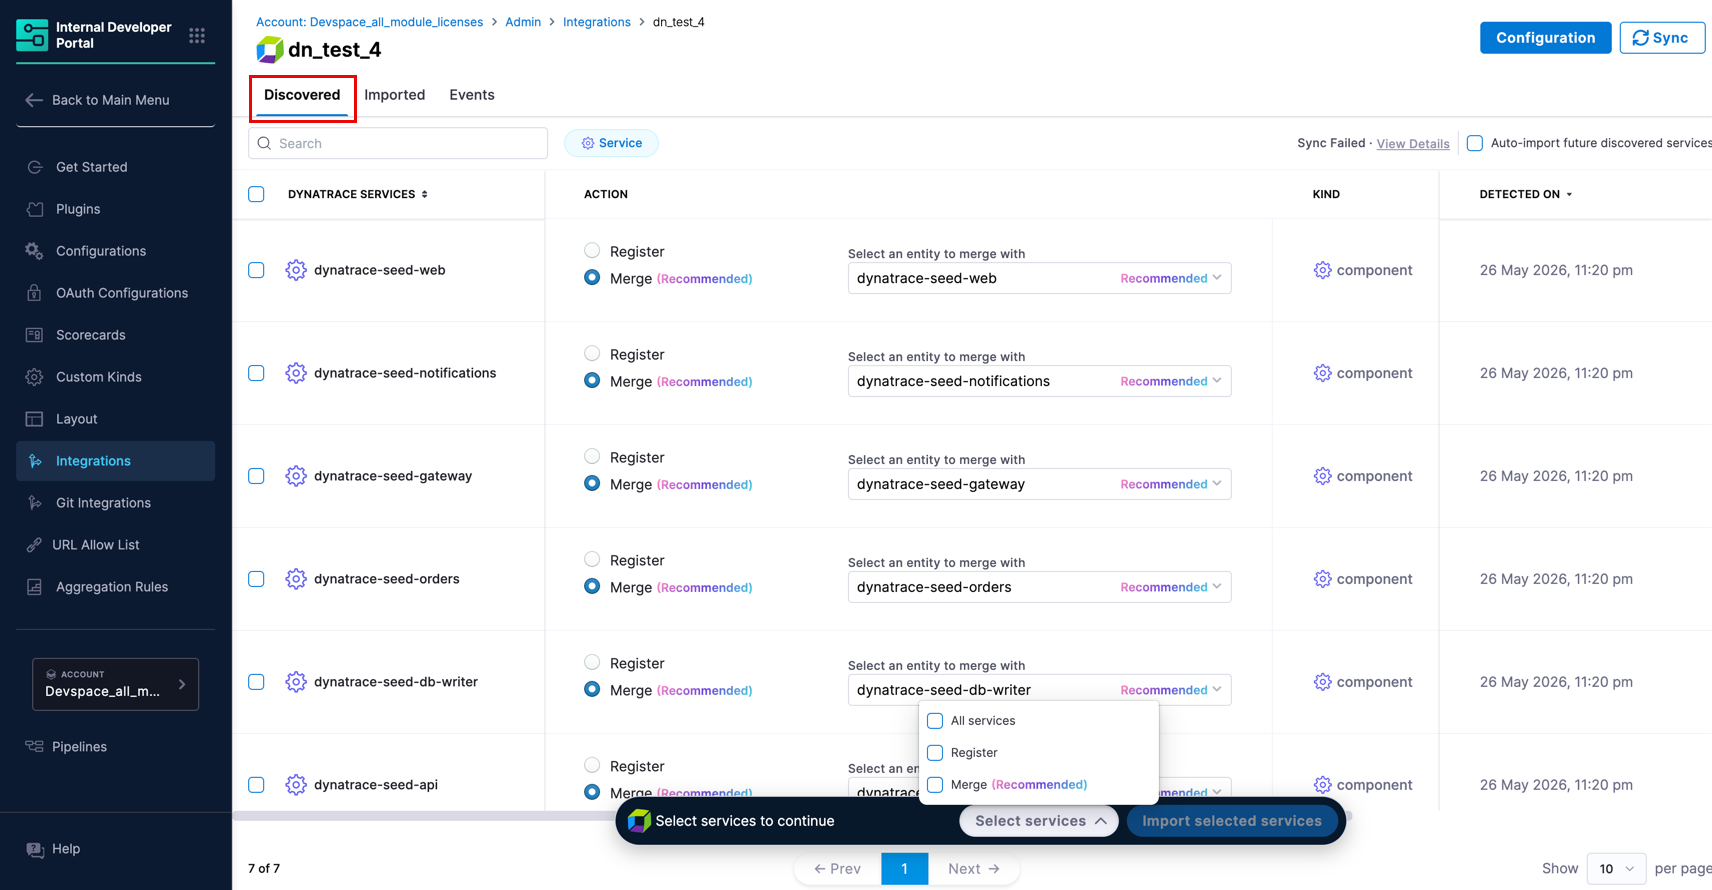
After the integration runs, all Dynatrace services detected appear in the **Discovered** tab. If no services appear yet, the sync may still be in progress. Use the **Sync** button at the top right to manually trigger a refresh if needed.

<figure><img src="/files/DLgMOJqpKNsu2FDb8wq9" alt=""><figcaption></figcaption></figure>

Once discovery completes, each discovered service appears with its name, recommended catalog action, kind, type, and detection date. You can bring entities into the catalog using one of the following actions:

* **Register** *(typically used when no matching catalog entity exists)* - Creates a new catalog entity populated with Dynatrace metadata.
* **Merge** *(shown as Recommended when a matching catalog entity is found)* - Links the discovered entity to an existing catalog entity, enriching it with Dynatrace data. If IDP finds a catalog entity with a matching name, **Merge** is pre-selected and the suggested entity is shown automatically.

{% hint style="info" %}
**BULK IMPORT**

Select services individually using the checkboxes, or use the snackbar at the bottom of the page to bulk-select by action type. Open the dropdown to choose **All services**, **Register**, or **Merge (Recommended)**, then click **Import selected services**.
{% endhint %}

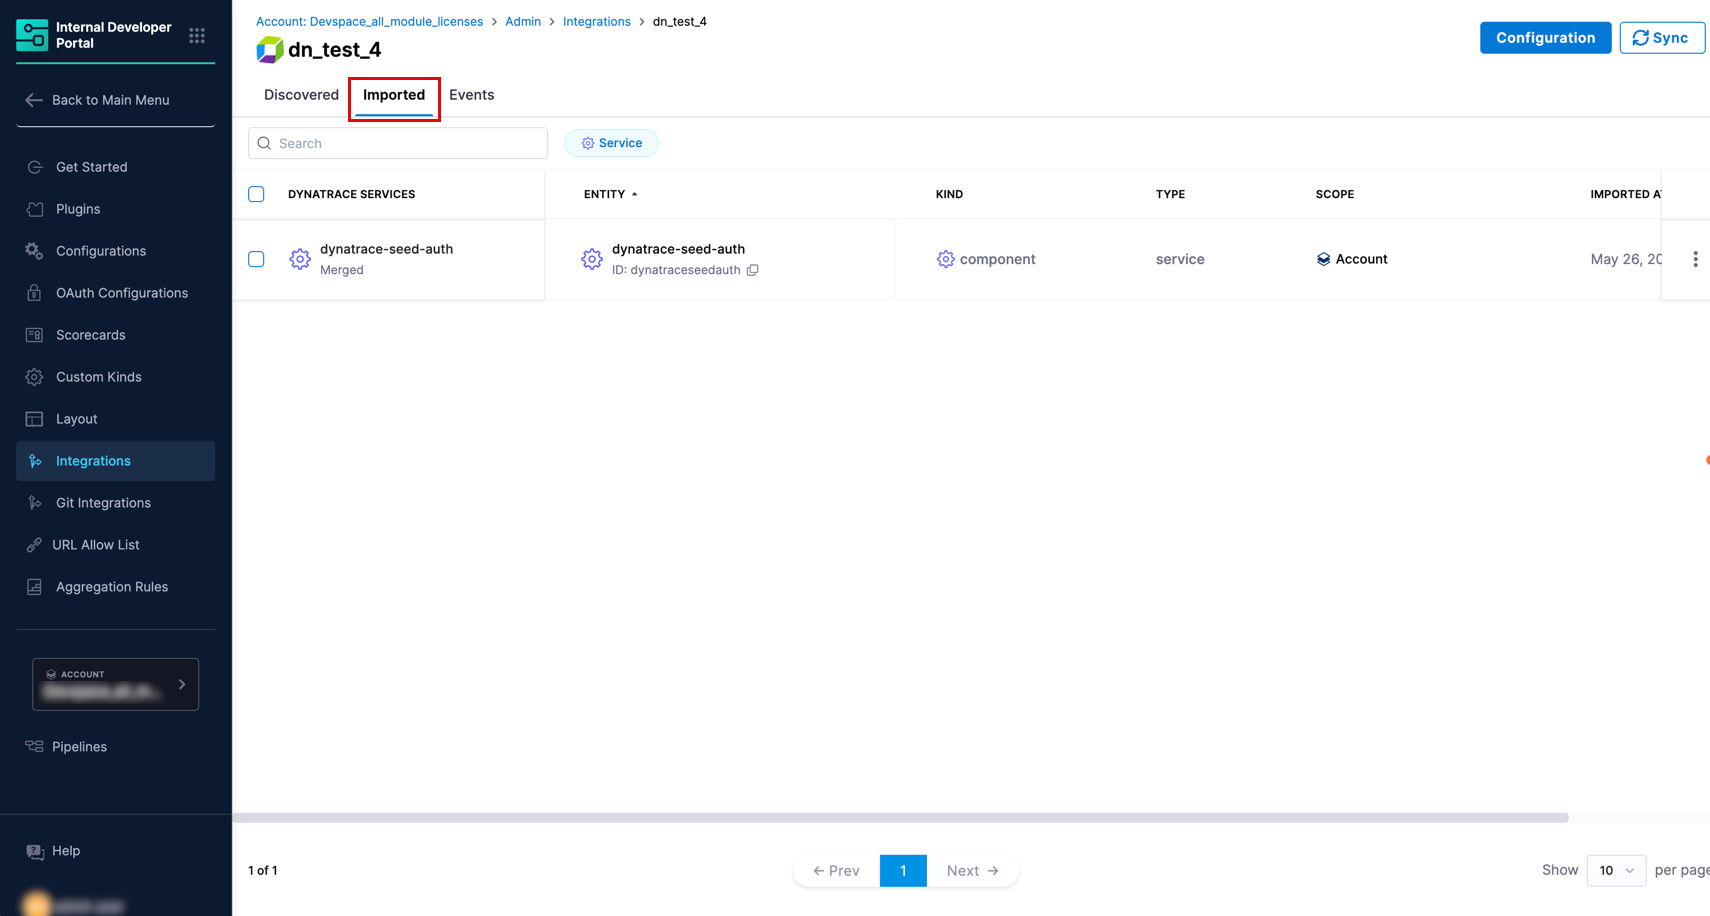
#### Imported tab <a href="#imported-tab" id="imported-tab"></a>

The **Imported** tab displays all Dynatrace services that have been brought into the catalog.

<figure><img src="/files/fEItns8bASShqqWCf7Lp" alt=""><figcaption></figcaption></figure>

It displays the following data:

| Column                 | Description                                                                              |
| ---------------------- | ---------------------------------------------------------------------------------------- |
| **Dynatrace Services** | The name of the service from Dynatrace, along with its import status (e.g., **Merged**). |
| **Entity**             | The linked IDP catalog entity and its ID.                                                |
| **Kind**               | The catalog entity kind (e.g., `component`).                                             |
| **Type**               | The catalog entity type (e.g., `service`).                                               |
| **Scope**              | The Harness account scope the entity belongs to.                                         |
| **Imported**           | The timestamp when the entity was imported.                                              |

{% hint style="warning" %}
**UNLINK AN IMPORTED ENTITY**

To stop syncing a specific entity without deleting the catalog entity, use the three-dot menu on any row and select **Unlink**. This stops sync updates while keeping the IDP entity and its existing data intact.
{% endhint %}

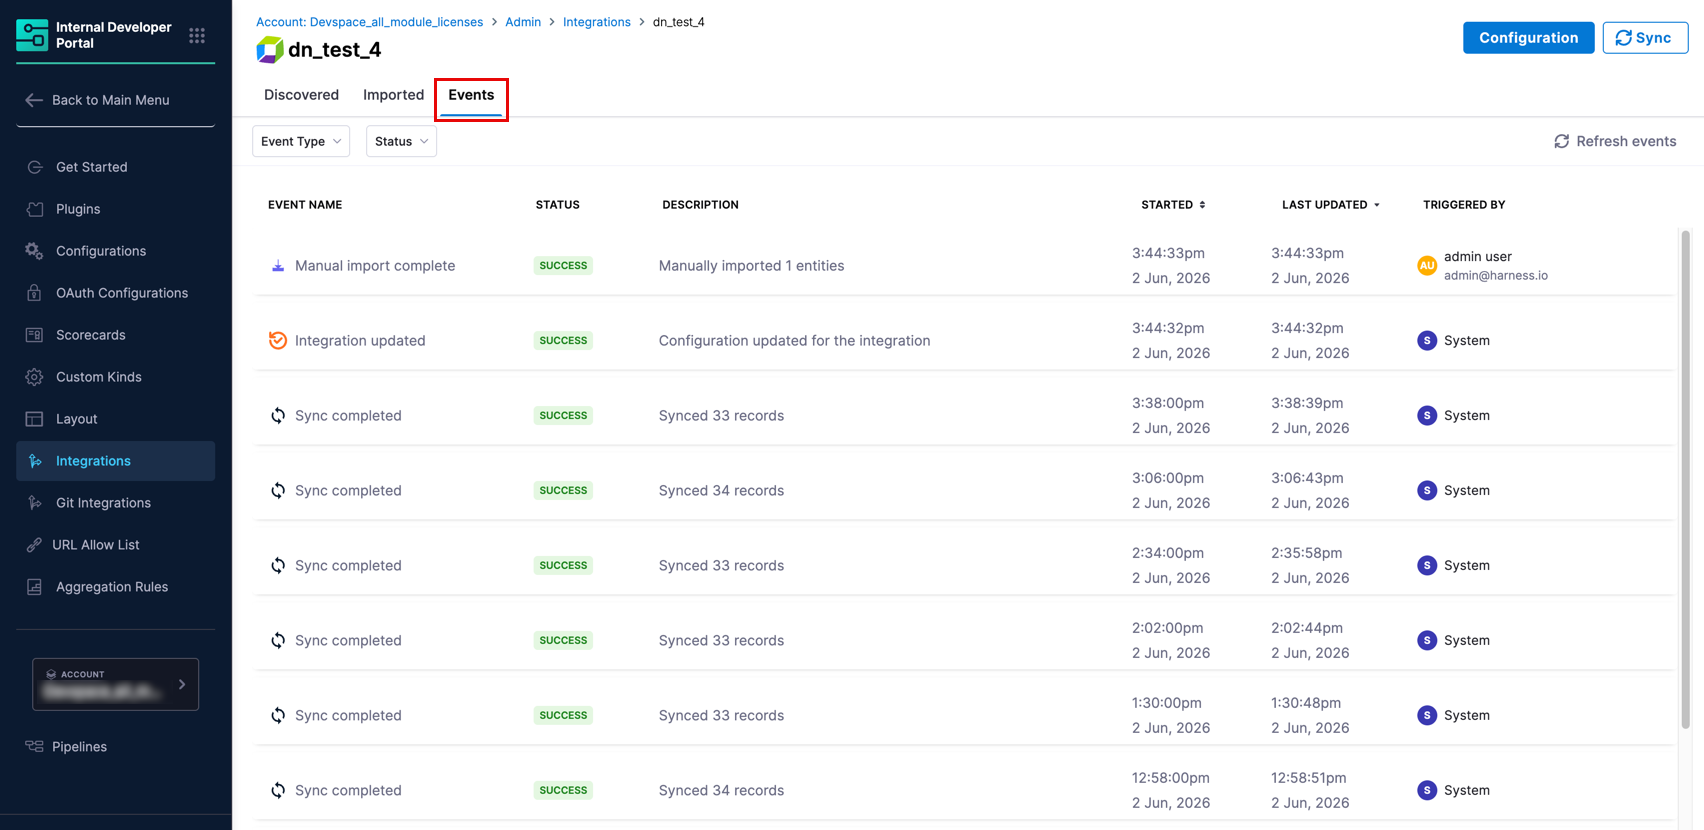
#### Events tab <a href="#events-tab" id="events-tab"></a>

The **Events** tab logs all sync and lifecycle activity for this integration. Use it to verify that syncs are running, confirm that imports completed successfully, and investigate any failures.

<figure><img src="/files/iwI82nXrKFpeqalM5Gpv" alt=""><figcaption></figcaption></figure>

For the full event type reference and detail panel fields, go to [Integration Events](/internal-developer-portal/use-idp/software-catalog/create-entity/catalog-discovery/integration-events.md).

***

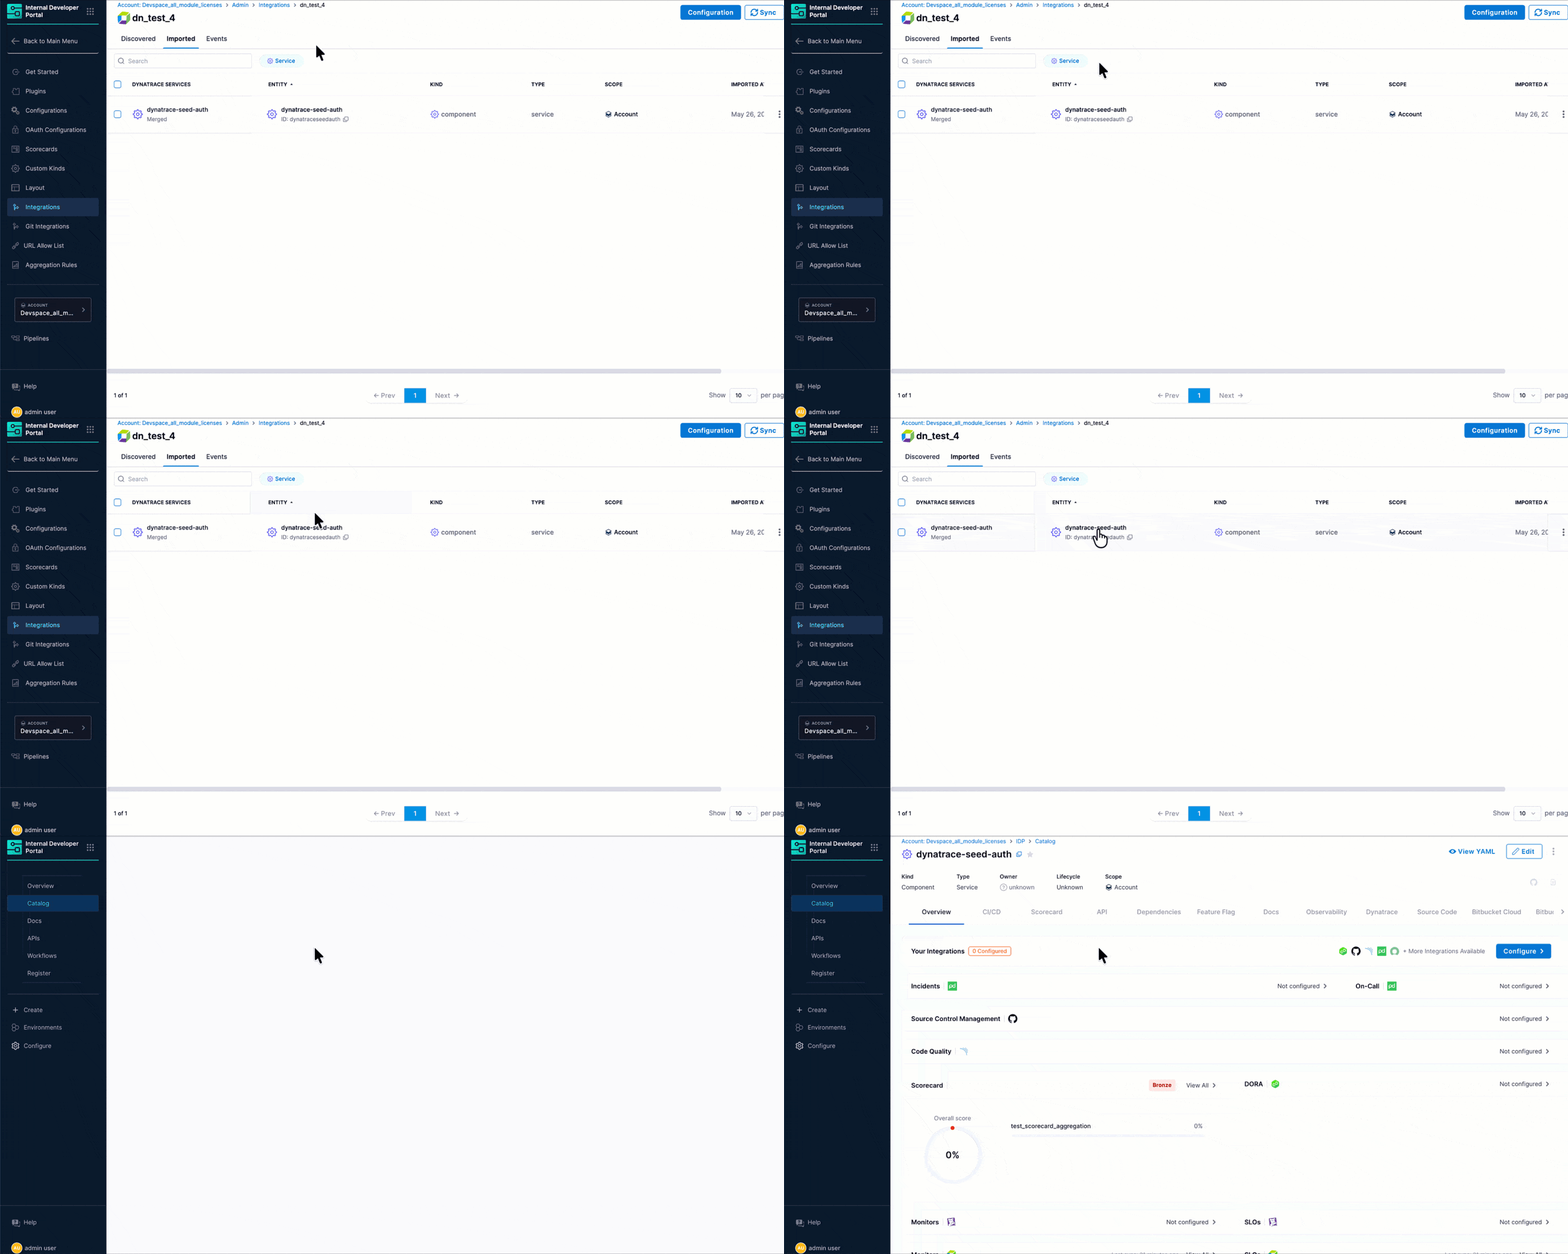
### View Dynatrace entities in the catalog <a href="#view-dynatrace-entities-in-the-catalog" id="view-dynatrace-entities-in-the-catalog"></a>

Once imported, Dynatrace entities are available in the **Catalog** section of IDP as standard catalog entities.

Each imported Dynatrace service is registered with:

* **Kind:** `Component`
* **Type:** `Service`
* **Scope:** The Harness account the integration belongs to

Open any entity to view Dynatrace-sourced data directly on the entity details page. This data is displayed through two dedicated UI components: one on the **Overview** tab and a **Dynatrace** tab. Both require a one-time layout configuration, described in the [next section](#layout-for-dynatrace-components).

<figure><img src="/files/IAkoAeH6CVZQEk1nFMN3" alt=""><figcaption></figcaption></figure>

#### Layout for Dynatrace components <a href="#layout-for-dynatrace-components" id="layout-for-dynatrace-components"></a>

To display Dynatrace data on the [entity details](/internal-developer-portal/use-idp/software-catalog/create-entity/entity-details.md) page, you need to add the two Dynatrace components to the relevant entity layout. This is a one-time configuration per entity kind and type.

1. From the left sidebar of IDP, go to **Configure** → **Layout** → **Catalog Entities**.
2. Edit the existing layout for your entity or create a new one.
3. Select the **Entity Kind** (e.g., `component`) and the **Entity Type** (e.g., `service`) that matches your imported Dynatrace entities.
4. In the YAML editor, add the `IntegrationsContent` component inside the **Overview** tab's `contents` block, and add a new **Dynatrace** tab using the `ObservabilityTabContent` component.

   ![Entity Layout configuration for Dynatrace components](/files/c3HU7uHKzoKwlfsZkz2c)

   Figure 8: Layout configuration for Dynatrace cards in Overview tab and Dynatrace tab

   The relevant YAML additions are:

   ```yaml
           - component: IntegrationsContent
             specs:
               props:
                 variant: gridItem
               gridProps:
                 md: 12
   ```

   ```yaml
       - name: Dynatrace
         path: /dynatrace
         title: Dynatrace
         contents:
           - component: ObservabilityTabContent
             specs:
               props:
                 observabilityType: DYNATRACE
   ```
5. Click **Save** to apply the layout changes. The Dynatrace components will now appear on all entity detail pages of the selected kind and type that have Dynatrace data.

#### Cards in overview tab <a href="#cards-in-overview-tab" id="cards-in-overview-tab"></a>

After the layout is configured, cards like `Monitors` and `SLOs` appear in the **Overview** tab of any entity that has Dynatrace data linked to it. The card displays the key Dynatrace metadata ingested for that entity, sourced from the entity's [ingested properties](#ingested-properties).

![Catalog entity page for a Dynatrace-imported service](/files/m2PsGBB7LUtyLFYykgN7)

Figure 9: IDP Catalog Entity Page for a Dynatrace service

If the Dynatrace integration has not been configured for the entity, the card shows a **Not configured** state with a link to the Integrations page.

#### Dynatrace tab <a href="#dynatrace-tab" id="dynatrace-tab"></a>

The **Dynatrace** tab provides a more complete view of the Dynatrace data for the entity. This tab fetches latest possible data using the integration ID and entity UUID.

![Dynatrace tab showing full resource details](/files/OCFvL20fThBRegVyT8kZ)

Figure 10: Tab showing full Dynatrace resource details

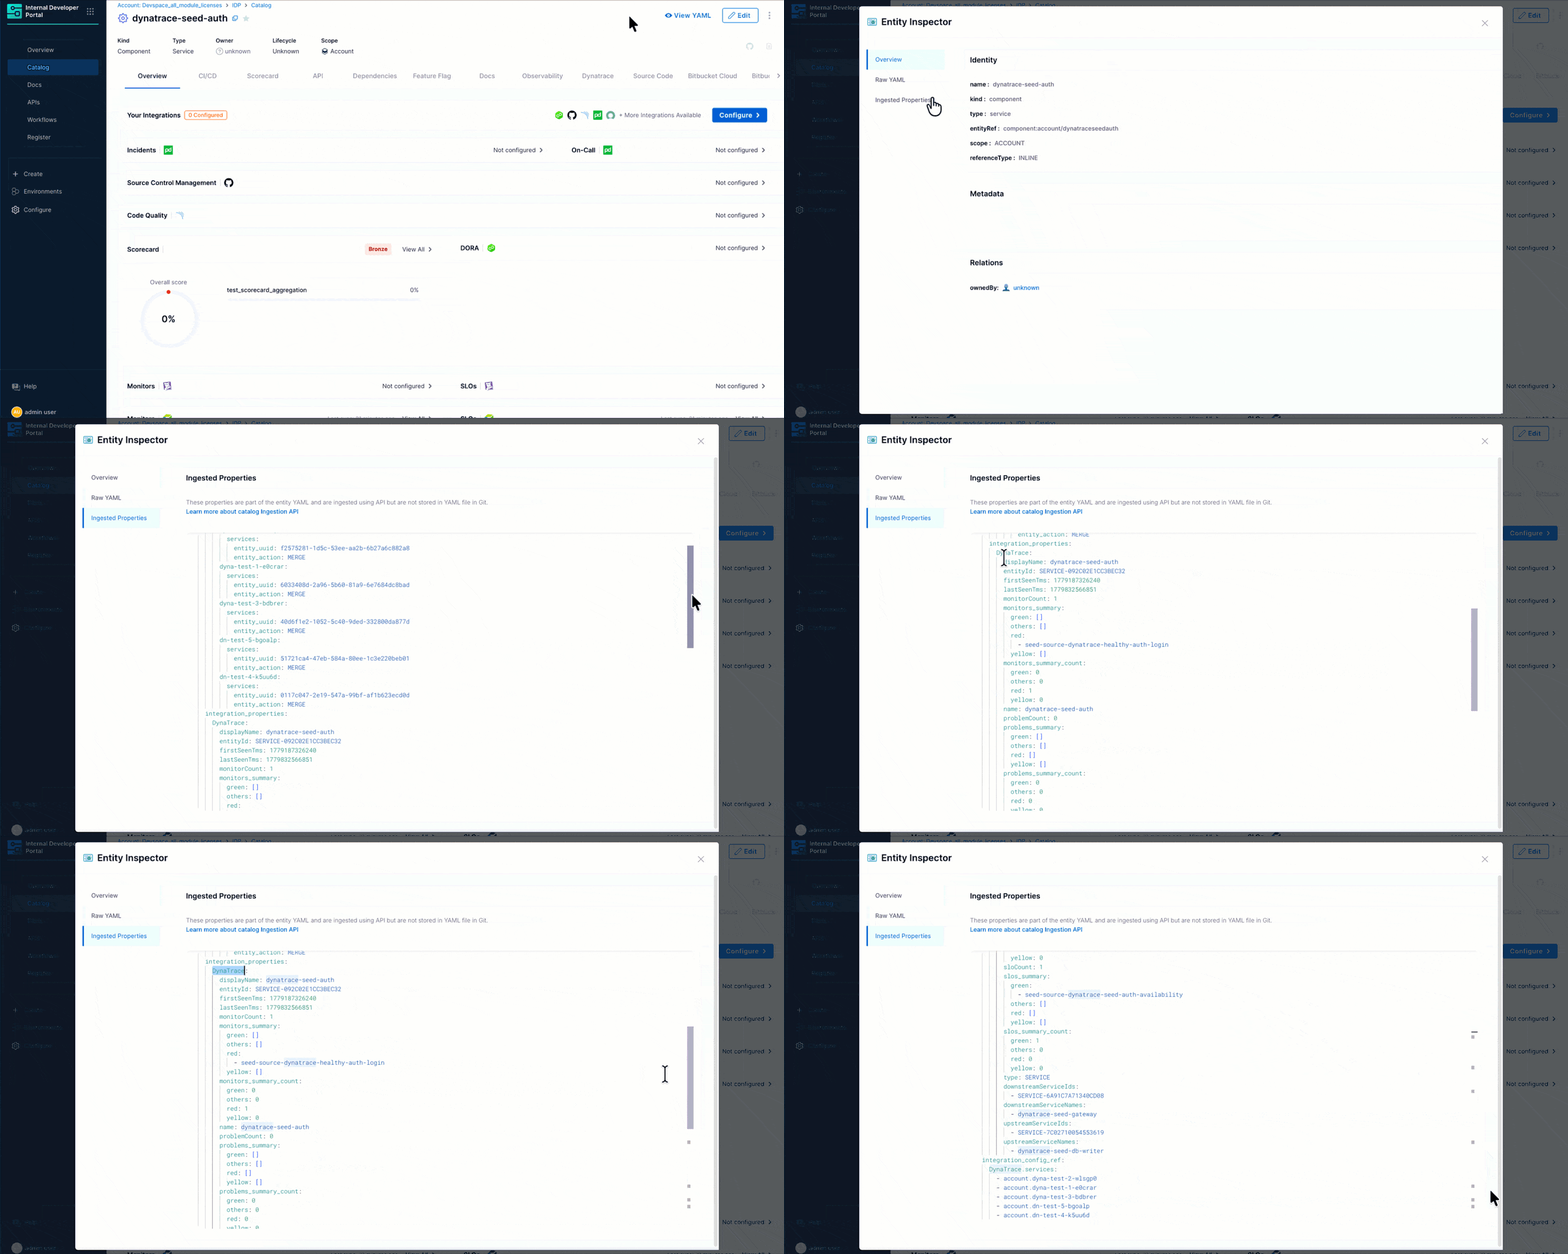
#### Ingested properties <a href="#ingested-properties" id="ingested-properties"></a>

To inspect the raw data ingested from Dynatrace, open the entity and click **View YAML**, then select **Ingested Properties** in the Entity Inspector.

Ingested properties are stored in two sections of the entity YAML:

* **`metadata.integration`** - Tracks which Dynatrace integration instances are linked to this entity, including the entity action (e.g., `MERGE`) and the linked entity UUID.
* **`integration_properties.DynaTrace`** - Contains the Dynatrace-specific data for the entity, including fields synced from the Dynatrace service.

<figure><img src="/files/GJ6iKlwPe9VOl1EpVFHB" alt=""><figcaption></figcaption></figure>

***

### Manage the Dynatrace integration <a href="#manage-the-dynatrace-integration" id="manage-the-dynatrace-integration"></a>

#### Edit the integration <a href="#edit-the-integration" id="edit-the-integration"></a>

To update the integration name, switch the Dynatrace connector, or change the mapping and correlation settings, navigate to the **Integrations** page, find your Dynatrace integration card, and click **View**. From there, click **Configuration** to open the edit screen.

#### Suspend auto-discovery <a href="#suspend-auto-discovery" id="suspend-auto-discovery"></a>

If auto-discovery is suspended, new entities will not appear in the **Discovered** tab. Existing imported entities remain unchanged in the catalog and the sync between Dynatrace and their corresponding IDP entities will stop.

To suspend auto-discovery:

1. Go to **Integrations** and open your Dynatrace integration using the **View** button.
2. Click **Configuration** at the top.
3. In the **Danger Zone** section, click **Suspend**.
4. Confirm the action.

You may re-enable it at any time by following the same steps.