> For the complete documentation index, see [llms.txt](https://developer.harness.io/llms.txt). Markdown versions of documentation pages are available by appending `.md` to page URLs; this page is available as [Markdown](https://developer.harness.io/internal-developer-portal/use-idp/software-catalog/teams/create-a-team.md).
# Creating a Team
Learn how to create a Team in Harness IDP using the visual editor, YAML, Git import, or the Entity API.
You can create a Team from the Harness IDP user interface, from YAML, by importing an existing definition from Git, or through the Entity API. All four methods produce the same entity.
***
### Before you begin
| Prerequisite | Details |
| ------------ | ---------------------------------------------------------------------------------------------------------------------------------------------------------------------------------------------------------------------------------------- |
| Permissions | You need **Create/Edit** permission on the **Teams** resource at the scope where you want to create the Team. Go to [Team access control](/internal-developer-portal/use-idp/software-catalog/teams/team-access-control.md) for details. |
| Scope | Decide whether the Team belongs at the Account, Organization, or Project scope. Go to [Scopes](/internal-developer-portal/admin-and-customization/rbac/scopes.md#scopes-idp-20) to review what each scope means. |
| Parent team | If this Team is a sub-team, the parent Team must already exist at the same scope or at a parent scope. |
***
### Create a Team from the user interface
There are two entry points.
* Go to **Teams** in the IDP sidebar and click **+ Create**.
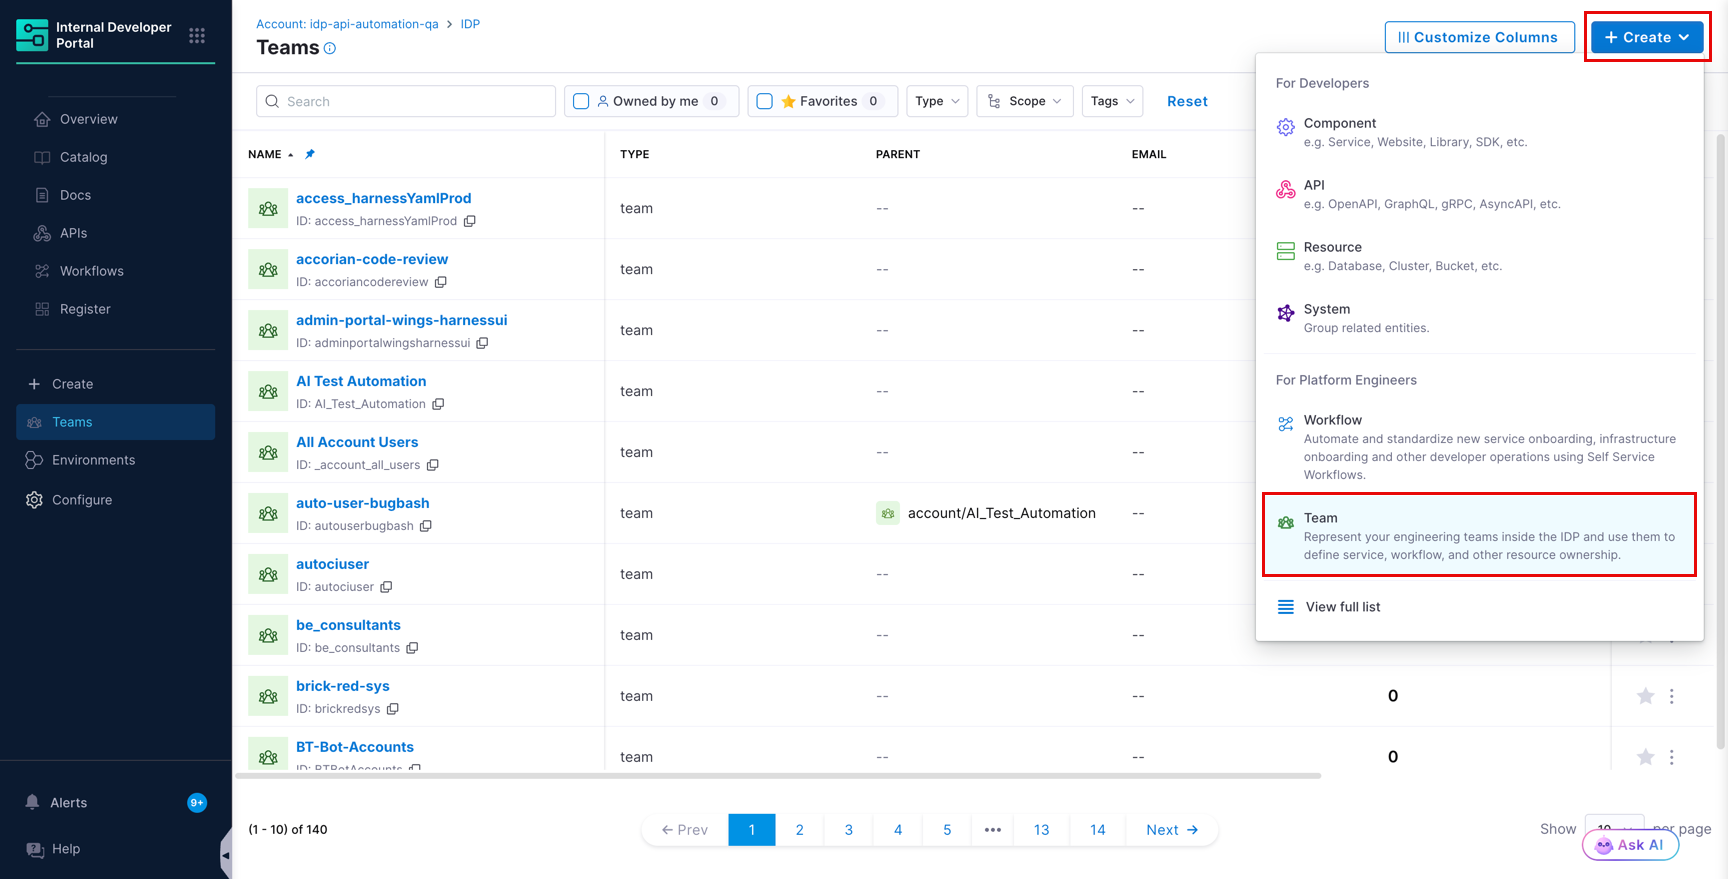
* Go to **Catalog**, click **+ Create**, and select **Team** under **For Platform Engineers**.
Create menu with the Team option
#### Step 1: Fill in the basic details
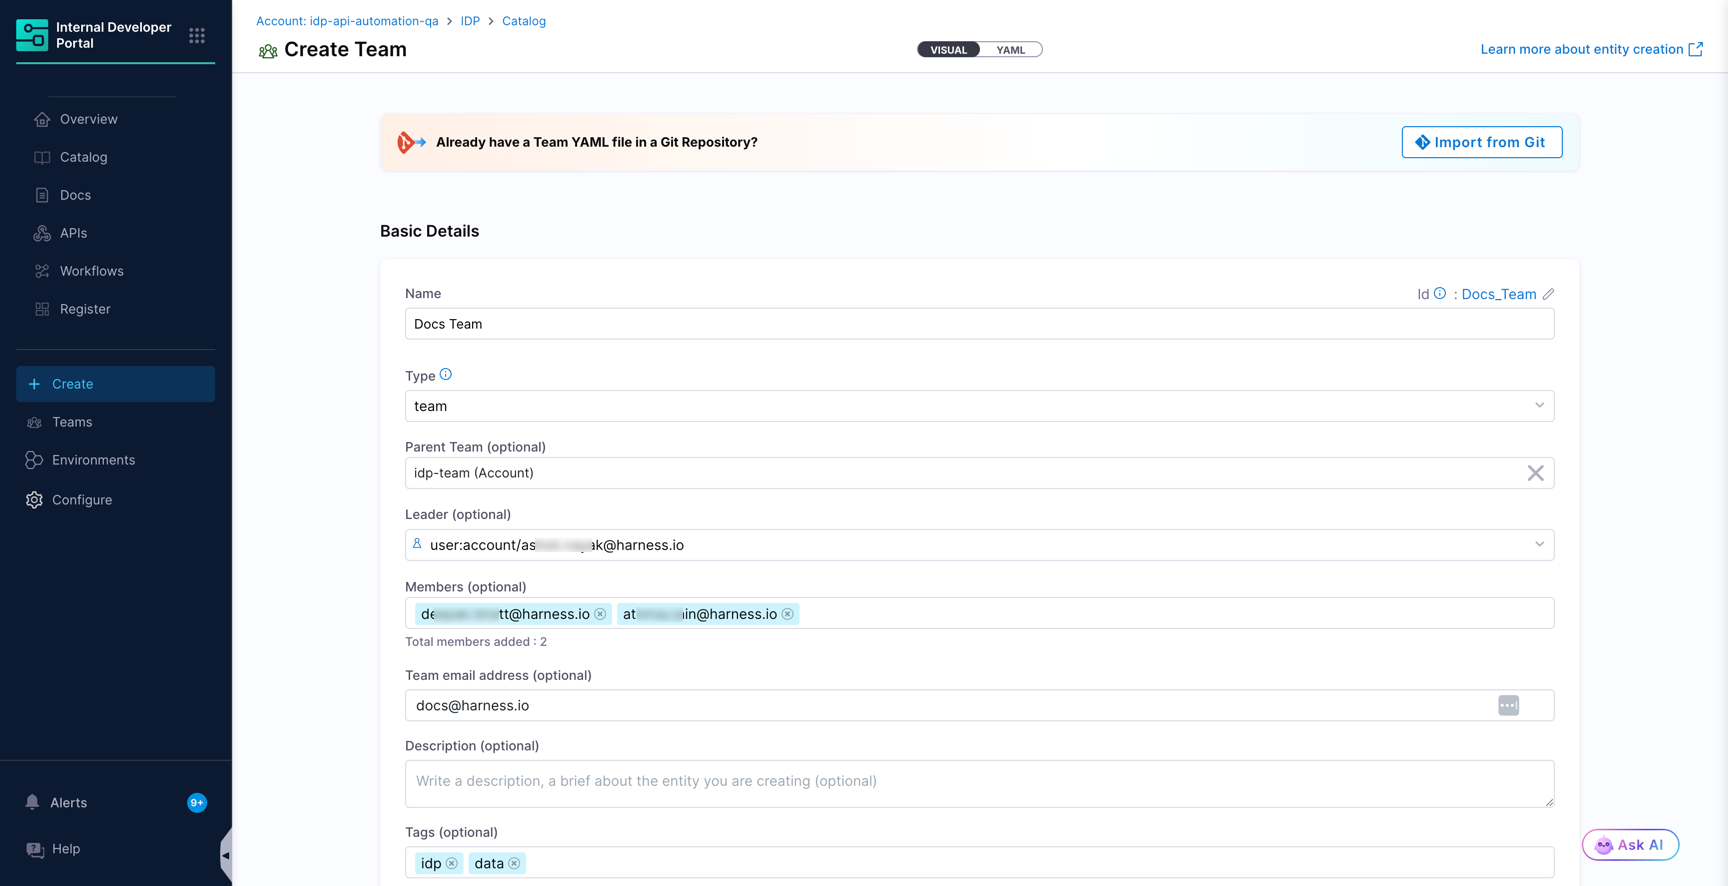
Create Team form
| Field | Required | Description |
| ---------------------- | -------- | ------------------------------------------------------------------------------------------------------------------------------------------------------------------------- |
| **Name** | Yes | The display name of the Team, for example `Payments Platform`. The identifier is generated from the name and can be edited using the pencil icon. |
| **Type** | Yes | A classification for the Team, for example `team` or `squad`. Select an existing type or enter a new one. |
| **Parent Team** | No | The Team that this Team reports into. Leave this empty for a top-level Team. |
| **Leader** | No | The person who leads the Team. Setting this creates a `hasLeader` relation from the Team to the user, visible in the Catalog graph. In YAML, this maps to `spec.leaders`. |
| **Members** | No | The users who belong to the Team. A Team can be created with no members and populated later. |
| **Team email address** | No | A shared contact address for the Team, for example `payments@example.com`. |
| **Description** | No | A short explanation of what the Team is responsible for. |
| **Tags** | No | Labels used for filtering and discovery in the Catalog. |
#### Step 2: Define the scope
Under **Define Scope**, choose where the Team lives.
| Scope | Behavior |
| ---------------- | ------------------------------------------------------------------------------------------------------------------------------------------------------ |
| **Account** | The Team is created at the account level and is accessible by all organizations and projects by default. |
| **Organization** | The Team is created at the organization level and is accessible by all projects in that organization by default. |
| **Project** | The Team is created at the project level and is accessible only by users added to that project. Select the project from the **Select a Project** list. |
{% hint style="info" %}
**HOW THE PARENT TEAM LIST IS BUILT**
The **Parent Team** list is scope-aware. A Team can take sub-teams from its own scope or from any child scope. For example, a Team at the Organization scope can have sub-teams that live in different projects inside that organization. It cannot take a sub-team from a parent scope.
{% endhint %}
#### Step 3: Choose where to store the Team
Under **Where to store the Team?**, select one of the following.
* **Inline**: The Team definition is stored in Harness and is managed entirely through the user interface or the API. This is the default.
* **Remote**: The Team definition is stored in your Git repository. Select a Git connector, repository, branch, and YAML path. Go to [Git Experience Journey](/internal-developer-portal/use-idp/git-experience/gitx-journey.md) to set up remote storage.
If you already have a Team definition in Git, click **Import from Git** at the top of the page instead of filling in the form.
#### Step 4: Review the YAML and create the Team
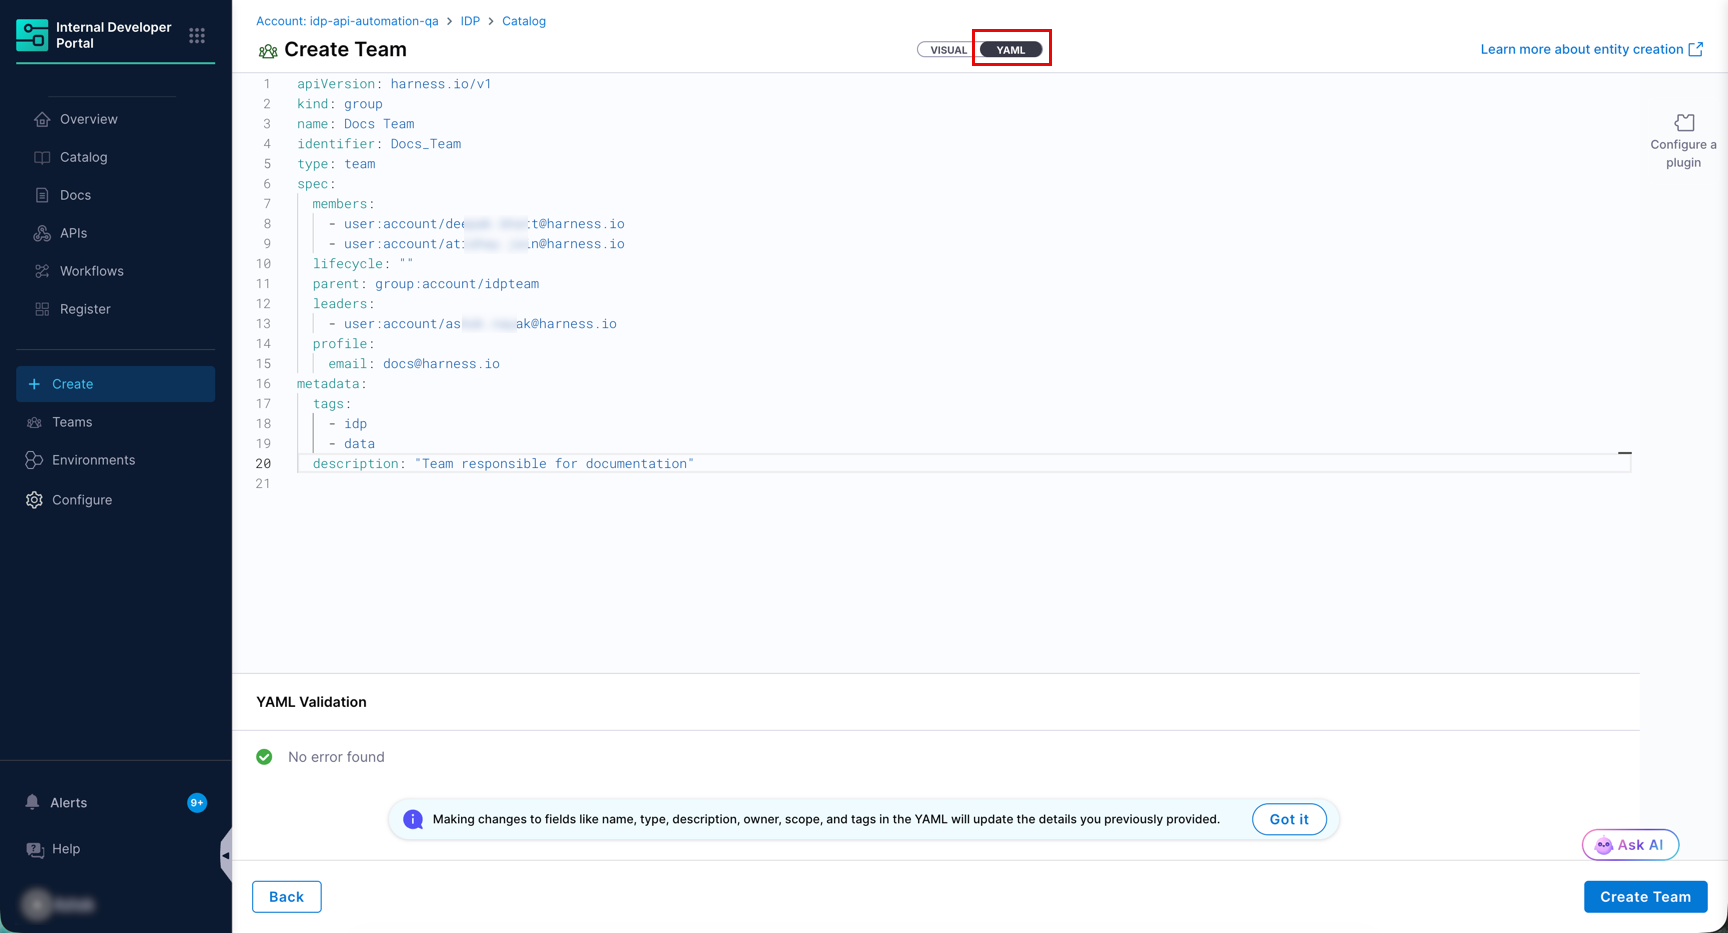
Click **Review YAML** to see the generated definition. The visual view and the YAML view stay in sync, so a change in one is reflected in the other.
Review YAML step of the Create Team flow
Check the **YAML Validation** panel, then click **Create Team**.
{% hint style="info" %}
Ensure your identifier follows the [identifier naming rules](https://developer.harness.io/harness-platform/use-harness-platform/references/entity-identifier-reference#identifier-naming-rules). An invalid identifier causes the entity registration to fail.
{% endhint %}
***
### Create a Team using YAML
You can write the definition yourself instead of using the form. Switch to the **YAML** view using the toggle at the top of the Create Team page, or use the [Entity API](https://apidocs.harness.io/entities) with `kind` set to `Group`.
```yaml
apiVersion: harness.io/v1
kind: Group
type: team
identifier: payments_platform
name: Payments Platform
spec:
members:
- user:account/jane.doe@example.com
- user:account/john.smith@example.com
leaders:
- user:account/matt.mathew@example.com
parent: group:account/platform_engineering
profile:
email: payments-platform@example.com
metadata:
description: Owns the payment gateway, settlement services, and their APIs.
tags:
- payments
- platform
```
#### Field reference
| Field | Description |
| -------------------- | ------------------------------------------------------------------------------------ |
| `apiVersion` | Always `harness.io/v1`. |
| `kind` | Always `Group`. This is the entity kind that backs a Team. |
| `type` | A classification for the Team, for example `team`, `squad`, or `department`. |
| `identifier` | The unique reference for the Team. |
| `name` | The display name shown in the Catalog. |
| `spec.members` | The users who belong to the Team, referenced as `user:account/`. |
| `spec.leaders` | The Team leader, referenced as `user:account/`. |
| `spec.parent` | A reference to the parent Team, which creates the hierarchy. |
| `spec.profile.email` | The shared contact address for the Team. |
| `metadata` | Description, tags, and any additional key-value pairs you want to carry on the Team. |
If you are [bringing entity definitions across from Backstage](/internal-developer-portal/troubleshooting-and-resources/harness-vs-backstage.md#step-1-entity-migration), keep `kind: Group` in your YAML. Harness IDP accepts it without modification.
You do not need to declare child teams. When you set `spec.parent` on a Team, Harness IDP generates the reverse relations automatically, so both `childOf` and `parentOf` are visible in the Catalog graph.
***
### Add more information to a Team
Beyond the fields above, a Team can carry any metadata that is useful to your organization, such as a region, a focus area, or an on-call rotation. You can add these directly under `metadata` in the YAML, or push them from an external system. Go to [Team metrics and scorecards](/internal-developer-portal/use-idp/software-catalog/teams/team-metrics-and-scorecards.md#enrich-a-team-with-custom-properties) to learn how.
***
### Next steps
Explore the following pages next:
* [Manage Teams and assign ownership](/internal-developer-portal/use-idp/software-catalog/teams/manage-teams.md)
* [Configure Team access control](/internal-developer-portal/use-idp/software-catalog/teams/team-access-control.md)
{% @harness-feedback/feedback %}