> For the complete documentation index, see [llms.txt](https://developer.harness.io/llms.txt). Markdown versions of documentation pages are available by appending `.md` to page URLs; this page is available as [Markdown](https://developer.harness.io/internal-developer-portal/use-idp/software-catalog/teams/team-access-control.md).
# Team Access Control
Learn how permissions on a Team extend to the Catalog entities that Team owns in Harness IDP.
Teams give you a second way to grant access to your Catalog. If a Team owns an entity, then holding a permission on that Team gives you the same permission on the entity.
This matters at scale. Instead of granting permissions on thousands of individual entities, you grant permissions on the handful of Teams that own them.
***
### The two paths to a Catalog entity
A user can view, edit, or delete a Catalog entity if **either** of the following is true.
1. The user holds that permission on the **Catalog** resource at the entity's scope.
2. The user holds that permission on the **Team** that owns the entity.
Neither path replaces the other. A direct Catalog grant behaves exactly as it always has, and it is not limited by team boundaries.
#### An example
Consider a service called `payments-api` that lives in the `retail` project and is owned by the `Payments Platform` Team at the organization scope.
| The user holds | The result |
| ---------------------------------------------------------- | ------------------------------------------------------------------------------------------------------------------------------------------------------------- |
| **View** on Catalog at the `retail` project scope | The user sees `payments-api`, along with everything else in that project. |
| **View** on the `Payments Platform` Team, and nothing else | The user sees `payments-api` and the rest of what that Team owns, wherever those entities live. The user does not see other entities in the `retail` project. |
| Neither of the above | The user does not see `payments-api`. |
***
### What inheritance covers
Ownership inherits **View**, **Create/Edit**, and **Delete** on the entities a Team already owns.
{% hint style="info" %}
**POINTS TO REMEMBER**
* **Creating a new entity is never inherited** - To create a catalog entity, you need Catalog **Create/Edit** permission at the scope where the entity will live. A permission on a Team lets you edit and delete the entities that Team already owns. It does not let you create new ones.
* **Sub-teams do not inherit** - A permission on a Team applies only to the entities that Team owns directly. It does not extend to the Team's sub-teams, and it does not extend to the entities those sub-teams own. Grant permission on each Team whose entities you want to reach. Go to [Add Teams to a resource group](#add-teams-to-a-resource-group) to grant access across a Team and its sub-teams.
{% endhint %}
***
### What team ownership does not cover
{% hint style="warning" %}
Team-based inheritance applies to Catalog entities only. **Workflows**, **Environments**, and **Environment Blueprints** are separate resource types with their own permissions, and they do not inherit access from team ownership. Grant permissions on those resources directly.
{% endhint %}
Entities of a [custom entity kind](/internal-developer-portal/admin-and-customization/custom-entity-kinds/overview.md) do inherit team-based access, because they fall under the Catalog resource in the same way that Components, APIs, and Resources do.
***
### Add Teams to a resource group
**Team** is a resource type in Harness resource groups. Because permissions do not pass down to sub-teams, a resource group is where you decide exactly which Teams a role can reach.
Go to **Account Settings**, **Organization Settings**, or **Project Settings**, then select **Resource Groups** under **Access Control**. Create a resource group, or open an existing one.
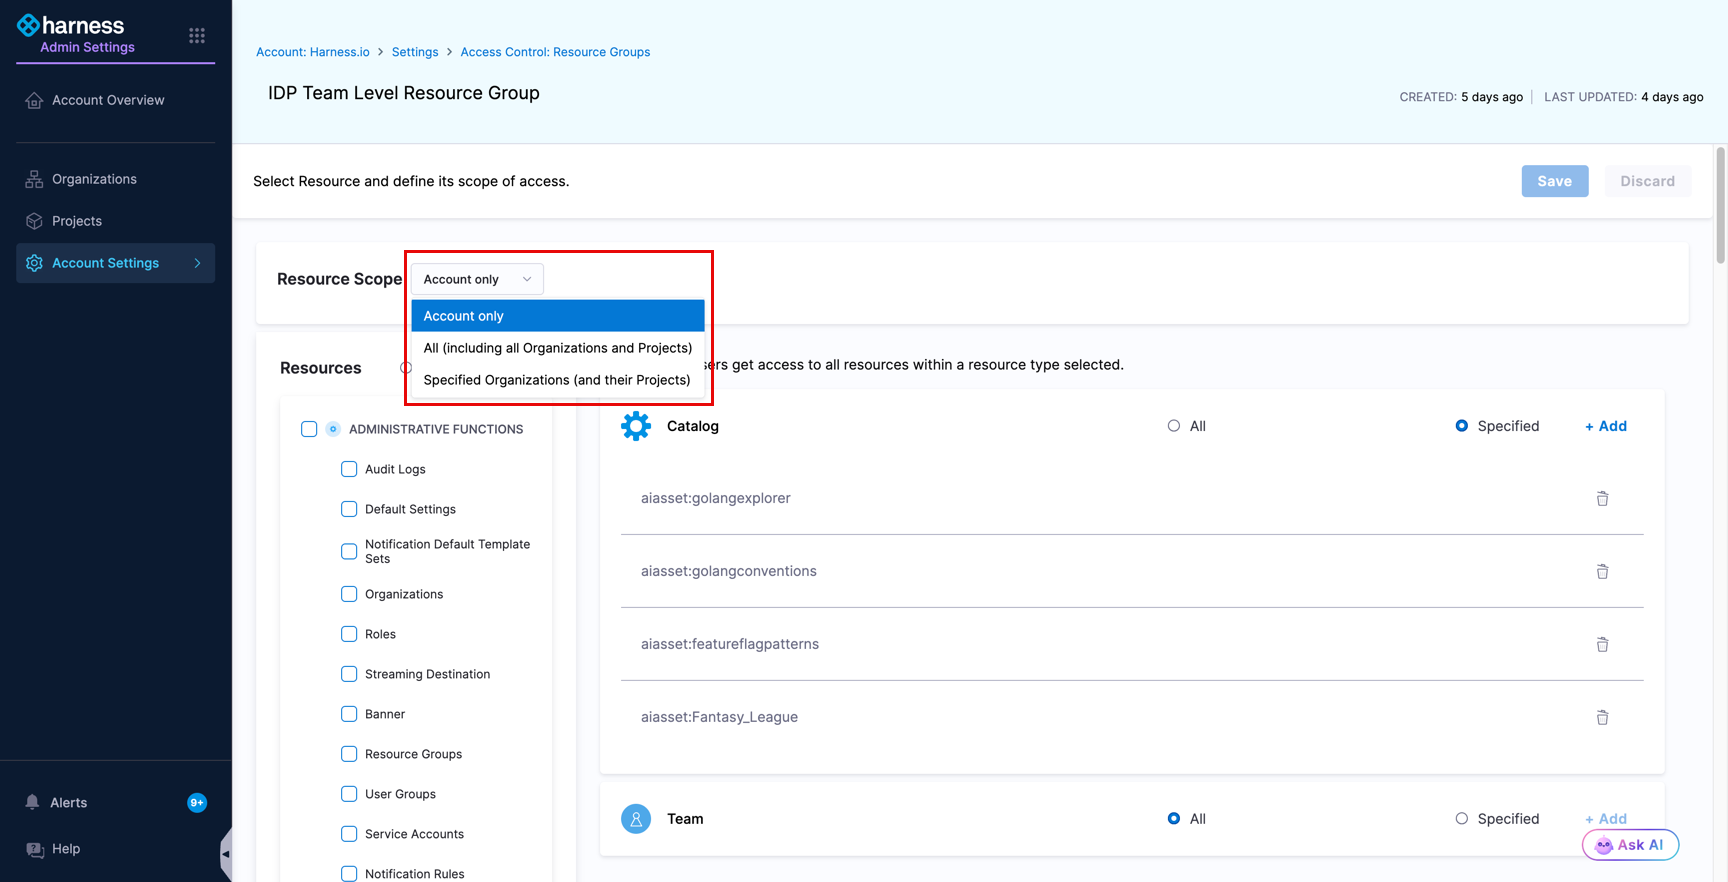
#### Step 1: Set the resource scope
**Resource Scope** decides which Teams the resource group can reach.
| Resource Scope | Teams covered |
| -------------------------------------------------- | ------------------------------------------------------------- |
| **Account only** | Teams at the Account scope. |
| **All (including all Organizations and Projects)** | Teams at every scope in the account. |
| **Specified Organizations (and their Projects)** | Teams in the organizations you select, and in their projects. |
A Team is covered when it falls inside the Resource Scope and is included by your **Resources** choice. This applies to every Team, including sub-teams. Selecting a parent Team does not add its sub-teams, so select each sub-team you want the resource group to reach.
#### Step 2: Add the Team resource
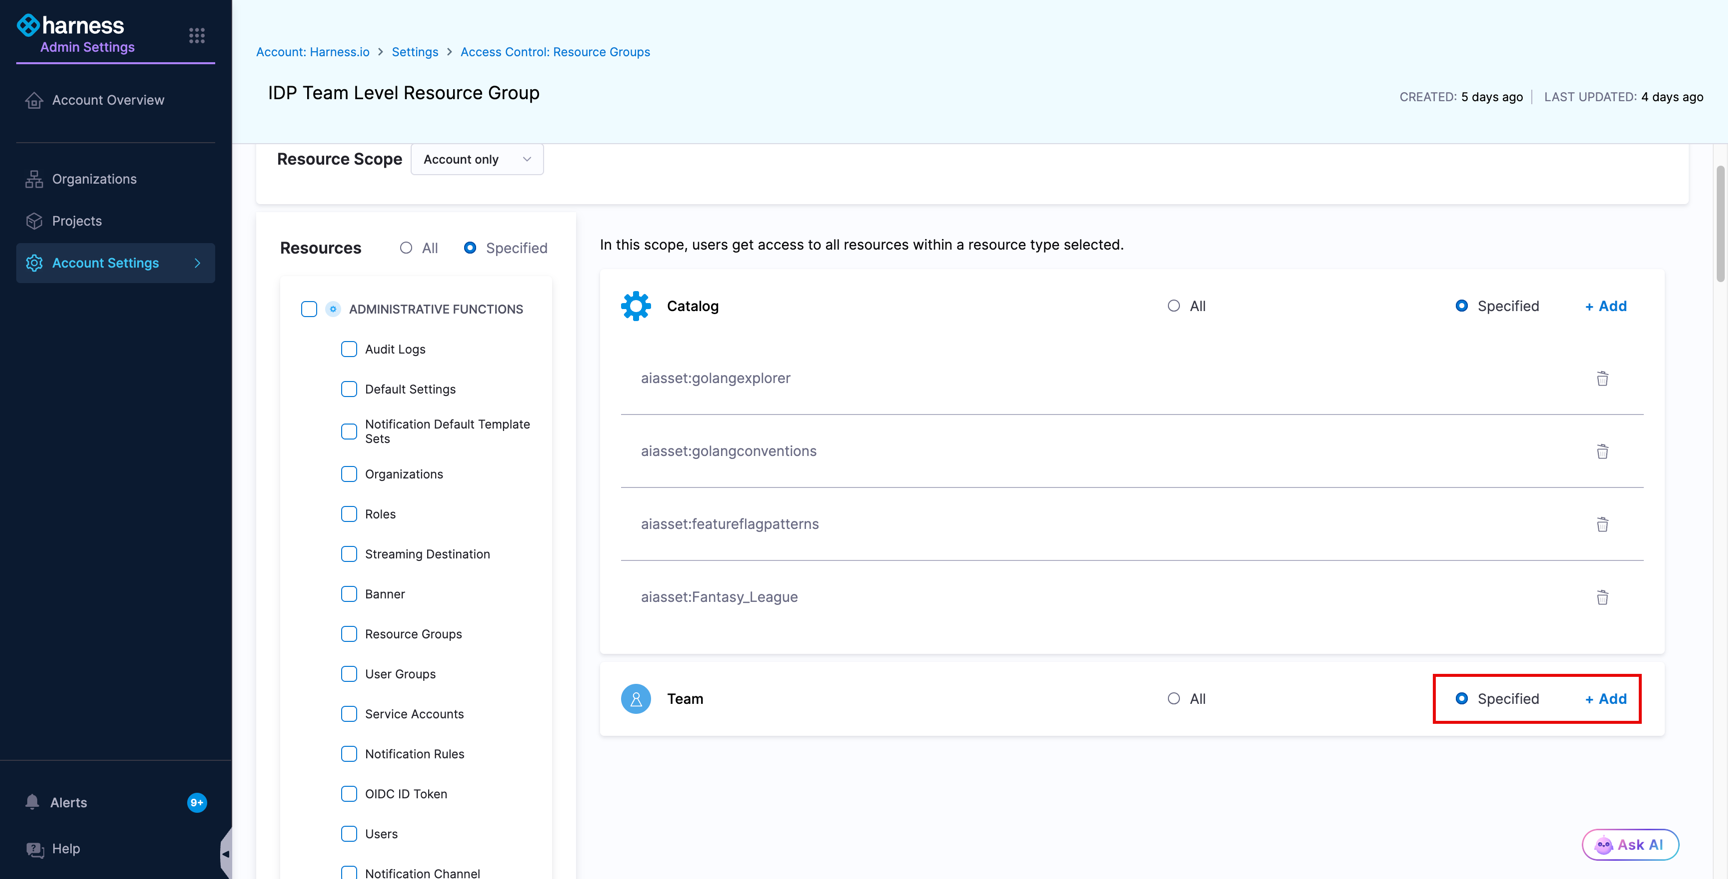
Under **Resources**, select **Specified**, then find the **Team** row.
* Choose **All** to include every Team available in the resource scope you set.
* Choose **Specified**, then click **+ Add**, to pick individual Teams.
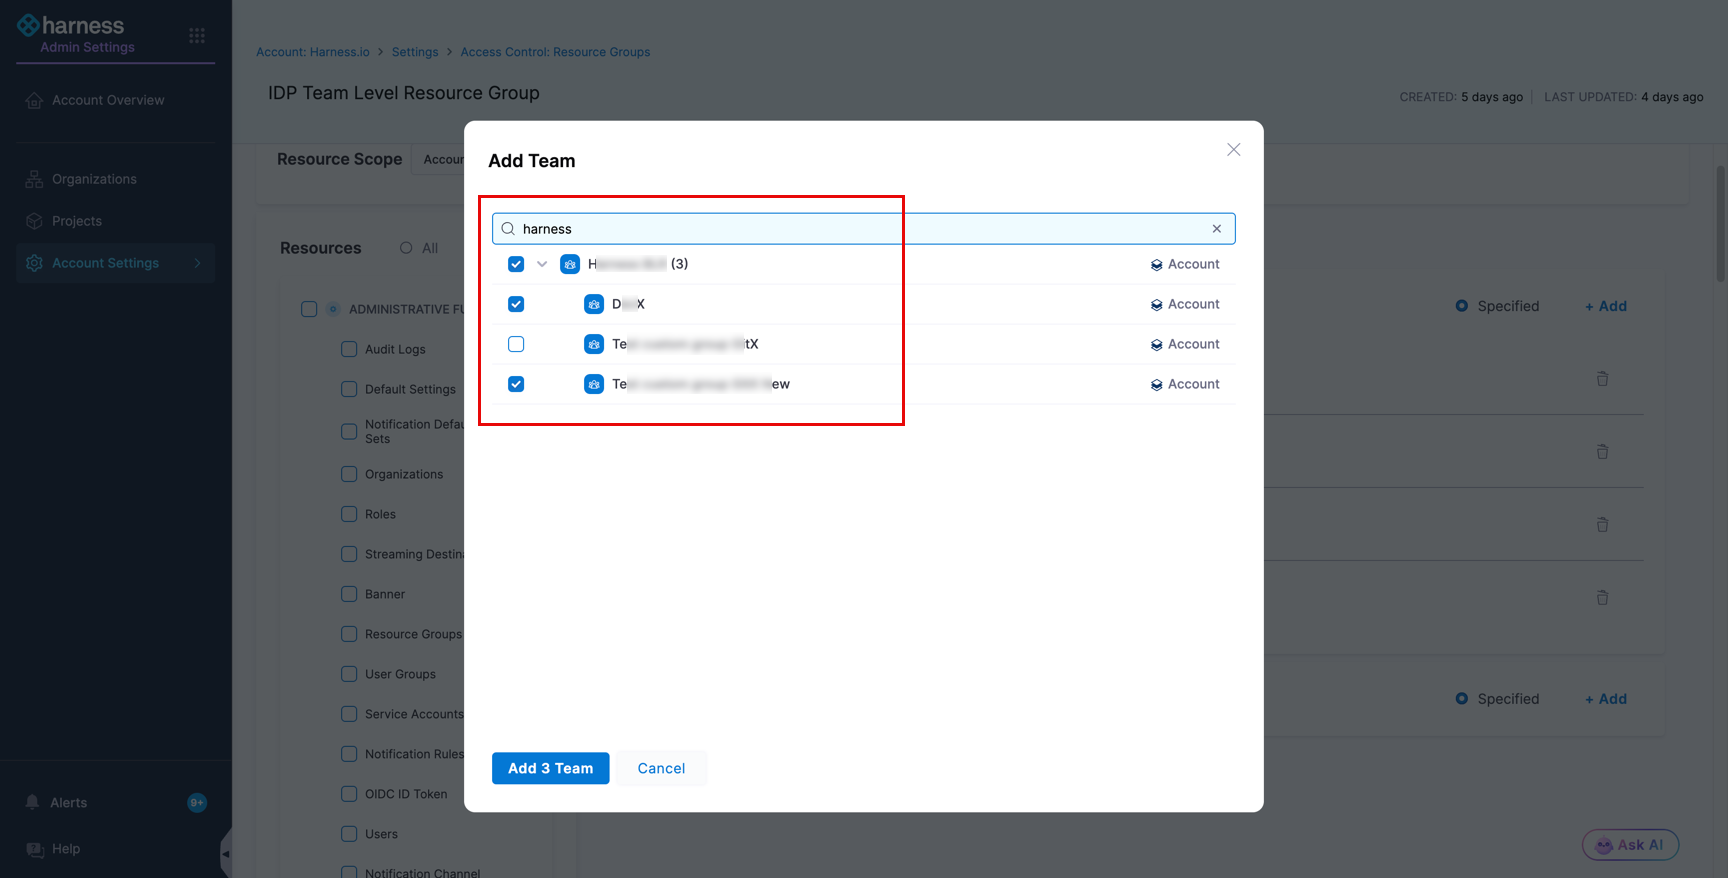
#### Step 3: Select Teams, including sub-teams
The **Add Team** dialog lists Teams as a hierarchy. Click the arrow beside a Team to expand it and see the sub-teams.
{% hint style="warning" %}
Each Team (parent and sub-team), carries its own checkbox and grants access only to the entities it owns directly. Select every sub-team you want the resource group to reach.
{% endhint %}
Go to [Manage resource groups](https://developer.harness.io/harness-platform/use-harness-platform/platform-access-control/manage-resource-groups) for the full resource group reference.
***
### Set up team-based access
The steps below follow the same pattern as [Catalog RBAC](/internal-developer-portal/admin-and-customization/rbac/catalog-rbac.md).
1. Go to the settings for the scope where you want to configure access.
2. [Create a role](https://developer.harness.io/harness-platform/use-harness-platform/platform-access-control/add-manage-roles#create-a-role) with the permissions you want on the **Teams** resource.
3. [Create a resource group](https://developer.harness.io/harness-platform/use-harness-platform/platform-access-control/manage-resource-groups#create-a-resource-group) and add the Teams that the role should apply to.
4. [Create a user group](https://developer.harness.io/harness-platform/use-harness-platform/platform-access-control/add-user-groups) and [add users](https://developer.harness.io/harness-platform/use-harness-platform/platform-access-control/add-users) to it.
5. [Assign the role and the resource group](https://developer.harness.io/harness-platform/use-harness-platform/platform-access-control#role-binding) to that user group.
***
### Frequently asked questions Does the owner field affect permissions?
Yes. When a Team is set as the owner of a Catalog entity, users who hold a permission on that Team hold the same permission on the entity. The owner field records responsibility and drives inherited access.
What happens to access when an entity changes owner?
An entity has one owner. When you assign it to a new Team, the previous ownership relation is removed. Users who had access only through the previous Team lose that access, and users with a permission on the new Team gain it.
Does a user need both a Catalog grant and a Team grant?
To view, edit, or delete an existing entity, no. Either one is sufficient, and holding both is not a problem. To create a new entity, yes: that always requires Catalog Create/Edit permission at the entity's scope, whatever Team permissions you hold.
I have permission on a parent Team. Can I reach the entities owned by its sub-teams?
No. Permissions apply to the entities a Team owns directly. To reach the entities owned by sub-teams, add those sub-teams to the resource group as well. In the **Add Team** dialog, expand the parent Team and select each sub-team you want to include. Go to [Select Teams, including sub-teams](#step-3-select-teams-including-sub-teams) for the steps.
***
### Next steps
Explore the following pages next:
* [Roll up metrics and run scorecards on Teams](/internal-developer-portal/use-idp/software-catalog/teams/team-metrics-and-scorecards.md)
* [Catalog RBAC](/internal-developer-portal/admin-and-customization/rbac/catalog-rbac.md)
{% @harness-feedback/feedback %}