> For the complete documentation index, see [llms.txt](https://developer.harness.io/llms.txt). Markdown versions of documentation pages are available by appending `.md` to page URLs; this page is available as [Markdown](https://developer.harness.io/resilience-testing/chaos-engineering/faults/chaos-fault-categories/aws/security-configurations/aws-iam-integration.md).
# Use IAM roles for authentication
There are three methods available for HCE to authenticate itself with AWS and obtain the necessary permissions that are specific to the targeted services:
* **IAM Roles for Service Accounts (IRSA) - OIDC method**
IRSA leverages an OpenID Connect (OIDC) provider for authentication. This method is applicable when the execution plane is installed on an Amazon EKS cluster. It provides least-privilege access and credential isolation. This method requires setting up an OIDC provider in your EKS cluster and (for cross-account access) in each target account.
* **AWS Assume Role method**
The Assume Role method uses [chained AssumeRole operations](https://docs.aws.amazon.com/eks/latest/userguide/cross-account-access.html) to enable cross-account access. It requires IRSA/OIDC only in the source account (where your EKS cluster is installed), and **does not require OIDC providers in any target account**, only standard IAM role trust relationships. This provides a simpler setup for cross-account chaos experiments.
* **Kubernetes Secret**
This approach involves providing the necessary credentials through Kubernetes secrets. The advantage of this method is its compatibility with any cluster and platform. It is explained in the "notes" section of the experiment documentation.
Use the selector below to choose your preferred IAM role-based authentication method and follow the complete setup instructions.
{% @harness-package-selector/package-selector platforms="%5B%7B%22label%22%3A%22IRSA%20(OIDC%20Method)%22%2C%22slug%22%3A%22irsa-oidc-method%22%2C%22path%22%3A%22chaos-engineering%2Ffaults%2Fchaos-fault-categories%2Faws%2Fsecurity-configurations%2Faws-iam-integration%2Firsa-oidc-method-aws-iam-integration%22%7D%2C%7B%22label%22%3A%22AWS%20Assume%20Role%20Method%22%2C%22slug%22%3A%22aws-assume-role-method%22%2C%22path%22%3A%22chaos-engineering%2Ffaults%2Fchaos-fault-categories%2Faws%2Fsecurity-configurations%2Faws-iam-integration%2Faws-assume-role-method-aws-iam-integration%22%7D%5D" %}
{% tabs %}
{% tab title="AWS Assume Role Method" %}
The AWS Assume Role method provides a simplified approach for setting up cross-account access for chaos experiments. Unlike the OIDC method, the Assume Role method **does not require you to create OIDC providers in each target account**. Instead, it uses [chained AssumeRole operations](https://docs.aws.amazon.com/eks/latest/userguide/cross-account-access.html) — the source account's IAM role (which already has IRSA/OIDC credentials from the EKS cluster) assumes IAM roles in the target accounts using `sts:AssumeRole`.
This is especially useful when:
* You want to avoid the overhead of creating and managing OIDC identity providers in every target account.
* You need to target AWS resources across multiple accounts from a single chaos infrastructure.
* You prefer a simpler trust relationship setup using IAM role-to-role trust rather than OIDC federation in target accounts.
### Architecture
The following diagram illustrates how the Assume Role method works:
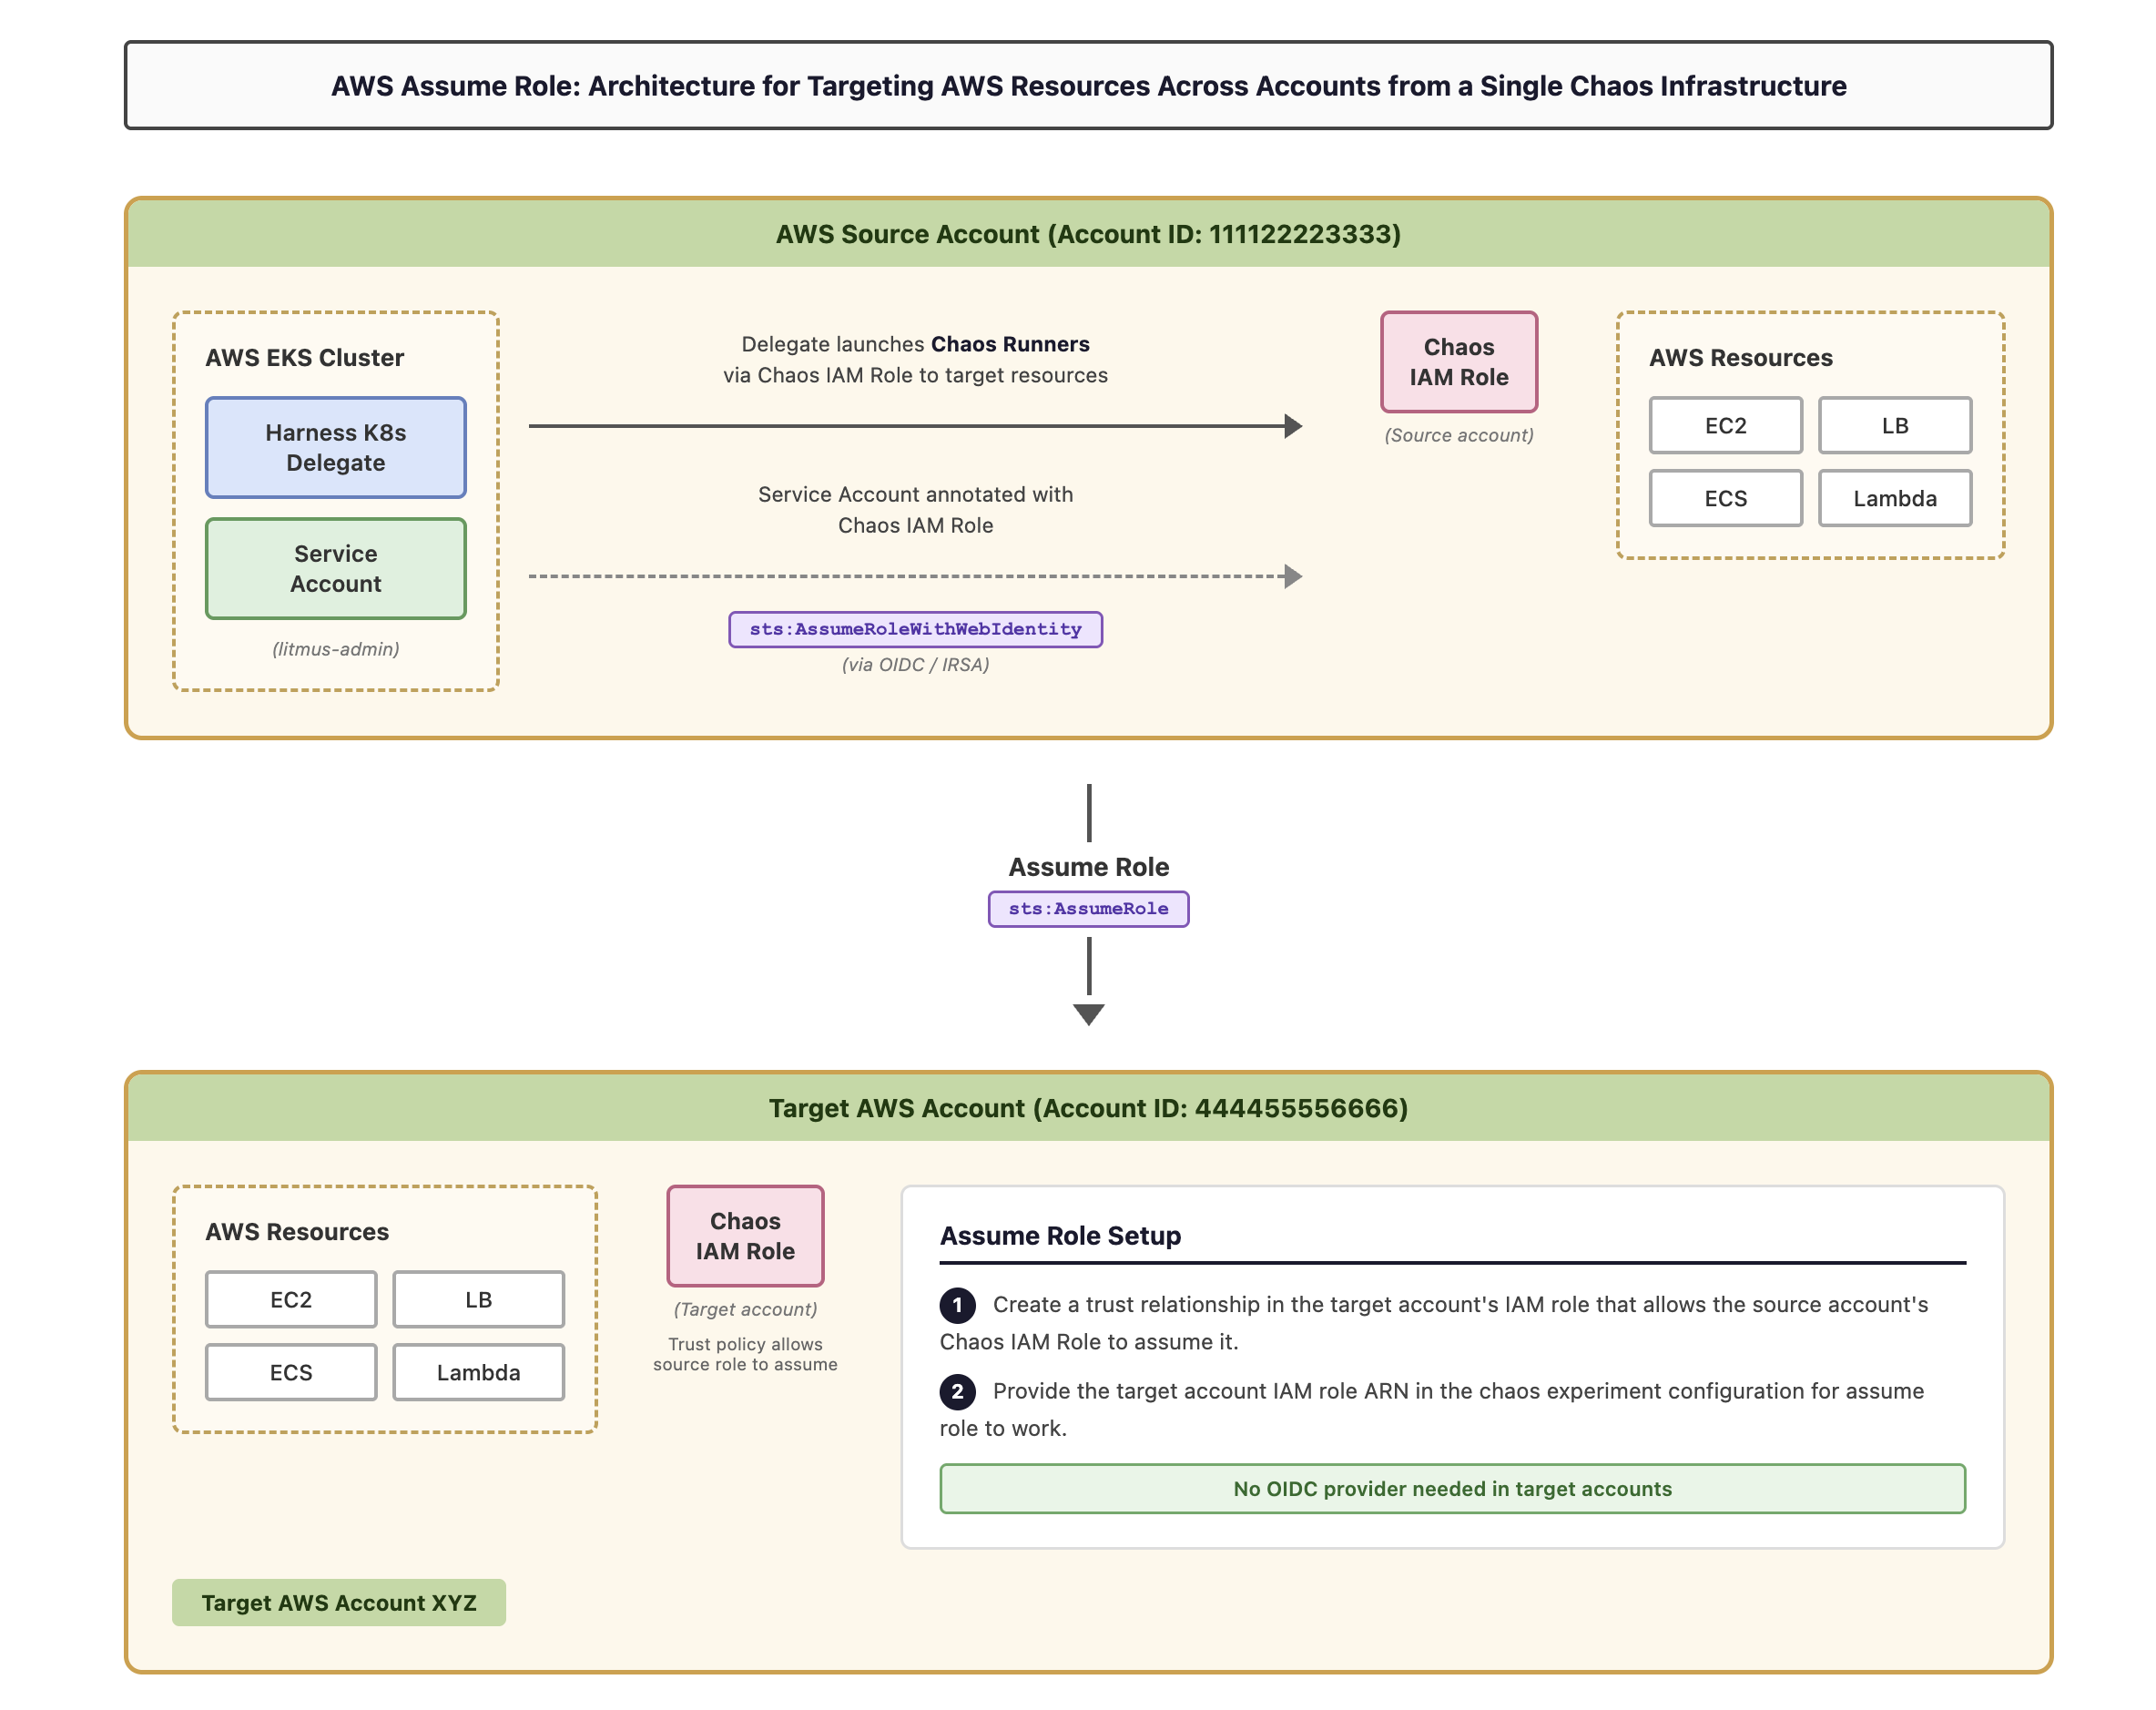 **How it works:**
1. The **Harness K8s Delegate** in the AWS EKS cluster (source account) launches **Chaos Runners** to conduct chaos experiments against AWS resources (EC2, LB, ECS, Lambda) in the source account.
2. The **Service Account** in the EKS cluster is annotated with the **Chaos IAM Role** in the source account. The service account obtains credentials for this role via IRSA (OIDC federation with the EKS cluster).
3. To target resources in a different AWS account, the Chaos IAM Role in the source account **assumes** the Chaos IAM Role in the target account using `sts:AssumeRole`.
4. This is enabled by configuring a **trust relationship** in the target account's IAM role that allows the source account's IAM role to assume it.
5. You provide the **target account IAM role ARN** in the chaos experiment configuration for assume role to work.
### Account terminology
* **AWS source account:** The AWS account where your EKS cluster and chaos infrastructure are installed. This account hosts the Harness K8s Delegate that launches chaos runners. An OIDC provider is configured in this account for IRSA.
* **Target accounts:** AWS accounts where you'll run experiments against resources (EC2, LB, ECS, Lambda, etc.) to intentionally disrupt them. You can have many target accounts. **No OIDC provider is needed in target accounts**, only an IAM role trust relationship.
* **The experiment service account:** A Kubernetes service account (default: `litmus-admin`) in the EKS cluster that is annotated with the source account's Chaos IAM Role.
### Prerequisites
* Your execution plane must be installed on an Amazon EKS cluster.
* An [OIDC provider must be configured for your EKS cluster](https://docs.aws.amazon.com/eks/latest/userguide/enable-iam-roles-for-service-accounts.html) in the source account. This is a standard IRSA prerequisite. If you have already set up IRSA for your chaos infrastructure, this is already done.
* An IAM role in the source account (Chaos IAM Role) with the following trust policy that allows the EKS cluster's OIDC provider to issue credentials:
```
{
"Version": "2012-10-17",
"Statement": [
{
"Effect": "Allow",
"Principal": {
"Federated": "arn:aws:iam:::oidc-provider/oidc.eks..amazonaws.com/id/"
},
"Action": "sts:AssumeRoleWithWebIdentity",
"Condition": {
"StringEquals": {
"oidc.eks..amazonaws.com/id/:aud": "sts.amazonaws.com"
}
}
}
]
}
```
* The experiment service account must be annotated with this IAM role:
```
kubectl annotate serviceaccount -n \
eks.amazonaws.com/role-arn=arn:aws:iam:::role/
```
{% hint style="info" %}
* The default name for the experiment service account is `litmus-admin` and the namespace for chaos infrastructure is `HCE`, however, you can use different names.
* If you have already completed the IRSA (OIDC method) setup for your source account, these prerequisites are already met. You only need to follow the steps below to configure cross-account access.
{% endhint %}
### Step 1: Grant the source account role permission to assume target roles
Attach a permission policy to the source account's Chaos IAM Role that allows it to call `sts:AssumeRole` on the target account roles.
1. Navigate to the AWS IAM console in your **source account**.
2. Find the Chaos IAM Role that the experiment service account is annotated with.
3. Attach the following inline policy (or add to an existing policy) to allow assuming roles in target accounts:
```
{
"Version": "2012-10-17",
"Statement": [
{
"Effect": "Allow",
"Action": "sts:AssumeRole",
"Resource": [
"arn:aws:iam:::role/",
"arn:aws:iam:::role/"
]
}
]
}
```
4. Additionally, attach any policies needed for chaos experiments against resources in the source account itself. You can use the [AWS superset policy](/resilience-testing/chaos-engineering/faults/chaos-fault-categories/aws/security-configurations/policy-for-all-aws-faults.md) as a reference.
### Step 2: Create an IAM role and policy in each AWS target account
Create an IAM role in each target account that will be assumed by the source account's IAM role.
1. Navigate to the AWS IAM console in your **target account**.
2. Create a new IAM role with the following configuration:
* **Trusted entity type**: Custom trust policy (configured in Step 3 below)
3. Create or attach a policy that grants the necessary permissions for chaos experiments on the target account's resources. You can use the [AWS superset policy](/resilience-testing/chaos-engineering/faults/chaos-fault-categories/aws/security-configurations/policy-for-all-aws-faults.md) as a reference for comprehensive permissions.
4. Note the ARN of the created role. You'll need this for the trust relationship configuration and experiment setup.
### Step 3: Configure the trust relationship in target accounts
Configure the trust relationship in the target account's IAM role to allow the source account's IAM role to assume it. This step **does not require an OIDC provider in the target account**. It uses a standard IAM role-to-role trust.
1. **In each target account**: Edit the trust relationship for the IAM role you created in Step 2.
Navigate to **AWS IAM** > ***ROLE\_NAME*** > **Trust relationships** tab and update the trust policy:
```
{
"Version": "2012-10-17",
"Statement": [
{
"Effect": "Allow",
"Principal": {
"AWS": "arn:aws:iam:::role/"
},
"Action": "sts:AssumeRole"
}
]
}
```
Where:
* ``: The AWS account ID of your source account (where the EKS cluster and chaos infrastructure are installed).
* ``: The name of the IAM role in the source account that the experiment service account is annotated with.
{% hint style="info" %}
For [least privilege](https://docs.aws.amazon.com/IAM/latest/UserGuide/best-practices.html#grant-least-privilege), always specify the exact role ARN in the `Principal` field (for example, `arn:aws:iam::111122223333:role/chaos-source-role`) rather than using the account root (`arn:aws:iam::111122223333:root`). Using the account root would allow **any** IAM principal in the source account to assume this role.
{% endhint %}
2. Repeat for each target account.
### Step 4: Configure experiments to use assume role
When creating chaos experiments that target resources in different accounts, specify the target account's role ARN directly in the chaos experiment configuration.
1. In the Harness Chaos Dashboard, navigate to your experiment configuration.
2. In the fault configuration panel, locate the **Assume Role ARN** field.
3. Enter the ARN of the target account role you created in Step 2:
```
arn:aws:iam:::role/
```
4. The chaos infrastructure will automatically assume this role when executing the experiment against resources in the target account.
### Remove all secret references from experiment definitions
When you create a new AWS chaos experiment using the assume role method, you do not need to provide AWS access key secrets. The assume role functionality works seamlessly with the IAM role configuration.
**How it works:**
1. The **Harness K8s Delegate** in the AWS EKS cluster (source account) launches **Chaos Runners** to conduct chaos experiments against AWS resources (EC2, LB, ECS, Lambda) in the source account.
2. The **Service Account** in the EKS cluster is annotated with the **Chaos IAM Role** in the source account. The service account obtains credentials for this role via IRSA (OIDC federation with the EKS cluster).
3. To target resources in a different AWS account, the Chaos IAM Role in the source account **assumes** the Chaos IAM Role in the target account using `sts:AssumeRole`.
4. This is enabled by configuring a **trust relationship** in the target account's IAM role that allows the source account's IAM role to assume it.
5. You provide the **target account IAM role ARN** in the chaos experiment configuration for assume role to work.
### Account terminology
* **AWS source account:** The AWS account where your EKS cluster and chaos infrastructure are installed. This account hosts the Harness K8s Delegate that launches chaos runners. An OIDC provider is configured in this account for IRSA.
* **Target accounts:** AWS accounts where you'll run experiments against resources (EC2, LB, ECS, Lambda, etc.) to intentionally disrupt them. You can have many target accounts. **No OIDC provider is needed in target accounts**, only an IAM role trust relationship.
* **The experiment service account:** A Kubernetes service account (default: `litmus-admin`) in the EKS cluster that is annotated with the source account's Chaos IAM Role.
### Prerequisites
* Your execution plane must be installed on an Amazon EKS cluster.
* An [OIDC provider must be configured for your EKS cluster](https://docs.aws.amazon.com/eks/latest/userguide/enable-iam-roles-for-service-accounts.html) in the source account. This is a standard IRSA prerequisite. If you have already set up IRSA for your chaos infrastructure, this is already done.
* An IAM role in the source account (Chaos IAM Role) with the following trust policy that allows the EKS cluster's OIDC provider to issue credentials:
```
{
"Version": "2012-10-17",
"Statement": [
{
"Effect": "Allow",
"Principal": {
"Federated": "arn:aws:iam:::oidc-provider/oidc.eks..amazonaws.com/id/"
},
"Action": "sts:AssumeRoleWithWebIdentity",
"Condition": {
"StringEquals": {
"oidc.eks..amazonaws.com/id/:aud": "sts.amazonaws.com"
}
}
}
]
}
```
* The experiment service account must be annotated with this IAM role:
```
kubectl annotate serviceaccount -n \
eks.amazonaws.com/role-arn=arn:aws:iam:::role/
```
{% hint style="info" %}
* The default name for the experiment service account is `litmus-admin` and the namespace for chaos infrastructure is `HCE`, however, you can use different names.
* If you have already completed the IRSA (OIDC method) setup for your source account, these prerequisites are already met. You only need to follow the steps below to configure cross-account access.
{% endhint %}
### Step 1: Grant the source account role permission to assume target roles
Attach a permission policy to the source account's Chaos IAM Role that allows it to call `sts:AssumeRole` on the target account roles.
1. Navigate to the AWS IAM console in your **source account**.
2. Find the Chaos IAM Role that the experiment service account is annotated with.
3. Attach the following inline policy (or add to an existing policy) to allow assuming roles in target accounts:
```
{
"Version": "2012-10-17",
"Statement": [
{
"Effect": "Allow",
"Action": "sts:AssumeRole",
"Resource": [
"arn:aws:iam:::role/",
"arn:aws:iam:::role/"
]
}
]
}
```
4. Additionally, attach any policies needed for chaos experiments against resources in the source account itself. You can use the [AWS superset policy](/resilience-testing/chaos-engineering/faults/chaos-fault-categories/aws/security-configurations/policy-for-all-aws-faults.md) as a reference.
### Step 2: Create an IAM role and policy in each AWS target account
Create an IAM role in each target account that will be assumed by the source account's IAM role.
1. Navigate to the AWS IAM console in your **target account**.
2. Create a new IAM role with the following configuration:
* **Trusted entity type**: Custom trust policy (configured in Step 3 below)
3. Create or attach a policy that grants the necessary permissions for chaos experiments on the target account's resources. You can use the [AWS superset policy](/resilience-testing/chaos-engineering/faults/chaos-fault-categories/aws/security-configurations/policy-for-all-aws-faults.md) as a reference for comprehensive permissions.
4. Note the ARN of the created role. You'll need this for the trust relationship configuration and experiment setup.
### Step 3: Configure the trust relationship in target accounts
Configure the trust relationship in the target account's IAM role to allow the source account's IAM role to assume it. This step **does not require an OIDC provider in the target account**. It uses a standard IAM role-to-role trust.
1. **In each target account**: Edit the trust relationship for the IAM role you created in Step 2.
Navigate to **AWS IAM** > ***ROLE\_NAME*** > **Trust relationships** tab and update the trust policy:
```
{
"Version": "2012-10-17",
"Statement": [
{
"Effect": "Allow",
"Principal": {
"AWS": "arn:aws:iam:::role/"
},
"Action": "sts:AssumeRole"
}
]
}
```
Where:
* ``: The AWS account ID of your source account (where the EKS cluster and chaos infrastructure are installed).
* ``: The name of the IAM role in the source account that the experiment service account is annotated with.
{% hint style="info" %}
For [least privilege](https://docs.aws.amazon.com/IAM/latest/UserGuide/best-practices.html#grant-least-privilege), always specify the exact role ARN in the `Principal` field (for example, `arn:aws:iam::111122223333:role/chaos-source-role`) rather than using the account root (`arn:aws:iam::111122223333:root`). Using the account root would allow **any** IAM principal in the source account to assume this role.
{% endhint %}
2. Repeat for each target account.
### Step 4: Configure experiments to use assume role
When creating chaos experiments that target resources in different accounts, specify the target account's role ARN directly in the chaos experiment configuration.
1. In the Harness Chaos Dashboard, navigate to your experiment configuration.
2. In the fault configuration panel, locate the **Assume Role ARN** field.
3. Enter the ARN of the target account role you created in Step 2:
```
arn:aws:iam:::role/
```
4. The chaos infrastructure will automatically assume this role when executing the experiment against resources in the target account.
### Remove all secret references from experiment definitions
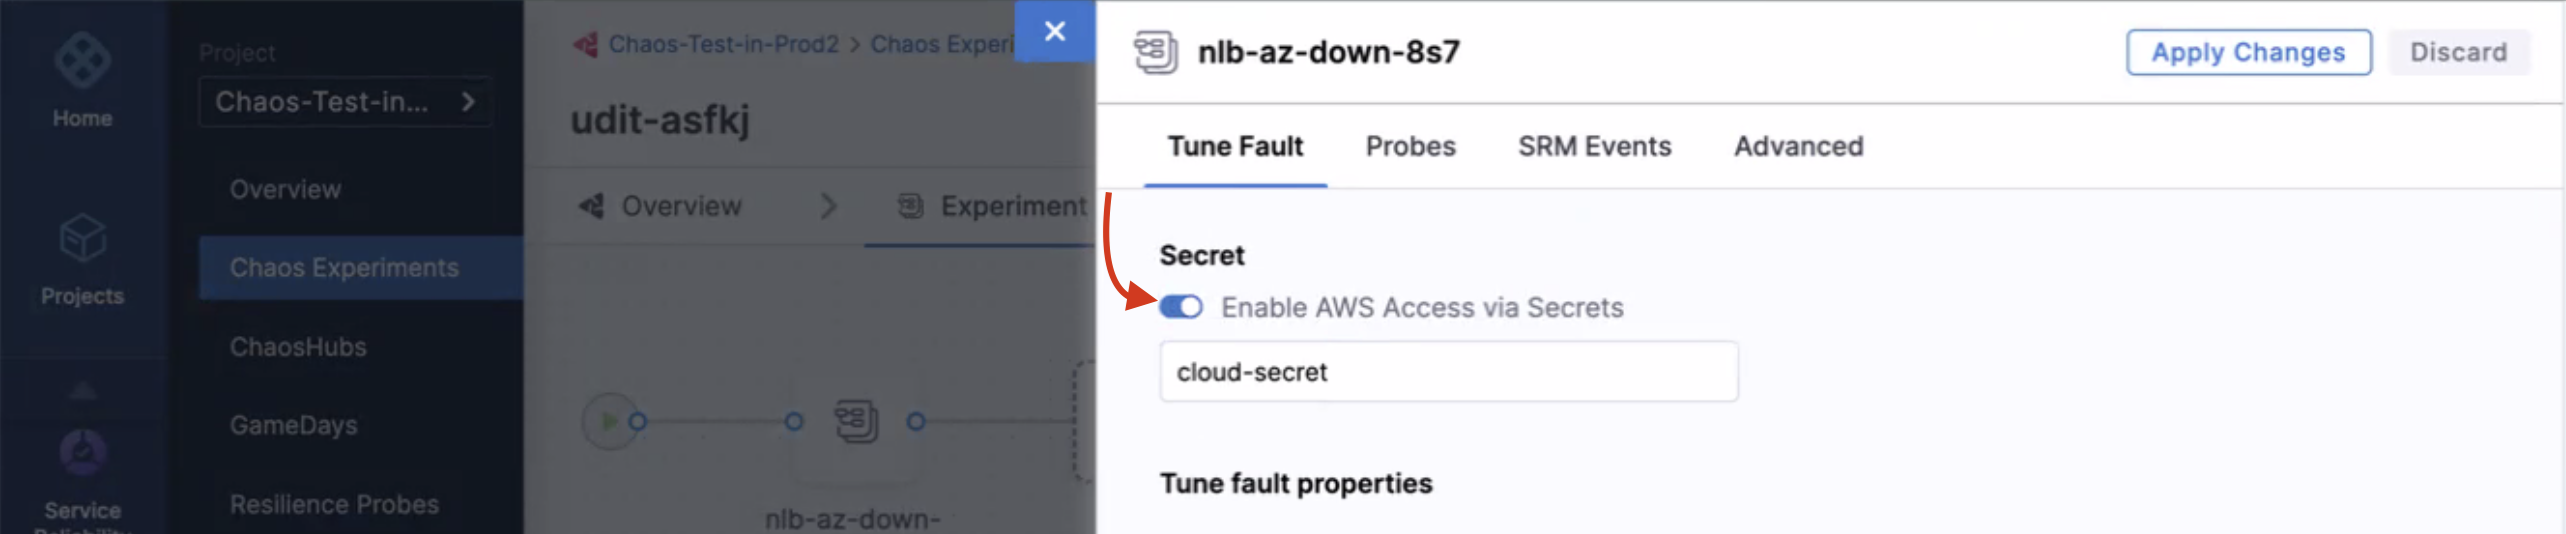
When you create a new AWS chaos experiment using the assume role method, you do not need to provide AWS access key secrets. The assume role functionality works seamlessly with the IAM role configuration.
 {% endtab %}
{% tab title="IRSA (OIDC Method)" %}
IRSA (IAM Roles for Service Accounts) leverages an OpenID Connect (OIDC) provider for authentication. This method is applicable when the execution plane is installed on an Amazon EKS cluster. With IRSA, you have these benefits:
* **Least privilege:** Using IRSA avoids extending permissions for the pods on the node, such as restricting the node IAM role for pods from making an AWS API call. You can scope IAM permissions to a service account, and this way, only pods that use that service account have access to those permissions.
* **Credential isolation:** An experiment can only retrieve credentials for the IAM role associated with a particular service account. This experiment does not have access to credentials for other experiments belonging to other pods.
### Prerequisites
* Your execution plane must be installed on an Amazon EKS cluster.
* You must have `eksctl` installed and configured.
### Account terminology
In this topic, Harness refers to three types of accounts:
* **The experiment service account:** A Kubernetes service account created when you install a chaos infrastructure on your EKS cluster. This is the account that executes and controls chaos experiments. Its default name is `litmus-admin`, however you can use a different name.
* **AWS source account:** This AWS account also resides where you install a chaos infrastructure, and serves as the host for the EKS cluster. This account enables Harness CE to access resources across multiple target accounts.
* **Target accounts:** These are AWS accounts where you'll run experiments against resources and services to intentionally disrupt them. You can have many target accounts.
### Enable the experiment service account to access AWS resources
Chaos experiments are initiated and controlled through this service account (usually named `litmus-admin`). You must enable this account to access AWS resources.
#### Step 1: Create an OIDC provider for your EKS cluster
You must create an IAM OpenID Connect (OIDC) identity provider for your cluster with `eksctl`. You only need to do this once for a cluster. For more information, go to [AWS documentation to set up an OIDC provider](https://docs.aws.amazon.com/eks/latest/userguide/enable-iam-roles-for-service-accounts.html).
To create an OIDC provider for your EKS cluster:
1. Run the following command to check if your cluster has an existing IAM OIDC provider.
```
aws eks describe-cluster --name --query "cluster.identity.oidc.issuer" --output text
```
**Example output:**
```
https://oidc.eks.us-west-1.amazonaws.com/id/D054E55B6947B1A7B3F200297789662C
```
In the above example `us-west-1` is the region, and `D054E55B6947B1A7B3F200297789662C` is the OIDC provider ID.
1. Run the following command to list the IAM OIDC providers available to this account.
```
aws iam list-open-id-connect-providers | grep
```
Where: `Provider_ID` is the value returned from the output of the previous command. In our example, this value is `D054E55B6947B1A7B3F200297789662C`.
1. If no IAM OIDC identity provider is available for this account, create one for your cluster using the following command.
```
eksctl utils associate-iam-oidc-provider --cluster --approve
```
**Example output:**
```
2021-09-07 14:54:01 [ℹ] eksctl version 0.52.0
2021-09-07 14:54:01 [ℹ] using region us-west-1
2021-09-07 14:54:04 [ℹ] will create IAM Open ID Connect provider for cluster "udit-cluster-11" in "us-west-1"
2021-09-07 14:54:05 [✔] created IAM Open ID Connect provider for cluster "litmus-demo" in "us-west-1"
```
tip
* By default, chaos infrastructure associated with your chaos experiment has `litmus-admin` as a chaos service account. Based on the chaos experiment you wish to execute, you can configure the policy and attach the policy to a role, and go to [step 2](#step-2-create-an-iam-role-and-policy-in-each-aws-target-account). Refer to [AWS superset policy](/resilience-testing/chaos-engineering/faults/chaos-fault-categories/aws/security-configurations/policy-for-all-aws-faults.md) to know more.
* If you wish to create a custom service account, you can create one and configure the policy and attach the policy with a role.
* For more information, go to [AWS IAM documentation](https://docs.aws.amazon.com/transfer/latest/userguide/requirements-roles.html).
#### Step 2: Configure the trust relationship of the IAM role in the source account
Configure the trust relationship in the IAM role associated with your experiment service account in the AWS source account. This step is required for both single-account and cross-account IRSA configurations.
Edit the trust relationship in the IAM role you created in Step 1.
You can find the JSON for the trust relationship in **AWS IAM > *****ROLE\_NAME***** > Trust relationship** tab.
```
{
"Version": "2012-10-17",
"Statement": [
{
"Effect": "Allow",
"Principal": {
"Federated": "arn:aws:iam:::oidc-provider/oidc.eks..amazonaws.com/id/"
},
"Action": "sts:AssumeRoleWithWebIdentity"
}
]
}
```
Where:
* ``: Your AWS source account ID
* ``: The AWS region of your EKS cluster
* ``: The OIDC provider ID from your EKS cluster
#### Step 3: Associate the IAM role with the experiment service account
Associate the IAM role you created in Step 1 by annotating the experiment service account (usually `litmus-admin`). This will give it the required access to AWS resources.
To associate the IAM role to the experiment service account, run this command:
```
kubectl annotate serviceaccount -n \
eks.amazonaws.com/role-arn=arn:aws:iam:::role/
```
{% hint style="info" %}
* The default name for the experiment service account is `litmus-admin` and the namespace for chaos infrastructure is `HCE`, however, you can use different names.
* For the cluster autoscaler experiment, annotate the experiment service account in the `kube-system` namespace.
{% endhint %}
#### Step 4: Verify the association of the IAM role with the experiment service account
To verify the association between the experiment service account (`litmus-admin`) and the IAM role:
1. Run an experiment and describe one of the pods.
2. Verify whether the `AWS_WEB_IDENTITY_TOKEN_FILE` and `AWS_ROLE_ARN` environment variables exist. For example:
```
kubectl exec -n litmus env | grep AWS
```
**Example output:**
```
AWS_VPC_K8S_CNI_LOGLEVEL=DEBUG
AWS_ROLE_ARN=arn:aws:iam:::role/
AWS_WEB_IDENTITY_TOKEN_FILE=/var/run/secrets/eks.amazonaws.com/serviceaccount/token
```
### Set up your target accounts for IRSA
Whereas chaos experiments are initiated and controlled through the experiment service account, **target accounts** are the accounts you'll subject to chaos experiments, so you can intentionally disrupt and manipulate their services.
In this section, you create an IAM role and set up an OIDC provider in each target account.
#### Step 1: Create an IAM role and policy in each AWS target account
This step lets you grant permissions for Harness CE to inject chaos targeting various AWS services in the target account.
Create an IAM role and policy in each target account to provide the required permissions to access the desired resources in that account. You have the flexibility to define the level of permissions you wish to assign to Harness CE. For instructions, go to [Create an IAM role and policy](https://docs.aws.amazon.com/transfer/latest/userguide/requirements-roles.html) in the AWS documentation.
#### Step 2: Add the OIDC provider in all target accounts
Follow this procedure for each one of your target accounts.
To add the OIDC provider to each target account:
1. Determine your OIDC URL.
1. Open the AWS Management Console and navigate to the Amazon EKS service.
2. Select the EKS cluster that corresponds to the OIDC provider.
3. Select the **Configuration** tab.
4. Under the **OpenID Connect (OIDC)** section, locate the **Issuer URL**.
An example Issuer URL looks like this:
```
https://oidc.eks.us-east-2.amazonaws.com/id/FOSBW293U0Q92423BR43290RU
```
2. Navigate to the target account.
3. In the IAM dashboard, select **Identity Providers**, and then select **Add Provider**.
4. In the **Add an Identity provider** screen, for **Provider type**, select **OpenID Connect**.
5. Provide these required details of the OIDC provider:
* **Provider URL:** Use the URL you retrieved in Step 1.
* **Audience:** Specify `sts.amazonaws.com`.
6. Select **Add provider**.
7. Repeat these steps for each target account.
### Establish trust between the AWS source account and target accounts
The AWS source account enables Harness CE to access resources across multiple target accounts.
#### Step 1: Configure trust relationship in target accounts
Configure the trust relationship for each IAM role you created in a target account to allow the AWS source account's OIDC provider to assume that role.
**In each target account:** Edit the trust relationship for the IAM role you [created on the target account](/resilience-testing/chaos-engineering/faults/chaos-fault-categories/aws/security-configurations/policy-for-all-aws-faults.md) as shown in the example below.
You can find the JSON for the trust relationship in **AWS IAM > *****ROLE\_NAME***** > Trust relationship** tab.
In this example `2222222222` is the target account ID.
```
{
"Version": "2012-10-17",
"Statement": [
{
"Effect": "Allow",
"Principal": {
"Federated": "arn:aws:iam::2222222222:oidc-provider/oidc.eks.us-east-2.amazonaws.com/id/AAAAA11111111C9909AEC6992AEFNWQO0"
},
"Action": "sts:AssumeRoleWithWebIdentity"
}
]
}
```
#### Step 2: Enable the experiment service account to switch between target accounts
This procedure enables the experiment service account (`litmus-admin`) to seamlessly switch between target accounts when running experiments. To do this, you must annotate the experiment service account with the corresponding chaos role in each target account.
For example, if the target account has a role named `chaos-role`, you must annotate the litmus-admin service account with the unique ARN of that role. This enables seamless switching between target accounts for running experiments.
**To annotate the experiment service account with the role ARN:**
1. Run the following command:
`kubectl annotate serviceaccount -n eks.amazonaws.com/role-arn=`
Where:
* `` is the namespace where the chaos infrastructure is installed (usually `HCE`).
* `` is the name of your experiment service account (usually `litmus`).
* `` is the ARN of the role in the target account.
2. Repeat the above step for the chaos role in each target account.
### Remove all secret references from experiment definitions
When you create a new AWS chaos experiment, you can choose to enable or disable AWS access. You can select or deselect the button depending on your use of the secret references.
{% endtab %}
{% tab title="IRSA (OIDC Method)" %}
IRSA (IAM Roles for Service Accounts) leverages an OpenID Connect (OIDC) provider for authentication. This method is applicable when the execution plane is installed on an Amazon EKS cluster. With IRSA, you have these benefits:
* **Least privilege:** Using IRSA avoids extending permissions for the pods on the node, such as restricting the node IAM role for pods from making an AWS API call. You can scope IAM permissions to a service account, and this way, only pods that use that service account have access to those permissions.
* **Credential isolation:** An experiment can only retrieve credentials for the IAM role associated with a particular service account. This experiment does not have access to credentials for other experiments belonging to other pods.
### Prerequisites
* Your execution plane must be installed on an Amazon EKS cluster.
* You must have `eksctl` installed and configured.
### Account terminology
In this topic, Harness refers to three types of accounts:
* **The experiment service account:** A Kubernetes service account created when you install a chaos infrastructure on your EKS cluster. This is the account that executes and controls chaos experiments. Its default name is `litmus-admin`, however you can use a different name.
* **AWS source account:** This AWS account also resides where you install a chaos infrastructure, and serves as the host for the EKS cluster. This account enables Harness CE to access resources across multiple target accounts.
* **Target accounts:** These are AWS accounts where you'll run experiments against resources and services to intentionally disrupt them. You can have many target accounts.
### Enable the experiment service account to access AWS resources
Chaos experiments are initiated and controlled through this service account (usually named `litmus-admin`). You must enable this account to access AWS resources.
#### Step 1: Create an OIDC provider for your EKS cluster
You must create an IAM OpenID Connect (OIDC) identity provider for your cluster with `eksctl`. You only need to do this once for a cluster. For more information, go to [AWS documentation to set up an OIDC provider](https://docs.aws.amazon.com/eks/latest/userguide/enable-iam-roles-for-service-accounts.html).
To create an OIDC provider for your EKS cluster:
1. Run the following command to check if your cluster has an existing IAM OIDC provider.
```
aws eks describe-cluster --name --query "cluster.identity.oidc.issuer" --output text
```
**Example output:**
```
https://oidc.eks.us-west-1.amazonaws.com/id/D054E55B6947B1A7B3F200297789662C
```
In the above example `us-west-1` is the region, and `D054E55B6947B1A7B3F200297789662C` is the OIDC provider ID.
1. Run the following command to list the IAM OIDC providers available to this account.
```
aws iam list-open-id-connect-providers | grep
```
Where: `Provider_ID` is the value returned from the output of the previous command. In our example, this value is `D054E55B6947B1A7B3F200297789662C`.
1. If no IAM OIDC identity provider is available for this account, create one for your cluster using the following command.
```
eksctl utils associate-iam-oidc-provider --cluster --approve
```
**Example output:**
```
2021-09-07 14:54:01 [ℹ] eksctl version 0.52.0
2021-09-07 14:54:01 [ℹ] using region us-west-1
2021-09-07 14:54:04 [ℹ] will create IAM Open ID Connect provider for cluster "udit-cluster-11" in "us-west-1"
2021-09-07 14:54:05 [✔] created IAM Open ID Connect provider for cluster "litmus-demo" in "us-west-1"
```
tip
* By default, chaos infrastructure associated with your chaos experiment has `litmus-admin` as a chaos service account. Based on the chaos experiment you wish to execute, you can configure the policy and attach the policy to a role, and go to [step 2](#step-2-create-an-iam-role-and-policy-in-each-aws-target-account). Refer to [AWS superset policy](/resilience-testing/chaos-engineering/faults/chaos-fault-categories/aws/security-configurations/policy-for-all-aws-faults.md) to know more.
* If you wish to create a custom service account, you can create one and configure the policy and attach the policy with a role.
* For more information, go to [AWS IAM documentation](https://docs.aws.amazon.com/transfer/latest/userguide/requirements-roles.html).
#### Step 2: Configure the trust relationship of the IAM role in the source account
Configure the trust relationship in the IAM role associated with your experiment service account in the AWS source account. This step is required for both single-account and cross-account IRSA configurations.
Edit the trust relationship in the IAM role you created in Step 1.
You can find the JSON for the trust relationship in **AWS IAM > *****ROLE\_NAME***** > Trust relationship** tab.
```
{
"Version": "2012-10-17",
"Statement": [
{
"Effect": "Allow",
"Principal": {
"Federated": "arn:aws:iam:::oidc-provider/oidc.eks..amazonaws.com/id/"
},
"Action": "sts:AssumeRoleWithWebIdentity"
}
]
}
```
Where:
* ``: Your AWS source account ID
* ``: The AWS region of your EKS cluster
* ``: The OIDC provider ID from your EKS cluster
#### Step 3: Associate the IAM role with the experiment service account
Associate the IAM role you created in Step 1 by annotating the experiment service account (usually `litmus-admin`). This will give it the required access to AWS resources.
To associate the IAM role to the experiment service account, run this command:
```
kubectl annotate serviceaccount -n \
eks.amazonaws.com/role-arn=arn:aws:iam:::role/
```
{% hint style="info" %}
* The default name for the experiment service account is `litmus-admin` and the namespace for chaos infrastructure is `HCE`, however, you can use different names.
* For the cluster autoscaler experiment, annotate the experiment service account in the `kube-system` namespace.
{% endhint %}
#### Step 4: Verify the association of the IAM role with the experiment service account
To verify the association between the experiment service account (`litmus-admin`) and the IAM role:
1. Run an experiment and describe one of the pods.
2. Verify whether the `AWS_WEB_IDENTITY_TOKEN_FILE` and `AWS_ROLE_ARN` environment variables exist. For example:
```
kubectl exec -n litmus env | grep AWS
```
**Example output:**
```
AWS_VPC_K8S_CNI_LOGLEVEL=DEBUG
AWS_ROLE_ARN=arn:aws:iam:::role/
AWS_WEB_IDENTITY_TOKEN_FILE=/var/run/secrets/eks.amazonaws.com/serviceaccount/token
```
### Set up your target accounts for IRSA
Whereas chaos experiments are initiated and controlled through the experiment service account, **target accounts** are the accounts you'll subject to chaos experiments, so you can intentionally disrupt and manipulate their services.
In this section, you create an IAM role and set up an OIDC provider in each target account.
#### Step 1: Create an IAM role and policy in each AWS target account
This step lets you grant permissions for Harness CE to inject chaos targeting various AWS services in the target account.
Create an IAM role and policy in each target account to provide the required permissions to access the desired resources in that account. You have the flexibility to define the level of permissions you wish to assign to Harness CE. For instructions, go to [Create an IAM role and policy](https://docs.aws.amazon.com/transfer/latest/userguide/requirements-roles.html) in the AWS documentation.
#### Step 2: Add the OIDC provider in all target accounts
Follow this procedure for each one of your target accounts.
To add the OIDC provider to each target account:
1. Determine your OIDC URL.
1. Open the AWS Management Console and navigate to the Amazon EKS service.
2. Select the EKS cluster that corresponds to the OIDC provider.
3. Select the **Configuration** tab.
4. Under the **OpenID Connect (OIDC)** section, locate the **Issuer URL**.
An example Issuer URL looks like this:
```
https://oidc.eks.us-east-2.amazonaws.com/id/FOSBW293U0Q92423BR43290RU
```
2. Navigate to the target account.
3. In the IAM dashboard, select **Identity Providers**, and then select **Add Provider**.
4. In the **Add an Identity provider** screen, for **Provider type**, select **OpenID Connect**.
5. Provide these required details of the OIDC provider:
* **Provider URL:** Use the URL you retrieved in Step 1.
* **Audience:** Specify `sts.amazonaws.com`.
6. Select **Add provider**.
7. Repeat these steps for each target account.
### Establish trust between the AWS source account and target accounts
The AWS source account enables Harness CE to access resources across multiple target accounts.
#### Step 1: Configure trust relationship in target accounts
Configure the trust relationship for each IAM role you created in a target account to allow the AWS source account's OIDC provider to assume that role.
**In each target account:** Edit the trust relationship for the IAM role you [created on the target account](/resilience-testing/chaos-engineering/faults/chaos-fault-categories/aws/security-configurations/policy-for-all-aws-faults.md) as shown in the example below.
You can find the JSON for the trust relationship in **AWS IAM > *****ROLE\_NAME***** > Trust relationship** tab.
In this example `2222222222` is the target account ID.
```
{
"Version": "2012-10-17",
"Statement": [
{
"Effect": "Allow",
"Principal": {
"Federated": "arn:aws:iam::2222222222:oidc-provider/oidc.eks.us-east-2.amazonaws.com/id/AAAAA11111111C9909AEC6992AEFNWQO0"
},
"Action": "sts:AssumeRoleWithWebIdentity"
}
]
}
```
#### Step 2: Enable the experiment service account to switch between target accounts
This procedure enables the experiment service account (`litmus-admin`) to seamlessly switch between target accounts when running experiments. To do this, you must annotate the experiment service account with the corresponding chaos role in each target account.
For example, if the target account has a role named `chaos-role`, you must annotate the litmus-admin service account with the unique ARN of that role. This enables seamless switching between target accounts for running experiments.
**To annotate the experiment service account with the role ARN:**
1. Run the following command:
`kubectl annotate serviceaccount -n eks.amazonaws.com/role-arn=`
Where:
* `` is the namespace where the chaos infrastructure is installed (usually `HCE`).
* `` is the name of your experiment service account (usually `litmus`).
* `` is the ARN of the role in the target account.
2. Repeat the above step for the chaos role in each target account.
### Remove all secret references from experiment definitions
When you create a new AWS chaos experiment, you can choose to enable or disable AWS access. You can select or deselect the button depending on your use of the secret references.
{% endtab %}
{% endtabs %}
{% @harness-feedback/feedback %}