> For the complete documentation index, see [llms.txt](https://developer.harness.io/llms.txt). Markdown versions of documentation pages are available by appending `.md` to page URLs; this page is available as [Markdown](https://developer.harness.io/security-testing-orchestration/use-sto/sto-scanner-configuration/aquasec-scanner-reference.md).
# Aqua Security step configuration
Scan container images with Aqua Security.
You can scan your container images and ingest scan results from [Aqua Security Enterprise](https://www.aquasec.com/solutions/docker-container-security/).
{% hint style="info" %}
* You can utilize custom STO scan images and pipelines to run scans as a non-root user. For more details, refer [Configure your pipeline to use STO images from private registry](/security-testing-orchestration/troubleshooting-and-resources/sto-use-cases/set-up-sto-pipelines/configure-pipeline-to-use-sto-images-from-private-registry.md).
* STO supports three different approaches for loading self-signed certificates. For more information, refer [Run STO scans with custom SSL certificates](/security-testing-orchestration/troubleshooting-and-resources/sto-use-cases/secure-sto-pipelines/ssl-setup-in-sto.md#supported-workflows-for-adding-custom-ssl-certificates).
{% endhint %}
### Aqua Security step settings
The recommended workflow is to add an **Aqua Security** step to a **Security** or **Build** stage and then configure it as described below.
#### Scan
**Scan Mode**
* **Orchestration** Configure the step to [run a scan](/security-testing-orchestration/new-to-sto/key-concepts/run-an-orchestrated-scan-in-sto.md) and then ingest, normalize, and deduplicate the results.
* **Ingestion** Configure the step to [read scan results from a data file](/security-testing-orchestration/new-to-sto/key-concepts/ingest-scan-results-into-an-sto-pipeline.md) and then ingest, normalize, and deduplicate the data.
**Scan Configuration**
The predefined configuration to use for the scan. All scan steps have at least one configuration.
For the **Aqua Security** step, you have two configuration options:
* **Default**: Connects to your Aqua Security instance using an **Access Token** for authentication.
* **Self-Hosted**: Connects to your on-premises Aqua Security instance using a **Username and Password** for authentication.
#### Target
**Type**
* **Container Image** Scan the layers, libraries, and packages in a container image.
**Target and Variant Detection**
When **Auto** is enabled for container images, the step detects the target and variant using the **Container Image Name** and **Tag/Digest** defined in the step or runtime input.
Note the following:
* **Auto** is not available when the **Scan Mode** is **Ingestion**.
* By default, **Auto** is selected when you add the step. You can change this setting if needed.
**Name**
The identifier for the [target](/security-testing-orchestration/new-to-sto/key-concepts/targets-and-baselines.md), such as `codebaseAlpha` or `jsmith/myalphaservice`. Descriptive target names make it much easier to navigate your scan data in the STO UI.
It is good practice to [specify a baseline](/security-testing-orchestration/new-to-sto/key-concepts/targets-and-baselines.md#every-target-needs-a-baseline) for every target.
**Variant**
The identifier for the specific variant to scan. This is usually the branch name, image tag, or product version. Harness maintains a historical trend for each variant.
#### Container image
**Type**
The registry type where the image is stored:
* **Docker v2** A registry that uses the Docker Registry v2 API such as [Docker Hub](https://docs.docker.com/registry/spec/api/), [Google Container Registry](https://cloud.google.com/container-registry), or [Google Artifact Registry](https://cloud.google.com/artifact-registry). STO will automatically pull and scan the container image or OCI/Docker archive.
* [**AWS ECR**](https://aws.amazon.com/ecr/) Set your AWS ECR connector with image details. STO will automatically pull and scan the container image or OCI/Docker archive.
* [**Jfrog Artifactory**](https://jfrog.com/artifactory/) Set your Jfrog Artifactory connector with image details. STO will automatically pull and scan the container image or OCI/Docker archive.
* **Local Image in this Stage** Scan a local image built and stored within the context of the current stage (via `/var/run/docker.sock` registered as a stage level volume mount). For this, you will need to [configure Docker-in-Docker](/security-testing-orchestration/use-sto/sto-scanner-configuration/security-step-settings-reference.md#configuring-docker-in-docker-dind-for-your-pipeline) as a background step. STO will identify and scan the container image matching the step configuration inside the Docker-in-Docker background within that stage.
* **Local OCI/Docker archive in this Stage** Scan an OCI or Docker archive created and stored within the current stage. STO will scan the archive based on the path configured in the workspace field during the step. Ensure that the path to which the archive is saved is a shared volume mount.
**Domain (*****extraction*****)**
The URL of the registry that contains the image to scan. Examples include:
* `docker.io`
* `app.harness.io/registry`
* `us-east1-docker.pkg.dev`
**Name**
The image name. For non-local images, you also need to specify the image repository. Example: `jsmith/myalphaservice`
**Tag/Digest**
The image tag or digest. Examples: `latest`, `1.2.3`, `@sha256:abc123...`
**Region**
The region where the image to scan is located, as defined by the cloud provider such as AWS.
#### Authentication
**Domain**
The fully-qualified URL to the scanner.
**Access ID**
Enter the username for your on-premises Aqua Security instance. This field is visible only when you select the **Self-Hosted** scan configuration.
**Access Token**
* For the **Default** scan configuration, enter your Aqua Security access token.
* For the **Self-Hosted** scan configuration, enter the password associated with your Aqua Security username.
Always store sensitive credentials securely by creating a Harness text secret. Reference the secret in your configuration using the format `<+secrets.getValue("my-access-token")>`. For detailed steps, see [Add and Reference Text Secrets](/harness-platform/use-harness-platform/secrets/add-use-text-secrets.md).
#### Ingestion
**Ingestion File**
The path to your scan results when running an [Ingestion scan](/security-testing-orchestration/new-to-sto/key-concepts/ingest-scan-results-into-an-sto-pipeline.md), for example `/shared/scan_results/myscan.latest.sarif`.
* The data file must be in a [supported format](/security-testing-orchestration/new-to-sto/sto-whats-supported/scanners.md#supported-ingestion-formats) for the scanner.
* The data file must be accessible to the scan step. It's good practice to save your results files to a [shared path](/continuous-integration/new-to-harness-ci/key-concepts.md#stages) in your stage. In the visual editor, go to the stage where you're running the scan. Then go to **Overview** > **Shared Paths**. You can also add the path to the YAML stage definition like this:
```yaml
- stage:
spec:
sharedPaths:
- /shared/scan_results
```
#### Log Level
The minimum severity of the messages you want to include in your scan logs. You can specify one of the following:
* **DEBUG**
* **INFO**
* **WARNING**
* **ERROR**
#### Additional CLI flags
Use this field to run the scanner binary with additional flags supported by the external scanner.
{% hint style="warning" %}
Passing additional CLI flags is an advanced feature. Harness recommends the following best practices:
* Test your flags and arguments thoroughly before you use them in your Harness pipelines. Some flags might not work in the context of STO.
* Don't add flags that are already used in the default configuration of the scan step.
To check the default configuration, go to a pipeline execution where the scan step ran with no additional flags. Check the log output for the scan step. You should see a line like this:
`Command [ scancmd -f json -o /tmp/output.json ]`
In this case, don't add `-f` or `-o` to **Additional CLI flags**.
{% endhint %}
#### Fail on Severity
Every STO scan step has a **Fail on Severity** setting. If the scan finds any vulnerability with the specified [severity level](/security-testing-orchestration/new-to-sto/key-concepts/severities.md) or higher, the pipeline fails automatically. You can specify one of the following:
* **`CRITICAL`**
* **`HIGH`**
* **`MEDIUM`**
* **`LOW`**
* **`INFO`**
* **`NONE`** — Do not fail on severity
The YAML definition looks like this: `fail_on_severity : critical # | high | medium | low | info | none`
#### Additional Configuration
The fields under **Additional Configuration** vary based on the type of infrastructure. Depending on the infrastructure type selected, some fields may or may not appear in your settings. Below are the details for each field
* Override Security Test Image
* [Container Registry](/security-testing-orchestration/troubleshooting-and-resources/sto-use-cases/set-up-sto-pipelines/configure-pipeline-to-use-sto-images-from-private-registry.md#step-level-override)
* [Image Tag](/security-testing-orchestration/troubleshooting-and-resources/sto-use-cases/set-up-sto-pipelines/configure-pipeline-to-use-sto-images-from-private-registry.md#step-level-override)
* [Privileged](/continuous-integration/use-harness-ci/use-harness-ci/manage-dependencies/background-step-settings.md#privileged)
* [Image Pull Policy](/continuous-integration/use-harness-ci/use-harness-ci/manage-dependencies/background-step-settings.md#image-pull-policy)
* [Run as User](/continuous-integration/use-harness-ci/use-harness-ci/manage-dependencies/background-step-settings.md#run-as-user)
* [Set Container Resources](/continuous-integration/use-harness-ci/use-harness-ci/manage-dependencies/background-step-settings.md#set-container-resources)
* [Timeout](/continuous-integration/use-harness-ci/use-harness-ci/run-step-settings.md#timeout)
#### Advanced settings
In the **Advanced** settings, you can use the following options:
* [Conditional Execution](/harness-platform/use-harness-platform/pipelines/step-skip-condition-settings.md)
* [Failure Strategy](/harness-platform/use-harness-platform/pipelines/failure-handling/define-a-failure-strategy-on-stages-and-steps.md)
* [Looping Strategy](/harness-platform/use-harness-platform/pipelines/looping-strategies/looping-strategies-matrix-repeat-and-parallelism.md)
* [Policy Enforcement](/harness-platform/use-harness-platform/governance/policy-as-code/harness-governance-overview.md)
### Proxy settings
This step supports private network connectivity if you're using Harness Cloud infrastructure. For information on connectivity options, see [IP allowlisting](https://developer.harness.io/harness-platform/use-harness-platform/references/private-network-connectivity/ip-allowlisting). When using proxy configurations, the `HTTPS_PROXY` and `HTTP_PROXY` variables are automatically set to route traffic through the secure tunnel. If there are specific addresses that you want to bypass the proxy, you can define those in the `NO_PROXY` variable. This can be configured in the **Settings** of your step.
If you need to configure a different proxy, you can manually set the `HTTPS_PROXY`, `HTTP_PROXY`, and `NO_PROXY` variables in the **Settings** of your step.
**Definitions of Proxy variables:**
* `HTTPS_PROXY`: Specify the proxy server for HTTPS requests, example `https://sc.internal.harness.io:30000`
* `HTTP_PROXY`: Specify the proxy server for HTTP requests, example `http://sc.internal.harness.io:30000`
* `NO_PROXY`: Specify the domains as comma-separated values that should bypass the proxy. This allows you to exclude certain traffic from being routed through the proxy.
### View AquaSec Assurance Policy violations
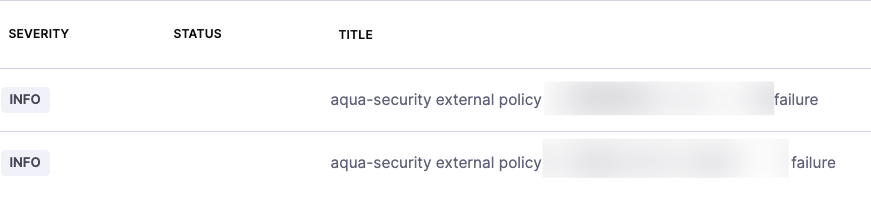
AquaSec Assurance Policy violations will appear in scan results as `Info` severity issues, with the issue type set to `EXTERNAL_POLICY`. Additionally, you can apply OPA policies in Harness STO to enforce or manage these failures. Additionally, you can apply an OPA policy to fail the pipeline based on the security assurance policy violations. This can be achieved using the [Security Tests - External Policy Failures](/security-testing-orchestration/use-sto/enforce-sto-policies-for-governance/create-opa-policies.md#block-the-pipeline-based-on-external-policy-failures) policy from the [security tests policy samples](/security-testing-orchestration/use-sto/enforce-sto-policies-for-governance/create-opa-policies.md#security-test-policy-samples).
Select policy sample
### Configure External Policy Failures
You can configure Harness STO to treat external policy failures as vulnerabilities. To do this, navigate to Account Settings, go to the Default Settings page, select Security Test Orchestration, and click the External Policy Failures setting.
Enable the external policy failures setting to map them to a selected severity level — `Critical`, `High`, `Medium`, or `Low` to treat them as vulnerabilities instead of `Info` level issues. This setting takes effect from the next pipeline execution.
{% hint style="info" %}
This feature is behind the Feature flag `STO_EXTERNAL_POLICY_FAILURES_AS_VULNS`. Contact [Harness Support](mailto:support@harness.io) to enable this flag.
{% endhint %}
{% @harness-feedback/feedback %}