> For the complete documentation index, see [llms.txt](https://developer.harness.io/llms.txt). Markdown versions of documentation pages are available by appending `.md` to page URLs; this page is available as [Markdown](https://developer.harness.io/service-reliability-management/use-srm/monitored-services/change-source/victorops-change-source.md).
# Configure VictorOps as change source
Configure VictorOps as a change source to monitor incidents.
You can configure VictorOps as a custom change source to monitor incidents.
To configure VictorOps as a change source, do the following:
1. [Add VictorOps as a custom change source in the Harness SRM monitored service and generate a webhook.](#add-victorops-as-a-change-source)
2. [Integrate Harness webhook with VictorOps.](#integrate-harness-webhook-with-victorops)
### Add VictorOps as a change source
To add VictorOps as a change source to a monitored service, do the following:
1. In your Harness project, go to **Service Reliability** > **Monitored Services**.\
A list of monitored services is displayed.
2. Locate the monitored service for which you want to add a custom change source, select **More Options** (⋮), and then select **Edit service**.\
The Configurations page appears.
3. On the **Configurations** page, go to the **Change Sources**, and select **+ Add New Change Source**.
4. On the Edit Change Source page, under **Select Change Source**, choose **Incident** as **Provider Type**, and then select **Custom**.
5. Enter a name for the change source. For example, VictoreOps.
6. Select **Submit**.\
The custom incident change source is added to the monitored service. A webhook URL and cURL commands are generated.
### Copy webhook URL
To configure your VictorOps to send incident reports to the monitored service in Harness SRM, you'll need to obtain a webhook from the SRM monitored service.
To copy the webhook URL from the monitored service, do the following:
1. From the list of monitored services, select the monitored service in which you have created the VictorOps incident change source, and go to the **Configuration** tab.
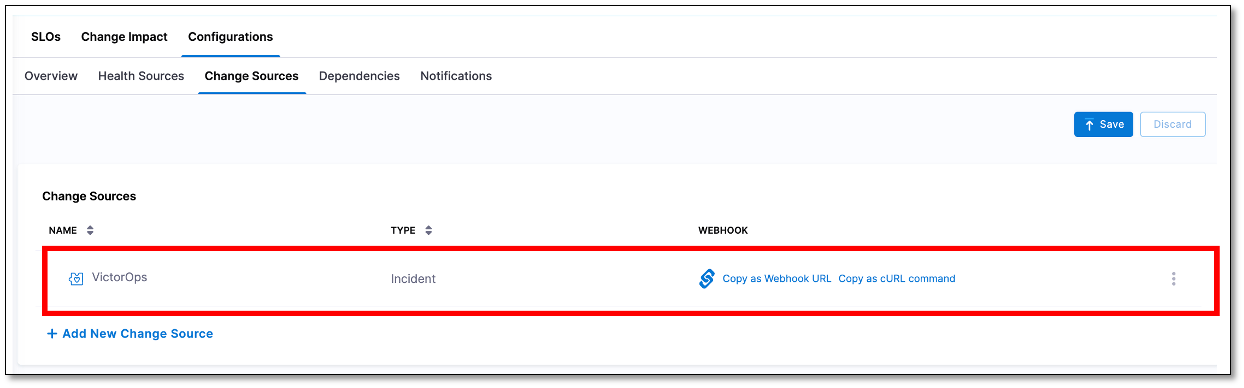
2. On the **Configurations** page, go to the **Change Sources** tab. In the **Change Sources** section, a list of change sources that have been added to the monitored service is displayed. The list also displays webhook URLs and cURL commands next to each change source.
3. Locate the VictorOps incident change source that you want to configure with the VictorOps, and then copy the webhook URL.
### Integrate Harness webhook with VictorOps
You need to integrate the webhook you created in Harness SRM with VictorOps to start receiving the incidents alerts.
To integrate Harness webook with VictorOps, do the following:
1. Log in to VictorOps and select **Integrations** on the menu bar.
2. On the Integrations page, go to the **Outgoing Webhooks** tab.
3. Select **Add Webhook** and configure the following settings:
* **Event**: Choose **Incident-triggered** to specify when the webhook should trigger.
* **Method**: Select the **POST** method.
* **Content-Type**: Set this to **application/json**.
* **Custom-Header**: Include an X-api-Key header for authentication and security. You can create this key in your VictorOps account.
* **To**: Paste the webhook URL copied during the custom change source creation in Harness SRM.
* **Payload**: Define the payload structure as follows:
```
{
"user": "${{ALERT.entity_display_name}}",
"startTime":${{STATE.INCIDENT_TIMESTAMP}},
"endTime": ${{STATE.INCIDENT_TIMESTAMP}},
"eventDetail": {
"description":"${{ALERT.entity_display_name}}",
"externalLinkToEntity": "https://portal.victorops.com/ui/my-srm/incident/78/details",
"name": "${{ALERT.entity_display_name}}"
}
}
```
4. Select **Save** to complete the integration setup.
#### Advanced Option: Customizing Webhooks for Different Monitored Services
If you need to trigger different webhooks depending on specific rules or want to associate different webhook URLs with each custom change source in various monitored services, you can do this through the VictorOps Alert Rules Engine.
To create a rule in Alert Rules Engine:
1. Navigate to **Settings** in VictorOps and access the **Alert Rules Engine**.
2. Create a rule, for example:
```
When monitoredServiceIdentifier matches * using Wildcard
Transform these alert fields:
Set vo-webhook-field to new value *
```
3. When creating an incident, this rule will match the `monitoredServiceIdentifier` field using a wildcard and sets it to a new variable, `vo-webhook-field`, with a custom value. This custom value can be used to distinguish different webhook targets.
4. While creating the webhook integration, use the `vo-webhook-field` variable inside the custom change source URL. This allows you to dynamically target multiple monitored services based on the value set by the rule.
{% @harness-feedback/feedback %}