> For the complete documentation index, see [llms.txt](https://developer.harness.io/llms.txt). Markdown versions of documentation pages are available by appending `.md` to page URLs; this page is available as [Markdown](https://developer.harness.io/software-supply-chain-assurance/use-scs/artifact-security/sign-verify/sign-artifacts.md).
# Sign Artifacts with Harness SCS
Sign your artifacts using Harness SCS
Protect your software supply chain by safeguarding your artifacts from being compromised. Attackers may attempt to inject malicious code into your artifacts, aiming to tamper with your software supply chain. One of the primary goals of attackers is to get you to deploy compromised (or "poisoned") artifacts into your environments. In the worst-case scenario, your deployments could become a distribution channel for these poisoned artifacts, putting your customers and users at risk.
As artifacts pass through multiple stages in the software lifecycle, ensuring they remain secure and untampered is critical. Artifact signing provides a reliable way to guarantee that the artifact built at one stage is the exact same artifact consumed or deployed at the next, with no chance of compromise. This process builds trust, ensures integrity, and strengthens the security of your software supply chain.
### Artifact Signing in SCS
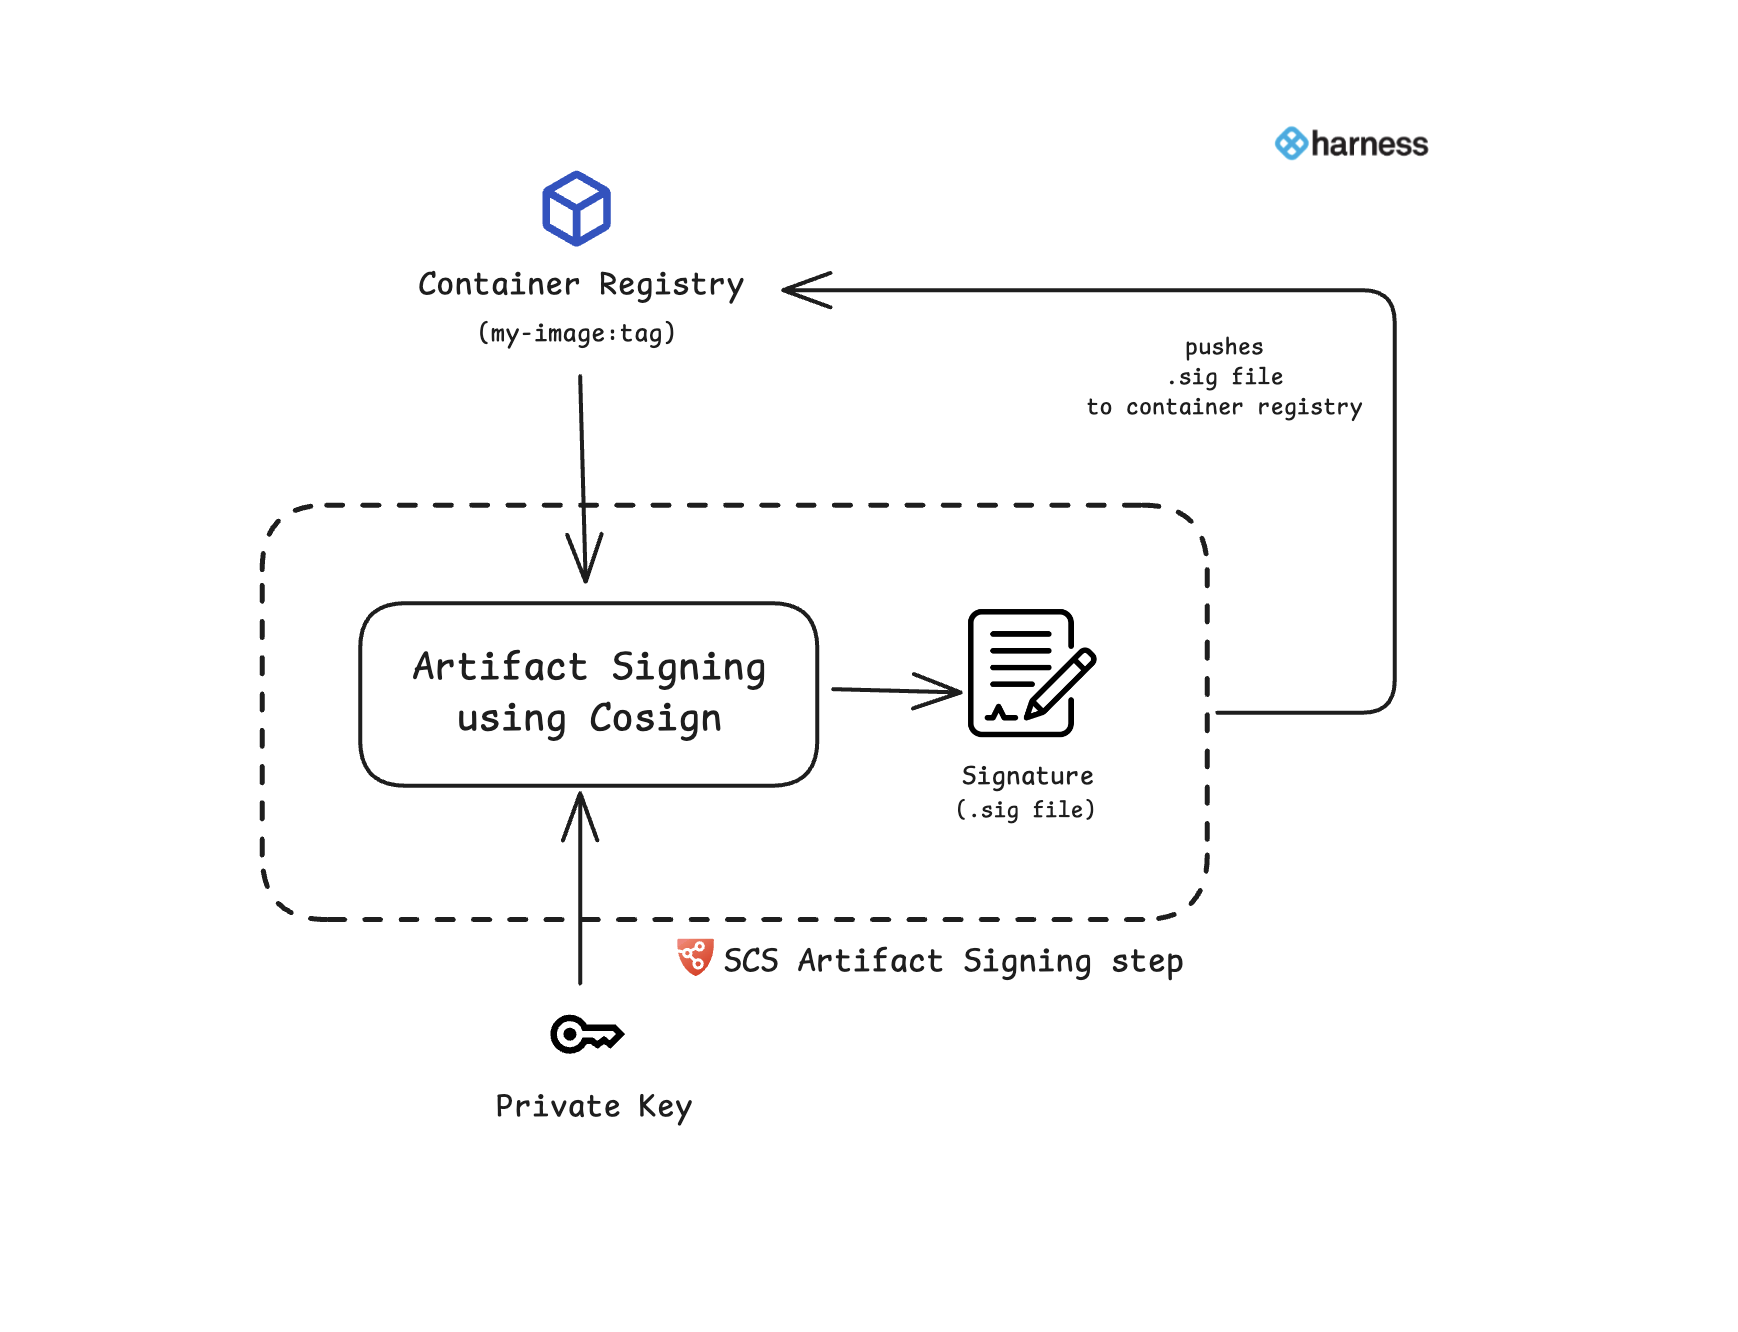
For signing container images, the Artifact Signing step retrieves the artifact from the container registry, signs it using [Cosign](https://docs.sigstore.dev/cosign/signing/overview/) with a private key from a key pair, and generates a signature file `.sig`. Once the signature is successfully generated, it is pushed back to the same container registry alongside the artifact. This signature file is essential for verifying the artifact's integrity and authenticity. For more details on artifact verification, refer to the [Artifact Verification documentation](/software-supply-chain-assurance/use-scs/artifact-security/sign-verify/verify-signed-artifacts.md)
### Artifact Signing step configuration
The Artifact Signing step allows you to sign your artifacts and optionally push the generated signature file `.sig` to the same artifact registry from which the artifact was retrieved.
Artifact Signing step supports both [**container**](#container-images) as well as [**non-container images**](#non-container-images).
#### Container images
You can search for **Artifact Signing** and add it to either the **Build** , **Deploy**, or **Security** stage of a Harness pipeline
{% hint style="info" %}
At present, Harness does not support artifact signing in the deployment stage, However this is part of our roadmap.
{% endhint %}
Follow the instructions below to configure the Artifact Signing step.
* **Name**: Provide a name for the signing step.
* **Artifact Source**: Select the source container registry (e.g., DockerHub, ACR, ECR, etc.).
{% tabs %}
{% tab title="HAR" %}
* **Registry:** Select the Harness Registry configured for the Harness Artifact Registry where your artifact is stored.
* **Image:** Enter the name of your image with tag or digest, such as `imagename:tag` or `imagename:digest`.
{% endtab %}
{% tab title="Docker Registry" %}
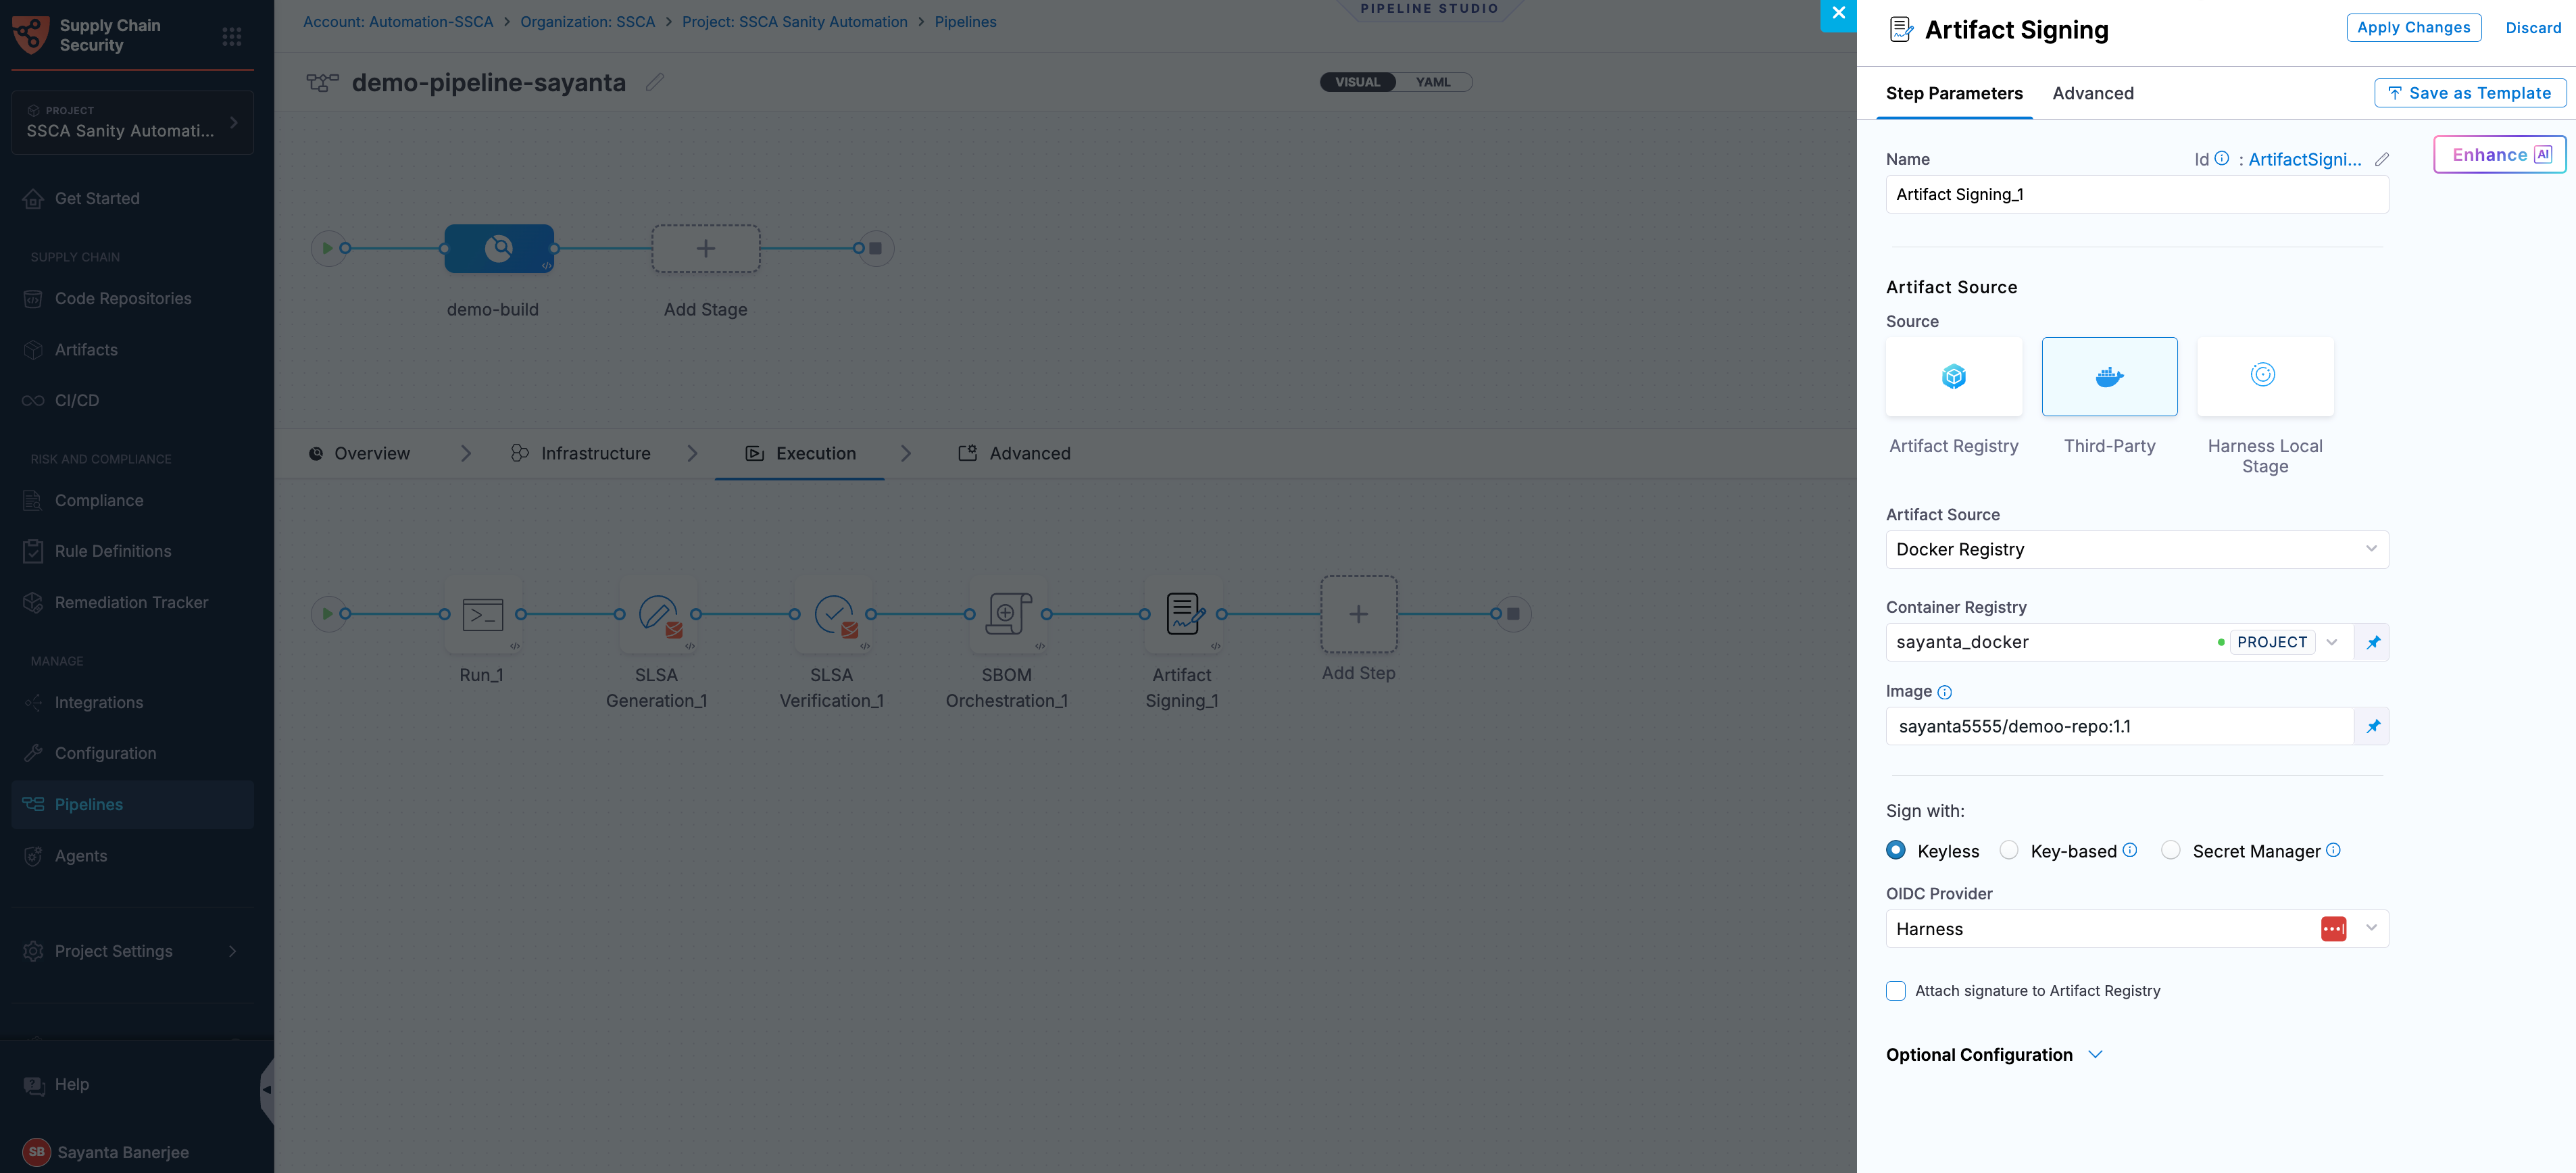
* **Container Registry:** Select the [Docker Registry connector](/harness-platform/use-harness-platform/connectors/artifact-repositories/add-a-docker-registry-connector/docker-registry-connector-settings-reference.md) that is configured for the DockerHub container registry where the artifact is stored.
* **Image:** Enter the name of your image using a tag or digest, example `my-docker-org/repo-name:tag` or `my-docker-org/repo-name@sha256:`
{% hint style="info" %}
Unlike other artifact sources, JFrog Artifactory requires additional permissions for attestation. The connector’s user or token must have `Read`, `Annotate`, `Create/Deploy`, and `Delete` permissions.
{% endhint %}
{% endtab %}
{% tab title="ECR" %}
* **Container Registry:** Select the [Docker Registry connector](/harness-platform/use-harness-platform/connectors/artifact-repositories/add-a-docker-registry-connector/docker-registry-connector-settings-reference.md) that is configured for the Elastic container registry where the artifact is stored.
* **Image:** Enter the name of your image using a tag or digest, example `my-docker-repo/my-artifact:tag`or you can use the digest `my-docker-repo/my-artifact@sha256:`
* **Artifact Digest:** Specify the digest of your artifact. After building your image using the [Build and Push](#slsa-generation-step-configuration-with-build-and-push-step) step or a [Run](#slsa-generation-step-configuration-with-run-step) step, save the digest in a variable. You can then reference it here using a Harness expression. Refer to the workflows described below for detailed guidance.
* **Region:** The geographical location of your ECR repository, example `us-east-1`
* **Account ID:** The unique identifier associated with your AWS account.
{% endtab %}
{% tab title="ACR" %}
* **Container Registry:** Select the [Docker Registry connector](/harness-platform/use-harness-platform/connectors/artifact-repositories/add-a-docker-registry-connector/docker-registry-connector-settings-reference.md) that is configured for the Azure container registry where the artifact is stored.
* **Image:** Enter your image details in the format `/`. The `` is a fully qualified name of your Azure Container Registry. It typically follows the format `.azurecr.io`, where `` is the name you have given to your container registry instance in Azure. Example input: `automate.azurecr.io/:tag` or you can use digest `automate.azurecr.io/@sha256:`
* **Artifact Digest:** Specify the digest of your artifact. After building your image using the [Build and Push](#slsa-generation-step-configuration-with-build-and-push-step) step or a [Run](#slsa-generation-step-configuration-with-run-step) step, save the digest in a variable. You can then reference it here using a Harness expression. Refer to the workflows described below for detailed guidance.
* **Subscription Id:** Enter the unique identifier that is associated with your Azure subscription.
{% endtab %}
{% tab title="GAR" %}
* **Container Registry:** Select the [Docker Registry connector](/harness-platform/use-harness-platform/connectors/artifact-repositories/add-a-docker-registry-connector/docker-registry-connector-settings-reference.md) that is configured for the Google container registry where the artifact is stored.
* **Image:**: Enter the name of your image using tag or digest, example `repository-name/image:tag` or you can use digest `repository-name/@sha256:`.
* **Artifact Digest:** Specify the digest of your artifact. After building your image using the [Build and Push](#slsa-generation-step-configuration-with-build-and-push-step) step or a [Run](#slsa-generation-step-configuration-with-run-step) step, save the digest in a variable. You can then reference it here using a Harness expression. Refer to the workflows described below for detailed guidance.
* **Host:** Enter your GAR Host name. The Host name is regional-based. For example, `us-east1-docker.pkg.dev`.
* **Project ID:** Enter the unique identifier of your Google Cloud Project. The Project-ID is a distinctive string that identifies your project across Google Cloud services. Example: `my-gcp-project`.
{% endtab %}
{% endtabs %}
#### Non-Container images
Artifacts are not limited to container images. With the Artifact Signing step, you can also sign non-container images to ensure the integrity and authenticity. Each artifact is uniquely identified by its digest (SHA), which is later used during the verification step.
The following non-container artifact types are supported:
* Helm Charts (`.tgz`)
* YAML Manifests (`.yaml`)
* Java Archives (`.jar`)
* Web Application Archives (`.war`)
* Artifacts that are not listed above will be considered as `Unknown` types.
Follow the instructions below to configure the Artifact Signing step for non-container images:
**Name:** Provide a name for the signing step.
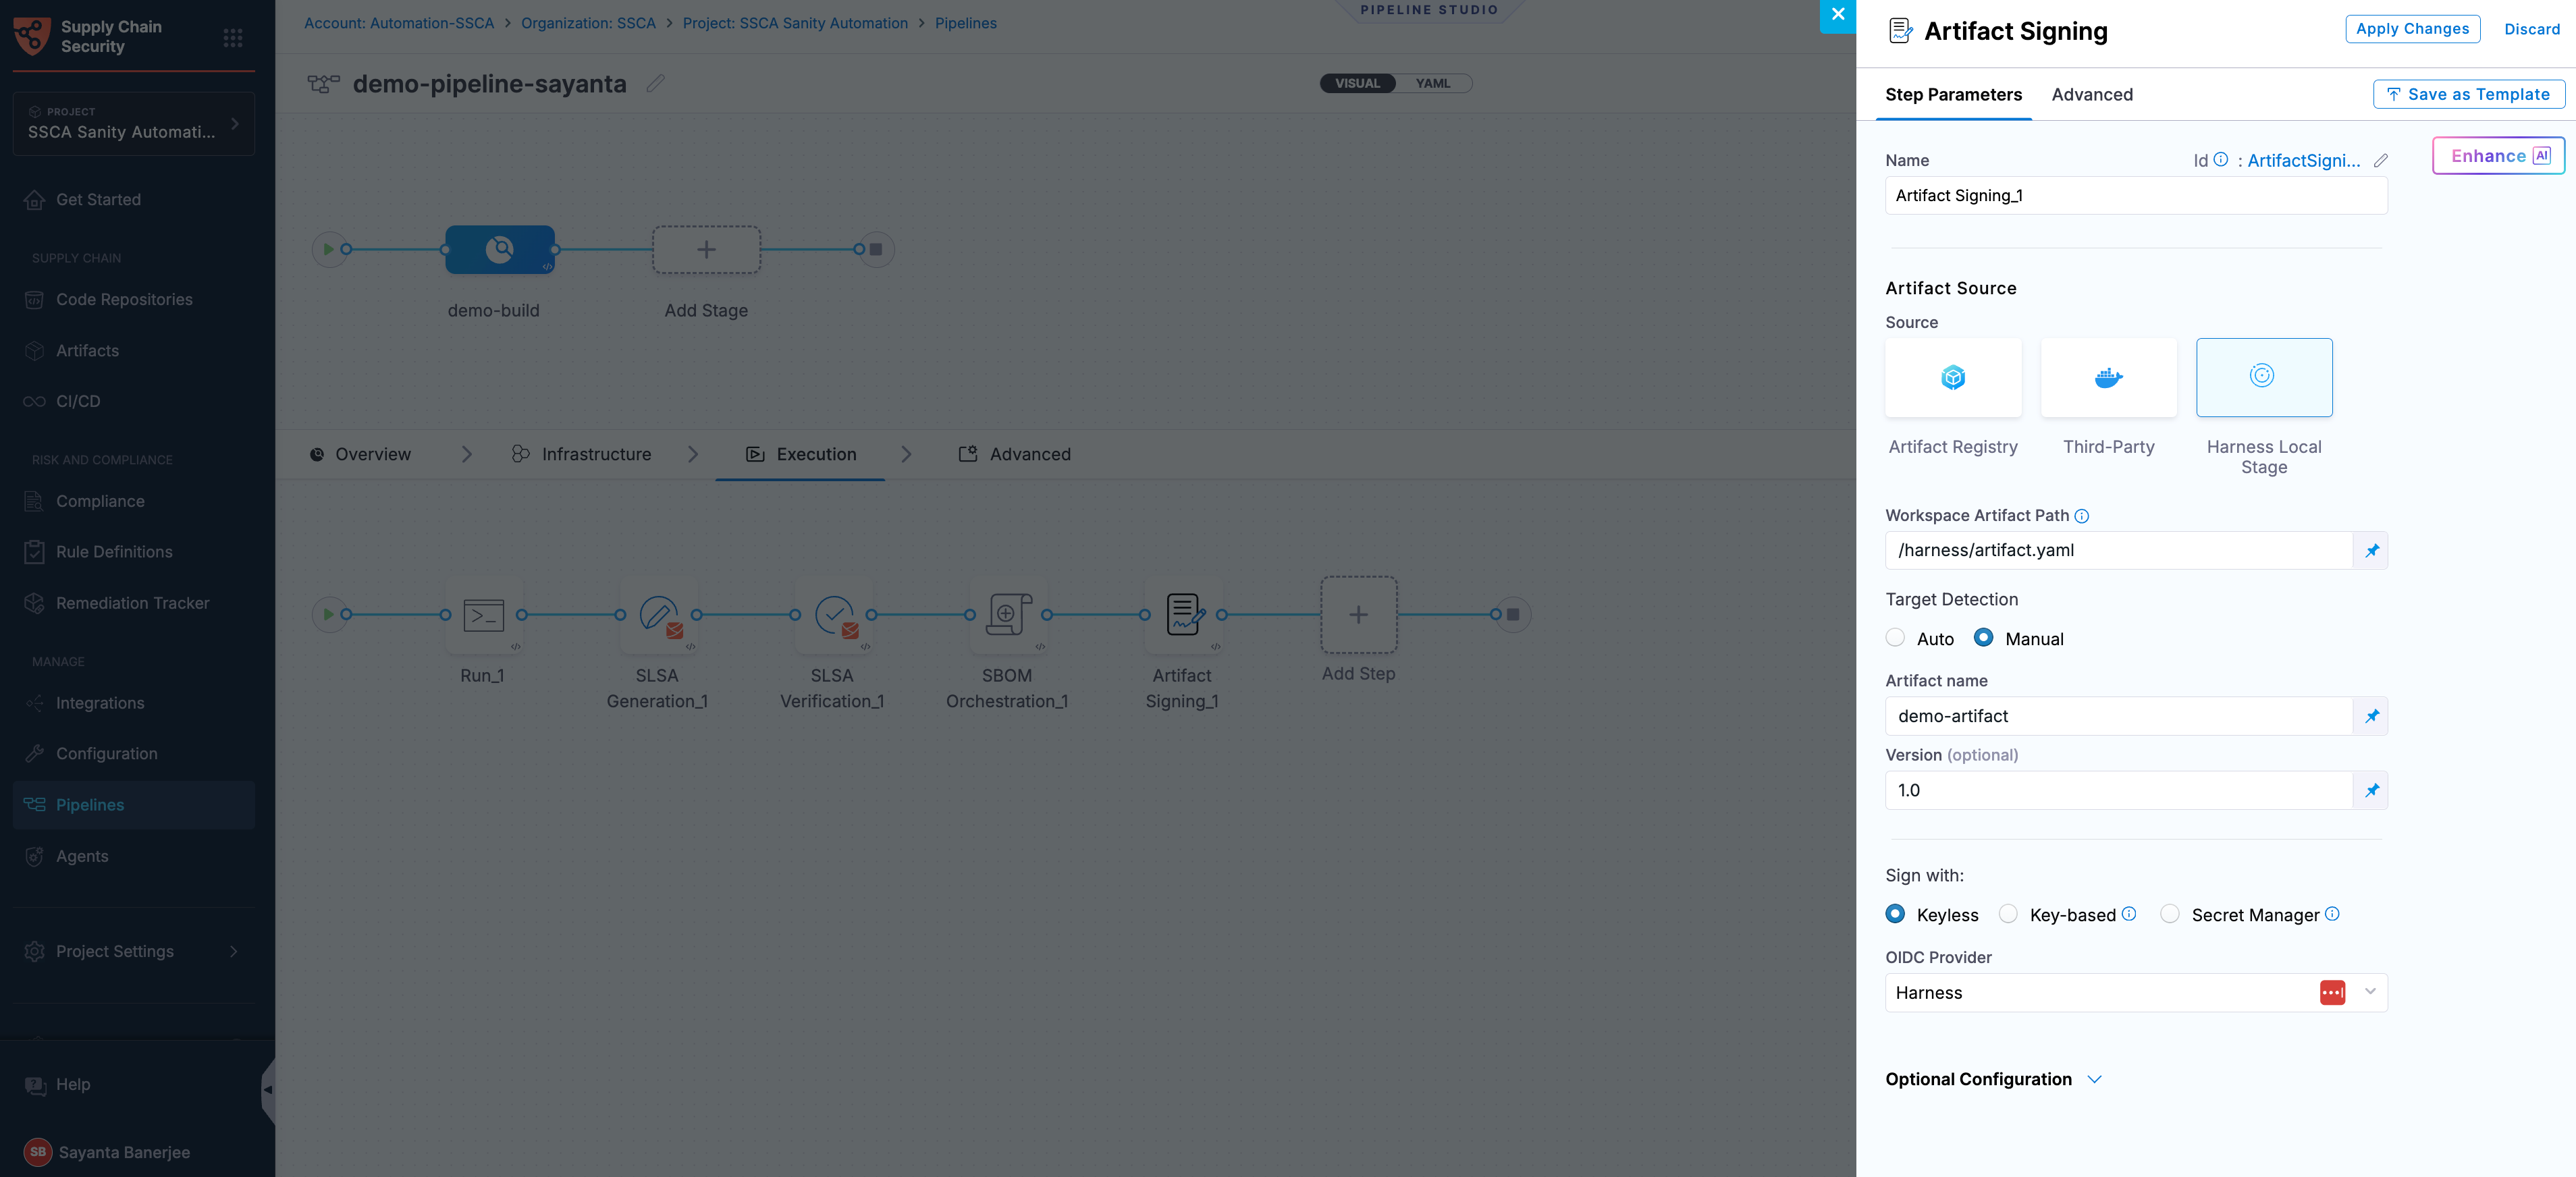
**Artifact Source:** Select the Harness Local Stage as the source of the artifact.
**Workspace Artifact Path:** Provide the exact path to the artifact within the workspace. Ensure that you run a custom step to pull the artifact into the workspace directory.
**Target Detection:** Choose between Auto and Manual
**Auto (default):** Automatically sets the artifact name from the provided path.
**Manual:** Allows you to manually specify the artifact name and version.
#### Sign the artifacts
You can sign artifacts using Cosign with the following signing methods:
* **Keyless** - Uses short-lived, automatically generated keys based on identity to sign artifacts without storing private keys.
* **Key-based** - Uses a user-managed private and public key pair to sign artifacts, requiring secure key storage and handling.
* **Secret Manager** - A secure service used to store, manage, and access sensitive data such as cryptographic keys without exposing them directly in pipelines.
{% tabs %}
{% tab title="Keyless" %}
Keyless signing using Cosign lets you sign artifacts without managing long-lived signing keys. Instead, Cosign uses your workload identity (via OIDC) to obtain a short-lived signing certificate during pipeline execution, which is then used to sign the provenance. The signing key is generated and used only in memory and is not persisted. This reduces the risk of key compromise while ensuring the provenance remains verifiable and trusted. The signed artifact is pushed to the container registry and associated with the image digest, typically referenced using the digest with a `.sig` extension.
To sign artifacts with Keyless signing using cosign, complete the following steps:
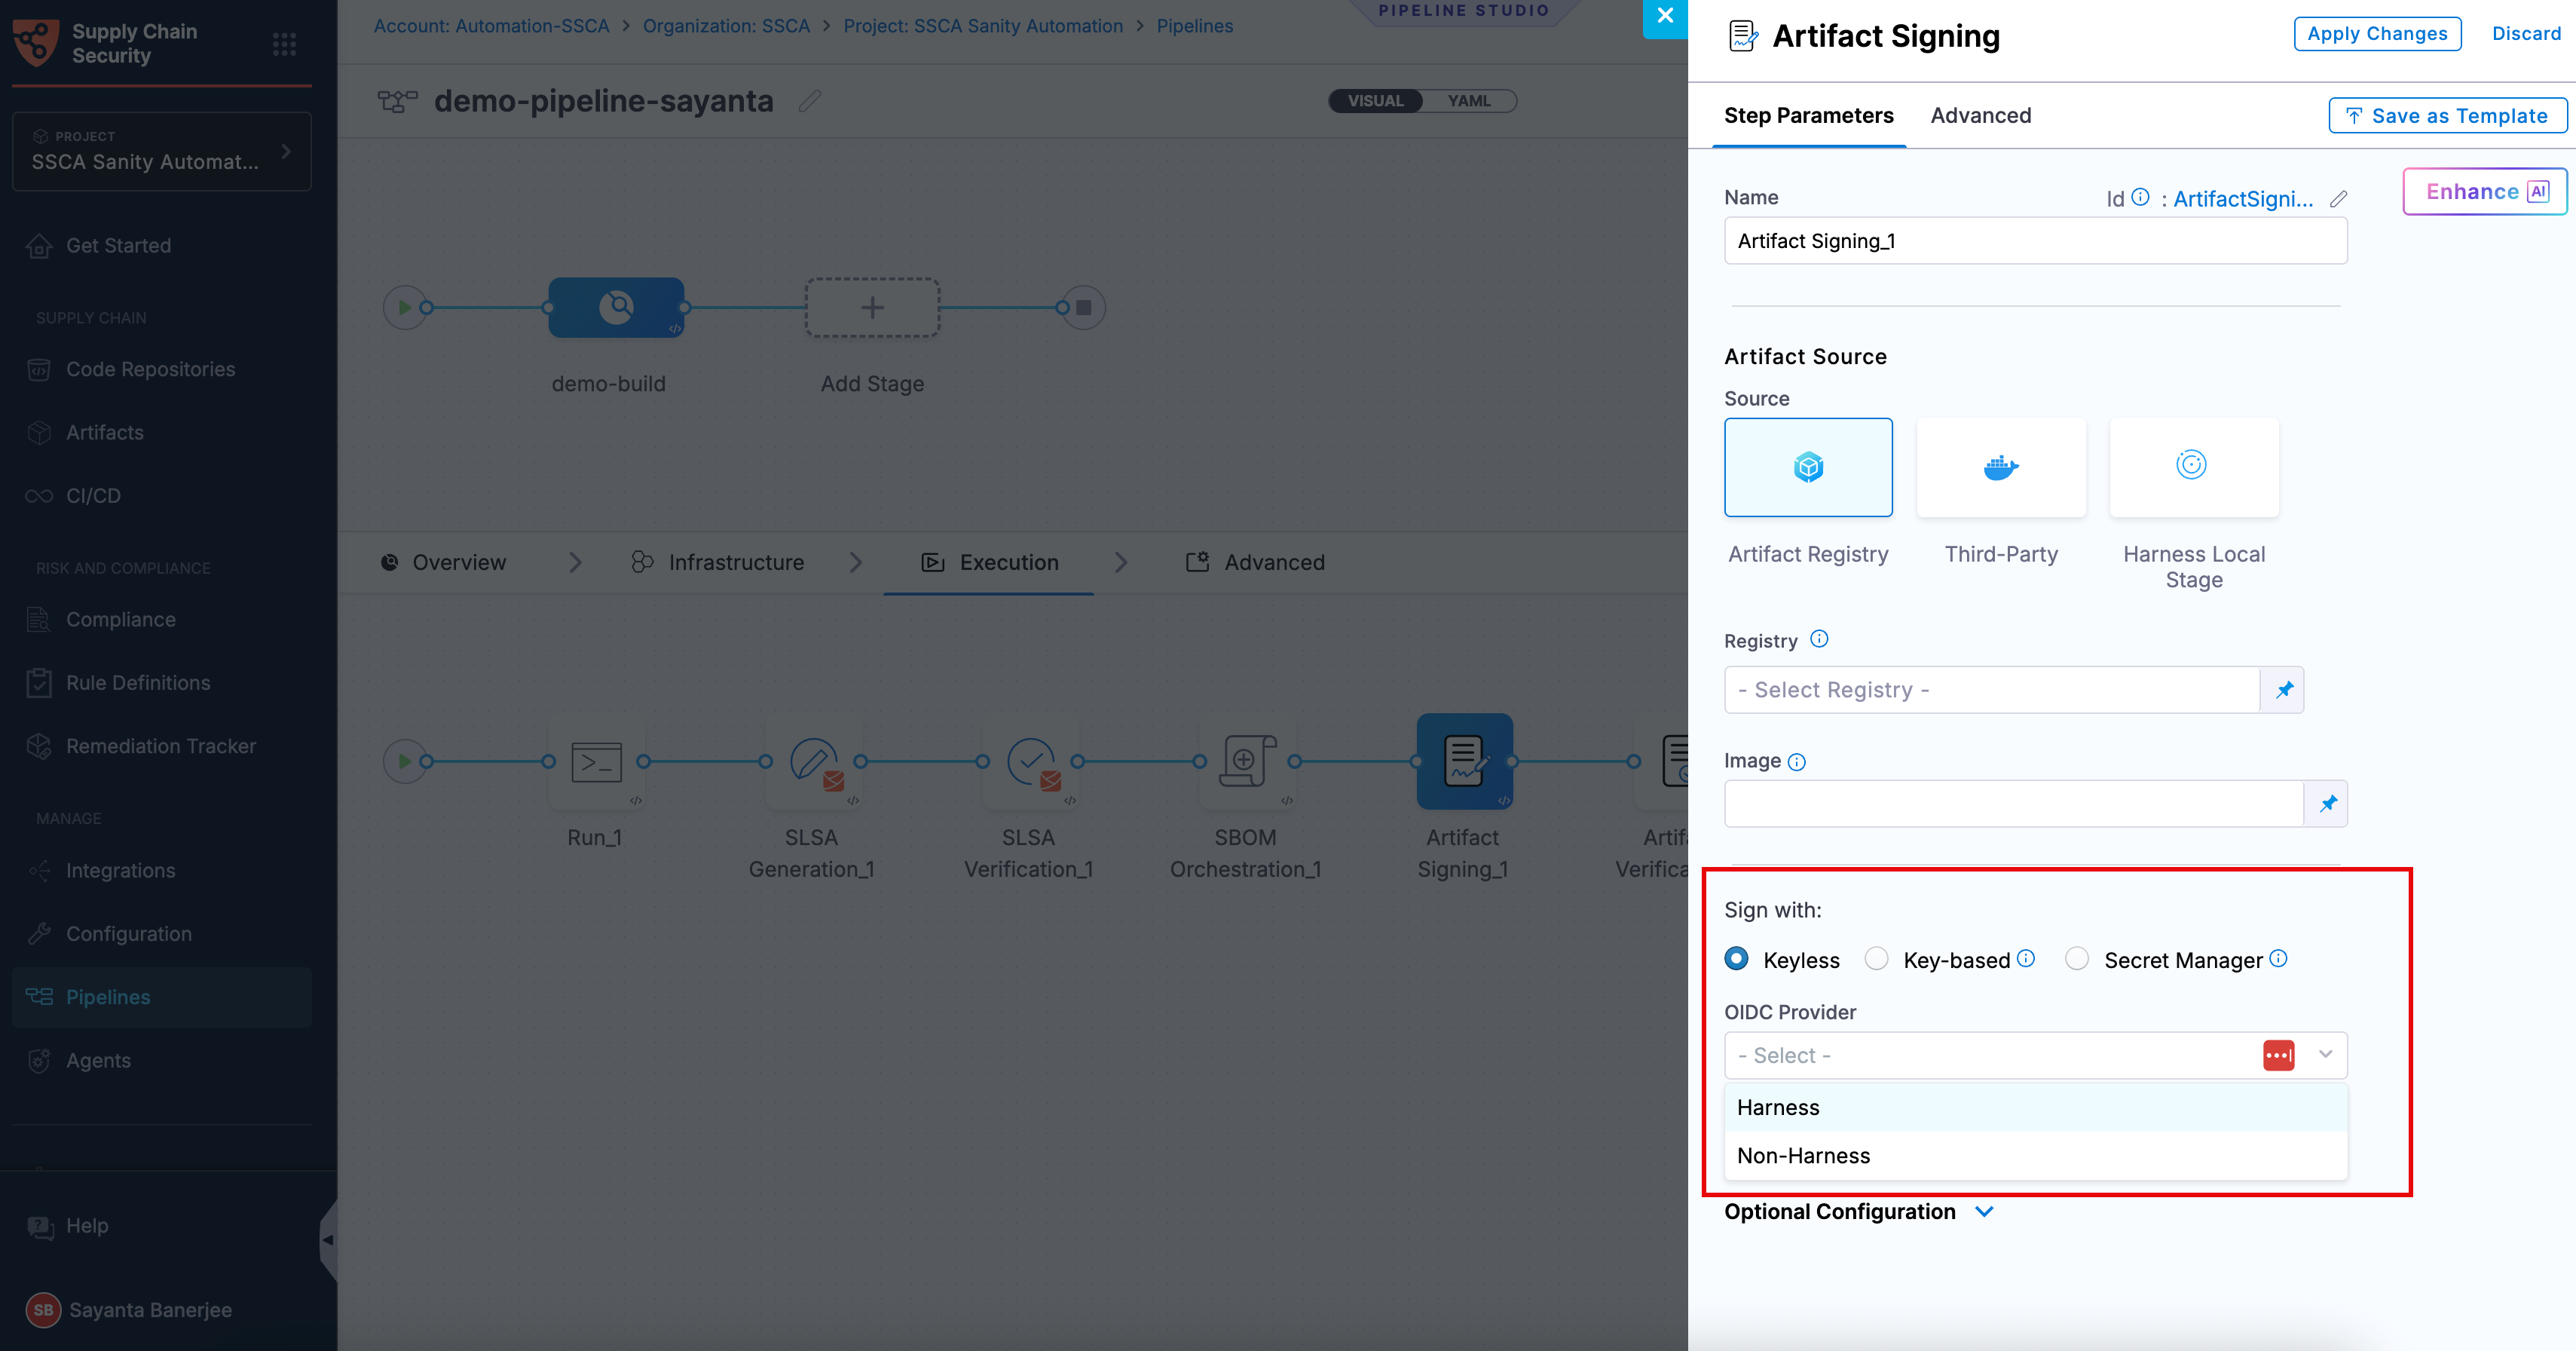
1. Click the radio button beside `Keyless` under **Sign with:** to select Keyless signing.
2. Select your preferred OIDC Provider from the dropdown under OIDC Provider. The available options are:
* [Harness](/software-supply-chain-assurance/use-scs/artifact-security/sign-verify/sign-artifacts.md#harness-oidc)
* [Non-Harness](/software-supply-chain-assurance/use-scs/artifact-security/sign-verify/sign-artifacts.md#non-harness-oidc)
{% hint style="info" %}
This signing method is not supported for SMP at the moment.
{% endhint %}
**Harness OIDC**
Harness OIDC allows you to use the pipeline’s built-in identity for keyless signing. In this approach, Harness acts as the OIDC provider and automatically supplies the identity required during pipeline execution, eliminating the need for external identity configuration.
**Non-Harness OIDC**
Non-Harness OIDC allows you to use an external identity provider for keyless signing. In this approach, the OIDC token is retrieved from a configured connector (such as AWS, Azure, or GCP) during pipeline execution and used to obtain a signing certificate. This option is useful when you want to integrate with your organization’s existing identity and access management system instead of using Harness as the OIDC provider.
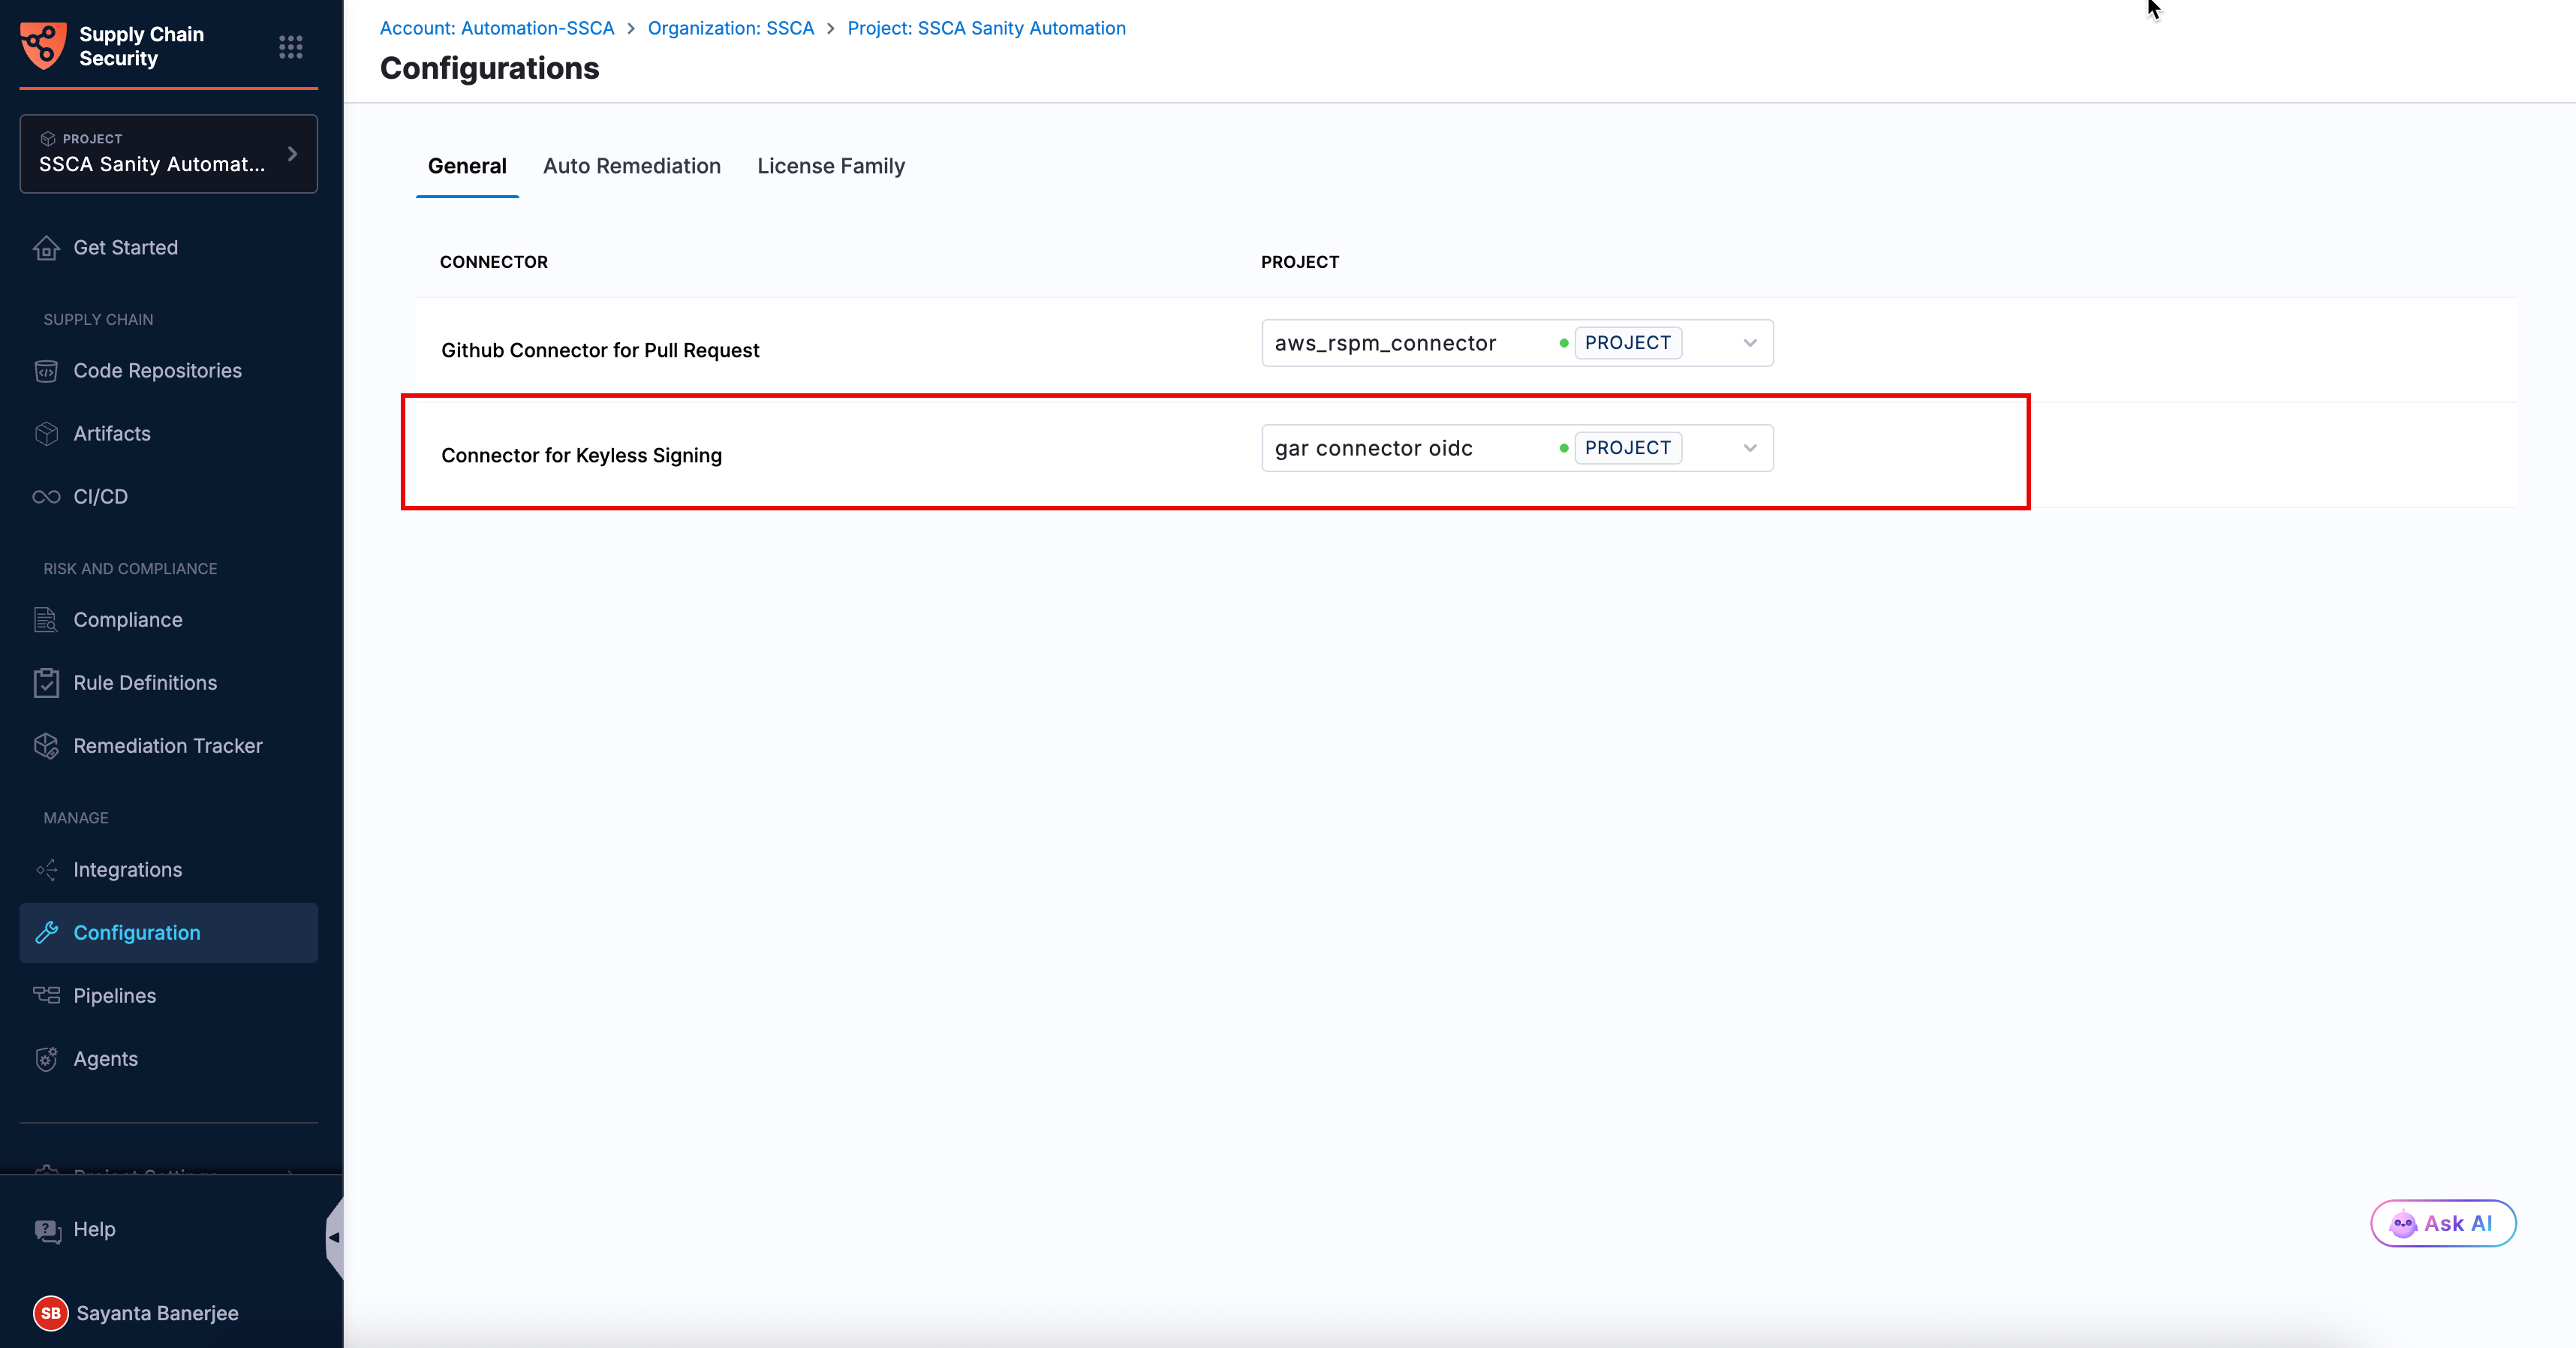
To use a Non-Harness OIDC provider, you need to configure the Connector for Keyless Signing. To configure the Connector:
1. Navigate to the **Configuration** page under the **Manage** section from the sidebar navigation of your SCS account. The **General** tab opens by default.
2. Click `Select Connector` next to `Connector for Keyless Signing` to open the `Create or Select an Existing Connector` dialog.
3. Select your required connector from the list of existing connectors. You can search for your created connector or filter connectors by **Project**, **Organization**, and **Account**.
4. Alternatively, click `+ New Connector` to create a new OIDC connector for your preferred cloud provider. For more information, see [Connectors for Cloud Providers](https://app.gitbook.com/s/3F2TpHXhur2QtQnORSM9/use-harness-platform/connectors/cloud-providers/README).
5. Click `Apply Selected`. Once selected, you can view the **Configuration Saved Successfully** toaster message at the top, indicating that the connector has been selected or created successfully.
Once the connector configuration is done successfully, you can perform artifact signing with a Non-Harness OIDC provider.
{% endtab %}
{% tab title="Key-based" %}
To perform Artifact Signing with **Cosign** selected, you need a key pair. Follow the instructions below to generate the key pair.
Generate key pairs using Cosign for Artifact Signing
* **Private Key**: Input your Private key from the [Harness file secret](/harness-platform/use-harness-platform/secrets/add-file-secrets.md).
* **Password**: Input your Password for the Private key from the [Harness file secret](/harness-platform/use-harness-platform/secrets/add-file-secrets.md).
{% endtab %}
{% tab title="HashiCorp Vault" %}
In this mode, you can pass your **Cosign keys** using a **Secret Manager**. SCS supports **HashiCorp Vault** as a secret manager. You can connect your Vault with Harness using the [Harness HashiCorp Vault connector](/harness-platform/use-harness-platform/secrets/secrets-management/add-hashicorp-vault.md). Here are the key points to consider when connecting your Vault:
{% hint style="info" %}
Harness Vault Connector now supports fetching keys from Vault subfolder paths. This feature is behind the FF `SSCA_COSIGN_USING_VAULT_V2`. To enable it contact [Harness Support](mailto:support@harness.io), and also ensure to upgrade your Harness delegate version to `25.10.87000` or higher.
{% endhint %}
1. **Enable the Transit Secrets Engine** on your HashiCorp Vault. This is essential for key management and cryptographic operations.
2. Configure your HashiCorp Vault connector using the following authentication methods [**AppRole**](/harness-platform/use-harness-platform/secrets/secrets-management/add-hashicorp-vault.md#option-app-role), [**Token**](/harness-platform/use-harness-platform/secrets/secrets-management/add-hashicorp-vault.md#option-token), [**JWT Auth**](https://developer.harness.io/docs/platform/secrets/secrets-management/add-hashicorp-vault/#option-jwtoidc-auth) or [**Vault Agent**](/harness-platform/use-harness-platform/secrets/secrets-management/add-hashicorp-vault.md#option-vault-agent).
3. Create a Cosign key pair of type `ecdsa-p256`,`rsa-2048`, or `rsa-4096` in the Transit Secrets Engine. You can do this in two ways:
* **CLI**: Run the command:
```bash
vault write -f / type=ecdsa-p256
```
* **Vault UI**: Create the key pair directly from the Vault interface.
4. Ensure the Vault token generated has the [**required policy**](https://docs.sigstore.dev/cosign/key_management/overview/#hashicorp-vault) applied for Cosign to perform attestation operations.
Configure the following fields in the step to perform the attestation
* **Connector**: Select the HashiCorp Vault connector.
* **Key**: Enter the path to the Transit Secrets Engine in your HashiCorp Vault where the keys are stored.
{% hint style="info" %}
Harness Vault Connector is supported only for Kubernetes and VM infrastructure. Ensure your Harness delegate is on version `25.10.87000` or higher.
{% endhint %}
{% endtab %}
{% tab title="GCP KMS" %}
GCP Key Management Service (KMS) enables you to sign artifacts using cryptographic keys managed by Google Cloud. Harness SCS uses Cosign to sign artifacts through GCP KMS without exposing private key material to the build environment.
GCP KMS performs signing operations using an asymmetric cryptographic key stored in Google Cloud. To use this key for artifact signing, configure GCP KMS, grant the required permissions to the identity used to access the key, and create a GCP KMS connector in Harness. The setup includes enabling the Cloud KMS API, creating a key ring and signing key, configuring authentication, and retrieving an enabled key version. You can then use the connector and key version when configuring artifact signing .
To configure GCP KMS for artifact signing, complete the following steps:
1. [Enable the Cloud KMS API](#step-1-enable-the-cloud-kms-api)
2. [Create a key ring](#step-2-create-a-key-ring)
3. [Create an asymmetric signing key](#step-3-create-an-assymetric-signing-key)
4. [Configure IAM permissions for the service account or workload identity](#step-4-configure-iam-permissions-for-the-service-account-or-workload-identity)
5. [Retrieve the enabled key version](#step-5-retrieve-the-enabled-key-version)
6. [Configure the GCP KMS connector](#step-6-configure-the-gcp-kms-connector-in-sbom-attestation)
#### Step 1: Enable the Cloud KMS API
Enable the Cloud Key Management Service (KMS) API in your Google Cloud project to allow applications and services to interact with Cloud KMS.
Execute the following command in your Google Cloud terminal:
```bash
gcloud services enable cloudkms.googleapis.com \
--project="PROJECT_ID"
```
Replace `PROJECT_ID` with your Google Cloud project ID.
If the command succeeds, it returns no output. The Cloud KMS API is enabled for the specified project.
#### Step 2: Create a key ring
Create a key ring in Google Cloud KMS to organize the cryptographic keys used for SBOM attestation signing.
{% hint style="info" %}
You only need to create the key ring during the initial setup. If the key ring already exists, skip this step.
{% endhint %}
Run the following command in your Google Cloud terminal:
```bash
gcloud kms keyrings create "KEY_RING" \
--project="PROJECT_ID" \
--location="LOCATION"
```
Replace the following placeholders:
* `KEY_RING` with a name for your key ring.
* `PROJECT_ID` with your Google Cloud project ID.
* `LOCATION` with the location where you want to create the key ring, such as `global`.
If the command succeeds, it returns no output. The key ring is created in the specified project and location.
#### Step 3: Create an assymetric signing key
Create an asymmetric signing key in Google Cloud KMS to sign SBOM attestations. The key must have the `ASYMMETRIC_SIGN` purpose, which enables it to create digital signatures. It must also use a signing algorithm supported by Cosign. For more information on key purposes, go to [Key purposes and algorithms](https://docs.cloud.google.com/kms/docs/algorithms).
{% hint style="info" %}
You only need to create the signing key during the initial setup. If the key already exists, skip this step.
{% endhint %}
Run the following command in your Google Cloud terminal:
```bash
gcloud kms keys create "COSIGN_KEY" \
--project="PROJECT_ID" \
--location="LOCATION" \
--keyring="KEY_RING" \
--purpose=asymmetric-signing \
--default-algorithm=ec-sign-p256-sha256 \
--protection-level=software
```
Replace the following placeholders:
* `COSIGN_KEY` with a name for your signing key.
* `PROJECT_ID` with your Google Cloud project ID.
* `LOCATION` with the location of your key ring.
* `KEY_RING` with the name of your key ring.
If the command succeeds, it returns no output. The asymmetric signing key is created in the specified key ring.
After creating the key, retrieve its enabled version by following [Step 5](#step-5-retrieve-the-enabled-key-version). You will need this version when configuring artifact signing.
#### Step 4: Configure IAM permissions for the service account or workload identity
Configure the Identity and Access Management (IAM) permissions to grant the required IAM roles to the service account (SA) and Workload Identity Federation (WIF) principal used by the Harness GCP KMS connector. The `roles/cloudkms.signerVerifier` role allows the identities to sign and verify data using the key. The `roles/cloudkms.publicKeyViewer` role allows them to retrieve the public key. For more information, see [Access control with IAM](https://docs.cloud.google.com/kms/docs/iam) and [Cloud KMS roles and permissions](https://docs.cloud.google.com/iam/docs/roles-permissions/cloudkms).
Run the following commands in your Google Cloud terminal:
```bash
gcloud kms keys add-iam-policy-binding "${COSIGN_KEY}" \
--project="${PROJECT_ID}" \
--location="${LOCATION}" \
--keyring="${KEY_RING}" \
--member="${SA}" \
--role=roles/cloudkms.signerVerifier
gcloud kms keys add-iam-policy-binding "${COSIGN_KEY}" \
--project="${PROJECT_ID}" \
--location="${LOCATION}" \
--keyring="${KEY_RING}" \
--member="${SA}" \
--role=roles/cloudkms.publicKeyViewer
gcloud kms keys add-iam-policy-binding "${COSIGN_KEY}" \
--project="${PROJECT_ID}" \
--location="${LOCATION}" \
--keyring="${KEY_RING}" \
--member="${WIF}" \
--role=roles/cloudkms.signerVerifier
gcloud kms keys add-iam-policy-binding "${COSIGN_KEY}" \
--project="${PROJECT_ID}" \
--location="${LOCATION}" \
--keyring="${KEY_RING}" \
--member="${WIF}" \
--role=roles/cloudkms.publicKeyViewer
```
{% hint style="info" %}
The above commands use the variables defined in the initial configuration. Ensure that `SA` contains the service account identity and `WIF` contains the Workload Identity Federation principal identifier for your GCP project.
{% endhint %}
If the commands succeed, they return no output. The specified IAM permissions are added to both identities for the signing key.
#### Step 5: Retrieve the enabled key version
Retrieve the enabled version of your signing key in Google Cloud KMS to specify it when configuring artifact signing. Each key can have one or more versions. Using an explicit key version ensures that the step uses the intended version for signing.
Run the following command in your Google Cloud terminal:
```bash
gcloud kms keys versions list \
--project="${PROJECT_ID}" \
--location="${LOCATION}" \
--keyring="${KEY_RING}" \
--key="${COSIGN_KEY}" \
--filter="state=ENABLED" \
--format="value(name)"
```
{% hint style="info" %}
The above command uses the variables defined during the initial configuration. It lists the enabled versions of the specified signing key.
{% endhint %}
Copy the key version returned by the command. You will use it when configuring artifact signing.
#### Step 6: Configure the GCP KMS connector for artifact signing
Configure the GCP KMS connector in the Artifact Signing step to sign artifacts using the signing key managed by Google Cloud KMS. To configure artifacts signing for artifacts with GCP KMS using cosign, complete the following steps:
1. Under **Sign with**, select the **Secret Manager** radio button to configure artifact signing using a secret manager.
2. Click `-Select-` to open the `Create or Select an Existing Connector` dialog.
3. Select your required connector from the list of existing connectors. You can search for your created connector or filter connectors by **Project**, **Organization**, and **Account**.
4. Alternatively, click `+ New Connector` to create a new GCP KMS connector. For more information, see [Add Google KMS as a Harness secret manager](https://developer.harness.io/harness-platform/use-harness-platform/secrets/secrets-management/add-google-kms-secrets-manager).
5. In the **Key Name** field, enter the signing key name and version in the following format:
```
COSIGN_KEY/versions/KEY_VERSION
```
Replace `COSIGN_KEY` with your GCP KMS signing key name and `KEY_VERSION` with the enabled key version retrieved in [Step 5](#step-5-retrieve-the-enabled-key-version). For example, `cosign-sign/versions/1`.
GCP KMS secret manager in artifact signing
{% hint style="info" %}
Before enabling GCP KMS signing, ensure that the following requirements are met:
* **Delegate and feature flag**
* **Delegate version:** `26.09.90103` or later. Upgrade the Delegate before enabling the feature flag. For more information, go to [Delegate automatic upgrades and expiration policy](https://developer.harness.io/harness-platform/use-harness-platform/delegates/delegate/install-delegates/delegate-upgrades-and-expiration).
* **Feature flag:** This feature is behind the `SSCA_GCP_KMS_SIGNING` feature flag. Contact [Harness Support](https://www.harness.io/support) to enable the feature in your account.
* **GCP KMS key requirements:** The GCP KMS key configuration depends on the operation:
* **Artifact signing:** Use an asymmetric key with the Elliptic Curve P-256 algorithm and SHA-256 digest.
* **GCP KMS connector test:** Use a symmetric key for the existing Google KMS Secret Manager integration, which performs secret encryption and decryption. Grant the required `roles/cloudkms.cryptoKeyEncrypterDecrypter` IAM role.
GCP KMS does not support using an `ASYMMETRIC_SIGN` key for encryption or decryption. This is an expected limitation of GCP KMS.
* **Plugin versions:** If you pin plugin versions, use the following tags:
```
{
"sscaOrchestrationTag": "harness/ssca-plugin:0.68.4",
"sscaEnforcementTag": "harness/ssca-plugin:0.68.4",
"sscaArtifactSigningTag": "harness/ssca-artifact-signing-plugin:0.68.4",
"sscaArtifactVerificationTag": "harness/ssca-artifact-signing-plugin:0.68.4",
"sscaCdxgenOrchestrationTag": "harness/ssca-cdxgen-plugin:0.68.4",
"provenanceTag": "harness/slsa-plugin:0.68.4",
"slsaVerificationTag": "harness/slsa-plugin:0.68.4"
}
```
{% endhint %}
{% endtab %}
{% endtabs %}
**Attach Signature to Artifact Registry** (Optional): By default, this option is unchecked which means the signature will not be uploaded to the artifact registry and checking this option will push the signature as a `.sig` file to the artifact registry.
{% hint style="info" %}
This option is available only for signing container images.
{% endhint %}
### View signed artifacts
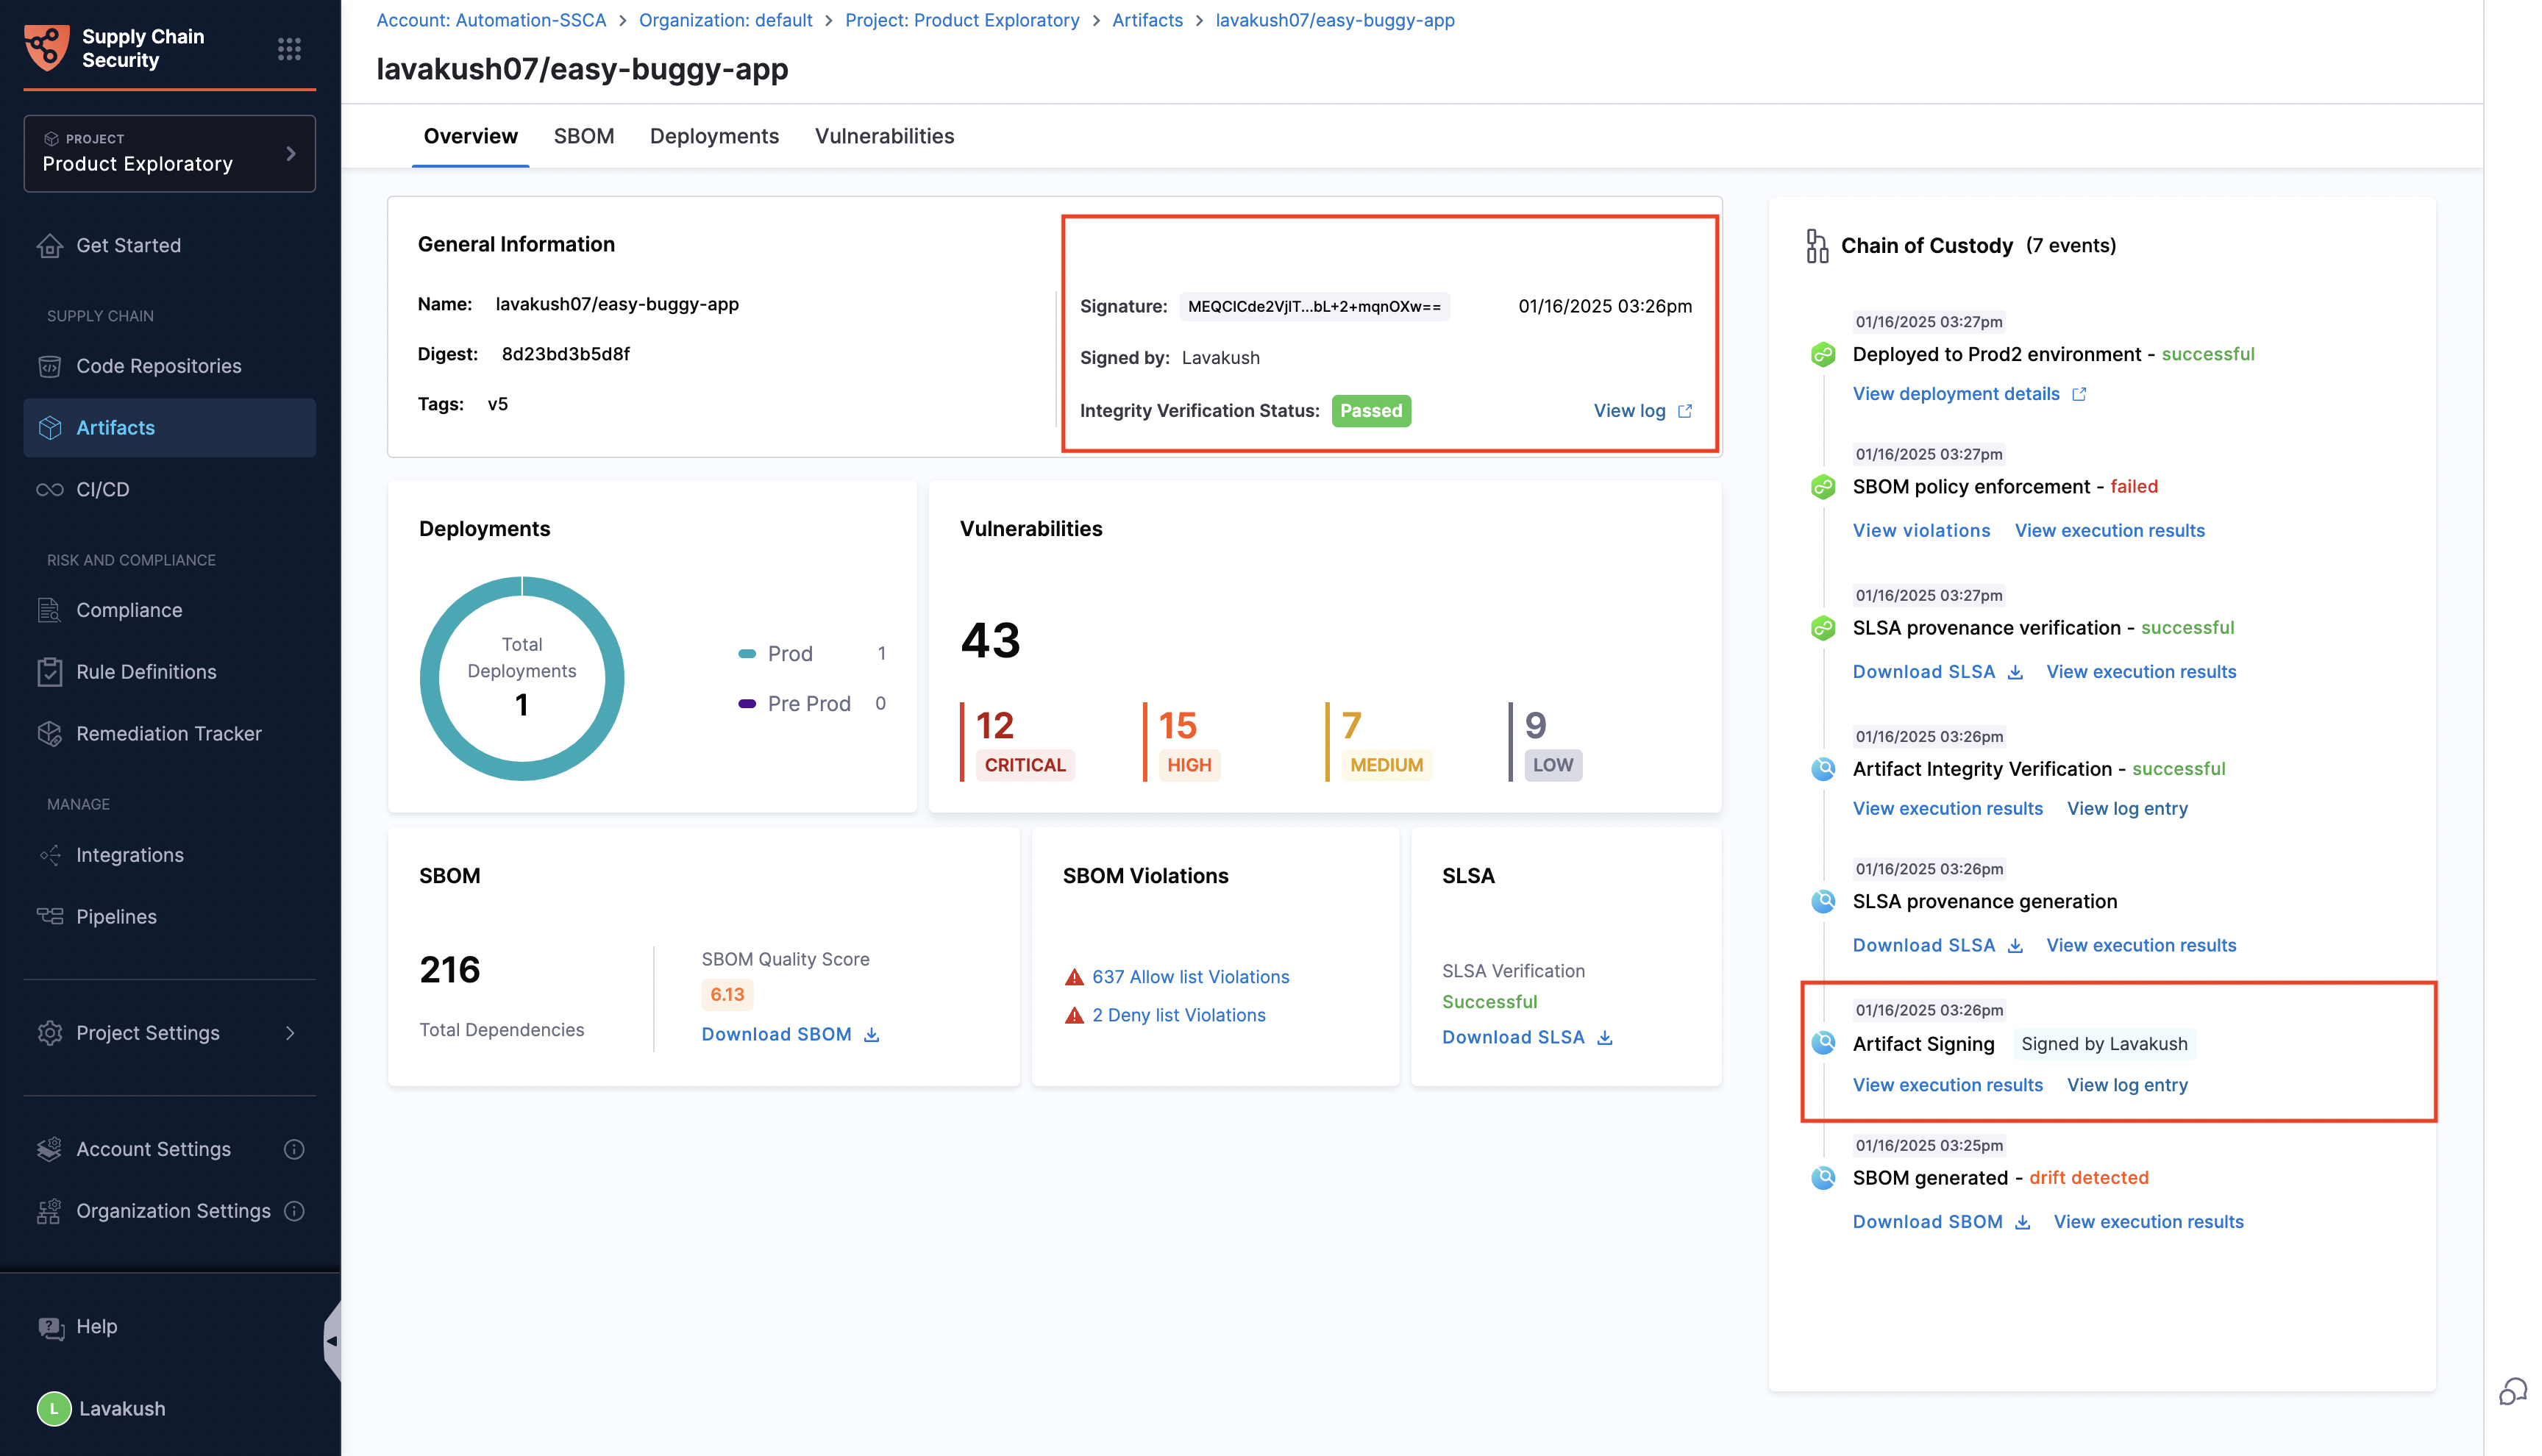
You can easily access the signed artifact details from the Artifacts Overview tab. This section shows the signature and who signed the artifact. Additionally, you can also find the artifact signing as an event in the Chain of Custody, where a new entry is logged every time you sign an artifact. This entry includes a link to the execution results and rekor log entry, allowing you to track the signing activity and cross-check the details.
{% hint style="info" %}
Rekor logs are disabled by default. To enable them, click on **Project Settings**, navigate to **Default Settings**, and disable Airgap mode in Supply Chain Security.
{% endhint %}
{% hint style="info" %}
You are allowed to re-sign the same image multiple times, with each new signing overwriting the previous one. The Artifacts Overview tab will always display the most up-to-date signing details, reflecting the latest signature information for the artifact.
{% endhint %}
### Example pipeline For Artifact Signing
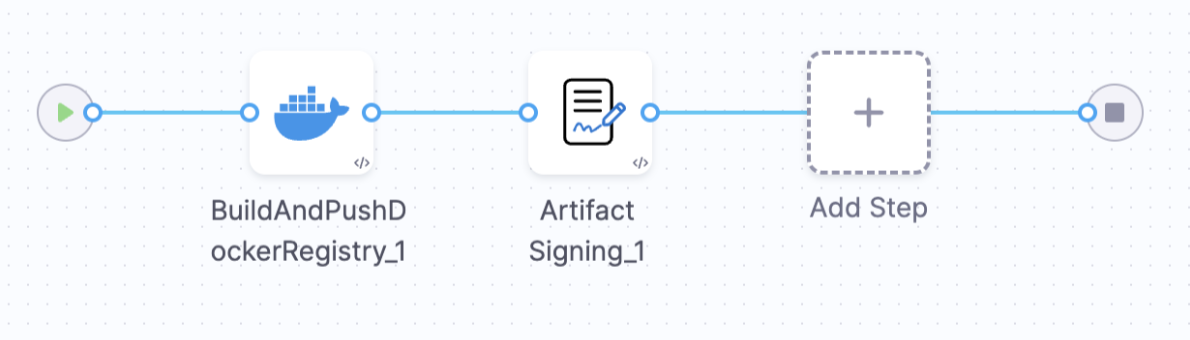
This example demonstrates how to implement artifact signing in the Build stage of the pipeline.
This example **Build** stage has two steps:
* **Build and Push an Image to Docker Registry**: This step builds the cloned codebase and pushes the image to the container registry (DockerHub, ACR, etc.).
* **Artifact Signing**: Pulls the artifact from the registry and signs it with a private key pair and pushes the `.sig` file back to the artifact registry.
Click to view full size image
To replicate the Artifact Signing step you can use the below sample pipeline YAML
Sample Pipeline YAML
```yaml
pipeline:
name: Artifact Signing
identifier: ArtifactSigning
tags: {}
projectIdentifier: Harness
orgIdentifier: default
properties:
ci:
codebase:
connectorRef: Harnessgithub
build: <+input>
stages:
- stage:
name: Build
identifier: Build
description: ""
type: CI
spec:
cloneCodebase: true
caching:
enabled: true
buildIntelligence:
enabled: true
execution:
steps:
- step:
type: BuildAndPushDockerRegistry
name: BuildAndPushDockerRegistry_1
identifier: BuildAndPushDockerRegistry_1
spec:
connectorRef: lavakushDockerhub
repo: lavakush07/easy-buggy-app
tags:
- v5
caching: true
- step:
type: SscaArtifactSigning
name: Artifact Signing_1
identifier: ArtifactSigning_1
spec:
source:
type: docker
spec:
connector: lavakushDockerhub
image: lavakush07/easy-buggy-app:v5
signing:
type: cosign
spec:
private_key: account.Cosign_Private_Key
password: account.Cosign_Password
uploadSignature:
upload: true
infrastructure:
type: KubernetesDirect
spec:
connectorRef: account.harness_kubernetes_connector
namespace: artifact-signing
automountServiceAccountToken: true
nodeSelector: {}
os: Linux
variables:
- name: LOG_LEVEL
type: String
description: ""
required: false
value: TRACE
```
### Verify Artifact Signing
You can verify the signed artifacts using the Artifact verification step. Go to [configure your pipeline to verify the artifact Signing](/software-supply-chain-assurance/use-scs/artifact-security/sign-verify/verify-signed-artifacts.md) to configure your pipeline for verification.
{% @harness-feedback/feedback %}