> For the complete documentation index, see [llms.txt](https://developer.harness.io/llms.txt). Markdown versions of documentation pages are available by appending `.md` to page URLs; this page is available as [Markdown](https://developer.harness.io/software-supply-chain-assurance/use-scs/artifact-security/slsa/generate-slsa.md).
# Generate SLSA
Generate SLSA Provenance with Harness SCS
Harness SCS when used along with Harness CI Hosted Builds([Harness Cloud](/continuous-integration/use-harness-ci/use-harness-ci/set-up-build-infrastructure/use-harness-cloud-build-infrastructure.md)), ensures that the resulting artifacts have **SLSA Level 3** provenance that every consumer (including the following deployment stage) can verify for artifact integrity prior to making use of this artifact. Build hardening for Level 3 compliance is achieved through:
1. Built-in infrastructure isolation for every build where new infrastructure is created for every run and deleted after the run completes.
2. OPA policy enforcement on CI stage templates with non-privileged, hosted containerized steps that do not use volume mounts. This disallows the build steps to access the provenance key information in compliance with SLSA specifications.
End result is that hackers cannot do tampering during the build process. This capability when coupled with open source governance through [SBOM lifecycle management](/software-supply-chain-assurance/use-scs/open-source-management/generate-sbom-for-repositories.md) provides the most advanced shift-left supply chain security solution in the market today.
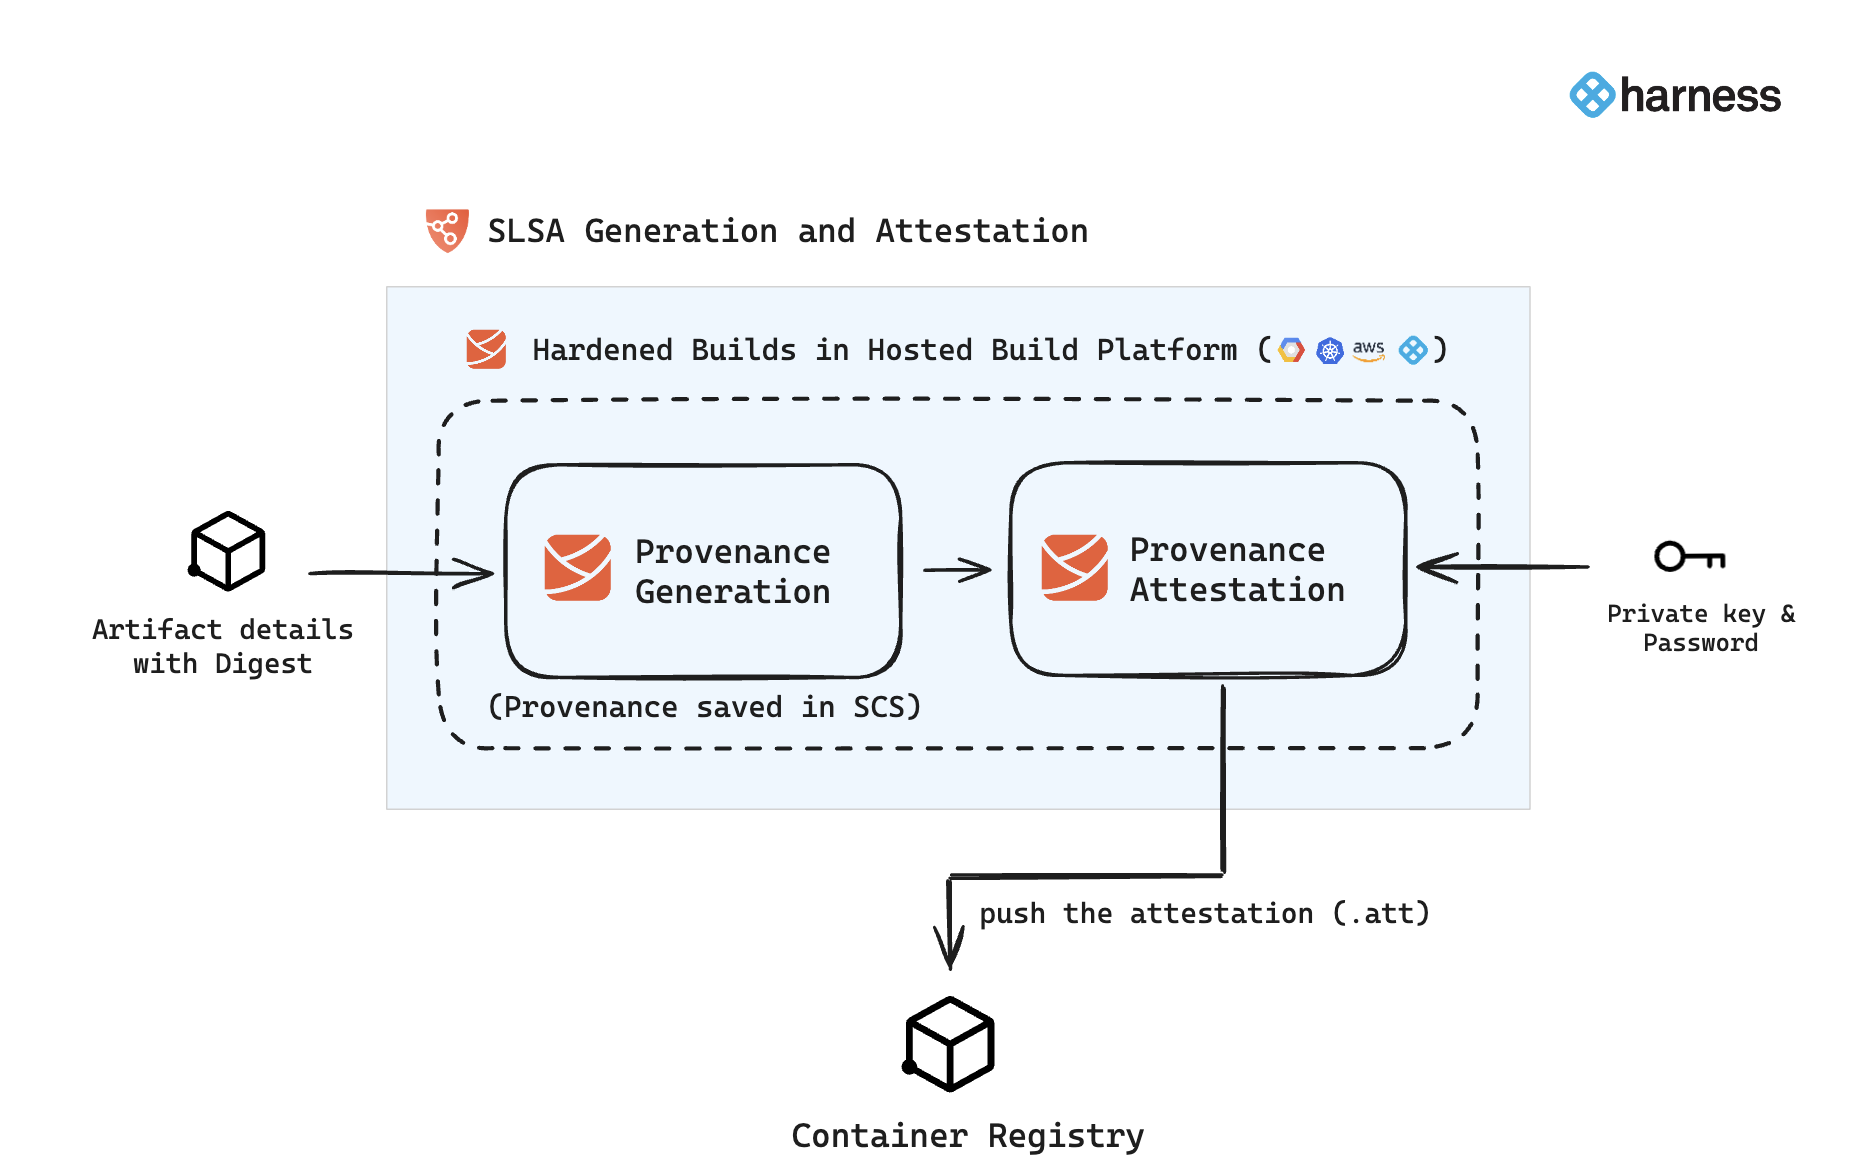
In Harness SCS, you can use the **SLSA Generation** step to configure your pipeline to generate SLSA Provenance and optionally attest and sign the attestation. The generated provenance is saved in Harness and can be easily accessed from the [Artifact section](/software-supply-chain-assurance/use-scs/artifact-security/overview.md) in SCS. If the provenance is attested and signed with keys, the resulting attestation file (`.att`) is pushed to the container registry. Here is an overview of the workflow:
### SLSA Generation step configuration
The **SLSA Generation** step enables you to generate SLSA Provenance and optionally attest it. The generated provenance is saved in the [Artifact section](/software-supply-chain-assurance/use-scs/artifact-security/overview.md) in SCS, while the attestation file is pushed to the configured container registry. This step should be configured immediately after completing your image-building process, as the image digest is required for provenance generation and attestation.
#### Container images
Follow the instructions below to configure the **SLSA Generation** step for container images.
* Search and add the **SLSA Generation** step to your pipeline. It is important to place this step immediately after the steps that complete your image-building process, as it requires the artifact digest as input.
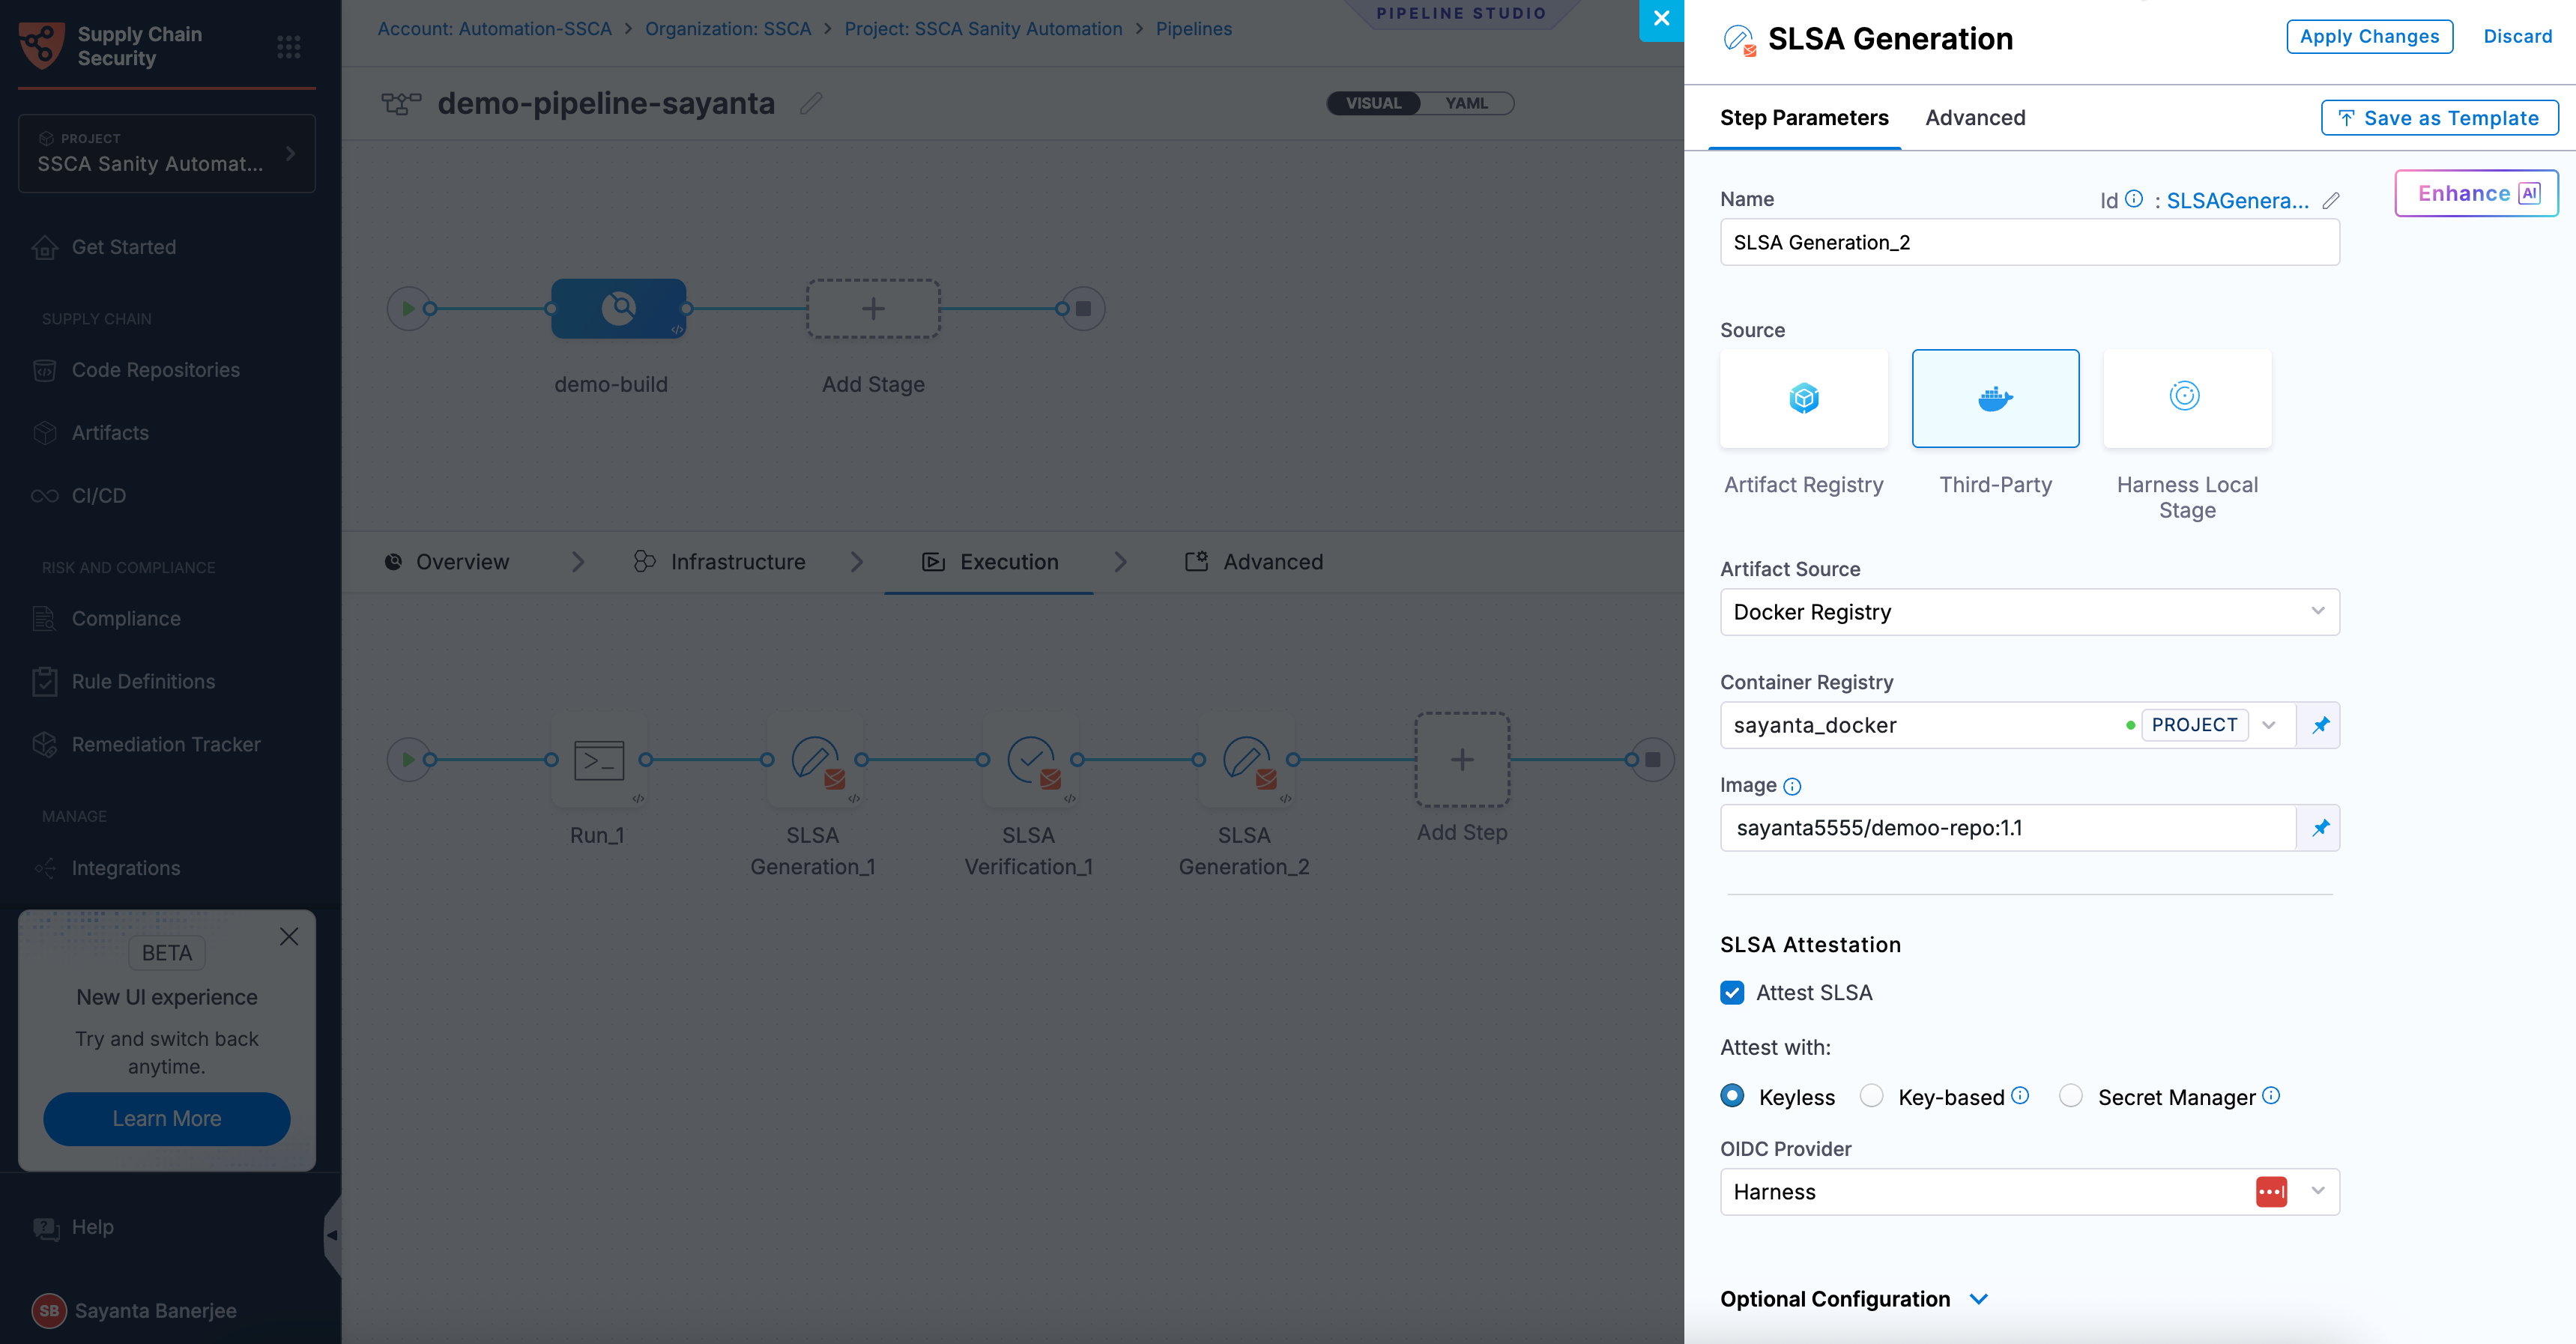
* **Artifact Source**: Configure your artifact source by selecting from the options available in the dropdown menu. You can choose from **Docker Registry**, **ECR**, **ACR**, or **GAR**. Select the corresponding artifact source tab below for detailed instructions on configuration.
{% hint style="info" %}
When modifying the existing SLSA steps, you must manually remove the digest from the YAML configuration to ensure compatibility with the updated functionality.
{% endhint %}
{% tabs %}
{% tab title="HAR" %}
* **Registry:** Select the Harness Registry configured for the Harness Artifact Registry where your artifact is stored.
* **Image:** Enter the name of your image with tag, such as `imagename:tag` or `imagename@sha256:`.
{% endtab %}
{% tab title="Docker Registry" %}
* **Container Registry:** Select the [Docker Registry connector](/harness-ai/use-harness-platform/connectors/artifact-repositories/docker-registry-connector-settings-reference.md) that is configured for the DockerHub container registry where the artifact is stored.
* **Image:** Enter the name of your image using a tag or digest, example `my-docker-org/repo-name:tag` or `my-docker-org/repo-name@sha256:`
{% hint style="info" %}
Unlike other artifact sources, JFrog Artifactory requires additional permissions for attestation. The connector’s user or token must have `Read`, `Annotate`, `Create/Deploy`, and `Delete` permissions.
{% endhint %}
{% endtab %}
{% tab title="ECR" %}
* **Container Registry:** Select the [Docker Registry connector](/harness-ai/use-harness-platform/connectors/artifact-repositories/docker-registry-connector-settings-reference.md) that is configured for the Elastic container registry where the artifact is stored.
* **Image:** Enter the name of your image with tag or digest, example `my-docker-repo/my-artifact` or `my-docker-repo/my-artifact@sha256:`.
* **Artifact Digest:** Specify the digest of your artifact. After building your image using a [Build and Push](/continuous-integration/use-harness-ci/use-harness-ci/build-and-upload-artifacts/build-and-push/build-and-push-to-docker-registry.md) step or a [Run](/continuous-integration/use-harness-ci/use-harness-ci/run-step-settings.md) step, save the digest in a variable, then reference it here using a Harness expression.
* **Region:** The geographical location of your ECR repository, example `us-east-1`
* **Account ID:** The unique identifier associated with your AWS account.
{% endtab %}
{% tab title="ACR" %}
* **Container Registry:** Select the [Docker Registry connector](/harness-ai/use-harness-platform/connectors/artifact-repositories/docker-registry-connector-settings-reference.md) that is configured for the Azure container registry where the artifact is stored.
* **Image:** Enter your image details in the format `/`. The `` is a fully qualified name of your Azure Container Registry. It typically follows the format `.azurecr.io`, where `` is the name you have given to your container registry instance in Azure. Example: `automate.azurecr.io/:tag` or you can use digest `automate.azurecr.io/@sha256:`
* **Artifact Digest:** Specify the digest of your artifact. After building your image using a [Build and Push](/continuous-integration/use-harness-ci/use-harness-ci/build-and-upload-artifacts/build-and-push/build-and-push-to-docker-registry.md) step or a [Run](/continuous-integration/use-harness-ci/use-harness-ci/run-step-settings.md) step, save the digest in a variable, then reference it here using a Harness expression.
* **Subscription Id:** Enter the unique identifier that is associated with your Azure subscription.
{% endtab %}
{% tab title="GAR" %}
* **Container Registry:** Select the [Docker Registry connector](/harness-ai/use-harness-platform/connectors/artifact-repositories/docker-registry-connector-settings-reference.md) that is configured for the Google container registry where the artifact is stored.
* **Image:** Enter the name of your image with tag or digest, example `repository-name/image` or `repository-name/image@sha256:`.
* **Artifact Digest:** Specify the digest of your artifact. After building your image using a [Build and Push](/continuous-integration/use-harness-ci/use-harness-ci/build-and-upload-artifacts/build-and-push/build-and-push-to-docker-registry.md) step or a [Run](/continuous-integration/use-harness-ci/use-harness-ci/run-step-settings.md) step, save the digest in a variable, then reference it here using a Harness expression.
* **Host:** Enter your GAR Host name. The Host name is regional-based. For example, `us-east1-docker.pkg.dev`.
* **Project ID:** Enter the unique identifier of your Google Cloud Project. The Project-ID is a distinctive string that identifies your project across Google Cloud services. Example: `my-gcp-project`.
{% endtab %}
{% endtabs %}
#### Non-container artifacts
SLSA generation is not limited to container images. You can also generate SLSA provenance for non-container artifacts. Non-container artifacts are files or packages that are not packaged as container images, such as binaries, manifests, or archives. Each artifact is uniquely identified by its digest (SHA), which is used during verification. For non-container artifacts, ensure your pipeline includes a step (e.g., a [Run step](/continuous-integration/use-harness-ci/use-harness-ci/run-step-settings.md#add-the-run-step)) that generates the artifact and its digest before the SLSA Generation step.
The following non-container artifact types are supported:
* Helm charts (`.tgz`)
* YAML manifests (`.yaml`)
* Java archives (`.jar`)
* Web application archives (`.war`)
{% hint style="info" %}
Artifacts not listed above are treated as unknown types.
{% endhint %}
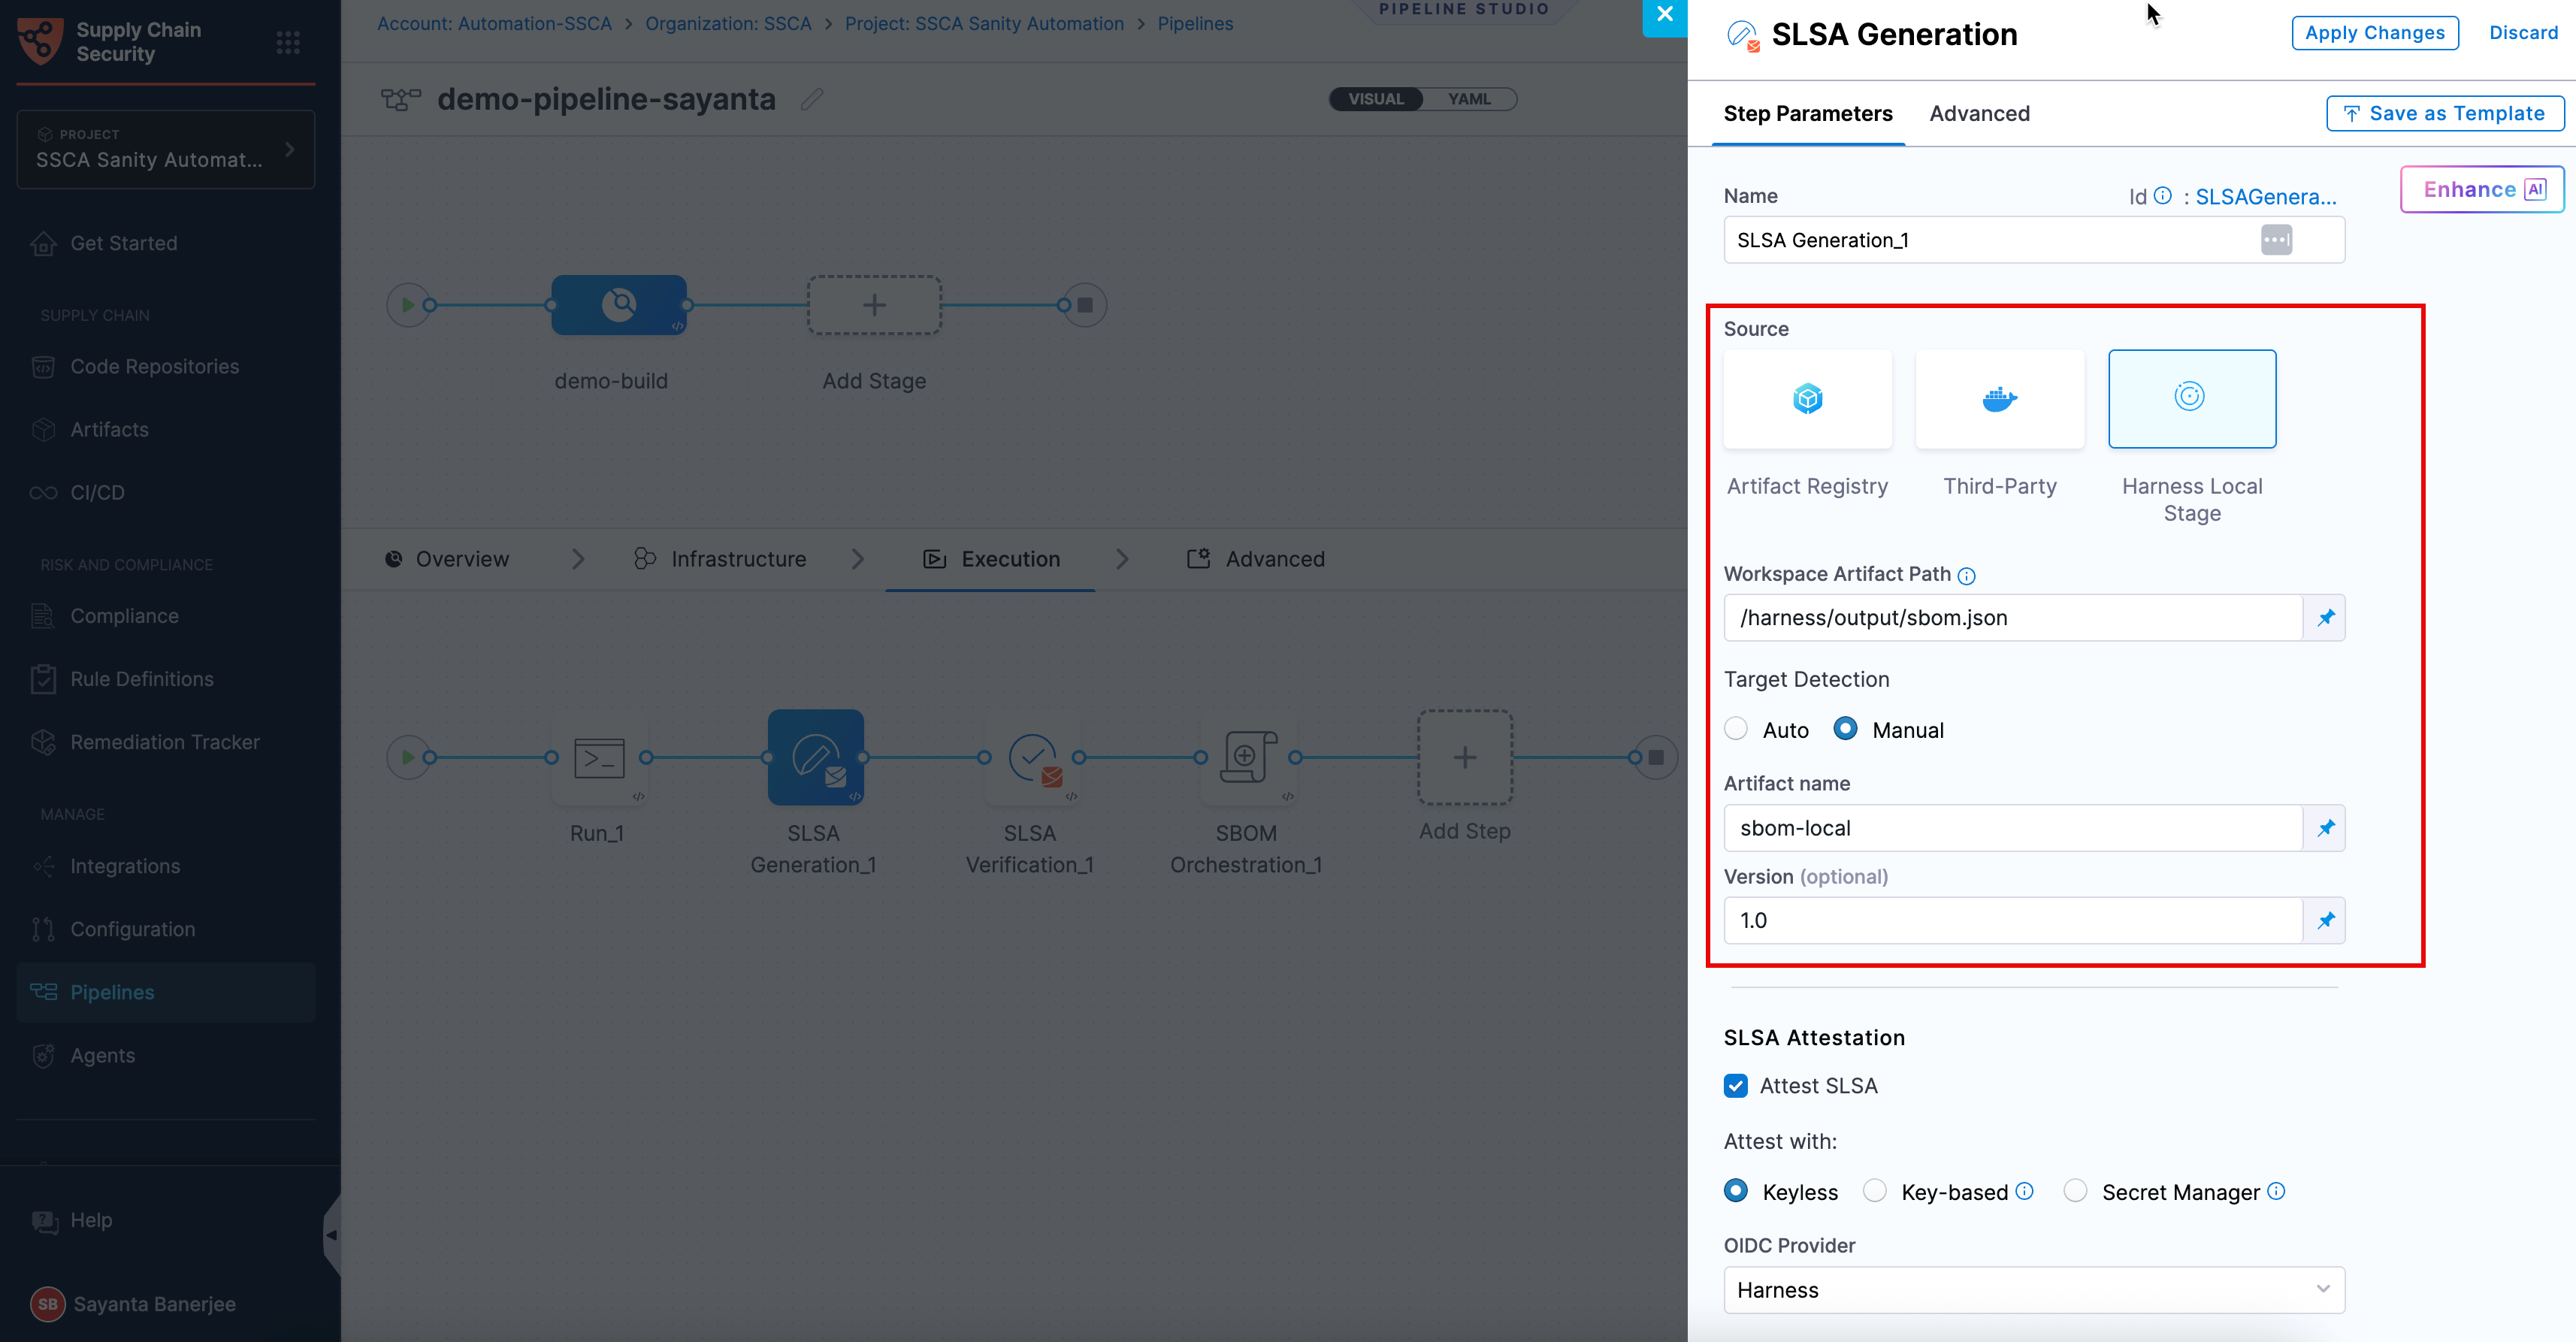
To generate SLSA Provenance for Non-Container Artifacts:
1. Enter a **Name** for the step under `Name`. Harness automatically generates a step ID from the name. Once the pipeline is created, you cannot change the ID.
2. Select **Harness Local Stage** as the **Source**.
3. Provide the exact path to the artifact within the workspace under `Workspace Artifact Path`. Ensure that you run a custom step to pull the artifact into the workspace directory. The default workspace path is `/harness`.
4. Click the radio buttons under `Target Detection` to set the artifact name and version. The available options are **Auto** and **Manual**.
* By default, the target detection is set to **Auto**. It automatically sets the artifact name from the provided path.
* Click the radio button beside **Manual** to manually specify the artifact name and version.
* Provide the name of the artifact under `Artifact Name`. Optionally, provide the artifact version under `Version`.
Click to view full size image
With this configuration, the step generates the SLSA Provenance and stores it in the [Artifact section](/software-supply-chain-assurance/use-scs/artifact-security/overview.md) of SCS. To attest to the generated provenance, follow the instructions in the section below.
#### Attest SLSA Provenance
Attestation is the process of cryptographically signing the generated provenance to ensure its authenticity and integrity. In SLSA generation, attestation ensures that the provenance has not been tampered with and can be trusted by downstream systems. Go to [attestation and verification concepts](/software-supply-chain-assurance/new-to-scs/key-concepts.md#attestation-and-verification) to understand the attestation process.
You can perform attestation using Cosign with the following signing methods:
* **Keyless** - Uses short-lived, automatically generated keys based on identity to sign SLSA provenance without storing private keys.
* **Key-based** - Uses a user-managed private and public key pair to sign SLSA provenance, requiring secure key storage and handling.
* **Secret Manager** - A secure service used to store, manage, and access sensitive data such as cryptographic keys without exposing them directly in pipelines.
Based on the attestation type you select, click the tab below and specify the configurations for the SLSA Generation step to perform the attestation.
{% tabs %}
{% tab title="Keyless" %}
Keyless signing using Cosign lets you sign SLSA provenance without managing long-lived signing keys. Instead, Cosign uses your workload identity (via OIDC) to obtain a short-lived signing certificate during pipeline execution, which is then used to sign the provenance. The signing key is generated and used only in memory and is not persisted. This reduces the risk of key compromise while ensuring the provenance remains verifiable and trusted. The signed attestation is pushed to the container registry and associated with the image digest, typically referenced using the digest with a `.att` extension.
To configure SLSA attestation with Keyless signing using cosign, complete the following steps:
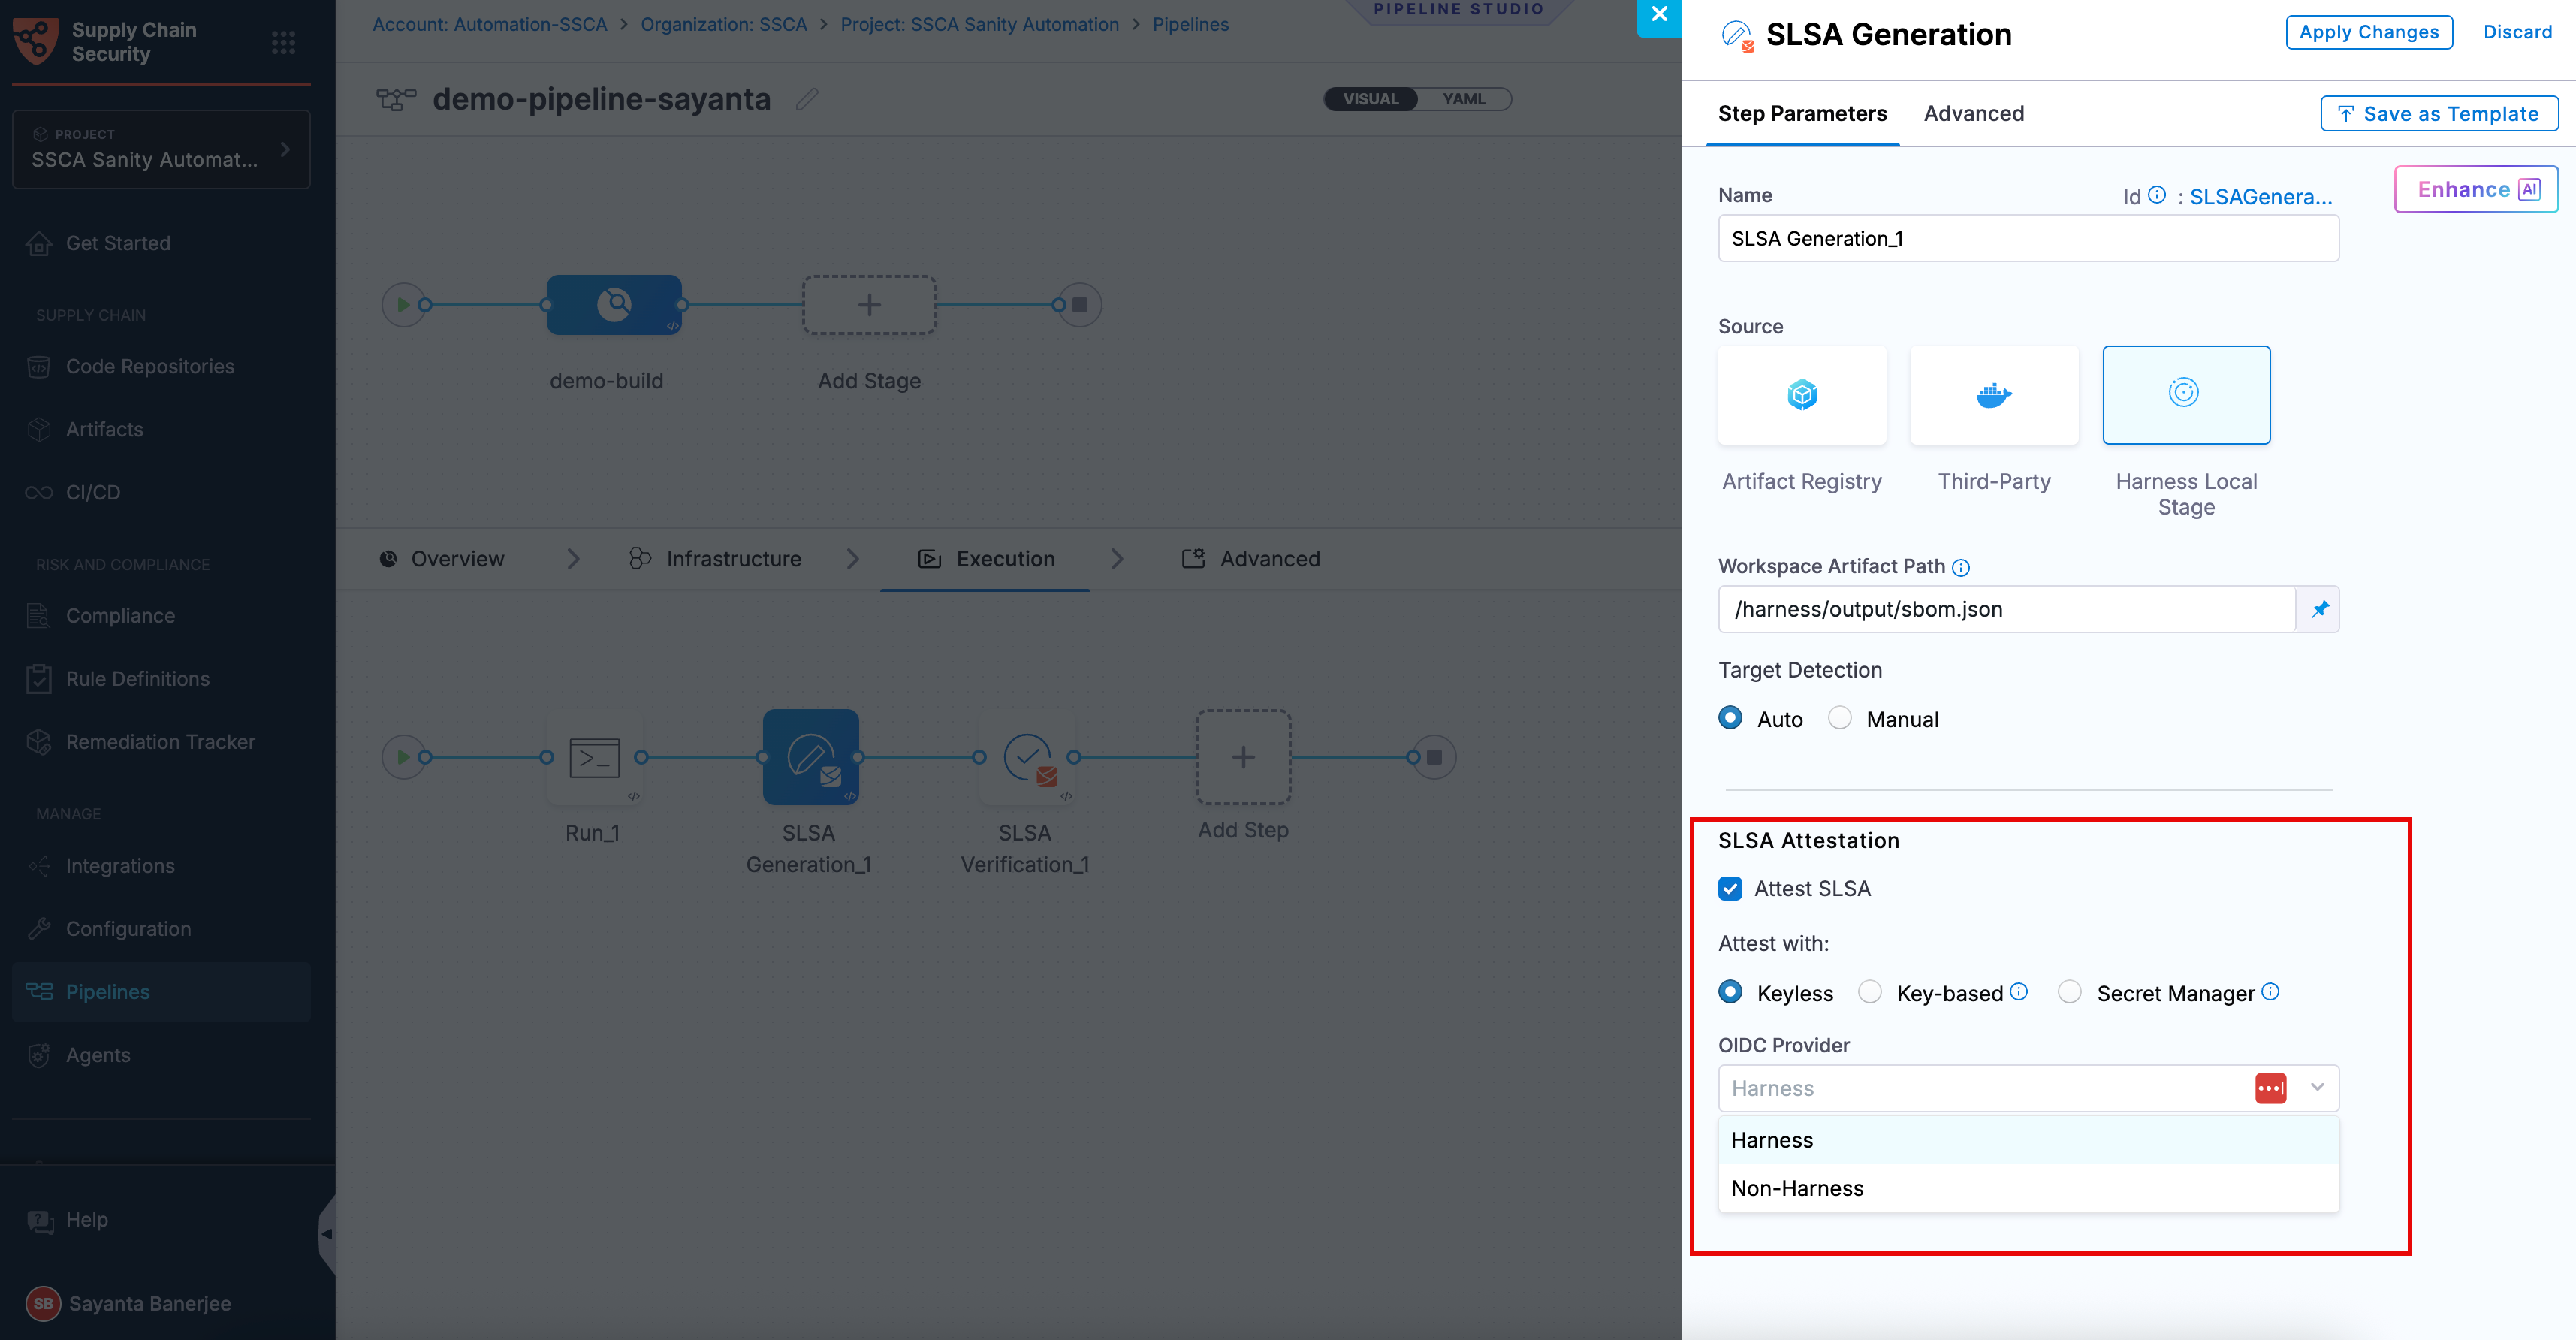
1. Click the checkbox beside `Attest SLSA` to enable SLSA attestation. The radio button beside `Keyless` will be selected by default.
2. Select your preferred OIDC Provider from the dropdown under `OIDC Provider`. The available options are:
* [Harness](/software-supply-chain-assurance/use-scs/artifact-security/slsa/generate-slsa.md#harness-oidc)
* [Non-Harness](/software-supply-chain-assurance/use-scs/artifact-security/slsa/generate-slsa.md#non-harness-oidc)
{% hint style="info" %}
This attestation method is not supported for SMP at the moment.
{% endhint %}
**Harness OIDC**
Harness OIDC allows you to use the pipeline’s built-in identity for keyless signing. In this approach, Harness acts as the OIDC provider and automatically supplies the identity required during pipeline execution, eliminating the need for external identity configuration.
**Non-Harness OIDC**
Non-Harness OIDC allows you to use an external identity provider for keyless signing. In this approach, the OIDC token is retrieved from a configured connector (such as AWS, Azure, or GCP) during pipeline execution and used to obtain a signing certificate. This option is useful when you want to integrate with your organization’s existing identity and access management system instead of using Harness as the OIDC provider.
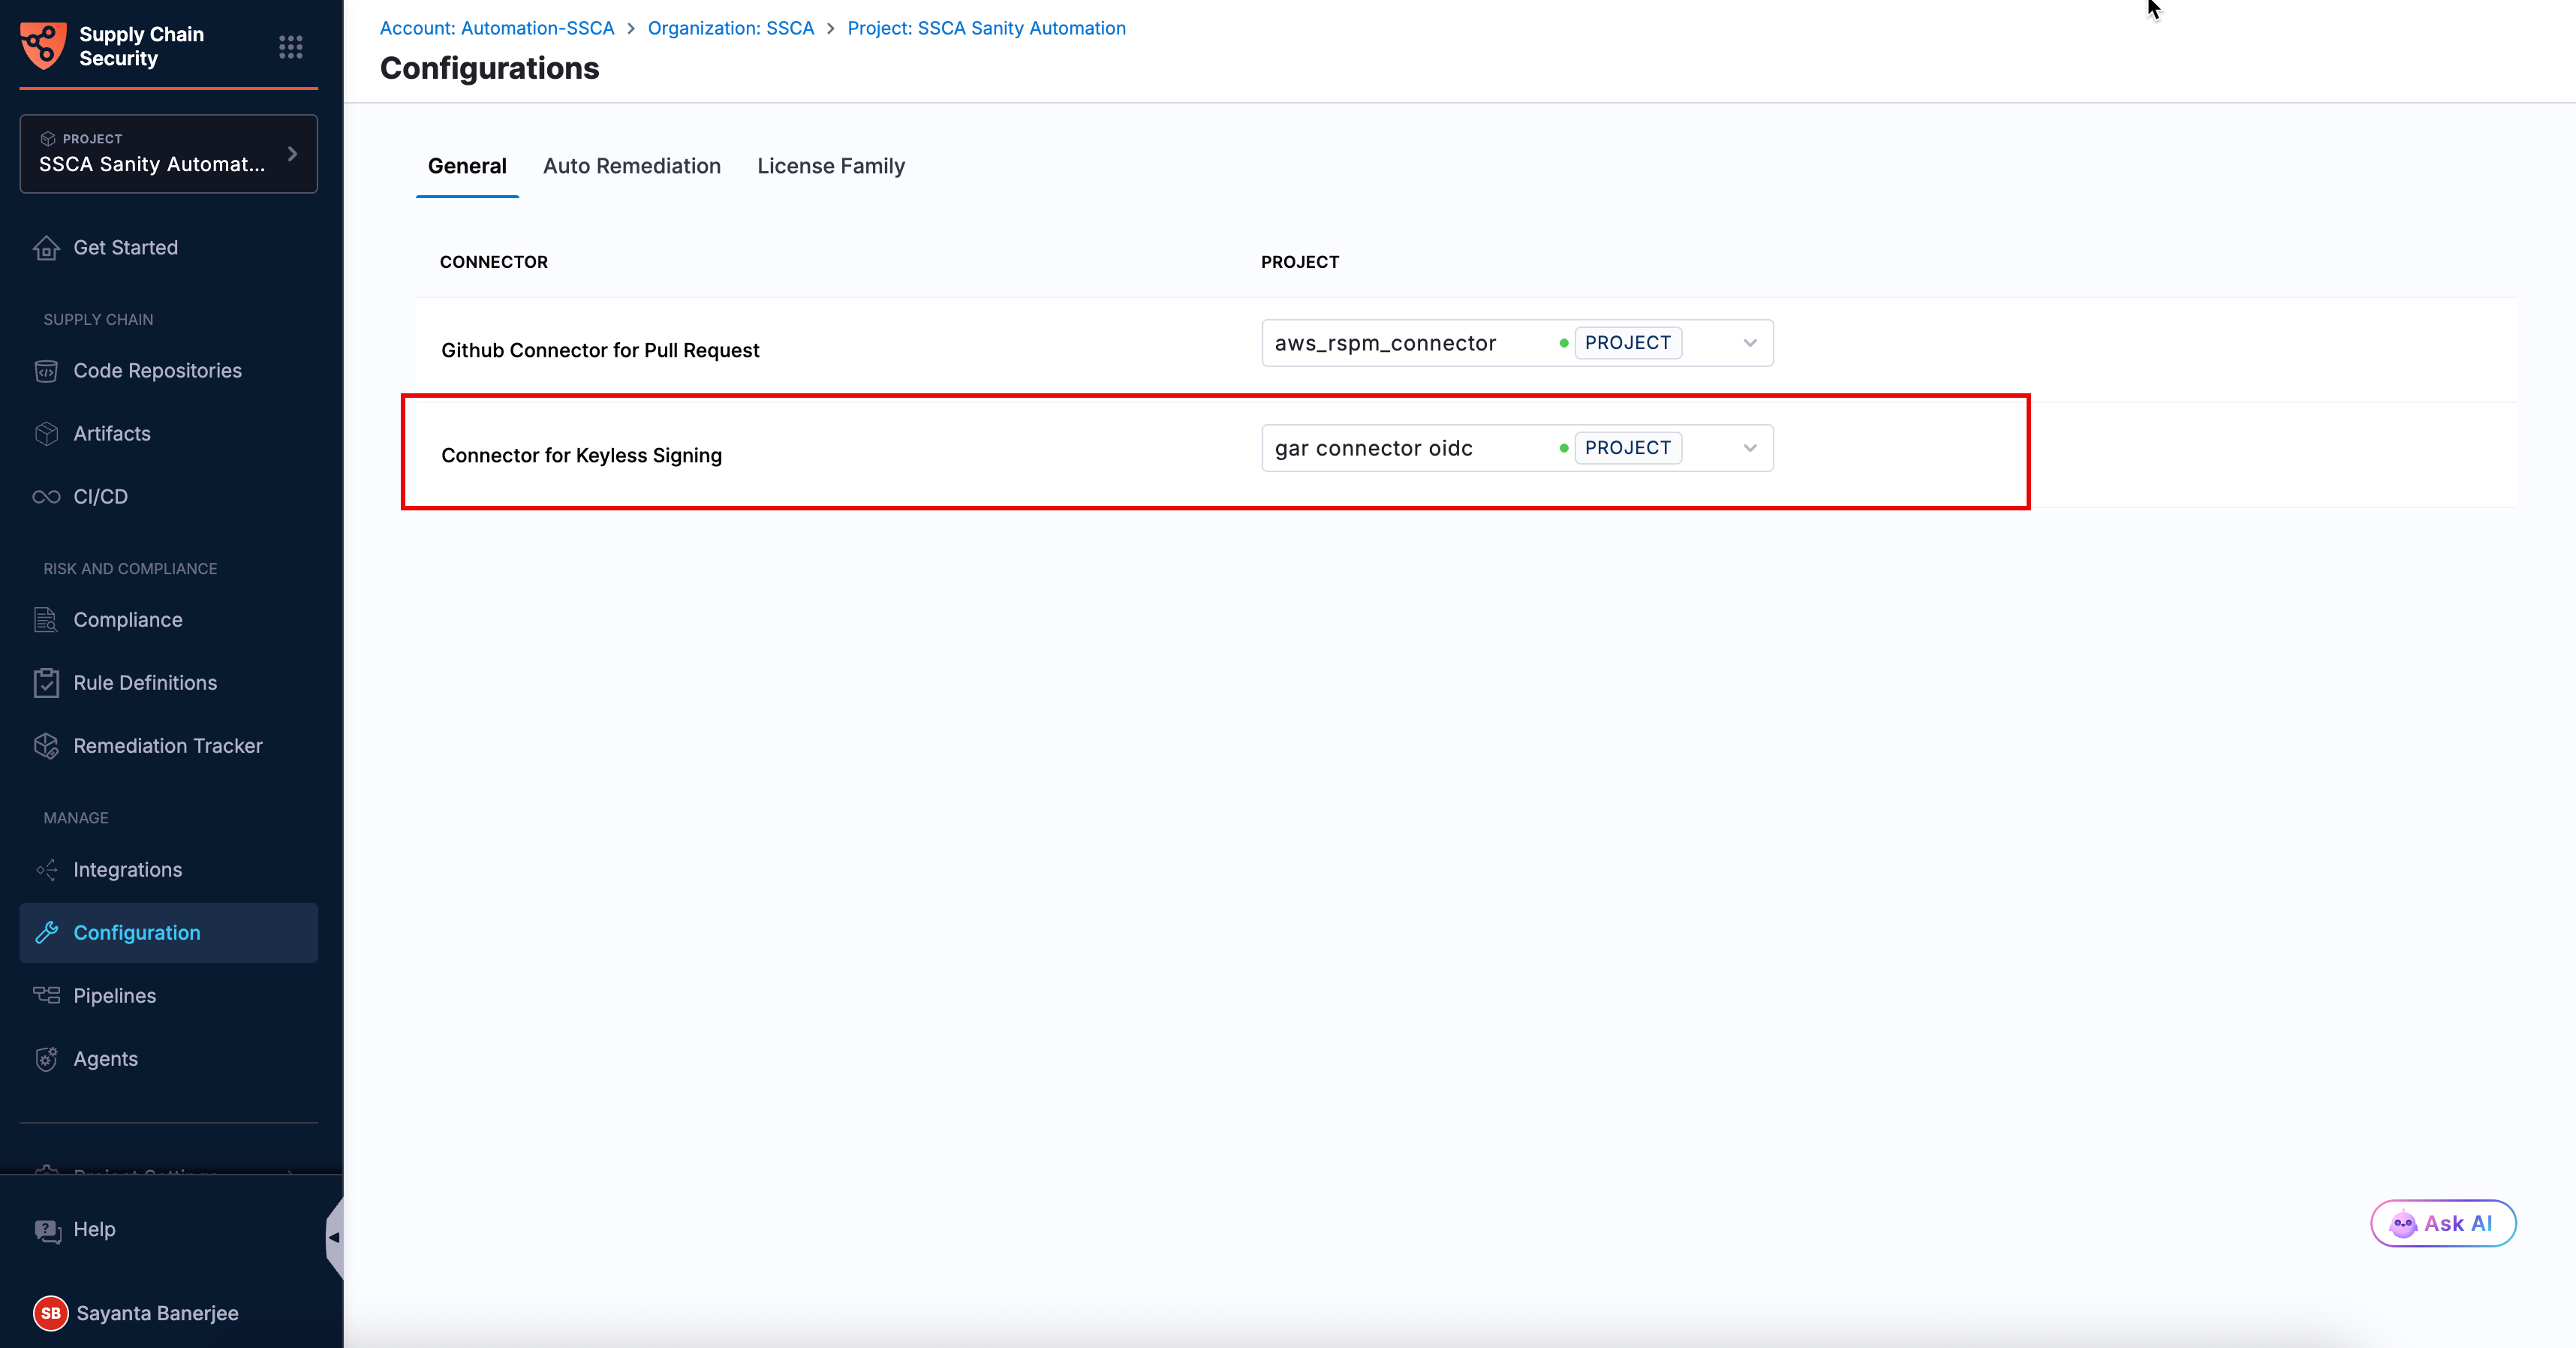
To use a Non-Harness OIDC provider, you need to configure the Connector for Keyless Signing. To configure the Connector:
1. Navigate to the **Configuration** page under the **Manage** section from the sidebar navigation of your SCS account. The **General** tab opens by default.
2. Click `Select Connector` next to `Connector for Keyless Signing` to open the `Create or Select an Existing Connector` dialog.
3. Select your required connector from the list of existing connectors. You can search for your created connector or filter connectors by **Project**, **Organization**, and **Account**.
4. Alternatively, click `+ New Connector` to create a new OIDC connector for your preferred cloud provider. For more information, see [Connectors for Cloud Providers](https://app.gitbook.com/s/3F2TpHXhur2QtQnORSM9/use-harness-platform/connectors/cloud-providers/README).
5. Click `Apply Selected`. Once selected, you can view the **Configuration Saved Successfully** toaster message at the top, indicating that the connector has been selected or created successfully.
Once the connector configuration is done successfully, you can perform attestation using keyless signing with a Non-Harness OIDC provider.
{% endtab %}
{% tab title="Key-based" %}
To perform **Key-based** attestation with **Cosign** selected, you need a key pair. Follow the instructions below to generate the key pair.
Generate key pairs using Cosign for SBOM attestation
* **Private Key**: Input your Private key from the [Harness file secret](/harness-ai/use-harness-platform/secrets/add-file-secrets.md).
* **Password**: Input your Password for the Private key from the [Harness file secret](/harness-ai/use-harness-platform/secrets/add-file-secrets.md).
{% endtab %}
{% tab title="Secret Manager" %}
In this mode, you can pass your **Cosign keys** using a **Secret Manager**. Currently, SCS supports only the **HashiCorp Vault** secret manager. You can connect your Vault with Harness using the [Harness HashiCorp Vault connector](/harness-ai/use-harness-platform/secrets/secrets-management/add-hashicorp-vault.md). Here are the key points to consider when connecting your Vault:
1. **Enable the Transit Secrets Engine** on your HashiCorp Vault. This is essential for key management and cryptographic operations.
2. Configure your HashiCorp Vault connector using the following authentication methods [**AppRole**](/harness-ai/use-harness-platform/secrets/secrets-management/add-hashicorp-vault.md#option-app-role), [**Token**](/harness-ai/use-harness-platform/secrets/secrets-management/add-hashicorp-vault.md#option-token) , [**JWT Auth**](https://developer.harness.io/docs/platform/secrets/secrets-management/add-hashicorp-vault/#option-jwtoidc-auth) or [**Vault Agent**](/harness-ai/use-harness-platform/secrets/secrets-management/add-hashicorp-vault.md#option-vault-agent).
3. Create a Cosign key pair of type `ecdsa-p256`,`rsa-2048`, or `rsa-4096` in the Transit Secrets Engine. You can do this in two ways:
* **CLI**: Run the command:
```bash
vault write -f / type=ecdsa-p256
```
* **Vault UI**: Create the key pair directly from the Vault interface.
4. Ensure the Vault token generated has the [**required policy**](https://docs.sigstore.dev/cosign/key_management/overview/#hashicorp-vault) applied for Cosign to perform attestation operations.
{% hint style="info" %}
Harness Vault Connector now supports fetching keys from Vault subfolder paths. This feature is behind the FF `SSCA_COSIGN_USING_VAULT_V2`. To enable it contact [Harness Support](mailto:support@harness.io), and also ensure to upgrade your Harness delegate version to `25.10.87000` or higher.
{% endhint %}
Configure the following fields in the step to perform the attestation
* **Connector**: Select the HashiCorp Vault connector.
* **Key**: Enter the path to the Transit Secrets Engine in your HashiCorp Vault where the keys are stored.
{% hint style="info" %}
Harness Vault Connector is supported only for Kubernetes and VM infrastructure. Ensure your Harness delegate is on version `25.10.87000` or higher.
{% endhint %}
{% endtab %}
{% endtabs %}
The following example shows what the signed attestation looks like:
```json
{
"payloadType": "application/vnd.in-toto+json",
"payload": "CJTUERYUmVmLVBhY2thZ2UtZGViLXpsaWIxZy1mOTFhODZjZjhhYjJhZTY3XCIsXCJyZWxhdGlvbnNoaXBUeXBlXCI6XCJDT05UQUlOU1wifSx7XCJzcGR4RWxlbWVudE",
"signatures": [
{
"keyid": "dEdLda4DzZYoQgNCgW",
"sig": "MEUCIFoNt/ELa4DzZYoQgNCgW++AaCbYv4eOu0FloUFfAiEA6EJQ31P0ROEbLhDpUhMdMAzkqlBSCMFPDk1cyR1s6h8="
}
]
}
```
Additionally, you can perform Base64 decoding on the payload data to view your SLSA Provenance. Go to [Verify SLSA](/software-supply-chain-assurance/use-scs/artifact-security/slsa/verify-slsa.md) to verify the SLSA attestation.
{% hint style="info" %}
When SBOM and SLSA attestation steps run in parallel, only one attestation layer may be uploaded to the container registry due to a race condition in Cosign.
**Recommended approach:**
* Run the SBOM and SLSA attestation steps **sequential** rather than in parallel way to avoid SLSA verification or SBOM policy enforcement failures.
* Place the SLSA generation step just after the **Docker Build and Push step.**
{% endhint %}
### Run the pipeline
When you run a pipeline with SLSA generation enabled, Harness SCS:
* Generates an SLSA Provenance for the image created by the Build and Push steps in the Build stage.
* Generates and signs an attestation using the provided key and password.
* Stores the SLSA Provenance in Harness and uploads the `.att` file to your container registry alongside the image.
* Access the generated SLSA Provenance directly from the pipeline output, generated under the default `/harness` working directory and available at `/harness/harness/slsa/{slsa_}.json`.
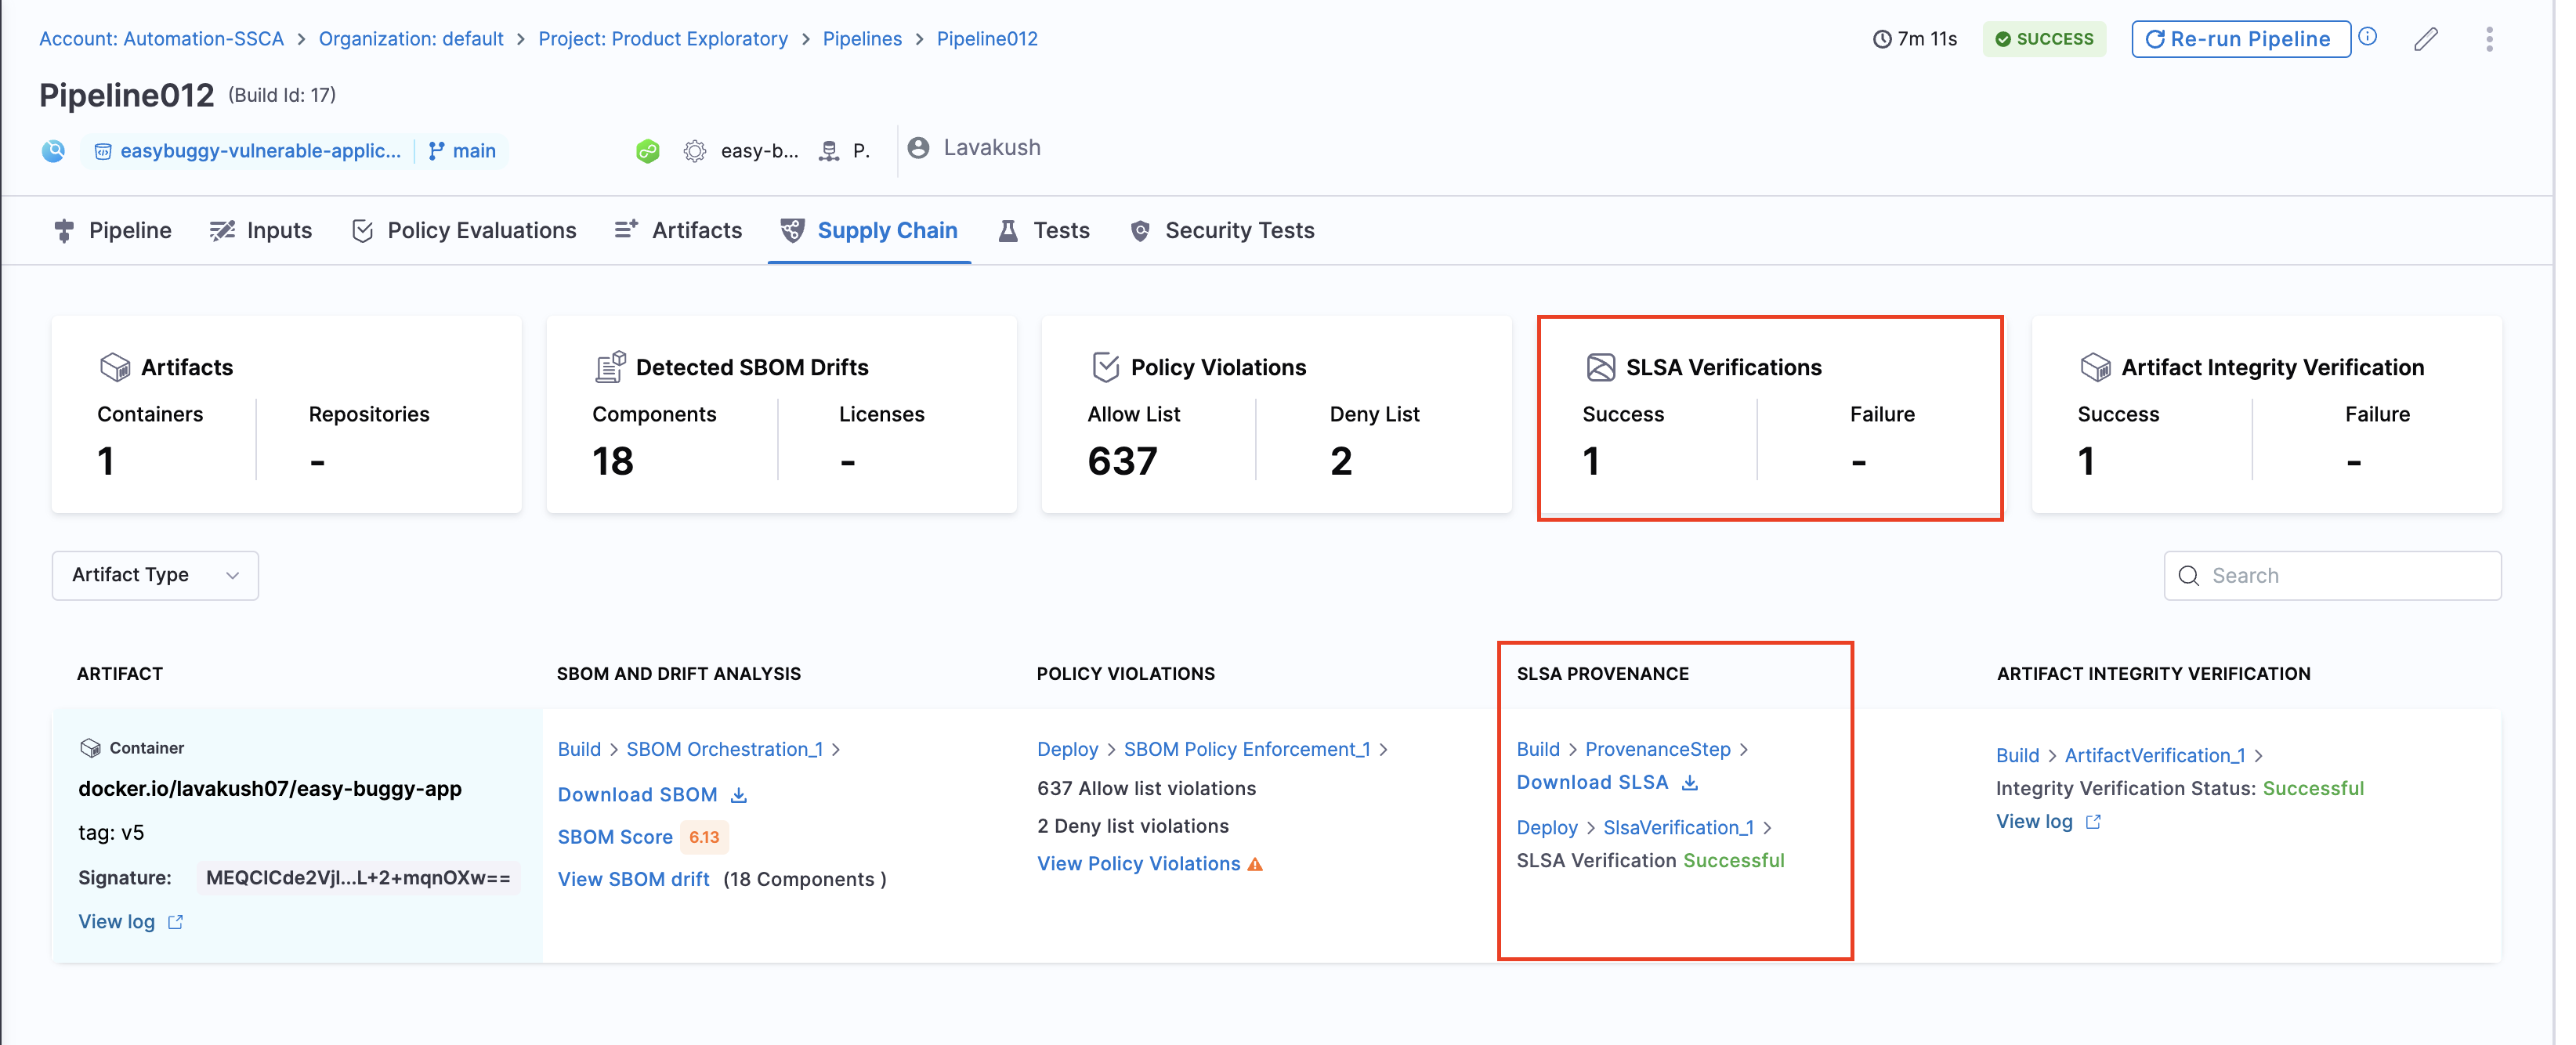
The signed attestation is stored, as a `.att` file, in the artifact repository along with the image. You can also find the SLSA Provenance on the **Supply Chain** tab on the Pipeline Execution details page in Harness.You can download your SLSA provenance and find the status of the **SLSA verification step**. The overview section presents a cumulative count of all Success and failure cases.
### Provenance example
Here is an example of an SLSA Provenance generated by Harness SCS. The information in your SLSA Provenance might vary depending on your build and changes to the provenance structure applied in SCS updates. Identifiers, repo names, and other details in this example are anonymized or truncated.
```json
{
"_type": "https://in-toto.io/Statement/v0.1",
"subject": [
{
"name": "index.docker.io/harness/plugins",
"digest": {
"sha256": "2deed18c31c2bewfab36d121218e2dfdfccafddd7d2llkkl5"
}
}
],
"predicateType": "https://slsa.dev/provenance/v1",
"predicate": {
"buildDefinition": {
"buildType": "https://developer.harness.io/docs/software-supply-chain-assurance/slsa/generate-slsa/",
"externalParameters": {
"codeMetadata": {
"repositoryURL": "https://github.com/nginxinc/docker-nginx",
"branch": "master"
},
"triggerMetadata": {
"triggerType": "MANUAL",
"triggeredBy": "Humanshu Arora"
}
},
"internalParameters": {
"pipelineExecutionId": "UECDFDECEn8PpEfqhQ",
"accountId": "ppbDDDVDSarz_23sd_d_tWT7g",
"pipelineIdentifier": "SLSA_Build_and_Push",
"tool": "harness/slsa-plugin"
}
},
"runDetails": {
"builder": {
"id": "https://developer.harness.io/docs/continuous-integration/use-ci/set-up-build-infrastructure/which-build-infrastructure-is-right-for-me"
},
"metadata": {
"invocationId": "aRrEdsfdfdRwWdfdfdecEnwdg",
"startedOn": "2024-11-26T09:37:18.000Z",
"finishedOn": "2024-11-26T09:37:18.000Z"
}
}
}
}
```
### Verify SLSA Provenance
After generating SLSA Provenance, you can [configure your pipeline to verify SLSA Provenance](/software-supply-chain-assurance/use-scs/artifact-security/slsa/verify-slsa.md).
### Next steps
* [Verify SLSA](/software-supply-chain-assurance/use-scs/artifact-security/slsa/verify-slsa.md): Verify the SLSA attestation and enforce provenance checks in your pipeline.
* [Create SLSA policies](/software-supply-chain-assurance/use-scs/artifact-security/slsa/create-slsa-policies.md): Define the policies that SLSA verification evaluates against.
{% @harness-feedback/feedback %}