> For the complete documentation index, see [llms.txt](https://developer.harness.io/llms.txt). Markdown versions of documentation pages are available by appending `.md` to page URLs; this page is available as [Markdown](https://developer.harness.io/software-supply-chain-assurance/use-scs/artifact-security/slsa/verify-slsa.md).
# Verify SLSA
Verify SLSA Provenance with Harness SCS
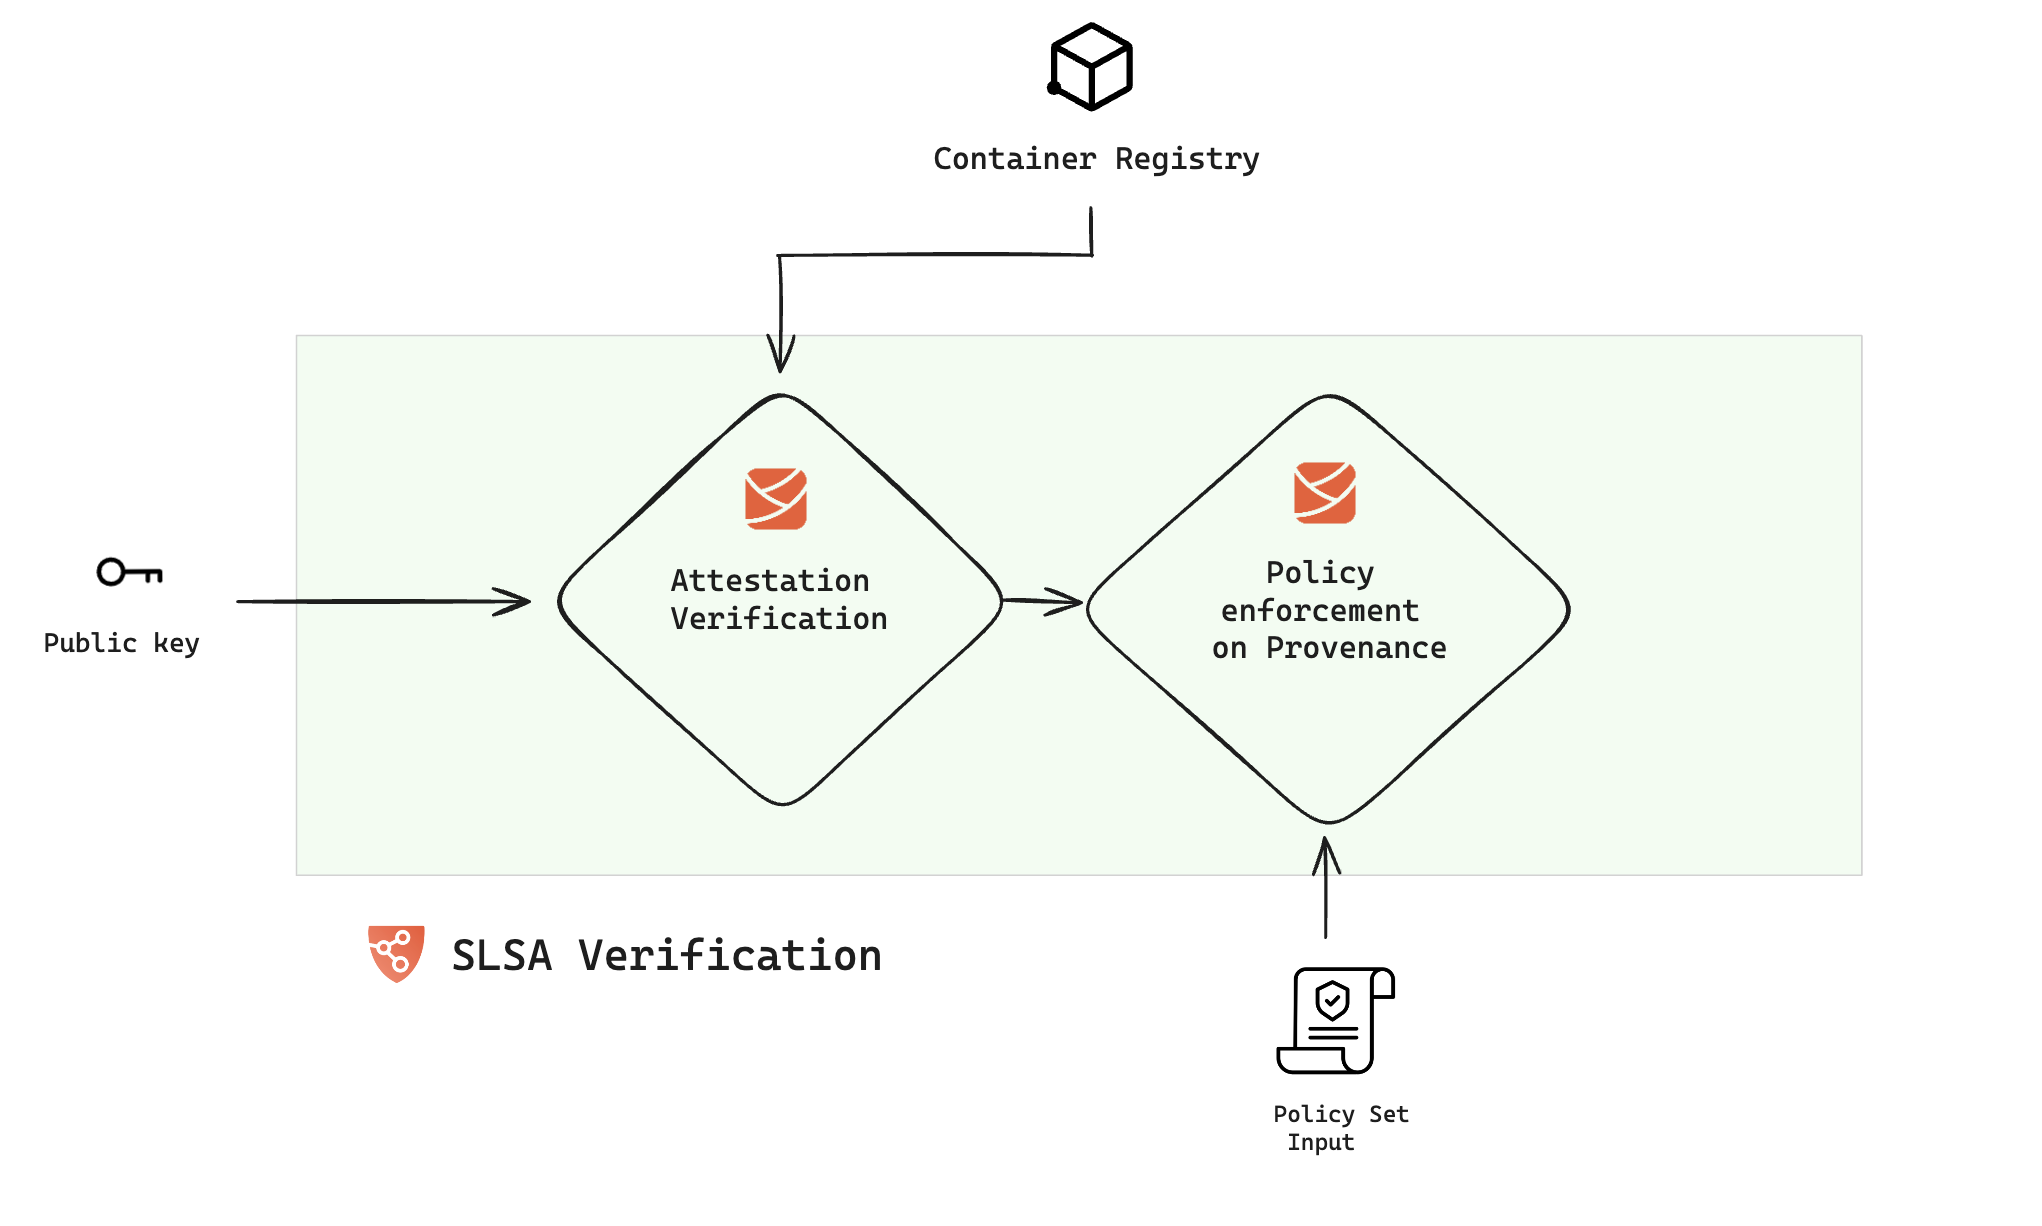
In this document, we will explore how to verify SLSA Provenance attestation and enforce policies to guarantee the provenance contents remain unaltered. Unlike the setup for SLSA provenance generation, the verification process can be conducted in both the Build and Deploy stages of your pipeline. Here is an overview of the procedure:
### Configure the SLSA verification step
In the Harness SCS, the SLSA verification step is responsible for verifying the attested provenance and applying policies. To incorporate this, navigate to either the build or deploy stage of your pipeline and add the "SLSA Verification" step. When adding this to a deploy stage, ensure it is placed within a [container step group](/continuous-delivery/use-continuous-delivery/cd-building-blocks/cd-steps/containerized-steps/containerized-step-groups.md) and you enable the `container based execution`.
#### Container images
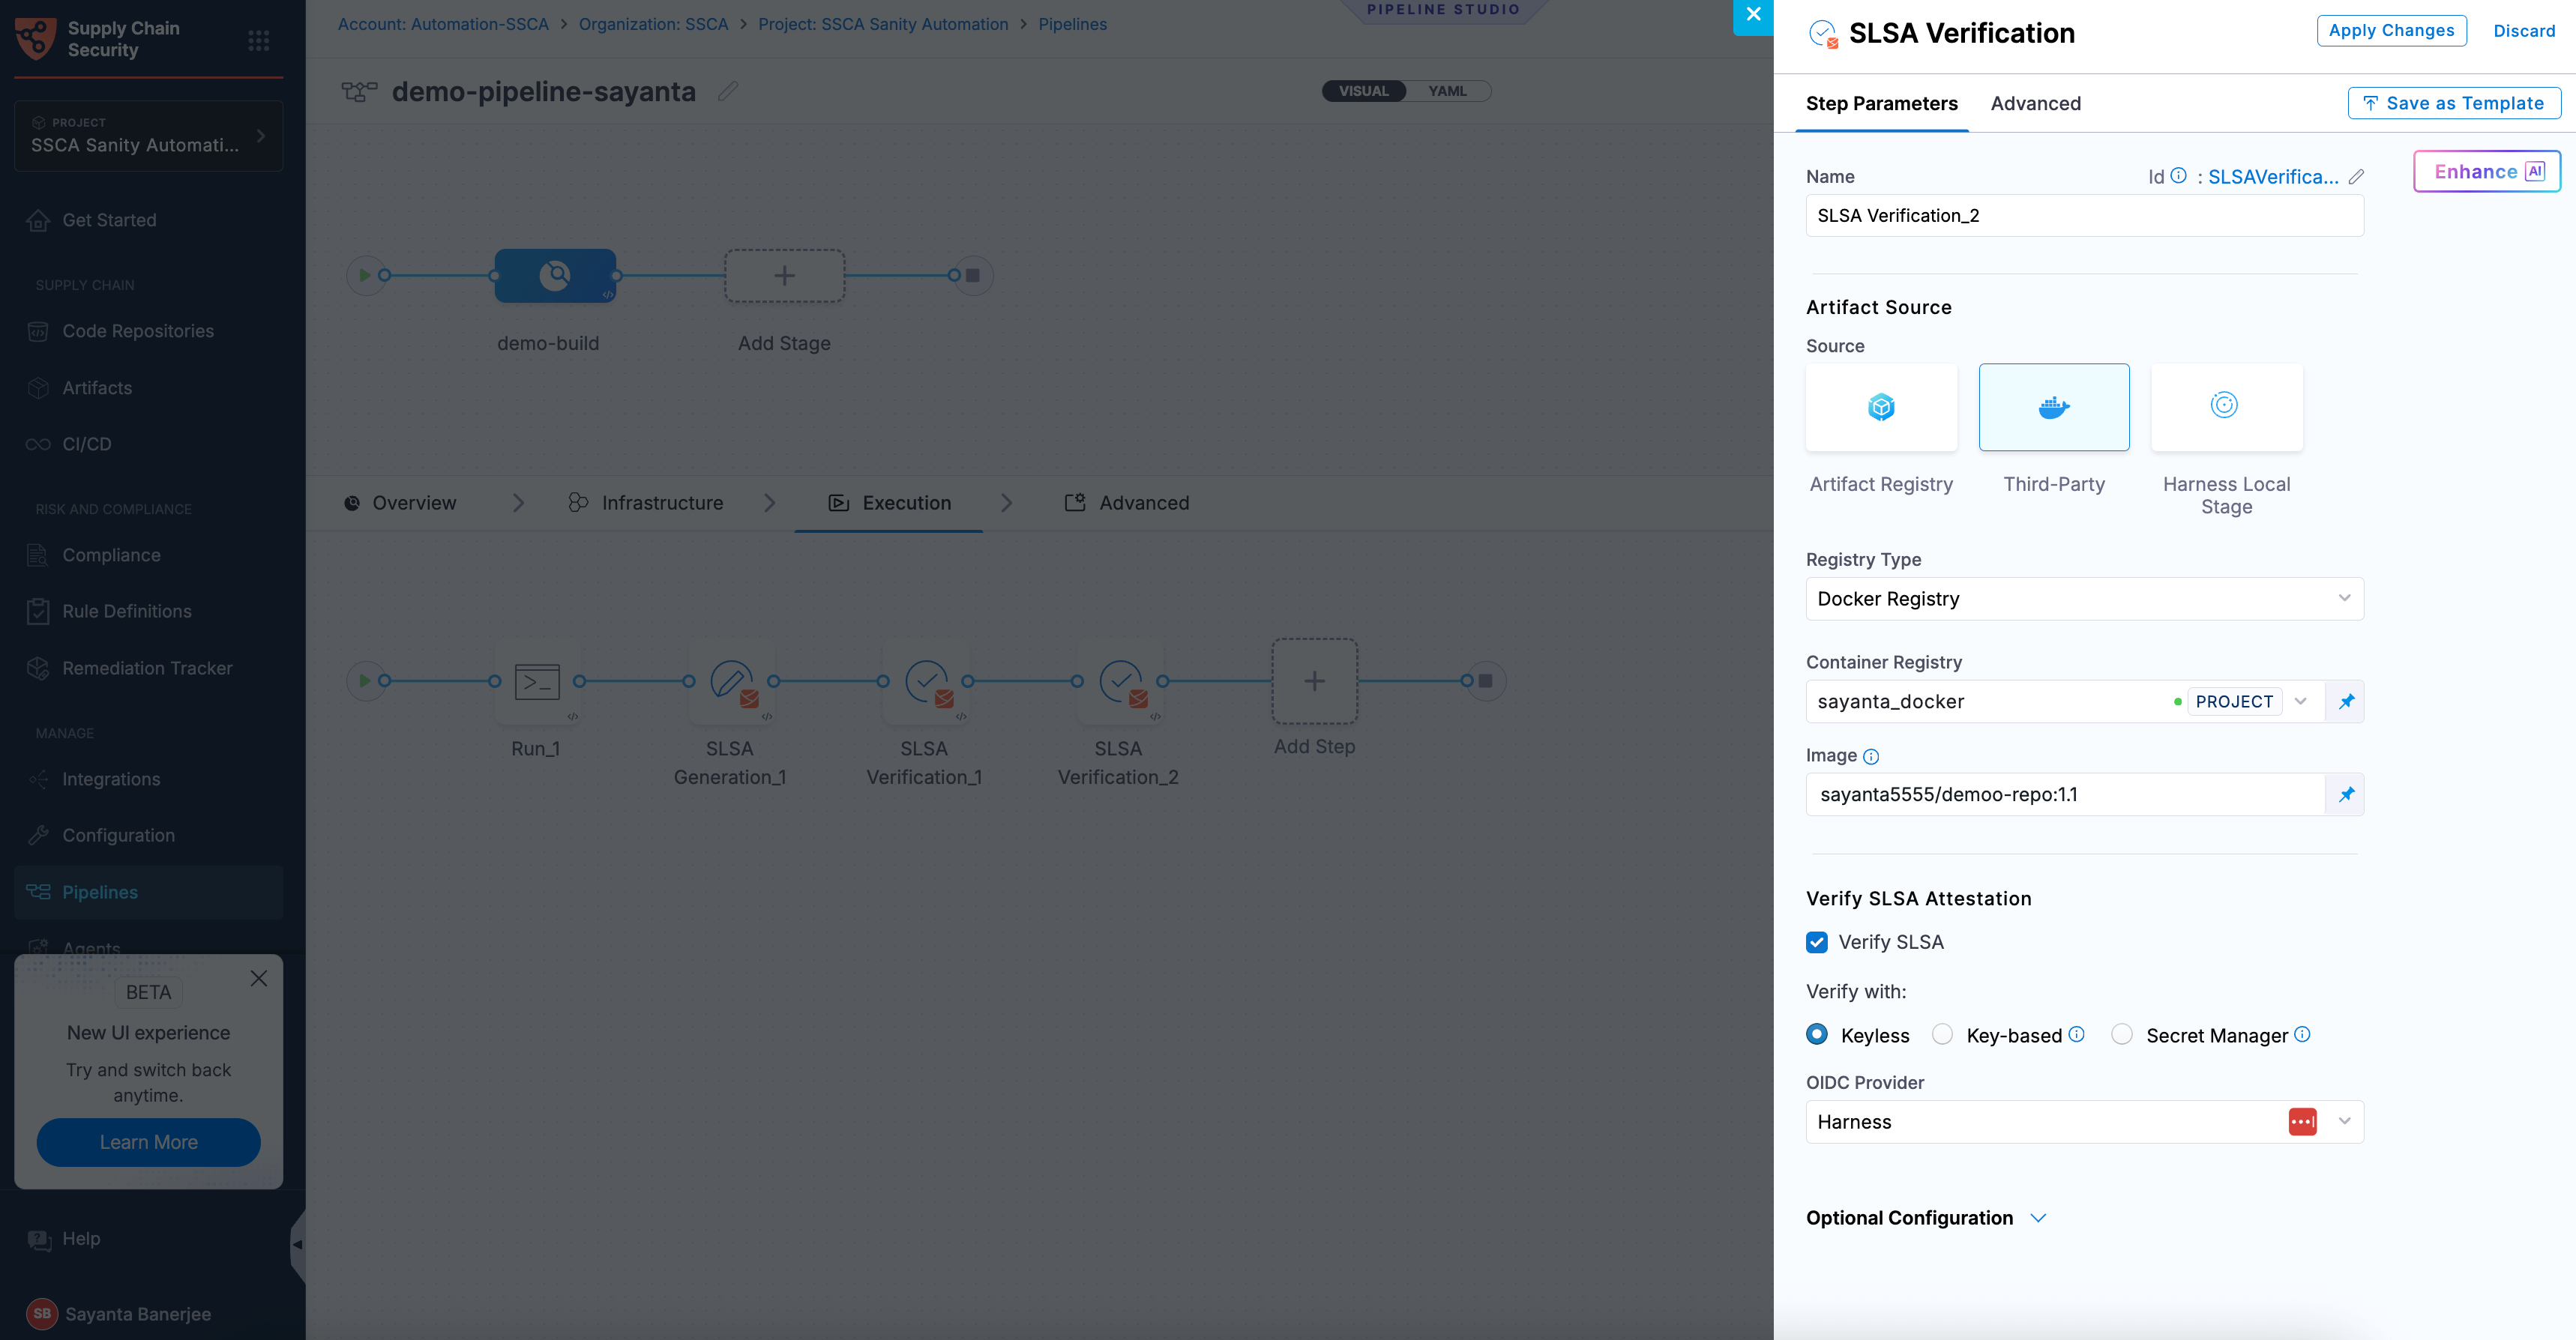
Follow the instructions below to configure the **SLSA Verification** step for container images.
* **Name**: Enter a name for the step.
* **Registry Type**: Choose your registry from the list of supported items.
{% hint style="info" %}
When modifying the existing SLSA steps, you must manually remove the digest from the YAML configuration to ensure compatibility with the updated functionality.
{% endhint %}
{% tabs %}
{% tab title="HAR" %}
* **Registry:** Select the Harness Registry configured for the Harness Artifact Registry where your artifact is stored.
* **Image:** Enter the name of your image with tag or digest, such as `imagename:tag` or `imagename@sha256:`.
{% endtab %}
{% tab title="Docker Registry" %}
* **Container Registry:** Select the [Docker Registry connector](/harness-ai/use-harness-platform/connectors/artifact-repositories/docker-registry-connector-settings-reference.md) that is configured for the DockerHub container registry where the artifact is stored.
* **Image:** Enter the name of your image using a tag or digest, example `my-docker-org/repo-name:tag` or `my-docker-org/repo-name@sha256:`.
{% endtab %}
{% tab title="ECR" %}
* **Container Registry:** Select the [Docker Registry connector](/harness-ai/use-harness-platform/connectors/artifact-repositories/docker-registry-connector-settings-reference.md) that is configured for the Elastic container registry where the artifact is stored.
* **Image:** Enter the name of your image, example `my-docker-repo/my-artifact` or `my-docker-repo/my-artifact@sha256:`.
* **Region:** The geographical location of your ECR repository, example `us-east-1`.
* **Account ID:** The unique identifier associated with your AWS account.
{% endtab %}
{% tab title="GAR" %}
* **Container Registry:** Select the [Docker Registry connector](/harness-ai/use-harness-platform/connectors/artifact-repositories/docker-registry-connector-settings-reference.md) that is configured for the Google container registry where the artifact is stored.
* **Host:** Enter your GAR Host name. The Host name is regional-based. For example, `us-east1-docker.pkg.dev`.
* **Project ID:** Enter the unique identifier of your Google Cloud Project. The Project-ID is a distinctive string that identifies your project across Google Cloud services. Example: `my-gcp-project`.
* **Image Name:** Enter the name of your image with tag oe digest, example `repository-name/image:tag` or `repository-name@sha256:`.
{% endtab %}
{% tab title="ACR" %}
* **Container Registry:** Select the [Docker Registry connector](/harness-ai/use-harness-platform/connectors/artifact-repositories/docker-registry-connector-settings-reference.md) that is configured for the Azure container registry where the artifact is stored.
* **Image:** Enter your image details in the format `/`. The `` is a fully qualified name of your Azure Container Registry. It typically follows the format `.azurecr.io`, where `` is the name you have given to your container registry instance in Azure. Example: `automate.azurecr.io/:tag` or you can use digest `automate.azurecr.io/@sha256:`
* **Subscription Id:** Enter the unique identifier that is associated with your Azure subscription.
{% endtab %}
{% endtabs %}
#### Non-container artifacts
SLSA verification supports both container images and non-container artifacts. Non-container artifacts are files or packages that are not packaged as container images, such as binaries, manifests, or archives. They are identified using their digest (SHA). This digest is used to match the artifact with its corresponding provenance during verification.
Ensure that the artifact and its digest are generated earlier in the pipeline, typically via a [Run step](/continuous-integration/use-harness-ci/use-harness-ci/run-step-settings.md#add-the-run-step), and that SLSA provenance is already available. Use the same artifact reference in the SLSA Verification step.
To verify SLSA Provenance for Non-Container Artifacts:
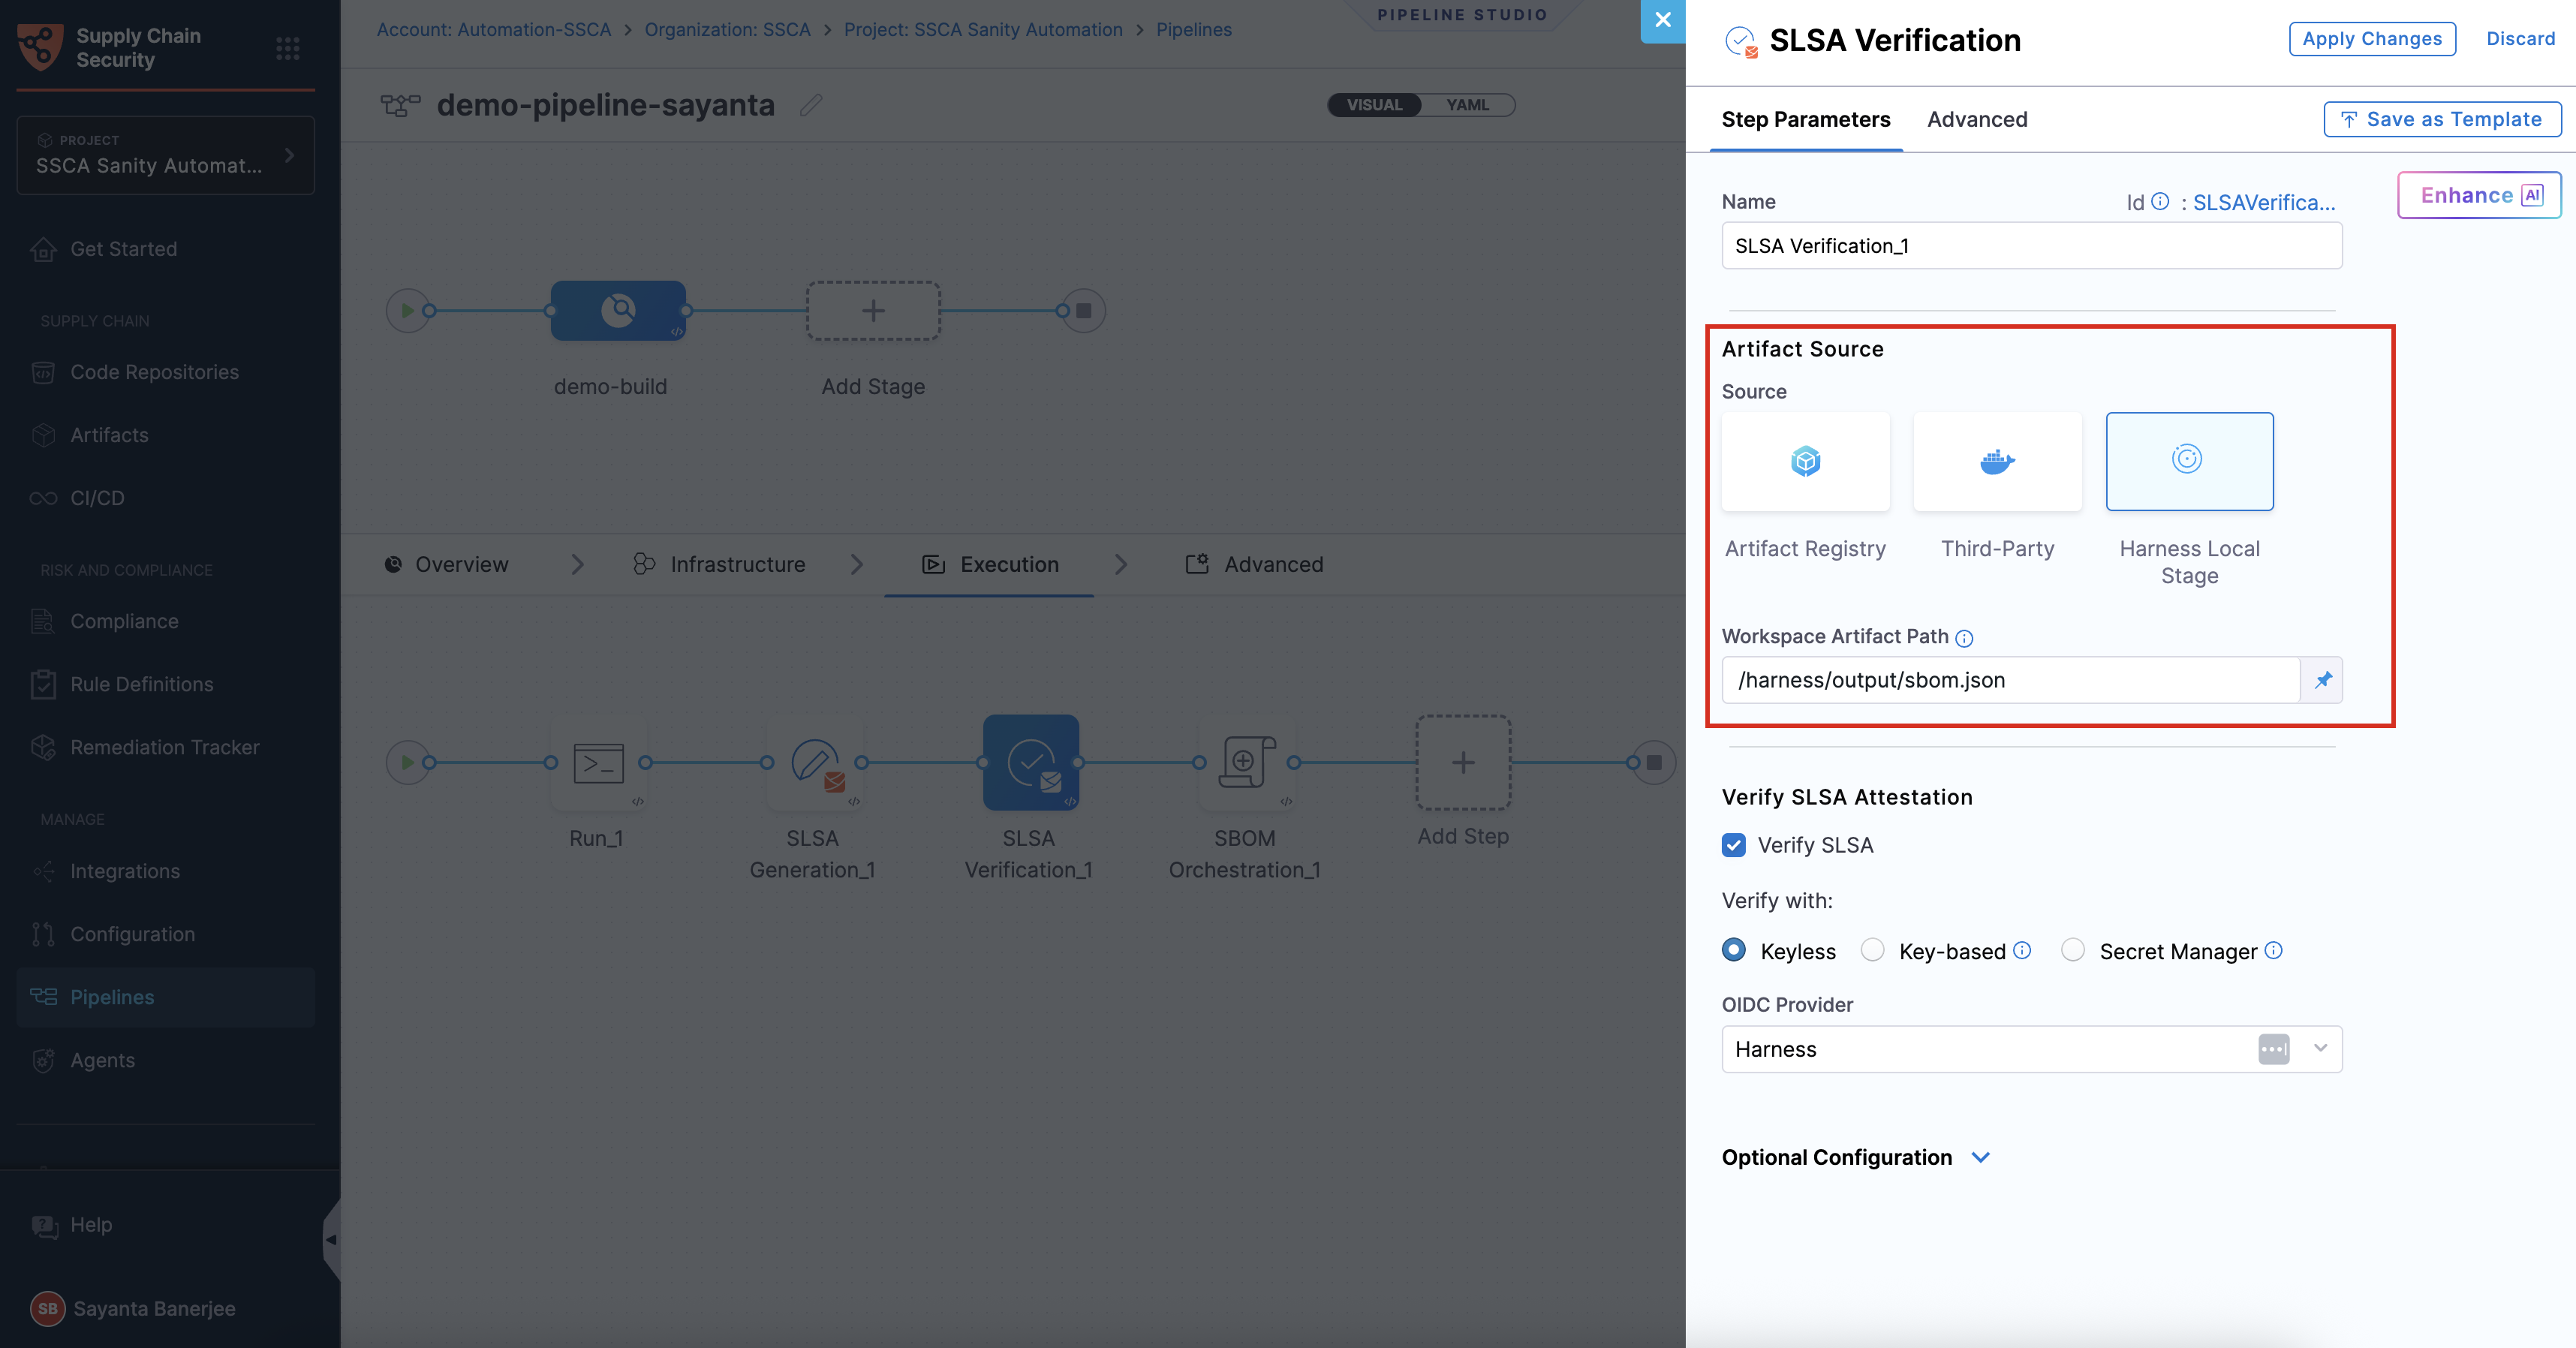
1. Enter a **Name** for the step under `Name`. Harness automatically generates a step ID from the name. Once the pipeline is created, you cannot change the ID.
2. Select **Harness Local Stage** as the **Source**.
3. Specify the same workspace artifact path that was used during the SLSA Generation step under `Workspace Artifact Path`. This path must point to the exact location of the artifact within the workspace so that it can be matched with its provenance during verification. The default workspace path is `/harness`.
Click to view full size image
#### Verify SLSA attestation
Verification is the process of validating a provenance attestation to ensure its authenticity and integrity. It confirms that the attestation was signed by a trusted source, has not been tampered with, and corresponds to the expected artifact. In the SLSA Verification step, SLSA attestation verification ensures that only trusted, compliant artifacts are allowed to proceed in the pipeline. Go to [attestation and verification](/software-supply-chain-assurance/new-to-scs/key-concepts.md#attestation-and-verification) to understand the verification process.
You can perform verification using Cosign with the following verification methods:
* **Keyless** - Uses short-lived, automatically generated keys based on identity to verify SLSA provenance without storing private keys.
* **Key-based** - Uses a user-managed private and public key pair to verify SLSA provenance, requiring secure key storage and handling.
* **Secret Manager** - A secure service used to store, manage, and access sensitive data such as cryptographic keys without exposing them directly in pipelines.
Based on the verification type you select, click the tab below and specify the configurations for the SLSA Verification step to perform the verification.
{% tabs %}
{% tab title="Keyless" %}
Keyless verification using Cosign allows you to verify the authenticity and integrity of SLSA provenance without requiring access to a private signing key. During verification, Cosign uses the certificate and signature stored in the attestation bundle to validate that the provenance was signed by a trusted identity and has not been tampered with. It checks the certificate chain against trusted root certificates, verifies the signature using the public key embedded in the certificate, and ensures that the certificate was valid at the time of signing.
{% hint style="info" %}
In air-gapped environments, transparency log (Tlog) checks are skipped. The transparency log records signing events in a tamper-evident log, enabling independent verification. By default, the [airgap setting](/software-supply-chain-assurance/troubleshooting-and-resources/settings-1/default-settings.md) is enabled, which prevents attestations from being pushed to the Rekor transparency log.
{% endhint %}
To configure SLSA verification with Keyless verification using cosign, complete the following steps:
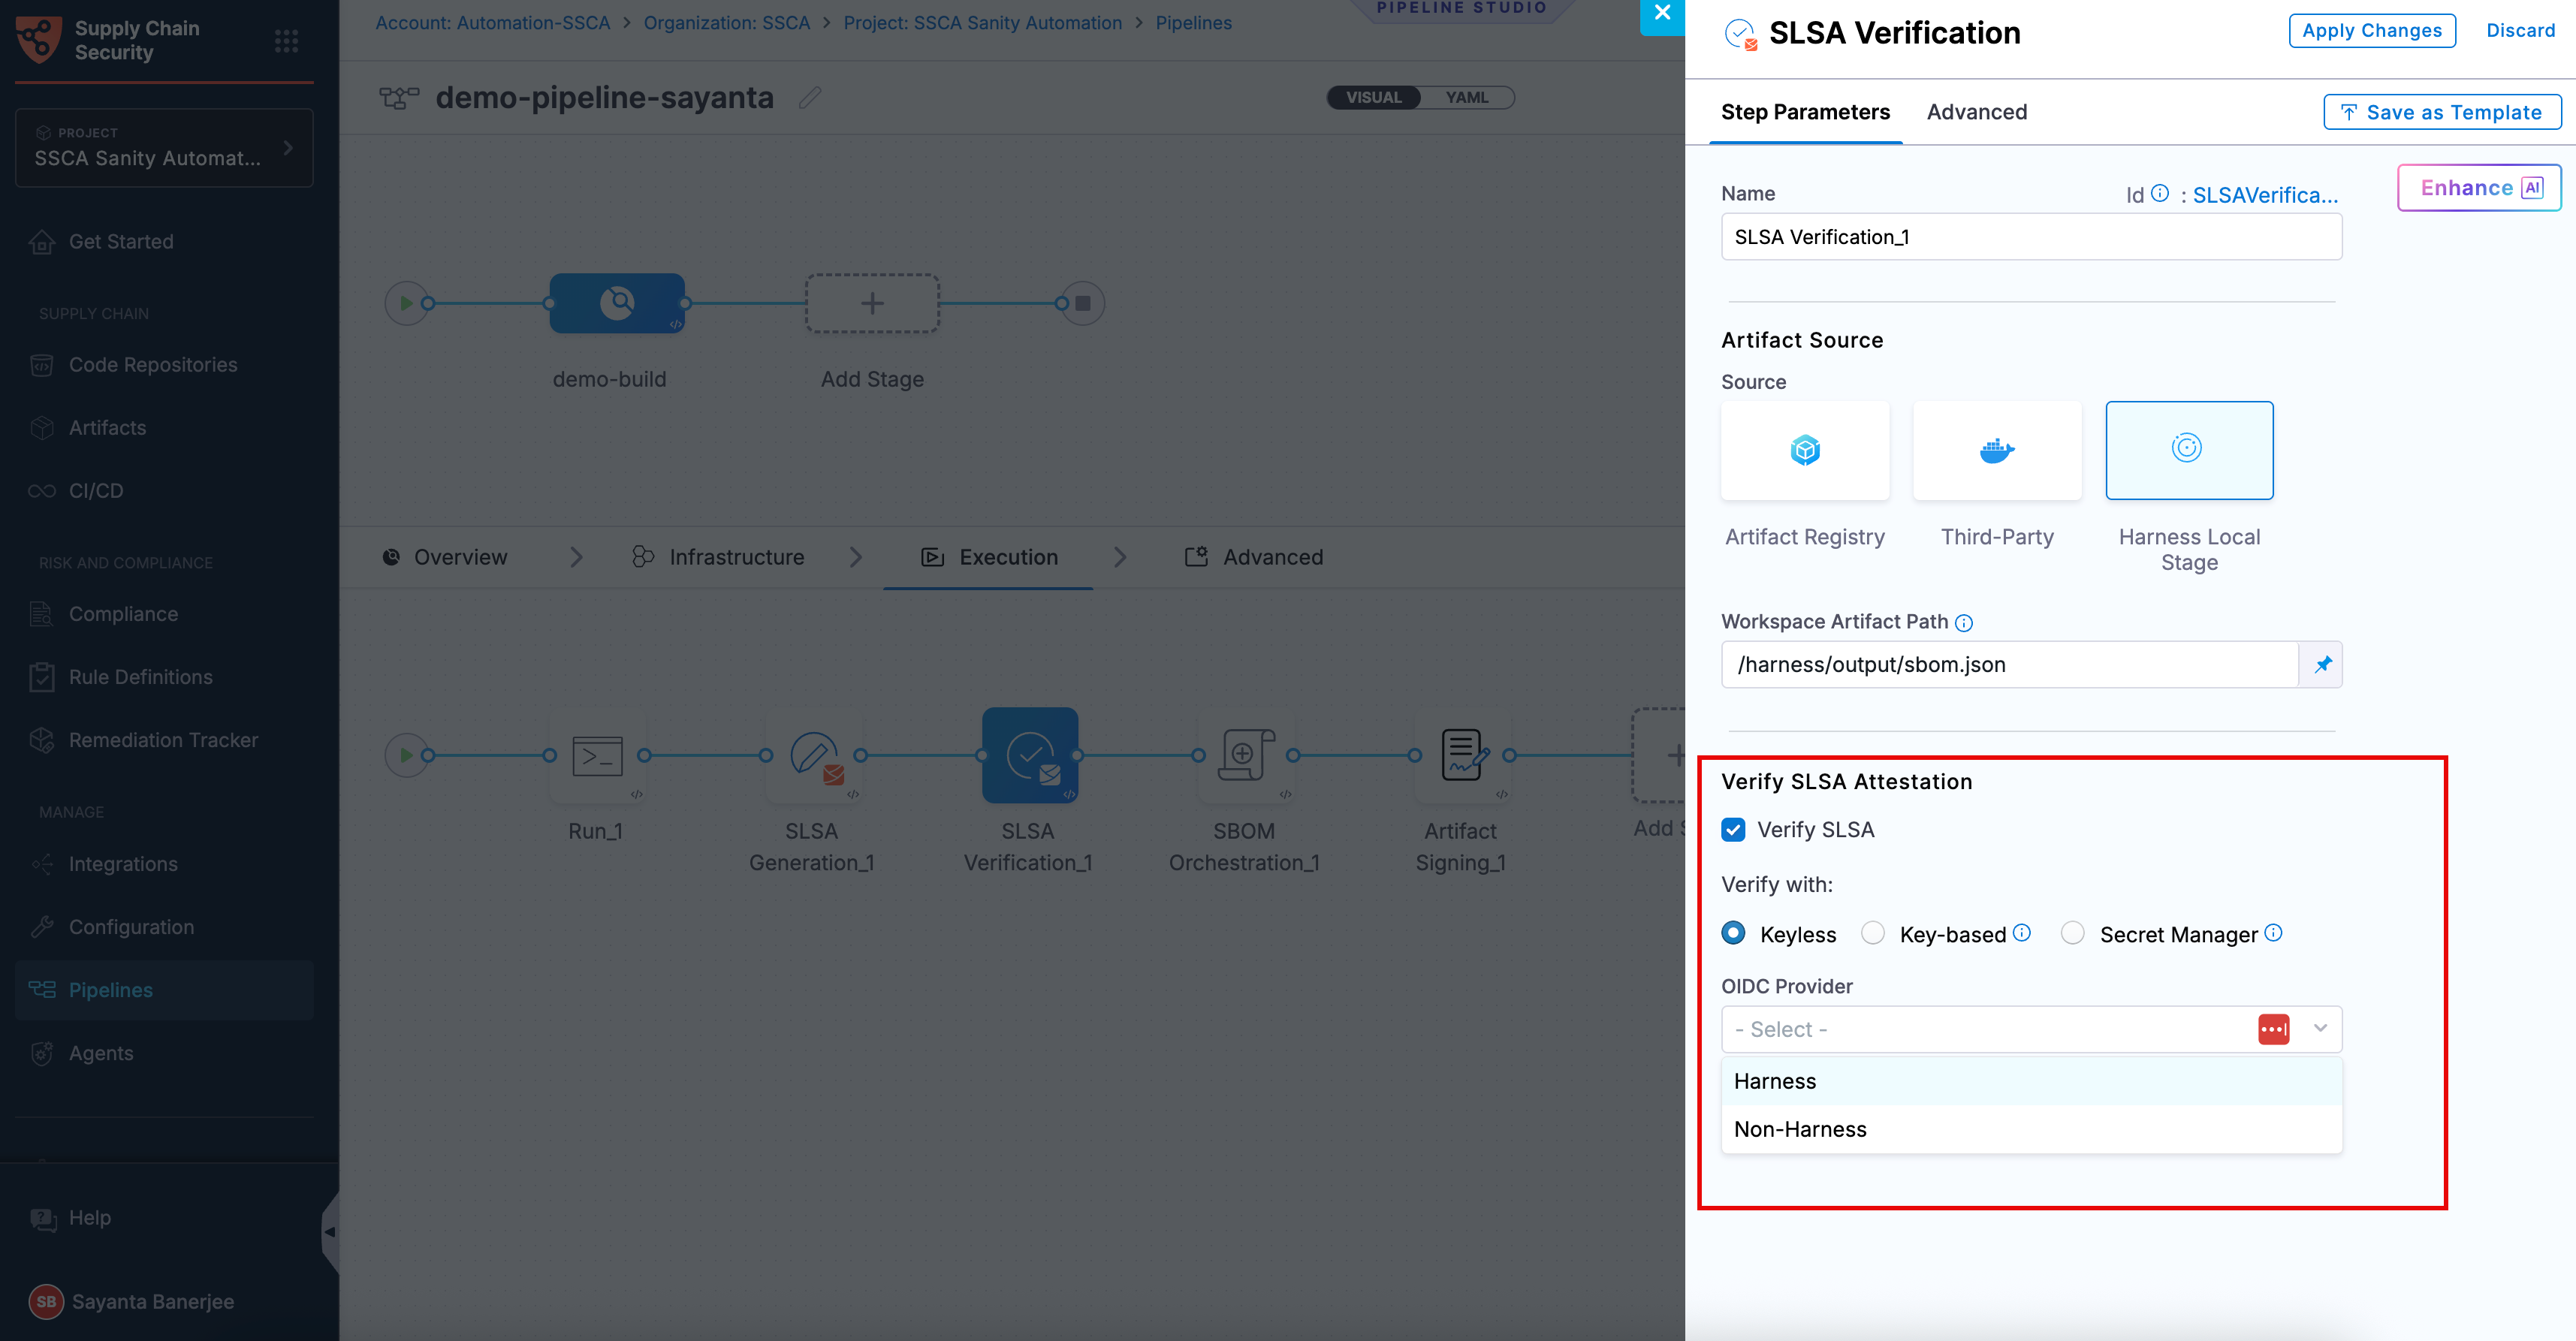
1. Click the checkbox beside `Verify SLSA` to enable SLSA verification. The radio button beside `Keyless` will be selected by default.
2. Select your preferred OIDC Provider from the dropdown under `OIDC Provider`. The available options are:
* [Harness](/software-supply-chain-assurance/use-scs/artifact-security/slsa/verify-slsa.md#harness-oidc)
* [Non-Harness](/software-supply-chain-assurance/use-scs/artifact-security/slsa/verify-slsa.md#non-harness-oidc)
{% hint style="info" %}
This verification method is not supported for SMP at the moment.
{% endhint %}
**Harness OIDC**
Harness OIDC allows you to use the pipeline’s built-in identity for keyless verification. In this approach, Harness acts as the OIDC provider and automatically generates an OIDC token during pipeline execution, which Cosign uses to validate the attestation without requiring access to a private key.
The verification process uses the certificate and signature from the attestation bundle along with the identity provided through the OIDC token to confirm that the provenance was signed by a trusted source, has not been tampered with, and corresponds to the expected artifact. No additional configuration is required when using Harness as the OIDC provider.
**Non-Harness OIDC**
Non-Harness OIDC allows you to use an external identity provider for keyless verification. In this approach, the OIDC token is retrieved during pipeline execution from a configured connector, such as AWS, Azure, or GCP. This token is then used by Cosign to validate the attestation against the identity issued by the external provider.
The verification process ensures that the provenance was signed by a trusted identity, the certificate chain is valid, and the signature matches the artifact. To use a Non-Harness OIDC provider for verification, you must configure the OIDC connector for Keyless Signing. For setup instructions, see the [Non-Harness OIDC](/software-supply-chain-assurance/use-scs/artifact-security/slsa/generate-slsa.md#non-harness-oidc) section in the [Generate SLSA](/software-supply-chain-assurance/use-scs/artifact-security/slsa/generate-slsa.md) documentation.
{% endtab %}
{% tab title="Key-based" %}
To perform the attestation verification with Cosign selected, you need to pass the key from the Harness Secret Manager
* **Public Key**: Input your Public key from the [Harness file secret](/harness-ai/use-harness-platform/secrets/add-file-secrets.md).
{% endtab %}
{% tab title="Secret Manager" %}
If you used **HashiCorp Vault** as your Secret Manager for attestation, you can also use it for verifying the attestation.
* **Connector**: Select the same HashiCorp Vault connector that was used during the attestation process.
* **Key**: Enter the path to the Transit Secrets Engine in your HashiCorp Vault where your **public key** is stored. This should be the same path used for the attestation process. Note that **HashiCorp Vault** does not allow viewing the private key directly.
{% endtab %}
{% endtabs %}
### Enforce policies on SLSA Provenance
Immediately following the verification of the provenance attestation, you have the option to configure the step to enforce policies on the provenance. This ensures that the contents of the provenance remain unchanged and have not been tampered with.
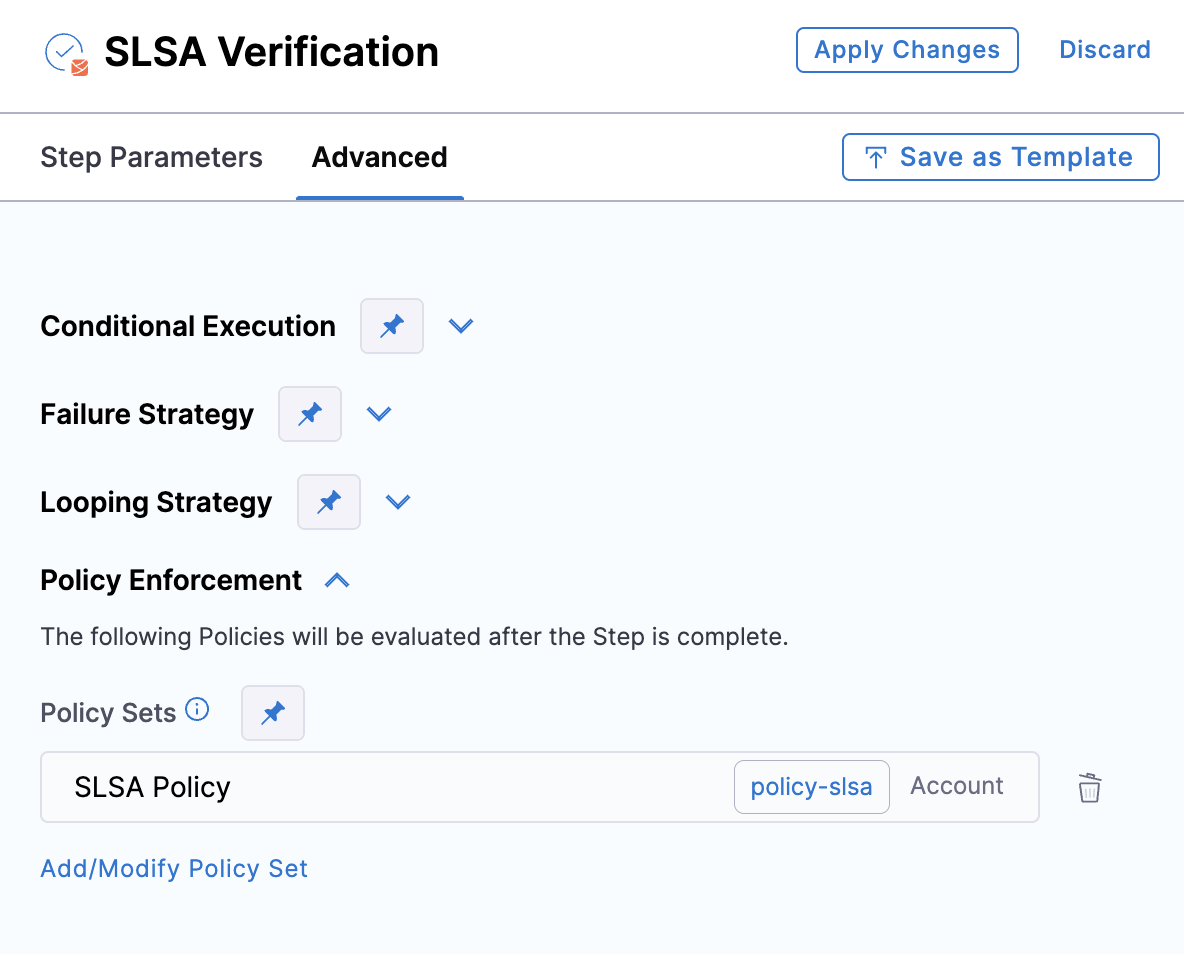
To enforce policies, navigate to the Advanced tab of the **SLSA Verification** step, expand the **Policy Enforcement** section, and specify the policy sets you wish to enforce.
### Run the pipeline
When the pipeline runs, the **SLSA Verification** step does the following:
* Verifies the authenticity of the attestation.
* Verifies the provenance data by applying the specified policy set.
* Records the policy evaluation results in the step's logs.
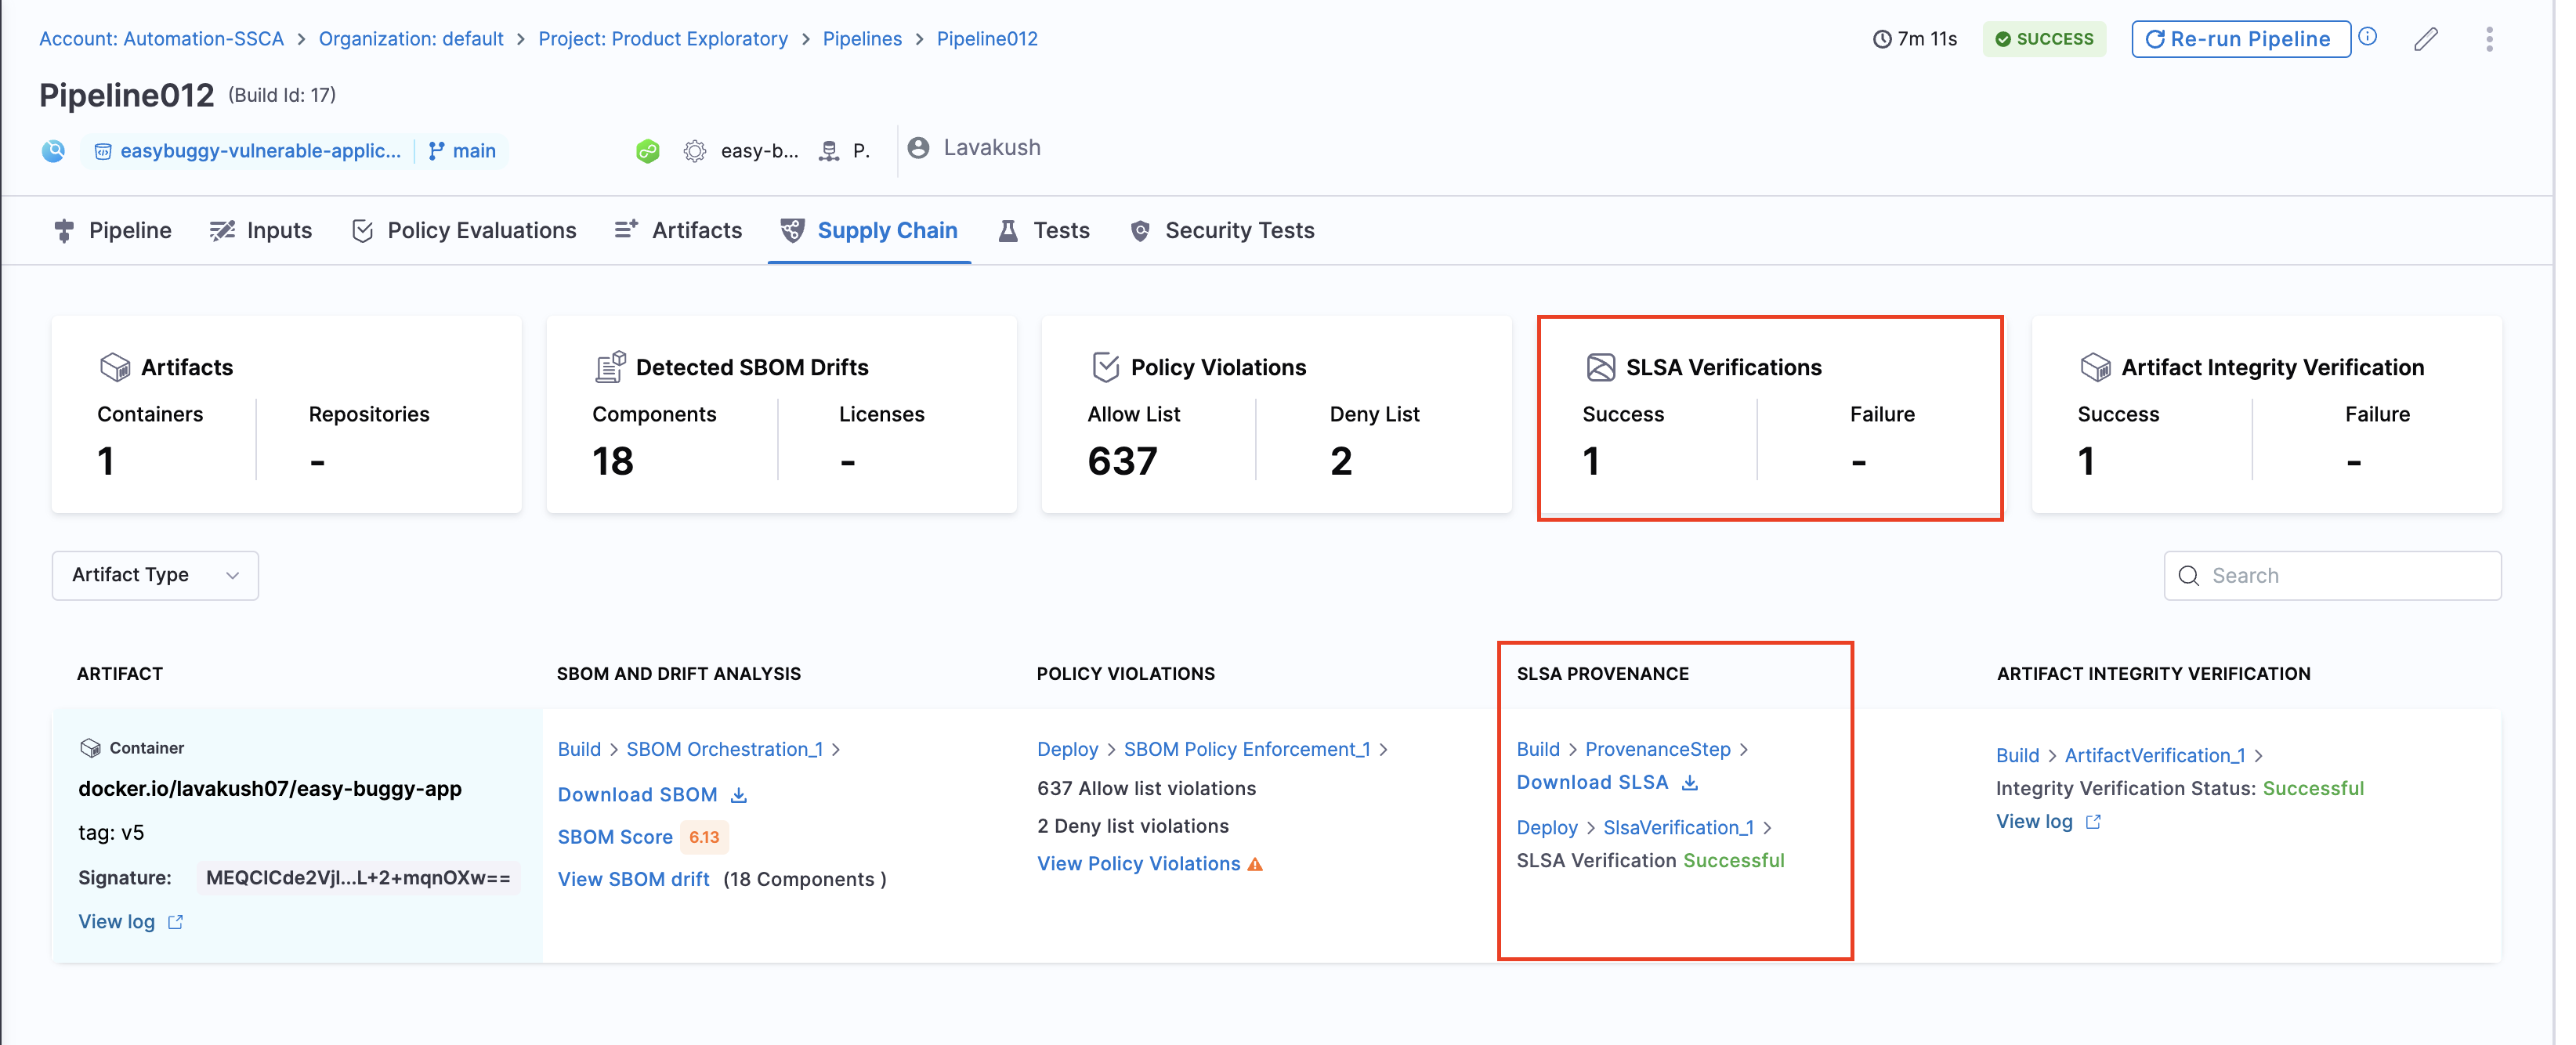
* Reports the overall pass/fail for SLSA verification on the **Supply Chain** tab.
You can view SLSA provenance and verification results in the Supply Chain tab of the pipeline execution details.
### Verify provenance from third-party build systems
You can use Harness SCS to verify provenance generated by third-party build systems.
To do this:
1. Get the public key.
2. [Create SLSA policies](#create-slsa-policies) that verify the provenance data according to the provenance structure used by in the build system provider.
3. [Add SLSA Verification step](#verify-slsa-attestation).
{% @harness-feedback/feedback %}