> For the complete documentation index, see [llms.txt](https://developer.harness.io/llms.txt). Markdown versions of documentation pages are available by appending `.md` to page URLs; this page is available as [Markdown](https://developer.harness.io/software-supply-chain-assurance/use-scs/open-source-management/generate-sbom-for-repositories.md).

# Generate SBOM for Repositories

A Software Bill of Materials (SBOM) is a comprehensive list of all components, libraries, and dependencies used in a software application. The **SBOM Orchestration** step in Harness Software Supply Chain (SCS) allows you to generate SBOMs for both code repositories and [software artifacts](/software-supply-chain-assurance/use-scs/open-source-management/generate-sbom-for-artifacts.md), providing visibility into the components that make up your software.

If you already possess an SBOM and wish to ingest it, go to the [Ingest SBOM](/software-supply-chain-assurance/use-scs/open-source-management/ingest-sbom-data.md) section.

{% hint style="info" %}
In the SBOM, dependency names may differ from their original source names, as SBOM tools sometimes list dependencies under a product or bundle name rather than the actual dependency name.
{% endhint %}

### SBOM Orchestration step configuration <a href="#sbom-orchestration-step-configuration" id="sbom-orchestration-step-configuration"></a>

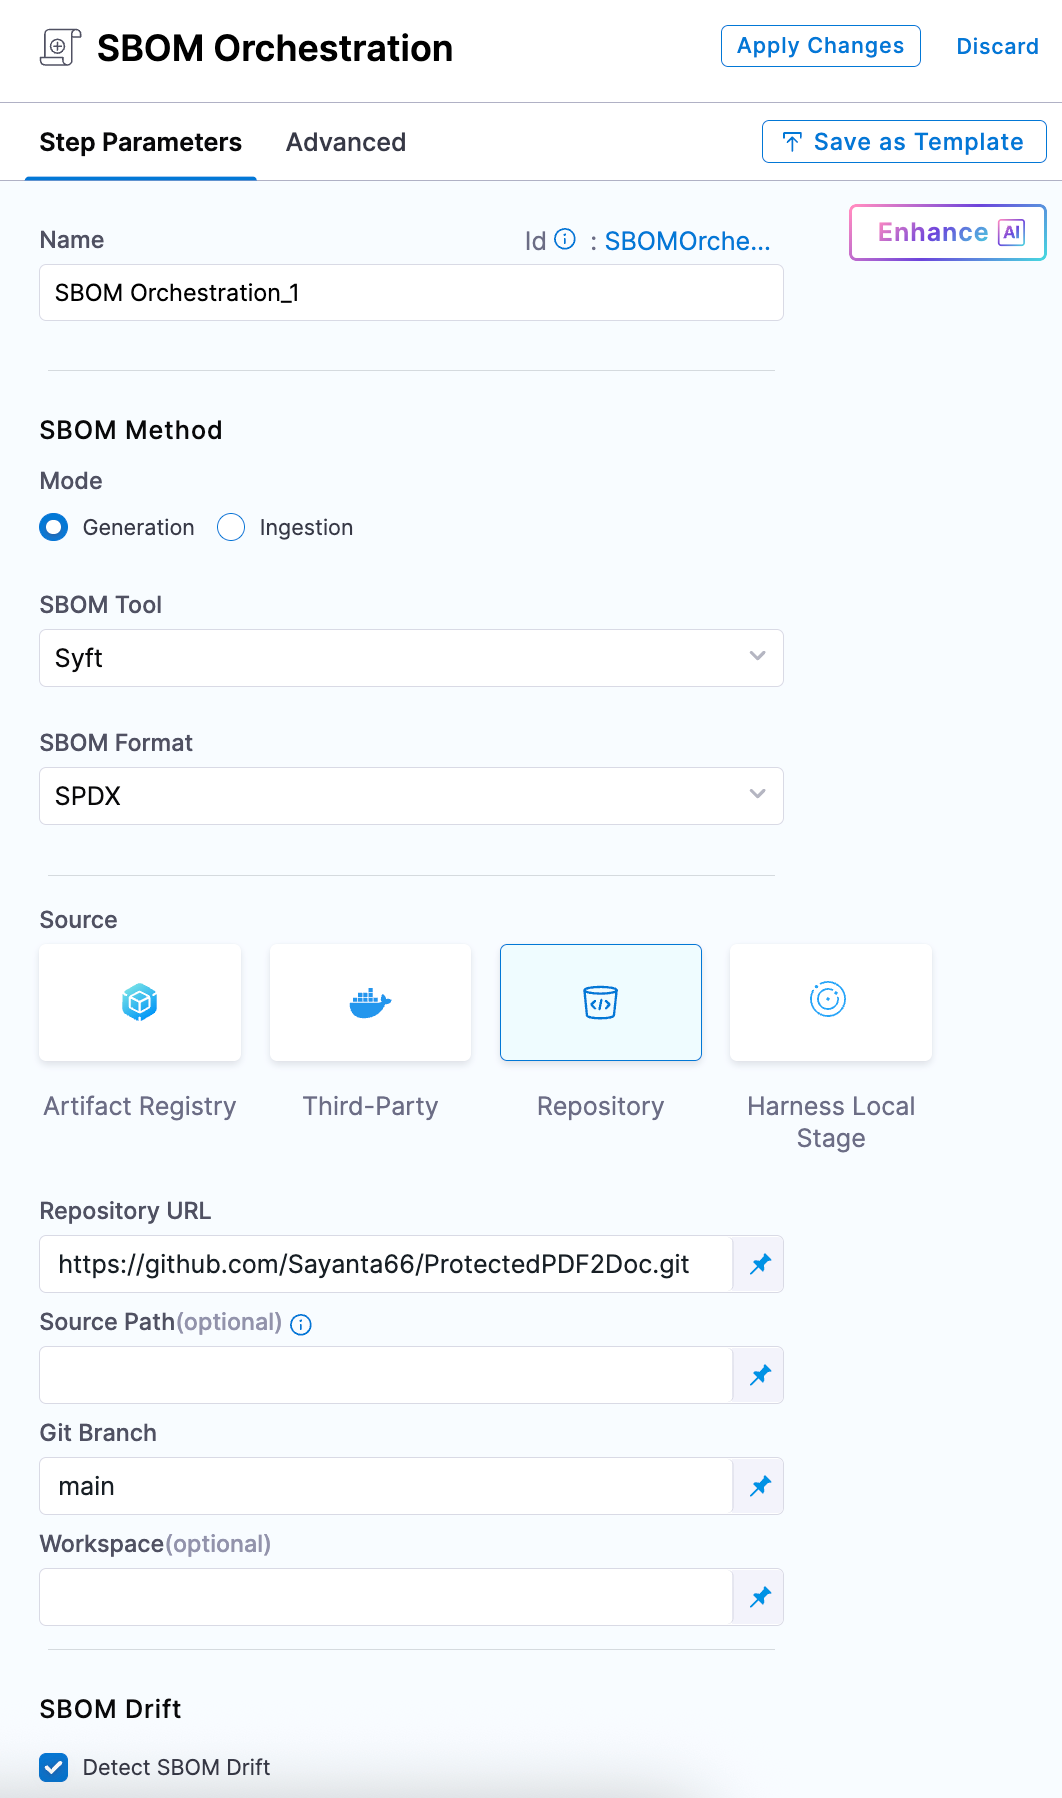
<figure><img src="/files/QThBWJkZho6V7XaF9sqf" alt=""><figcaption></figcaption></figure>

You can use **SBOM Orchestration** step to generate an SBOM in either the **Build** or **Deploy** stage of a Harness pipeline.

* In a **Build** stage, add the **SBOM Orchestration** step after the artifact (image) has been pushed to an artifact repository.
* In a **Deploy** stage, add the **SBOM Orchestration** step before the deployment step.

{% hint style="info" %}
**SBOM Orchestration** step in deploy stage can only be used in the [Containerized Step Groups](/continuous-delivery/use-continuous-delivery/cd-building-blocks/cd-steps/containerized-steps/containerized-step-groups.md) and ensure you enable the `container based execution`.
{% endhint %}

Using SBOM Orchestration step you can generate the SBOM for both Container images and Repositories. Follow the steps to configure the fields for each supported type.

* **Name:** Enter a name for the step.
* **Step Mode:** Select **Generation**.
* **SBOM Tool:** Select **Syft** or **cdxgen**. For other SBOM tools, go to [Ingest SBOM](/software-supply-chain-assurance/use-scs/open-source-management/ingest-sbom-data.md).
* **SBOM Format:** Select **SPDX** or **CycloneDX**.

#### Use Syft <a href="#use-syft" id="use-syft"></a>

If you are using **Syft** to generate the SBOM and want to ensure it includes all component licenses with high accuracy, you will need to set specific environment variables based on your project's programming language. Here are the relevant variables:

<details>

<summary>Set variables for enhanced SBOM</summary>

| Programming Language | Name of Variable                         | Value |
| -------------------- | ---------------------------------------- | ----- |
| Go                   | `SYFT_GOLANG_SEARCH_REMOTE_LICENSES`     | true  |
| Java                 | `SYFT_JAVA_USE_NETWORK`                  | true  |
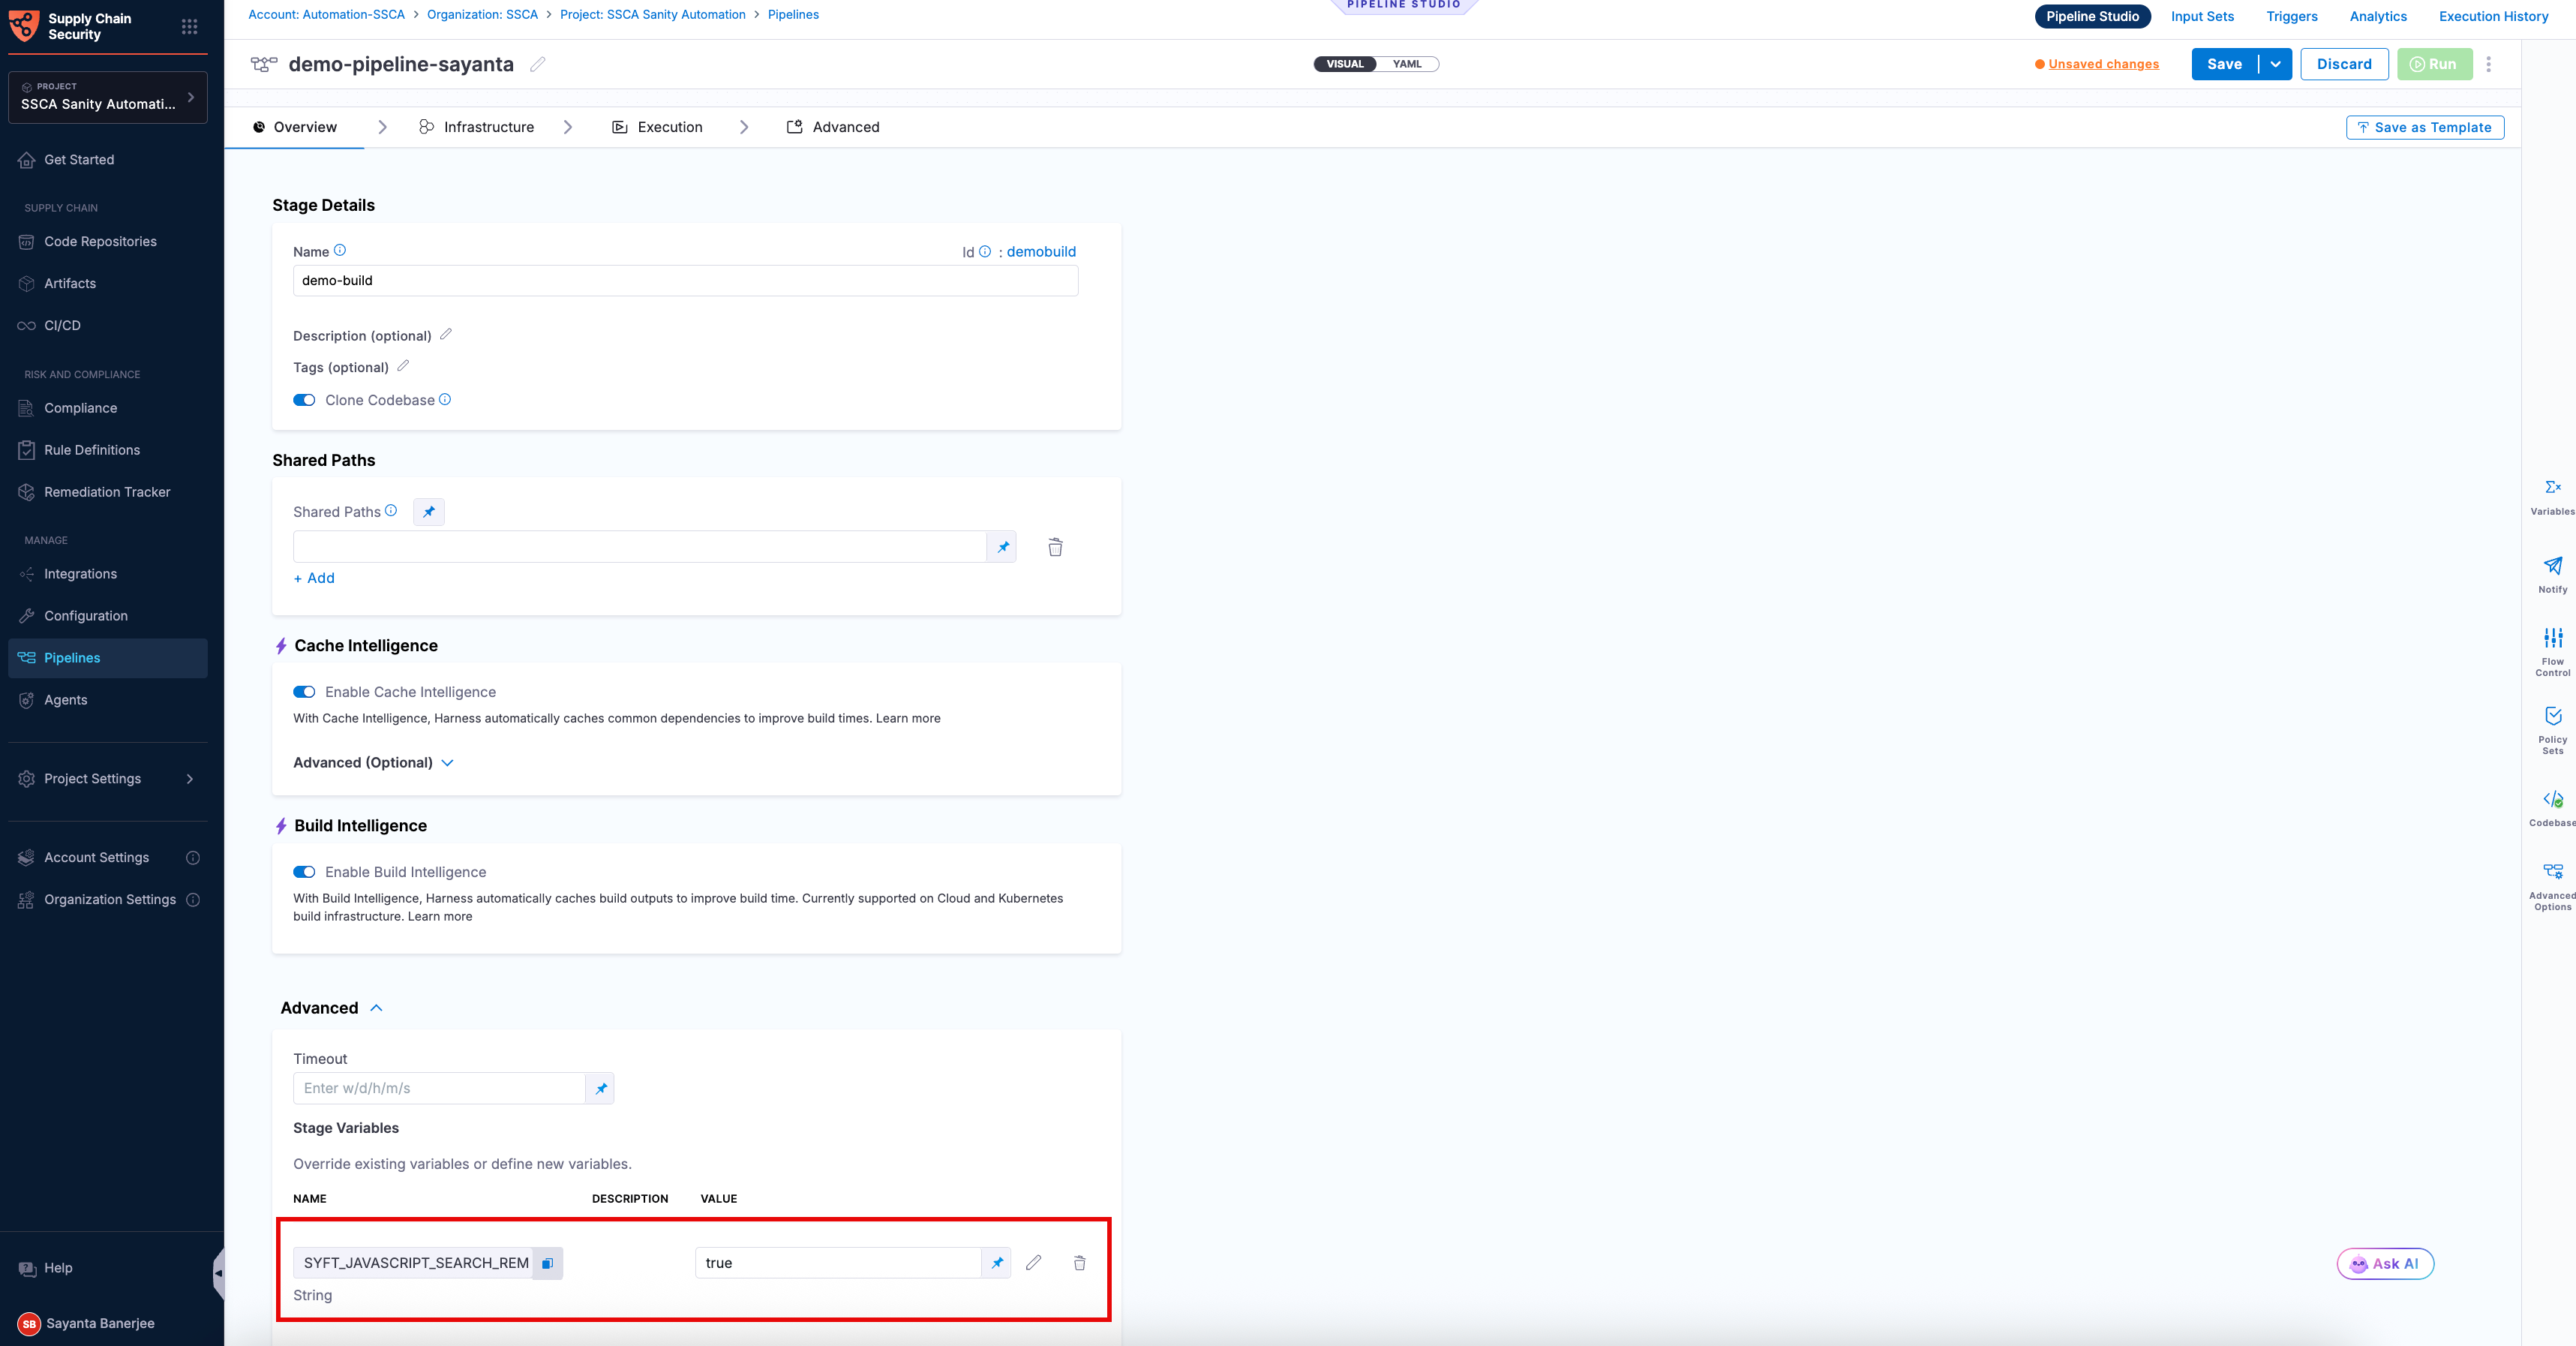
| JavaScript           | `SYFT_JAVASCRIPT_SEARCH_REMOTE_LICENSES` | true  |

To add a new environment variable, go to **Overview** section of your Build stage, and expand the **Advanced** section.

<figure><img src="/files/B4N7Oqk1OCJUC22BPC94" alt=""><figcaption><p>Click to view full size image</p></figcaption></figure>

By setting these variables, Syft can more effectively fetch and populate the licensing data for the components in your SBOM. This not only enhances the quality of the SBOM but also improves its overall SBOM score. If your SBOM contains `NOASSERTIONS`, it indicates that Syft was unable to retrieve necessary data.

</details>

#### Use cdxgen <a href="#use-cdxgen" id="use-cdxgen"></a>

Generating SBOMs using cdxgen supports CLI flags that customize how the scan runs. These flags are passed directly to cdxgen and control how the repository is scanned, how dependencies are resolved, and how the final SBOM is generated. You can use them to tune performance, scope, and output based on your specific use case.

| Why use the flags?                                                                                                                | When to use?                                                                                                                                  | How can you leverage it?                                                                                                                                                        |
| --------------------------------------------------------------------------------------------------------------------------------- | --------------------------------------------------------------------------------------------------------------------------------------------- | ------------------------------------------------------------------------------------------------------------------------------------------------------------------------------- |
| Customize SBOM generation across discovery, dependency resolution, and output phases to balance performance, scope, and accuracy. | When default scans are slow, overly broad, or require environment-specific adjustments (for example, large monorepos or restricted networks). | Add CLI flags to control what gets scanned and limit dependency resolution. Use them to adjust output or validation to improve performance and control SBOM coverage and depth. |

To apply the cdxgen CLI flags within your scan configurations, complete the following steps:

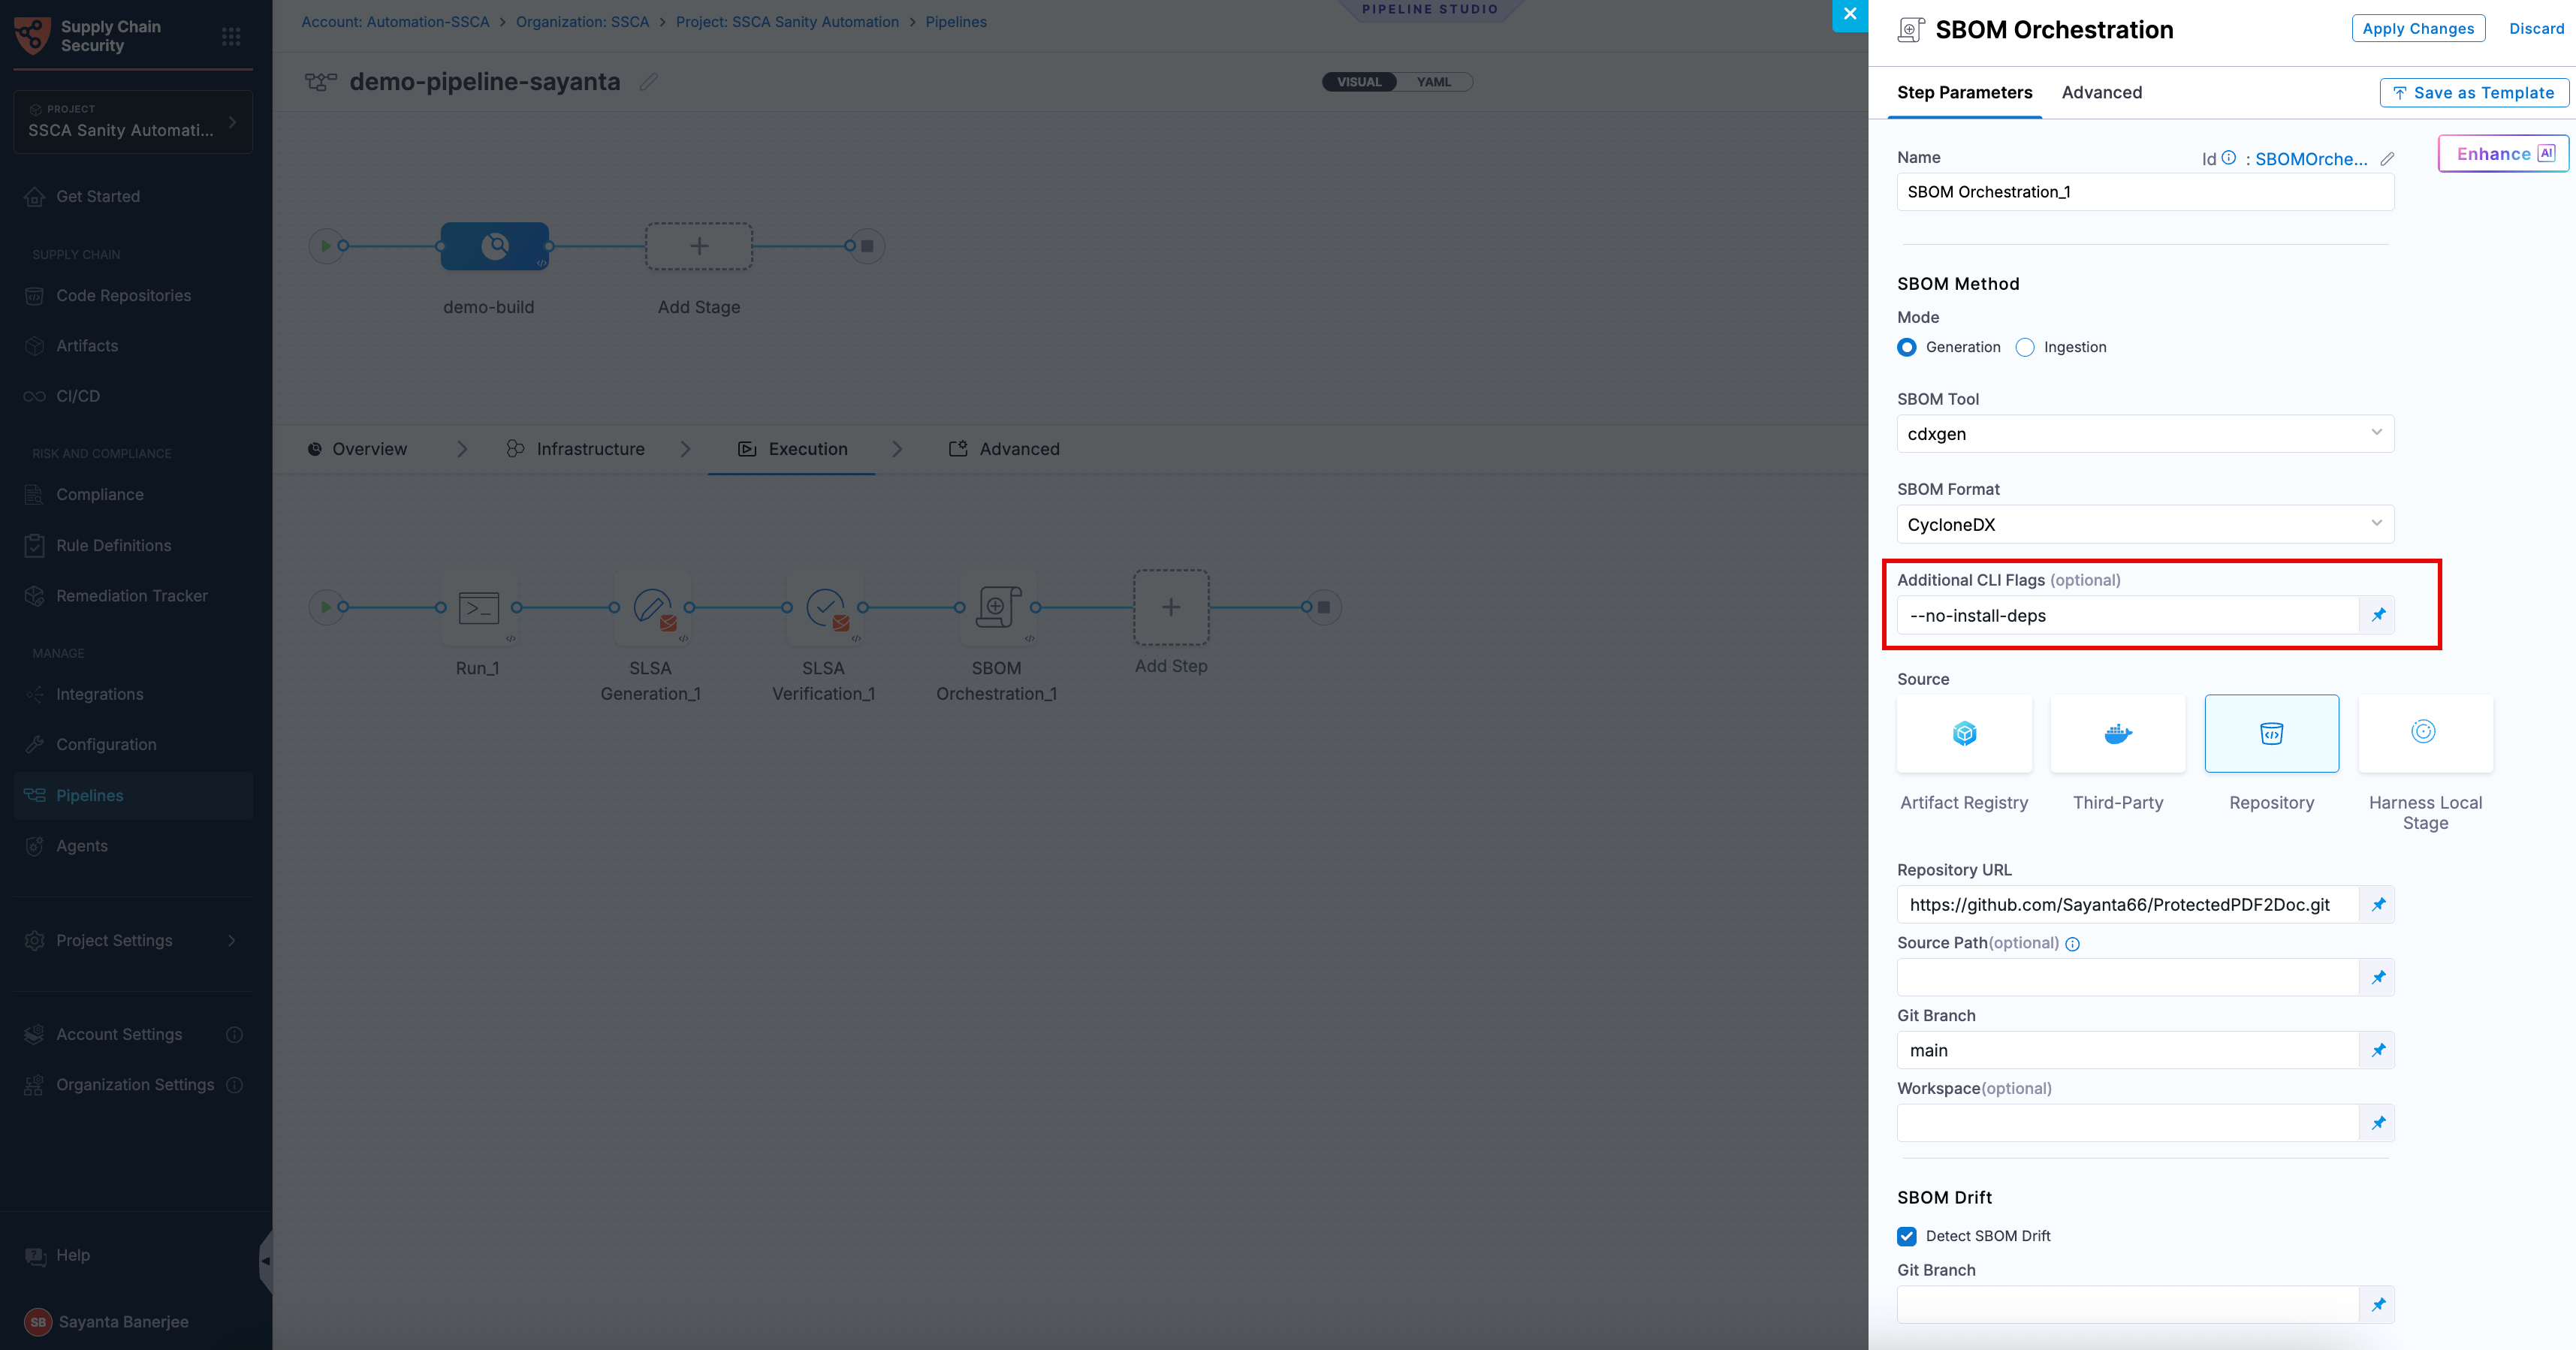
* Select **cdxgen** as the SBOM generation tool. The Additional CLI Flags field will appear as an optional step.
* In the `Additional CLI Flags` field, enter the required cdxgen CLI flags to customize SBOM generation. All cdxgen CLI flags are supported in this step. For a complete list of available flags and their detailed descriptions, refer to the [official cdxgen documentation](https://cdxgen.github.io/cdxgen/#/CLI?id=getting-help).

<figure><img src="/files/COy3CVZB70Ilj0jrCZEo" alt=""><figcaption></figcaption></figure>

The following flags can help optimize SBOM generation for common use cases:

| Flag                  | What it does?                                                 | When to use?                                                        | Trade-off                                         |
| --------------------- | ------------------------------------------------------------- | ------------------------------------------------------------------- | ------------------------------------------------- |
| `--no-install-deps`   | Skips running build tools and uses manifest or lockfile data. | When you need faster scans for large repositories or frequent runs. | May miss dependencies resolved during build time. |
| `--exclude <pattern>` | Skips specified directories or files during scanning.         | When large or irrelevant directories slow down scans.               | Incorrect exclusions can omit valid components.   |
| `--type <ecosystem>`  | Limits scanning to a specific ecosystem.                      | When focusing on a single language or framework.                    | Other ecosystems are ignored.                     |
| `--no-validate`       | Skips SBOM schema validation.                                 | When faster execution is needed in non-critical runs.               | Validation issues may surface later.              |

{% hint style="info" %}

* You can combine multiple CLI flags to optimize SBOM generation.
* Depending on your repository and the flags used, execution time, SBOM size, and component count can change. Results may differ across setups.
* Reducing scan scope or skipping dependency resolution can miss vulnerable dependencies, which may leave gaps in your security visibility.
  {% endhint %}

#### Configure the repository source <a href="#configure-the-repository-source" id="configure-the-repository-source"></a>

Configure the following fields to point the step at the repository you want to scan.

* **Source**: Select the **Source** as a Repository to generate the SBOM for source code.
* **Repository URL:** The Repository URL you have configured for cloning into the workspace.

  <div data-gb-custom-block data-tag="hint" data-style="info" class="hint hint-info"><p>Ensure that the repository configured as the <strong>Codebase</strong> in the pipeline stage is the repository you want to scan. The <strong>Repository URL</strong> field is used only to associate the generated SBOM with the corresponding repository in SCS and does not determine which repository is scanned.</p></div>
* **Source Path:** Leave blank or enter a path (in the repository) for which you want to generate SBOM. Use this setting to generate SBOM for a specific section of your code repo, rather than your entire repo. The path must start with `/`. For example, if your repository URL is `https://github.com/username/repo`, and you want to generate SBOM for `https://github.com/username/repo/service-core/source`, then enter `/service-core/source` for **Source Path**. To generate an SBOM for the entire repository, leave this field empty.
* **Git Branch:** The branch of the repository for which you want to generate the SBOM.
* **Workspace:** If you cloned the codebase to a different directory than the root workspace directory (`/harness`), enter the path to the subdirectory using the format `/harness/PATH/TO/SUBDIRECTORY`. Leave this field empty if you cloned your codebase into the default directory (`/harness`). Usually, your codebase is only cloned into a non-default directory if you are [cloning multiple codebases](/continuous-integration/use-harness-ci/use-harness-ci/codebase-configuration/clone-and-process-multiple-codebases-in-the-same-pipeline.md) into a pipeline.

{% hint style="info" %}
Make sure your repository is cloned into the stage workspace before the SBOM Orchestration step runs. There are several ways you can do this: \* Clone the codebase by default, such as a [Build stage's default codebase](/continuous-integration/use-harness-ci/use-harness-ci/codebase-configuration/create-and-configure-a-codebase.md). \* Add a [Git Clone step](/continuous-delivery/use-continuous-delivery/cd-building-blocks/cd-steps/containerized-steps/git-clone-step.md) to the Deploy stage. \* Add a [Run step](/continuous-delivery/use-continuous-delivery/cd-building-blocks/cd-steps/containerized-steps/run-step.md) to the Deploy stage. \* Add a [Git Clone step](/continuous-integration/use-harness-ci/use-harness-ci/codebase-configuration/clone-and-process-multiple-codebases-in-the-same-pipeline.md) to a Build stage. \* Add a [Run step](/continuous-integration/use-harness-ci/use-harness-ci/codebase-configuration/clone-and-process-multiple-codebases-in-the-same-pipeline.md) to a Build stage.
{% endhint %}

#### Configure SBOM drift <a href="#configure-sbom-drift" id="configure-sbom-drift"></a>

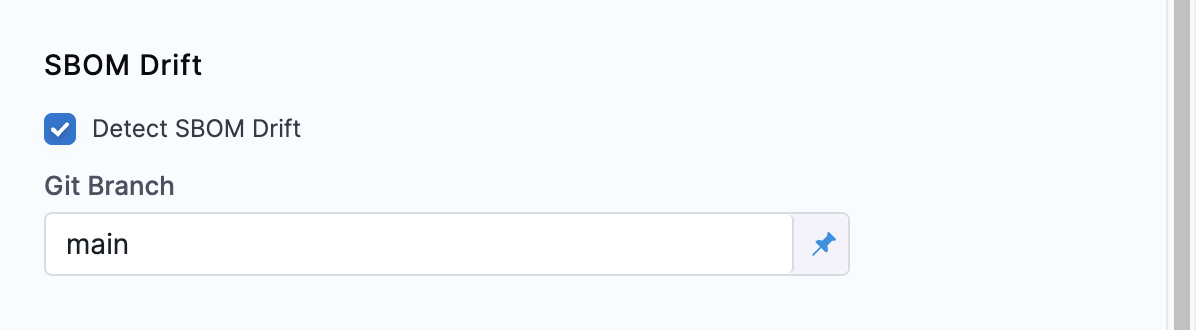
This feature allows you to track changes in SBOMs by comparing them against a Git branch. It provides a detailed analysis of addition or removal of components and licenses, helps you manage and oversee repositories more effectively. You can configure the comparison to be between any two branches. For example, comparing a feature branch against the main branch to identify SBOM drift before merging. However, this is optional and not required for SBOM generation. If you prefer not to detect changes in SBOMs, simply leave this option unchecked.

<figure><img src="/files/3YMSeZxFePuprC6qG5Sm" alt=""><figcaption></figcaption></figure>

#### Configure cdxgen with extended Java support <a href="#configure-cdxgen-with-extended-java-support" id="configure-cdxgen-with-extended-java-support"></a>

If you are using cdxgen to generate an SBOM, the default cdxgen image doesn’t include all Java runtime dependencies.

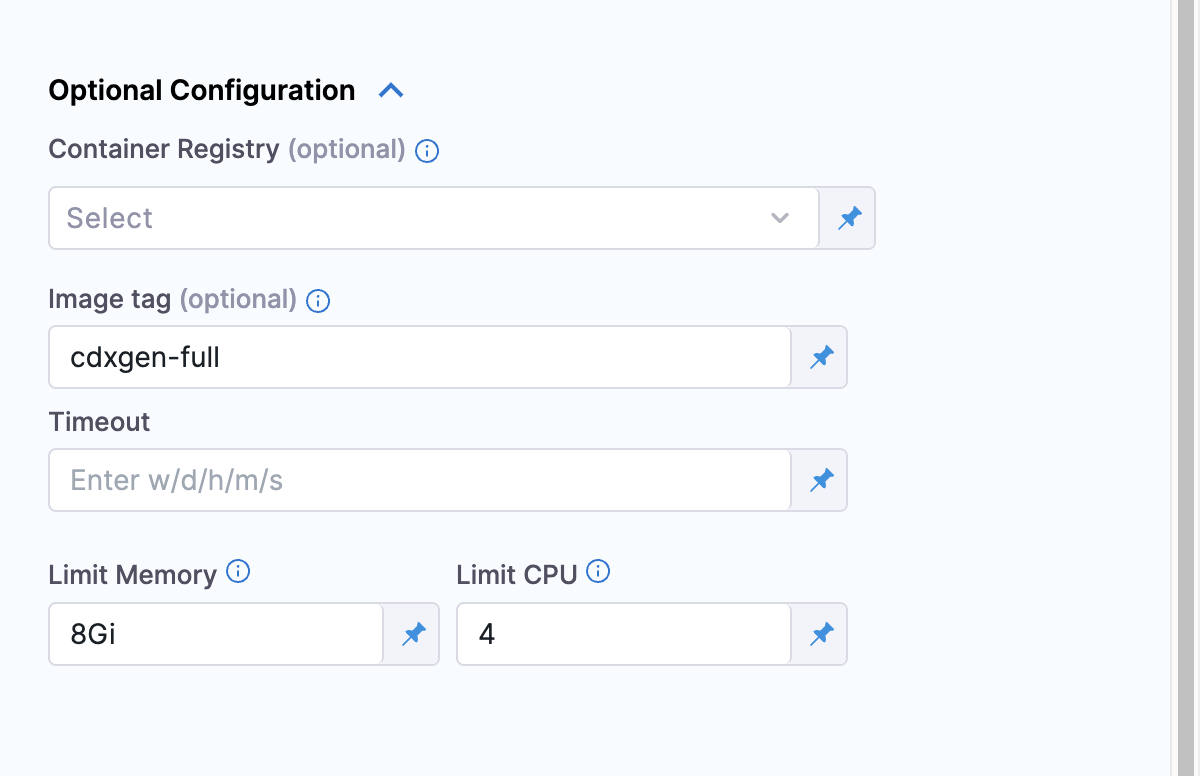
To resolve this, override the default cdxgen image by providing the tag `cdxgen-full` in the optional configuration section of the SBOM Orchestration step to enable extended Java support.

**Container Registry:** By default, Harness pulls cdxgen image from Docker Hub. To pull the image from private registry, select a connector that points to it.

**Image tag:** Provide the tag `cdxgen-full` to support environments like Java.

**Limit Memory and CPU:** Set the minimum memory to `8 Gi` and CPU to `4`.

<figure><img src="/files/w2TZRFiu25D0BPeEiLNu" alt=""><figcaption></figcaption></figure>

{% hint style="info" %}
The CocoaPods ecosystem is not fully supported by cdxgen at the moment
{% endhint %}

### Run the pipeline <a href="#run-the-pipeline" id="run-the-pipeline"></a>

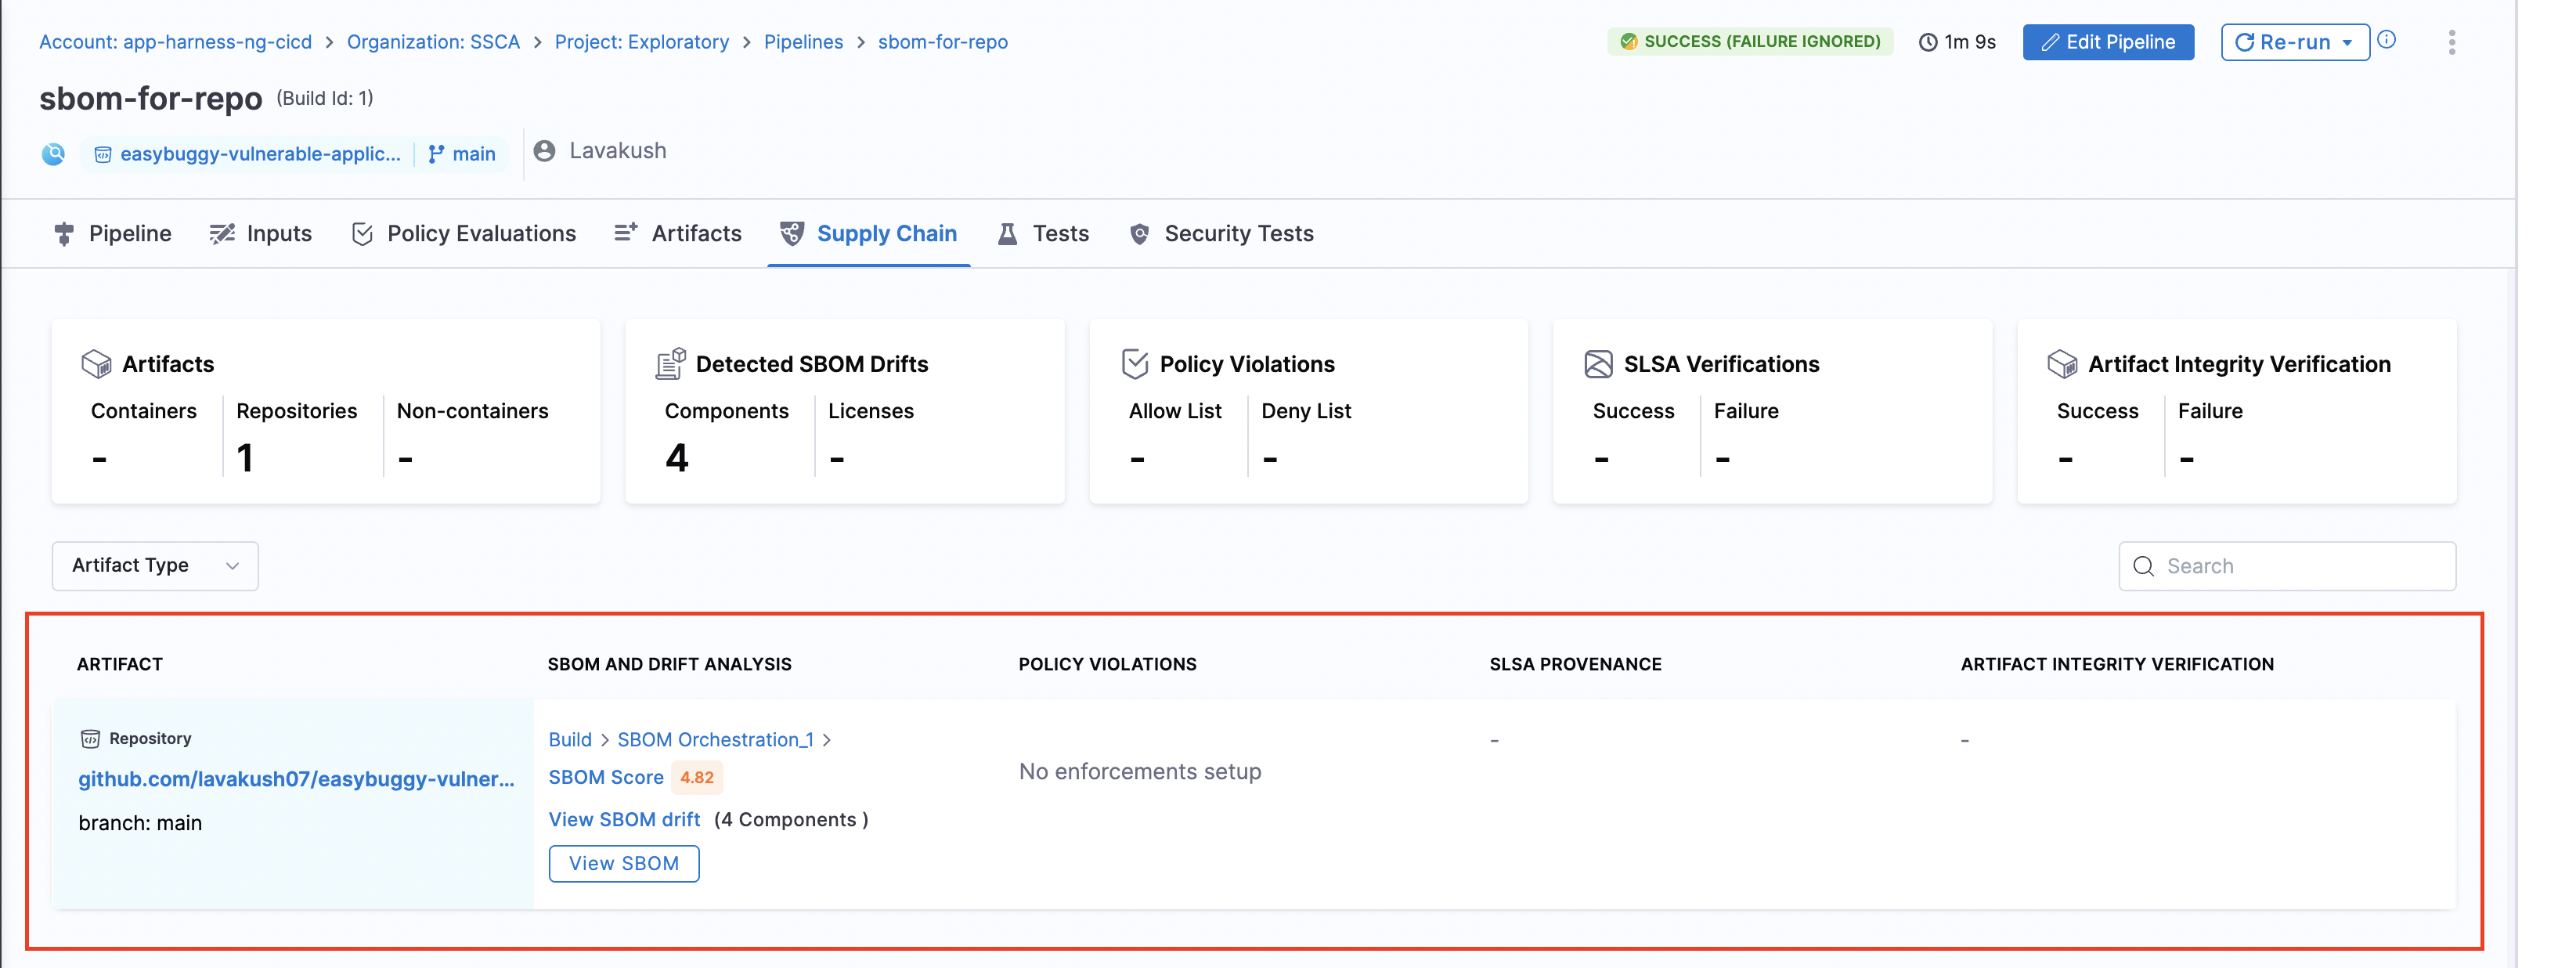
When the pipeline runs, the generated SBOMs for Code Repositories are accessible in the [Artifacts view](/software-supply-chain-assurance/use-scs/artifact-security/overview.md). Additionally, you can locate the SBOM for any artifact on the **Supply Chain** tab within the **Execution Details** page in Harness.

<figure><img src="/files/6T0reIIdusageh2eAGA8" alt=""><figcaption></figcaption></figure>

<details>

<summary>Example Pipeline for SBOM generation</summary>

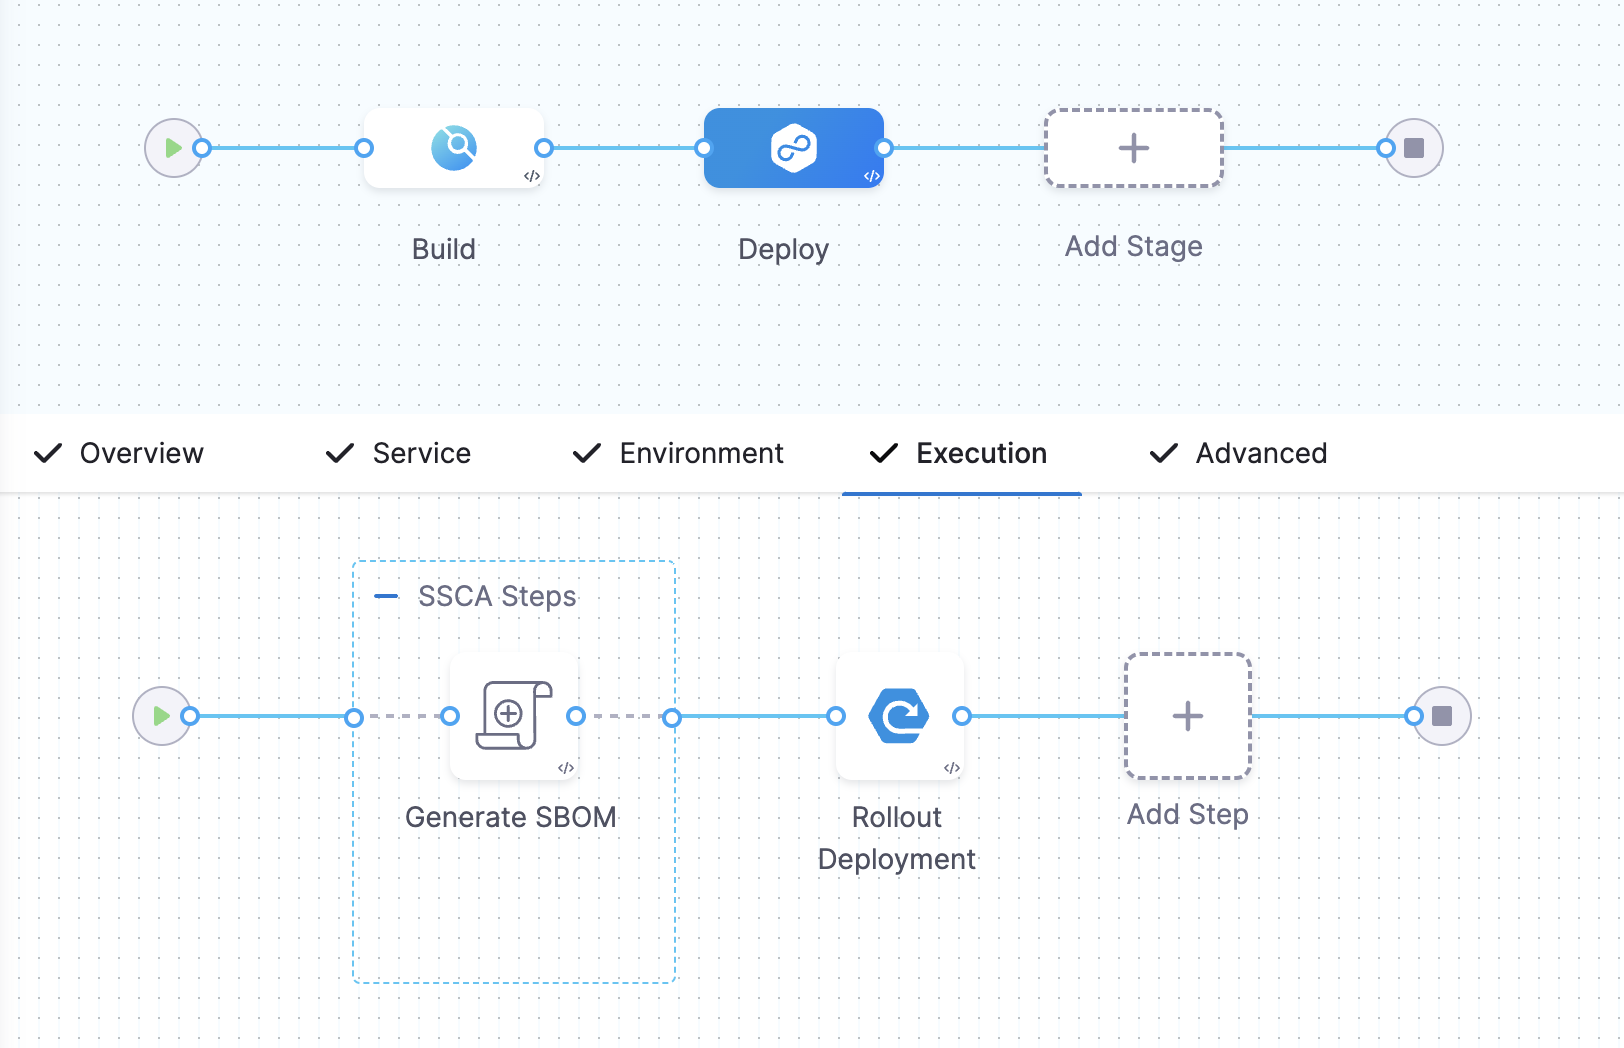
These example demonstrate how you could set up Build and Deploy stages to generate SBOM.

This example Build stage has three steps:Run step: Build and test an artifact (image).Build and Push an image to Docker Registry step: Build and push the image to a Docker registry.SBOM Orchestration step: Generate the SBOM.SBOM Orchestration in deploy stage can only be used in the Containerized Step Groups. This example Deploy stage has two steps:SBOM Orchestration step: Generate the SBOM.Rolling deployment step: Deploy the image.

This example Build stage has three steps:Run step: Build and test an artifact (image).Build and Push an image to Docker Registry step: Build and push the image to a Docker registry.SBOM Orchestration step: Generate the SBOM.SBOM Orchestration in deploy stage can only be used in the Containerized Step Groups. This example Deploy stage has two steps:SBOM Orchestration step: Generate the SBOM.Rolling deployment step: Deploy the image.

</details>

#### View vulnerabilities in the SBOM <a href="#view-vulnerabilities-in-the-sbom" id="view-vulnerabilities-in-the-sbom"></a>

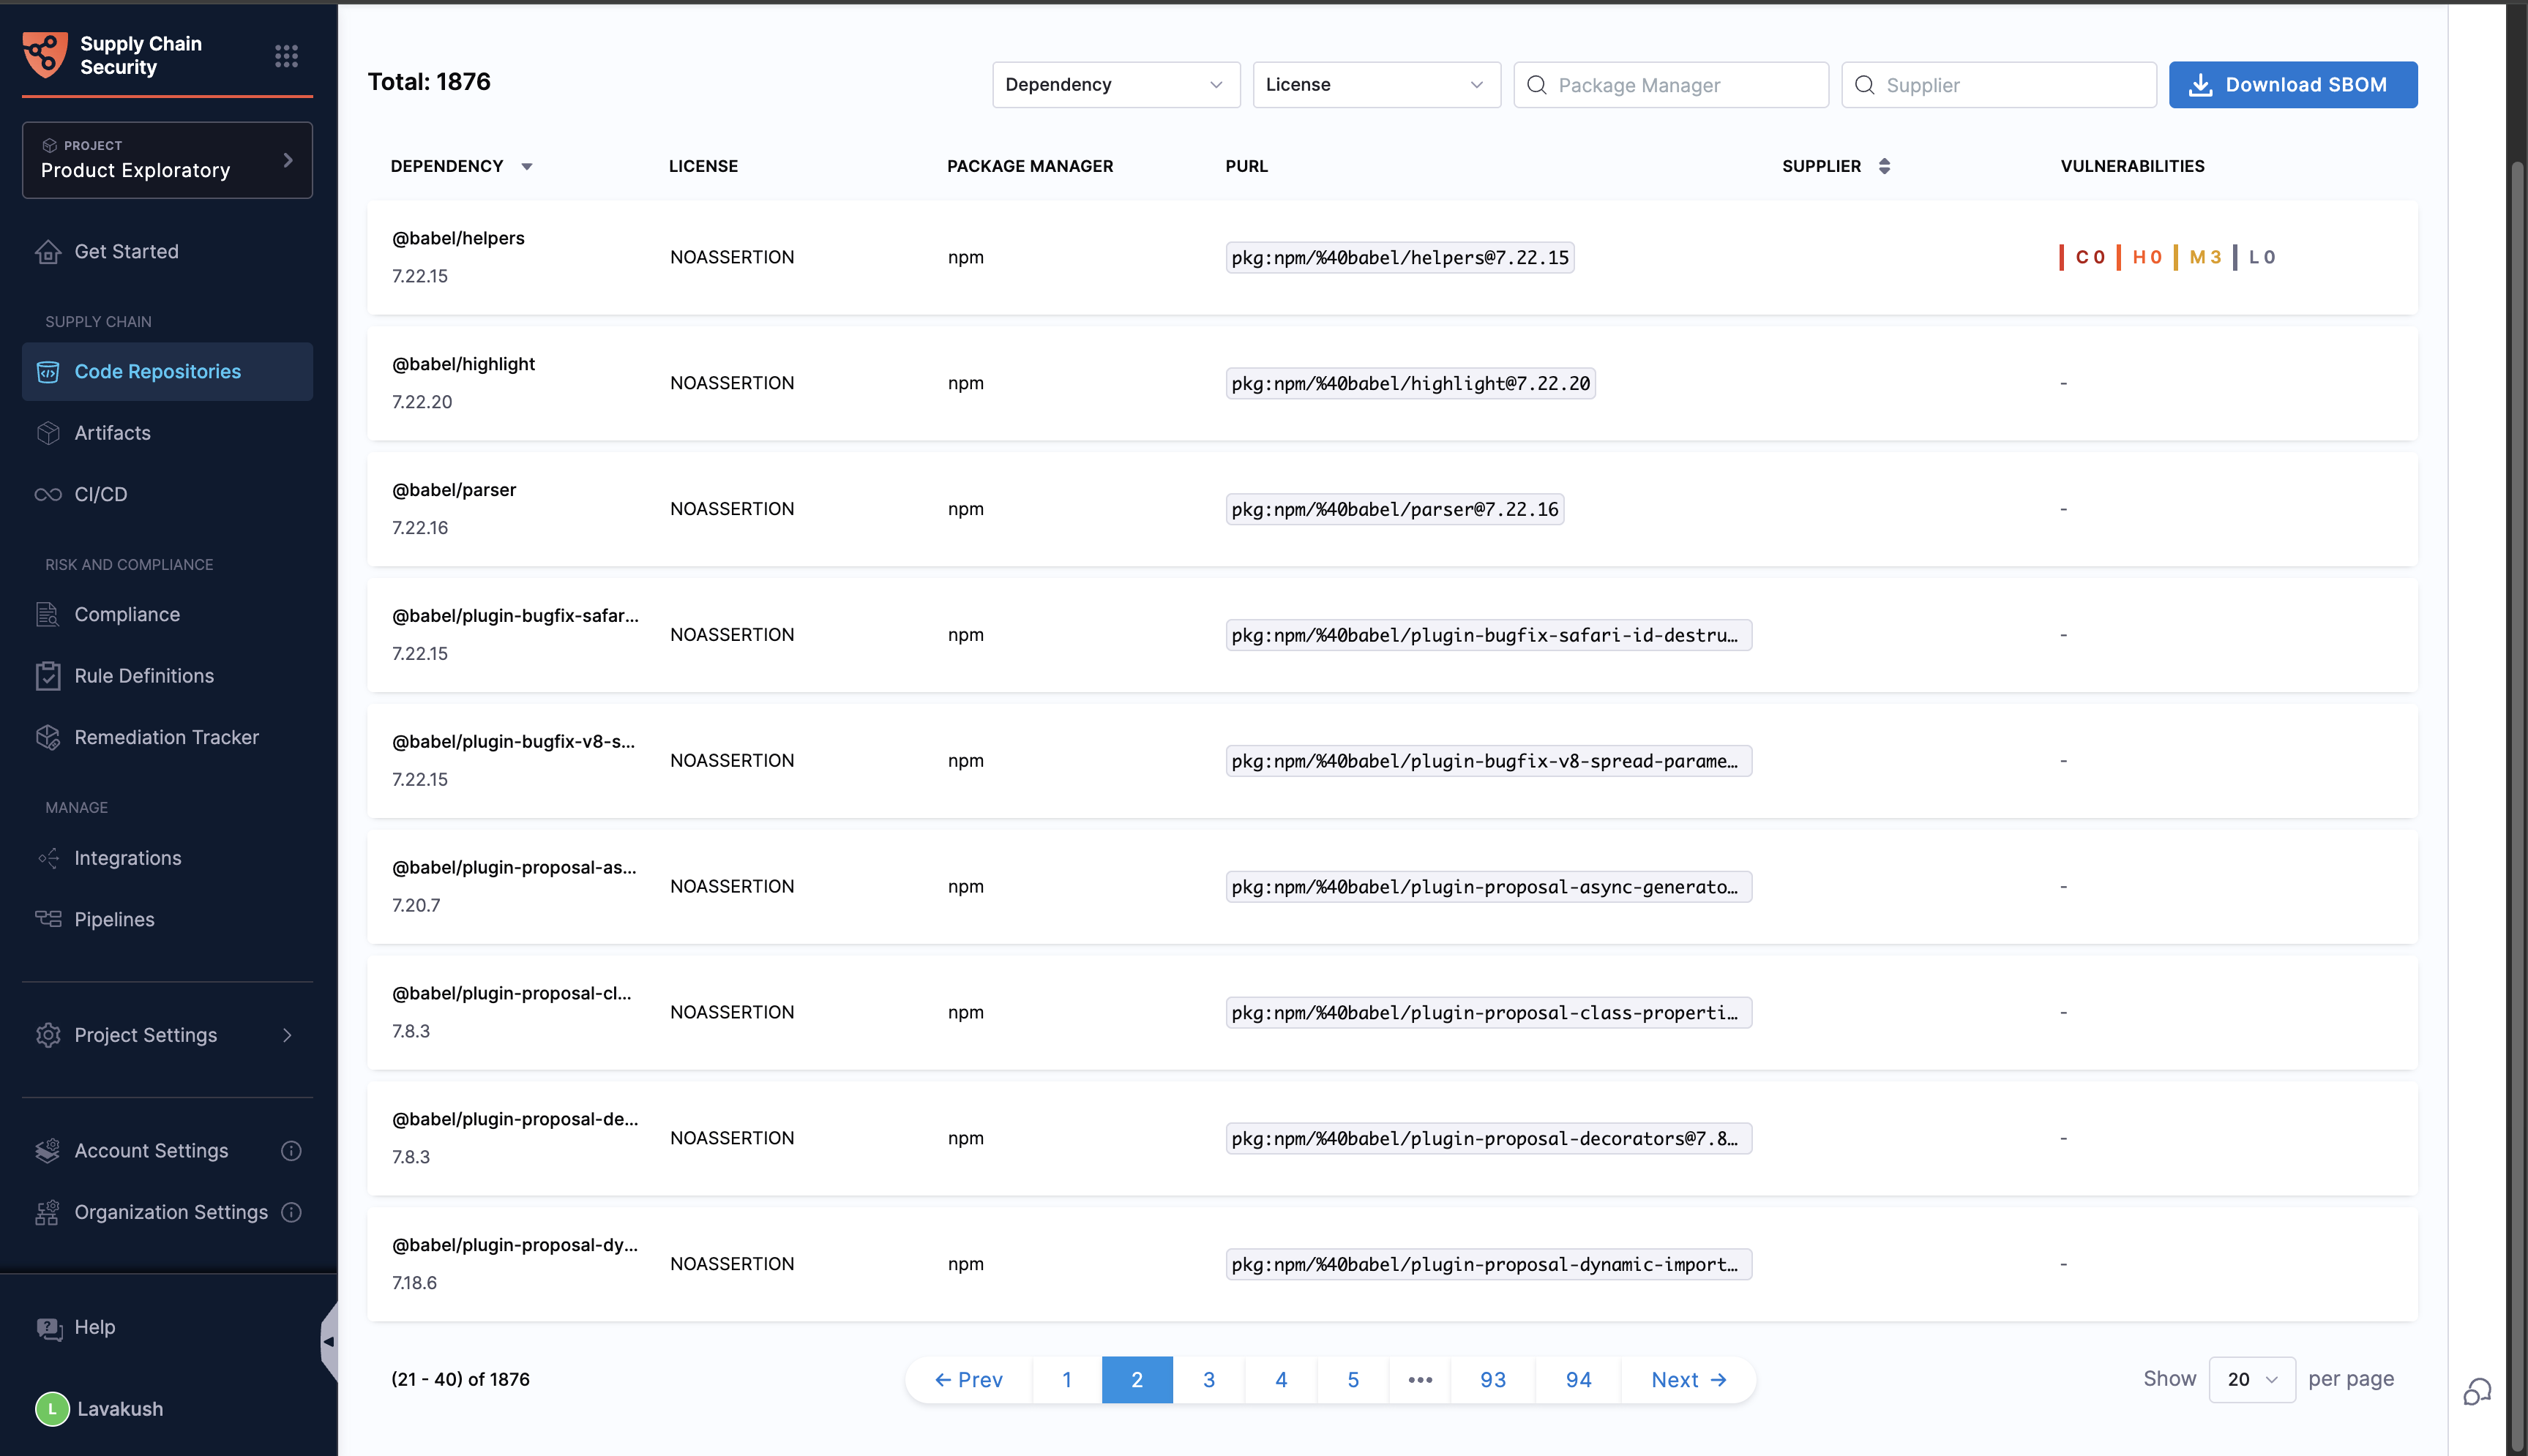
After you run the SBOM orchestration step followed by the STO Snyk scan, the SBOM tab on the Code Repositories page displays vulnerabilities for the components identified by Snyk. This helps you effectively identify and prioritize open source risks.

<figure><img src="/files/GUIAK6C734lSJmCXpjkf" alt=""><figcaption><p>Click to view full size image</p></figcaption></figure>

#### Publish SBOM <a href="#publish-sbom" id="publish-sbom"></a>

After you run the SBOM Orchestration step, you can download or publish SBOM through multiple ways depending on your workflow:

* Via [Harness API](https://apidocs.harness.io/sbom/downloadsbomforartifact)
* Use the Download SBOM button available on the Code Repositories page.
* Download the SBOM score for repository via [Harness API](https://apidocs.harness.io/sbom/getsbomscoreforartifact)
* Access the SBOM file directly from the pipeline output, generated under the default `/harness` working directory and is available at `/harness/harness/sbom/{sbom_<sbom_orchestration_step_execution_id>}.json`.

### Next steps <a href="#next-steps" id="next-steps"></a>

After generating an SBOM, you can apply [SBOM Policy Enforcement](/software-supply-chain-assurance/use-scs/open-source-management/enforce-sbom-policies.md) to achieve open source governance.