> For the complete documentation index, see [llms.txt](https://developer.harness.io/llms.txt). Markdown versions of documentation pages are available by appending `.md` to page URLs; this page is available as [Markdown](https://developer.harness.io/software-supply-chain-assurance/use-scs/open-source-management/integrations/bitbucket.md).
# Onboard Bitbucket Repositories
Onboard Bitbucket repositories in SCS to perform repository security and posture management.
SCS allows you to onboard Bitbucket repositories to perform security scanning and generate Software Bill of Materials (SBOM) for your codebase. Managing security analysis across multiple Bitbucket repositories can require manual pipeline configuration and make it difficult to maintain centralized visibility into repository findings. Bitbucket repository onboarding in SCS solves this by allowing you to automatically discover repositories and bring them under analysis through a single workflow.
After integration, you can select the repositories you want to scan without manually configuring pipelines. SCS performs analysis in the background and makes the results available within the platform. This gives you centralized visibility into repository security posture and helps you review findings from a single view.
***
### What you will learn from this topic
By the end of this topic, you will be able to understand:
* How Bitbucket repository onboarding works in SCS.
* How to create or select a Bitbucket connector for repository onboarding.
* How to choose Bitbucket repositories for security scanning and SBOM generation.
* How to modify or delete an existing Bitbucket integration.
* How to view onboarded repositories and their scan results within SCS.
***
### Understand Bitbucket repository onboarding in SCS
Repository Security Posture Management (RSPM) in SCS provides a centralized framework for managing repository-level security insights across your development environment. Bitbucket repository onboarding extends this framework by bringing your Bitbucket repositories into a unified repository inventory for visibility and assessment. This allows teams to organize repository analysis within a single workflow and maintain a consolidated view of repository security posture across Bitbucket projects. Go to [RSPM with Harness SCS](/software-supply-chain-assurance/use-scs/risk-and-compliance/repository-security-posture-management-rspm.md) to understand how RSPM tracks repository posture.
The following table provides a structured overview of why Bitbucket repository onboarding is used, when it is appropriate, and how it can be effectively leveraged within SCS for security scanning and SBOM generation.
| Why use it? | When to use? | How can you leverage it? |
| ------------------------------------------------------------------------------------------------------------------------------------------------------------- | --------------------------------------------------------------------------------------------------------------------------------------------------------------------------------------------------------- | -------------------------------------------------------------------------------------------------------------------------------------------------------------------------------------------------------------------------------- |
| Centralize repository visibility within SCS. Reduce manual repository onboarding effort. Maintain continuous repository monitoring across Bitbucket projects. | When onboarding Bitbucket repositories into SCS for continuous monitoring. When managing security visibility across multiple repositories. When streamlining repository discovery and analysis workflows. | Onboard selected repositories or automatically include future repositories. Review repository findings and security posture from a centralized view. Track repository insights to support remediation and dependency management. |
***
### Create a Bitbucket integration
Creating a Bitbucket integration allows you to connect your repositories to SCS and enable onboarding for security scanning and SBOM generation. To configure a Bitbucket integration in SCS, complete the following steps:
1. [Create/Select the Bitbucket connector](#step-1---createselect-the-bitbucket-connector)
2. [Choose the repositories to scan](#step-2---choose-the-repositories-to-scan)
#### Step 1 - Create/Select the Bitbucket connector
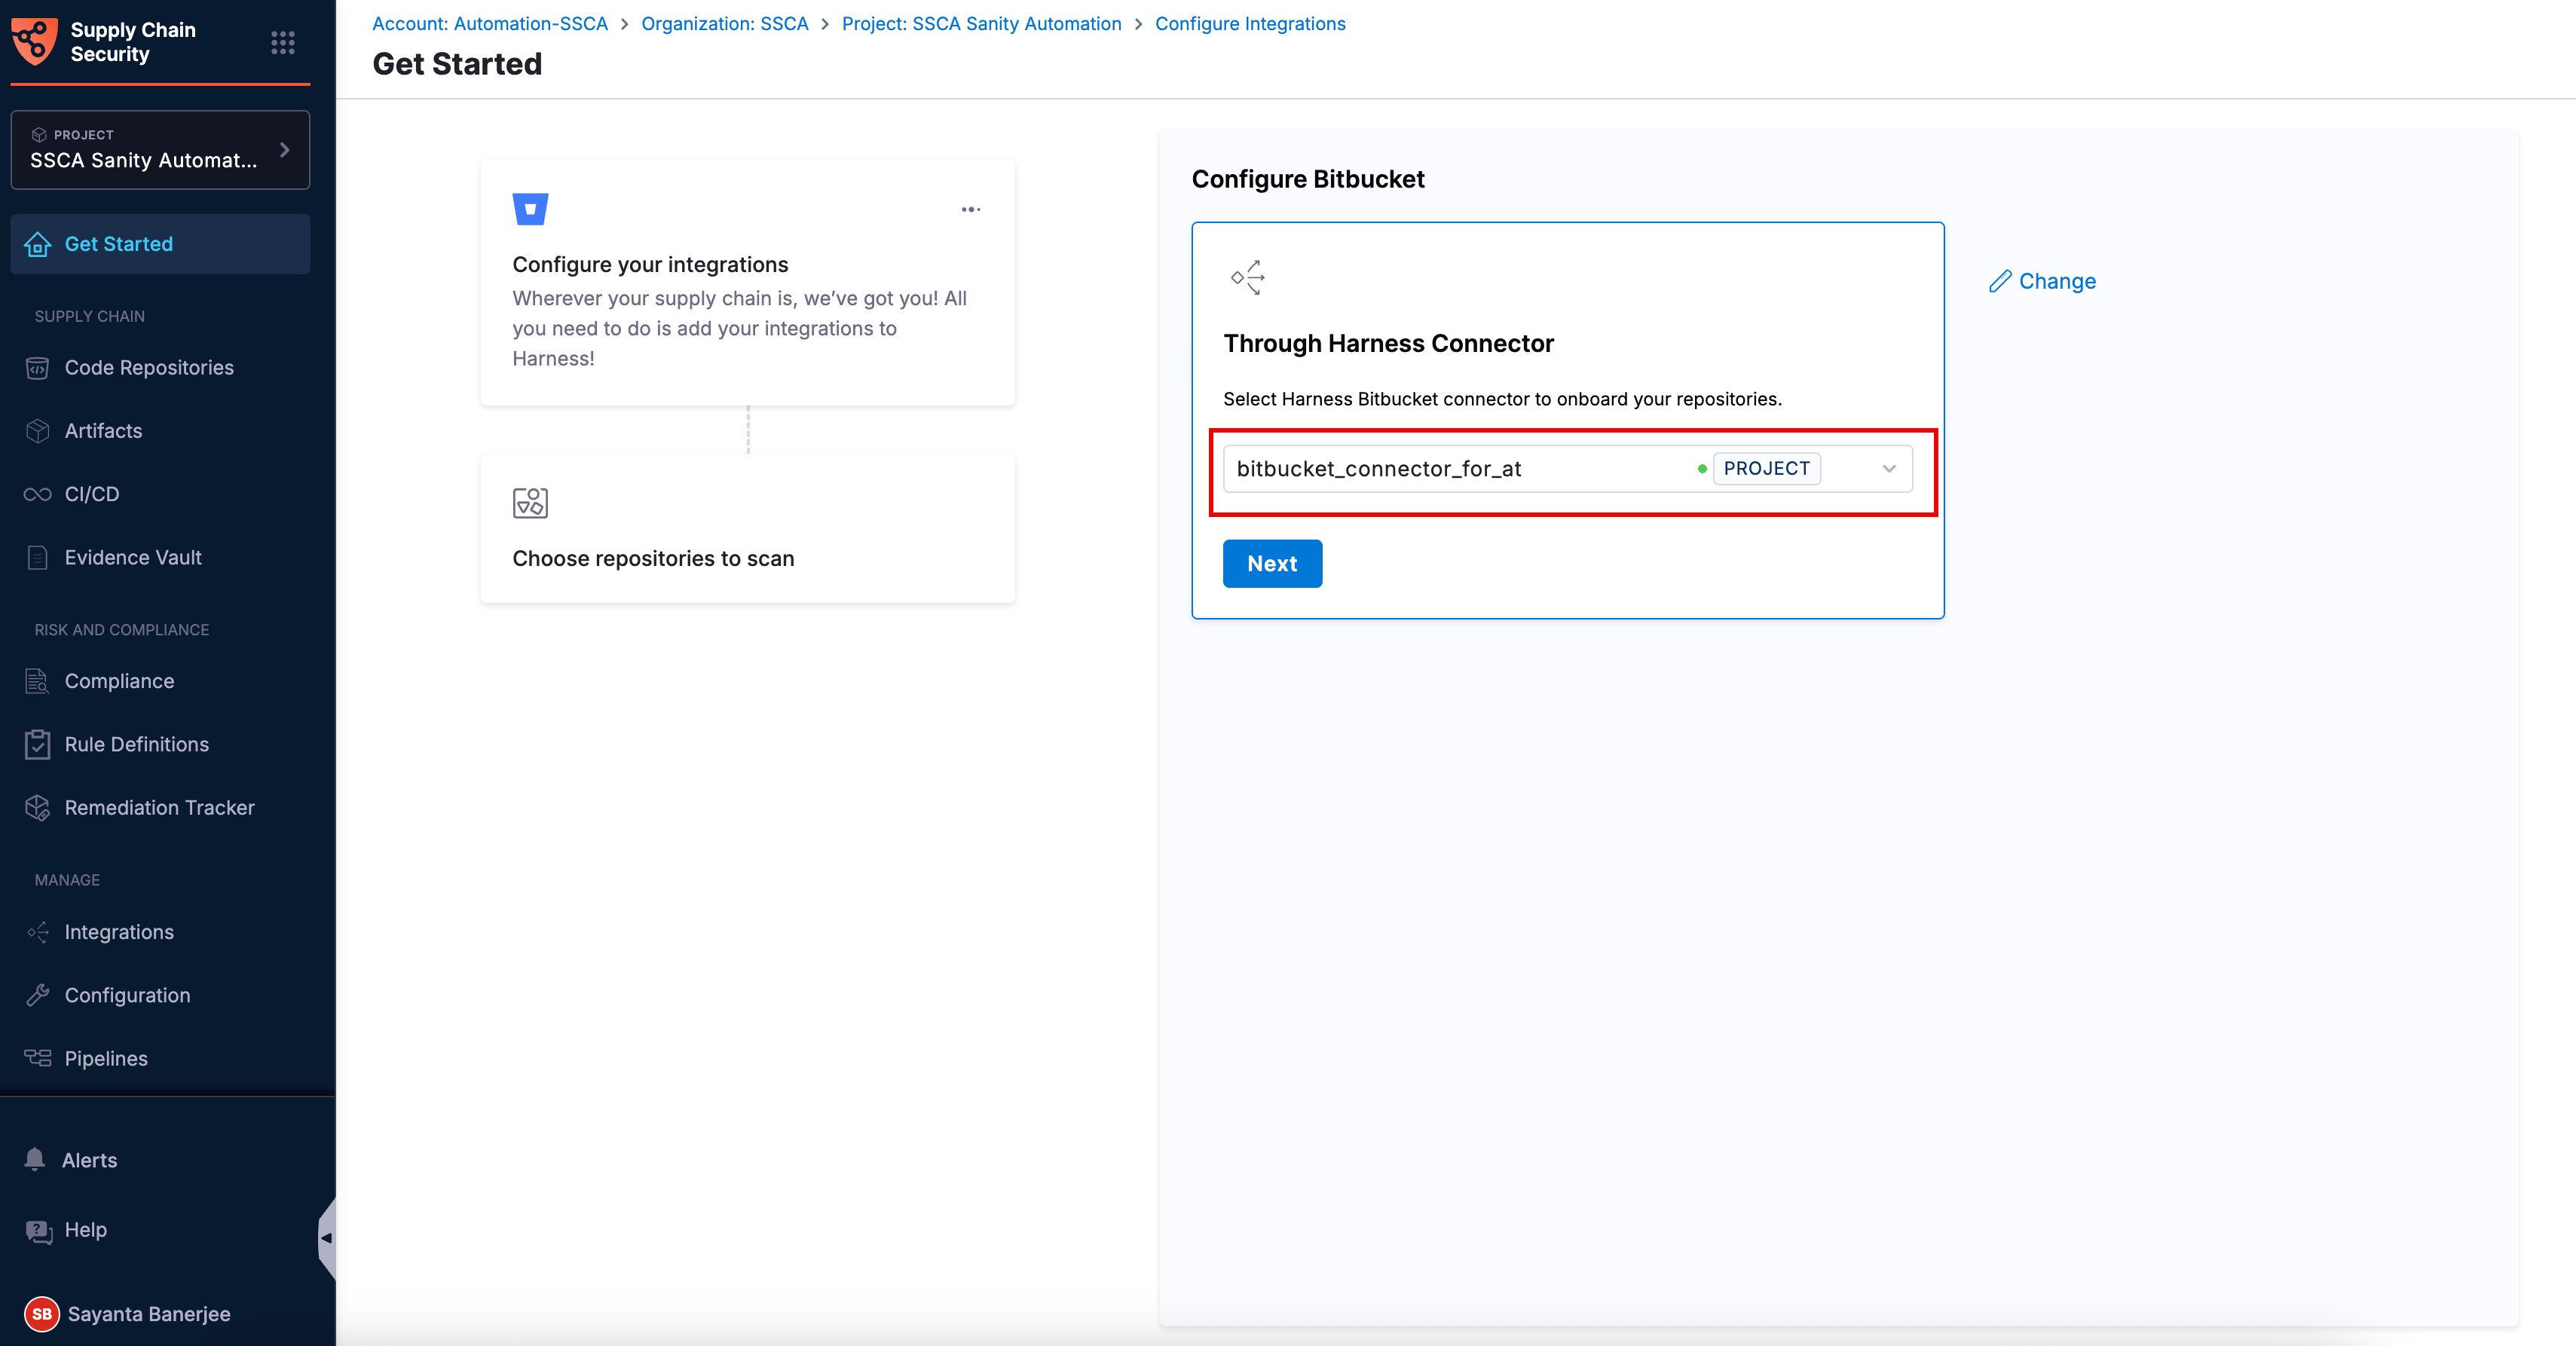
A Bitbucket connector allows SCS to securely connect to your Bitbucket account and discover repositories for onboarding. To create or select a Bitbucket connector, complete the following steps:
1. Navigate to the **Integrations** page under the **Manage** section from the sidebar navigation of your SCS account. The page displays key information for each integration, including the integration type, organization URL (your Bitbucket URL), integration status (active or inactive), and the last scan time of the associated repositories.
2. Click the `Add Integration` button to go to the **Configure Integration** page. Alternatively, you can access this page by clicking **Get Started > Get Started** from the sidebar navigation of your SCS account.
3. Scroll down to the Bitbucket collapsible section. It is expanded by default. If it is collapsed, click it to expand.
4. Click the `Configure` button under **Onboard your repositories** to open the **Get Started** page, where the Bitbucket configuration panel is displayed.
5. Within the configuration panel, click `Select Connector` under **Through Harness Connector** to open the `Create or Select an Existing Connector` dialog.
6. Select your required connector from the list of existing connectors. You can search for your created connector or filter connectors by **Project**, **Organization**, and **Account**.
7. Alternatively, click `+ New Connector` to create a new Bitbucket connector for onboarding new repositories. Go to the [Bitbucket connector settings reference](/harness-ai/use-harness-platform/connectors/code-repositories/ref-source-repo-provider/bitbucket-connector-settings-reference.md) to configure the connector fields.
When creating a Bitbucket connector, ensure that API access is enabled and select the Email and API token authentication method. The API token must be created in your Bitbucket account with the appropriate repository access scopes required for scanning. Go to the Bitbucket connector settings reference to enable API access.
8. Click `Apply Selected` to use the existing or newly created Bitbucket connector.
9. Click `Next` to open the **Choose repositories to scan** configuration section.
Click to view full size image
#### Step 2 - Choose the repositories to scan
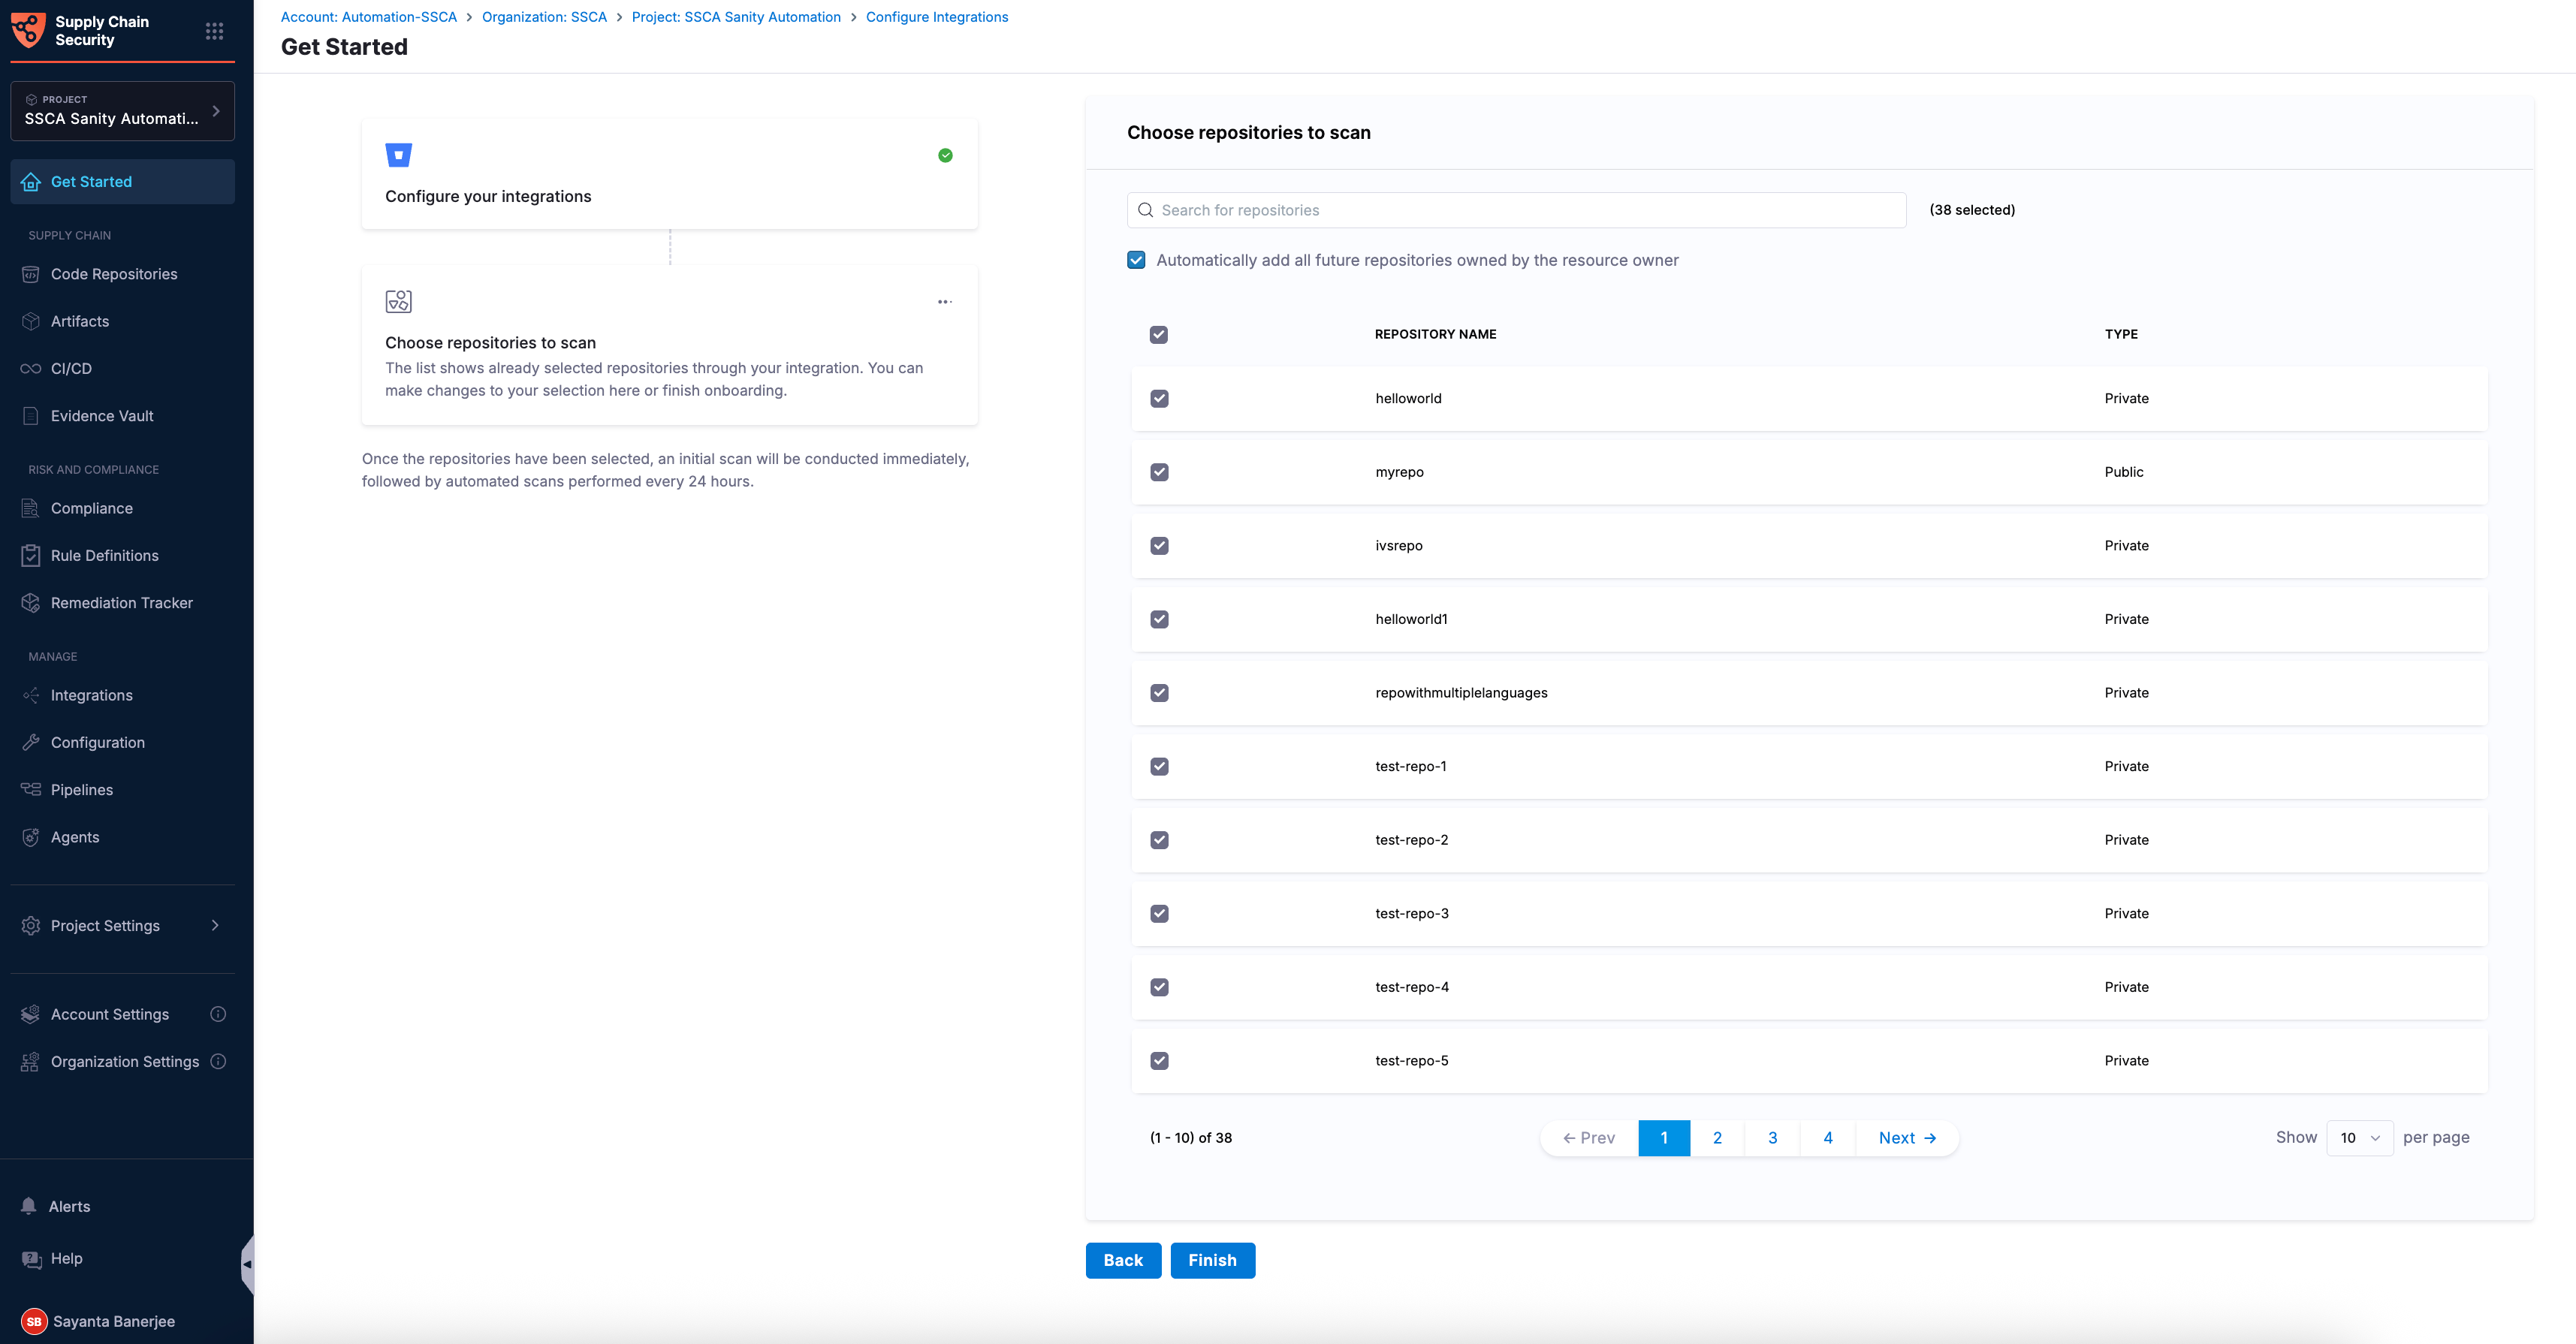
Onboarding Bitbucket repositories allows you to select either all repositories or only the ones you want to scan. The **Choose repositories to scan** configuration section lists all repositories associated with your Bitbucket account and lets you search for specific repositories.
To choose the Bitbucket repositories for scanning, complete the following steps:
1. Select the `Automatically add all future repositories owned by the resource owner` checkbox to include all current repositories and automatically add new repositories for scanning.
2. Alternatively, select the checkbox beside `REPOSITORY NAME` column to select all the repositories in that configuration page, or select the checkbox beside any individual repository name to select that particular repository.
3. After verifying the details, click **Finish**. Once finished, you can view the **You’re Done** toaster message at the top, indicating the successful onboarding of your Bitbucket repositories.
Click to view full size image
***
### Modify/Delete a Bitbucket integration
Modifying a Bitbucket integration allows you to update the repositories selected for scanning, while deleting an integration removes it from SCS. To modify or delete a Bitbucket integration, complete the following steps:
1. Navigate to the **Integrations** page under the **Manage** section from the sidebar navigation of your SCS account.
2. Find or search your created integration from the list of available integrations.
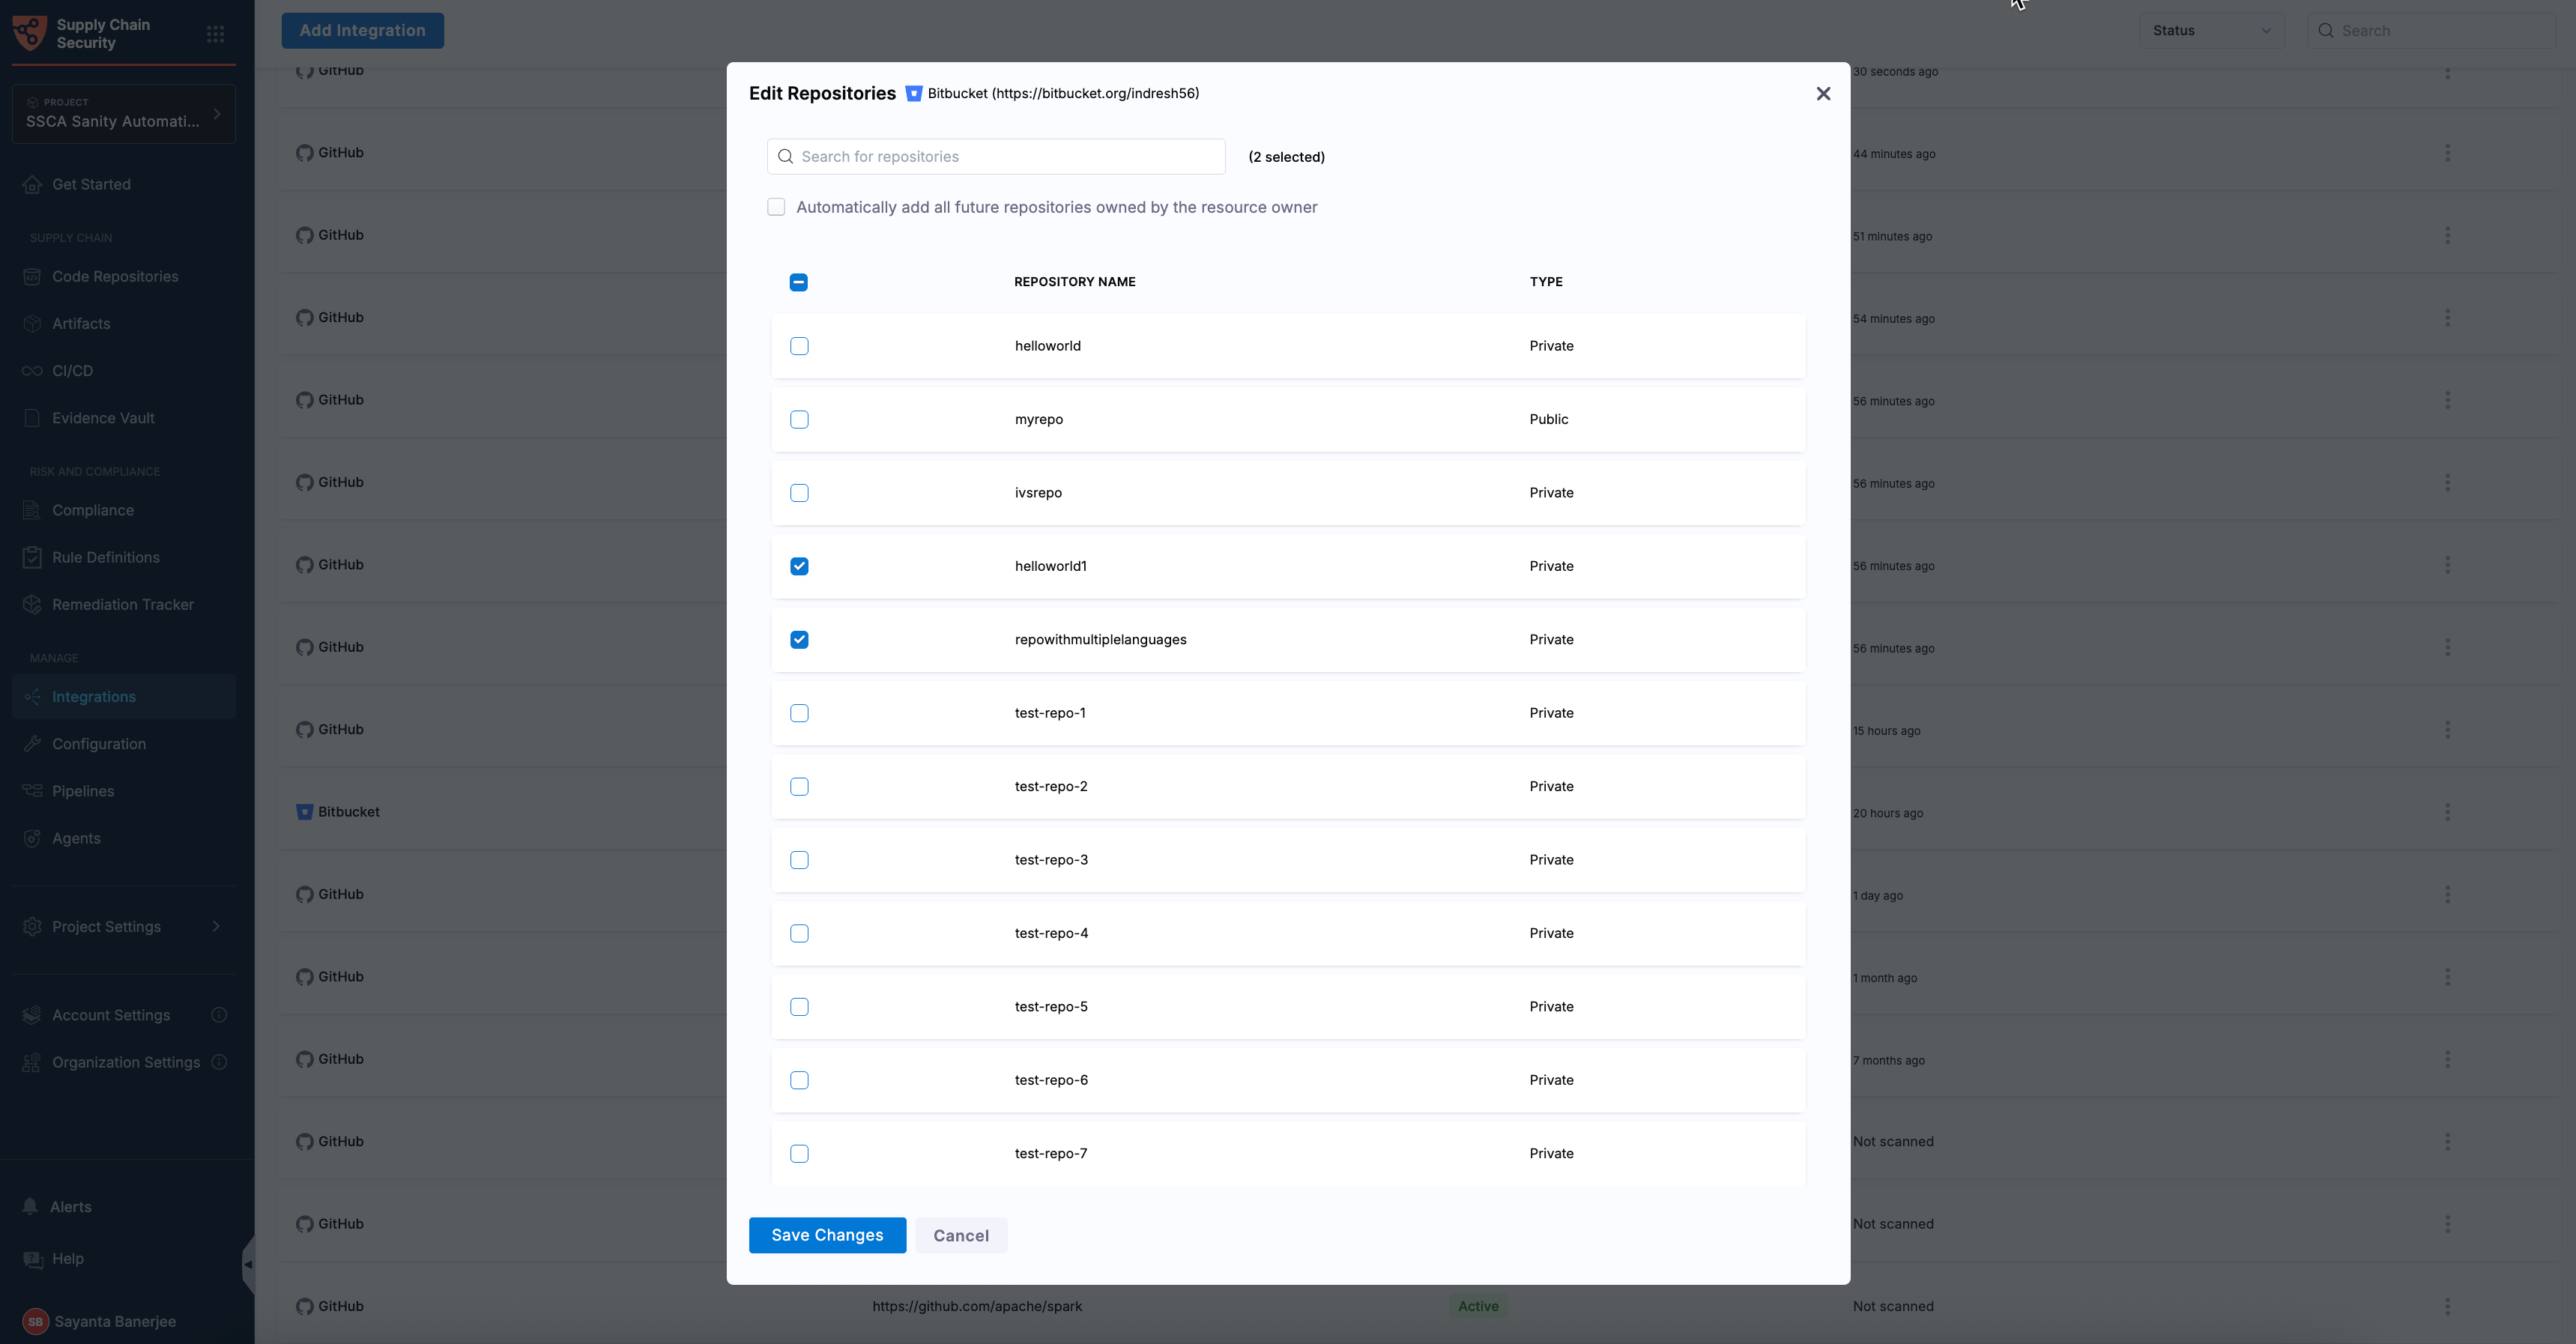
3. Click the `more options (three-dot) icon` on the right side of the integration row to view the `Edit` and `Delete` options.
* Click the `Edit (pen) icon` to open the **Edit Repositories** dialog.
* Select the checkboxes for your preferred repositories from the list or select the checkbox to automatically add all future repositories.
* After verifying the details, click **Save Changes**. Once finished, you can view the **Integration Updated** toaster message at the top, indicating the successful modification of your Bitbucket integration.
When you modify an integration and select additional repositories without unchecking the previously selected repositories, SCS scans both the newly selected repositories and the repositories that were previously selected.
* Alternatively, click the `Delete (trash) icon` to open the **Are you sure you want to delete?** dialog.
* Click **Confirm** to delete your Bitbucket integration.
Click to view full size image
***
### View an onboarded repository
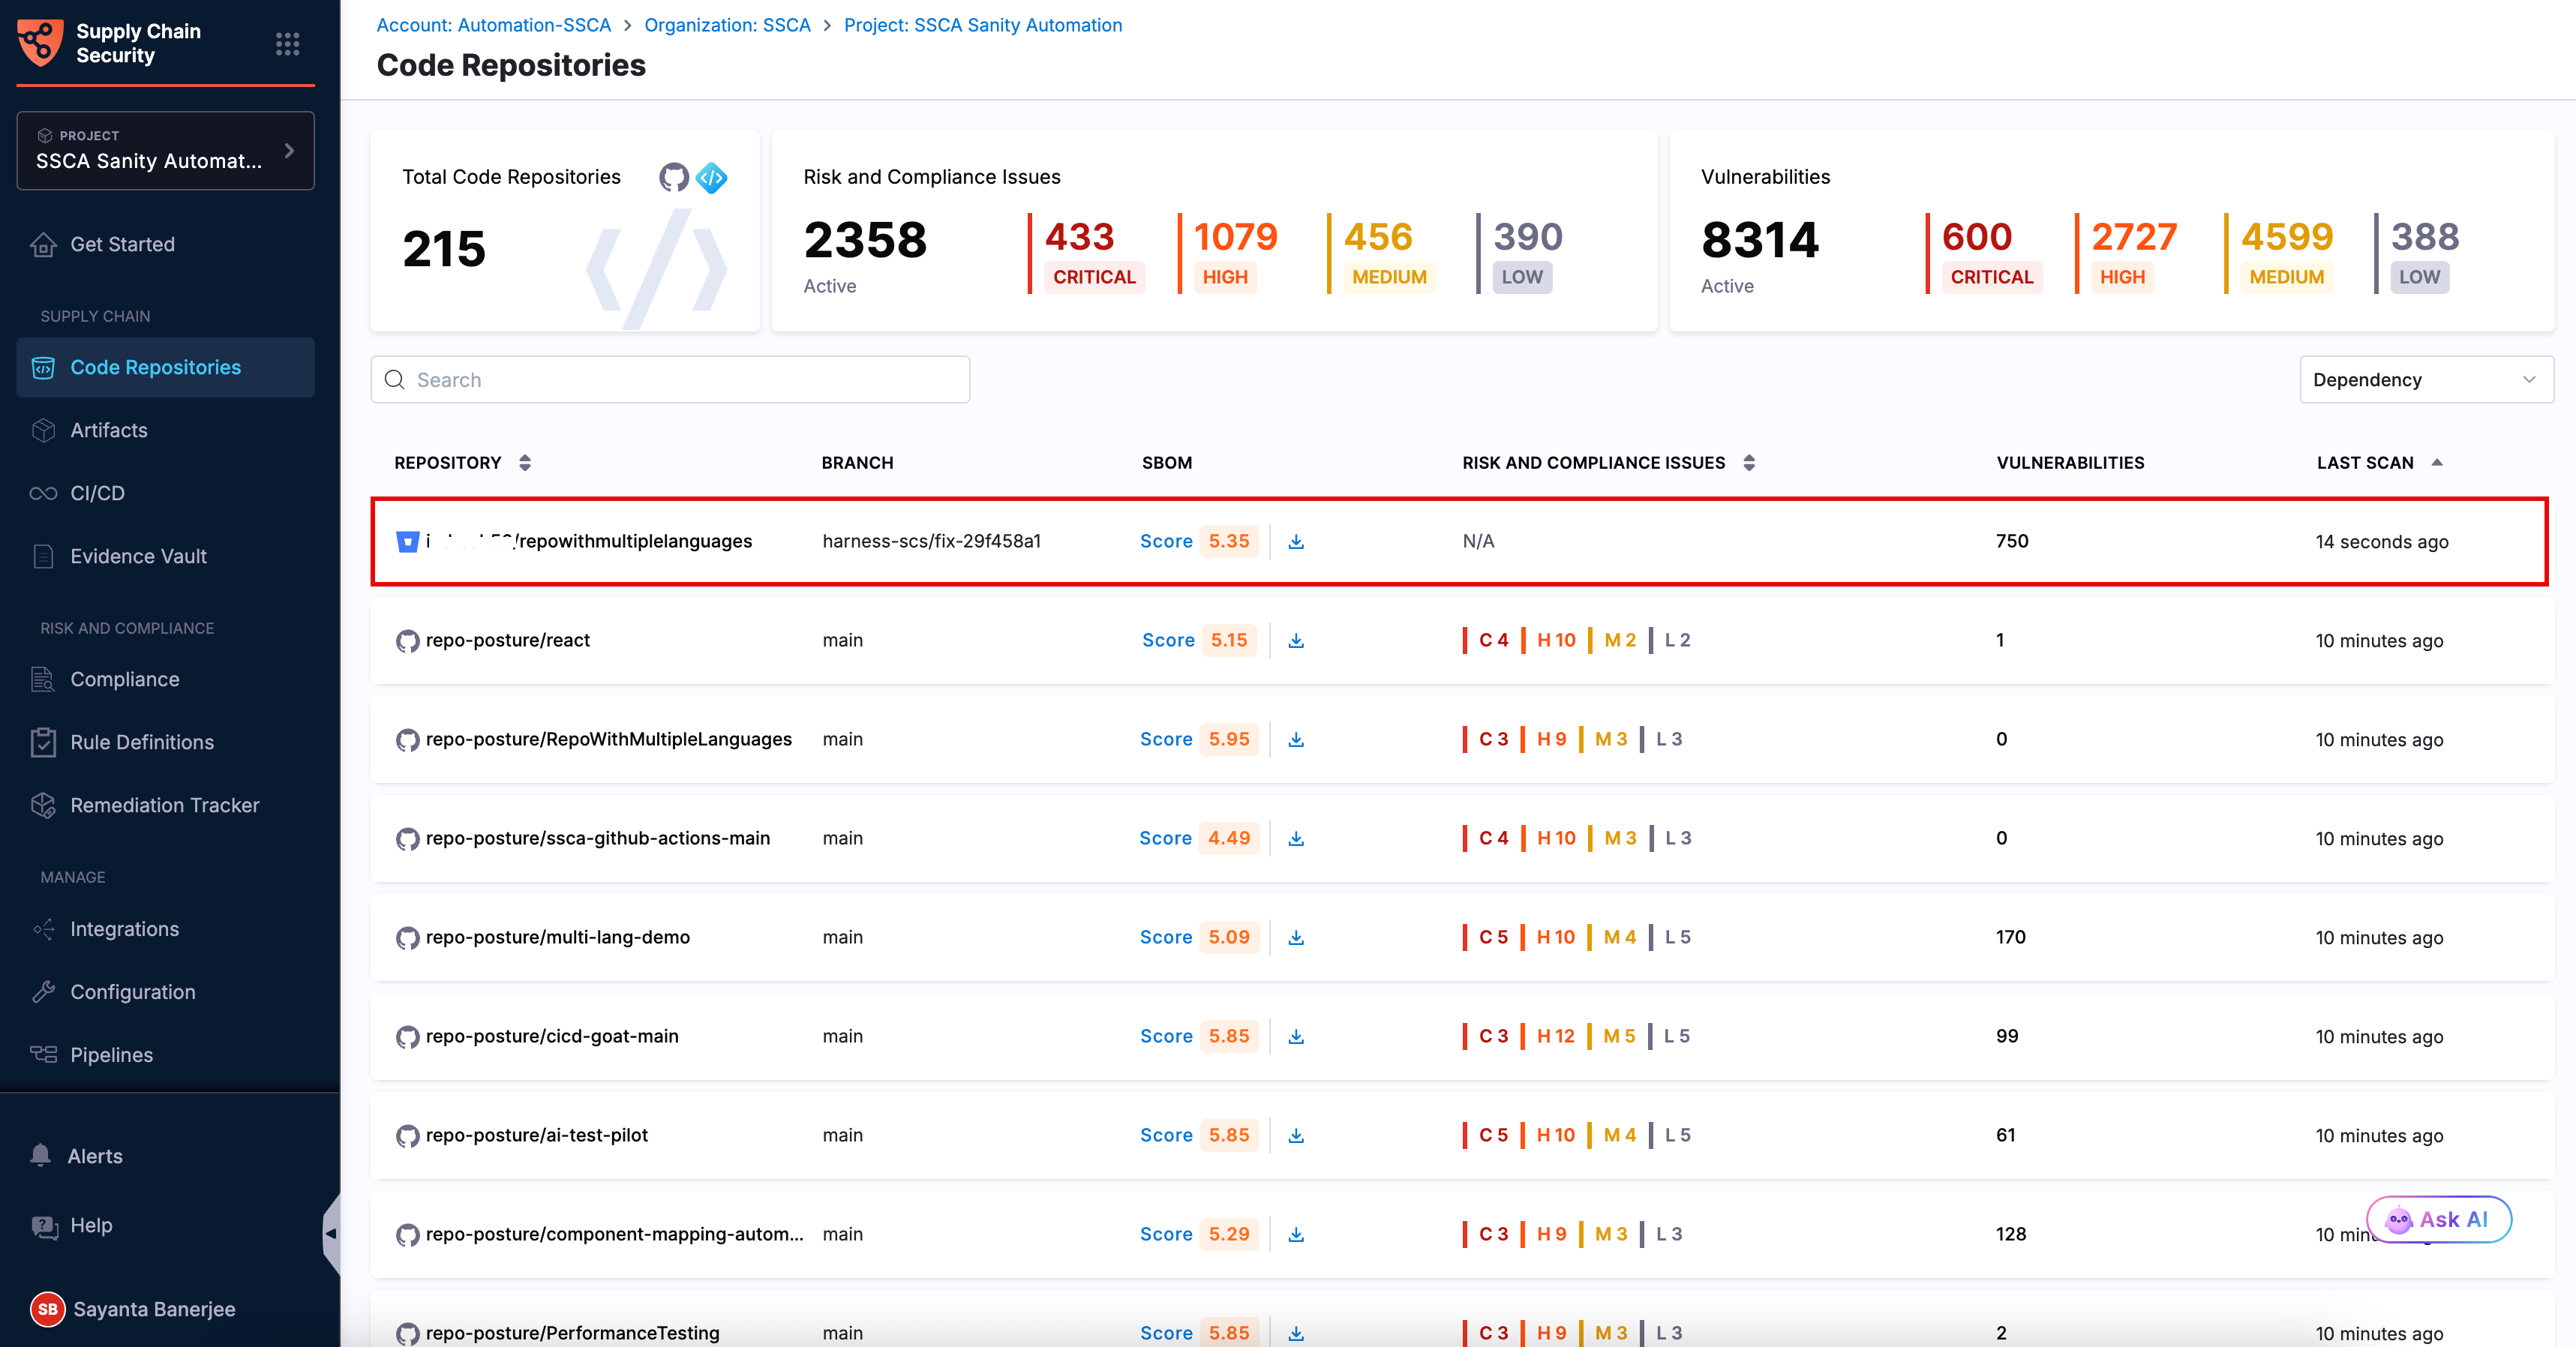
After you add a Bitbucket integration and select the repositories for scanning, SCS immediately starts scanning the selected repositories in the background. Once the scans are complete, you can view the onboarded repositories and their scan results within SCS. To view an onboarded repository, complete the following steps:
1. Navigate to the **Code Repositories** page under the **Supply Chain** section from the sidebar navigation of your SCS account. The page displays key information for each scanned repository, including the repository branch, SBOM score with an option to download the SBOM, risk and compliance overview, vulnerability count, and last scan status.
2. Identify the repositories from the list or use the search bar to find it.
3. Click the repository to view its scan details.
Click to view full size image
***
### Next steps
After you onboard your Bitbucket repositories, review the dependency and risk data that SCS generates for them:
* [Direct/Indirect Dependency](/software-supply-chain-assurance/use-scs/open-source-management/direct-indirect-dependency.md)
* [OSS Risks Remediation](/software-supply-chain-assurance/use-scs/open-source-management/oss-risks-remediation.md)
{% @harness-feedback/feedback %}