> For the complete documentation index, see [llms.txt](https://developer.harness.io/llms.txt). Markdown versions of documentation pages are available by appending `.md` to page URLs; this page is available as [Markdown](https://developer.harness.io/software-supply-chain-assurance/use-scs/open-source-management/oss-risks-remediation.md).

# OSS Risks Remediation

SCS enables you to generate SBOM via code repositories through Repository Security Posture Management (RSPM) and SBOM Orchestration in a pipeline. From the SBOM, you can remediate vulnerabilities in direct dependencies declared in your project configuration. Dependencies exposed to one or more OSS risks may contain known vulnerabilities detected through the internal database or STO scans. Remediation lets you upgrade these dependencies to the recommended or updated versions, reducing risk and improving overall application security and stability.

Remediate risks and vulnerabilities for a direct dependency by using one of the following methods:

* [Manual Pull Request](#raise-a-manual-pull-request) - Select an updated version of the dependency and manually raise a pull request to apply the update.
* [Auto Pull Request](#auto-pull-request-remediation) - Configure Auto PR remediation to automatically generate pull requests that update multiple dependencies across your onboarded repositories.

{% hint style="info" %}

* This remediation is available only for direct dependencies with OSS Risks and excludes [End of Life Components](/software-supply-chain-assurance/use-scs/risk-and-compliance/opensource-security-risk-management.md#end-of-life-components).
* Vulnerability remediation through pull requests is supported only for repositories and not for artifacts.
* Both Manual and Auto PR remediation are currently not available for SMP.
  {% endhint %}

***

### What you will learn from this topic <a href="#what-you-will-learn-from-this-topic" id="what-you-will-learn-from-this-topic"></a>

By the end of this topic, you will be able to understand:

* An overview of remediating OSS risks in direct dependencies using the SBOM.
* The detailed steps to raise a manual pull request.
* The detailed steps for Auto PR configuration.

***

### Before you begin <a href="#before-you-begin" id="before-you-begin"></a>

Make a note of the following before you proceed with the remediation:

* Make sure that your SCM provider is integrated with the platform to generate SBOMs for your code repositories. You can do this in one of the following ways:
  * Repository onboarding through RSPM currently supports GitHub. To integrate your GitHub account and onboard the repositories, refer to the [Get Started](/software-supply-chain-assurance/new-to-scs/get-started.md) guide.
  * SBOMs can be generated through pipeline execution. Supported SCM providers include GitHub and Harness Code Repository (HCR). To generate SBOM via pipeline execution, refer to the [Generate SBOM for Repositories](/software-supply-chain-assurance/use-scs/open-source-management/generate-sbom-for-repositories.md) documentation.

***

### Create/Select the GitHub connector for pull requests <a href="#createselect-the-github-connector-for-pull-requests" id="createselect-the-github-connector-for-pull-requests"></a>

Harness connectors allow you to link your Harness account to your GitHub account. SCS lets you create your own connector or select an already existing one. Make sure you complete this step before remediating OSS risks using manual or automated pull requests. Go to [Connect to a Git Repository documentation](/harness-ai/use-harness-platform/connectors/code-repositories/connect-to-code-repo.md) to understand how connectors work.

To create or select a GitHub connector for pull requests:

1. Navigate to the **Configurations** page under the **Manage** section from the sidebar navigation of your SCS account. The **General** tab opens by default.
2. Click `Select Connector` beside the `Github Connector for Pull Request` to open the `Create or Select an Existing Connector` dialog.
3. Select your required connector from the list of existing connectors. You can search for your created connector or filter connectors by **Project**, **Organization**, and **Account**.
4. Alternatively, click `+ New Connector` to create a new connector for raising pull requests in your onboarded repositories. Go to [GitHub connector settings reference](/harness-ai/use-harness-platform/connectors/code-repositories/ref-source-repo-provider/git-hub-connector-settings-reference.md) to review the available settings.
5. Click `Apply Selected`. Once selected, you can view the **Configuration Saved Successfully** toaster message at the top, indicating that the connector has been selected or created successfully.

<figure><img src="/files/7LAqBdoARzaoApCQ3OLK" alt=""><figcaption><p>Click to view full size image</p></figcaption></figure>

{% hint style="info" %}
To automatically create pull requests using Auto PR remediation, the GitHub personal access token (PAT) must have sufficient repository permissions, including write access to the repository (such as the repo scope for classic tokens or equivalent permissions for fine-grained tokens). Go to [Managing your personal access tokens](https://docs.github.com/en/authentication/keeping-your-account-and-data-secure/managing-your-personal-access-tokens) in the GitHub documentation to configure token scopes.
{% endhint %}

Once a connector is selected/created, you can proceed with OSS risks remediation through:

* [Manual Pull Request](#raise-a-manual-pull-request)
* [Auto Pull Request](#auto-pull-request-remediation)

***

### Raise a manual pull request <a href="#raise-a-manual-pull-request" id="raise-a-manual-pull-request"></a>

To remediate a direct dependency exposed to any OSS risks, complete the following steps:

1. [Select the recommended/updated dependency version](#step-1-select-the-recommendedupdated-version-of-the-dependency)
2. [Raise a manual Pull Request to update the dependency version](#step-2-raise-a-pull-request-manually)

#### Step 1: Select the recommended/updated version of the dependency <a href="#step-1-select-the-recommendedupdated-version-of-the-dependency" id="step-1-select-the-recommendedupdated-version-of-the-dependency"></a>

Updating a dependency to a recommended or an updated version helps address known risks and vulnerabilities, improving your application’s security and reducing potential exposure. When you select a recommended or updated version from the dependency side panel, the change is applied directly through a Pull Request, making it easier to keep your dependencies secure.

To select the recommended version of the dependency:

1. Navigate to the **Code Repositories** page under the **Supply Chain** section from the sidebar navigation of your SCS account and select your repository. The `Overview` tab opens by default.
2. Click the `SBOM` tab to view the list of dependencies.
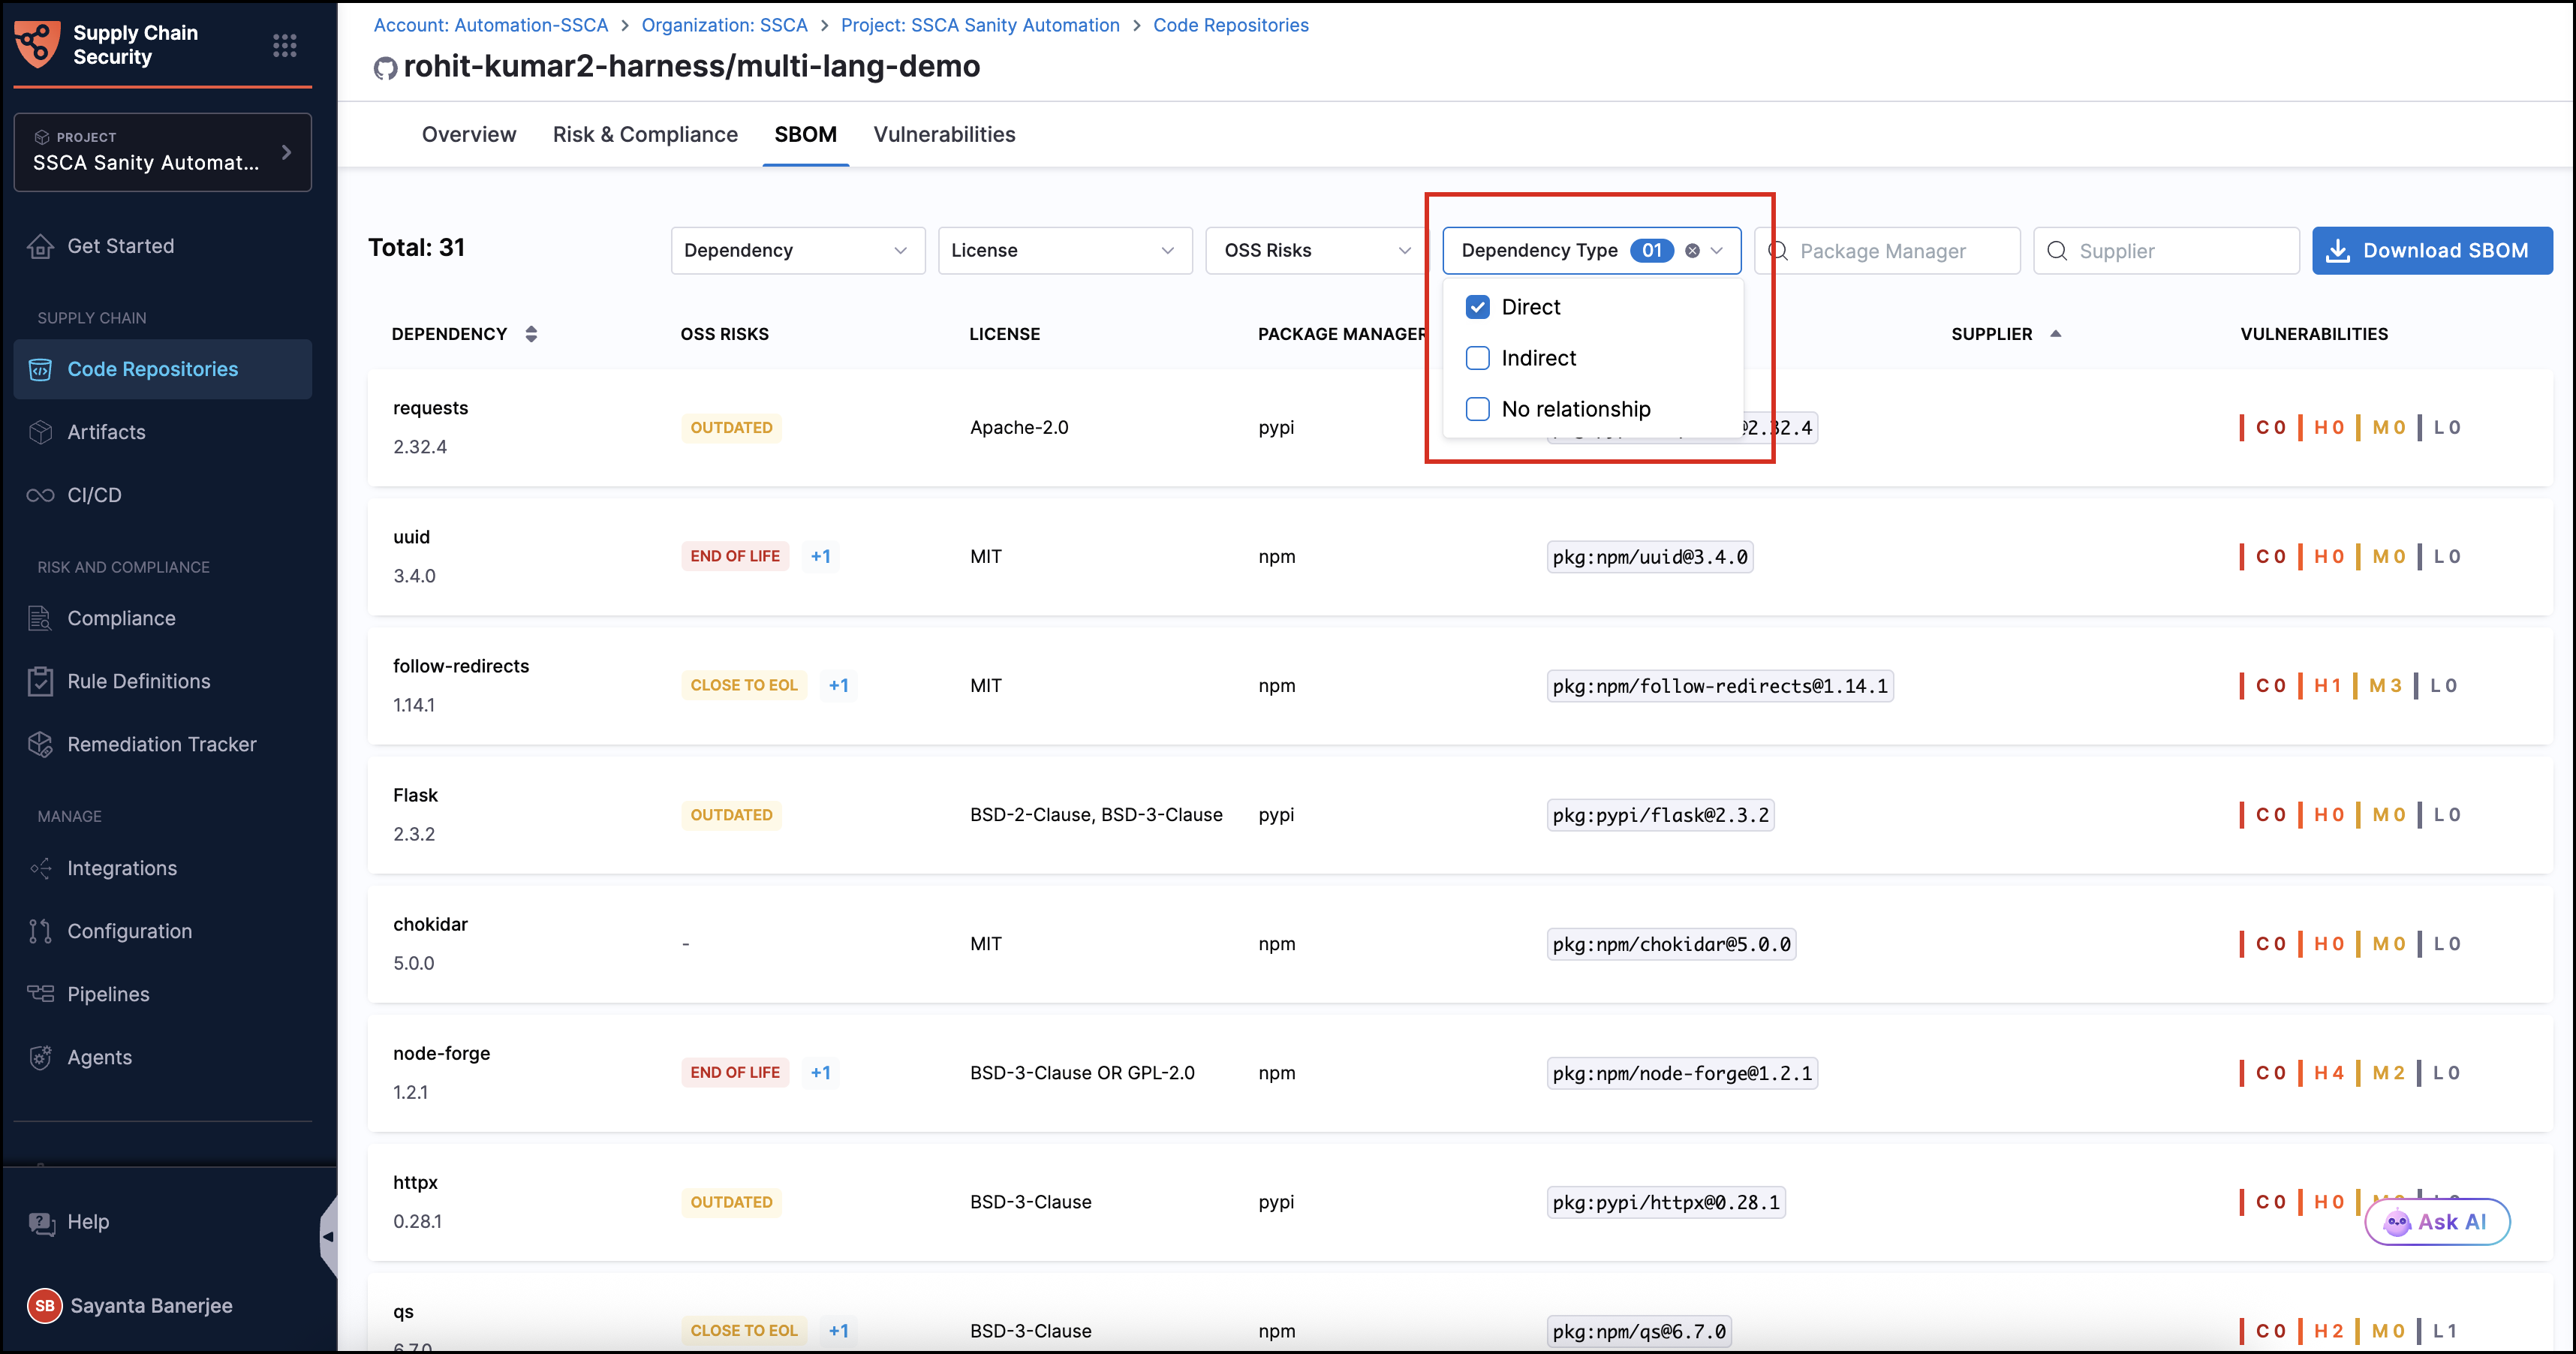
3. Click `Dependency Type`, then select the checkbox next to `Direct` to filter the list to show direct dependencies related to your project.

<figure><img src="/files/QapIr6zRGdKLCTsS3y2j" alt=""><figcaption><p>Click to view full size image</p></figcaption></figure>

4. Click on any dependency exposed to OSS risks from the dependency list to open the dependency side panel.
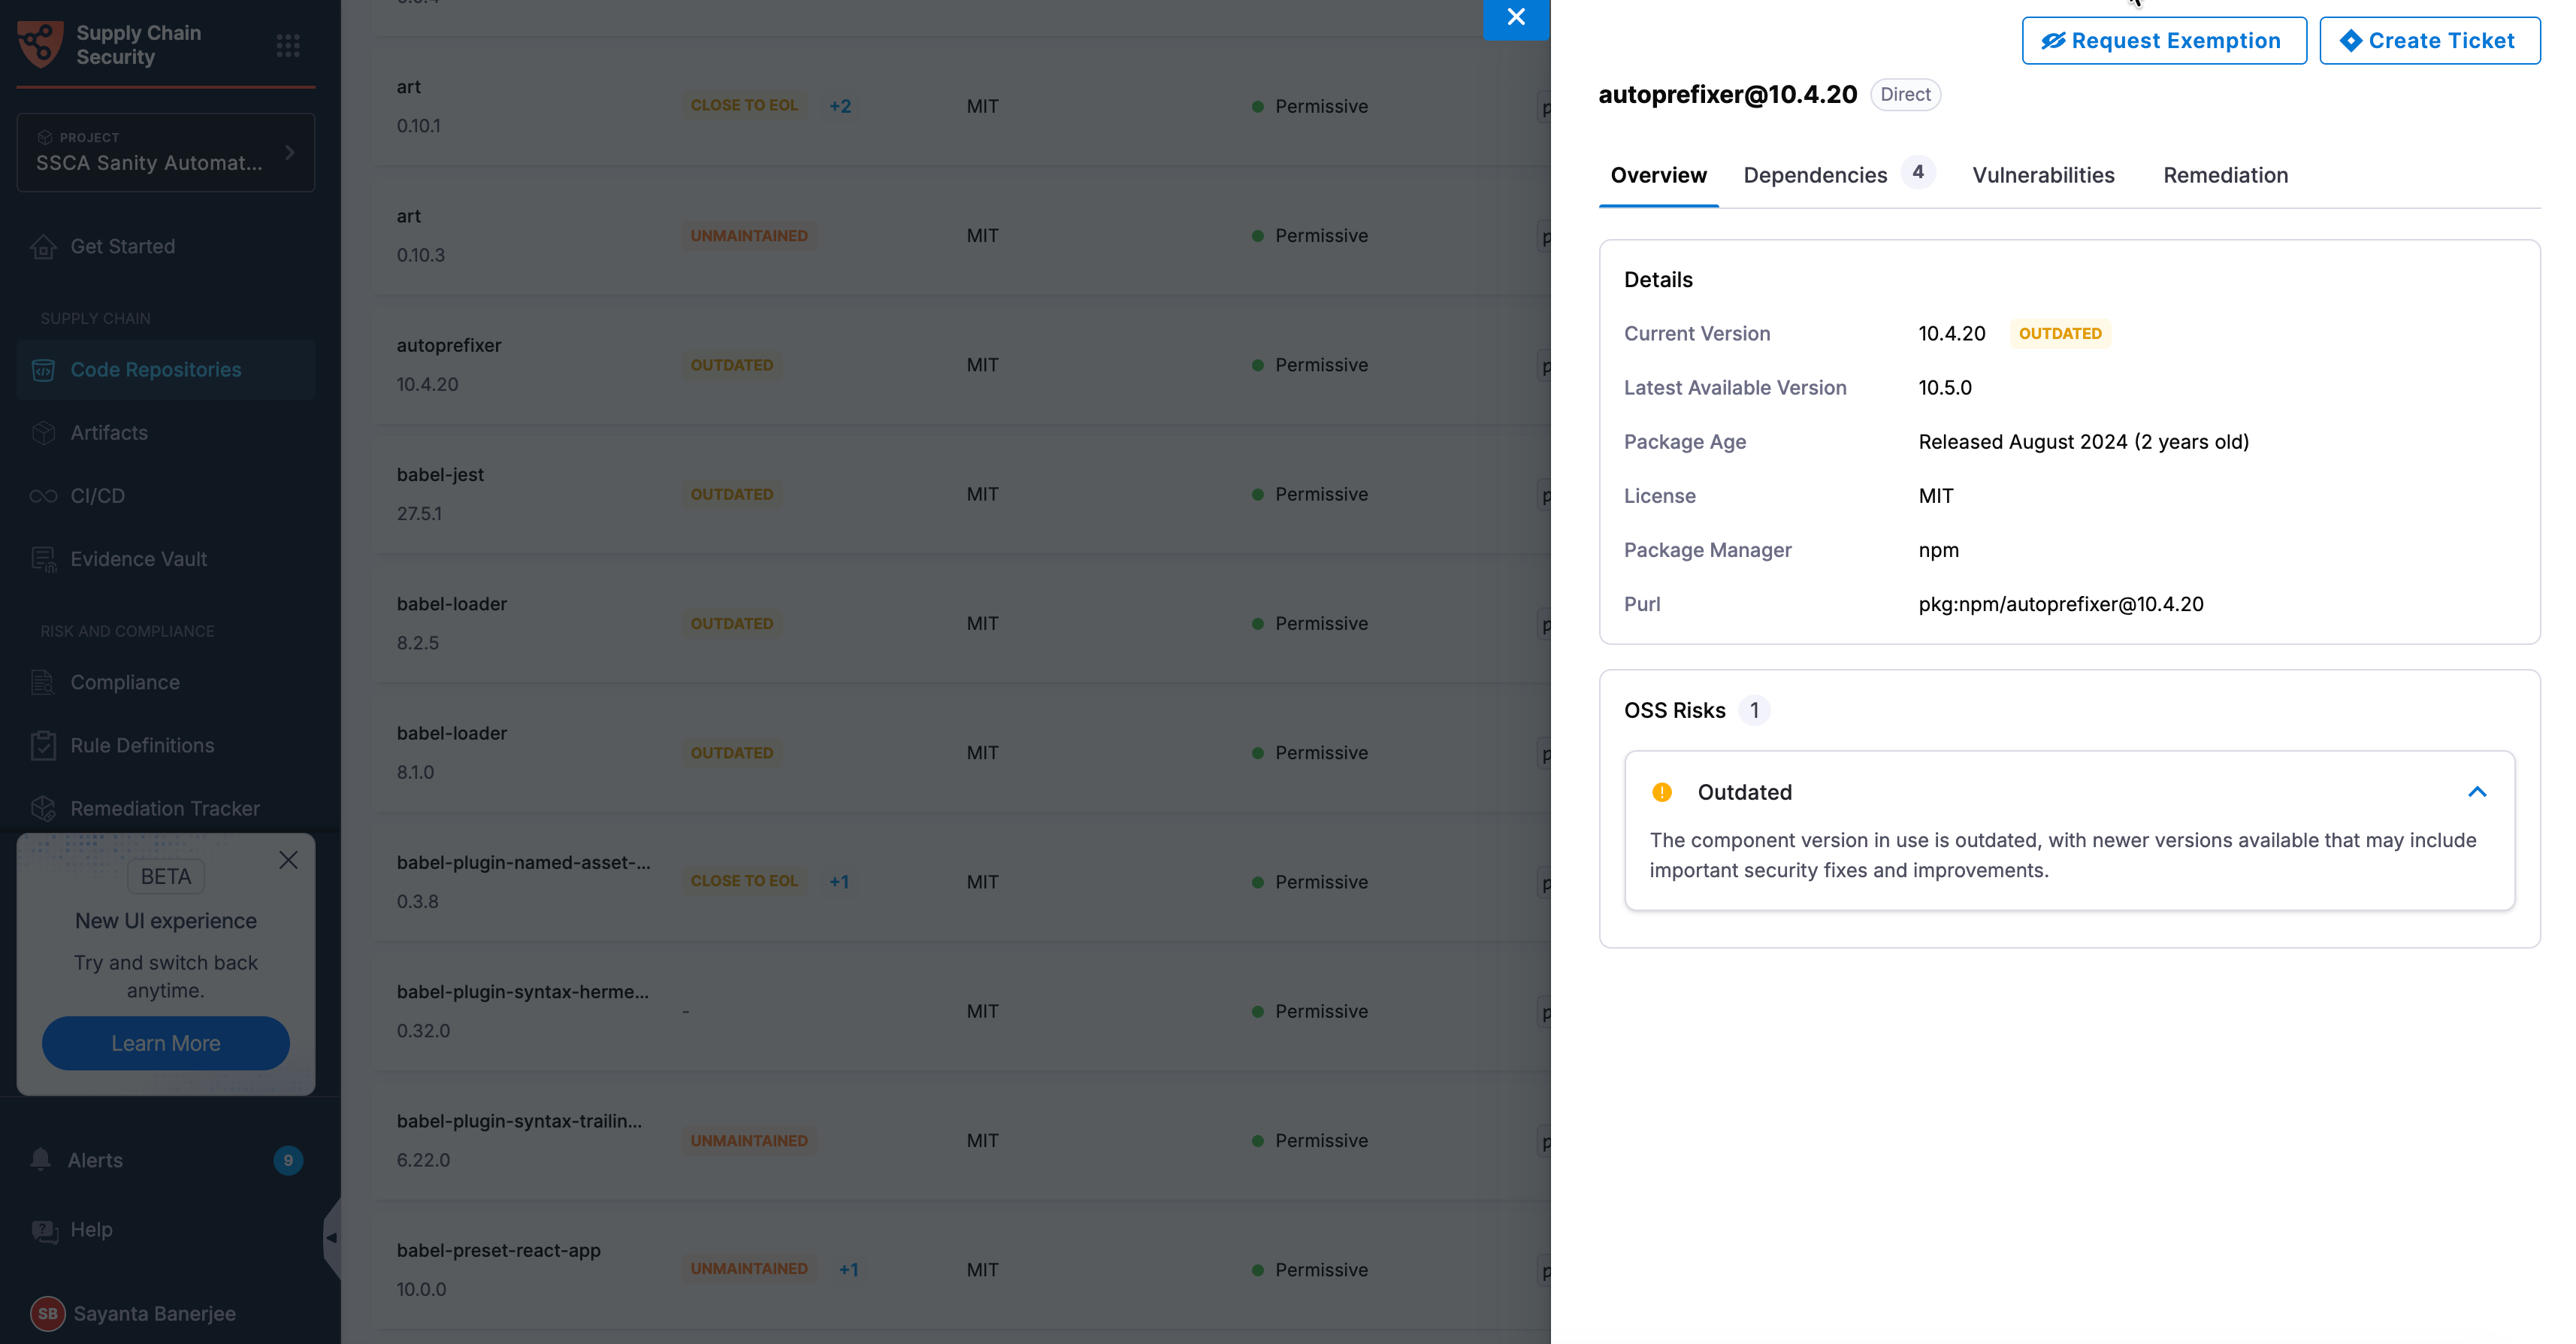
5. The **Overview tab** of the dependency side panel opens by default. It has the following sections:

* **Details** - Review the dependency’s current and latest available versions, package age, license, package manager, and associated PURL.
* **OSS Risks** - Displays detailed information about the OSS risks associated with the selected dependency, including the total number of identified risks. Each risk is presented in a collapsible section. Click a collapsed section to view its details.

  <figure><img src="/files/HjZeAovD823fDhQLhhRY" alt=""><figcaption><p>Click to view full size image</p></figcaption></figure>
* **Vulnerabilities** - Displays the number of vulnerabilities by severity (Critical, High, Medium, and Low) and their source.

  <figure><img src="/files/Am49F9oR1Zb0X4DKZi7C" alt=""><figcaption><p>Click to view full size image</p></figcaption></figure>

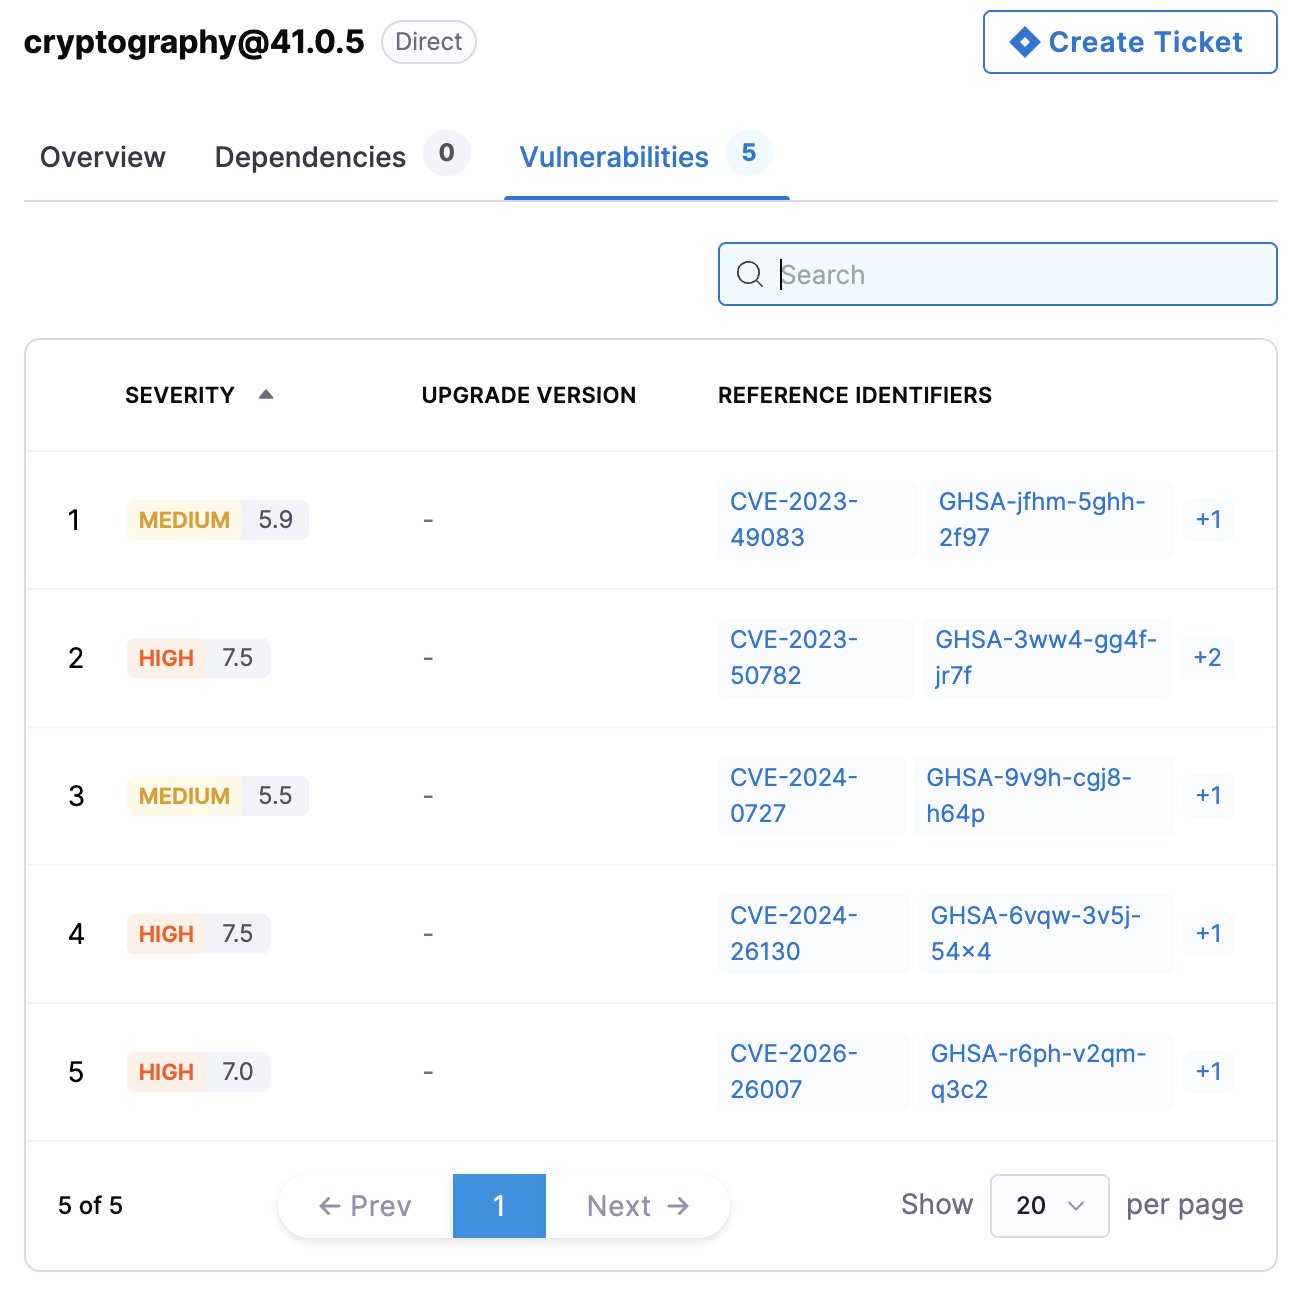
  * Click `View` to see detailed vulnerability information in a table under the **Vulnerabilities tab** of the side panel. Each entry includes severity with a vulnerability severity score, upgrade version, and reference identifiers (CVE, GHSA, CWE, and many more).

    <div data-gb-custom-block data-tag="hint" data-style="info" class="hint hint-info"><p>Vulnerabilities are derived either from the internal database or from the STO scan. If the STO license is not enabled, dependency vulnerabilities are mapped from the Harness internal database. If you have an STO license and want to map the vulnerabilities from the Harness internal database, contact <a href="mailto:support@harness.io">Harness Support</a> to enable this feature.</p></div>

    <figure><img src="/files/Q71pJDQhp7M3WFKZrbte" alt=""><figcaption><p>Click to view full size image</p></figcaption></figure>

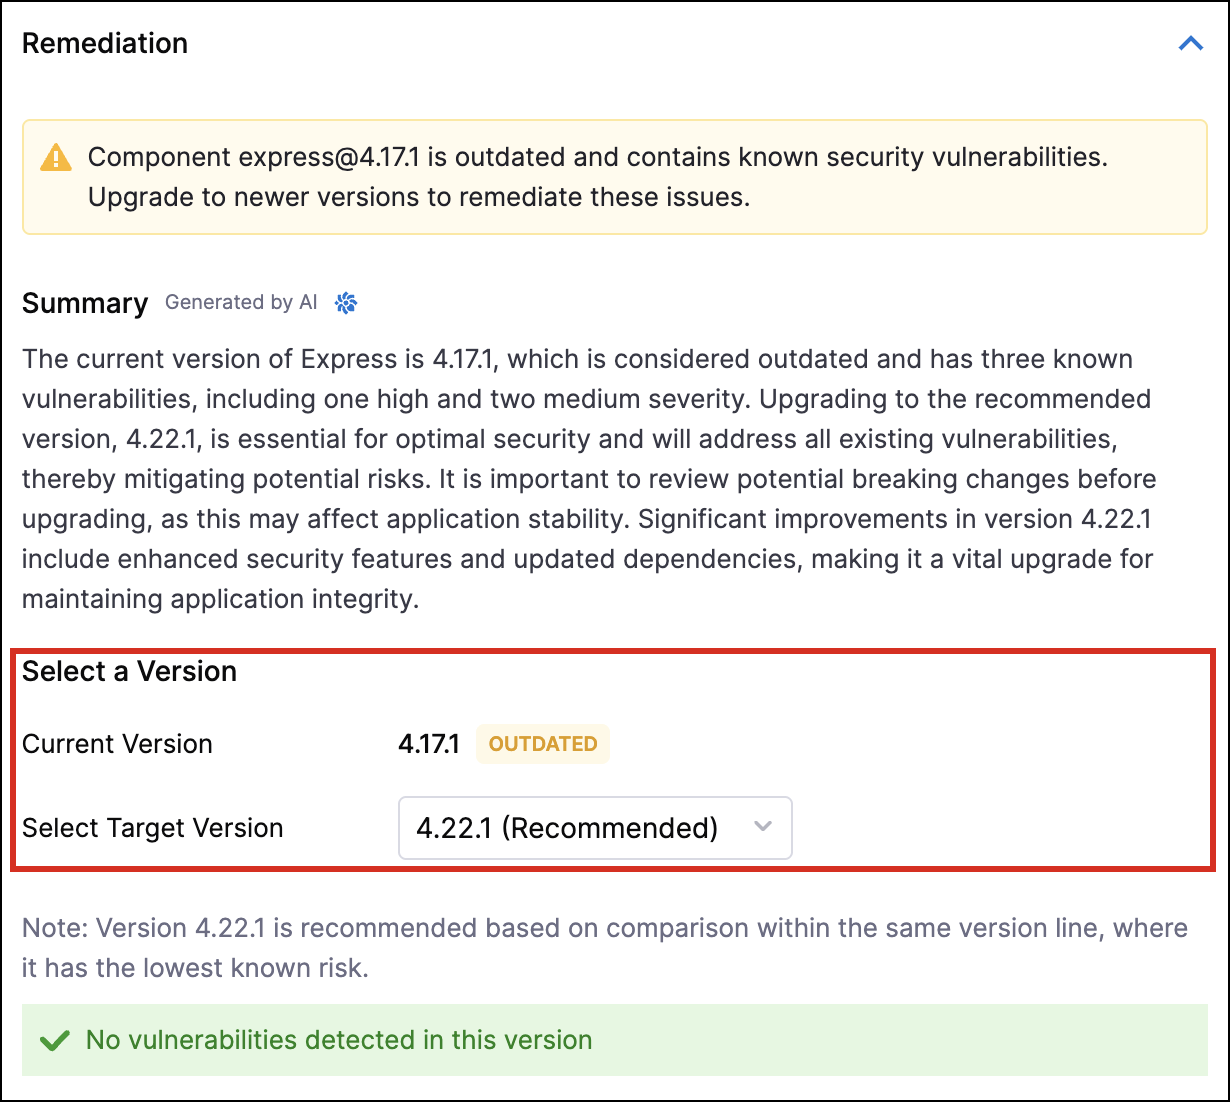
6. Click the **Remediation tab** to see the remediation details. The tab displays a warning about the current dependency version. It also includes an AI-generated summary that highlights the improvements introduced by the recommended dependency version.

{% hint style="info" %}
The Target Version will be selected by default if there is enough information available about the dependency.
{% endhint %}

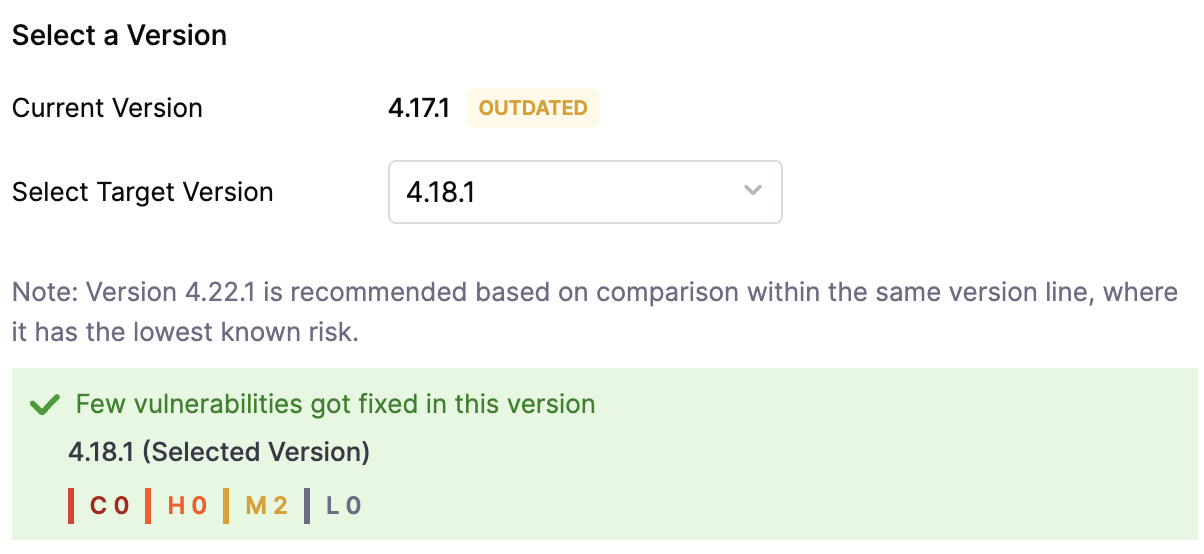
7. Under Select a Version, the recommended Target Version is selected by default. Alternatively, if no Target Version is recommended, click the dropdown to select a dependency version as the Target Version of your choice.

{% hint style="info" %}
A target version is recommended based on comparison within the same version line, where it has the lowest known risk.
{% endhint %}

<figure><img src="/files/ai59sG9HzcrgoxonT9gz" alt=""><figcaption><p>Click to view full size image</p></figcaption></figure>

{% hint style="info" %}
Selecting a target version automatically displays a visualization of existing vulnerabilities by severity for the selected version, or a `No vulnerabilities detected in this version` message if none are found.

<img src="/files/oxS4GkkMHR6zxduXMDue" alt="Click to view full size image" data-size="original">
{% endhint %}

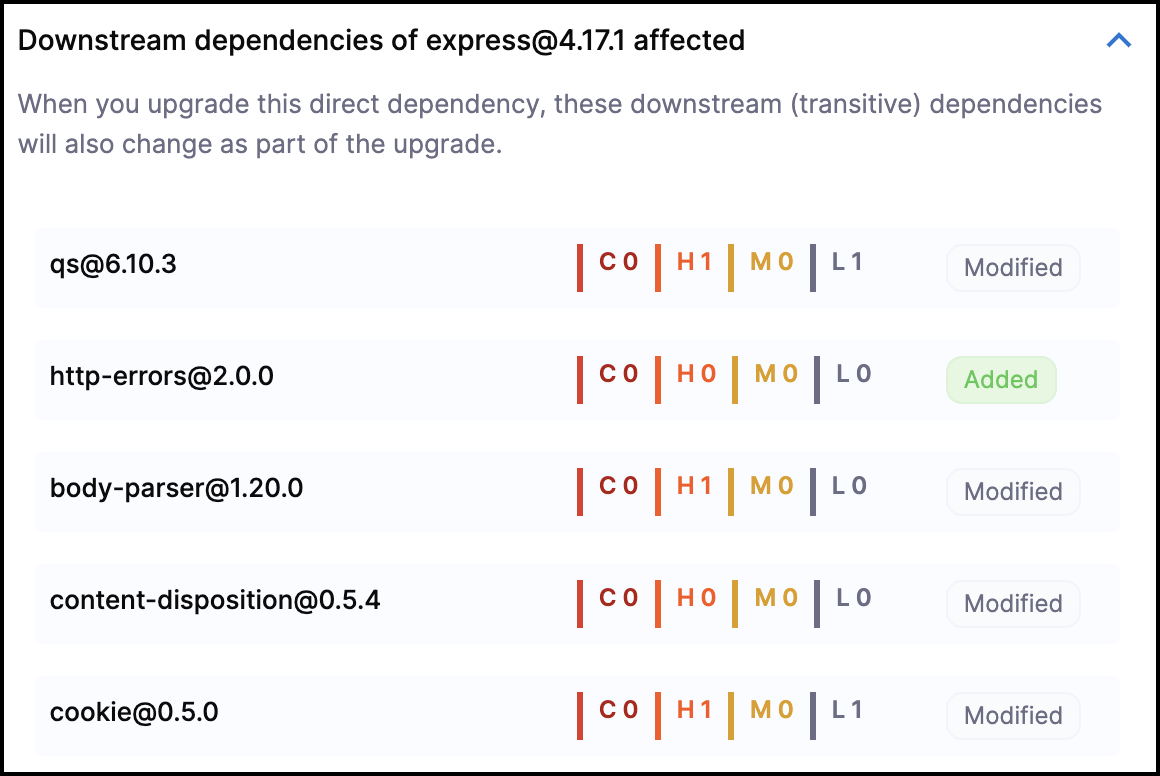
8. Click on the expandable **Top Dependencies Impacted** to open a list of the affected transitive dependencies because of the upgrade. These are direct dependencies of the primary dependency and the list shows which of them are modified and whether any new dependencies are added.
<figure><img src="/files/p4ZYoGY4Bv3HppyMhFgn" alt=""><figcaption><p>Click to view full size image</p></figcaption></figure>

#### Step 2: Raise a pull request manually <a href="#step-2-raise-a-pull-request-manually" id="step-2-raise-a-pull-request-manually"></a>

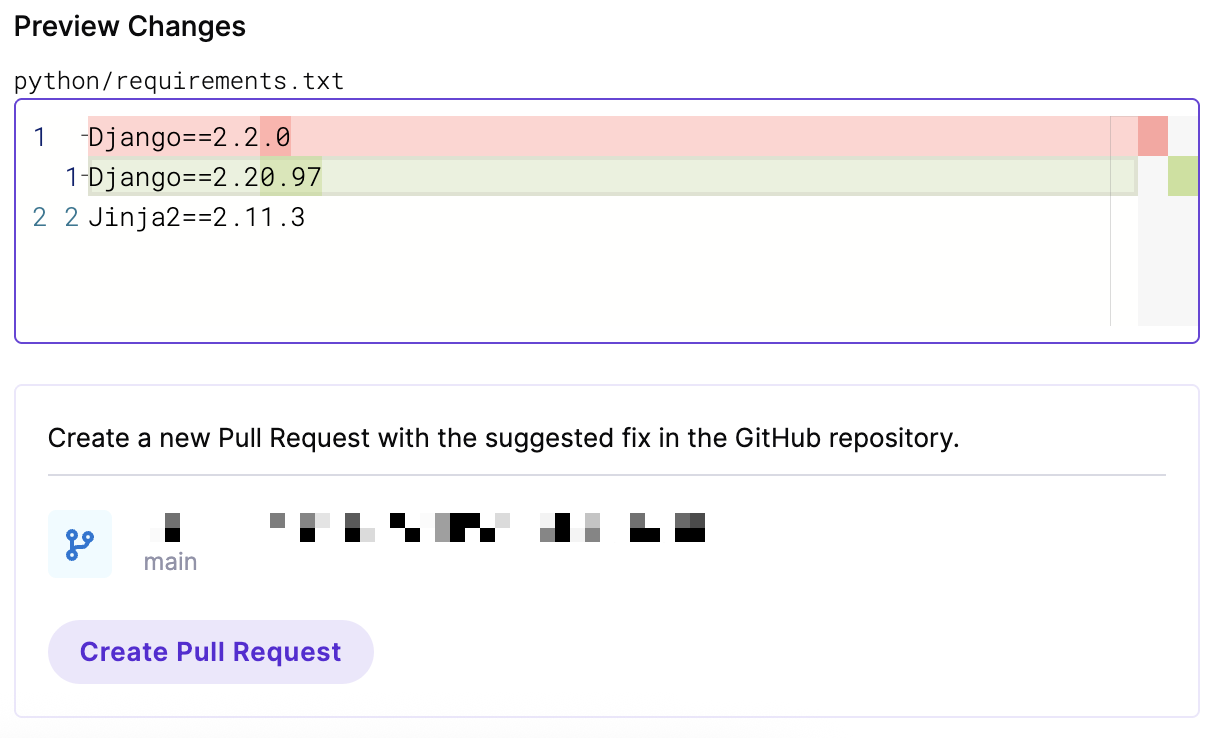
Selecting a target version shows you the preview changes in the auto-detected manifest file for the dependency version change. To make that change in your repository, you need to raise a pull request.

<figure><img src="/files/EAzoiLLqk8HDRkgyukwj" alt=""><figcaption><p>Click to view full size image</p></figcaption></figure>

To raise a Pull Request manually:

1. Click on the `Create Pull Request` button to create a pull request on the default branch of the repository.
2. Merge the Pull Request to apply the dependency update, which remediates the vulnerabilities and risks associated with the dependency.

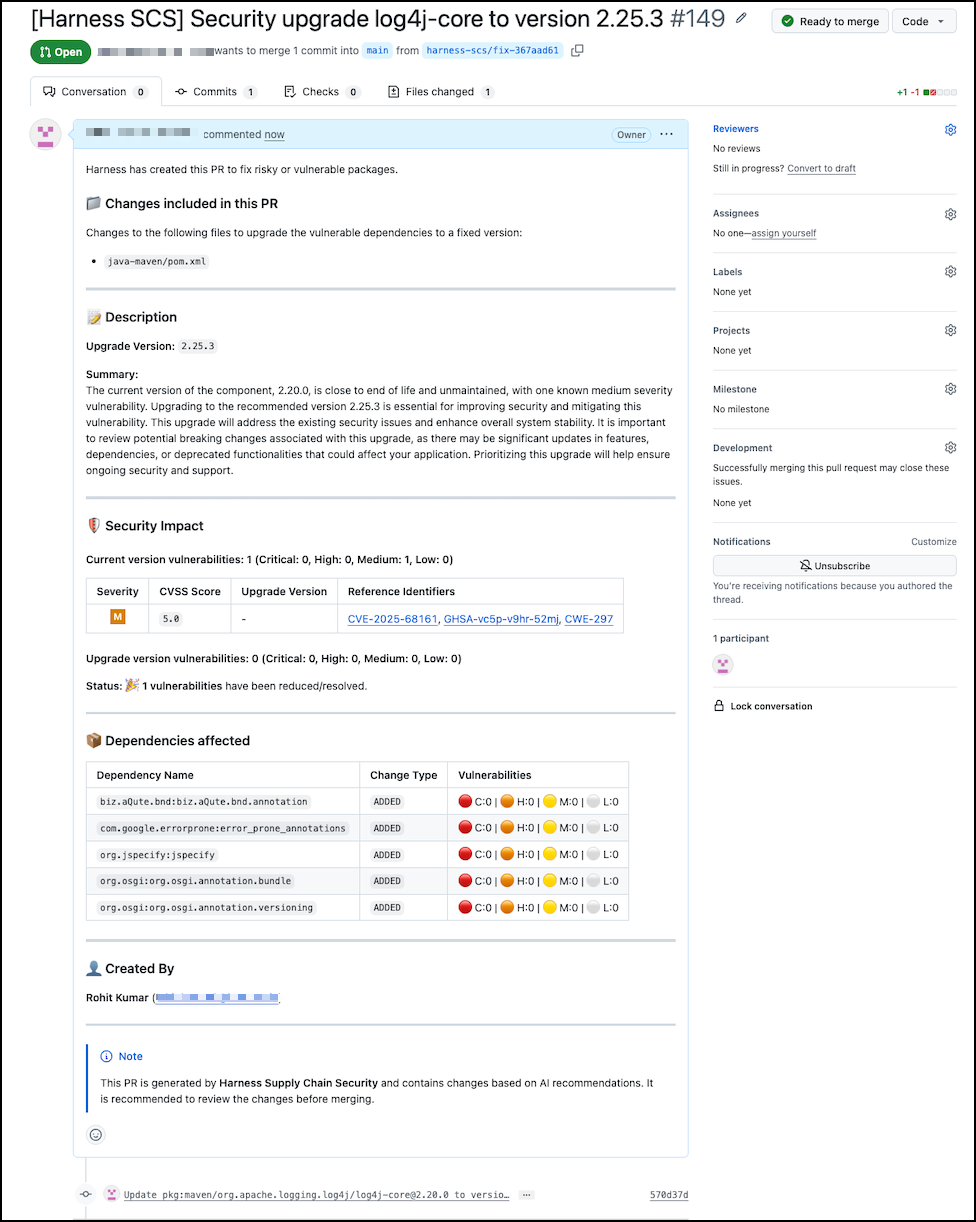
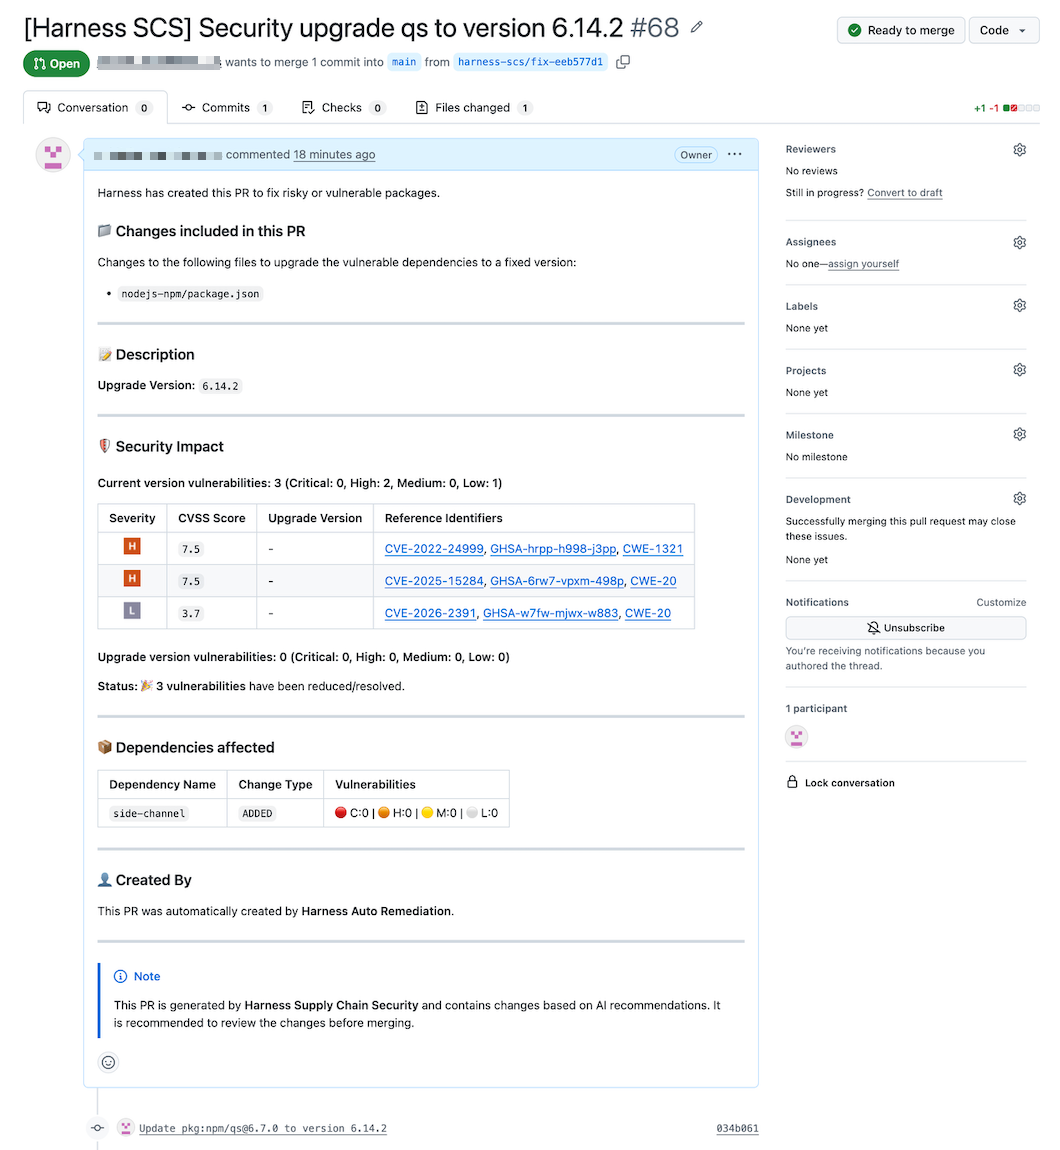
Below is a pull request summary created through manual PR remediartion, highlighting the recommended upgrade, security impact, and affected dependencies.

<figure><img src="/files/JCB4Ys4FxwopOVkYNhPV" alt=""><figcaption><p>Click to view full size image</p></figcaption></figure>

***

### Auto pull request remediation <a href="#auto-pull-request-remediation" id="auto-pull-request-remediation"></a>

Setting up Auto PR configuration lets you control when automated pull requests are created to update open-source dependencies across all onboarded repositories.

To set up the Auto PR configuration:

1. Navigate to the **Configurations** page under the **Manage** section from the sidebar navigation of your SCS account. The **General** tab opens by default.
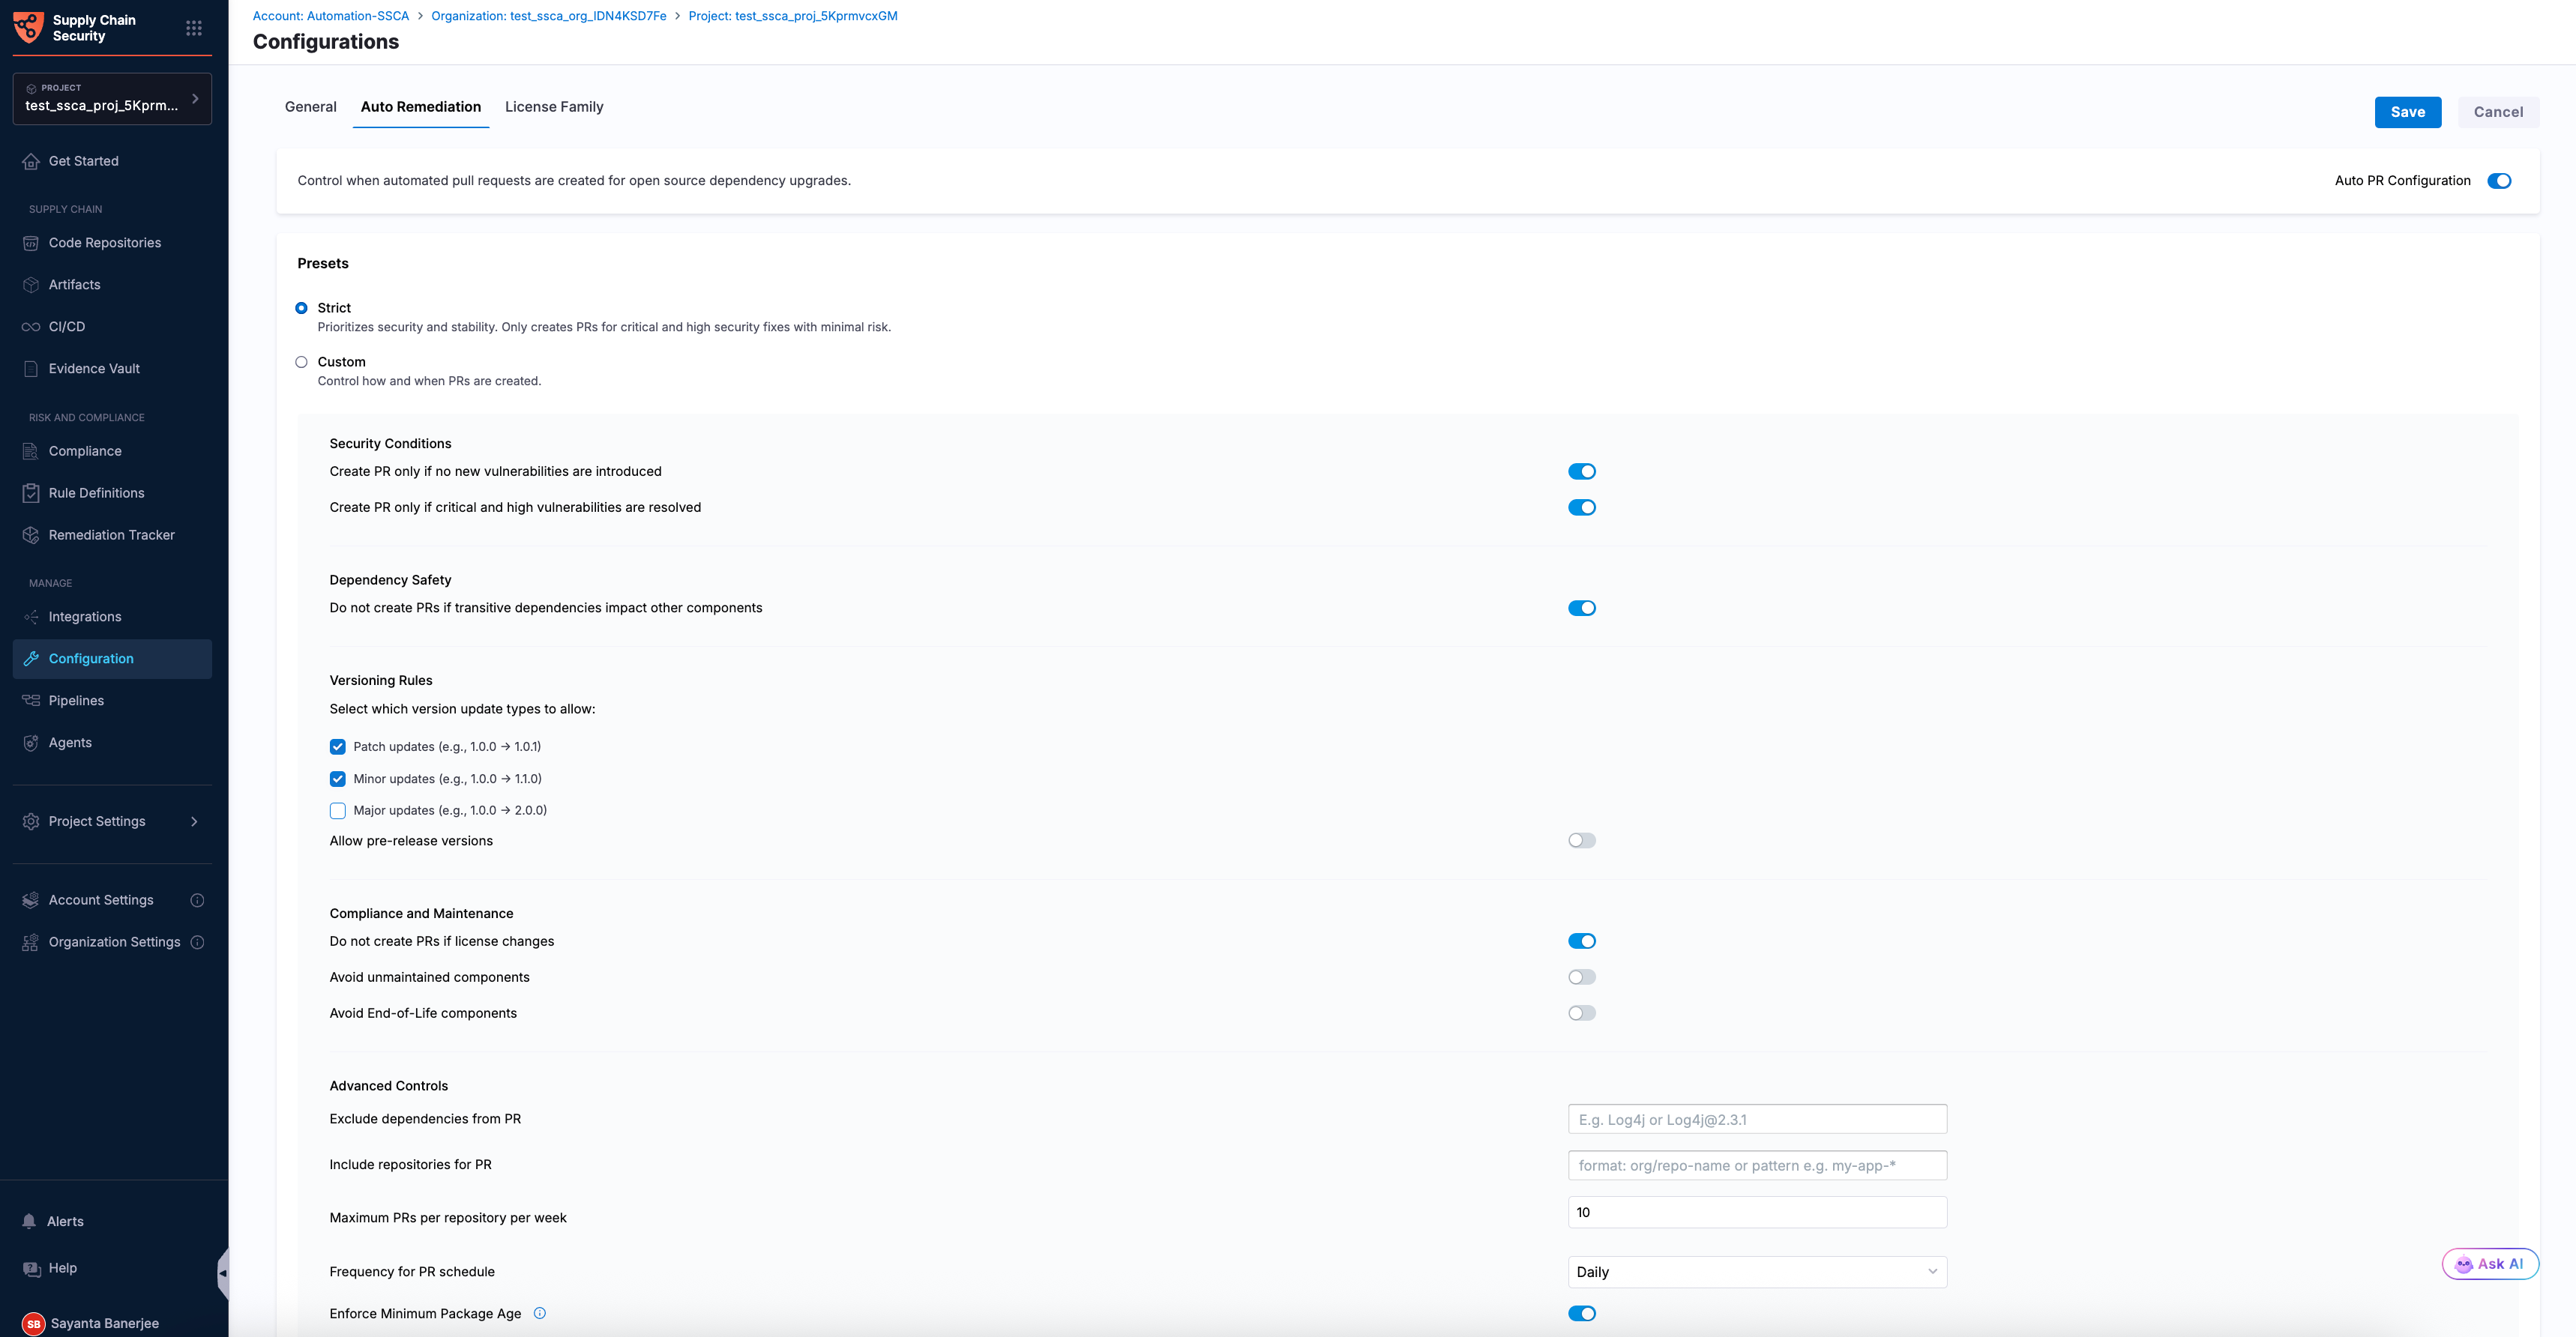
2. Click on the `Auto Remediation` tab and enable the **Auto PR Configuration toggle** that lets you set the presets. A preset is a set of settings you can use to control automatic pull requests. There are two presets:

* **Strict** - A preset that prioritizes security and stability and lets you create pull requests for critical and high security fixes with minimal risk. This is enabled by default.
* **Custom** - A preset that controls how and when the pull requests are created.

{% hint style="info" %}

* Any change in the settings automatically changes the selected preset to custom.
* You can switch back to the Strict preset at any time.
  {% endhint %}

3. Select the radio button beside `Custom` to choose the Custom preset. Configure the following settings:

* **Security Conditions**
  * Enable the toggle beside `Create PR only if no new vulnerabilities are introduced` to raise a pull request only if there are no new vulnerabilities found within the scanned dependencies. This is enabled by default with the Strict preset.
  * Enable the toggle beside `Create PR only if critical and high vulnerabilities are resolved` to raise a pull request only if the critical and high vulnerabilities are resolved from the scanned dependencies. This is enabled by default with the Strict preset.
* **Dependency Safety**
  * Enable the toggle beside `Do not create PRs if transitive dependencies impact other components` to prevent the raising of pull requests if the dependency updates impact transitive dependencies, which in turn impact other dependencies. This is enabled by default with the Strict preset.
* **Versioning Rules**
  * The following are the types of version updates to allow under versioning rules:
    * **Patch Updates:** Select the checkbox beside `Patch Updates` to allow patch updates. This is enabled by default with the Strict preset.
    * **Minor Updates:** Select the checkbox beside `Minor Updates` to allow patch updates. This is enabled by default with the Strict preset.
    * **Major Updates:** Select the checkbox beside `Major Updates` to allow patch updates.
  * Enable the toggle beside `Allow pre-release versions` to allow pre-release versions.
* **Compliance and Maintenance**
  * Enable the toggle beside `Do not create PRs if license changes` to prevent the creation of pull requests in the event of a change in the license during any dependency update. This is enabled by default with the Strict preset.
  * Enable the toggle beside `Avoid unmaintained components` to avoid updating and remediating dependencies with [unmaintained components](/software-supply-chain-assurance/use-scs/risk-and-compliance/opensource-security-risk-management.md#unmaintained-components-oss-risk---4) identified as OSS risk.
  * Enable the toggle beside `Avoid End-of-Life components` to avoid updating and remediating dependencies with [End of Life](/software-supply-chain-assurance/use-scs/risk-and-compliance/opensource-security-risk-management.md#end-of-life-components) OSS risk.
* **Advanced Controls**
  * Specify the dependencies to exclude from a raised pull request by entering comma-separated strings. For example, *Log4j or Log4j\@2.3.1, flask\@0.5.1*.
  * Specify the repositories for which automated pull requests can be raised. You can enter one or more repository names in the format `<org>/<repo-name>`. Wildcard patterns are also supported. For example, *my-app-\**.
  * Specify the maximum number of pull requests that you can raise for a repository in a week. By default, the value is set to 10.
  * Select the frequency for the pull request schedule from the dropdown. The available options are `Daily`, `Weekly`, `Bi-weekly`, and `Monthly`. By default, it is set to `Daily`.
  * Enable the toggle beside `Enforce Minimum Package Age` to enforce a minimum package age for dependency versions. When enabled, upgraded pull requests include only dependency versions that meet the specified minimum package age requirement. This helps reduce the risk of introducing newly released packages. This setting is enabled by default with the Strict preset.
  * Specify the minimum number of days a package must exist before it can be considered for upgrades. By default, this value is set to 2 days.

<figure><img src="/files/B2qMxUwqRCqVeDsiYxkX" alt=""><figcaption><p>Click to view full size image</p></figcaption></figure>

4. After verifying the details, click **Save**. Once saved, you can view the **Auto PR configuration saved successfully** toaster message at the top, indicating the successful set up of the Auto PR configurations.

{% hint style="info" %}

* Dependency data is refreshed every 2 days to fetch newly available dependencies.
  {% endhint %}

Below is a pull request summary created through auto PR remediation, highlighting the recommended upgrade, security impact, and affected dependencies.

<figure><img src="/files/CrNVLDTqktLQCN0YvPyD" alt=""><figcaption><p>Click to view full size image</p></figcaption></figure>

***

### Next steps <a href="#next-steps" id="next-steps"></a>

* [Repository Security Posture Management](/software-supply-chain-assurance/use-scs/risk-and-compliance/repository-security-posture-management-rspm.md): Continuously monitor your repositories for security, compliance, and configuration risks to strengthen your software supply chain posture.
* [Generate AIBOM for Repositories](/software-supply-chain-assurance/use-scs/open-source-management/generate-aibom-for-repositories.md): Generate AI Bill of Materials (AIBOMs) to identify and inventory AI components used across your source code repositories.