Build and test on a Kubernetes cluster build infrastructure
This tutorial demonstrates how you can use Harness CI to build and test on a Kubernetes cluster build infrastructure. In this tutorial, you'll create a Harness CI pipeline with two stages that does the following:
- Clones a sample app code repo.
- Builds the app code and runs unit tests.
- Packages the app as a Docker image, and uploads it to a Docker Hub repo.
- Pulls the uploaded image into the build infrastructure as a dependency.
- Runs an integration test against the app.
This tutorial uses publicly-available code and images. You need a Harness account, Github account, and a Docker Hub account.
All build infrastructure options, including Kubernetes cluster builds, are available across Free, Team, and Enterprise plans.
Prerequisites
This tutorial assumes you have experience with Kubernetes, such as setting up service accounts and clusters.
In addition to a Harness account, you need the following accounts and tools:
- A GitHub account where you can fork the tutorial repo.
- A Docker Hub account and repo where the pipeline can push and pull app images.
- A Kubernetes cluster where you'll install the Harness Delegate and run the build farm. The cluster needs the following minimum specifications:
- Pods: 3 (two for the Delegate and one for the build farm)
- Machine type: 4vCPU
- Memory: 16GB RAM
- Networking: Outbound HTTPS for the Harness and Docker Hub connections. Allow port 22 for SSH.
- Namespace: During the tutorial, when you install the Harness Delegate, the
harness-delegate-ngnamespace is created. You'll use the same namespace for the build infrastructure.
- A Kubernetes service account with permission to create entities in the target namespace. The set of permissions should include
list,get,create, anddeletepermissions. Usually, thecluster-adminpermission ornamespace adminpermission is sufficient. For more information, go to the Kubernetes documentation on User-Facing Roles.
Google Kubernetes Engine (GKE) Autopilot is not recommended. For more information, go to Set up a Kubernetes cluster build infrastructure.
Prepare the codebase
- Fork the tutorial repo harness-community/goHelloWorldServer to your GitHub account. Alternately, you can use your own code repo. This tutorial works for any Git repo that you can access.
- Create a GitHub personal access token with the
repo,admin:repo_hook, anduserscopes. For instructions, go to the GitHub documentation on creating a personal access token. For information about the token's purpose in Harness, go to the Authentication section of the GitHub connector settings reference. - Store the token somewhere secure; you'll need it later in the tutorial.
- In Harness, switch to the Project you want to use for this tutorial, or create a project.
Create a project
Use these steps to create a project in your Harness account.
- Select Project, select All Projects or Manage Projects, and then select New Project.
- Enter a Name, such as
CI kubernetes tutorial. - Leave the Organization as default.
- Select Save and Continue.
- On Invite Collaborators, you can add others to your project, if desired. You don't need to add yourself.
- Select Save and Continue.
- On the Modules page, select Continuous Integration, and then select Go to Module.
If this is your first project with CI, the CI pipeline wizard starts after you select Go to Module. You'll need to exit the wizard to create the GitHub connector if you don't already have a GitHub connector for the account where you forked the tutorial repo.
Create a GitHub connector
Next, you'll create a connector that allows Harness to connect to your Git codebase, and you'll install a Harness Delegate in your Kubernetes cluster. A connector is a configurable object that connects to an external resource automatically while the pipeline runs. For more information, go to the GitHub connector settings reference.
-
Under Project Settings, select Connectors.
-
Select New Connector, and then select GitHub under Code Repositories.
-
Enter a recognizable name, such as
CI kubernetes tutorial connector, and select Continue. -
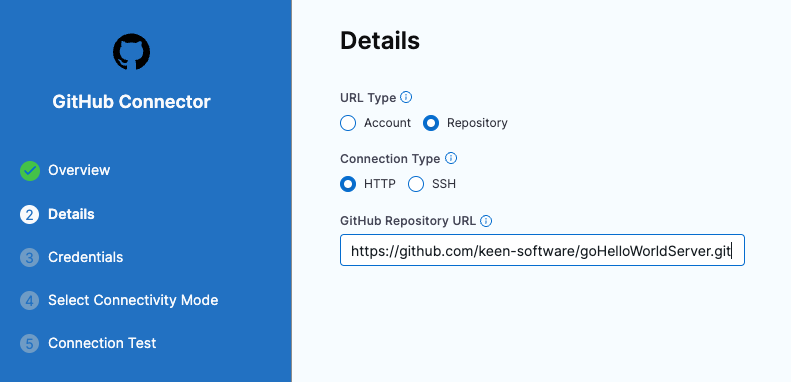
Configure the Details as follows, and then select Continue:
- URL Type: Select Repository.
- Connection Type: Select HTTP.
- GitHub Repository URL: Enter the URL to your fork of the tutorial repo, such as
https://github.com/YOUR_ACCOUNT/goHelloWorldServer.git.
-
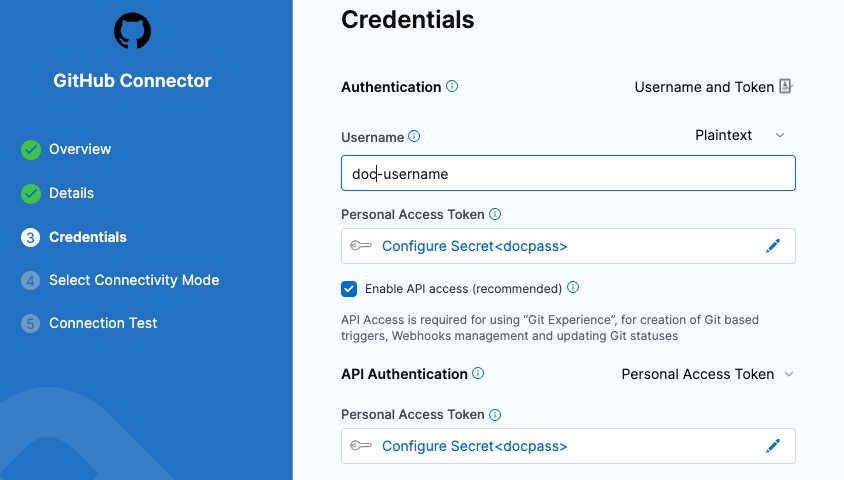
Configure the Credentials as follows, and then select Continue:
- Username: Enter the username for the GitHub account where you forked the tutorial repo.
- Personal Access Token: Create a secret for the personal access token you created earlier. Harness secrets are safe; they're stored in the Harness Secret Manager. You can also use your own Secret Manager with Harness.
- Enable API access: Enable this option, and then select the same personal access token secret.
-
For Select Connectivity Mode, select Connect through a Harness Delegate, and then select Continue.
You can choose to establish connections directly from your Harness platform or through a delegate service running within your corporate firewall. The Harness Delegate is a local service that connects your infrastructure, collaboration, verification, and other providers with your Harness platform. For this tutorial, you'll install a delegate in your Kubernetes cluster.
-
On Delegates Setup, select Only use Delegates with all of the following tags, and then select Install new Delegate.
-
Select Kubernetes Manifest and follow the instructions given on the New Delegate page to install the Delegate on a pod in your Kubernetes cluster.
You can use a Helm Chart, Terraform, or Kubernetes Manifest to install Kubernetes delegates. For this tutorial, select Kubernetes Manifest. For information about the other options and detailed instructions, go to Delegate installation overview.
If delegate installation succeeds, the
kubectl applycommand should produce output similar to the following:namespace/harness-delegate-ng created
clusterrolebinding.rbac.authorization.k8s.io/harness-delegate-ng-cluster-admin created
secret/ci-quickstart created
statefulset.apps/ci-quickstart created
service/delegate-service created -
In Harness, select Verify to test the connection. It might take a few minutes to verify the delegate. Once it is verified, exit delegate creation and return to connector setup.
-
Back in the connector's Delegates Setup, select your new delegate, and then select Save and Continue.
-
Wait while Harness tests the connection, and then select Finish.
Create a pipeline
Pipelines are comprised of one or more stages. Each stage has one or more steps that manage and automate builds, tests, deployments, and other important build and release tasks. To learn more about pipeline components, go to CI pipeline components.
- Select Pipelines, and then select Create a Pipeline.
- Enter a Name for the pipeline. Harness automatically creates a pipeline ID based on the name. Once the pipeline is created, you can't change the ID. You can use the ID to reference subordinate elements of a pipeline, such as the names of variables within the pipeline.
- Select Start. You're taken to the Pipeline Studio where you can configure pipeline settings and add stages and steps to your pipeline.
Add a Build stage
For most CI pipelines, Build stages do the heavy lifting. Build stages are where you specify the end-to-end workflow for your pipeline: the codebase to build, the build infrastructure to use, where to push the finished artifact, and any additional tasks, such as automated tests or validations.
- In the Pipeline Studio, select Add Stage and select Build.
- For the Stage Name, enter
Build Test and Push. - Under Configure Codebase, select Third-party Git Provider.
- For Connector, select the GitHub connector you created earlier in Prepare the codebase.
- Select Set Up Stage. The Build stage is added to the pipeline.
Define the build infrastructure
Next, you need to define the build infrastructure. Harness offers several build infrastructure options, and this tutorial uses a Kubernetes cluster build infrastructure.
-
Select the Infrastructure tab for your Build stage.
-
Under Infrastructure, select Kubernetes.
-
Under Platform, select the Kubernetes Cluster field to open the Create or Select an Existing Connector window.
-
Select New Connector, and configure the connector as follows. For detailed instructions and information about these settings, go to Add a Kubernetes cluster connector.
- Name: Enter
ci-delegate - Details: Select Use the credentials of a specific Harness Delegate.
- Delegates Setup: Select the Kubernetes Delegate you installed earlier in Prepare the codebase.
- Connection Test: Wait for the test to finish and then click Finish.
- Name: Enter
-
In Namespace, enter
harness-delegate-ng, and then select Continue.
Add steps to build, test, and push an image
Now that the pipeline has a stage with a defined codebase and build infrastructure, you are ready to add steps to build the codebase, run unit tests, and push an artifact to Docker Hub. The first step will run unit tests and compile the codebase. The second step builds a container image and pushes it to a Docker Hub repo.
To run unit tests in a CI pipeline, you can use either a Run step or a Test step. This tutorial uses a Run step. In addition to unit tests, the Run step can run any number of commands on a container image. Run steps are highly versatile and you'll use them often in your CI pipelines. While not used in this tutorial, with the Test step you can leverage Test Intelligence.
-
On the Execution tab for your Build stage, select Add Step, select Add Step again, and then select the Run step from the Step Library.
-
For Name, enter
Run Unit Tests. -
Select the Container Registry field, select New Connector, and then select Docker Registry.
-
Create a Docker Registry connector to connect to your Docker Hub account.
- Name: Enter a recognizable name for the connector.
- Provider Type: Select Docker Hub.
- Docker Registry URL: Enter
https://index.docker.io/v2/. - Username: Enter the username for your Docker Hub account.
- Password: Create a secret for a Personal Access Token that Harness can use to access your Docker Hub account.
- Select Connectivity Mode: Select Connect through a Harness Delegate.
- Delegates Setup: Select Only use Delegates with all of the following tags, and then select the Delegate you installed in your Kubernetes cluster.
- Select Save and Continue, wait for the connectivity test to run, and then select Finish.
-
Back in the Run step settings, enter
golang:1.17in the Image field. -
Enter the following code in the Command field:
go get gotest.tools/gotestsum
gotestsum --format=standard-verbose --junitfile unit-tests.xml || true
CGO_ENABLED=0 GOOS=linux GOARCH=amd64 go build -a -tags netgo
The last line contains the
go buildcommand that compiles the package along with its dependencies.This Run step intentionally fails the tests so that you can see how Harness records test failures.
-
Under Optional Configuration, add a Report Path and enter
*.xml. -
Select Apply Changes to save the step.
-
Add a Build and Push to Docker step to your Build stage, and configure it as follows:
- Name: Enter a name, such as
Build and push to Docker. - Docker Connector: Select the Docker Hub connector you created for the Run step.
- Docker Repository: Enter your Docker Hub username and the destination repo name formatted as
[docker_username]/[repo_name]. For example:mydockerhub/ci_tutorial_repo. - Tags: Add a tag and enter
<+pipeline.sequenceId>.
- Name: Enter a name, such as
-
Select Apply Changes to save the step, and then select Save to save the pipeline.
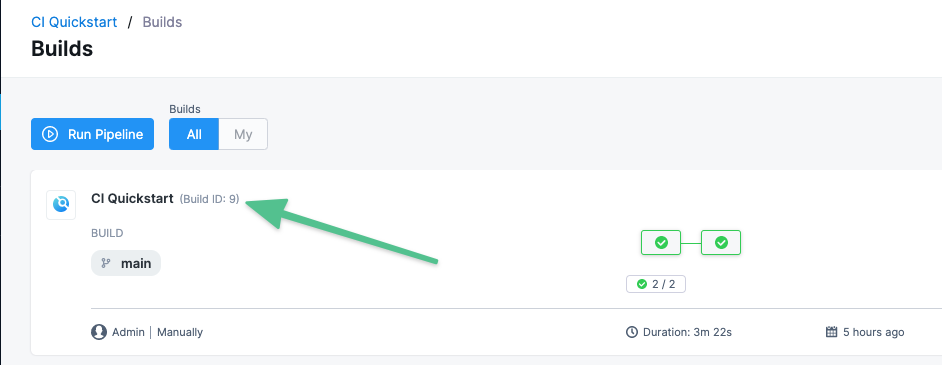
The tag <+pipeline.sequenceId> is a built-in Harness variable that represents the Build ID number, for example 9. The pipeline uses the Build ID to tag the image that it pushes in the first stage and pulls in the second stage of this tutorial pipeline. You will see the Build ID when you run the pipeline. You will also use this variable to identify the image location when you set up the dependency (as a Background step) in the next stage.
You can run the pipeline now or continue the tutorial to add integration tests to the pipeline.
Add integration tests
The first stage in this tutorial pipeline builds, tests, containerizes, and then pushes an image to Docker Hub. Now, you'll add a stage that pulls the image, runs it in a container (using a Background step), and then runs integration tests on it (using a Run step).
-
Select Add Stage (in the upper portion of the Pipeline Studio), and select Build.
-
Enter
Run integration testfor the Name, disable Clone Codebase, and then select Set Up Stage.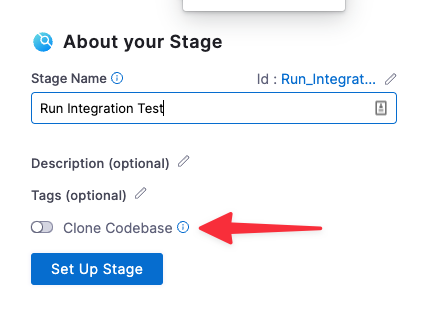
-
In the Infrastructure tab, select Propagate from an existing stage, and select the first Build stage in your pipeline. This configures the pipeline to use the same Kubernetes cluster and namespace for both stages.
-
Select Continue.
-
Add a Background step to this stage and configure it as follows. For more information, go to the Background step settings reference.
- Name: Enter a recognizable name.
- Container Registry: Select the Docker Hub connector you used for the steps in the previous stage.
- Image: Enter
[docker_username]/[repo_name]:<+pipeline.sequenceId>. Make sure the Docker Hub username and repo name are the same as you used for the Build and Push an Image to Docker Registry step. For example:mydockerhub/ci_tutorial_repo:<+pipeline.sequenceId>.
Notice that the Image field uses the same variable
<+pipeline.sequenceId>that you used in the previous stage. This tells Harness to pull the image with the same tag as the image pushed previously in the pipeline. -
Select Apply Changes to save the step.
-
Add a Run step to your
Run integration teststage and configure it as follows:- Name: Enter a recognizable name, such as
Test server connection. - Container Registry: Select the same Docker Connector as you have for the other steps.
- Image: Enter
curlimages/curl:7.73.0. - Command: Enter the following code, which runs a simple server connection test:
sleep 10
curl localhost:8080
curl localhost:8080?Hello!_I_am_a_nice_demo! - Name: Enter a recognizable name, such as
-
Select Apply Changes to save the step, and then select Save to save the pipeline.
Run the pipeline
- Select Run.
- For the Pipeline Inputs, select Git branch and enter the target branch in the code repo, such as
main. - Select Run Pipeline.
On the Build details page you can observe the pipeline while it runs. Select a stage to examine the steps in that stage. Select a step to view the step's logs. Select the Tests tab to view test results.
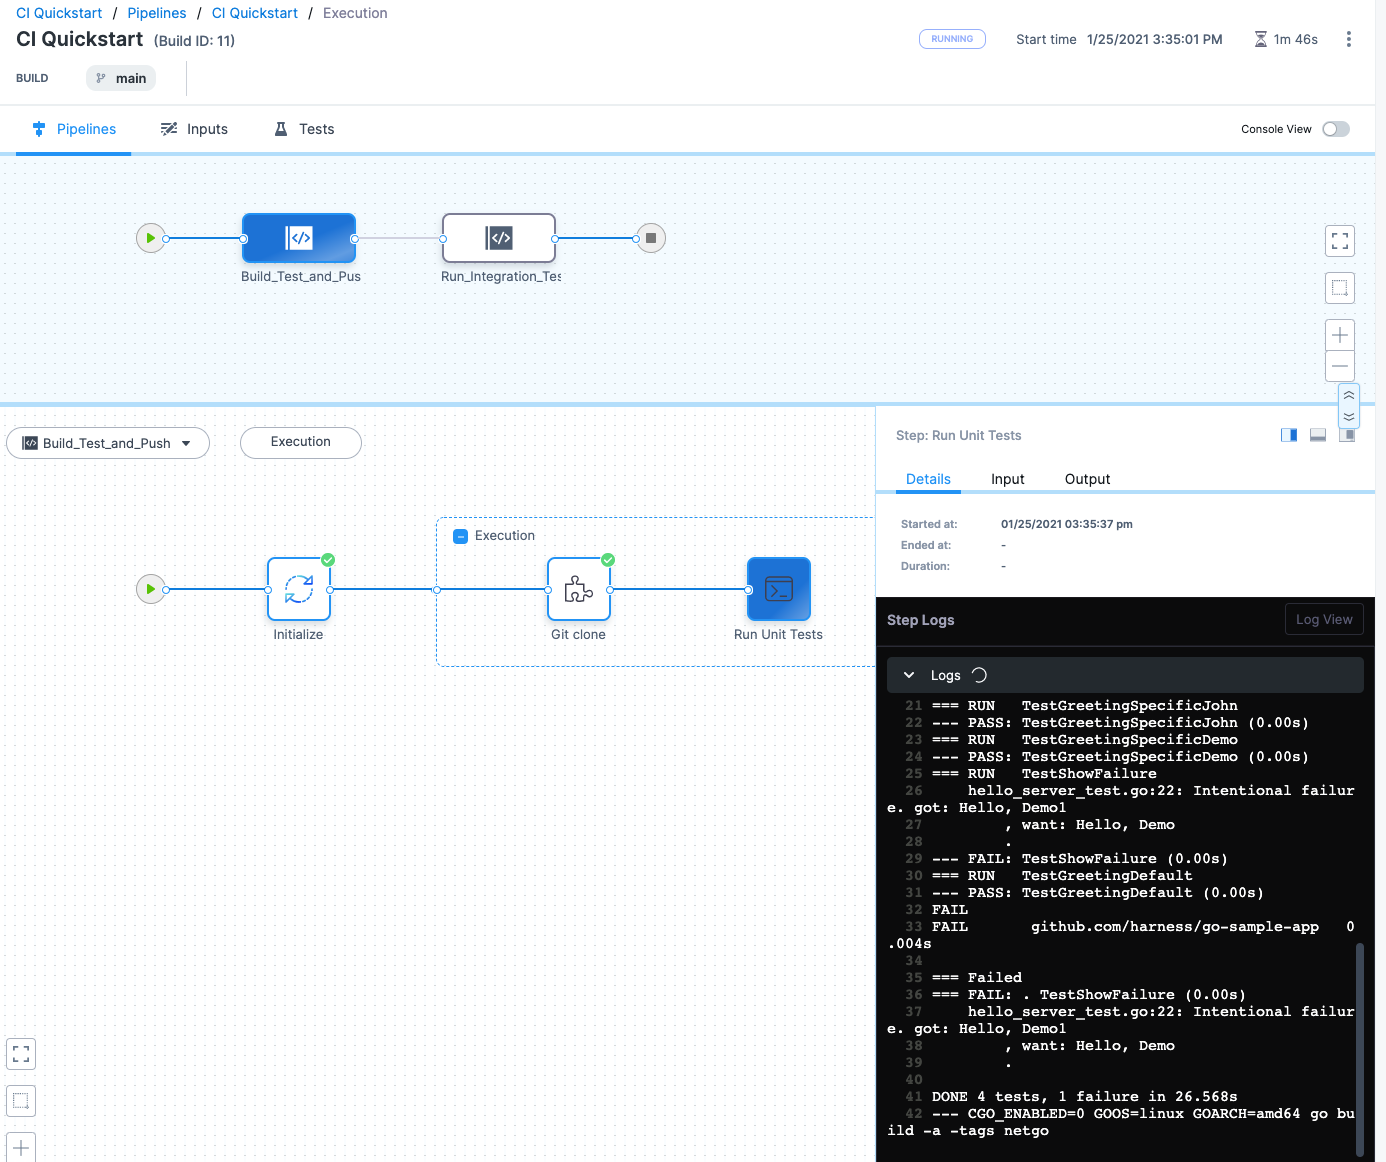
You can switch to Console view for a focused view of the logs.
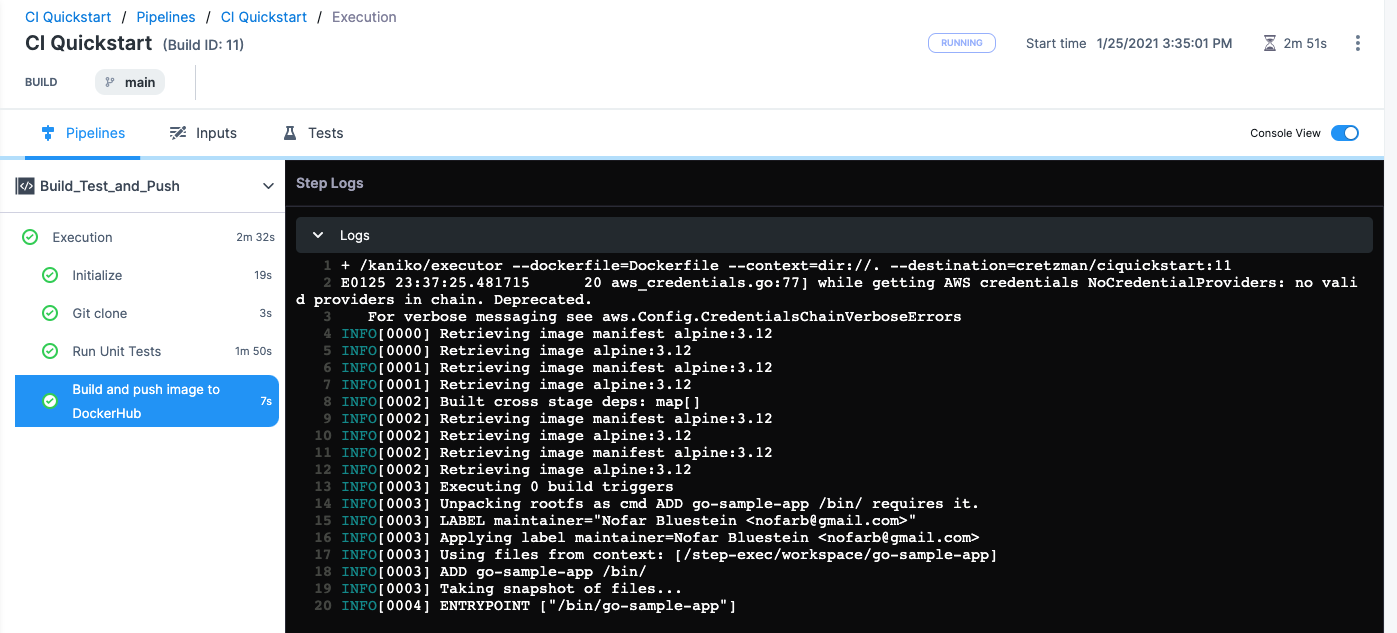
For this pipeline, note the following log details:
-
In the logs for the Build and push image to Docker Hub step, you can see that the build number, such as
11, is used as an image tag, for example:--destination=myrepo/ciquickstart:11 -
In the Initialize step of the Run Integration Test stage, you can see the image with the same tag is pulled from your Docker Hub repo:
Pulling image "myrepo/ciquickstart:11"
Successfully pulled image "myrepo/ciquickstart:11" in 1.878887425s -
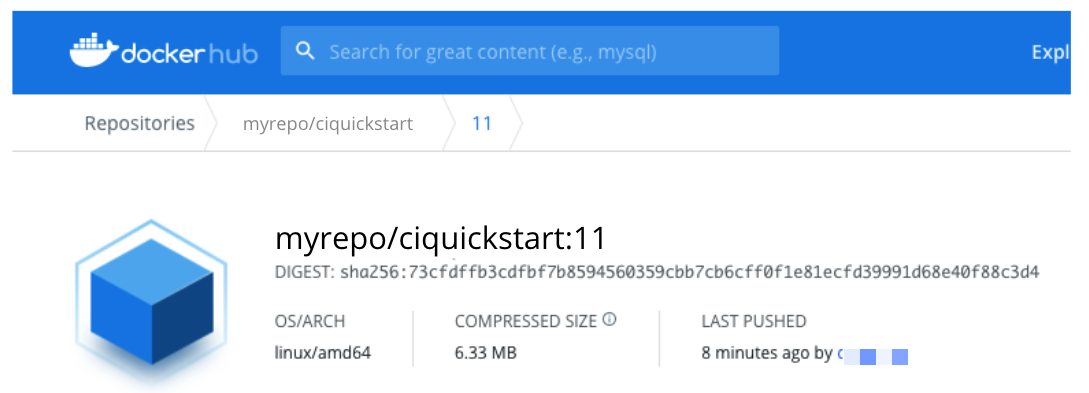
You can find the pushed image and the associated tag in your Docker Hub repo.
Continue your Continuous Integration journey
Congratulations! You have created a CI pipeline that builds and tests code.
With CI pipelines you can consistently execute your builds at any time. For example, you can try adding a commit trigger to the pipeline that listens for commits against the codebase and automatically kicks off the pipeline. All objects you create are available to reuse in your pipelines.
You can also save your build pipelines as part of your source code. Everything that you do in Harness is represented by YAML; you can store it all alongside your project files. Here is a YAML example of the pipeline created in this tutorial.
Pipeline YAML example
pipeline:
  name: k8s tutorial example
  identifier: k8s_tutorial_example
  projectIdentifier: k8s_tutorial_project
  orgIdentifier: default
  tags: {}
  properties:
    ci:
      codebase:
        connectorRef: ghconnector
        build: <+input>
  stages:
    - stage:
        name: Build Test and Push
        identifier: Build_Test_and_Push
        description: ""
        type: CI
        spec:
          cloneCodebase: true
          infrastructure:
            type: KubernetesDirect
            spec:
              connectorRef: k8stutorial
              namespace: harness-delegate-ng
              automountServiceAccountToken: true
              nodeSelector: {}
              os: Linux
          execution:
            steps:
              - step:
                  type: Run
                  name: Run Unit Tests
                  identifier: Run_Unit_Tests
                  spec:
                    connectorRef: dockerhubconnector
                    image: golang:1.17
                    shell: Sh
                    command: |2-
                         go get gotest.tools/gotestsum
                         gotestsum --format=standard-verbose --junitfile unit-tests.xml || true
                         CGO_ENABLED=0 GOOS=linux GOARCH=amd64 go build -a -tags netgo
                    reports:
                      type: JUnit
                      spec:
                        paths:
                          - "*.xml"
              - step:
                  type: BuildAndPushDockerRegistry
                  name: BuildAndPushDockerRegistry_1
                  identifier: BuildAndPushDockerRegistry_1
                  spec:
                    connectorRef: dockerhubconnector
                    repo: mydockerhub/ci-tutorial-repo
                    tags:
                      - <+pipeline.sequenceId>
    - stage:
        name: n test
        identifier: n_test
        description: ""
        type: CI
        spec:
          cloneCodebase: false
          infrastructure:
            useFromStage: Build_Test_and_Push
          execution:
            steps:
              - step:
                  type: Background
                  name: Pull and host image
                  identifier: Pull_and_host_image
                  spec:
                    connectorRef: dockerhubconnector
                    image: mydockerhub/ci-tutorial-repo:<+pipeline.sequenceId>
                    shell: Sh
              - step:
                  type: Run
                  name: Test server connection
                  identifier: Test_server_connection
                  spec:
                    connectorRef: dockerhubconnector
                    image: curlimages/curl:7.73.0
                    shell: Sh
                    command: |-
                      sleep 10
                      curl localhost:8080
                      curl localhost:8080?Hello!_I_am_a_nice_demo!
After you build an artifact, you can use the Harness Continuous Delivery (CD) module to deploy your artifact. If you're ready to try CD, check out the CD Tutorials.