> For the complete documentation index, see [llms.txt](https://developer.harness.io/llms.txt). Markdown versions of documentation pages are available by appending `.md` to page URLs; this page is available as [Markdown](https://developer.harness.io/web-application-and-api-protection-waap-discovery-discovery-api-security-testing/api-security-testing/ast-basics-and-workflow/apist-issues/remediate-issues/virtual-patching.md).
# Virtual Patching
Protect an API endpoint with a virtual patch while your team works on the code-level fix for an eligible issue
A virtual patch scopes an existing Web Application Firewall (WAF) threat rule to the affected endpoint, so that Harness RPA can monitor or block the exact attack pattern the scan detected. You can create a virtual patch to protect an endpoint while your team works on the code-level fix.
## What you will learn from this topic
By the end of this topic, you will be able to understand:
* How to create a virtual patch for an eligible issue.
* Why a virtual patch protects an endpoint while your team works on the code-level fix.
* How Harness RPA evaluates eligibility, creates the patch, and tracks it.
***
## Before you begin
Make a note of the following before creating a virtual patch:
* Ensure you are assigned the *Security admin* or *Account Owner* role, or the equivalent permissions. Go to [Role-Based Access Control (RBAC)](https://developer.harness.io/web-application-and-api-protection-waap-discovery-discovery-api-security-testing/settings/configuration/teams/role-based-access-control-rbac.md) for more details.
* Make sure that the issue is eligible for a virtual patch, because Harness RPA checks whether a WAF is deployed and whether a matching WAF rule is already enabled. Go to [How virtual patching works](#how-virtual-patching-works) for more details.
***
## Create a virtual patch
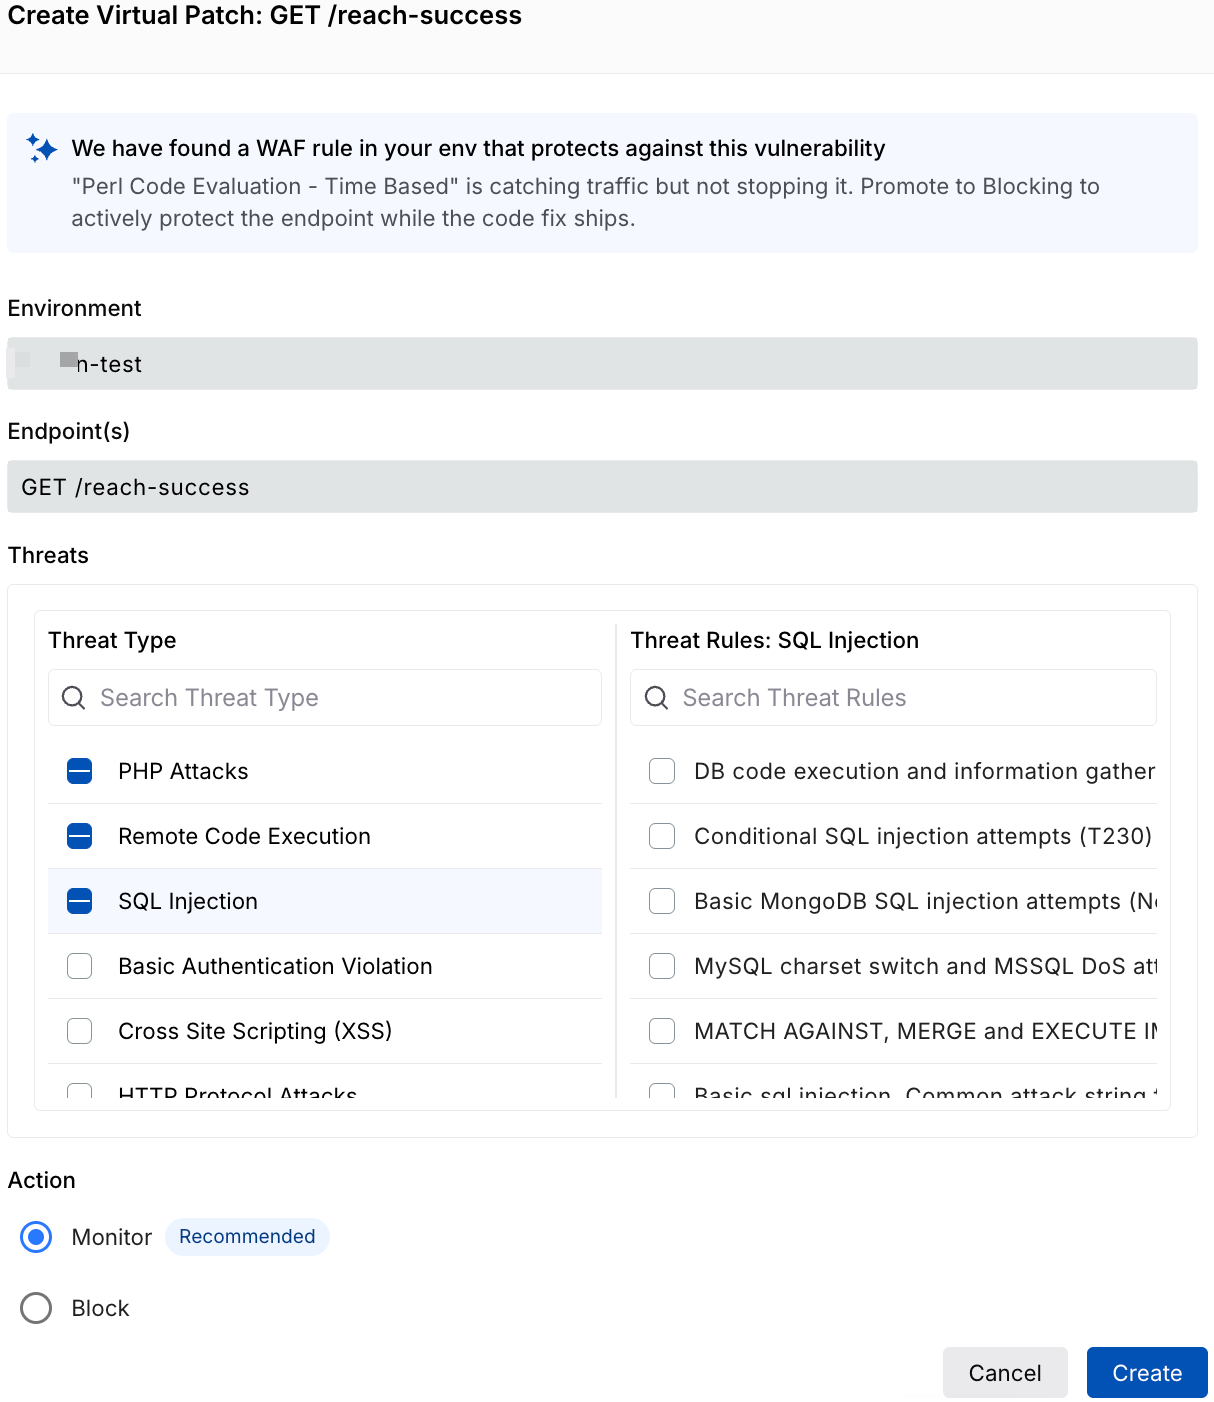
Create a Virtual Patch
To create a virtual patch for an eligible issue, complete the following steps:
1. Navigate to **Testing** → **Issues**.
2. Select the issue for which you want to create a virtual patch.
3. Click **Create Virtual Patch**.
4. Select the **Threat Type** and **Threat Rules**.
5. Select the **Action** you wish to take. For example, M*onitor* or *Block.*
6. Select **Create**.
7. Verify that the patch is active and scoped to the intended endpoint. Go to [Custom Signatures](https://developer.harness.io/web-application-and-api-protection-waap-discovery-discovery-api-security-testing/protection/settings/custom-policies/custom-signatures.md) for more details.
The following demo walks you through the steps to create a virtual patch in the issues page under Testing:
{% embed url="" %}
***
## Why virtual patching matters
Fixing a code-level vulnerability can take days or weeks, and the endpoint stays exposed until it does. It is useful in the following ways:
* It allows you to apply protection directly from the Issues page.
* It enables Harness RPA to scope an existing WAF rule to only the affected endpoint.
* It allows you to choose *Monitor* mode or *Blocking* mode.
***
## How virtual patching works
Virtual patching lets you mitigate an eligible vulnerability at the affected API endpoint without waiting for a permanent code-level fix. When an issue detected by API Security Testing meets the eligibility requirements, Harness RPA lets you create a virtual patch directly from the issue.
The virtual patch workflow consists of the following steps:
Granular drill-down of an issue
1. **Detection**: API Security Testing detects a vulnerability and creates an issue for the affected API endpoint.
2. **Eligibility evaluation**: Harness RPA evaluates whether the issue is eligible for virtual patching. It also checks protection state of your environment, including whether a WAF is deployed and whether a matching WAF rule is already enabled.
3. **Patch availability**: If the issue meets the eligibility requirements, Harness RPA displays the **Create Virtual Patch** action on the issue.
4. **Create the virtual patch**: From the issue, select **Create Virtual Patch** and review the WAF rule and endpoint details before applying the patch.
5. **Track the patch**: Harness RPA links the virtual patch to the source issue and WAF rule. You can use this linkage to track how frequently the rule is evaluated, detects matching traffic, and blocks requests.
***
## Next steps
* [Custom Signatures](https://developer.harness.io/web-application-and-api-protection-waap-discovery-discovery-api-security-testing/protection/settings/custom-policies/custom-signatures.md): Manage the virtual patches you create.
* [Remediate Issues](https://developer.harness.io/web-application-and-api-protection-waap-discovery-discovery-api-security-testing/api-security-testing/ast-basics-and-workflow/apist-issues/remediate-issues.md): Create tickets and update issues individually or in bulk.
* [Manage Issues](https://developer.harness.io/web-application-and-api-protection-waap-discovery-discovery-api-security-testing/api-security-testing/ast-basics-and-workflow/apist-issues/manage-issues.md): Review the evidence of an issue and change its status.
* [APIST Issues](https://developer.harness.io/web-application-and-api-protection-waap-discovery-discovery-api-security-testing/api-security-testing/ast-basics-and-workflow/apist-issues.md): Review which issues are eligible for a virtual patch.
{% @harness-feedback/feedback %}