> For the complete documentation index, see [llms.txt](https://developer.harness.io/llms.txt). Markdown versions of documentation pages are available by appending `.md` to page URLs; this page is available as [Markdown](https://developer.harness.io/web-application-and-api-protection-waap-discovery-discovery-discovery-discovery/api-security-testing/ast-basics-and-workflow/apist-issues/remediate-issues.md).

# Remediate Issues

Remediate APIST issues by configuring integrations, creating tickets, and updating issues individually or in bulk

<details>

<summary>Updates (October 2026 to December 2026)</summary>

* *October 2026*: Updated the page to add information about the ServiceNow ITSM and Azure DevOps integrations and ticket creation. Go to [Configure an integration](#configure-an-integration) and [Create a ticket](#create-a-ticket) for more details.

</details>

Harness RPA provides the following remediation actions from the issue details panel and the issue occurrence list. Each action records its result against the issue, so that the history of the issue stays in one place. Go to [Issue details panel tabs](https://developer.harness.io/web-application-and-api-protection-waap-discovery-discovery-discovery-discovery/api-security-testing/ast-basics-and-workflow/apist-issues/manage-issues.md#issue-details-panel-tabs) for more details.

You can remediate an issue in the following ways:

* **Tickets**: Assign an issue to the team that owns the fix in Jira, ServiceNow ITSM, or Azure DevOps, and track its remediation alongside their other work.
* **Status updates**: Update the status of issues, individually or in bulk.
* [**Virtual Patching**](https://developer.harness.io/web-application-and-api-protection-waap-discovery-discovery-discovery-discovery/api-security-testing/ast-basics-and-workflow/apist-issues/remediate-issues/virtual-patching.md): Protect an endpoint while your team works on the code-level fix.

## What you will learn from this topic

By the end of this topic, you will be able to understand:

* How to configure an integration so that you can create tickets from Harness RPA.
* How to create a ticket in Jira, ServiceNow ITSM, or Azure DevOps to assign and track an issue.
* How to update the status of issues, or create tickets for them, individually or in bulk.

Go to [Manage Issues](https://developer.harness.io/web-application-and-api-protection-waap-discovery-discovery-discovery-discovery/api-security-testing/ast-basics-and-workflow/apist-issues/manage-issues.md) for more details on viewing the evidence and context of an issue, changing its status, and how Harness RPA resolves issues automatically. Go to [Virtual Patching](https://developer.harness.io/web-application-and-api-protection-waap-discovery-discovery-discovery-discovery/api-security-testing/ast-basics-and-workflow/apist-issues/remediate-issues/virtual-patching.md) for more details on protecting an endpoint with a virtual patch. Go to [APIST Issues](https://developer.harness.io/web-application-and-api-protection-waap-discovery-discovery-discovery-discovery/api-security-testing/ast-basics-and-workflow/apist-issues.md) for more details on issues, their lifecycle, and their key components.

***

## Before you begin

Make a note of the following before working with issues:

* Make sure that you understand scans and traffic types, because the evidence available for an issue depends on the traffic type the scan used. Go to [Understanding Scans and Traffic Types](https://developer.harness.io/web-application-and-api-protection-waap-discovery-discovery-discovery-discovery/api-security-testing/ast-basics-and-workflow/understanding-scans-and-traffic-types.md) for more details.
* Ensure you are assigned the *Security admin* or *Account Owner* role, or the equivalent permissions. Go to [Role-Based Access Control (RBAC)](https://developer.harness.io/web-application-and-api-protection-waap-discovery-discovery-discovery-discovery/settings/configuration/teams/role-based-access-control-rbac.md) for more details.

***

## Configure an integration

Integrations connect Harness RPA to the tools your teams already use to track work, so that you can assign an issue to the team that owns the fix and follow its remediation alongside their other work. When you create a ticket, Harness RPA links it to the issue and adds the issue details, which gives the team the context to act on it without switching tools.

To configure a new integration, click the icon of a tool that is not yet connected to Harness RPA. Harness RPA displays a **Configure \<integration> Integration** prompt. Click **Add Integration** to open the configuration panel, and specify the details according to the integration. Harness RPA saves the integration, and you can create tickets from the issue.

Harness RPA supports the following issue management integrations:

* **Jira**: Creates a Jira issue. Go to [Jira Integration](https://developer.harness.io/web-application-and-api-protection-waap-discovery-discovery-discovery-discovery/integrations/project-management/jira-integration.md) for more details.
* **ServiceNow ITSM**: Creates a ServiceNow ITSM incident. Go to [ServiceNow ITSM Integration](https://developer.harness.io/web-application-and-api-protection-waap-discovery-discovery-discovery-discovery/integrations/project-management/servicenow-itsm-integration.md) for more details.
* **Azure DevOps**: Creates an Azure DevOps ticket. Go to [Azure DevOps Integration](https://developer.harness.io/web-application-and-api-protection-waap-discovery-discovery-discovery-discovery/integrations/project-management/azure-devops-integration.md) for more details.

***

## Create a ticket

Create a ticket in your tracking tool to assign the issue to the concerned team, and to track its remediation in the same place as the rest of their work. Harness RPA supports the following integrations:

* **Jira**: Creates a Jira issue.
* **ServiceNow ITSM**: Creates a ServiceNow ITSM incident.
* **Azure DevOps**: Creates an Azure DevOps ticket.

To create a ticket, click the relevant integration icon in the panel header, or click the Jira icon in the **Jira** column of the issue occurrence list. If the integration is not configured yet, Harness RPA prompts you to configure it first. Go to [Configure an integration](#configure-an-integration) for more details.

The following tabs list the fields for each integration:

{% tabs %}
{% tab title="Jira" %}
A Jira ticket tracks the status of issue remediation and helps you assign it to the concerned team. Follow the given steps to create a Jira issue:

1. Click the Jira Icon.
2. The **Create Jira Issue** dialog opens. Fill the following fields:
   1. **Integration Template**: Select a Jira template that pre-fills the ticket fields. The default is *None*. Go to [Jira Templates](https://developer.harness.io/web-application-and-api-protection-waap-discovery-discovery-discovery-discovery/integrations/project-management/beta-jira-templates.md) for more details.
   2. **Project**: Select the Jira project in which Harness RPA creates the ticket.
   3. **Issue Type**: Select the Jira issue type for the ticket.
   4. (Optional) **Link Existing Jira**: Link the issue to an existing Jira ticket instead of creating a new one.
   5. **Summary**: Displays the ticket title, which Harness RPA pre-fills with the issue name, API endpoint, service, and environment. You can edit it according to your requirements.
   6. **Include evidence**: Adds the issue description, potential impact, remediation guidance, and the Harness RPA evidence, including the request and response, to the ticket. This option is selected by default.
3. Click **Create** once you have specified the above details.

   <div data-gb-custom-block data-tag="hint" data-style="info" class="hint hint-info"><ul><li>Harness RPA creates the ticket in the selected project and links it to the issue. Go to <a href="https://developer.harness.io/web-application-and-api-protection-waap-discovery-discovery-discovery-discovery/integrations/project-management/jira-integration.md">Jira integration</a> for more details.</li><li>You can also create Jira tickets in bulk to remediate an issue. Go to <a href="#bulk-update">Bulk Jira tickets</a> for more details.</li></ul></div>

{% endtab %}

{% tab title="ServiceNow ITSM" %}
Create a ServiceNow incident from an issue to track its remediation in your ITSM workflow. Follow the given steps to create a ServiceNow incident:

1. Click the **ServiceNow ITSM** icon.
2. The **Create ServiceNow ITSM Incident** dialog opens. Fill the following fields:
   * **Short Description**: The summary of the incident. Harness RPA prefills it with the issue name, API endpoint, service, and environment, and you can edit it.
   * **Caller**: The ServiceNow user on whose behalf the incident is raised.
   * **Assignee Group**: The ServiceNow group that owns the incident.
   * **Assignee**: The member of the selected group who works on the incident. This field is available only after you select an **Assignee Group**.
   * **Severity**: The severity of the incident in ServiceNow. The default is *Low*.
   * **Urgency**: How soon the incident needs a resolution. The default is *Low*.
   * **Impact**: The extent to which the issue affects your business. The default is *Low*.
   * **Description**: The details of the issue, which Harness RPA adds to the incident automatically: Issue, Description, Mitigation, Issue Type, Category, Severity, Source, API Endpoint, Service, and a link back to the issue. You can add your own notes in the text box below these details.
3. Click **Create** once you have specified the above details.

{% hint style="info" %}

* Harness RPA creates the incident in your ServiceNow instance and links it to the issue. Go to [ServiceNow ITSM integration](https://developer.harness.io/web-application-and-api-protection-waap-discovery-discovery-discovery-discovery/integrations/project-management/servicenow-itsm-integration.md) for more details.
* You can create ServiceNow incidents for multiple issues. Go to [Bulk ServiceNow incidents](#bulk-update) for more details.
  {% endhint %}
  {% endtab %}

{% tab title="Azure DevOps" %}
Create an Azure DevOps work item from an issue to track its remediation alongside your team's other work. Follow the given steps to create an Azure DevOps work item:

1. Click the **Azure DevOps** icon.
2. The **Create Azure DevOps Ticket** dialog opens. Fill the following fields:
   * **Project**: The Azure DevOps project in which Harness RPA creates the work item.
   * **Work Item Type**: The type of the work item, for example, *Bug*. This field is available only after you select a **Project**.
   * **Additional Comments**: (Optional) Any notes that you want to add to the work item.
3. Click **Create** once you have specified the above details.

{% hint style="info" %}

* Harness RPA creates the work item in your Azure DevOps organization and links it to the issue. Go to [Azure DevOps integration](https://developer.harness.io/web-application-and-api-protection-waap-discovery-discovery-discovery-discovery/integrations/project-management/azure-devops-integration.md) for more details.
* The **Description** of the work item is populated automatically and cannot be edited.
  {% endhint %}
  {% endtab %}
  {% endtabs %}

***

## Update issues

When you select one or more occurrences using the checkboxes in the issue occurrence list, Harness RPA displays an action bar at the bottom of the page with the number of selected occurrences. You can use it when multiple occurrences share the same remediation path, such as moving all occurrences for a service to *Under Review* or raising tickets for them together. You can use filters or grouping to narrow down the list before you select the occurrences.

{% hint style="info" %}
You must have the relevant integration configured to create tickets in bulk. If it is not configured, clicking the integration icon prompts you to complete the setup. Go to [Configure an integration](#configure-an-integration) for more details.
{% endhint %}

Individual and bulk updates are available to update the status or create integration tickets:

* **Individual update**: Update the status or create tickets for each issue individually. Go to [Individual update](#individual-update) for the steps.
* **Bulk update**: Update the status or create tickets for multiple issues at once. Go to [Bulk update](#bulk-update) for the steps.

### Individual update

To remediate an issue, complete the following steps:

1. If the **Issues** page is grouped by a category, click the arrow corresponding to the category.
2. Click the issue name you wish to remediate.
3. In the **Issue Detailed View** page, click the **Integration** icon(s) or **Status** drop-down according to your requirements.

   <div data-gb-custom-block data-tag="hint" data-style="info" class="hint hint-info"><p>If you have not configured an integration, you can do so directly by clicking the relevant <strong>Integration</strong> icon. Go to the corresponding document under <a href="https://developer.harness.io/web-application-and-api-protection-waap-discovery-discovery-discovery-discovery/integrations/integrations.md">Integrations</a> for the configuration steps.</p></div>
4. Do one of the following:
   * If you clicked the **Integration** icon(s), specify the ticket details according to your requirements.
   * If you clicked the **Status** drop-down, change the status, and add the comment in the pop-up window according to your requirements. This helps you maintain a log of historical events related to the issue. Further, the comment is visible in the **Status Log** tab in the issue detail panel.

     <img src="https://1414883571-files.gitbook.io/~/files/v0/b/gitbook-x-prod.appspot.com/o/spaces%2Fdr7UJpJrdGkkSGT6AFTu%2Fuploads%2Fgit-blob-6bbc7771e9caf8a8d8f26d08f266aaaa5baedb75%2Ftraceable_catalog_issue_status_updaye-1ai8o1i.gif?alt=media" alt="Individual update of an issue" width="803">

### Bulk update

You can remediate multiple issues at once by performing a bulk update. This includes changing the issue status in Harness RPA or creating Jira tickets for multiple issues simultaneously.

#### **Additional consideration**

When creating Jira tickets in bulk, you can also update the issue status using the **Update Status** option from the same selection view. This bulk update action is fully compatible with the bidirectional sync functionality between Harness RPA and Jira, ensuring that updates made in Harness RPA are reflected in Jira and vice versa. After you fix an issue, Harness RPA can also resolve it automatically. Go to [Auto resolve issues](https://developer.harness.io/web-application-and-api-protection-waap-discovery-discovery-discovery-discovery/api-security-testing/ast-basics-and-workflow/apist-issues/manage-issues.md#auto-resolve-issues) for more details.

Follow the given steps to bulk update your issues.

#### **Step 1: Select issues**

1. Navigate to the **Issues** page.
2. Use filters or grouping as needed to narrow down the list.
3. Select the checkboxes next to the issues that you wish to update.

#### **Step 2: Perform bulk action**

At the bottom of the page, click one of the following options:

* **Update Status:** You can update the status of the selected issues within Harness RPA. Go to [Change the status of an issue](https://developer.harness.io/web-application-and-api-protection-waap-discovery-discovery-discovery-discovery/api-security-testing/ast-basics-and-workflow/apist-issues/manage-issues.md#change-the-status-of-an-issue) for more details.
* **Jira** ico&#x6E;**:** You can create Jira tickets for the selected issues. Go to [Bulk Jira tickets](#bulk-update) for more details.
* **ServiceNow** icon: You can create ServiceNow ITSM incidents for the selected issues. Go to [Bulk ServiceNow incidents](#bulk-update) for more details.
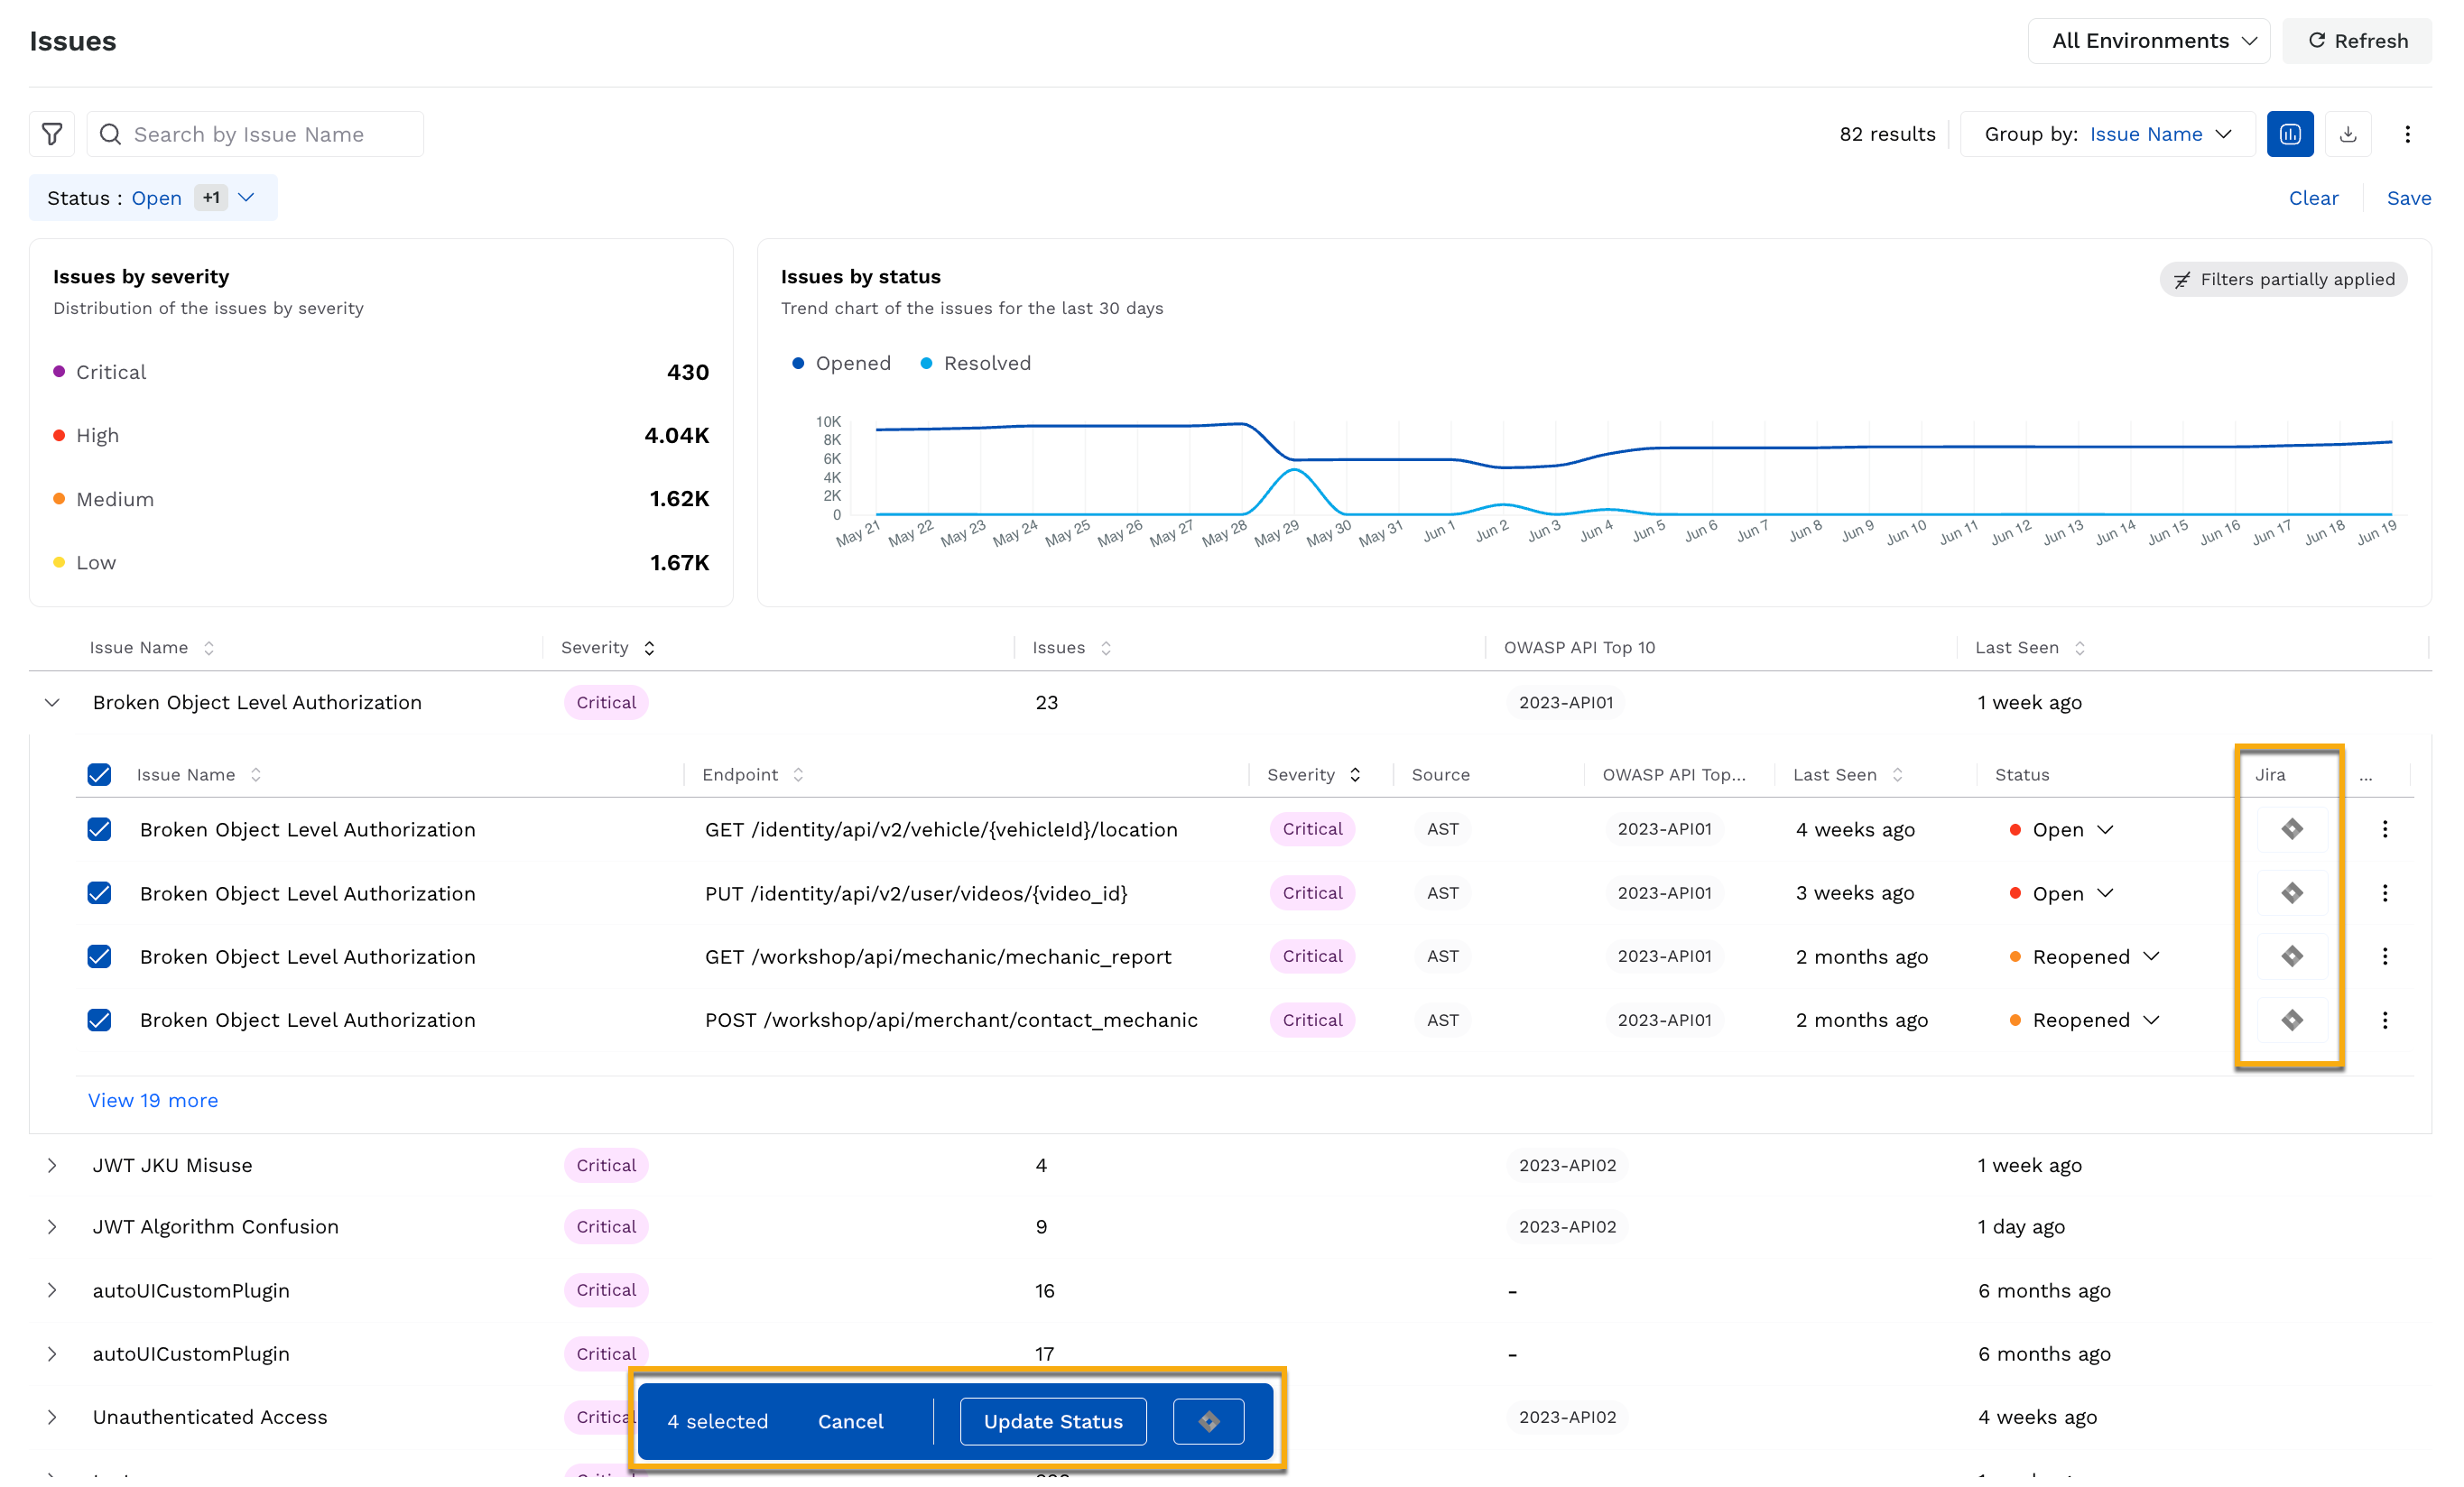
<figure><img src="https://1414883571-files.gitbook.io/~/files/v0/b/gitbook-x-prod.appspot.com/o/spaces%2Fdr7UJpJrdGkkSGT6AFTu%2Fuploads%2Fgit-blob-e32751db56de47621dabe94fe8f9d840c97021ab%2Ftraceable_ast_issue_management_bulk_update-1jd4frn.png?alt=media" alt="Issues Bulk Update" width="900"><figcaption><p>Issues Bulk Update</p></figcaption></figure>

{% hint style="info" %}

* Bulk updates are currently supported for Jira integration and ServiceNow integration.
* You must have an existing Jira or ServiceNow integration configured to create tickets. If not already configured, click the respective icon to complete the integration setup. Go to [Configure an integration](#configure-an-integration) for the configuration steps.
  {% endhint %}

{% tabs %}
{% tab title="Bulk Jira tickets" %}
Create Jira tickets for the selected occurrences, either as one combined ticket or as one ticket per occurrence. Complete the following steps:

1. Select the occurrences using the checkboxes in the issue occurrence list. You can select occurrences from different issues.
2. Click the **Jira** icon on the action bar.
3. The **Create Jira Issue** dialog opens. Fill the following fields:
   * **Integration Template**: The Jira integration template to use for the tickets.
   * **Project**: The Jira project in which Harness RPA creates the tickets.
   * **Issue Type**: The Jira issue type of the tickets, for example, *Bug*.
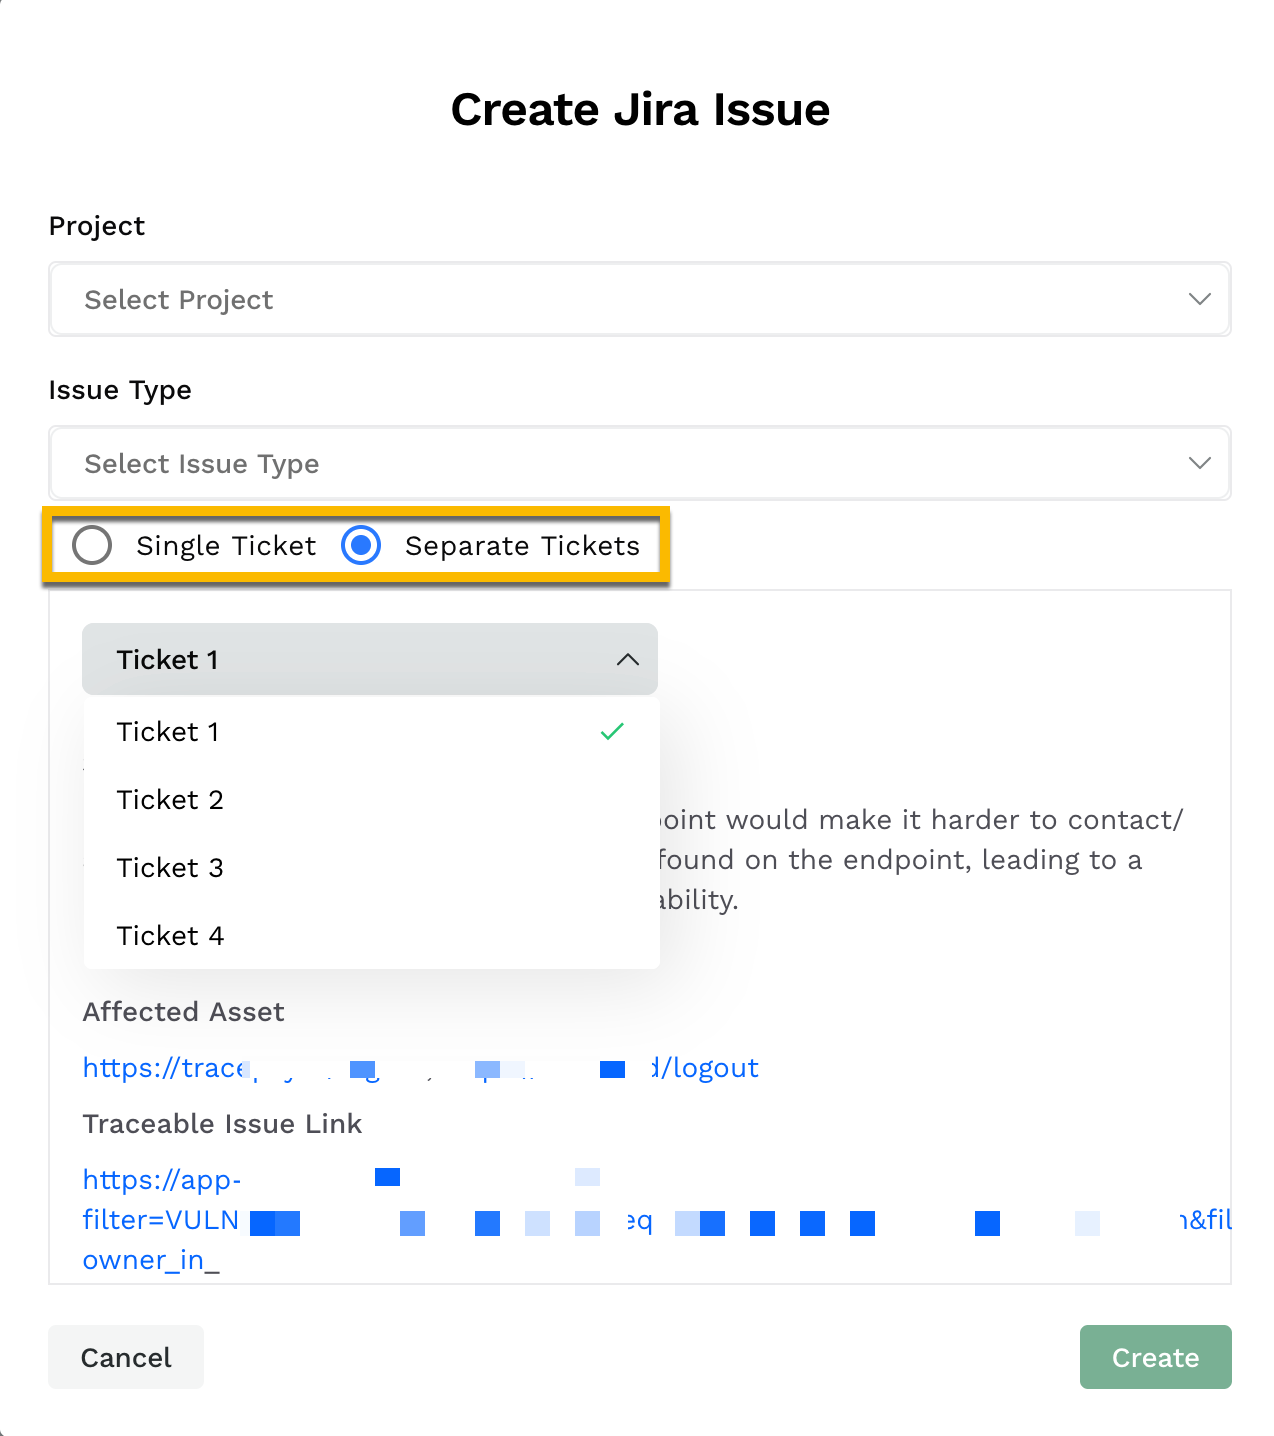
   * **Single Ticket** or **Separate Tickets**: The mode in which Harness RPA creates the tickets:
     * **Single Ticket**: Creates one Jira ticket that includes information for all the selected occurrences. Harness RPA populates the summary and description fields with a combined view of the selected occurrences.
     * **Separate Tickets**: Creates an individual Jira ticket for each selected occurrence. Harness RPA displays a **Ticket** drop-down with one entry for each selected occurrence, for example, *Ticket 1* to *Ticket 4*. Select an entry to preview and customize its **Summary** and **Description** before you submit.
4. Click **Create** once you have specified the above details. Harness RPA enables this button after you select the **Project** and **Issue Type**.

The **Description** of each ticket contains the details of the occurrence: the description, affected asset, link to the issue in Harness RPA, risk score, recommendation, steps to reproduce, cURL command, request and response evidence, and references.

<img src="https://1414883571-files.gitbook.io/~/files/v0/b/gitbook-x-prod.appspot.com/o/spaces%2Fdr7UJpJrdGkkSGT6AFTu%2Fuploads%2Fgit-blob-9f481cbf4d4b8ea5d864bd9b0dc068d1dffdd101%2Ftraceable_jira_bulk_update_2-1--8hftds.png?alt=media" alt="Create a Jira Issue" width="433">

#### Issues already linked to Jira

If one or more of the selected issues are already linked to Jira tickets, you are presented with two options:

* **Ignore linked issues:** Jira tickets will be created only for issues that are not currently linked.
* **Unlink and create new:** Existing Jira links will be removed, and new tickets will be created for all selected issues, including those previously linked.

{% hint style="info" %}
Harness RPA creates the tickets in the selected project and links them to the occurrences. Go to [Jira integration](https://developer.harness.io/web-application-and-api-protection-waap-discovery-discovery-discovery-discovery/integrations/project-management/jira-integration.md) for more details.
{% endhint %}
{% endtab %}

{% tab title="Bulk ServiceNow incidents" %}
Create ServiceNow incidents for the selected occurrences, either as one combined incident or as one incident per occurrence. Complete the following steps:

1. Select the occurrences using the checkboxes in the issue occurrence list. You can select occurrences from different issues.
2. Click the **ServiceNow ITSM** icon on the action bar.
3. The **Create ServiceNow ITSM Incident** dialog opens. Fill the following fields:
   * **Caller**: The ServiceNow user on whose behalf the incidents are raised.
   * **Assignee Group**: The ServiceNow group that owns the incidents. You can search the list by group name.
   * **Assignee**: The member of the selected group who works on the incidents. This field is available only after you select an **Assignee Group**.
   * **Severity**: The severity of the incidents in ServiceNow. The default is *Low*.
   * **Urgency**: How soon the incidents need a resolution. The default is *Low*.
   * **Impact**: The extent to which the issues affect your business. The default is *Low*.
   * **Single Ticket** or **Separate Tickets**: The mode in which Harness RPA creates the incidents:
     * **Single Ticket**: Creates one incident that includes information for all the selected occurrences.
     * **Separate Tickets**: Creates an individual incident for each selected occurrence. Harness RPA displays an **Incident** drop-down with one entry for each selected occurrence, for example, *Incident 1*. Select an entry to preview and customize its **Short Description** and **Description** before you submit.
4. Click **Create** once you have specified the above details.

The **Description** of each incident contains the details of the occurrence: issue, description, mitigation, issue type, category, severity, source, API endpoint, service, and a link to the issue in Harness RPA.

{% hint style="info" %}
Harness RPA creates the incidents in your ServiceNow instance and links them to the occurrences. Go to [ServiceNow ITSM integration](https://developer.harness.io/web-application-and-api-protection-waap-discovery-discovery-discovery-discovery/integrations/project-management/servicenow-itsm-integration.md) for more details.
{% endhint %}
{% endtab %}
{% endtabs %}

***

## Next steps

* [Manage Issues](https://developer.harness.io/web-application-and-api-protection-waap-discovery-discovery-discovery-discovery/api-security-testing/ast-basics-and-workflow/apist-issues/manage-issues.md): View the evidence of an issue, change its status, and learn how Harness RPA resolves issues automatically.
* [Virtual Patching](https://developer.harness.io/web-application-and-api-protection-waap-discovery-discovery-discovery-discovery/api-security-testing/ast-basics-and-workflow/apist-issues/remediate-issues/virtual-patching.md): Protect an endpoint while your team works on the code-level fix.
* [APIST Issues](https://developer.harness.io/web-application-and-api-protection-waap-discovery-discovery-discovery-discovery/api-security-testing/ast-basics-and-workflow/apist-issues.md): Review, filter, and group issues.
* [Issues](https://developer.harness.io/web-application-and-api-protection-waap-discovery-discovery-discovery-discovery/api-security-testing/ast-basics-and-workflow/scan-details/issues.md): Review the issues detected by a single scan.

{% @harness-feedback/feedback %}