> For the complete documentation index, see [llms.txt](https://developer.harness.io/llms.txt). Markdown versions of documentation pages are available by appending `.md` to page URLs; this page is available as [Markdown](https://developer.harness.io/web-application-and-api-protection-waap/application-security-testing/advanced-usage/plugins/configuring-and-writing-custom-plugins.md).
# Configuring and Writing Custom Plugins
Updates (July 2026 to September 2026)
* *July 2026* —
* Updated the **Writing a Custom Plugin** section to add information about logging test results. For more information, see [Writing a Custom Plugin](#writing-a-custom-plugin) section, **Python Plugin** tab, **Step 1**.
* Updated the **Writing a Custom Plugin** section to add a note about the impact of not uploading test results. For more information, see [Writing a Custom Plugin](#writing-a-custom-plugin) section, **Python Plugin** tab, **Step 8**.
Custom Plugins allow you to define customized API security tests by configuring how Traceable should mutate requests, validate, and report the identified vulnerabilities. You can write these plugins in YAML or Python according to your requirements.
This topic explains the different ways in which you can configure a custom plugin. It also explains how you can write a Custom YAML or Python Plugin along with the structure, required components, and detailed steps.
## Ways to Configure a Custom Plugin
You can configure custom plugins in Traceable in either of the following ways:
* Traceable platform (**Recommended Method**)
* `config.yaml` file
This section explains the steps to configure a custom plugin using the above options.
{% tabs %}
{% tab title="Traceable Platform (Recommended)" %}
To create a custom plugin using the Traceable platform, navigate to **Testing** → **Policies** → **Test Plugins** and click **Create** in the page’s top right corner. Creating a custom plugin is a 3-step process:
1. Specify the custom plugin details and select the vulnerability type you want to detect using the plugin.
2. Specify the plugin definition according to your requirements.
#### Step 1 — General Details
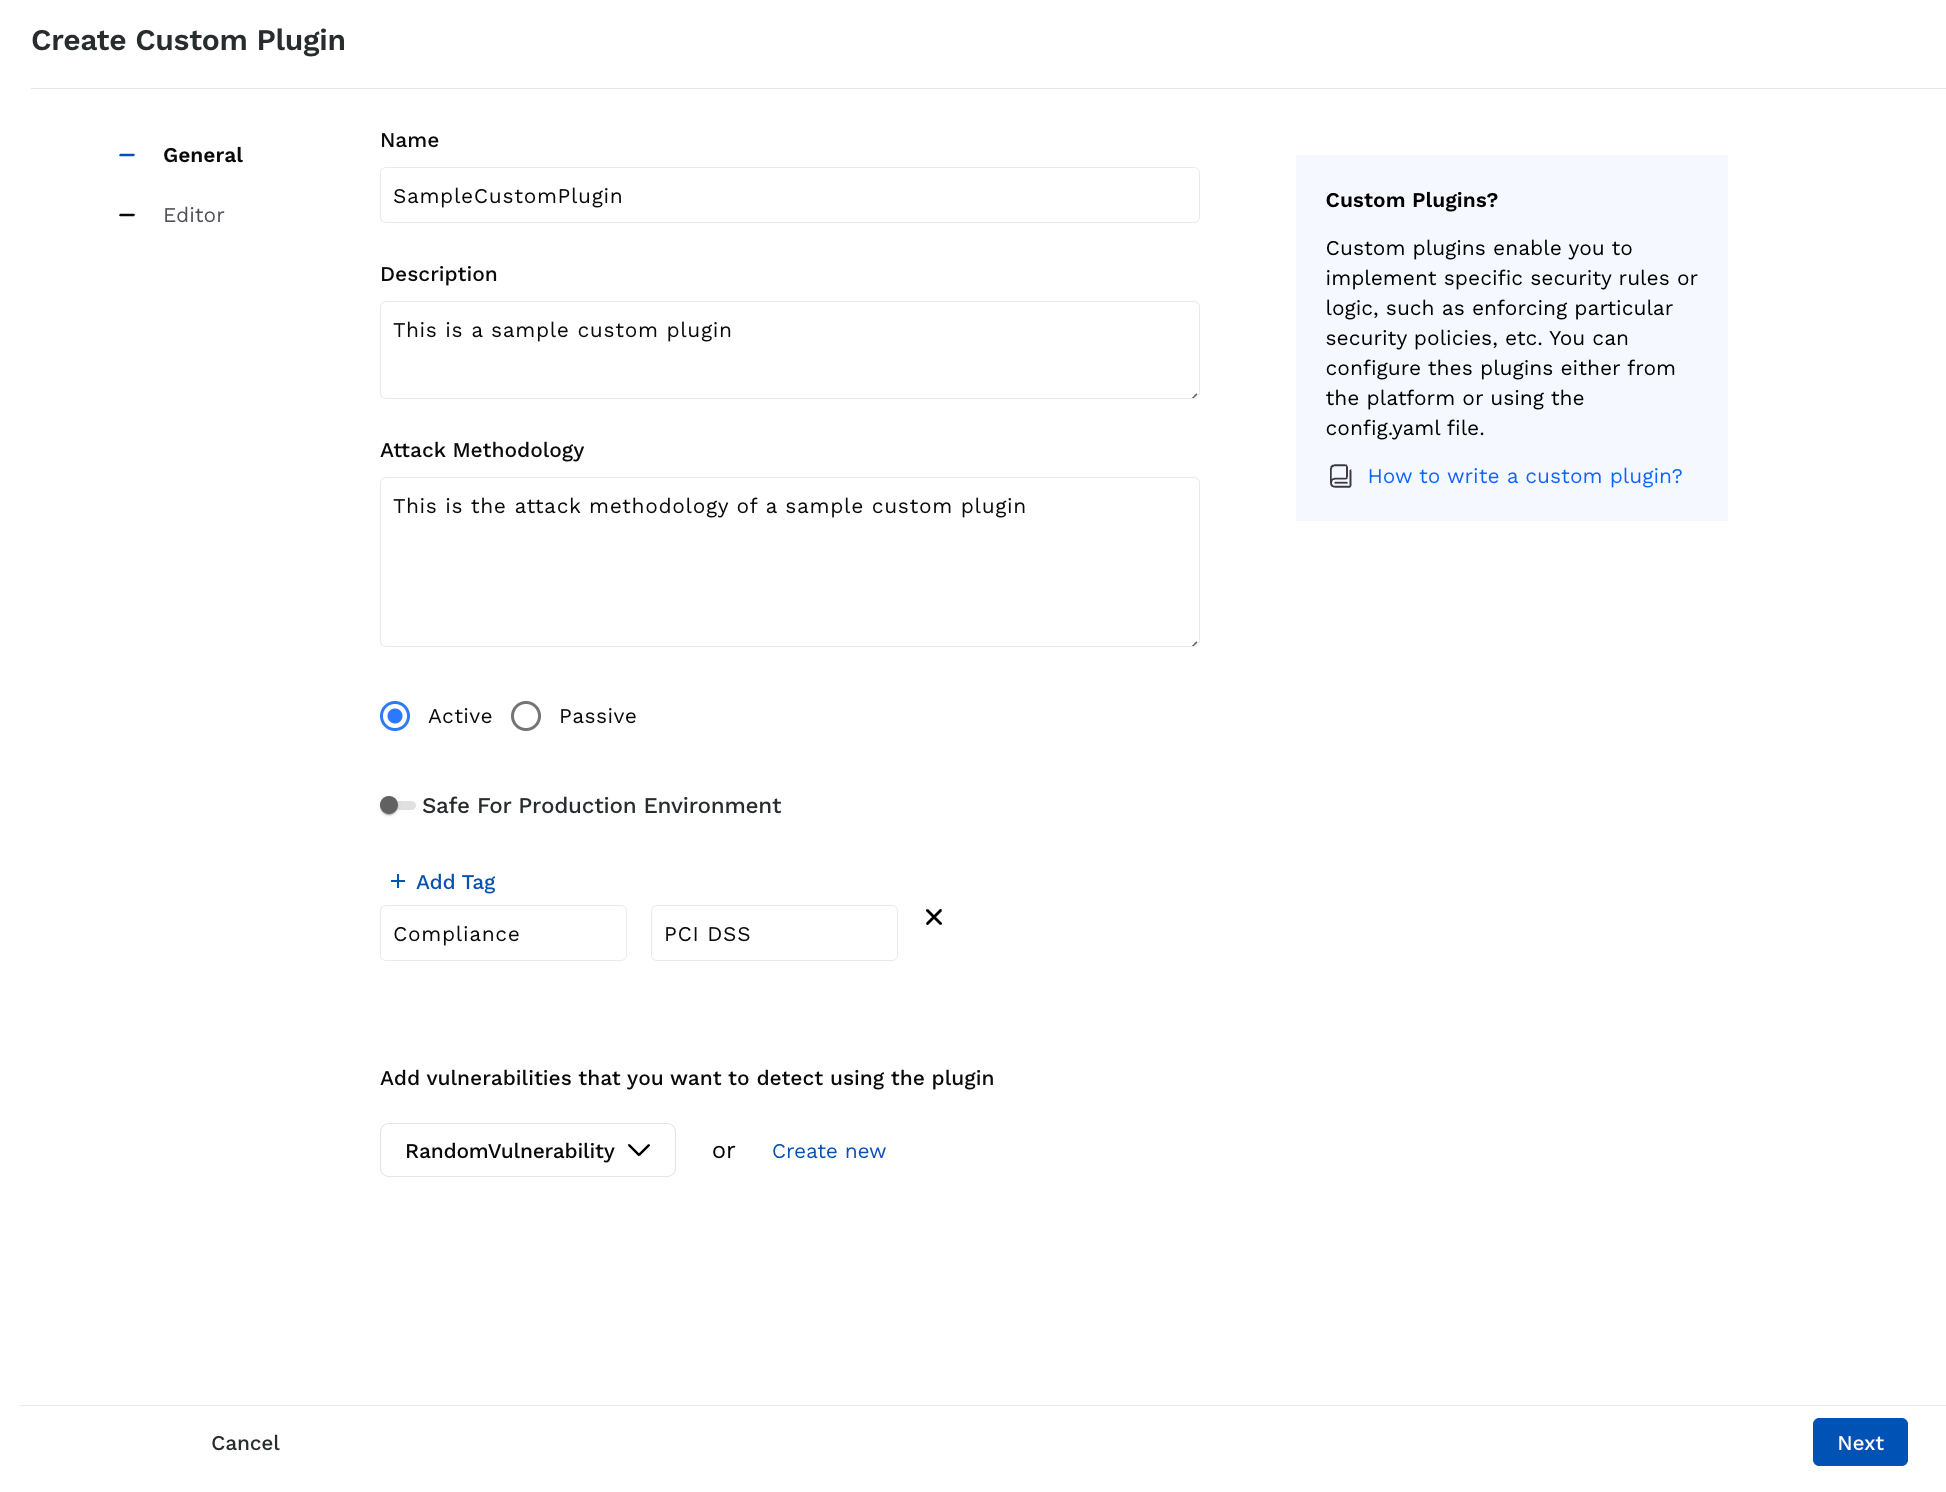
This step requires you to specify the details for the plugin, along with the custom vulnerability you want Traceable to detect. The following is the list of fields you can configure:
General Details of a Custom Plugin
* **Plugin name** — The name of the custom plugin.
* **Description** — Some basic information about the plugin, for example, the vulnerability it is detecting, and any references.
* **Attack Methodology** — A description of the attack methodology that you are going to use in the plugin, for example, how it detects a vulnerability, tests the APIs.
* **Category** — The category of the plugin:
* **Active** — This category of plugins actively interacts with your application by making API calls to your application environment.
* **Passive** — This category of plugins does not actively interact with your application and observe the calls made to your application environment.
* (Optional) **Safe for Production Environment** — If disabled, Traceable does not use the custom plugin on your **production** environment, minimizing risks of impact on live data. If enabled, Traceable uses the custom plugin on your production environment.
* (Optional) **Tags** — The metadata (key-value pairs) you want to apply to the plugin. For example, if the plugin detects vulnerabilities related to PCI DSS data, you can specify the key as *Compliance* with the value *PCI DSS*.\
To add multiple tags, click **+ Add Tag**.
* **Vulnerability Type** — Select or create the custom vulnerability you want Traceable to detect. Do either of the following:
* Click the **Select Vulnerability Types** drop-down and select an existing vulnerability type. The drop-down lists the custom vulnerability types you may have created in the **Vulnerability Types** tab.
* Click **Create new**, and in the pop-up window, specify the vulnerability type details according to your requirements. For more information, see [Vulnerability Types](/web-application-and-api-protection-waap/application-security-testing/advanced-usage/vulnerability-types.md).
Once you have selected a vulnerability type, click **Next**.
#### Step 2 — Plugin Definition
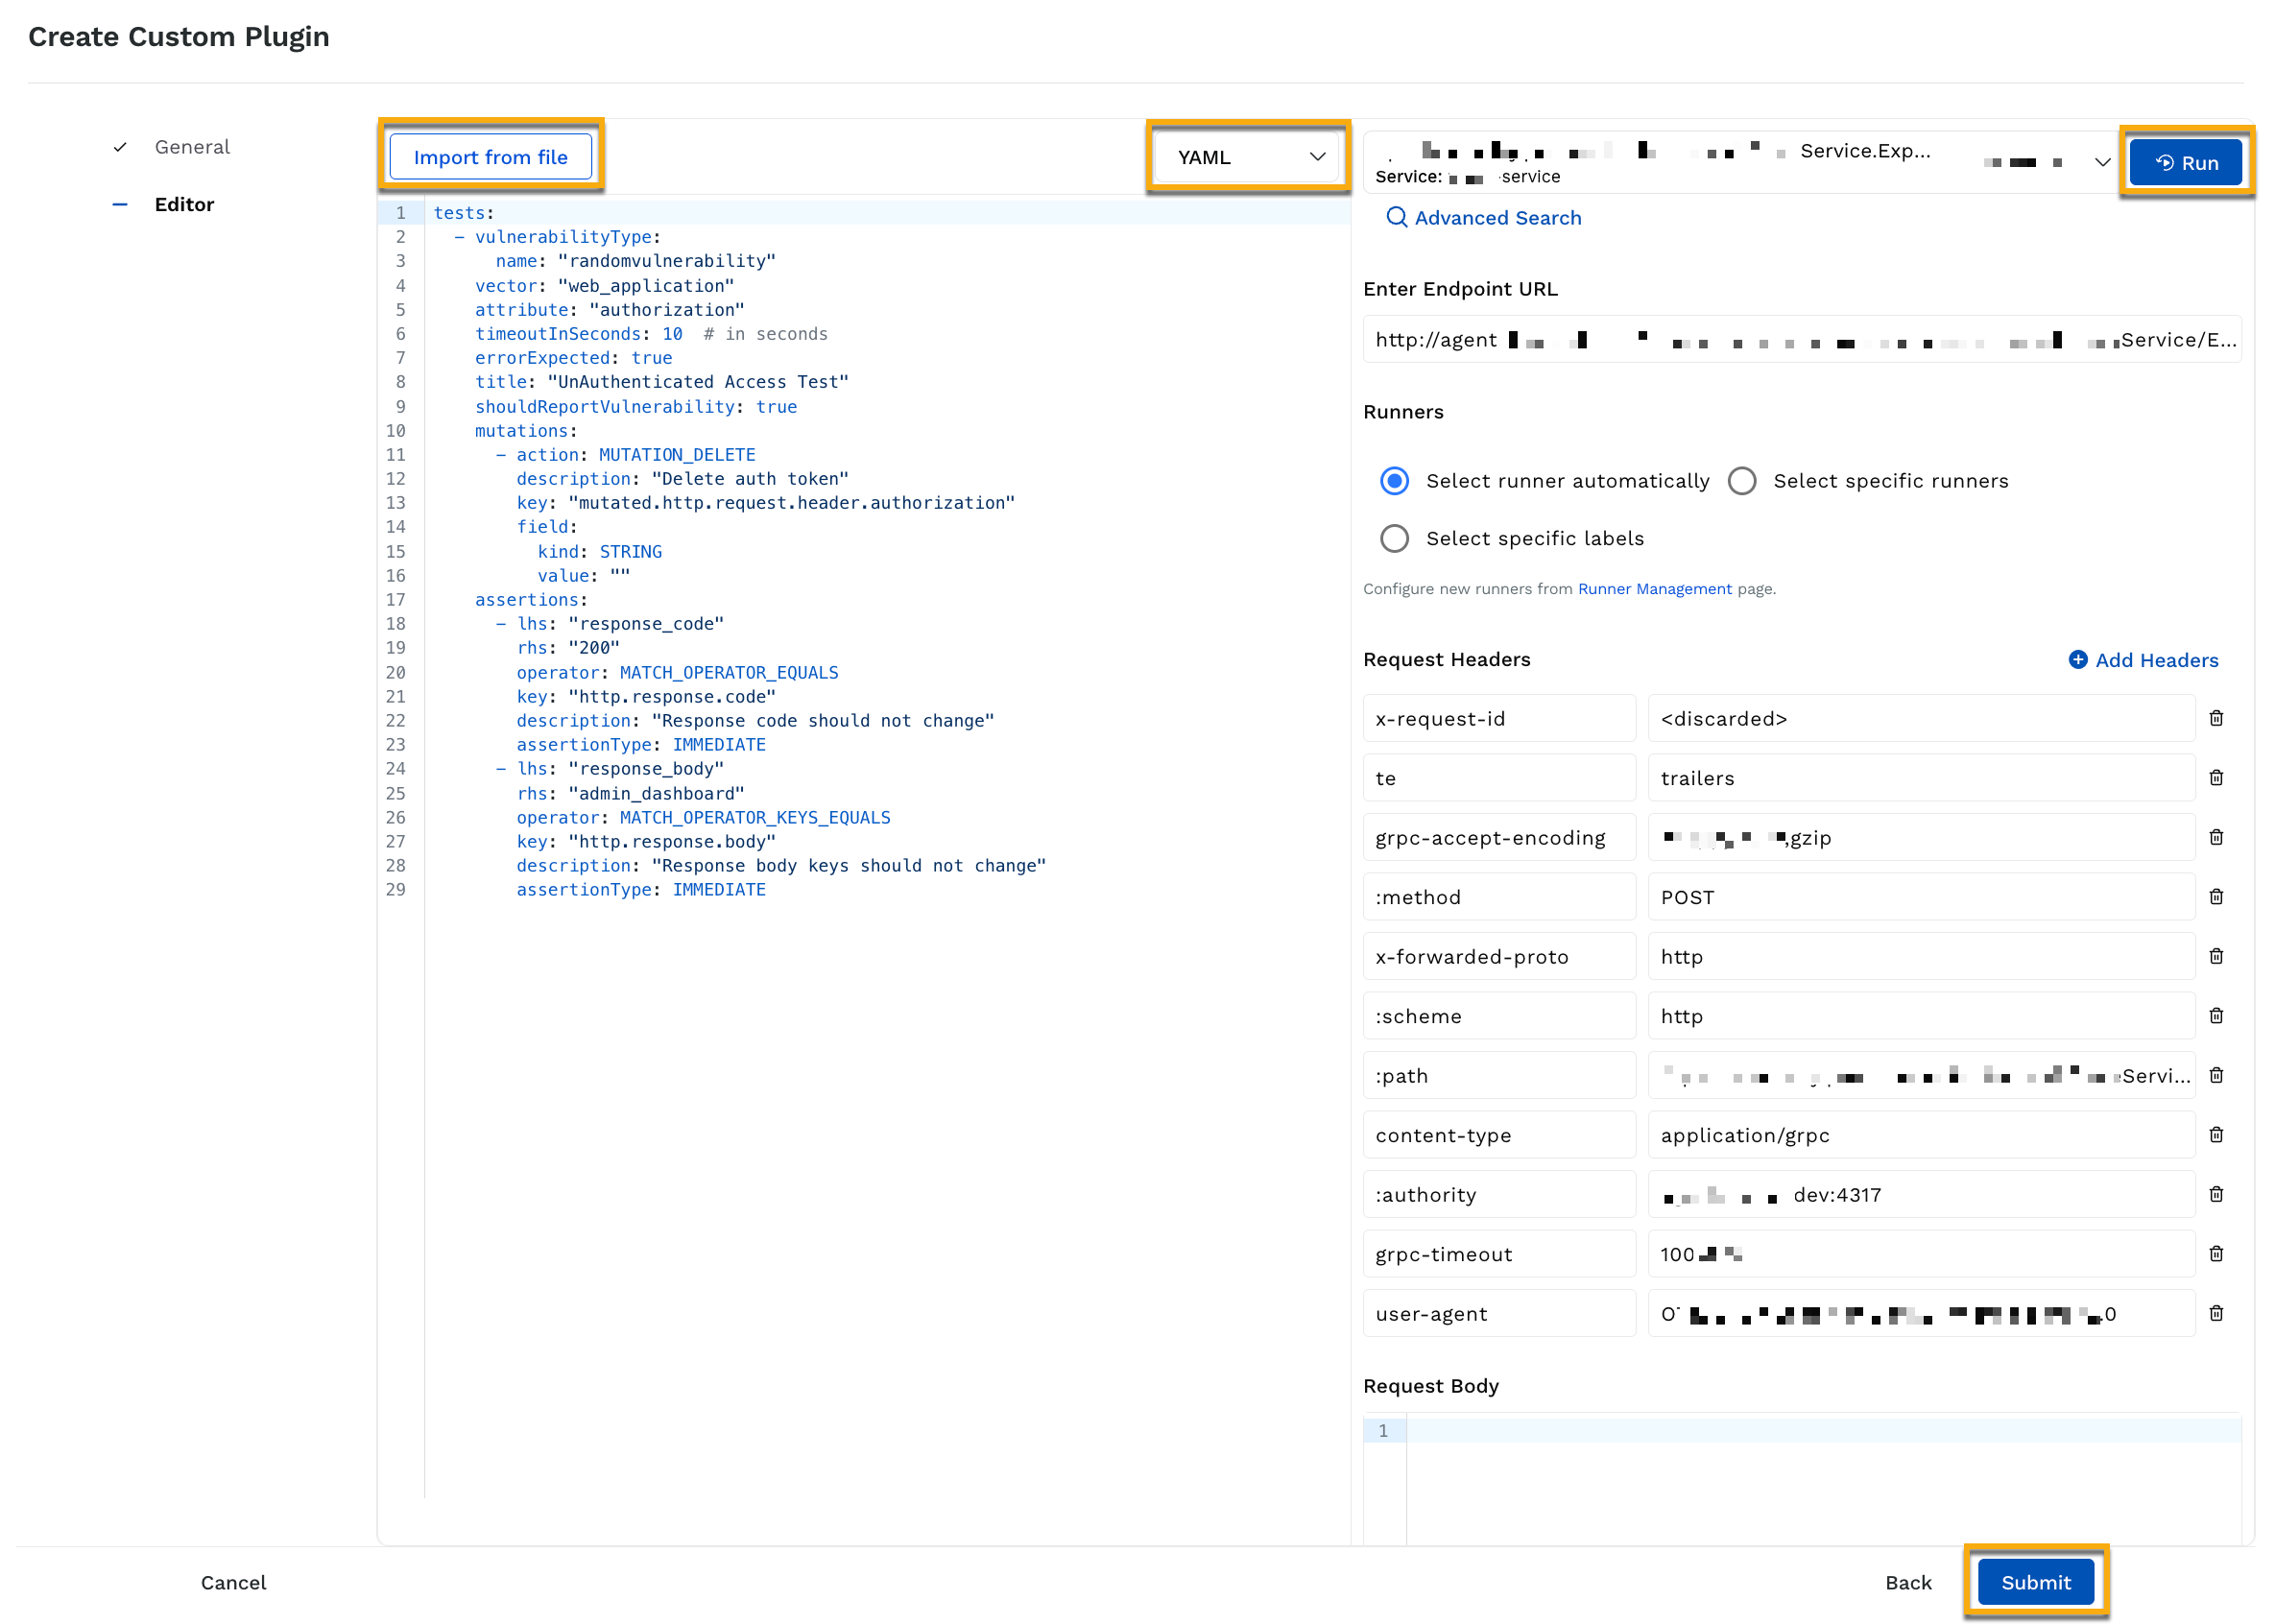
This step requires you to select the kind of custom plugin (Python or YAML) that you wish to create. After you have selected the plugin type, you can either upload the custom plugin code file or specify its code snippet. To upload the custom plugin file, click **Import from file**. For information on the attributes, functions, and operators you can use in a custom Python or YAML plugin, see [Plugin Functions and Operators](/web-application-and-api-protection-waap/application-security-testing/advanced-usage/plugins/plugin-functions-and-operators.md). For the steps to write a custom plugin, see [Writing a Custom Plugin](#writing-a-custom-plugin).
Defining a Custom Plugin
After you have specified the custom plugin code, Traceable also provides you with the option to test the plugin. To do so, you must complete the following configurations in the page’s right widget:
* **Endpoint selection** — You can do the following to use an endpoint for testing:
* Select an endpoint from the drop-down.
* Click **Advanced Search** and select an API endpoint.
* Specify the **Endpoint URL**.
Traceable populates the **Request Headers** and **Request Body** sections based on your selection. The selected endpoint acts as a reference. You can add **Request Headers** by clicking **+ Add Headers** and **Request Body** according to your requirements. Traceable uses this request header and body for testing the plugin.
* **Runner selection** — You can select a specific [runner](/web-application-and-api-protection-waap/application-security-testing/ast-basics-and-workflow/runners-and-cli.md) or allow Traceable to select one automatically. This runner is used for testing the plugin.
* **Run the scan** — After you have completed the above step, click **Run** from the widget’s top right corner. Traceable displays the result below the **Request Body** section.
Once you have tested the plugin, click **Submit**. Traceable displays the plugin in the **Test Plugins** tab. You can also click the **Ellipse** () icon corresponding to a plugin to edit or delete it.
{% endtab %}
{% tab title="Config.yaml File" %}
This method enables you to create custom Python plugins using the `config.yaml` file (`plugins` section) on your local machine. The following are configurations that you can use while creating the plugin:
**Default Location** — TRACEABLE\_HOME
**CLI** — $HOME/.traceable
**Docker** — /app/userdata
| File Directory | Default Location | Description |
| ------------------- | --------------------------------------- | ----------------------------------------------------------------------------------------------------------------------------- |
| config.yaml | `$TRACEABLE_HOME` | Contains the configuration for AST, such as pre-hooks, post-hooks, and custom plugin definitions. |
| custom | `$TRACEABLE_HOME/plugins/custom` | Contains the custom plugin implementations. |
| hooks | `$TRACEABLE_HOME/hooks` | Contains the pre- and post-hooks. |
| testsuite (per API) | `$TRACEABLE_HOME/data//*.json` | Contains the JSON files that represent test suites. Each file is a suite of tests generated at the moment for a specific API. |
#### Configuring custom plugins
The following section in the `config.yaml` file defines the custom plugins to load during the test runs:
```yaml
custom:
sample_plugin: {}
```
In the above code snippet, the plugin name is *sample\_plugin,* which should match the name of the plugin defined in the custom Python plugin code placed in the `$TRACEABLE_HOME/plugins/custom` directory. For information on the attributes, functions, and operators you can use in a custom Python plugin, see [Plugin Functions and Operators](/web-application-and-api-protection-waap/application-security-testing/advanced-usage/plugins/plugin-functions-and-operators.md). For the steps to write a custom plugin, see [Writing a Custom Plugin](#writing-a-custom-plugin).
Traceable also provides AI plugins that you can use to detect AI-related issues. In these AI plugins, you can update the *prompt key* in the `config.yaml` file using the following code:
```yaml
scan:
plugins:
generative_ai:
ai_user_prompt_key: "promptKey" # Replace the `promptKey` with your own prompt key.
```
{% endtab %}
{% endtabs %}
***
## Writing a Custom Plugin
You can write Custom Plugins in either YAML or Python, based on your comfort level and use-case complexity. While YAML-based plugins provide a clean and direct declarative approach, the Python-based plugins provide full programmatic control and flexibility over the plugin definition.
In either approach, writing a custom plugin is a multi-step process. The following sections highlight the plugin's scenario and provide its summary.
### Scenario: Mass Assignment Vulnerability Detection during User Registration
The below plugin simulates a **Mass Assignment attack** where it tests whether an attacker can exploit request payloads to gain **unauthorized access** (admin access) during user registration.
This scenario mirrors a common API security weakness where an unfiltered client-side input leads to unauthorized privilege, and is highlighted in the **OWASP API Top 10** under **API6:2023 - Unrestricted Access to Sensitive Business Flows**.
Following is a summary of the steps in the plugin:
1. Create a **Baseline** to verify whether the registration endpoint in your application returns the expected output without any modifications.
2. **Mutate (Modify) the request** by adding parameters like `admin=true` and modifying fields like `username` and `email`. This simulates the attempt of an attacker who might suspect that your application code does not validate the user-specified fields against the API schema.
3. **Assert (Validate) the response** to check whether the added and modified fields are accepted by the application code and if the registration succeeds unexpectedly.
4. Send a follow-up request to the endpoint to confirm whether the newly registered user received admin privileges. This final step confirms the presence of the mass assignment vulnerability.
The following tabs highlight the above steps in detail, along with the custom plugin code. Click the tabs according to your requirements and complete the steps to write your custom YAML or Python plugin.
{% tabs %}
{% tab title="YAML Plugin" %}
#### Step 1 — Define the Vulnerability Type and Attributes
Before you create a baseline test, you must define the test name and other attributes as mentioned below.
```yaml
tests: # Start of the Custom Plugin
- vulnerabilityType:
name: "Traceable Mass Assignment Vulnerability Detector" # Name of the Vulnerability Type Traceable should test for
vector: "Pretest to create baseline." # The strategy or idea behind the test
attribute: "http.request.body.admin.pretest" # The attribute for visibility in the Traceable platform
timeoutInSeconds: 10 # The time, in seconds that Traceable must wait for, to get a response
errorExpected: false # Declare whether you expect an error during plugin evaluation or not
title: "Pretest to create baseline for mass assignment." # The description of the plugin test for visibility in the Traceable platform
shouldReportVulnerability: false # The test should not report a vulnerability as it only captures the baseline
```
#### Step 2 — Adding Baseline Tests
As mentioned above, start by creating a baseline test. This helps you understand the endpoint’s expected behavior before creating the main attack.
```yaml
assertions: # Set of assertions to validate the baseline
- assertionType: IMMEDIATE # Type of Assertion: IMMEDIATE/LOGICAL
key: "http.response.code" # The key for visibility in the Traceable platform
description: "Validates the ideal response code: should be 200" # A description of the assertion function
operator: MATCH_OPERATOR_EQUALS # The operator to compare the lhs and rhs values below
lhs: "${mutated.http.response.code}" # The parameter to compare with the rhs based on the operator
rhs: "200" # The value to compare with the lhs based on the operator
- assertionType: IMMEDIATE # Type of Assertion: IMMEDIATE/LOGICAL
key: "http.request.url" # The key for visibility in the Traceable platform
description: "Validates the URL: should be the registeration endpoint" # A description of the assertion function
operator: MATCH_OPERATOR_MATCHES_REGEX # The operator to compare the lhs and rhs values below
lhs: "${mutated.http.request.url}" # The parameter to compare with the rhs based on the operator
rhs: ".*register.*" # The value to compare with the lhs based on the operator
```
#### Step 3 — Chaining a new test for the attack
Once you have created the above baseline tests, you can now mutate the request and try to trigger a vulnerability. In the below code, tests are chained because they are supposed to be executed only when the above baseline test (Step 2) returns `NOT_OK` as the result.
```yaml
chains: # Defines that the above baseline tests are linked to child tests
-
vulnerabilityType:
name: "Traceable Mass Assignment Vulnerability Detector" # Name of the Vulnerability Type Traceable should test for
dependsOn: # Ensures that the test runs only when the above baseline tests did not succeed
- testIdentifier: "parent" # Defines the identifier for the dependency. If a chain has multiple parents, you can define parent.parent, and so on.
expectedResult: "NOT_OK" # Defines the status returned from the baseline test based on which Traceable the remaining plugin. Values - NOT_OK: Vulnerable, OK: Not Vulnerable
vector: "Add admin param to request body to test mass assignment." # The strategy or idea behind the test
attribute: "http.request.body.admin" # The attribute for visibility in the Traceable platform
timeoutInSeconds: 10 # The time, in seconds that Traceable must wait for, to get a response
errorExpected: false # Declare whether you expect an error during test evaluation or not
title: "Mass Assignment by adding the admin param to request." # The description of the plugin test for visibility in the Traceable platform
shouldReportVulnerability: true # The test should report a vulnerability as it only checks for mass assignment
```
#### Step 4 — Add Mutations to modify the parameters
Now that you have specified the test details, you can specify the mutations and the parameter details to test for the mass assignment vulnerability.
```yaml
mutations: # Set of mutations to modify the request parameters
- action: MUTATION_ADD # Operator to use and change the existing value with the new one at the specified key
description: "Add admin param to request body." # A description of the mutation for visibility in the Traceable platform
key: "mutated.http.request.body.admin" # The parameter where the below value is to be mutated based on the action (operator) above
field:
kind: STRING # The type of value you are specifying below
value: "true" # The value to be replaced in the above key (mutated.http.request.body.admin)
- action: MUTATION_REGEX_MODIFY # Operator to change the username in the request to the specified value
description: "Change the params ending with username to user123" # A description of the mutation for visibility in the Traceable platform
key: "mutated.http.request.body.*username" # The parameter where the below value (user123) is to be mutated based on the action (operator) above
field:
kind: STRING # The type of value you are specifying below
value: "user123" # The value to be replaced in the above key (mutated.http.request.body.*username)
- action: MUTATION_REGEX_MODIFY # Operator to change the email in the request to the specified value
description: "Change the params ending with email to user123@gmail.com" # A description of the mutation for visibility in the Traceable platform
key: "mutated.http.request.body.*email" # The parameter where the below value (user123@gmail.com) is to be mutated based on the action (operator) above
field:
kind: STRING # The type of value you are specifying below
value: "user123@gmail.com" # The value to be replaced in the above key (mutated.http.request.body.*email)
```
#### Step 5 — Add Assertions to detect unexpected behavior
Based on the mutated parameters, you can specify the assertions to validate the API response towards the mutated data.
```yaml
assertions: # Set of assertions to validate the mutated parameters
- assertionType: IMMEDIATE # Type of Assertion: IMMEDIATE/LOGICAL
key: "http.response.code" # The key for visibility in the Traceable platform
description: "The mutated response code should not change" # A description of the assertion function
operator: MATCH_OPERATOR_EQUALS # The operator to compare the lhs and rhs values below
lhs: "${mutated.http.response.code}" # The parameter to be compared with the rhs value based on the above operator
rhs: "${original.http.response.code}" # The parameter to compare with the lhs based on the operator
- assertionType: IMMEDIATE # Type of Assertion: IMMEDIATE/LOGICAL
key: "http.response.body.success" # The key for visibility in the Traceable platform
description: "Response body should contain success field with true value" # A description of the assertion function
operator: MATCH_OPERATOR_REGEXLOOKUP_EQUALS
lhs: "mutated.http.response.body.status"
rhs: "success"
```
#### Step 6 — Add another chain for further Admin validation
As part of this step, you add another chain to follow up the above test. Here, Traceable verifies if the admin privileges were actually granted to the mutated user.
```yaml
chains: # Defines that the above chained test is linked to this child test
-
vulnerabilityType:
name: "Traceable Mass Assignment Vulnerability Detector" # Name of the Vulnerability Type Traceable should use for testing
dependsOn: # Ensures that the test runs only when the above baseline tests did not succeed
- testIdentifier: "parent" # Defines the identifier for the dependency. If a chain has multiple parents, you can define parent.parent, and so on.
expectedResult: "NOT_OK" # Defines the status returned from the baseline test based on which Traceable the remaining plugin. Values - NOT_OK: Vulnerable, OK: Not Vulnerable
vector: "Verifying that admin privileges were provided to the user" # The strategy or idea behind the test
attribute: "http.request.body.users.admin" # The attribute for visibility in the Traceable platform
timeoutInSeconds: 10 # The time, in seconds that Traceable must wait for, to get a response
errorExpected: false # Declare whether you expect an error during test evaluation or not
title: "Verifying admin privileges was provided to the user" # The description of the plugin test for visibility in the Traceable platform
shouldReportVulnerability: true # The test should not report a vulnerability as it only captures the baseline
```
#### Step 7 — Add Mutations to modify parameters for admin validation
Add the mutations as part of the validation test. This test changes the request path and method to check the availability of the admin field for the mutated user above.
```yaml
mutations: # Set of mutations to modify the request parameters
- action: MUTATION_SET # Operator to use and set a value at the specified key
description: "Changing URL Path to retrieve user details" # A description of the mutation for visibility in the Traceable platform
key: "mutated.http.request.path" # The parameter where the below value is to be mutated based on the action (operator) above
field:
kind: STRING # The type of value you are specifying below
value: "/users/v1/_debug" # The value to be specified in the above key (mutated.http.request.path)
- action: MUTATION_SET # Operator to use and set a value at the specified key
description: "Changing HTTP request method to GET" # A description of the mutation for visibility in the Traceable platform
key: "mutated.http.request.method" # The parameter where the below value is to be mutated based on the action (operator) above
field:
kind: STRING # The type of value you are specifying below
value: "GET" # The value to be specified in the above key (mutated.http.request.method)
```
#### Step 7 — Add Assertions to confirm exploitation
This assertion validates whether the vulnerability is successfully exploited using the above attacks.
```yaml
assertions: # Set of assertions to validate the mutated parameters
- assertionType: IMMEDIATE # Type of Assertion: IMMEDIATE/LOGICAL
key: "http.response.code" # The key for visibility in the Traceable platform
description: "The mutated response code should not change" # A description of the assertion function
operator: MATCH_OPERATOR_EQUALS # The operator to compare the lhs and rhs values below
lhs: "${mutated.http.response.code}" # The parameter to be compared with the rhs value based on the above operator
rhs: "${original.http.response.code}" # The parameter to compare with the lhs based on the operator
- assertionType: IMMEDIATE # Type of Assertion: IMMEDIATE/LOGICAL
key: "http.response.body" # The key for visibility in the Traceable platform
description: "Response body should contain the admin field with true value for the user." # A description of the assertion function
operator: MATCH_OPERATOR_MATCHES_REGEX # The operator to compare the lhs and rhs values below
lhs: "${mutated.http.response.body}" # The parameter to be compared with the rhs value based on the above operator
rhs: "'admin': (T|t)rue, 'email': 'user123@gmail.com'" # The parameter to compare with the lhs based on the operator
```
#### Combined Custom YAML Plugin
Following is the custom YAML plugin code that combines all the above steps:
```yaml
tests:
- vulnerabilityType:
name: "Traceable Mass Assignment Vulnerability Detector"
vector: "Pretest to create baseline."
attribute: "http.request.body.admin.pretest"
timeoutInSeconds: 10 # in seconds
errorExpected: false
title: "Pretest to create baseline for mass assignment."
shouldReportVulnerability: false
assertions:
- assertionType: IMMEDIATE
key: "http.response.code"
description: "Response code should be 200"
operator: MATCH_OPERATOR_EQUALS
lhs: "${mutated.http.response.code}"
rhs: "200"
- assertionType: IMMEDIATE
key: "http.request.url"
description: "URL should be registeration endpoint"
operator: MATCH_OPERATOR_MATCHES_REGEX
lhs: "${mutated.http.request.url}"
rhs: ".*register.*"
chains:
-
vulnerabilityType:
name: "Traceable Mass Assignment Vulnerability Detector"
dependsOn:
- testIdentifier: "parent"
expectedResult: "NOT_OK"
vector: "Add admin param to request body to test mass assignment."
attribute: "http.request.body.admin"
timeoutInSeconds: 10 # in seconds
errorExpected: false
title: "Mass Assignment by adding adming param to request."
shouldReportVulnerability: true
mutations:
- action: MUTATION_ADD
description: "Add admin param to request body."
key: "mutated.http.request.body.admin"
field:
kind: STRING
value: "true"
- action: MUTATION_REGEX_MODIFY
description: "Change the username to user123"
key: "mutated.http.request.body.*username"
field:
kind: STRING
value: "user123"
- action: MUTATION_REGEX_MODIFY
description: "Change the email to user123@gmail.com"
key: "mutated.http.request.body.*email"
field:
kind: STRING
value: "user123@gmail.com"
assertions:
- assertionType: IMMEDIATE
key: "http.response.code"
description: "Response code should not change"
operator: MATCH_OPERATOR_EQUALS
lhs: "${mutated.http.response.code}"
rhs: "${original.http.response.code}"
- assertionType: IMMEDIATE
key: "http.response.body.success"
description: "Response body should contain success field with true value"
operator: MATCH_OPERATOR_REGEXLOOKUP_EQUALS
lhs: "mutated.http.response.body.status"
rhs: "success"
chains:
-
vulnerabilityType:
name: "Traceable Mass Assignment Vulnerability Detector"
dependsOn:
- testIdentifier: "parent"
expectedResult: "NOT_OK"
vector: "Verifying admin privileges was provided to the user"
attribute: "http.request.body.users.admin"
timeoutInSeconds: 10 # in seconds
errorExpected: false
title: "Verifying admin privileges was provided to the user"
shouldReportVulnerability: true
mutations:
- action: MUTATION_SET
description: "Changing URL Path to retrieve user details"
key: "mutated.http.request.path"
field:
kind: STRING
value: "/users/v1/_debug"
- action: MUTATION_SET
description: "Changing HTTP request method to GET"
key: "mutated.http.request.method"
field:
kind: STRING
value: "GET"
assertions:
- assertionType: IMMEDIATE
key: "http.response.code"
description: "Response code should not change"
operator: MATCH_OPERATOR_EQUALS
lhs: "${mutated.http.response.code}"
rhs: "${original.http.response.code}"
- assertionType: IMMEDIATE
key: "http.response.body"
description: "Response body should contain admin field with true value for the user."
operator: MATCH_OPERATOR_MATCHES_REGEX
lhs: "${mutated.http.response.body}"
rhs: "'admin': (T|t)rue, 'email': 'user123@gmail.com'"
```
{% endtab %}
{% tab title="Python Plugin" %}
#### Step 1 — Import the Required Modules and Set Up Logging
As part of writing a Custom Python Plugin, you must import its core modules. These modules enable you to create test logic, modify the requests or responses, validate them, define dependency chains, etc.
```python
from traceable.ast.testsuite.assertion import Assertion
from traceable.ast.testsuite.mutation import Mutation
from traceable.ast.testsuite.plugin import Plugin
import logging
from traceable.ast.context import ScanContext
from traceable.ast.testsuite.plugin import DependsOn
logger = logging.getLogger("traceable.ast.custom.plugin")
```
#### Step 2 — Define the Plugin Class and Metadata
Define the plugin identity and behavior using the mandatory and optional fields. Some of these fields are used to specify the vulnerability information on the Traceable platform.
```python
class MassAssignment(Plugin):
category = "custom" # Can't be changed
name = "Custom Mass Assignment Plugin" # Name of the plugin
title = "Mass Assignment" # Title of the plugin used to display in the vulnerability
description = "The attack involves testing if the user can set a property for an request object that it should not have been able to do so. For an API param that was seen in the response but not in the request body, replace the original value of that parameter with a newer value, add it as part of the request and send the mutated request. If the new API response shows the attribute with the mutated value, raise a mass assignment vulnerability. As part of the assertion, the attack checks if the response code, body and the value of the attribute matches."
# Mitigation for the vulnerability this plugin finds
mitigation = """
The best way to protect your code against Mass Assignment is to make the API schemas and deployed apps consistent. The application should only accept parameters declared in the API schema.
While using ORM frameworks, always use lists of permitted parameters. Don't accepting raw inputs.
"""
# Severity of the vulnerability this plugin finds
severity = "HIGH"
# CVSS vector string for the vulnerability this plugin finds. Score is calculated automatically
# https://nvd.nist.gov/vuln-metrics/cvss/v3-calculator?version=3.1&vector=AV:A/AC:H/PR:L/UI:N/S:U/C:H/I:H/A:L
cvssVectorString = "CVSS:3.1/AV:N/AC:L/PR:N/UI:N/S:U/C:N/I:H/A:N"
# Optional Fields
###############################################################################
displayName = "Mass Assignment" # Display name for plugin in UI
affectedEntityType = "API"
impact = """
It depends on the exposed parameters.
- A parameter like role might have a critical impact in your application by allowing privilege escalation.
- A parameter like skipMfa might have a high impact in your application by allowing MFA bypass.
- A parameter like country_code might have a medium impact in your application by allowing country-block bypass.
"""
references = "OWASP API Top 10 - 2019 - A6 Mass Assignment - https://github.com/OWASP/API-Security/blob/master/editions/2019/en/0xa6-mass-assignment.md"
estimatedFixTime = 1.0
estimatedBountyValue = 100
tags = {
"author": "Tester",
}
```
#### Step 3 — Initialize the Plugin
Define the `init` method to ensure that the plugin has access to scanning APIs and the related metadata.
```python
def __init__(self, scanctx: ScanContext):
super().__init__(scanctx)
```
#### Step 4 — Set up the Run Method
Define the main execution point of the plugin. The logic below ensures that the plugin runs only once per API per scan. Additionally, on each execution, the plugin populates the logger message, which helps during any debugging.
```python
def run(self):
if self.scanctx.get(self.name, False):
return
else:
self.scanctx[self.name] = True
logger.info("Running mass assignment test")
```
#### Step 5 — Create the Baseline Test
Once you have defined the metadata and other methods, start by creating a baseline test. This test helps you understand the endpoint’s expected behavior before creating the main attack. The observed behavior is compared against that observed in the main test.
```python
pre_test = self.create_test_case(vector="Pretest to create baseline for mass assignment", onattribute="http.request.body.admin.pretest", report=False)
```
Add baseline assertions for validation of the following:
* The ideal response code (`${original.http.response.code}`) should match the mutated response code (`${mutated.http.response.code}`)
* The request URL should be the user registration endpoint
```python
pre_test.assertions = [
Assertion.create("mutated.http.response.code", "MATCH_OPERATOR_EQUALS", "${mutated.http.response.code}", "${original.http.response.code}"),
Assertion.create("mutated.http.request.url", "MATCH_OPERATOR_MATCHES_REGEX", "${mutated.http.request.url}", ".*register.*"),
]
```
#### Step 6 — Create the Main Attack
Once you have created the above baseline tests, you can now create the main attack that mutates the request and tries to trigger a vulnerability. In this step, tests are chained because they are supposed to be executed only when the above baseline test (Step 5) returns `NOT_OK` as the result.
```python
test = self.create_test_case(vector="Add admin param to request body to test mass assignment", onattribute="http.request.body.admin", report=False)
test.depends_on = [DependsOn.create("parent", "NOT_OK")]
```
Add request mutations. These mutations perform the following:
* Sets the Admin parameter (`${mutated.http.request.body.admin}`) to True.
* Modifies the user email (`${mutated.http.request.body.*email}`) to a dummy one.
* Modifies the username (`${mutated.http.request.body.*username}`) to a dummy one.
```python
test.mutations = [
Mutation.create("MUTATION_SET", "mutated.http.request.body.admin", "true"),
Mutation.create("MUTATION_REGEX_MODIFY", "mutated.http.request.body.*email", "user123@gmail.com"),
Mutation.create("MUTATION_REGEX_MODIFY", "mutated.http.request.body.*username", "user123"),
]
```
Add request assertions for validation of the following:
* The response body (`mutated.http.response.body.status`) contains success as the status.
* The mutated response code (`${mutated.http.response.code}`) is the same as the original one (`${original.http.response.code}`).
```python
test.assertions = [
Assertion.create("http.response.body.status", "MATCH_OPERATOR_REGEXLOOKUP_EQUALS", "mutated.http.response.body.status", "success"),
Assertion.create("mutated.http.response.code", "MATCH_OPERATOR_EQUALS", "${mutated.http.response.code}", "${original.http.response.code}"),
]
```
As mentioned above, chain this main attack to the above baseline test.
```python
pre_test.test_chains = [test]
```
#### Step 7 — Add a Validation Test to Confirm Exploitation
As part of this step, you add another chain to follow up the above test. Here, Traceable verifies if the admin privileges were actually granted to the mutated user. Here, tests are chained because they are supposed to be executed only when the above baseline test (Step 5) returns `NOT_OK` as the result.
```python
validation_test = self.create_test_case(vector="Verifying admin privileges were provided to the user", onattribute="http.request.body.users.admin", report=True)
validation_test.depends_on = [DependsOn.create("parent", "NOT_OK")]
```
Add request mutations. These mutations perform the following:
* Modifies the request path (`mutated.http.request.path`) to retrieve user details.
* Modifies the request method (`mutated.http.request.method`) to `GET`.
```python
validation_test.mutations = [
Mutation.create("MUTATION_SET", "mutated.http.request.path", "/users/v1/_debug"),
Mutation.create("MUTATION_SET", "mutated.http.request.method", "GET")
]
```
Add request assertions for validation of the following:
* The mutated response code (`${mutated.http.response.code}`) is the same as the original one (`${original.http.response.code}`).
* The response body (`${mutated.http.response.body}`) contains the `admin` field as `true` for the dummy user.
```python
validation_test.assertions = [
Assertion.create("mutated.http.response.code", "MATCH_OPERATOR_EQUALS", "${mutated.http.response.code}", "${original.http.response.code}"),
Assertion.create("mutated.http.response.body", "MATCH_OPERATOR_MATCHES_REGEX", "${mutated.http.response.body}", "'admin': (T|t)rue, 'email': 'user123@gmail.com'"),
]
```
As mentioned above, chain the baseline test with the main attack, and the main attack with the validation test.
```python
pre_test.test_chains = [test]
test.test_chains = [validation_test]
```
#### Step 8 — Run the Tests and Upload Results
Execute the test and upload the results to the Traceable platform.
```python
test_result = pre_test.run()
self.upload_result(test_result)
```
{% hint style="info" %}
Ensure that you call `self.upload_result()` to upload the test results to the Traceable platform. This provides you with visibility into the findings from a scan.
{% endhint %}
#### Combined Custom Python Plugin
Following is the Custom Python Plugin code that combines all the above steps:
```python
from traceable.ast.testsuite.assertion import Assertion
from traceable.ast.testsuite.mutation import Mutation
from traceable.ast.testsuite.plugin import Plugin
import logging
from traceable.ast.context import ScanContext
from traceable.ast.testsuite.plugin import DependsOn
logger = logging.getLogger("traceable.ast.plugins.businesslogic.mass_assignment")
class MassAssignment(Plugin):
category = "custom" # Can't be changed
name = "mass_assignment_custom" # Name of the plugin
title = "Mass Assignment" # Title of the plugin used to display in the vulnerability
description = "The attack involves testing if the user can set a property for an request object that it should not have been able to do so. For an API param that was seen in the response but not in the request body, replace the original value of that parameter with a newer value, add it as part of the request and send the mutated request. If the new API response shows the attribute with the mutated value, raise a mass assignment vulnerability. As part of the assertion, the attack checks if the response code, body and the value of the attribute matches."
# Mitigation for the vulnerability this plugin finds
mitigation = """
The best way to protect your code against Mass Assignment is to make the API schemas and deployed apps consistent. The application should only accept parameters declared in the API schema.
While using ORM frameworks, always use lists of permitted parameters. Don't accepting raw inputs.
"""
# Severity of the vulnerability this plugin finds
severity = "HIGH"
# CVSS vector string for the vulnerability this plugin finds. Score is calculated automatically
# https://nvd.nist.gov/vuln-metrics/cvss/v3-calculator?version=3.1&vector=AV:A/AC:H/PR:L/UI:N/S:U/C:H/I:H/A:L
cvssVectorString = "CVSS:3.1/AV:N/AC:L/PR:N/UI:N/S:U/C:N/I:H/A:N"
# Optional Fields
###############################################################################
displayName = "Mass Assignment" # Display name for plugin in UI
affectedEntityType = "API"
impact = """
It depends on the exposed parameters.
- A parameter like role might have a critical impact in your application by allowing privilege escalation.
- A parameter like skipMfa might have a high impact in your application by allowing MFA bypass.
- A parameter like country_code might have a medium impact in your application by allowing country-block bypass.
"""
references = "OWASP API Top 10 - 2019 - A6 Mass Assignment - https://github.com/OWASP/API-Security/blob/master/editions/2019/en/0xa6-mass-assignment.md"
estimatedFixTime = 1.0
estimatedBountyValue = 100
tags = {
"author": "Tester",
}
def __init__(self, scanctx: ScanContext):
super().__init__(scanctx)
def run(self):
if self.scanctx.get(self.name, False):
return
else:
self.scanctx[self.name] = True
logger.info("Running mass assignment test")
pre_test = self.create_test_case(vector="Pretest to create baseline for mass assignment", onattribute="http.request.body.admin.pretest", report=False)
pre_test.assertions = [
Assertion.create("mutated.http.response.code", "MATCH_OPERATOR_EQUALS", "${mutated.http.response.code}", "${original.http.response.code}"),
Assertion.create("mutated.http.request.url", "MATCH_OPERATOR_MATCHES_REGEX", "${mutated.http.request.url}", ".*register.*"),
]
test = self.create_test_case(vector="Add admin param to request body to test mass assignment", onattribute="http.request.body.admin", report=False)
test.depends_on = [DependsOn.create("parent", "NOT_OK")]
test.mutations = [
Mutation.create("MUTATION_SET", "mutated.http.request.body.admin", "true"),
Mutation.create("MUTATION_REGEX_MODIFY", "mutated.http.request.body.*email", "user123@gmail.com"),
Mutation.create("MUTATION_REGEX_MODIFY", "mutated.http.request.body.*username", "user123"),
]
test.assertions = [
Assertion.create("http.response.body.status", "MATCH_OPERATOR_REGEXLOOKUP_EQUALS", "mutated.http.response.body.status", "success"),
Assertion.create("mutated.http.response.code", "MATCH_OPERATOR_EQUALS", "${mutated.http.response.code}", "${original.http.response.code}"),
]
pre_test.test_chains = [test]
validation_test = self.create_test_case(vector="Verifying admin privileges was provided to the user", onattribute="http.request.body.users.admin", report=True)
validation_test.depends_on = [DependsOn.create("parent", "NOT_OK")]
validation_test.mutations = [
Mutation.create("MUTATION_SET", "mutated.http.request.path", "/users/v1/_debug"),
Mutation.create("MUTATION_SET", "mutated.http.request.method", "GET")
]
validation_test.assertions = [
Assertion.create("mutated.http.response.code", "MATCH_OPERATOR_EQUALS", "${mutated.http.response.code}", "${original.http.response.code}"),
Assertion.create("mutated.http.response.body", "MATCH_OPERATOR_MATCHES_REGEX", "${mutated.http.response.body}", "'admin': (T|t)rue, 'email': 'user123@gmail.com'"),
]
pre_test.test_chains = [test]
test.test_chains = [validation_test]
test_result = pre_test.run()
self.upload_result(test_result)
```
{% endtab %}
{% endtabs %}
{% @harness-feedback/feedback %}