> For the complete documentation index, see [llms.txt](https://developer.harness.io/llms.txt). Markdown versions of documentation pages are available by appending `.md` to page URLs; this page is available as [Markdown](https://developer.harness.io/web-application-and-api-protection-waap/data-collection/gateways-load-balancers/azure/data-collection-with-log-analytics.md).
# Data collection with log analytics
**Log Analytics** in Azure APIM is a tool for gathering and examining detailed logs and metrics from your APIs. It helps you monitor, troubleshoot, and optimize your APIs effectively. Traceable uses Log Analytics to collect data from your APIs, which is sent to the Traceable Platform for further analysis.
This topic outlines the steps for configuring data capture for Azure API Management (APIM) using Log Analytics. The process involves creating a Storage Account, enabling diagnostic logs on APIM, setting up a Log Analytics export rule, and creating an Azure Function to handle the log data.
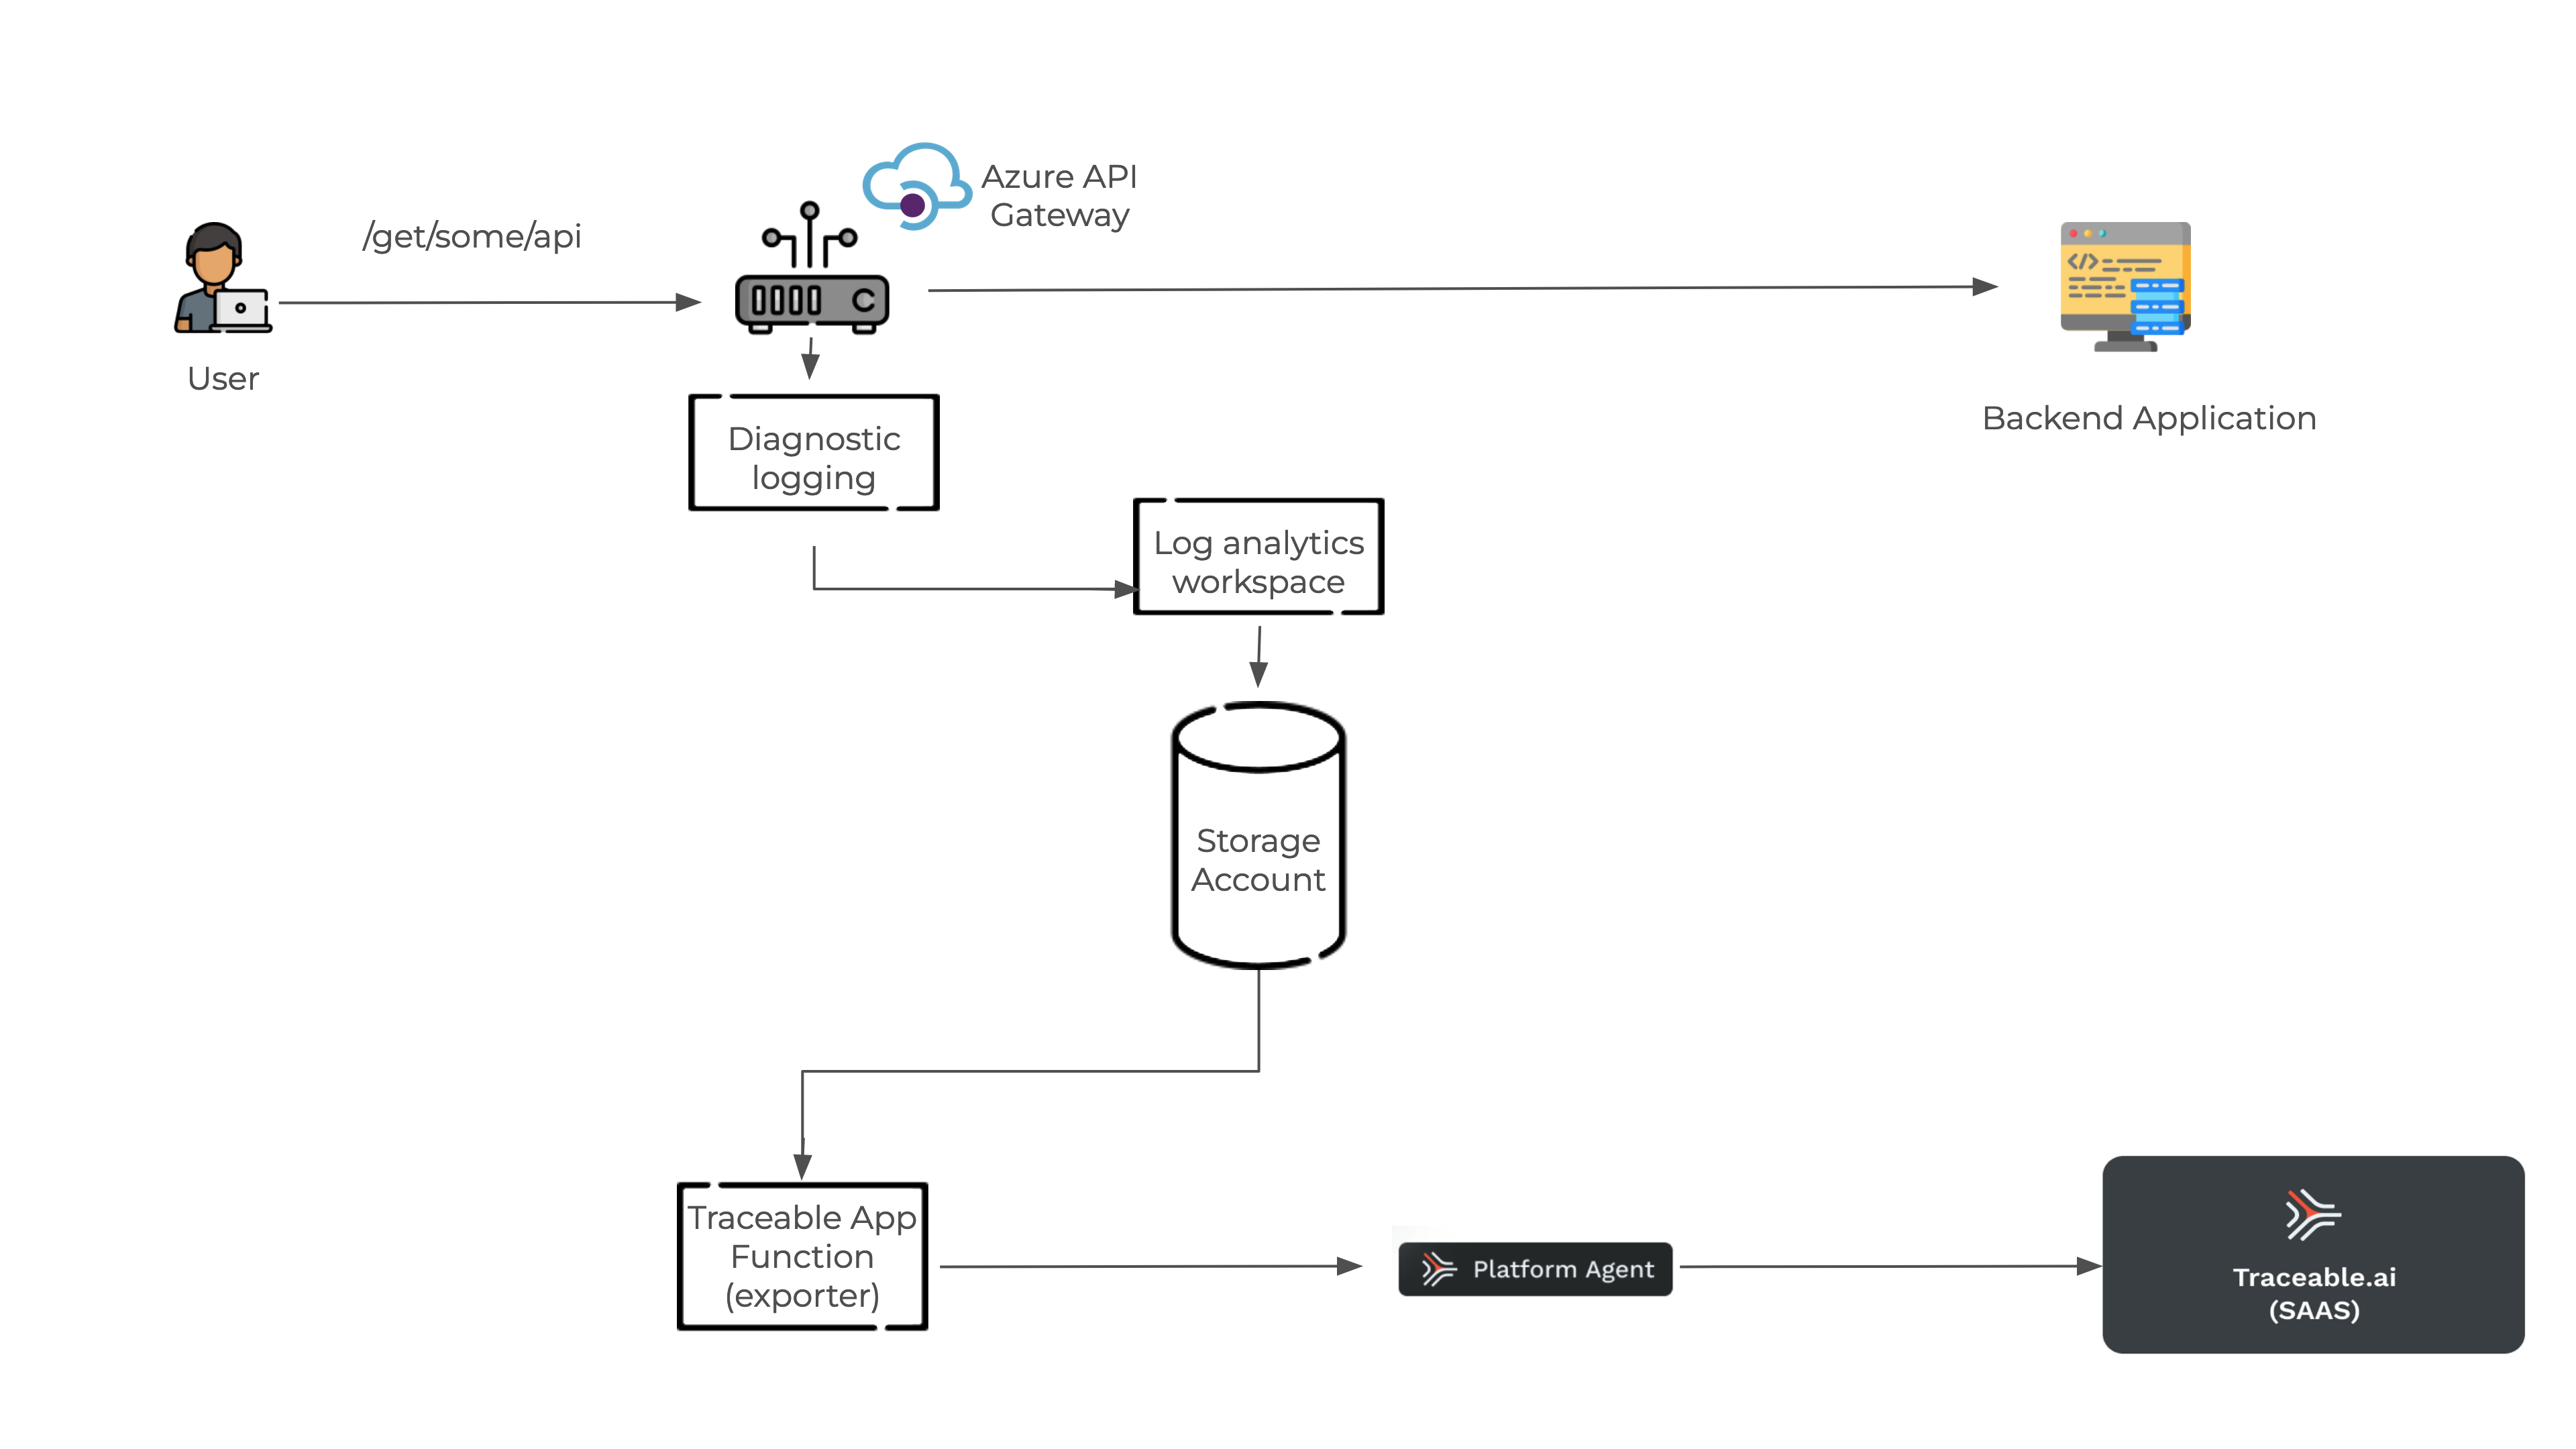
The following is a high-level data flow diagram for data collection using log analytics.
* **APIM Gateway**: Collects and sends logs.
* **Diagnostic Logs**: Stores logs before forwarding them to a Storage Account.
* **Storage Account**: Receives logs from Diagnostic Logs and triggers the Azure Function.
* **Azure Function**: Processes logs and sends data to the Traceable Platform agent.
* **Traceable Platform agent**: Consumes the data.
* **Log Analytics Workspace**: Stores and allows analysis of the processed data.
***
## Before you begin
Make a note of the following points before you start with the configuration:
* Make sure that the Traceable Platform agent is deployed. Note the platform agent's IP address. For more information, see [Platform agent](/web-application-and-api-protection-waap/installation/platform-agent.md).
* An Azure API Management gateway is created.
* A Log Analytics workspace is created.
***
## Configuration
### Step 1 — Create a storage account
The Storage Account receives application insight logs, which are processed by an Azure App Function and exported to the Traceable Platform agent. Complete the following steps to create a Storage account:
1. Log into your Azure account and click **Storage accounts**.
2. Click **Create** on the Storage accounts page.
3. On the **Create a storage account** page, navigate to the **Basics** tab and fill in the values. In the **Redundancy** field, you may choose Locally-redundant storage (LRS).
4. Navigate to the **Networking** tab and configure the following. These configurations limit access to this Storage account so that it is accessible from the Log Analytics workspace and the App Function created in the later steps.
1. **Network access** — Enable public access from selected virtual networks and IP addresses.
2. **Virtual networks** — Configure your Virtual network subscription, Virtual network, and Subnets.
3. **Network routing** — Select Microsoft network routing.
5. Once the Storage account is configured, configure the retention limits. The integration is event-based, so a short retention period is acceptable. In the Storage account you created above, navigate to Lifecycle Management.
6. In the **Details** tab of **Add a rule** page, provide the following:
1. Rule name
2. Rule scope — Select **Apply rule to all blob in your storage account**.
3. Blob type — Select **Block blobs**.
4. Blob subtype — Select **Base blob**.
7. In the **Base** blobs tab, configure the rule conditions. You may select **Delete the blob** in the `then` operation.
8. Click on **Add**.
***
### Step 2 — Enable API management diagnostic logs
Complete the following steps:
1. In Azure, navigate to your APIM instance.
2. Go to **Monitoring** → **Diagnostic Settings**.
3. Create a new Diagnostic Setting:
* Select the **Send to Log Analytics Workspace** checkbox.
* Ensure the **Destination table** is set to **Resource Specific**.
***
### Step 3 — Configure diagnostic logging on target APIs
Complete the following steps:
1. Navigate to **APIs** → \
 * **APIM Gateway**: Collects and sends logs.
* **Diagnostic Logs**: Stores logs before forwarding them to a Storage Account.
* **Storage Account**: Receives logs from Diagnostic Logs and triggers the Azure Function.
* **Azure Function**: Processes logs and sends data to the Traceable Platform agent.
* **Traceable Platform agent**: Consumes the data.
* **Log Analytics Workspace**: Stores and allows analysis of the processed data.
***
## Before you begin
Make a note of the following points before you start with the configuration:
* Make sure that the Traceable Platform agent is deployed. Note the platform agent's IP address. For more information, see [Platform agent](/web-application-and-api-protection-waap/installation/platform-agent.md).
* An Azure API Management gateway is created.
* A Log Analytics workspace is created.
***
## Configuration
### Step 1 — Create a storage account
The Storage Account receives application insight logs, which are processed by an Azure App Function and exported to the Traceable Platform agent. Complete the following steps to create a Storage account:
1. Log into your Azure account and click **Storage accounts**.
* **APIM Gateway**: Collects and sends logs.
* **Diagnostic Logs**: Stores logs before forwarding them to a Storage Account.
* **Storage Account**: Receives logs from Diagnostic Logs and triggers the Azure Function.
* **Azure Function**: Processes logs and sends data to the Traceable Platform agent.
* **Traceable Platform agent**: Consumes the data.
* **Log Analytics Workspace**: Stores and allows analysis of the processed data.
***
## Before you begin
Make a note of the following points before you start with the configuration:
* Make sure that the Traceable Platform agent is deployed. Note the platform agent's IP address. For more information, see [Platform agent](/web-application-and-api-protection-waap/installation/platform-agent.md).
* An Azure API Management gateway is created.
* A Log Analytics workspace is created.
***
## Configuration
### Step 1 — Create a storage account
The Storage Account receives application insight logs, which are processed by an Azure App Function and exported to the Traceable Platform agent. Complete the following steps to create a Storage account:
1. Log into your Azure account and click **Storage accounts**.
 2. Click **Create** on the Storage accounts page.
 3. On the **Create a storage account** page, navigate to the **Basics** tab and fill in the values. In the **Redundancy** field, you may choose Locally-redundant storage (LRS).
 4. Navigate to the **Networking** tab and configure the following. These configurations limit access to this Storage account so that it is accessible from the Log Analytics workspace and the App Function created in the later steps.
1. **Network access** — Enable public access from selected virtual networks and IP addresses.
2. **Virtual networks** — Configure your Virtual network subscription, Virtual network, and Subnets.
3. **Network routing** — Select Microsoft network routing.
4. Navigate to the **Networking** tab and configure the following. These configurations limit access to this Storage account so that it is accessible from the Log Analytics workspace and the App Function created in the later steps.
1. **Network access** — Enable public access from selected virtual networks and IP addresses.
2. **Virtual networks** — Configure your Virtual network subscription, Virtual network, and Subnets.
3. **Network routing** — Select Microsoft network routing.
 5. Once the Storage account is configured, configure the retention limits. The integration is event-based, so a short retention period is acceptable. In the Storage account you created above, navigate to Lifecycle Management.
 6. In the **Details** tab of **Add a rule** page, provide the following:
1. Rule name
2. Rule scope — Select **Apply rule to all blob in your storage account**.
3. Blob type — Select **Block blobs**.
4. Blob subtype — Select **Base blob**.
6. In the **Details** tab of **Add a rule** page, provide the following:
1. Rule name
2. Rule scope — Select **Apply rule to all blob in your storage account**.
3. Blob type — Select **Block blobs**.
4. Blob subtype — Select **Base blob**.
 7. In the **Base** blobs tab, configure the rule conditions. You may select **Delete the blob** in the `then` operation.
 8. Click on **Add**.
***
### Step 2 — Enable API management diagnostic logs
Complete the following steps:
1. In Azure, navigate to your APIM instance.
2. Go to **Monitoring** → **Diagnostic Settings**.
3. Create a new Diagnostic Setting:
* Select the **Send to Log Analytics Workspace** checkbox.
* Ensure the **Destination table** is set to **Resource Specific**.
8. Click on **Add**.
***
### Step 2 — Enable API management diagnostic logs
Complete the following steps:
1. In Azure, navigate to your APIM instance.
2. Go to **Monitoring** → **Diagnostic Settings**.
3. Create a new Diagnostic Setting:
* Select the **Send to Log Analytics Workspace** checkbox.
* Ensure the **Destination table** is set to **Resource Specific**.
 ***
### Step 3 — Configure diagnostic logging on target APIs
Complete the following steps:
1. Navigate to **APIs** → \
***
### Step 3 — Configure diagnostic logging on target APIs
Complete the following steps:
1. Navigate to **APIs** → \