Recommendations in Harness CCM
After you enable CCM, it may take up to 48 hours for the recommendations to appear in Cloud Costs. It depends on the time at which CCM receives the utilization data for the service.
What are Recommendations?
Harness CCM Recommendations are data-driven insights that help you optimize your cloud resources for cost efficiency without compromising performance. By analyzing historical usage patterns, resource configurations, and cloud provider pricing models, CCM identifies opportunities to right-size resources, eliminate waste, and implement best practices.
Benefits of Using CCM Recommendations
-
Reduce Azure VM Costs: Identify underutilized virtual machines and receive rightsizing or termination suggestions to significantly reduce Azure spending.
-
Optimize AWS EC2 Instances: Detect idle or oversized EC2 instances and get actionable guidance to select optimal instance types or eliminate unnecessary resources.
-
Clean Up Container Registry: Identify and remove unused container images in Amazon ECR, reducing storage costs and improving registry management.
-
Enhance Cost Governance: Implement best practices for tagging, business unit allocation, and spending patterns across AWS, GCP, and Azure to maintain financial control.
-
Improve Kubernetes Node Efficiency: Balance cost and performance with optimized node pool configurations for your Kubernetes clusters, tailored to each cloud provider's specific requirements.
-
Right-Size Kubernetes Workloads: Analyze CPU and memory utilization patterns to properly configure resource requests and limits, preventing waste while ensuring application performance.
Recommendations Homepage
- Open, Applied Recommendations and Filters
- Export, Ignore List
- Settings
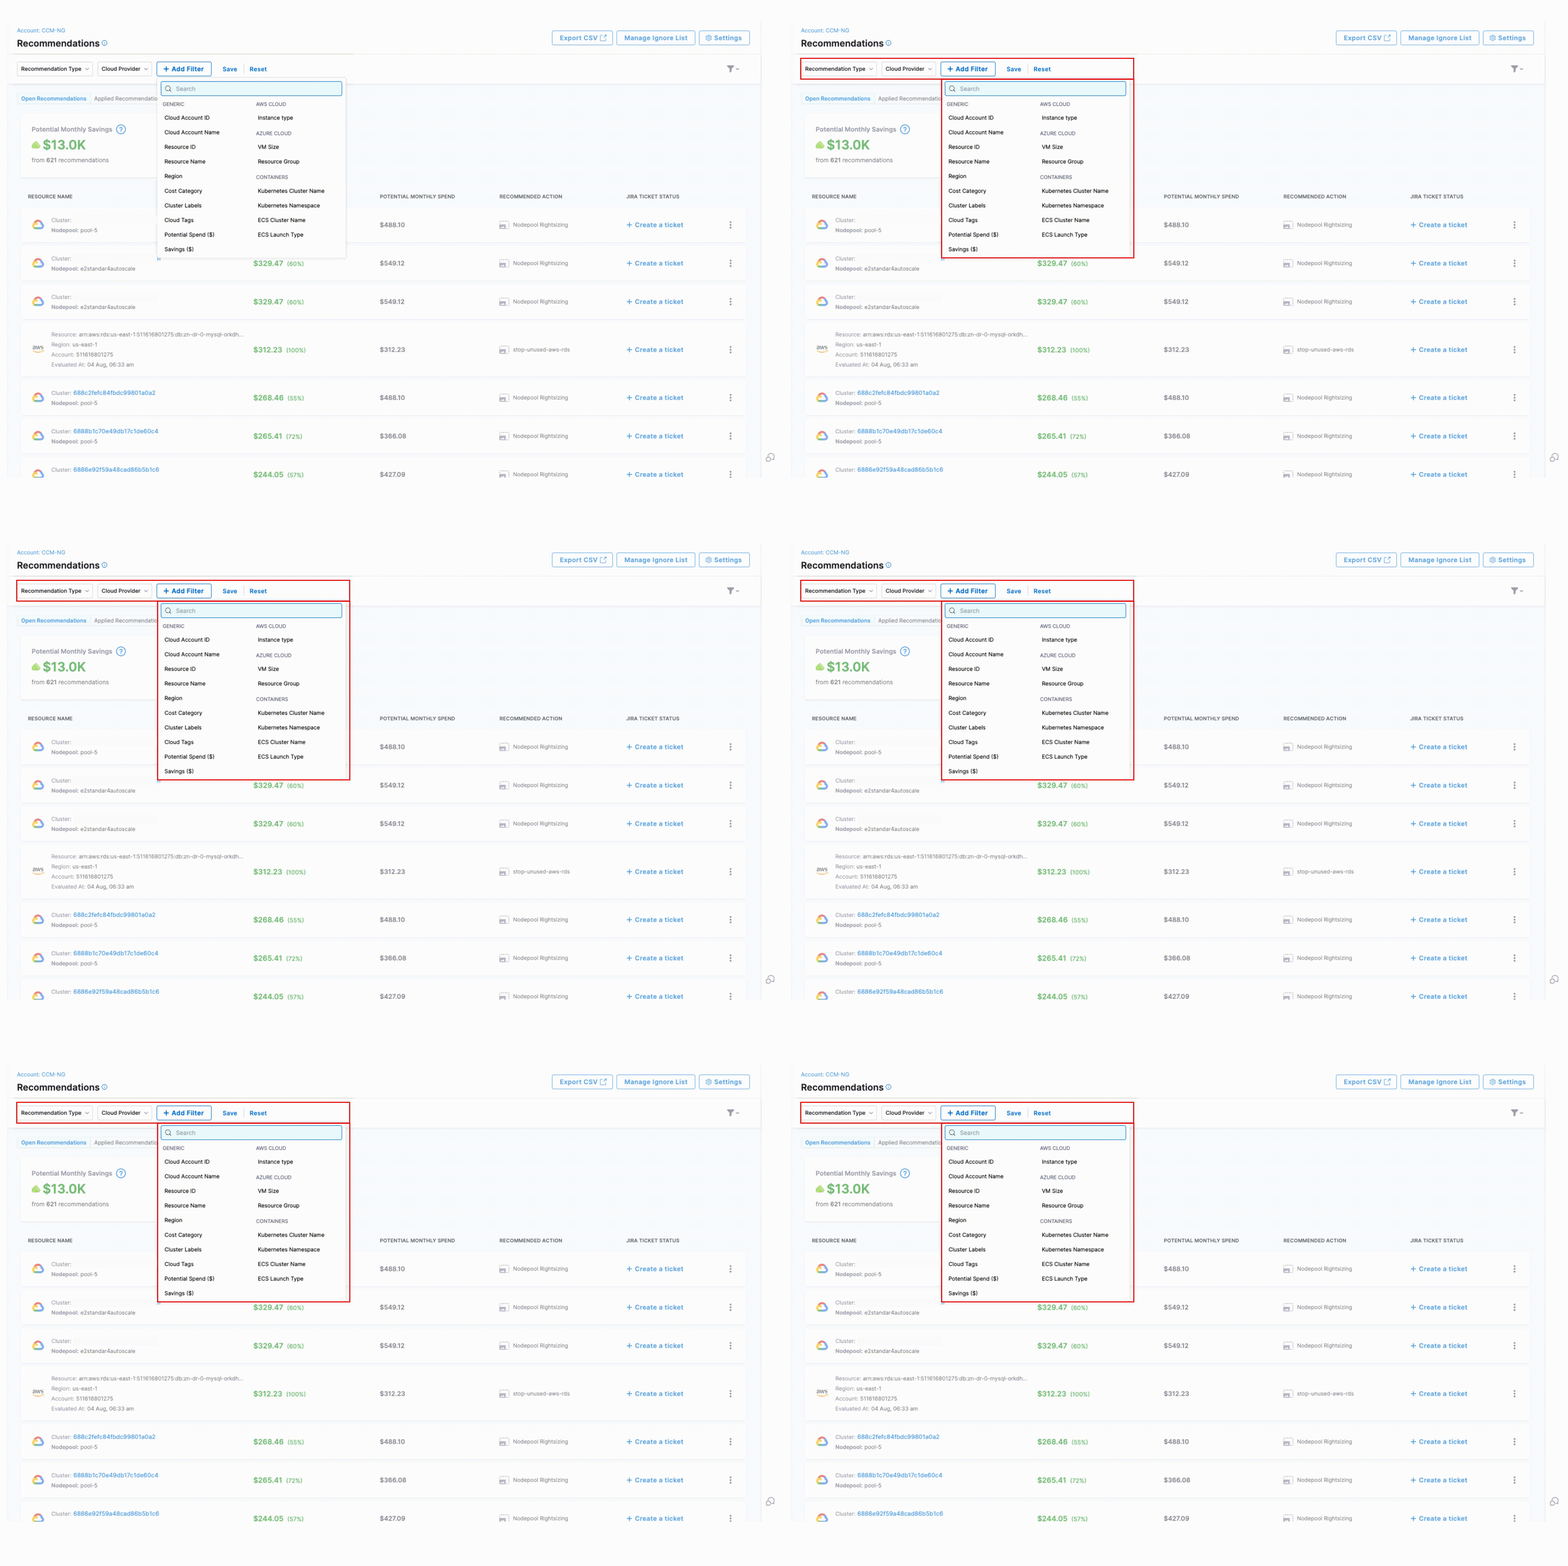
-
Recommendation Type: CCM has six types of recommendations:
AZURE_INSTANCE,EC2_INSTANCE,GOVERNANCE,NODE_POOLandWORKLOAD. See details about all the types of recommendations here. -
Cloud Provider:
-
+ Add Filter
- Generic Filters: Cloud Account ID, Cloud Account Name, Resource ID, Resource Name, Region, Cost Category, Cluster Labels, Cloud Tags, Potential Spend(USD), Savings (USD), Governance Rule Name
- AWS-Specific Filters: Instance Type
- Azure-Specific Filters: VM Size, Resource Group
- Container-Specific Filters: Kubernetes Cluster Name, Kubernetes Namespace, ECS Cluster Name, ECS Launch Type
-
Open Recommendations: List of recommendations that are not applied yet. All the types of recommendations are listed here. You can view:
- Potential Monthly Savings that can be achieved with the recommendation
- Potential Monthly Spend without applying recommendations.
- Table with columns:
- Resource Name
- Potential Monthly Savings
- Potential Monthly Spend
- Recommended Action
- Jira Ticket Status
-
Applied Recommendations: When you click on an individual recommendation, you'll be able to view a detailed breakdown of the recommendation, including relevant insights, suggested actions, and any supporting information. See how to apply recommendations here.
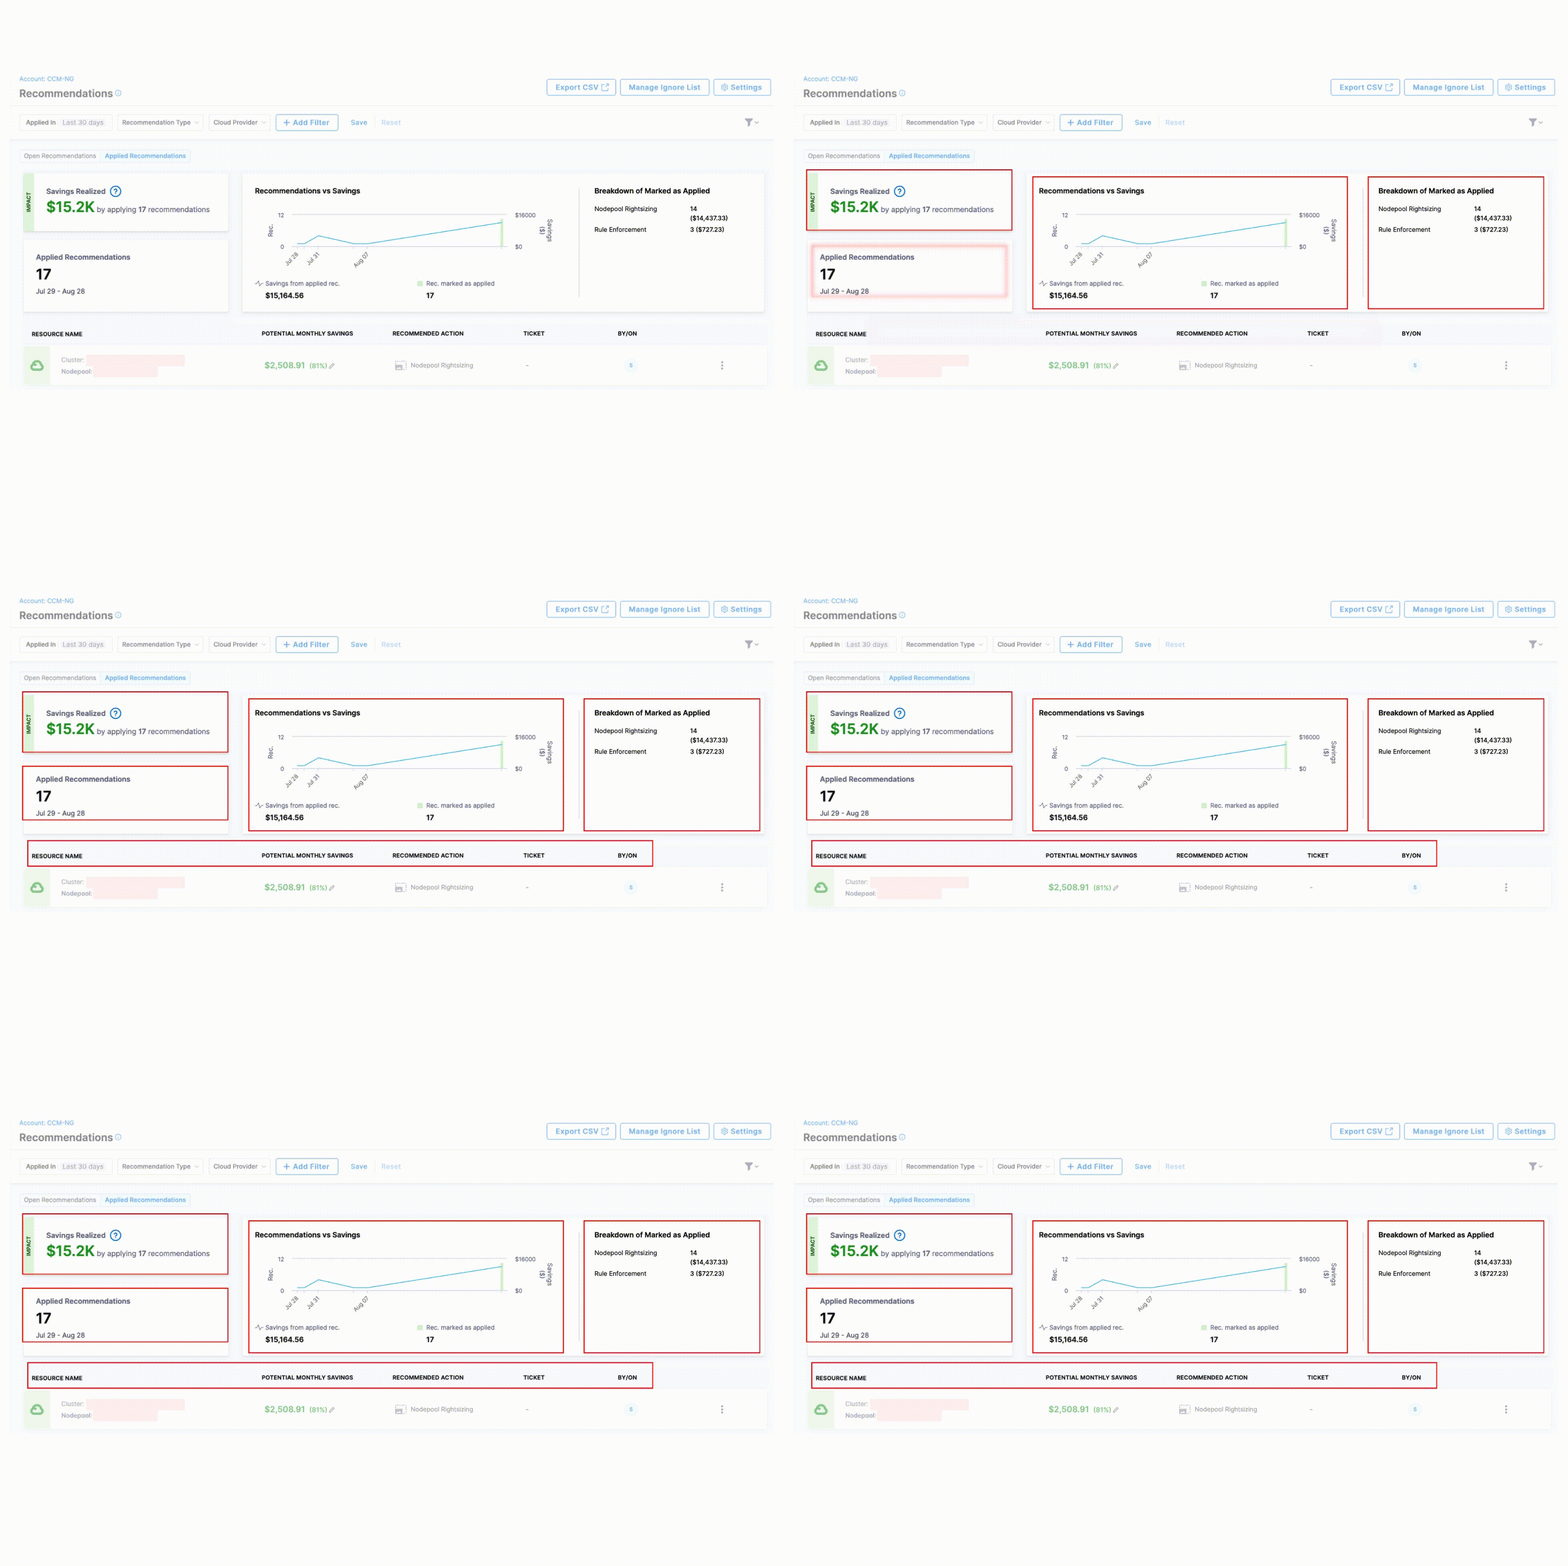
The Applied Recommendations tab provides comprehensive visibility into your cost optimization efforts with the following key components:
-
Savings Realized: Displays the total financial impact of all implemented recommendations, helping you quantify the ROI of your cost optimization efforts.
-
Recommendations vs. Savings Chart: A visual trend analysis showing the correlation between applied recommendations and actual cost savings over time. The saving from applied recommendations is shown against the number of recommendations applied.
-
Breakdown of Marked as Applied: Shows the distribution of applied recommendations by number of recommendations and associated savings to identify which optimization strategies are most frequently implemented.
-
Details Table: Provides a comprehensive view of each applied recommendation with the following information:
- Resource name
- Potential Monthly Savings
- Recommended Action
- Associated ticket
- Applied by which user and when
Marking a recommendation as "Applied" assumes all resources are actioned and full savings are recorded. If only a subset is applied, the user must manually update the realized savings using the “Edit savings amount” option.
- Export CSV: Option to export your Recommendations as comma-separated values (CSV) files. Exporting allows you to use the data in other software. Export respects the filters applied by the user in the filter panel. Only comma-separated values files (CSV) are supported and the maximum number of rows allowed in one export is 10,000 rows.
- Manage Ignore List: Adding resources to the Ignore list will stop Harness from displaying recommendations for those resources. You can view the Ignore list with details by clicking on "Manage Ignore List" on the overview page.
- Preferences
- Manage Presets
- Ticketing Tool Mapping
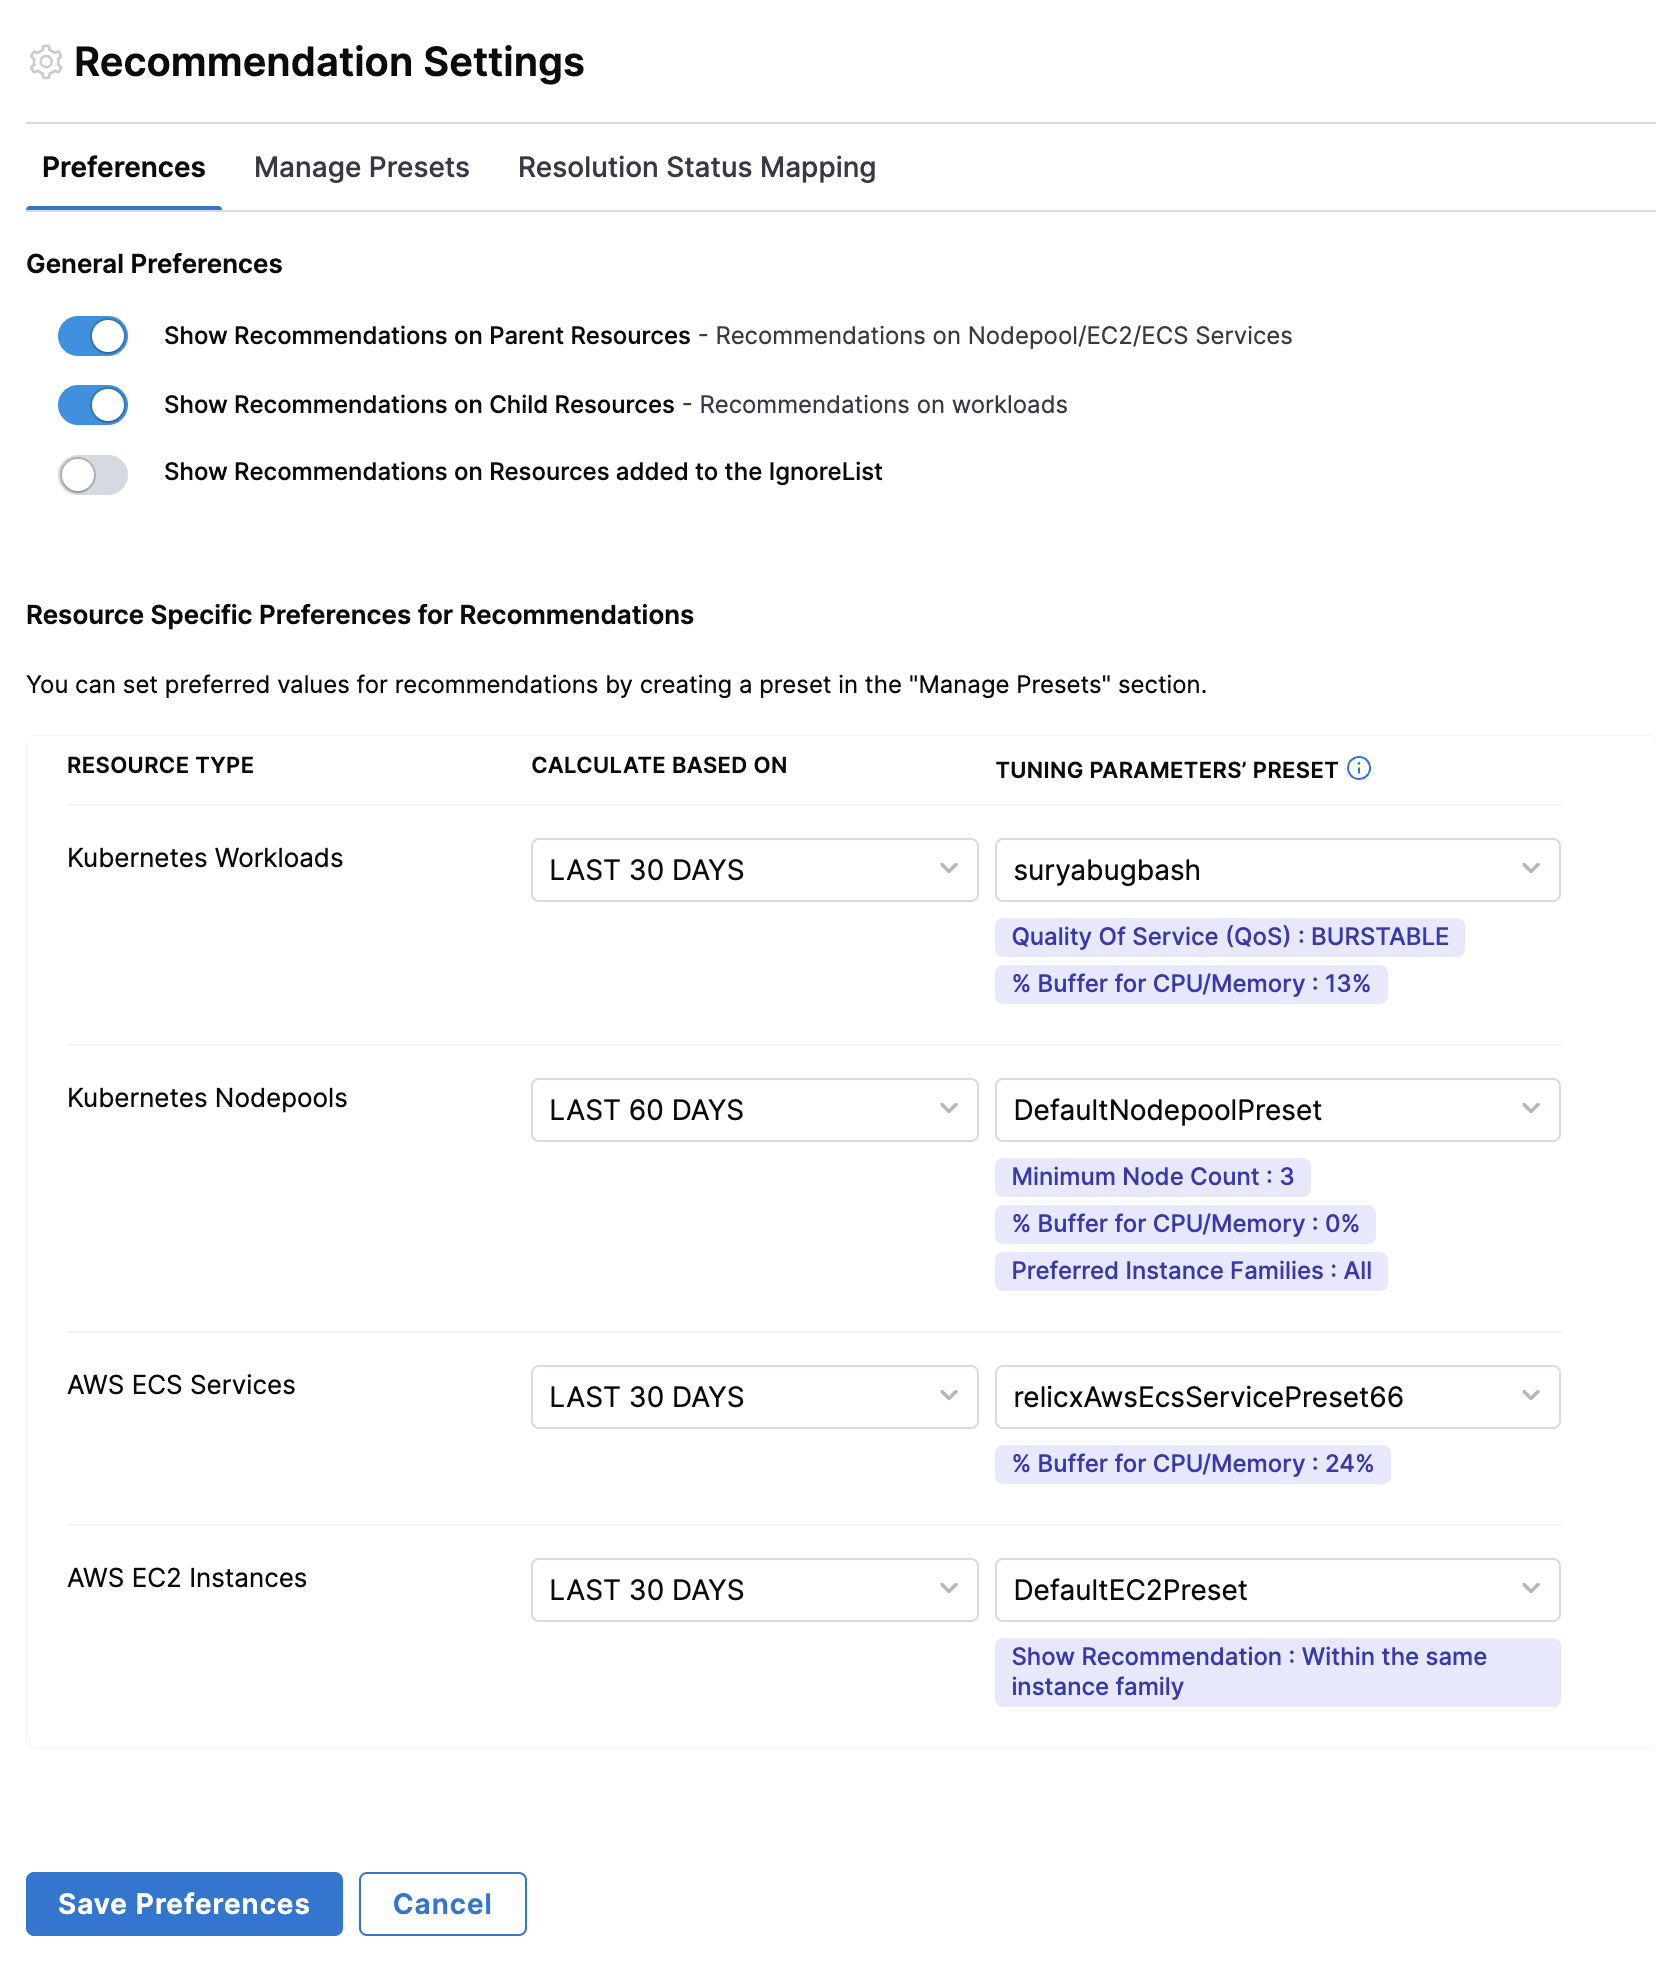
- General Preferences:
- Show Recommendations on Parent Resources - Enables recommendations for parent-level resources such as Nodepool, EC2, and ECS Services. This ensures users receive optimization suggestions for high-level infrastructure components.
- Show Recommendations on Child Resources - Displays recommendations for individual workloads, allowing users to optimize specific application components rather than just the underlying infrastructure.
- Show Recommendations on Resources Added to the Ignore List - If enabled, recommendations will still be displayed for resources that have been manually marked as ignored.
- Resource Specific Preferences: Over here, users can select the presets for each resource type and also set the default time range.
New Recommendation Preferences may take up to 24 hours to fully update across the platform. However, changes will be reflected immediately on the drill-down page, while the Overview page may take additional time to reflect updates.
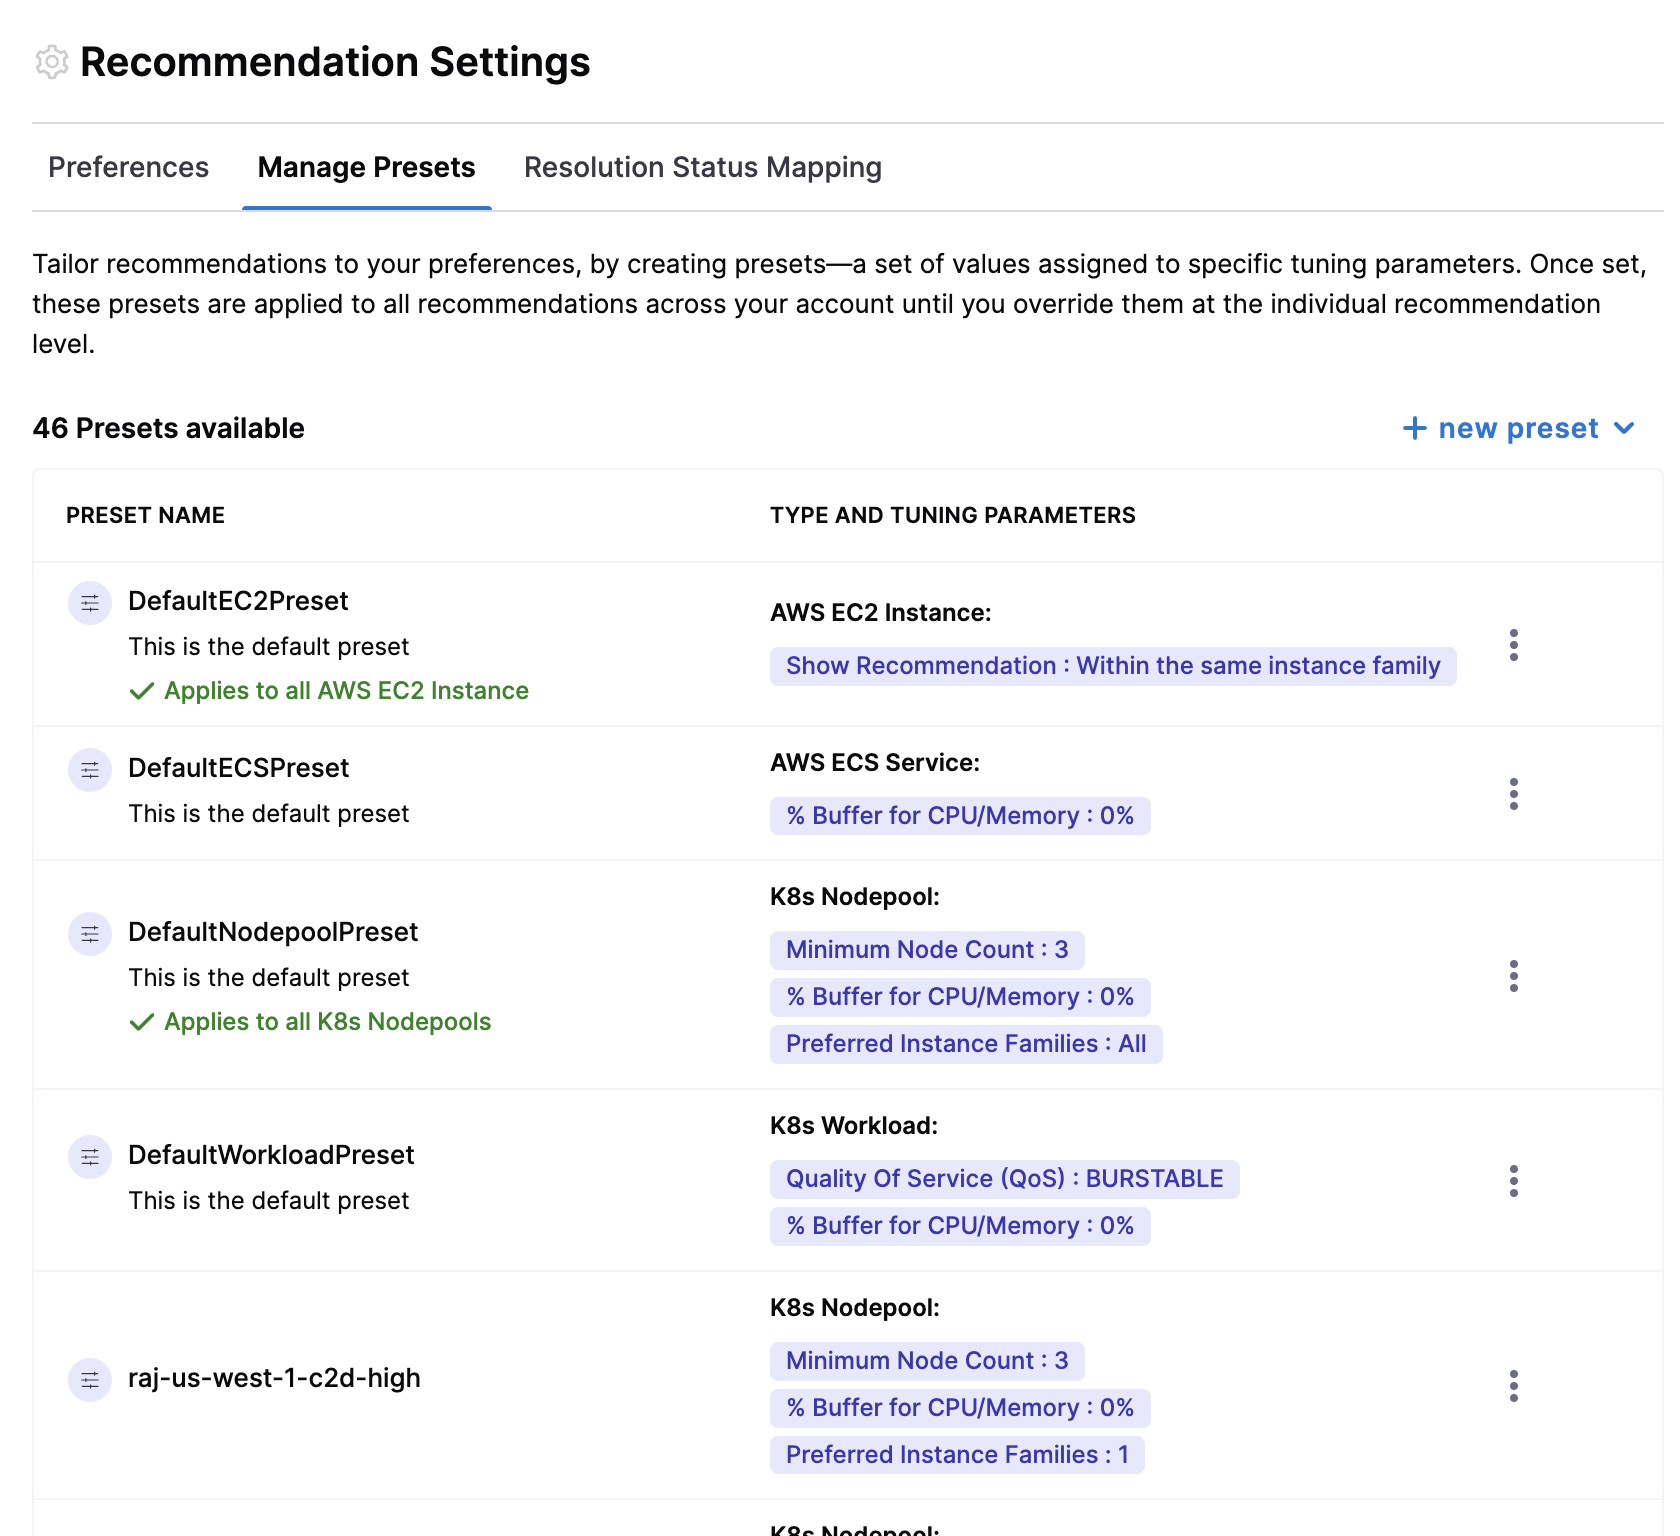
This helps users to create and save customized configurations for their recommendations. These presets capture specific user preferences, such as tuning parameters for resource types like workloads, nodepools, ECS, and EC2 instances.
Users can fine-tune recommendations for different resource types by configuring specific tuning parameters and save presets. By default, Harness CCM has default presets for all resources but users can tune recommendations using custom values. To set custom values, click on the recommendation and expand the "Tune Recommendations" section to configure the tuning parameters.
- Workload
- Nodepool
- AWS EC2
- AWS ECS
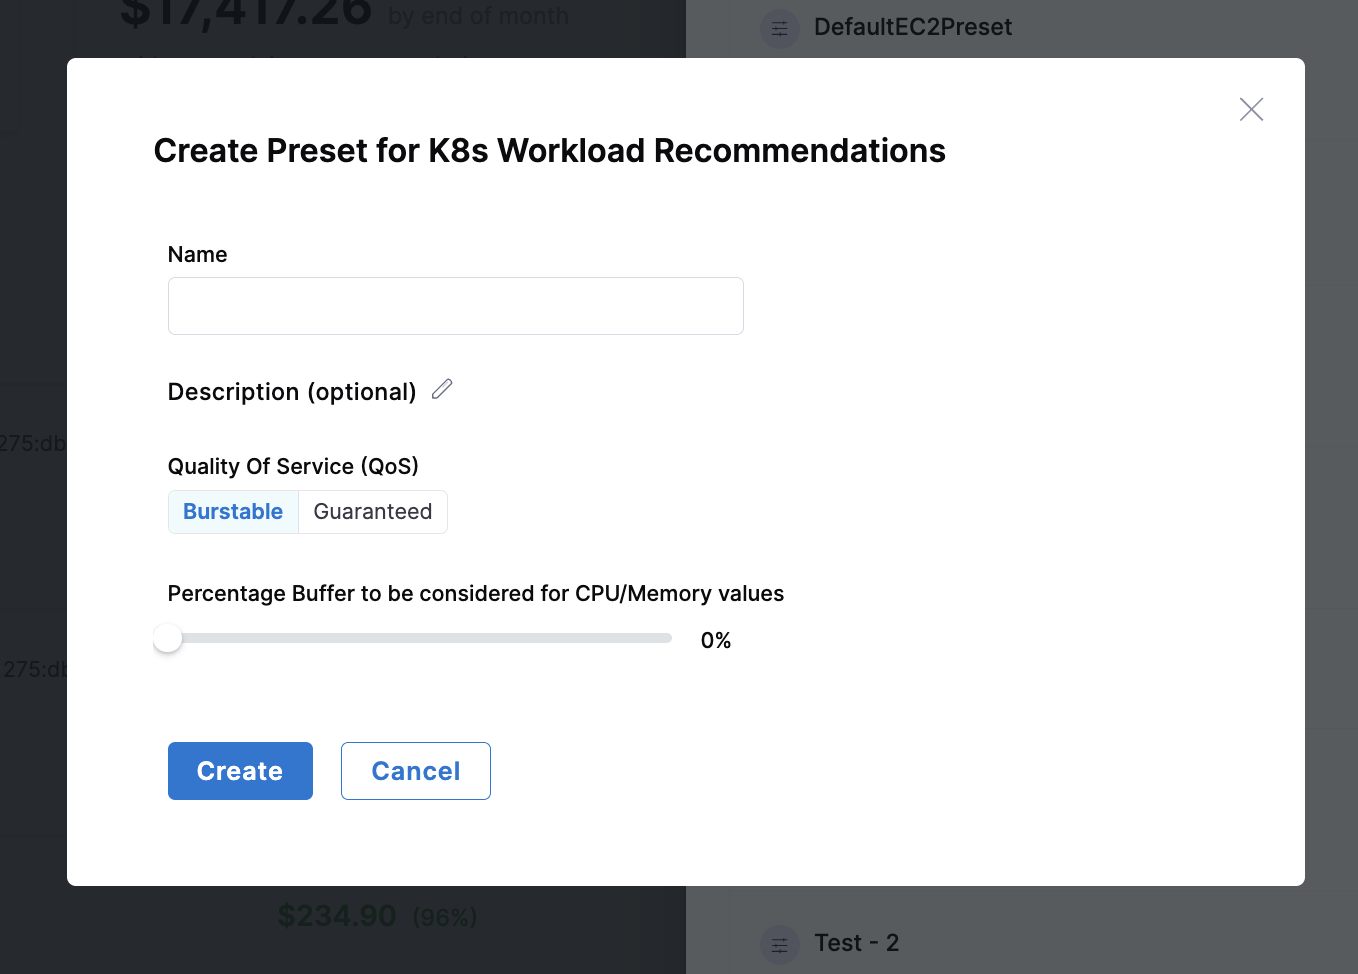
| Parameter | Description |
|---|---|
| Quality of Service (QoS) | Choose between Burstable or Guaranteed resource allocation for workloads. Burstable allows resources to exceed requests up to limits, while Guaranteed sets requests equal to limits for stable performance. |
| Percentage Buffer for CPU/Memory | Additional resource margin to handle unexpected spikes in usage. Higher buffer values provide more headroom for workload fluctuations but increase resource allocation. |
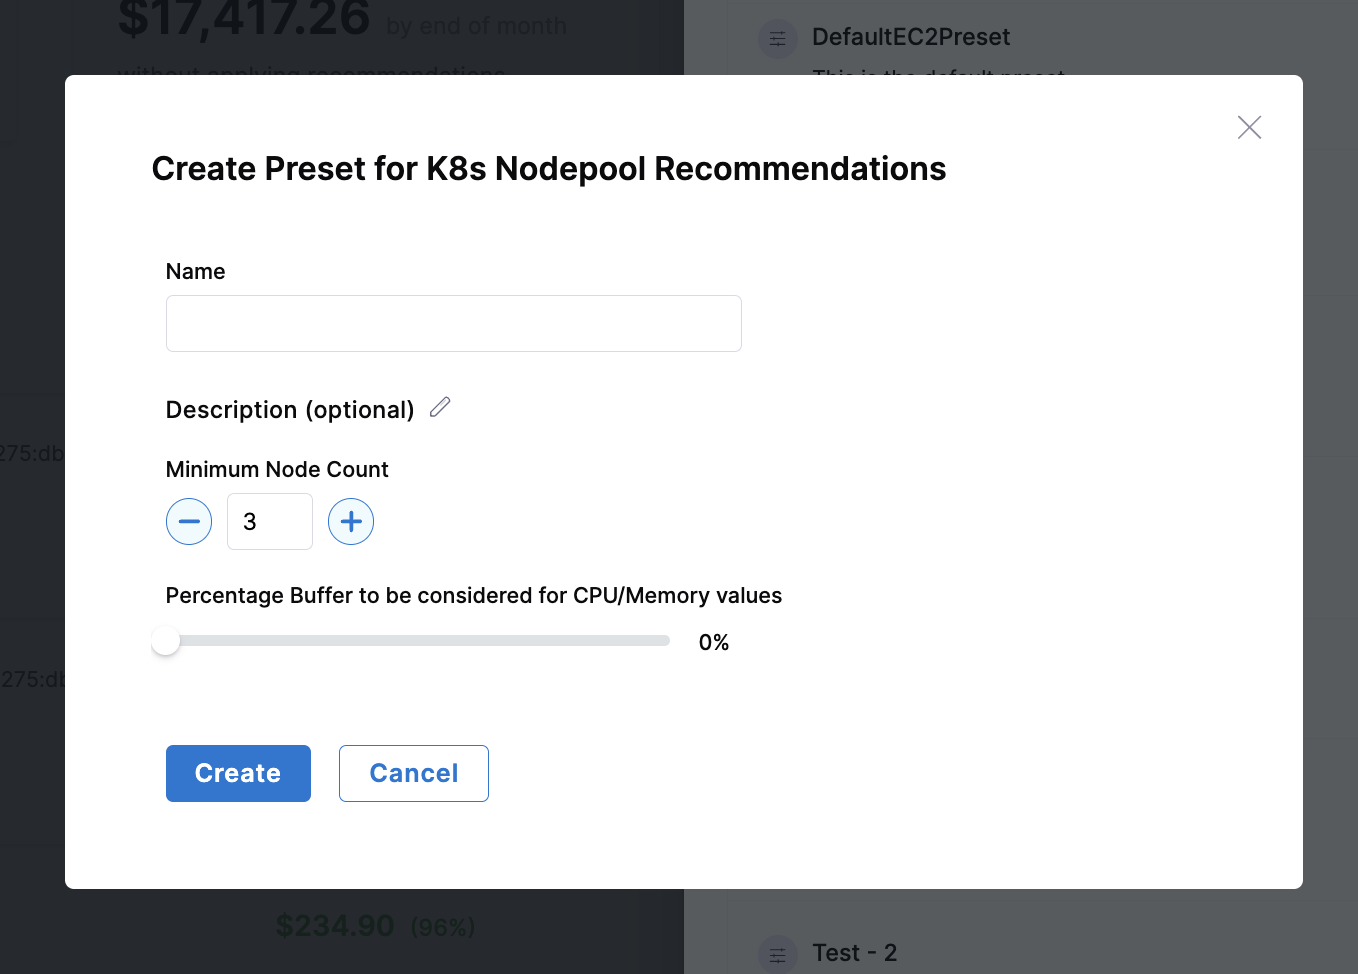
| Parameter | Description |
|---|---|
| Minimum Node Count | Ensures high availability by maintaining a minimum number of nodes in the cluster. This prevents scaling down below a threshold that might impact application availability. |
| Percentage Buffer for CPU/Memory | Additional resource margin to handle unexpected spikes in usage. Helps prevent resource contention during peak loads while maintaining efficient resource utilization. |

| Parameter | Description |
|---|---|
| Instance Family Selection |
|
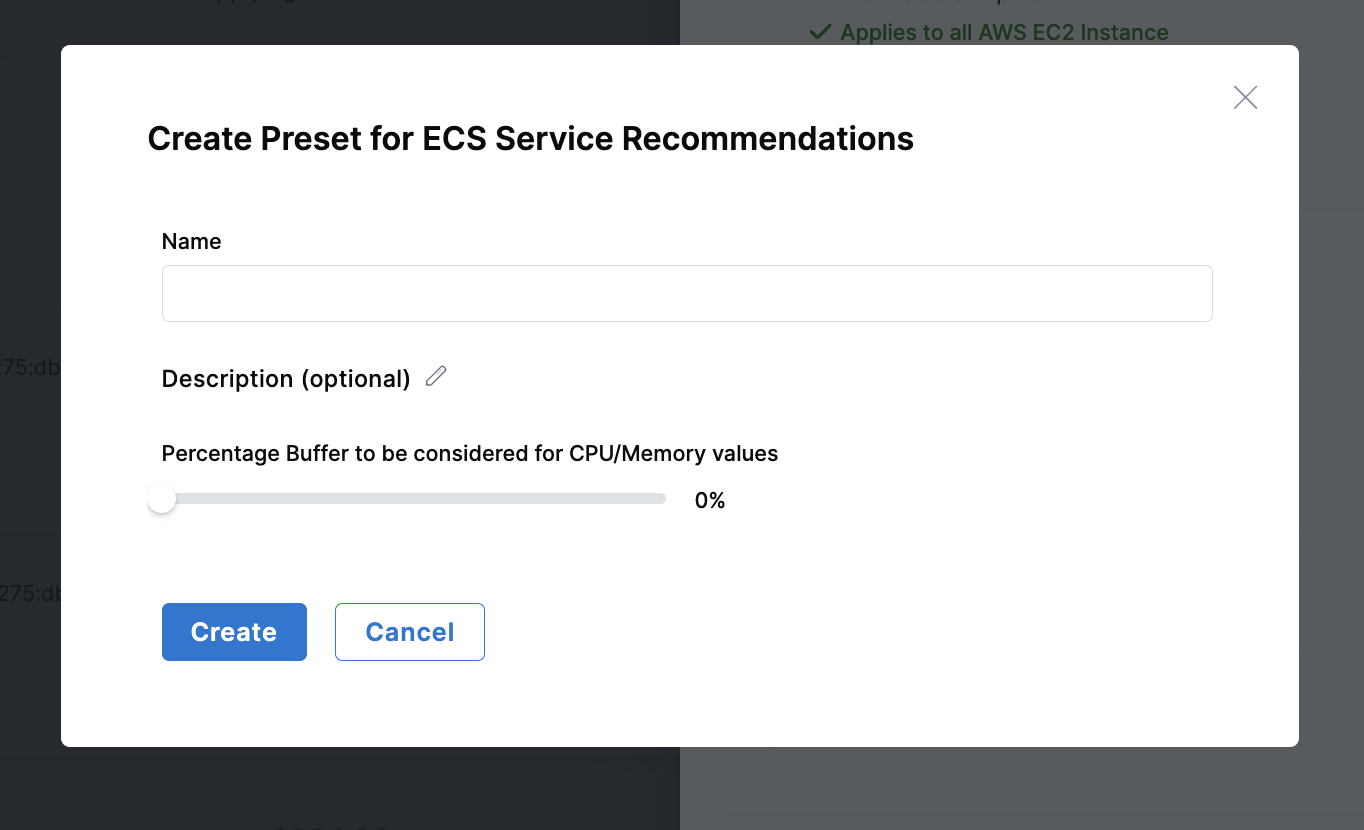
| Parameter | Description |
|---|---|
| Buffer Percentage | Additional resource margin to ensure containers have sufficient resources during peak usage. Helps prevent throttling and performance issues while maintaining efficient resource allocation. |
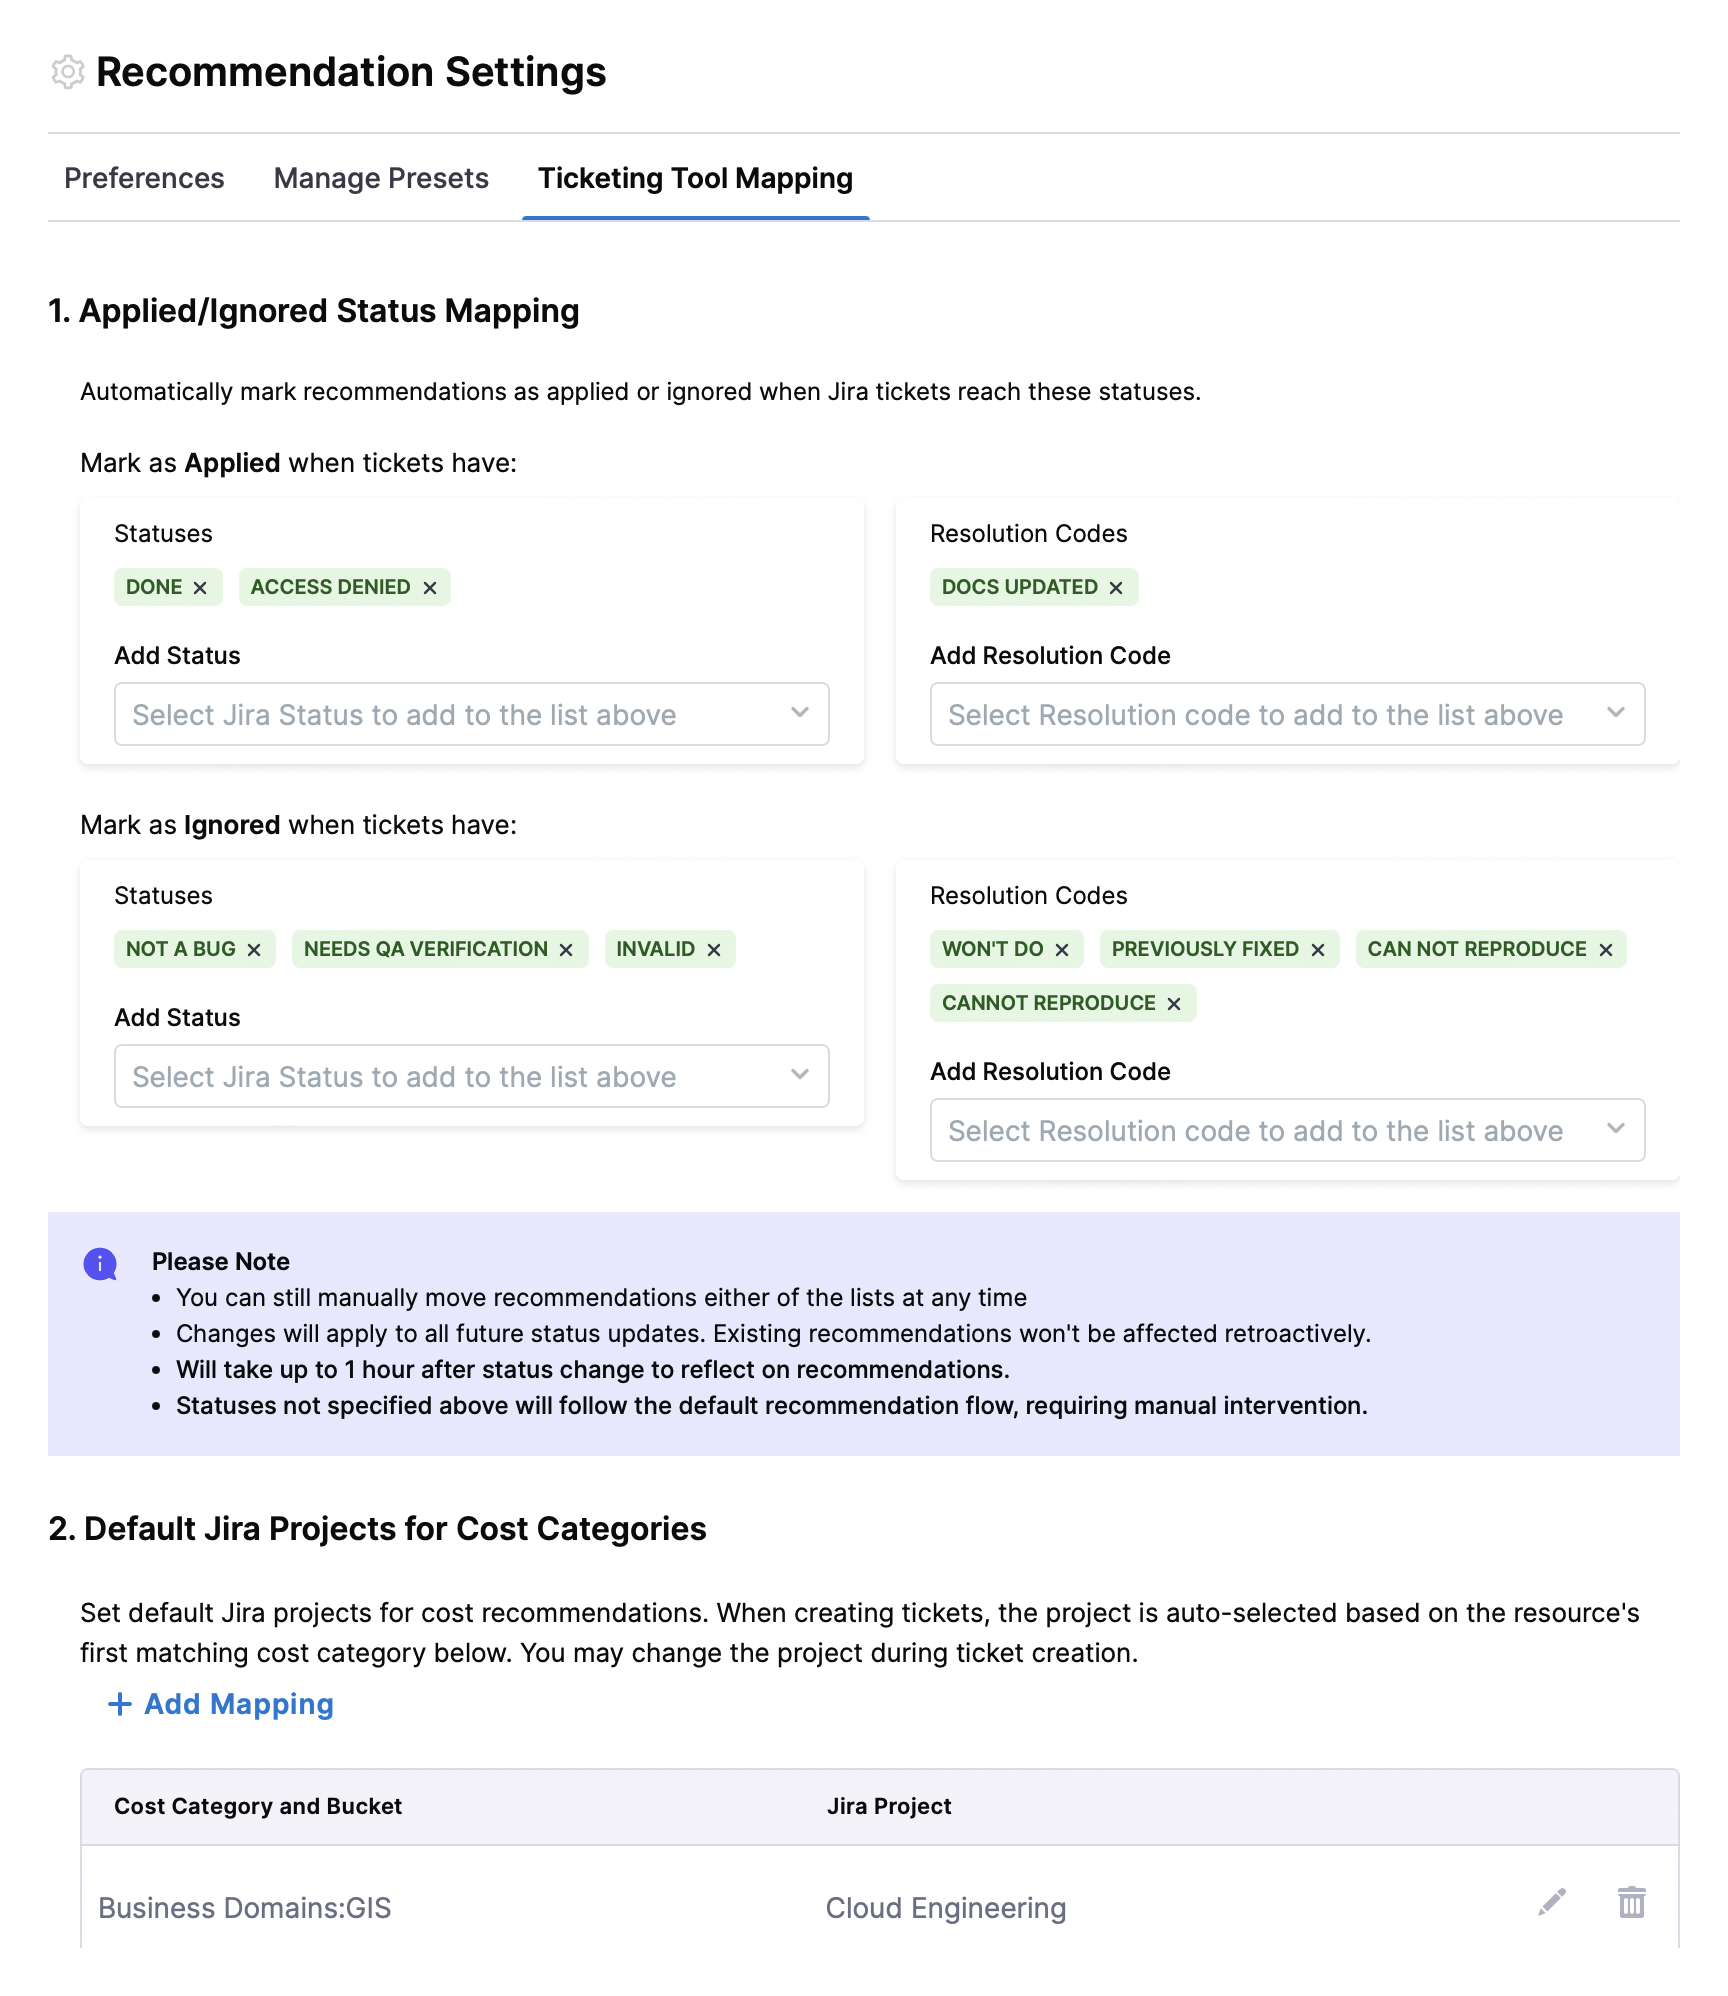
1. Applied/Ignored Status Mapping
Recommendations supports Jira Status Mapping. This feature allows you to automatically align recommendation states with the statuses of your Jira issues.
In Recommendation Settings, you can define which Jira statuses correspond to recommendations being considered Applied or moved to the Ignore List. When a linked Jira issue reaches a mapped status, the recommendation is automatically updated. You can also choose Resolution Codes with which the recommendation is automatically updated to Applied.
-
Jira Statuses that move recommendation to Applied automatically: Choose from a list of Jira statuses. Within an hour, CCM checks if any open recommendation is linked to a Jira issue with a mapped status, the recommendation is automatically updated to Applied.
-
Jira Statuses that move recommendation to Ignore List automatically: Choose from a list of Jira statuses. Within an hour, CCM checks if any open recommendation is linked to a Jira issue with a mapped status, the recommendation is automatically updated to Ignore List. You can also choose Resolution Codes with which the recommendation is automatically updated to Ignore List.
- A Jira connector must be successfully configured for using the feature.
- This is not supported for ServiceNow.
- Statuses not specified will follow the default recommendation flow.
- Regardless of automatic status updates, users can still manually move recommendations to either the Applied or Ignore List at any time.
- Changes will apply to all future status updates.
2. Default Jira Projects for Cost Categories
Set default Jira projects for cost recommendations. When creating tickets, the project is auto-selected based on the resource's first matching cost category below. You may change the project during ticket creation.
By mapping cost categories to specific Jira projects, you ensure that recommendations reach the right stakeholders without manual routing, reducing response time and increasing the likelihood of implementation. This is especially valuable in large organizations where different teams are responsible for different resource types.
To configure this feature, click on +Add mapping to add a new mapping, then select the cost category, cost bucket, and Jira project.
Recommendations per Cloud Provider
Apply Recommendations
Applying recommendations is easy! You just need to:
- Review Recommendations - Analyze the suggested optimizations in the Recommendations dashboard
- Tune Parameters - Adjust recommendation settings to see how different configurations affect potential cost savings. See Recommendations per Cloud Provider for a deeper drilldown into a particular type of recommendation to understand the action required, cost calculations and tuning.
- Implement Changes and Track using Jira/ServiceNow - Apply the optimizations manually in your cloud environment. Create and manage Jira or ServiceNow tickets to monitor implementation progress
- Update Status - Mark recommendations as applied in the CCM platform once implemented. Once applied, recommendations show up in the Applied tab.
Managing Recommendations via Jira/ServiceNow Tickets
Prerequisites
-
Create a Jira or ServiceNow connector:
- Steps to create a Jira connector: Create Jira Connector
- Steps to create a ServiceNow connector: Create ServiceNow Connector
-
Configure ticketing tool settings:
- Navigate to Cloud Costs > Setup > Default Settings > Cloud Cost Management.
- Under Ticketing preferences, select the Ticketing tool and the Ticketing tool connector. The default ticketing tool is Jira. You can choose ServiceNow if that's the tool used in your organization. Switching your ticketing tool between Jira and ServiceNow results in the removal of the existing recommendation tickets.

Go to the Recommendations page and create tickets to apply recommendations.
-
Select Create a ticket. In case you haven't set up your ticketing tool settings on the account level, you will see a prompt guiding you to access the Default Settings page to configure both the ticketing tool and the associated connector.
-
Enter the following ticket details:
- Jira
- ServiceNow
- ServiceNow Service Request
- Jira project — Select the Jira project where you want to create a ticket. Go to Create Jira Issues in CD Stages.
- Issue type — Select a Jira issue type from the list of types in the Jira project you selected. Go to Create Jira Issues in CD Stages.
- Ticket summary — Add a summary of the issue.
- Description — Add a description for the issue.
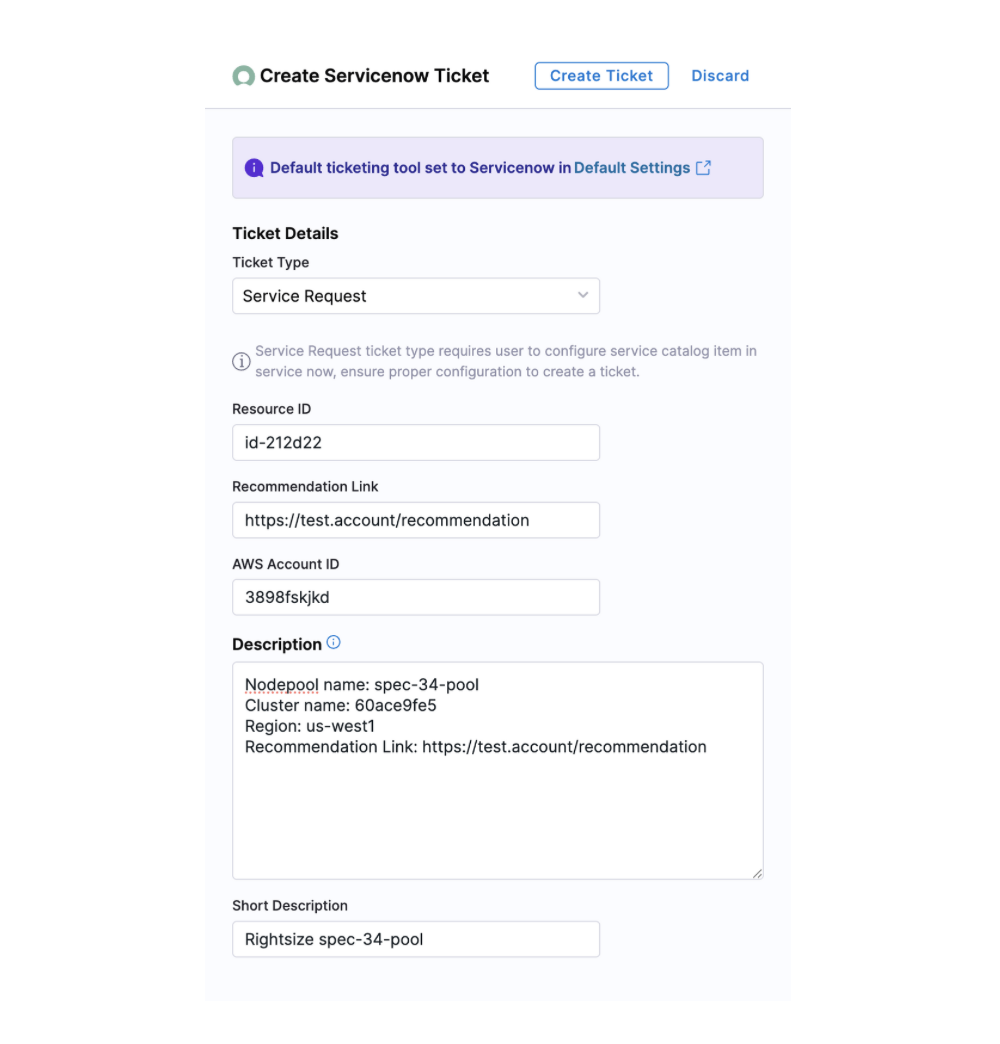
- Ticket Type - Select the ticket type from the dropdown list. For example, change request, Data Management task, and so on. Based on the selected ticket type, you might need to enter more required inputs.
- Short Description - Enter a brief description of the task. This is the title of the ticket.
- Description - Enter a more detailed description about the recommendation.
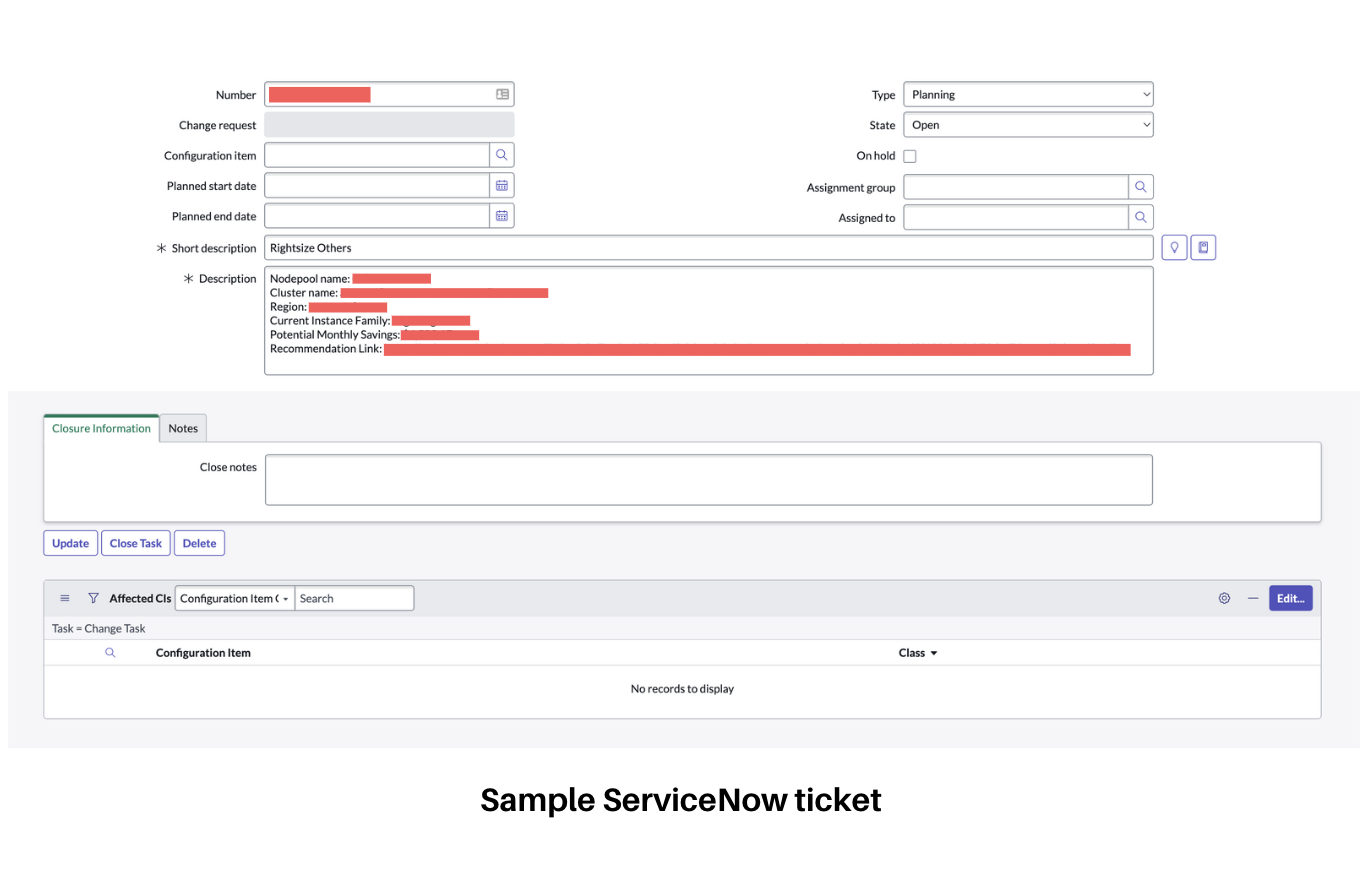
The Description field contains relevant information about the recommendation for which this ticket was created. Harness CCM retrieves the following data from ServiceNow:
When a user opens the dialog box to create a ServiceNow ticket, a request is made to obtain all possible ticket types. Here is a sample response:
{
    "status": "SUCCESS",
    "data": [
        {
            "key": "asset_reclamation_request",
            "name": "Asset Reclamation Request"
        },
        {
            "key": "asset_task",
            "name": "Asset Task"
        },
        {
            "key": "business_app_request",
            "name": "Business Application Request"
        }
    ]
}
Once the user selects a ticket type, another request retrieves the fields associated with that ticket type to determine the required fields. Here is a sample response:
{
    "data": [
        {
            "key": "parent",
            "name": "Parent",
            "required": false,
            "schema": {
                "array": false,
                "typeStr": "",
                "type": "unknown",
                "customType": null,
                "multilineText": false
            },
            "internalType": null,
            "allowedValues": [],
            "readOnly": false,
            "custom": false
        },
        {
            "key": "made_sla",
            "name": "Made SLA",
            "required": false,
            "schema": {
                "array": false,
                "typeStr": "boolean",
                "type": "boolean",
                "customType": null,
                "multilineText": false
            },
            "internalType": null,
            "allowedValues": [],
            "readOnly": false,
            "custom": false
        }
    ]
}
When the user clicks "Create Ticket," an API call is made to ServiceNow to create the ticket with the provided inputs. Additionally, there is an internal call that periodically checks if the ticket has been closed. Based on this status, the recommendation is moved to the applied state.
ServiceNow Service Request Integration
In ServiceNow (SNOW), a Service Request is a type of ticket that users raise when they want a standard service, resource, or information from IT or another department.
Common examples of Service Requests include:
- Requesting access to software applications
- Ordering new hardware resources
- Creating new email distribution lists
- Requesting password resets
- Requesting system configurations or reports
Steps to Configure a Catalog Item in ServiceNow
- Log in to ServiceNow as an Administrator.
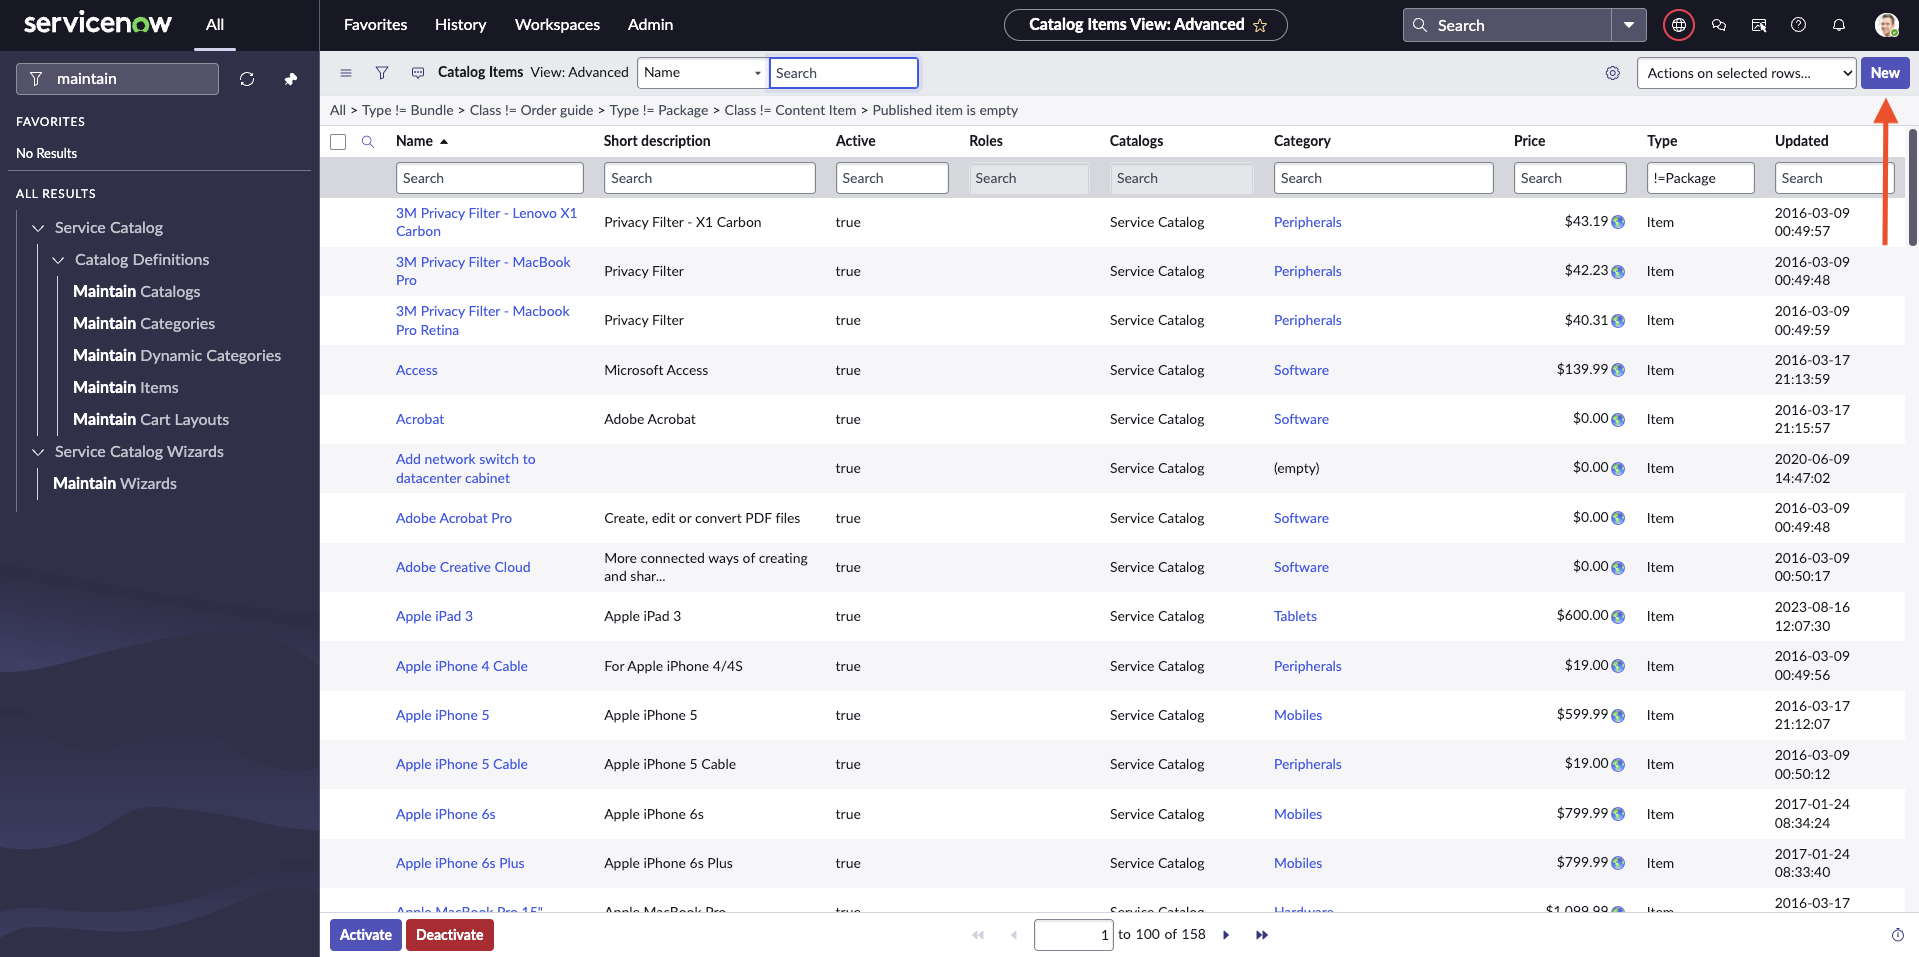
- Navigate to the "Maintain Items" section.
- Click "New" in the top right corner to create a new catalog item.
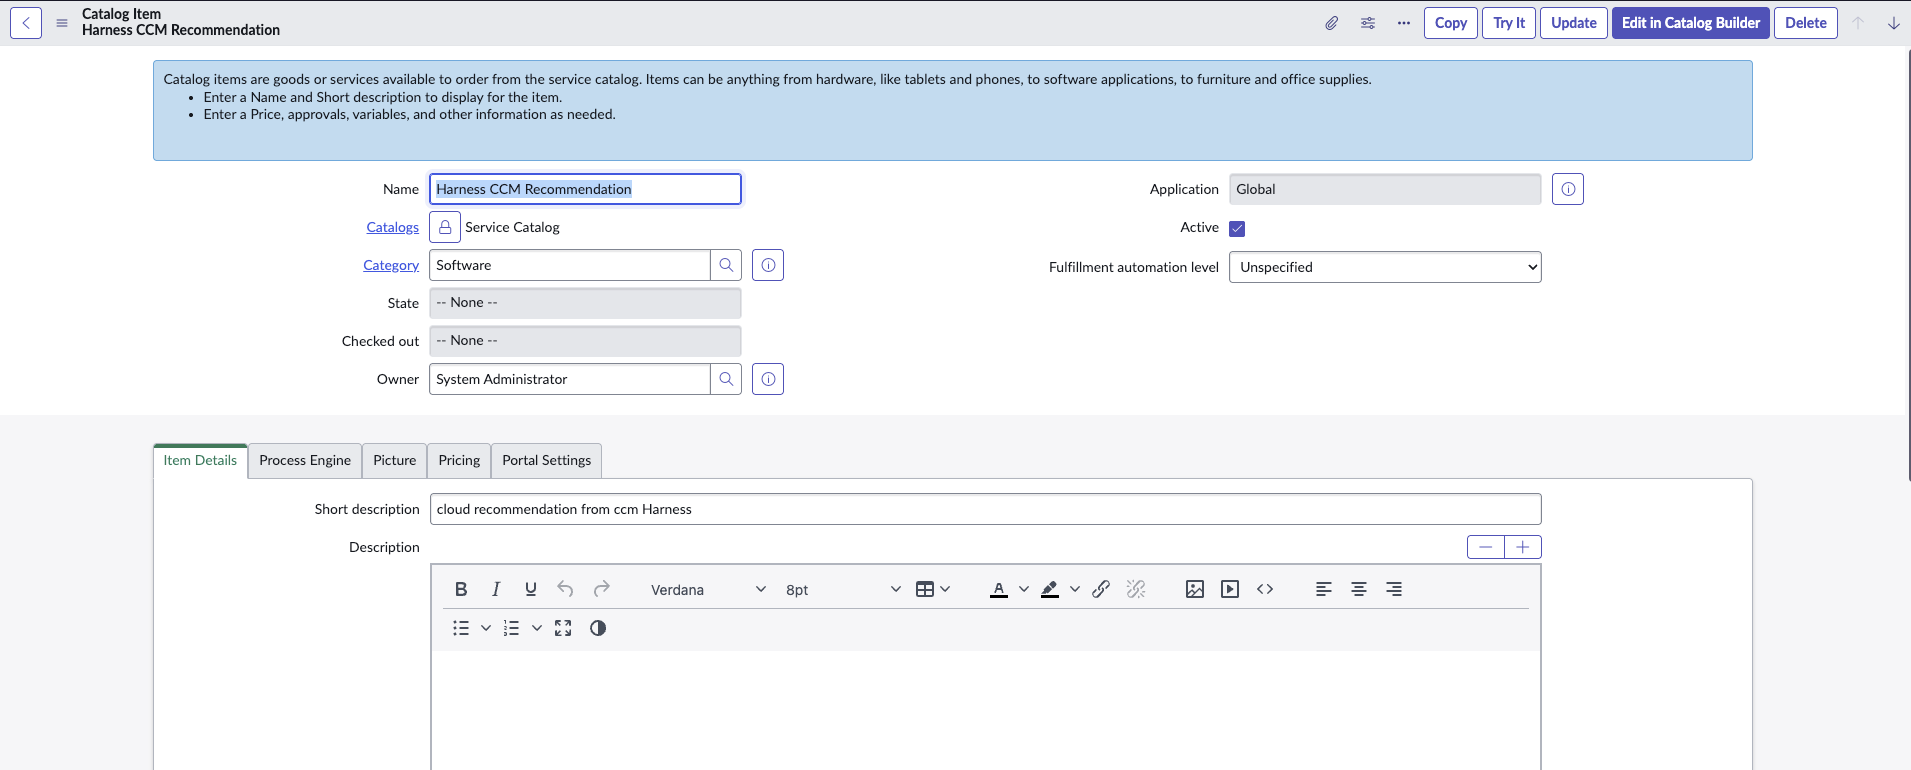
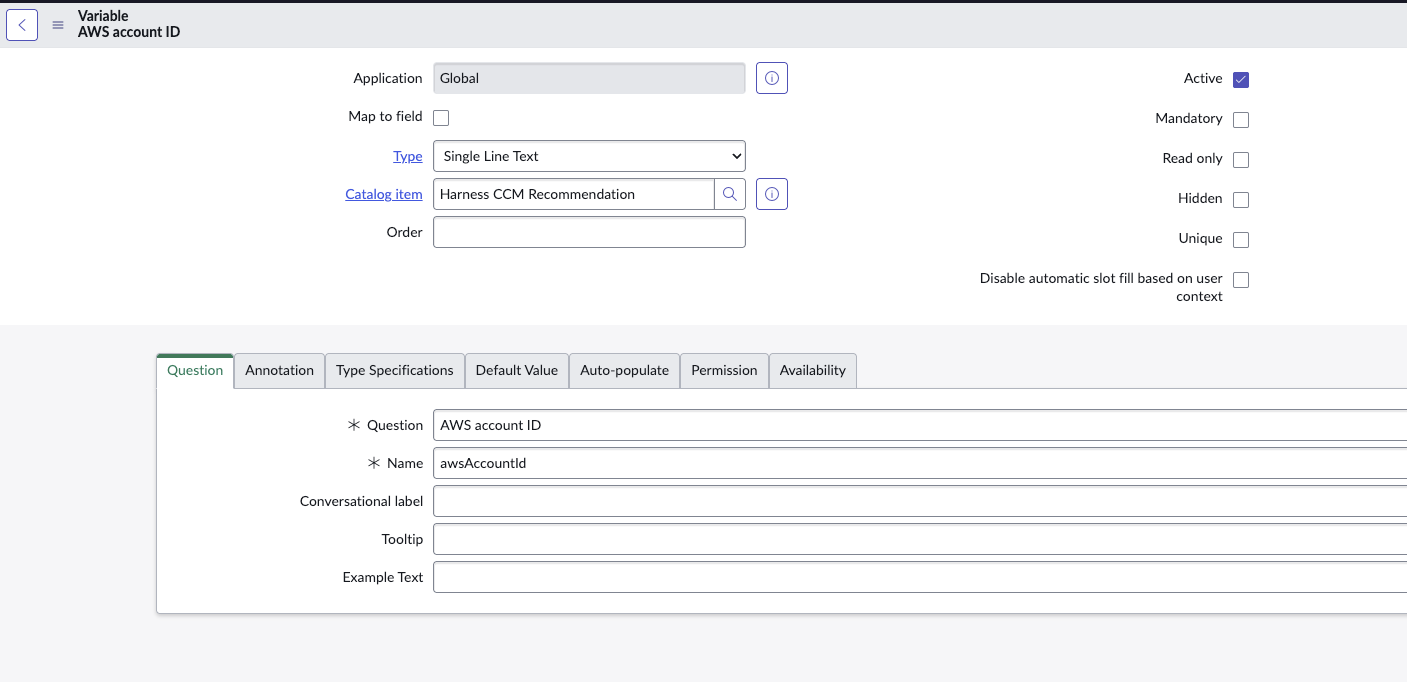
- Define a service catalog with the "Software" category. Ensure the name of the catalog item exactly matches "Harness CCM Recommendation" and mark it as Active.
- Define variables in the catalog item so that recommendation payload can be sent with the request/ticket:

- Use camel case convention for variable names (e.g., awsAccountId). You can provide additional data fields such as description and shortDescription.
- The variables defined in ServiceNow will be automatically populated with values from the recommendation data (keys must match) in CCM UI.
FAQs
What filtering options are available for recommendations across different cloud providers?
Harness provides filtering support for recommendations based on cloud account identifiers and Kubernetes attributes. This allows for better cost optimization insights while maintaining alignment with perspective-based RBAC settings.
-
AWS EC2: Filtering is supported on AWS Account ID. Nested Cost Categories are not supported.
-
AWS ECS: Filtering is supported on AWS Account ID. Nested Cost Categories are not supported.
-
Azure VM: Filtering is not supported.
-
Kubernetes: Filtering is supported on Labels and Cluster Name. Nested Cost Categories are not supported.
-
Governance Recommendations:
- AWS: No filtering support.
- Azure: No filtering support.
- GCP: No filtering support.
Filtering support for recommendations extends to RBAC configurations based on perspective folder access settings, ensuring that cost-saving suggestions are appropriately scoped to the right teams.
Why aren't memory metrics displayed when using Datadog integration?
If you ingest memory metrics using Datadog integration, EC2 recommendations do consider these metrics in their calculations; however, the memory utilization data is not displayed on the EC2 Recommendation page.
This occurs because:
- The CPU and memory metrics data we retrieve is typically sourced from CloudWatch
- In this case, the metrics originate from an external source (Datadog)
- These Datadog metrics are directly integrated with AWS Compute Optimizer and are utilized in generating the recommendations
- According to AWS Compute Optimizer API documentation, they do not offer support for retrieving these external utilization metrics
As a result, while the recommendations are accurately calculated using both CPU and memory data, the memory metrics themselves will not be visible in the recommendation interface.
Read more: External metrics ingestion
Why should I evaluate recommendations before implementing them?
Before using recommendations in your environment, ensure that you evaluate their impact thoroughly. The person reviewing the recommendations should be able to understand the impacts identified in the recommendations, as well as the impact on the infrastructure and business.
Using recommendations without proper assessment could result in unexpected changes, such as:
- Performance degradation for critical workloads
- Reliability issues during peak usage periods
- Incompatibility with specific application requirements
- Business disruption if services become unavailable or slow